|
UrlEncoded
|
Data is sent as simple key-value pairs.
|
application/x-www-form-urlencoded
|
Use for standard HTML form submissions without file uploads.
|
name=John&
3. Request HeadersRequest headers are key–value pairs sent along with an HTTP request to provide additional information about the request. They are commonly used for authentication, content type specification, API keys, client identification, and response formatting. Each header contains a unique key (such as Content-Type) and a corresponding value (such as application/json) that helps the server process the request correctly. Technical Format: Key: string, Value: InArgument
Example: Content-Type → “application/json” 4. Query ParametersQuery parameters are key-value pairs added to the end of a URL in an HTTP request. They let you pass extra information to the server, such as filters, search terms, page numbers, sort options, or other optional request details. Format: Add them to the URL using a question mark ?, followed by one or more parameters separated by &.
Example: https://api.example.com/tests?status=active&limit=10 Note: Think of these as extra instructions. For example, status=active tells the server to return only active items, and limit=10 tells the server to return only 10 results. 5. Invoke & Response1. Click Invoke to execute the API request.
2. Once the request is completed, the API response will be displayed.
3. You can either:
Copy the response directly, or
Assign the response to a variable for further use in the workflow.
4. In the Assign tab, use apiResponse.data to access the response data returned by the API. Best Practices1. Method Selection: Use GET for data retrieval and POST for data creation or submission.
2. Reachability: Ensure the endpoint URL is valid and accessible.
3. Authentication: Configure all required authentication headers (e.g., Bearer tokens) before testing.
4. Testing: Always use the Invoke option to verify your configuration before deploying to production.
Troubleshooting
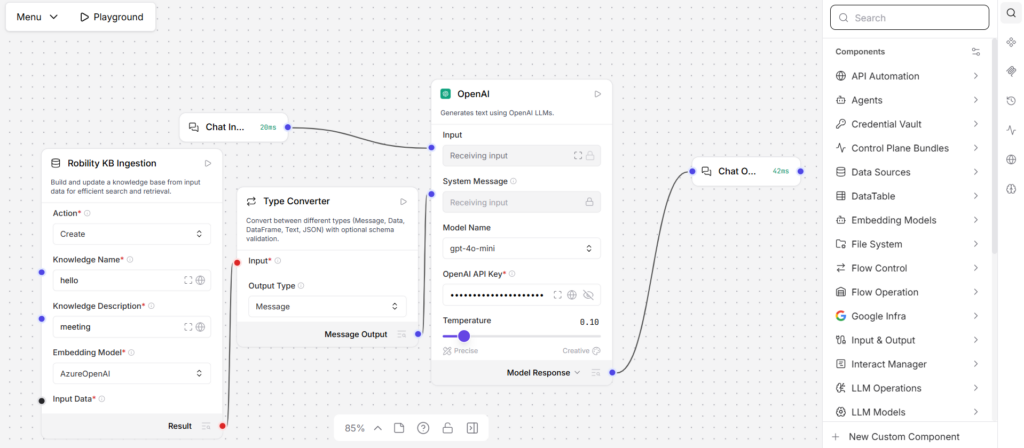
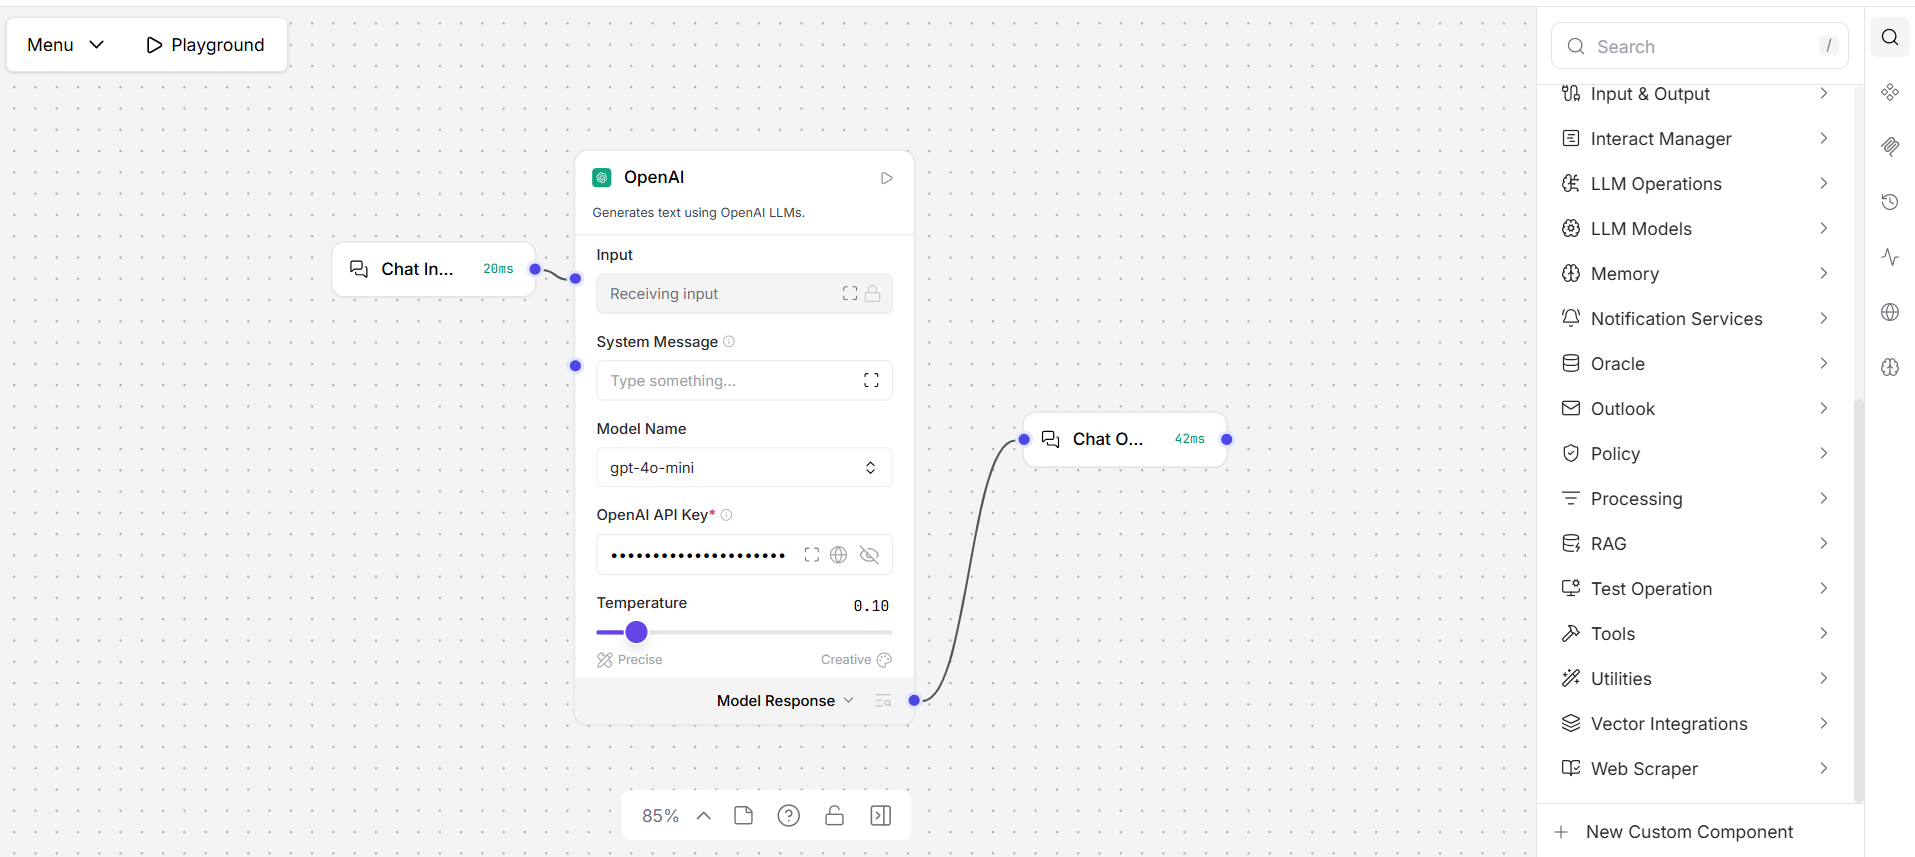
Robility Flow AI can make mistakes.Robility Flow is a visual builder for AI workflows. You drag components onto a canvas, connect them, and test the flow in the Playground. The responses you see come from the LLM or model provider that you configure in your flow. You will see this notice in the Playground: Robility Flow AI can make mistakes. Please double-check responses. The notice does not mean the output is usually wrong. It means the output was generated by an AI model and has not been checked by a person. Its quality depends on the model you chose, its settings, and how your flow is built. Review the output before you rely on it or act on it. Why AI responses can be wrongRobility Flow sends your input, prompts and context to the model you connected, then shows what that model returns. The model predicts likely text. It does not look up verified facts. Common causes of errors: 1. The model can invent facts, names, field values, quotes or references and state them confidently. The industry term for this is “hallucination”.
2. Model choice and settings. Models differ in accuracy, reasoning ability and language support. Settings such as temperature and maximum output length also affect results. A higher temperature gives more varied output, which is more likely to drift from the facts.
3. Outdated or missing knowledge. A model only knows what was in its training data, up to a cut-off date. Unless your flow gives it current data (through a connector, a knowledge base or a search component), it may not know about recent events or your organisation’s latest policies.
4. Flow design. The model can only work with what the flow sends it. A wrong prompt-template variable, truncated context, a retrieval step that returns the wrong content, or a poor-quality scan all lead to poor answers.
5. Unclear prompts. Vague instructions or missing context make wrong answers more likely.
6. When a question has more than one valid answer, the model may give only one, or present unequal positions as equal.
7. Calculations and counts. LLMs are not calculators. Totals, dates, percentages and counts can be wrong unless the flow uses a code or calculator component.
8. Language coverage. Many models are most accurate in English. Accuracy can drop for other languages, mixed-language content and specialist terms.
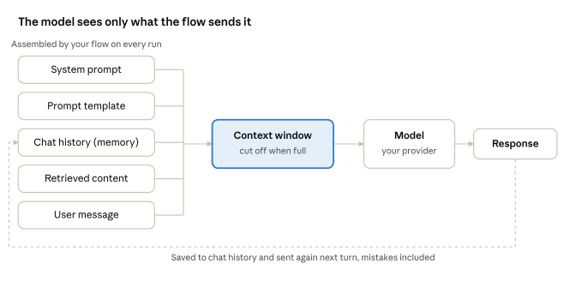
9. Variation between runs. The same input can produce different output each time. One good result does not guarantee the next. How your flow shapes the responseOn every run, the model sees only what your flow sends it: the system prompt, the prompt template, the chat history, any retrieved content, and the user’s message. It has no other memory of you or your data. If any of these inputs is wrong, missing or cut off, the answer will be too.
What the model receives on each run · 5 inputs, 1 loop Each response is saved to the chat history, so an early mistake can be sent back to the model on every later turn. Promptsa. System prompt. The instructions on the agent or model component set the model’s role, rules and tone. Vague or contradictory instructions lead to inconsistent answers.
b. Prompt templates. Variables such as {context} and {question} are filled when the flow runs. If a variable is empty or connected to the wrong component, the model gets incomplete input and fills the gap by guessing.
c. Grounding instructions. Telling the model to answer only from the provided context, and to say “I don’t know” when the information is missing, reduces made-up answers. Chat history and memorya. How the model “remembers”. The model does not remember earlier messages by itself. A memory component, or the agent’s built-in memory, retrieves past messages and sends them with each new input.
b. Mistakes carry forward. If the model gave a wrong answer earlier in the conversation, it may keep building on it. Starting a new session in the Playground is often the quickest fix.
c. How many messages are sent. Too few and the model loses track of the conversation. Too many and older, irrelevant messages crowd out the current question.
d. Session IDs. History is grouped by session ID. If a session ID is shared or reused by mistake, one user’s conversation can affect another user’s answers.
e. No long-term learning. Corrections you make in a chat are not saved into the model. They only apply while they stay in the history the flow sends. Context windowEach model can only read a limited amount of text per run: system prompt, history, retrieved content and the question combined. When the limit is reached, content is cut off, often the oldest history or the end of a long document, and the model answers without it. Larger documents may need to be split, summarised or retrieved in smaller parts. Retrieved contentWhen a flow uses a knowledge base, vector store or search component, the model answers from what that step returns. If it returns the wrong passages, outdated documents or nothing relevant, the model can still answer confidently. Check the retrieved content, not only the final answer.
Where to look most carefully
How to double-check responses1. Don’t treat it as your only source. Use AI output as a starting point, then confirm anything important with a system of record, an official document or a subject-matter expert.
2. Check the sources. When a response cites a document, knowledge-base article or web page, open it. The original often has context that a summary leaves out.
3. Match the effort to the stakes. A draft email needs a quick read. Financial figures, legal or compliance wording, customer-facing content and production changes need a careful review.
4. Verify the specifics. Names, amounts, dates, IDs, account numbers and quotes are where errors do the most damage. Check each one.
5. Test before you deploy. Run your flow against sample data in the Playground or a test environment before you deploy it.
6. Watch for overconfidence. A fluent, detailed answer is not proof of accuracy. Be most cautious when the answer is exactly what you hoped to hear.
7. Ask it to show its work. In your prompt, ask the model which part of the input supports its answer, then confirm that part yourself. How to reduce mistakes in your flowsWhen you write prompts 1. Be specific about the task, the audience and the output format. Give an example of a good output.
2. Supply the facts the model needs (documents, records, policies) rather than relying on what it already knows.
3. Tell the model to answer only from the supplied context, and to say “I don’t know” or leave a field empty when the information is missing.
4. Ask for structured output (for example JSON with fixed field names) so results can be validated automatically. When you design flows 1. Ground answers in current data with knowledge-base, retrieval or connector components.
2. Use code or calculator components for arithmetic, dates and counts, not the LLM.
3. Validate outputs: check required fields, formats, value ranges and totals before passing them on.
4. Add a human-in-the-loop approval before high-impact actions such as payments, external emails, record updates or deletions.
5. Log inputs and outputs so errors can be traced and fixed.
6. Re-test flows when you change the model, the prompt or the input documents. Agents and toolsAn agent component lets the model decide which tools to call, in what order and with which inputs. That flexibility brings its own errors: 1. Wrong tool or wrong inputs. The agent may choose an unsuitable tool, or pass it the wrong ID, date or search term. Clear tool names and descriptions help the model choose correctly.
2. Misreading tool output. The agent can misread or over-summarise what a tool returns, then act on that misreading.
3. Loops and extra steps. An agent may repeat calls or take more steps than needed. Set a maximum number of iterations.
4. Real-world side effects. Tools that create tickets, send messages or update records act on the agent’s decision. Use read-only tools where you can, and add a human approval step before actions that are hard to undo. Check the agent’s step-by-step output in the Playground to see which tools it called and what they returned. Debugging a wrong answerWhen a flow gives a wrong answer, find out what the model actually received before you change the model. Work through these in order: 1. Check the inputs. Inspect each component’s input and output to see the exact text that reached the model component.
2. Check the prompt. Are all template variables filled? Are the instructions clear and free of contradictions?
3. Check the history. Is an earlier wrong answer still in the conversation? Try again in a new session.
4. Check retrieval. Did the knowledge base or search step return the right, current content?
5. Check the context size. Is a long document or history being cut off?
6. Check the tools. For agents, did it call the right tool with the right inputs, and read the result correctly.
7. Check the model and settings. If the inputs are all correct, try lowering the temperature or switching to a more capable model. If the inputs were correct and the answer was still wrong, the problem is with the model. If an input was wrong, fix the flow. Data, privacy and bias1. What is sent to the provider. Prompts, chat history, retrieved documents and tool results are sent to the model provider you configured. How that data is handled depends on the provider’s terms, not on Robility Flow.
2. Sensitive data. Don’t send personal, financial or confidential data to a model unless your organisation has approved that provider for it. Mask or remove sensitive fields where you can.
3. Stored history. Chat history saved by memory components may hold sensitive content. Clear sessions you no longer need.
4. Models can reflect bias from their training data. Take extra care when output affects decisions about people, such as hiring, customer eligibility or performance reviews. Reporting incorrect responsesFirst, decide where the problem is. If a component, connector or the Playground isn’t working as expected, report it to us. If the model’s answer itself is wrong, try a clearer prompt, more context, a different model or lower temperature. Persistent quality issues with a particular model can also be reported to that model’s provider. Include: a. The flow name and, if you can, the run or session ID
b. The model and provider used, and key settings such as temperature
c. The input you gave, or a description of it (remove sensitive data)
d. The response you received and what the correct response should have been
e. The date and time it happened Send reports to the Robility support team. If a wrong response has already caused an action, such as a sent message or an updated record, report it immediately and correct the affected record. Frequently asked questions1. Which model produces the responses? The model you configure in your flow’s model component. Robility Flow does not have a built-in model. Changing the model or its settings can change the quality of the responses.
2. Why did it answer confidently when it was wrong? LLMs produce fluent text whether or not the underlying facts are correct. Confidence in the wording is not a sign of accuracy.
3. Why do I get a different answer when I run the same input again? Model output varies between runs. For repeatable results, use structured output, clear instructions and validation steps in your flow
4. Can a flow check the model’s work? Partly. You can add validation components, or a second model step that reviews the first. That reduces errors but does not remove them. A person should still check important output.
5. Who is responsible for the final output? You are. Review and approve AI output before you use it in decisions, send it to customers or act on it in production systems.
Create Automation
Repository Dispatch URL
Enter the GitHub repository dispatch endpoint in the following format:
https://api.github.com/repos/<owner>/<repository>/dispatches
Replace the owner and repository values with the target repository details.
Event Type
Specify a custom event name that identifies the event being sent to GitHub.
For example: prompt-update
“The value must match the event type configured in the corresponding GitHub Actions workflow.
GitHub Personal Access Token
Provide a GitHub Personal Access Token (PAT) to authenticate the dispatch request.
Token Requirements
A Fine-Grained Personal Access Token is recommended.
Configure the token with:
i. Access to the target repository.
ii. Repository permission Contents: Read and write.
iii. An appropriate expiration period.
iv. Access limited to only the repositories required for the integration.
Creating a Fine-Grained Personal Access Token
1. Sign in to GitHub.
2. Navigate to Settings > Developer Settings > Personal Access Tokens > Fine-Grained Tokens.
3. Select Generate New Token.
4. Enter a token name and optional description.
5. Select the appropriate resource owner.
6. Grant access to the target repository.
7. Set Contents permission to Read and write.
8. Configure the token expiration period.
9. Generate the token and copy it securely into the GitHub Personal Access Token field.
Security Recommendations
a. Store tokens securely.
b. Do not expose tokens in source code or logs.
c. Grant only the minimum permissions required.
d. Periodically rotate and renew tokens.
e. Revoke unused tokens immediately.
Result
When the automation is triggered:
1. A repository dispatch request is sent to the specified GitHub repository.
2. GitHub validates the request using the provided token.
3. A repository_dispatch event is created in the repository.
4. GitHub Actions workflows configured for the specified event type can run.
Slack
The Slack action sends notifications to a connected Slack workspace whenever the automation is triggered. This allows teams to receive real-time updates and event notifications directly within Slack.
Manage Users
System Requirements
Network Access & Message Traffic
Additional Requirements1. Administrator Rights:
Required for installation and specific features, such as setting up browser extensions. 2. Excel/Office Integration Requirements:
Microsoft Office (versions 2007, 2010, 2013, 2016, 2019, or 365 desktop editions) is required for automating tasks in Excel and Outlook. 3. Robility Manager Requirements:
For users integrating Robility Designer with Manager:
a. Ensure the system can establish communication with the Manager server.
b. SSL/TLS 1.2 is mandatory for secure communication. 4. Windows Registry:
Read & Write access is required during the installation of Robility Designer and Runner to configure essential registry entries for proper functionality.
Administrative Rights: Necessary for installing the Robility Runner. 5. Remote Desktop:
The Remote Desktop option must be enabled to support Robility Runner Auto Login for service accounts and user accounts. 6. URL Whitelisting:
Specified URLs must be whitelisted to ensure the proper functioning of Robility Designer and Runner across all deployment models. Click here to refer. 7. Group Policy:
For Robility’s Chrome and Edge browser automation, specific group policy configurations and prerequisites must be enabled. Click here to refer. 8. VM Name Requirements:
While creating virtual machines or Citrix environments, the machine name must not contain special characters. Only hyphens (-) and underscores (_) are permitted, and they should be used only within the name, not at the beginning. 9. User Account:
Dedicated service account with login rights, ideally non-interactive for unattended execution. 10. Auto-logon:
Auto Logon should be configured for unattended execution. Click here to refer.
Managing Runner
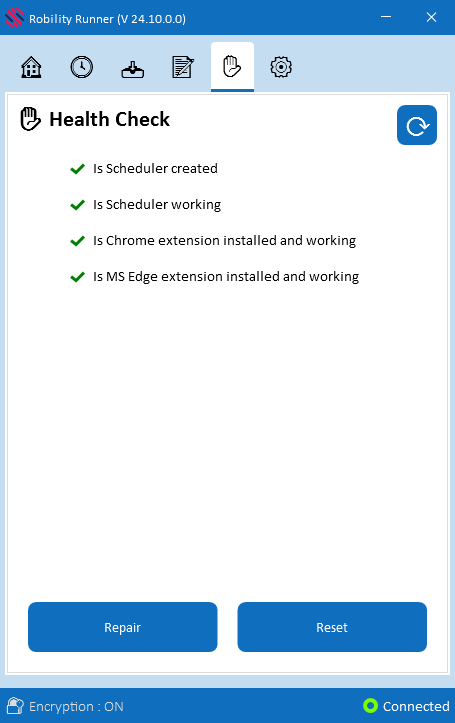
Health CheckThe Health Check tab in the Runner application is an essential tool for monitoring and diagnosing the bot’s health status. It provides critical insights into the bot’s readiness and operational condition, particularly when errors or unexpected issues occur during execution. When a bot encounters an error, the Health Check tab should be the first point of reference. This feature helps identify potential issues and ensures the bot meets all necessary conditions for successful execution. By regularly reviewing the health status, users can prevent downtime and maintain smooth operations. The Health Check tab highlights several important aspects: 1. Error Diagnosis: When a bot fails or encounters an issue during execution, the tab provides details about its health status, offering clues about what might have gone wrong. 2. Execution Readiness: It also verifies that the bot fulfills all required conditions for execution through the Runner. These conditions include system configurations, resource availability, and connectivity, which are vital for the bot to operate without interruptions.
3. Troubleshooting Guidance: By reviewing the health status, users can quickly identify problems, such as missing dependencies or misconfigurations, and address them efficiently. Refer to the image below for a detailed overview of the prerequisites and conditions that must be fulfilled for the bot to execute successfully. OverviewThe main screen of the Health Status tab displays four critical conditions that must be satisfied for the bot to run. These conditions are visually represented, and the bot will only execute if all four are marked with a green check. If any condition is incorrect, the following actions may be required: 1. Error Indication: If there is an issue with a condition, the corresponding status will turn red. The bot will not proceed and moves to the “ToCheck” status, to halt the execution until the error is resolved. 2. Repairing Issues: Use the Repair button to address plugin-related issues. This action removes and reinstalls the plugin, resolving most errors and allowing the bot to function. If the bot still fails to launch, review the log file to identify and resolve the underlying problem. 3. Scheduler Issues: If the scheduler’s configuration or functionality is problematic, attempt to repair the bot first. If repairing does not resolve the issue, use the Reset button as an alternative solution. 4. Browser Extensions: Errors related to Chrome or Edge extensions can be fixed by enabling the Robility Automation extension in the respective browsers. Open the affected browser, navigate to the extensions section, and activate the required plugin to restore functionality.
Build Your Automation
Now, the designer is launched and ready to build in your automation solutions. To create your workflow, first let’s create a new solution. Follow the below steps to create a new solution: 1. To get started using the Designer, the user needs to create a new solution by selecting “CTRL +N” or by clicking on “Create New Solution” button.
2. A Pop- up window labelled as “New solution”, appears to fill out the details of the Solution Name, Solution Description, Workflow Name, Workflow Description, and location path to be saved.
3. After filling out the details, the user needs to click on the “Create” button to create the new solution.
4. The solution will be created and saved in the specified location. And then you are all set to build the automation solution. As you can see on the left-hand side of the designer interface, there will be “Toolbox” panel. Here you can view the list of features are installed on the system. There will be a set of features that are installed by default. But wait there are a lot of features that awaiting to be explored. Installing the featuresOn the top of the designer, you can see “Manage Features” option. The Manage Features option enumerates the list of all features that are available for the Designer. It also displays the features which has been installed, features which have updates, any new features available currently for the designer and a browse option to browse and use any feature located in our system. To get more detailed information, click here. Now, let’s install the features using this option. 1. Click on the “Manage Features” option.
2. Navigate to the “New features” option to discover and download the latest features.
3. Now, you can click on “Select All” option on the top of the window and select “Install” option.
a. It will install all the features available in the designer.
b. This process might take a time since all the features are being installed one by one.
4. The designer will be refreshed, and you can view all the installed features on the “Toolbox” section. Now let’s start building our automation solution. In the interface you can now drag and drop any activities into the flowchart and start creating the solution. Steps to build the botHere I am going to showcase a demonstration of how to prompt a notification to the user. 1. Navigate to the “Toolbox” section and search for the activity as “MessageBox”.
2. Drag and drop the “MessageBox” activity from the “Notification” feature and set it as start node.
a. Setting the activity as the start node helps to initiate the execution process from that activity.
b. It helps the user to showcase any input either by hardcoding the values or by providing the input variable. Click here to get more information.
3. Double click on the activity.
4. Here, provide the input value as “Hello, Welcome to Automation”.
a. This field accepts only “String” datatype; hence we are providing the value within the double quotes.
BringToFront
BringToFrontThe ‘BringToFront’ activity helps you bring the application into focus when it has been minimized during runtime. PropertiesINPUT DelayAfter: It assists the user to add a delay before initiating subsequent activities. The delay duration here is in milliseconds. By default, it is set to “300” milliseconds. When the option is left blank, the delay will not be considered. DelayBefore: It assists the user in adding a delay before starting the execution of the activities. The delay duration here is in milliseconds. By default, it is set to “200” milliseconds. When the option is left blank, the delay will not be considered. ExecuteBy:* Gets auto filled once the “Active Application” is selected. This contains the set of attributes for the specific spied element. UIA3: It indicates the user to integrate “UIA3” functionality within the workflows. It accepts values in “Boolean” datatype.
True: It will enable “UIA3” functionality within the workflow.
False: It will disable “UIA3” functionality within the workflow.
By default, the parameter is set to false. When left empty, it will not consider UIA3 functionality. WaitTime: It enables the user to introduce a delay before initiating subsequent activities. The delay is specified in milliseconds.
By default, it is set to 10000 milliseconds. Leaving the option blank will result in no delay being applied. WindowState:* This parameter allows you to configure the application behavior.
Maximize: Maximizes the application.
Restore: Restores the application.
None: Does not perform any action.
By default, the ‘Maximize’ option will be selected. MISC DisplayName: Displays the name of the activity. The activity name can be customized, which aids in troubleshooting. SkipOnError: Specify the “Boolean” value as “True” or “False.”
True: Continue executing the workflow regardless of any errors thrown.
False: Halt the workflow if it encounters any errors.
None: If the option is left blank, the activity will, by default, behave as if “False” were chosen. Version: It indicates the version of the feature being used. RESULT Result: It provides the ability to view the execution status of the activity. It returns values in “Boolean.”
True: Indicates that the activity has been executed successfully without any errors.
False: Indicates that the activity has been unsuccessful due to an unexpected error being thrown. * Represents mandatory fields to execute the workflow Tips: 1. Enable the “UIA3” functionality when you have employed “DesktopAutomationUIA3” activities in the workflow.
2. If “UIA3” is enabled, and there are no “UIA3” activities used in the workflow, it will not execute properly.
DesktopAutomationUIA3
v.2.2.9
This release includes enhancements related to the Windows title handling logic to improve application detection and window identification during automation execution. EnhancementImproved Window Title Handling LogicEnhanced the existing Windows title matching mechanism to support both: • Exact window title matching • Partial window title matching Previously, the framework relied primarily on the complete window title for identifying application windows during execution. In scenarios where the window title changed dynamically, this could lead to window identification failures. With this enhancement, a fallback validation mechanism has been implemented. If an exact match using the full window title is not found, the framework will automatically perform a partial window title match by validating the static portion of the current active window title. This enhancement improves handling for: • Dynamic window title changes • Variable application title values • Window tree structure variations As a result, the framework can identify the correct target window more reliably during execution, improving the overall stability and consistency. Benefits• Better handling of dynamically changing application titles • Reduced execution failures caused by title mismatches • Enhanced reliability during application switching and interaction Note: This enhancement is backward compatible and does not impact existing workflows using exact window title matching. Released Date: 27/05/2026
Scroll
The Scroll Activity enables you to scroll content within a selected desktop application or UI element. You can configure the scroll direction, scroll amount, execution method, delays, and wait time to control how the scrolling operation is performed. Note: The Scroll Activity supports vertical and horizontal scrolling, depending on the capabilities of the selected application or UI element. Application FocusThe application does not need to be in the foreground when the target element supports the UI Automation ScrollPattern. If the activity uses simulated mouse-wheel input as a fallback, the application must be visible, unobstructed, and running in an unlocked interactive session. The activity does not automatically bring the application to the foreground. Prerequisites1. Ensure the target desktop application is open and accessible.
2. Select the required UI element using Edit Element before executing the activity.
3. Ensure that the selected element supports scrolling in the required direction.
4. Select the actual scrollable container rather than a parent window or non-scrollable container. PropertiesINPUTDelayAfter: Specifies the time to wait after the scroll operation is completed. The value is specified in milliseconds. The default value is 300. DelayBefore: Specifies the time to wait before performing the scroll operation. The value is specified in milliseconds. The default value is 200. Direction: Specifies the direction in which the content is scrolled. The available options are: Top: Scrolls to the beginning of the scrollable content.
Bottom: Scrolls to the end of the scrollable content.
VerticalUp: Scrolls vertically upward.
VerticalDown: Scrolls vertically downward.
HorizontalLeft: Scrolls horizontally to the left.
HorizontalRight: Scrolls horizontally to the right. ExecutedBy: Specifies the interaction method used to perform the scroll operation. ScrollAmount: Specifies the number of scroll units or notches used during the scrolling operation. Higher values generally result in a greater scrolling distance. Examples:
1: Performs one scroll unit in the selected direction.
3: Performs three scroll units.
10: Performs ten scroll units, resulting in a greater scrolling distance. Note: The actual scrolling distance may vary depending on the target application, control implementation, execution method, and operating system settings. WaitTime: Specifies the maximum time allowed for the target element to be identified and the scroll operation to be performed. The value is specified in milliseconds. The default value is 10000. MISCDisplayName: Specifies the display name of the activity. You can customize this value to make the activity easier to identify in the workflow. SkipOnError: Specifies whether workflow execution continues when an error occurs.
True: Logs the error and continues workflow execution.
False: Throws an exception and stops workflow execution.
None: Behaves as False by default. Version: Displays the current version of the activity. OUTPUT Result: Returns the success state of the scroll operation.
True: The scroll operation completed successfully.
False: The scroll operation did not complete successfully. Supported ControlsThe Scroll activity supports scrollable UI elements, including: a. Lists and tables
b. DataGrids
c. Tree views
d. Documents and document viewers
e. Scrollable panels and panes
f. Other scrollable containers Scrolling behavior depends on the UI Automation capabilities of the selected element and the scrolling method used. DataGrid Support: For UI Automation-based scrolling, the selected DataGrid or its scrollable container must support the ScrollPattern and the configured scrolling direction. Note: Browser windows may not expose the ScrollPattern directly. When automating browser-based applications, select the specific scrollable element within the page instead of the browser window. Scrolling Behavior and LimitationsThe Scroll activity scrolls the selected UI element in the configured direction. If the element does not support the required scrolling operation, the activity may fail with an error. Some controls, such as virtualized DataGrids, expose only the rows that are currently visible through UI Automation. Scrolling to the end of the control does not guarantee that all records in the underlying dataset are available to downstream data extraction activities. Important: The amount of data available depends on how the target application exposes its content through UI Automation. The Scroll activity navigates within the selected element but does not control how the application loads or exposes its data.
TrainModel
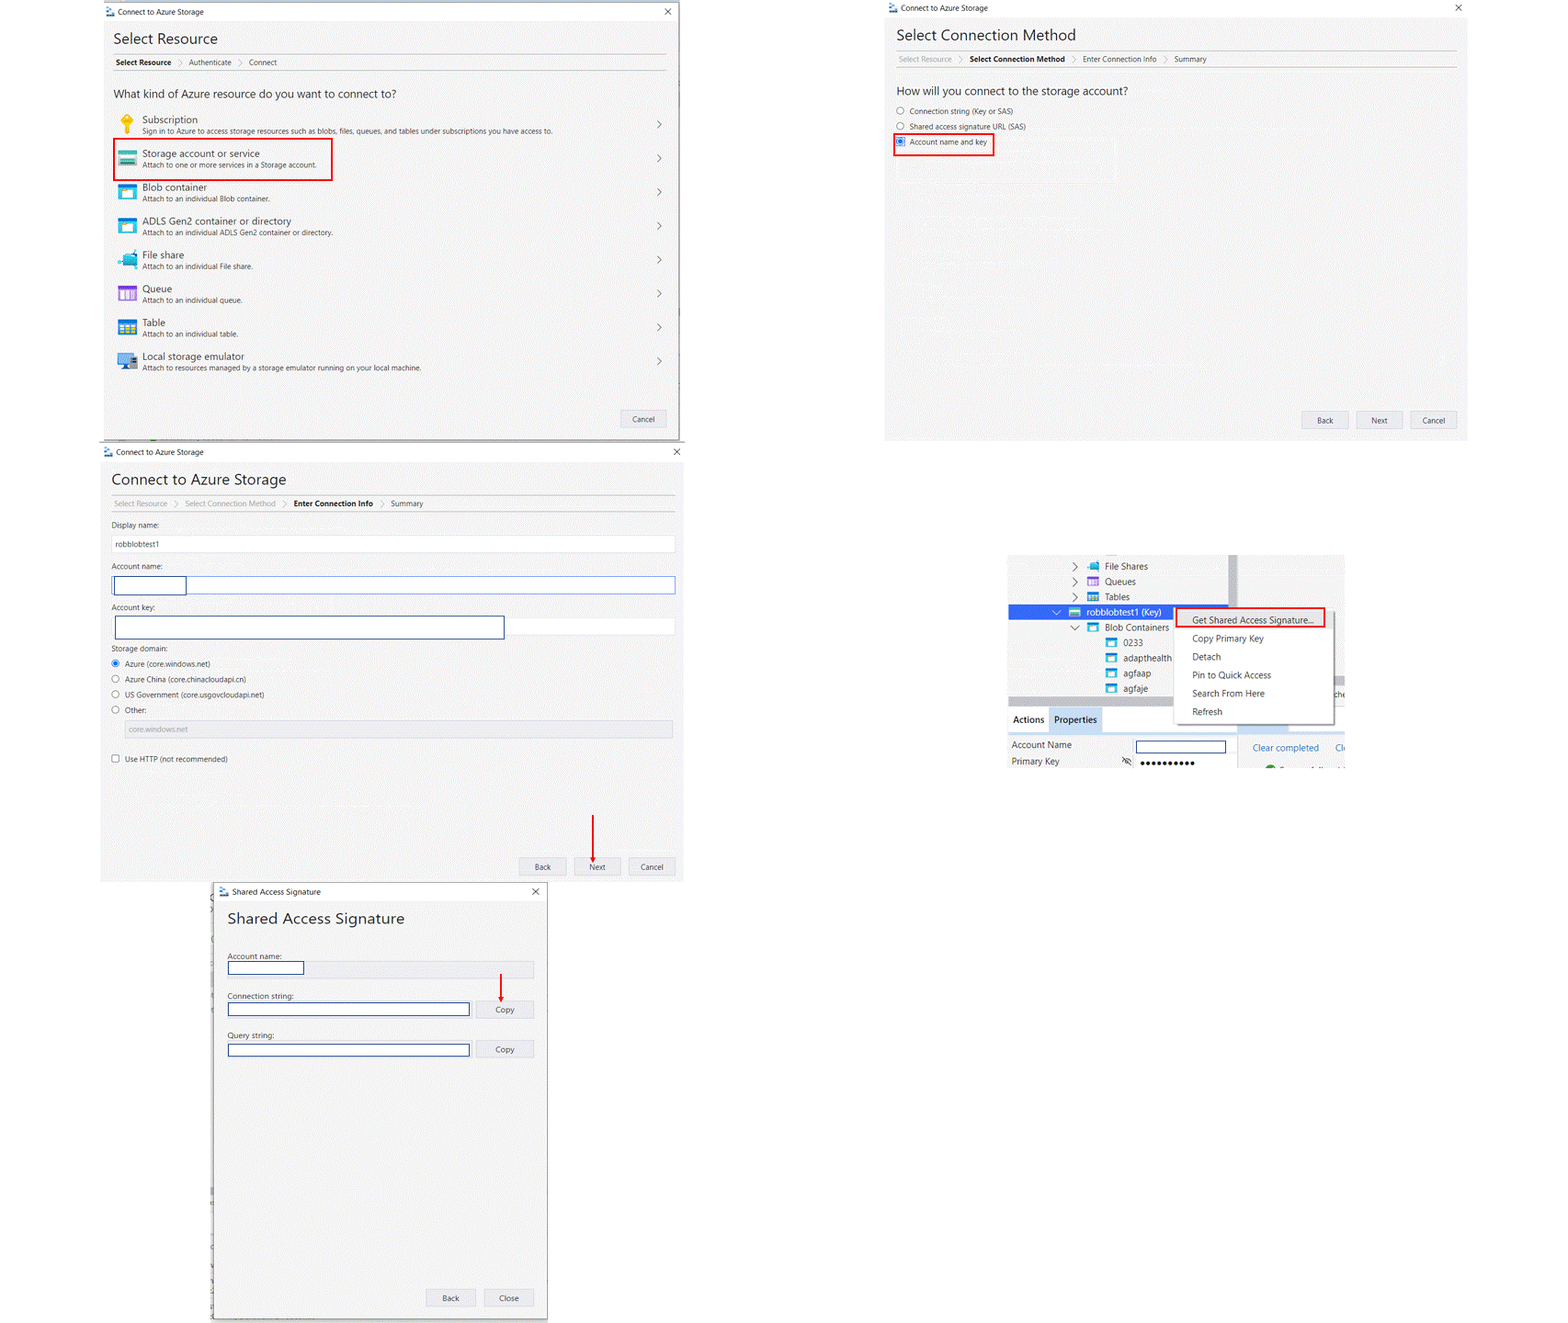
To use the Form Recognizer custom model, you provide your own training data to the Train Custom Model operation, so that the model can train the same to your industry-specific forms. This section demonstrates how to train a model with your own data. A trained model can output structured data that includes the key/value relationships in the original form document. PropertiesINPUT IncludeSubFolder: * Specify if the input should include the sub folders. Prefix: * Add the folder name and subfolder name in which the training data is uploaded. SourceURl:* Specify the SAS URL generated. Refer below on how to generate the same. MISC Display Name: Displays the name of the activity. You can also customize the activity name to help troubleshoot issues faster. This name will be used for logging purposes. SkipOnError: It specifies whether to continue executing the workflow even if it throws an error. This supports only Boolean value “True or False”. By default, it is set to “False.”
True: Continues the workflow to the next step
False: Stops the workflow and throws an error. Version: It specifies the version of the AzureAIFormRecogniser feature in use OUTPUT ModelLocation: This is not a mandatory field. However, to view the model location we must declare a variable here. Result: Declare a variable here to validate the activity. It accepts only Boolean value. This is not a mandatory field. StatusCode:* This is not a mandatory field. However, to view the status of the trained model, we must declare a variable here. * Represents mandatory fields to execute the workflow. Creating a SAS URLTo create a SAS URL, follow the steps below: 1.Open the Microsoft Azure Storage explorer
2.Click on the connections on the left-hand side and do the following steps.
Google
IntroductionThe Google package in Robility encompasses a set of activities designed to interact with Google workspace. Google Workspace is a cloud-based platform developed by Google, which includes popular applications like Google Sheets, Google Docs, Google Drive, and Gmail. These activities leverage Google Cloud APIs and functionalities to seamlessly integrate with Google’s services, enabling users to streamline document processing, automate email communication, and enhance productivity within their automation workflows. About activities package1. Google Document AI: Activities related to Google Document AI empower users to automate document processing and analysis tasks using Google’s AI and machine learning capabilities. This includes activities for extracting text, entities, and structured data from documents, performing document classification and entity recognition, and leveraging Google’s pre-trained models for document understanding tasks. 2. Gmail Integration: The Gmail activities in the Google package facilitate automation of email-related tasks within Gmail accounts. Users can automate actions such as sending emails, receiving and reading emails, searching for specific emails based on criteria, managing email threads and labels, and extracting email content for further processing. 3. Google Sheets Automation: Robility offers out-of-the-box automation activities for Google Sheets, such as reading/writing cell values, manipulating ranges, and generating reports. Automation workflows in Robility can pull data from various business applications, process it, and export it directly to Google Sheets for real-time reporting and decision-making. 4. Seamless Integration with Gmail: Robility integrates with Gmail to send automated emails based on predefined triggers or data conditions, making customer support or follow-up communication faster and more efficient. RPA bots can also manage email content dynamically, ensuring accurate information distribution. 5. File Handling with Google Drive: Robility bots can automate the upload, download, and organization of files in Google Drive, reducing manual intervention in document management tasks. With the integration of Google Drive, bots can archive, retrieve, and share documents securely, enhancing collaboration and compliance. Pre – requisitesTo integrate Google services (such as Google Sheets, Google Drive, Gmail, etc.) into Robility for automation, there are certain prerequisites that need to be met. These ensure that Robility can securely connect to and access the Google Workspace services required for automation tasks.
1. Google Cloud Project: You need to create a Google Cloud Project to access Google APIs (such as Google Sheets, Gmail, and Drive) for integration.
2. Enable Required APIs: Depending on the automation process, enable the relevant Google APIs within the Google Cloud project.
a. Google Sheets API: For automating Google Sheets.
b. Google Drive API: For file handling and folder management.
c. Gmail API: For automating email-related workflows.
3. OAuth 2.0 Credentials: Create OAuth 2.0 credentials to authenticate and authorize Robility to access the Google services on behalf of the user.
Steps:
a. In the APIs & Services section of the Google Cloud Console, go to Credentials.
b. Click on Create Credentials and select OAuth 2.0 Client IDs.
c. Configure the consent screen and specify the scopes (permissions) needed for your project.
d. Download the OAuth Client ID JSON file, which contains the credentials (client ID and client secret). 4. Google Account with Required Permissions: Ensure that you have a Google Workspace or Google Account with the required permissions for accessing the specific services. a. For Google Sheets, you need read and write access to the sheets you want to automate.
b. For Google Drive, ensure you have the necessary permissions to read/write files.
c. For Gmail, permissions to send or manage emails. Scopes for PermissionsWhen setting up the Google integration, you need to define the OAuth Scopes for your automation. These are permissions granted by the Google user to the Robility bot for accessing their data.
GetMailDetails
This activity helps the user extract mail details from the specified Gmail account. Ensure it is used within the ‘GmailScope’. PropertiesINPUT MailMessage: * Indicates to provide the “MailItem” variable (which will be declared in the “Read Mail” activity) to extract the emails from the provided “list”. MISC
DisplayName: Displays the name of the activity. The activity name can be customized, which aids in troubleshooting. SkipOnError: Specify the “Boolean” value as “True” or “False.”
True: Continue executing the workflow regardless of any errors thrown.
False: Halt the workflow if it encounters any errors.
None: If the option is left blank, the activity will, by default, behave as if “False” were chosen.
Version: It indicates the version of the feature being used. OUTPUT Body: This parameter enables to view the “Body” of the mail as an output of the activity in the “String” datatype, extracted from the email. Date: This parameter enables to view the “Date” as an output of the activity in the “String” datatype, extracted from the email. FromAddress: This feature enables you to view the “FromAddress” as an output of the activity in the “String” datatype, extracted from the email. Result: It provides the ability to view the execution status of the activity. It returns values in “Boolean.”
True: Indicates that the activity has been executed successfully without any errors.
False: Indicates that the activity has been unsuccessful due to an unexpected error being thrown. MailSubject: It helps to view the output of the activity as “MailSubject” extracted from the mails. This field returns the values in the “String” datatype.
ToAddress: It helps to view the output of the activity as “ToAddress” extracted from the mails. This field returns the values in the “String” datatype. * Represents mandatory fields to execute the workflow. Prerequisites1. The Gmail automation allows the following actions:
a. Extracting emails
b. Sending emails
c. Replying to emails
d. Moving emails
e. Reading emails
f. Saving emails 2. The bot must authenticate the specified Gmail account for secure access.
3. The KeyPath within the Gmail scope is required to grant the bot appropriate permissions.
4. The KeyPath must be provided in JSON format, containing the necessary credentials and configuration for authentication.
5. Proper setup of these prerequisites ensures smooth interaction with the Gmail account and allows the bot to perform the required actions effective
ReadMail
This activity helps the user to read the mails from the Gmail account. Ensure it is used within the ‘GmailScope’. PropertiesINPUT Filter: Specify the filter values that need to be applied while reading emails from the account name. This parameter accepts values in “String” datatype. You can either hardcode the values in “String” datatype or can enter the values in “String”. It is an optional field and reads all emails if no value is provided. SubFolderName: * Specify the folder name from which the emails need to be accessed and read. You can also provide the “SubFolderName” if you need to read emails from a subfolder. IncludeSpamTrash: This parameter indicates to include spam and trash mails while reading emails from the specified account. Specify the boolean value as “True” or “False”.
True: Enables to include the spam and trash mails.
False: The option will not be considered.
None: If the option is left blank, the activity will, by default, behave as if “False” were chosen. MarkAsUnread: This property indicates whether read emails should be marked as unread after the automation is completed. Specify “True” or “False” to enable or disable the marking of emails as unread during the mail reading process.
True: Enables marking emails as unread after they are read.
False: Disables marking emails as unread after they are read.
None: If this option is left blank, the property will not take effect, and by default, emails will be read without marking as unread. NoOfMails: * Enter the number of emails that need to be read within the specified account name. This parameter accepts values in “Integer” datatype. You can either hardcode the values in “Integer” datatype or can enter the values in “Integer”. Unread: Specify whether to read emails that have not been read yet in the mailbox. Specify either “True” or “False” in the field:
True – Enables reading only the “Unread” mails from the mailbox.
False – Disables the condition and reads emails according to the sorting order provided, irrespective of whether they are “Read” or “Unread” mails.
None – When left out blank, the activity will perform with “False” action. MISC DisplayName: Displays the name of the activity. The activity name can be customized, which aids in troubleshooting. SkipOnError: Specify the “Boolean” value as “True” or “False.”
True: Continue executing the workflow regardless of any errors thrown.
False: Halt the workflow if it encounters any errors.
None: If the option is left blank, the activity will, by default, behave as if “False” were chosen.
Version: It indicates the version of the feature being used. OUTPUT List: * It helps to store the mails in the list format that has been read from the mailbox. (Refer to the steps in creating a workflow.)
Result: It provides the ability to view the execution status of the activity. It returns values in “Boolean.”
True: Indicates that the activity has been executed successfully without any errors.
False: Indicates that the activity has been unsuccessful due to an unexpected error being thrown.
* Represents mandatory fields to execute the workflow.
SendMail
This activity helps the user send an email from their Gmail address to another Gmail address. Users can compose emails, add recipients’ email addresses, specify the subject and body of the email, and send the message directly from their Gmail account. Ensure it is used within the ‘GmailScope’. PropertiesINPUT AttachmentList: Indicate the list of attachments to include along with the mail. It accepts values in the form of a “list” datatype. When left blank, it will not be considered. CCAddress: Provide the “CC address” of the recipients to send the email. This allows sending email to additional recipients for informational purposes. This parameter accepts values in “String” datatype. You can either hardcode the values in “String” datatype or can enter the values in “String”. When left blank, it will not be considered. FromAddress:* Specify the “From address,” which is the sender’s email address used to send the email. This parameter accepts values in “String” datatype. You can either hardcode the values in “String” datatype or can enter the values in “String”. When left blank, it will not be considered. MailBody: This parameter specifies the “Mail Body” that should be sent as an email. It accepts values in “String” datatype. You can either hardcode the values in “String” datatype or can enter the values in “String”. When left blank, it will not be considered.
Subject: Specify the “Subject” of the email to be sent along with the mails. This parameter accepts values in “String” datatype. You can either hardcode the values in “String” datatype or can enter the values in “String”.
When left blank, it will not be considered. ToAddress: * It specifies the “To address” of the recipient to send the mail. This parameter accepts values in “String” datatype. You can either hardcode the values in “String” datatype or can enter the values in “String”.
When left blank, it will not be considered. MISC DisplayName: Displays the name of the activity. The activity name can be customized, which aids in troubleshooting.
SkipOnError: Specify the “Boolean” value as “True” or “False.”
True: Continue executing the workflow regardless of any errors thrown.
False: Halt the workflow if it encounters any errors.
None: If the option is left blank, the activity will, by default, behave as if “False” were chosen.
Version: It indicates the version of the feature being used.
OUTPUT Result: It provides the ability to view the execution status of the activity. It returns values in “Boolean.”
True: Indicates that the activity has been executed successfully without any errors.
False: Indicates that the activity has been unsuccessful due to an unexpected error being thrown.
* Represents mandatory fields to execute the workflow.
GoogleSheet
Robility® integrates with Google Sheet to automate tasks such as reading/writing cell values, manipulating ranges, and generating reports. Use cases1. Data Migration Between Systems: Robots can use Google Sheets as an intermediate storage location when transferring data between incompatible systems, ensuring smooth migration with data.
2. Automated Billing Reconciliation: Bots can check payment statuses or transaction records in Google Sheets against a system to ensure consistency and accuracy in billing data.
3. Employee Onboarding/Offboarding: Google Sheets can be used to track onboarding tasks or checklist completion for new hires. Bots can update HR systems with onboarding details automatically.
4. Expense Tracking: Bots can extract expense data from receipts, emails, or expense reports and record it in Google Sheets, where it can be categorized and summed up for financial reports. Pre – requisitesBuilding an automation workflow with Google Sheet requires a connection in the “App Integration” menu in Robility Manager. There are two types of authentication that brings Google Sheet into Robility, 1. OAuth 2.0 Authorization code – Enables you to provide the Gmail account address and password that has been authenticated with defined scopes.
2. OAuth 2.0 Client credentials – Enables you to provide your own Client ID, Client Secret and Scopes manually. Once the connection has been enabled, you are all set to build your automation workflow. ScopesScopes define what kind of data it accesses, and level of access needs to be provided. For detailed information, please check out the Google documentation. Below are the scopes that are mandatory to automate with Google Sheet API. Refresh TokenGoogle has refresh token limitation for every individual Oauth 2.0 authorization that expires every one hour. If the token has been expired, Robility’s App Integration service will refresh the authentication without any warning or disruptions during your automation execution. Even though Robility refreshes the token, at some certain circumstances, it requires re-connection with Google Sheet. 1. When you have revoked your access.
2. If the Google Sheet connection has not been utilized for six months after configuration.
3. If you have changed your Google account password and if the scopes for user have been changed.
4. If the user account has exceeded a maximum number of granted (100 live) refresh tokens. Note: The limit is currently set to 100 refresh tokens per Google account per OAuth 2.0 client ID. This number can be subject to change. For the latest information, always check the Google documentation.
AddSheet
This activity helps the user to add a new sheet in the specified spreadsheet. PropertiesConfiguration Each activity requires a connection with Google Sheets authentication. Once you select the respective project name where Google Sheets has been authenticated, the activity will automatically retrieve the available connections for that project. Below are the properties available after the project has been integrated: Google: *This parameter indicates the account name associated with the integration. INPUT WorkbookName: *This parameter specifies the existing spreadsheet where a new sheet will be added. It offers multiple ways to choose the spreadsheet:
1. Browse Option: When selecting the “Click on Browse” option, it will automatically list the folders and spreadsheets available for the specified account. The user must manually select the spreadsheet each time when using this option.
2. Three-Line Menu: Clicking on the “Three lines” icon will open a context menu with the following two options.
a. Reload Folder Picker: Refreshes the selected folder or spreadsheet.
b. Use Variable: Allows you to provide the “Workbook Name” as a variable in “String” format. You can either hardcode the values as a string or use a variable of the “String” datatype. Below are the values that can be provided as variable,
i. URL or ID: After creating the workbook in the specified Google account, you will receive the workbook’s URL and ID. You can use these as a reference to add a new sheet within the workbook.
ii. Spreadsheet Name: You can either hardcode the name as a string or provide a variable of the “String” datatype. Sheet Name: *This parameter specifies the name of the “Sheet” to be created. It accepts values in “String” format, which can be either hardcoded or provided as a variable in the “String” datatype. Position – This parameter indicates the index position of the sheet to be created within the specified spreadsheet. The index starts at “0”. By default, it is set to “0”. If no value is provided, the new sheet will be created at the start of the spreadsheet, i.e., as the first sheet. MISC DisplayName: Displays the name of the activity. The activity name can be customized, which aids in troubleshooting. SkipOnError: Specify the “Boolean” value as “True” or “False.”
True: Continue executing the workflow regardless of any errors thrown.
False: Halt the workflow if it encounters any errors.
None: If the option is left blank, the activity will, by default, behave as if “False” were chosen. Version: It indicates the version of the feature being used. OUTPUT NewSheetName: This parameter helps you to provide the created sheet name as output of the activity. It returns values in “String” datatype. Result: It provides the ability to view the execution status of the activity. It returns values in “Boolean.” True: Indicates that the activity has been executed successfully without any errors.
False: Indicates that the activity has been unsuccessful due to an unexpected error being thrown. * Represents mandatory fields to execute the workflow.
Create
This activity helps the user to create a new spreadsheet in the specified google account. PropertiesConfiguration Each activity requires a connection with Google Sheets authentication. Once you select the respective project name where Google Sheets has been authenticated, the activity will automatically retrieve the available connections for that project. Below are the properties available after the project has been integrated: Google: *This parameter indicates the account name associated with the integration. Folder: *This parameter indicates to provide the “Folder” name against where the created spreadsheet needs to be placed. It offers multiple ways to choose the Folder: 1. Browse Option: When selecting the “Click on Browse” option, it will automatically list the folders available for the specified account. The user must manually select the spreadsheet each time when using this option.
2. Three-Line Menu: Clicking on the “Three lines” icon will open a context menu with the following two options.
a. Reload Folder Picker: Refreshes the selected folder to select a new folder name.
b. Use Variable: Allows you to provide the “Folder Name” as a variable in “String” format. You can either hardcode the values as a string or use a variable of the “String” datatype. Below are the values that can be provided as variable,
i. URL or ID: After creating the folder in the specified Google account, you will receive the Folder’s URL and ID. You can use these as a reference to add a new spreadsheet.
ii. Folder Name: You can either hardcode the name as a string or provide a variable of the “String” datatype. INPUT WorkbookName: *This parameter specifies the existing spreadsheet where a new sheet will be added. It offers multiple ways to choose the spreadsheet:
1. Browse Option: When selecting the “Click on Browse” option, it will automatically list the folders and spreadsheets available for the specified account. The user must manually select the spreadsheet each time when using this option.
2. Three-Line Menu: Clicking on the “Three lines” icon will open a context menu with the following two options.
a. Reload Folder Picker: Refreshes the selected folder or spreadsheet.
b. Use Variable: Allows you to provide the “Workbook Name” as a variable in “String” format. You can either hardcode the values as a string or use a variable of the “String” datatype. Below are the values that can be provided as variable,
i. URL or ID: After creating the workbook in the specified Google account, you will receive the workbook’s URL and ID. You can use these as a reference to add a new sheet within the workbook.
ii. Spreadsheet Name: You can either hardcode the name as a string or provide a variable of the “String” datatype. First Sheet Name: *This parameter specifies the name of the “Sheet” to be created. It accepts values in “String” format, which can be either hardcoded or provided as a variable in the “String” datatype. If Spreadsheet Already Exists / CreatedSpreadsheetType: If the provided spreadsheet already exists in the specified folder, the activity offers the following options:
1. DontReplace: The spreadsheet will not be replaced, and the workflow will be aborted if a spreadsheet with the same name already exists.
2. Replace: The existing spreadsheet will be replaced with a new one if the same name is found in the folder.
3. AutoRename: If a spreadsheet with the same name already exists, it will automatically rename the new spreadsheet.
4. Addasseperatefile: If a spreadsheet with the same name already exists, a new file with the same name will be created as a separate file in the specified folder. MISC DisplayName: Displays the name of the activity. The activity name can be customized, which aids in troubleshooting. SkipOnError: Specify the “Boolean” value as “True” or “False.”
True: Continue executing the workflow regardless of any errors thrown.
False: Halt the workflow if it encounters any errors.
None: If the option is left blank, the activity will, by default, behave as if “False” were chosen. Version: It indicates the version of the feature being used. OUTPUT CreatedSpreadsheetInfoItems: This parameter allows the user to view the details of the created spreadsheet. The following items are provided:
1. FullName: Displays the full name of the created spreadsheet. You can access this value using Variable.FullName.
2. URL: Provides the URL of the created spreadsheet. You can access this value using Variable.URL.
3. URI: Provides the URI of the created spreadsheet. You can access this value using Variable.URI.
4. CreatedDate: Displays the creation date of the spreadsheet. You can access this value using Variable.CreatedDate.
5. ID: Provides the unique ID of the created spreadsheet. You can access this value using Variable.ID.
6. Name: Displays the name of the created spreadsheet. You can access this value using Variable.Name.
7. ParentID: Displays the name of the parent folder where the spreadsheet is stored. You can access this value using Variable.ParentID.
8. MimeType: Indicates whether the created item is a file or folder. You can access this value using Variable.MimeType.
9. Size: Displays the size of the created spreadsheet. You can access this value using Variable.Size”. Result: It provides the ability to view the execution status of the activity. It returns values in “Boolean.” True: Indicates that the activity has been executed successfully without any errors.
False: Indicates that the activity has been unsuccessful due to an unexpected error being thrown. * Represents mandatory fields to execute the workflow.
DeleteColumn
This activity helps the user to delete all the data in the specified column in the selected spreadsheet. PropertiesConfiguration Each activity requires a connection with Google Sheets authentication. Once you select the respective project name where Google Sheets has been authenticated, the activity will automatically retrieve the available connections for that project. Below are the properties available after the project has been integrated: Google: *This parameter indicates the account name associated with the integration. INPUT WorkbookName: *This parameter specifies the existing spreadsheet where a new sheet will be added. It offers multiple ways to choose the spreadsheet:
1. Browse Option: When selecting the “Click on Browse” option, it will automatically list the folders and spreadsheets available for the specified account. The user must manually select the spreadsheet each time when using this option.
2. Three-Line Menu: Clicking on the “Three lines” icon will open a context menu with the following two options.
a. Reload Folder Picker: Refreshes the selected folder or spreadsheet.
b. Use Variable: Allows you to provide the “Workbook Name” as a variable in “String” format. You can either hardcode the values as a string or use a variable of the “String” datatype. Below are the values that can be provided as variable,
i. URL or ID: After creating the workbook in the specified Google account, you will receive the workbook’s URL and ID. You can use these as a reference to add a new sheet within the workbook.
ii. Spreadsheet Name: You can either hardcode the name as a string or provide a variable of the “String” datatype. Sheet Name: *This parameter specifies the name of the sheet where the column needs to be deleted. It provides multiple options for selecting the sheet:
1. Update Range: Refreshes and updates the list of available sheet names, which will appear in a drop-down menu.
2. Use Variable: Allows you to provide the sheet name as a variable in “String” format. You can either hardcode the value as a string or use a variable of the “String” datatype. The following values can be provided as a variable:
a. Spreadsheet Name: You can either hardcode the name as a string or provide a variable of the “String” datatype. (Click here to learn how to retrieve the sheet name from the spreadsheet.)
3. Select Sheet: Allows you to manually select the sheet name from the drop-down menu, which lists the available sheets in the spreadsheet. The user must manually select the spreadsheet each time this option is used. Column Name: *This parameter indicates to provide the column name from the chosen sheet to delete the data. It provides multiple options for selecting the sheet:
1. Update Column: Refreshes and updates the list of available column names, which will appear in a drop-down menu.
2. Use Variable: Allows you to provide the column name as a variable in “String” format. You can either hardcode the value as a string or use a variable of the “String” datatype. The following values can be provided as a variable:
a. Column Name: You can either hardcode the name as a string or provide a variable of the “String” datatype. (Click here to learn how to retrieve the sheet name from the spreadsheet.)
3. Select Column: Allows you to manually select the column name from the drop-down menu, which lists the available column names in the spreadsheet. The user must manually select the column name each time this option is used. IncludeColumnHeaders: Indicates whether to include the “Column Headers” in the spreadsheet when deleting the data. If left blank, the column headers will not be considered. Delete Behavior: This parameter allows you to choose the following delete modes:
1. Clear: The values in the specified range will be cleared, leaving the cells empty.
2. Delete: Deletes the entire columns within the specified range of cells. MISC DisplayName: Displays the name of the activity. The activity name can be customized, which aids in troubleshooting. SkipOnError: Specify the “Boolean” value as “True” or “False.”
True: Continue executing the workflow regardless of any errors thrown.
False: Halt the workflow if it encounters any errors.
None: If the option is left blank, the activity will, by default, behave as if “False” were chosen. Version: It indicates the version of the feature being used. OUTPUT Result: It provides the ability to view the execution status of the activity. It returns values in “Boolean.” True: Indicates that the activity has been executed successfully without any errors.
False: Indicates that the activity has been unsuccessful due to an unexpected error being thrown. Status: It provides the ability to view the status of the deleted column in the Google sheet. It returns values in “Boolean.” True: Indicates that the column has been successfully deleted without any errors.
False: Indicates that the deletion has been unsuccessful due to an unexpected error being thrown. * Represents mandatory fields to execute the workflow.
DeleteRow
This activity helps the user to delete the specified row values in the selected spreadsheet. PropertiesConfiguration Each activity requires a connection with Google Sheets authentication. Once you select the respective project name where Google Sheets has been authenticated, the activity will automatically retrieve the available connections for that project. Below are the properties available after the project has been integrated: Google: *This parameter indicates the account name associated with the integration. INPUT WorkbookName: *This parameter specifies the existing spreadsheet where a new sheet will be added. It offers multiple ways to choose the spreadsheet:
1. Browse Option: When selecting the “Click on Browse” option, it will automatically list the folders and spreadsheets available for the specified account. The user must manually select the spreadsheet each time when using this option.
2. Three-Line Menu: Clicking on the “Three lines” icon will open a context menu with the following two options.
a. Reload Folder Picker: Refreshes the selected folder or spreadsheet.
b. Use Variable: Allows you to provide the “Workbook Name” as a variable in “String” format. You can either hardcode the values as a string or use a variable of the “String” datatype. Below are the values that can be provided as variable,
i. URL or ID: After creating the workbook in the specified Google account, you will receive the workbook’s URL and ID. You can use these as a reference to add a new sheet within the workbook.
ii. Spreadsheet Name: You can either hardcode the name as a string or provide a variable of the “String” datatype. Sheet Name: *This parameter specifies the name of the sheet where the rows need to be deleted. It provides multiple options for selecting the sheet:
1. Update Range: Refreshes and updates the list of available sheet names, which will appear in a drop-down menu.
2. Use Variable: Allows you to provide the sheet name as a variable in “String” format. You can either hardcode the value as a string or use a variable of the “String” datatype. The following values can be provided as a variable:
a. Spreadsheet Name: You can either hardcode the name as a string or provide a variable of the “String” datatype. (Click here to learn how to retrieve the sheet name from the spreadsheet.)
3. Select Sheet: Allows you to manually select the sheet name from the drop-down menu, which lists the available sheets in the spreadsheet. The user must manually select the spreadsheet each time this option is used. Rows: It indicates to provide the rows’ position to delete it from the specified spreadsheet. The index position of the row starts from “0”. It accepts values in “String” datatype, which can be either hardcoded or provided as a variable in the “String” datatype. Delete Behavior: This parameter allows you to choose the following delete modes:
Clear: The values in the specified range will be cleared, leaving the cells empty.
Delete: Deletes the entire rows within the specified range of cells. MISC DisplayName: Displays the name of the activity. The activity name can be customized, which aids in troubleshooting. SkipOnError: Specify the “Boolean” value as “True” or “False.”
True: Continue executing the workflow regardless of any errors thrown.
False: Halt the workflow if it encounters any errors.
None: If the option is left blank, the activity will, by default, behave as if “False” were chosen. Version: It indicates the version of the feature being used. OUTPUT Result: It provides the ability to view the execution status of the activity. It returns values in “Boolean.” True: Indicates that the activity has been executed successfully without any errors.
False: Indicates that the activity has been unsuccessful due to an unexpected error being thrown. Status: It provides the ability to view the deletion status of the row. It returns values in “Boolean.” True: Indicates that the row has been deleted successfully without any errors.
False: Indicates that the deletion has been unsuccessful due to an unexpected error being thrown. * Represents mandatory fields to execute the workflow.
DeleteSheet
This activity helps the user to delete the existing sheet in the specified spreadsheet. PropertiesConfiguration Each activity requires a connection with Google Sheets authentication. Once you select the respective project name where Google Sheets has been authenticated, the activity will automatically retrieve the available connections for that project. Below are the properties available after the project has been integrated: Google: *This parameter indicates the account name associated with the integration. INPUT WorkbookName: *This parameter specifies the existing spreadsheet where a new sheet will be added. It offers multiple ways to choose the spreadsheet:
1. Browse Option: When selecting the “Click on Browse” option, it will automatically list the folders and spreadsheets available for the specified account. The user must manually select the spreadsheet each time when using this option.
2. Three-Line Menu: Clicking on the “Three lines” icon will open a context menu with the following two options.
a. Reload Folder Picker: Refreshes the selected folder or spreadsheet.
b. Use Variable: Allows you to provide the “Workbook Name” as a variable in “String” format. You can either hardcode the values as a string or use a variable of the “String” datatype. Below are the values that can be provided as variable,
i. URL or ID: After creating the workbook in the specified Google account, you will receive the workbook’s URL and ID. You can use these as a reference to add a new sheet within the workbook.
ii. Spreadsheet Name: You can either hardcode the name as a string or provide a variable of the “String” datatype. Sheet Name: *This parameter specifies the name of the sheet to be deleted. It provides multiple options for selecting the sheet:
1. UpdateSheet: Refreshes and updates the list of available sheet names, which will appear in a drop-down menu.
2. Use Variable: Allows you to provide the sheet name as a variable in “String” format. You can either hardcode the value as a string or use a variable of the “String” datatype. The following values can be provided as a variable:
a. Spreadsheet Name: You can either hardcode the name as a string or provide a variable of the “String” datatype. (Click here to learn how to retrieve the sheet name from the spreadsheet.)
3. Select Sheet: Allows you to manually select the sheet name from the drop-down menu, which lists the available sheets in the spreadsheet. The user must manually select the spreadsheet each time this option is used. MISC DisplayName: Displays the name of the activity. The activity name can be customized, which aids in troubleshooting. SkipOnError: Specify the “Boolean” value as “True” or “False.”
True: Continue executing the workflow regardless of any errors thrown.
False: Halt the workflow if it encounters any errors.
None: If the option is left blank, the activity will, by default, behave as if “False” were chosen. Version: It indicates the version of the feature being used. OUTPUT Result: It provides the ability to view the execution status of the activity. It returns values in “Boolean.” True: Indicates that the activity has been executed successfully without any errors.
False: Indicates that the activity has been unsuccessful due to an unexpected error being thrown. Status: It provides the ability to view the deletion status of the sheet. It returns values in “Boolean.” True: Indicates that the sheet has been deleted successfully without any errors.
False: Indicates that the deletion has been unsuccessful due to an unexpected error being thrown. * Represents mandatory fields to execute the workflow.
DeleteRange
This activity helps the user to delete the specified range of value from the specified spreadsheet. PropertiesConfiguration Each activity requires a connection with Google Sheets authentication. Once you select the respective project name where Google Sheets has been authenticated, the activity will automatically retrieve the available connections for that project. Below are the properties available after the project has been integrated: Google: *This parameter indicates the account name associated with the integration. INPUT WorkbookName: *This parameter specifies the existing spreadsheet where a new sheet will be added. It offers multiple ways to choose the spreadsheet:
1. Browse Option: When selecting the “Click on Browse” option, it will automatically list the folders and spreadsheets available for the specified account. The user must manually select the spreadsheet each time when using this option.
2. Three-Line Menu: Clicking on the “Three lines” icon will open a context menu with the following two options.
a. Reload Folder Picker: Refreshes the selected folder or spreadsheet.
b. Use Variable: Allows you to provide the “Workbook Name” as a variable in “String” format. You can either hardcode the values as a string or use a variable of the “String” datatype. Below are the values that can be provided as variable,
i. URL or ID: After creating the workbook in the specified Google account, you will receive the workbook’s URL and ID. You can use these as a reference to add a new sheet within the workbook.
ii. Spreadsheet Name: You can either hardcode the name as a string or provide a variable of the “String” datatype. Sheet Name: *This parameter specifies the name of the sheet where the range of value needs to be deleted. It provides multiple options for selecting the sheet:
1. Update Range: Refreshes and updates the list of available sheet names, which will appear in a drop-down menu.
2. Use Variable: Allows you to provide the sheet name as a variable in “String” format. You can either hardcode the value as a string or use a variable of the “String” datatype. The following values can be provided as a variable:
a. Spreadsheet Name: You can either hardcode the name as a string or provide a variable of the “String” datatype. (Click here to learn how to retrieve the sheet name from the spreadsheet.)
3. Select Sheet: Allows you to manually select the sheet name from the drop-down menu, which lists the available sheets in the spreadsheet. The user must manually select the spreadsheet each time this option is used. Range: *It indicates to provide the range of cell values that needs to be deleted in the specified spreadsheet. It accepts values in “String” format, which can be either hardcoded or provided as a variable in the “String” datatype. Delete Behavior: This parameter allows you to choose the following delete modes: Clear: The values in the specified range will be cleared, leaving the cells empty.
Row: Deletes the entire rows within the specified range of cells.
Columns: Deletes the entire columns within the specified range of cells. MISC DisplayName: Displays the name of the activity. The activity name can be customized, which aids in troubleshooting. SkipOnError: Specify the “Boolean” value as “True” or “False.”
True: Continue executing the workflow regardless of any errors thrown.
False: Halt the workflow if it encounters any errors.
None: If the option is left blank, the activity will, by default, behave as if “False” were chosen. Version: It indicates the version of the feature being used. OUTPUT Result: It provides the ability to view the execution status of the activity. It returns values in “Boolean.” True: Indicates that the activity has been executed successfully without any errors.
False: Indicates that the activity has been unsuccessful due to an unexpected error being thrown. Status: It provides the ability to view the deletion status of the range. It returns values in “Boolean.” True: Indicates that the range has been deleted successfully without any errors.
False: Indicates that the deletion has been unsuccessful due to an unexpected error being thrown. * Represents mandatory fields to execute the workflow.
ForEachReadRange
This activity helps the user to iteratively read data from specified ranges from each sheet in the selected Google Sheet. Ensure that this activity is utilized within the “ForEachSheet” activity. PropertiesConfiguration Each activity requires a connection with Google Sheets authentication. Once you select the respective project name where Google Sheets has been authenticated, the activity will automatically retrieve the available connections for that project. Below are the properties available after the project has been integrated: Google: *This parameter indicates the account name associated with the integration. INPUT IncludeColumnHeaders: Indicates to include the “Column Headers” in the spreadsheet while reading the data. If left blank, the column headers will not be considered. Read Range: *It indicates to select the range or provide the range to read the data from the spreadsheet. It accepts the value in “String” datatype, which can be either hardcoded or provided as a variable in the “String” datatype. Sheet Name: *This parameter specifies the name of the sheet against which the range of data needs to be read. Utilize the “CurrentSheet” variable from “ForEachSheet” activity to automatically iterate and extract the values. What To Read: Indicates to read either the value from the range of cells or values with formula from the range of cells. MISC DisplayName: Displays the name of the activity. The activity name can be customized, which aids in troubleshooting. SkipOnError: Specify the “Boolean” value as “True” or “False.”
True: Continue executing the workflow regardless of any errors thrown.
False: Halt the workflow if it encounters any errors.
None: If the option is left blank, the activity will, by default, behave as if “False” were chosen. Version: It indicates the version of the feature being used. OUTPUT Datatable: It provides the output of the activity as the result of the values read from the specified range in the spreadsheet in a table format. It returns the value in “Datatable” datatype. Result: It provides the ability to view the execution status of the activity. It returns values in “Boolean.” True: Indicates that the activity has been executed successfully without any errors.
False: Indicates that the activity has been unsuccessful due to an unexpected error being thrown. * Represents mandatory fields to execute the workflow.
ForEachRowSpreadsheet
This activity helps the user to iterate through and retrieve the range of row values from the specified sheet in the Workbook. Configuration Each activity requires a connection with Google Sheets authentication. Once you select the respective project name where Google Sheets has been authenticated, the activity will automatically retrieve the available connections for that project. Below are the properties available after the project has been integrated: Google: *This parameter indicates the account name associated with the integration. INPUT If row is empty: This parameter defines the action to be taken when an empty row is encountered during processing: Skip: Skips the empty row and moves to the next one.
Process: Processes the empty row as part of the workflow.
Stop: Halts the operation upon encountering an empty row. WorkbookName: * This parameter specifies the existing spreadsheet where the sheet details needs to be retrieved. It offers multiple ways to choose the spreadsheet: 1. Browse Option: When selecting the “Click on Browse” option, it will automatically list the folders and spreadsheets available for the specified account. The user must manually select the spreadsheet each time when using this option.
2. Three-Line Menu:Clicking on the “Three lines” icon will open a context menu with the following two options.
a. Reload Folder Picker:Refreshes the selected folder or spreadsheet.
b. Use Variable: Allows you to provide the “Workbook Name” as a variable in “String” format. You can either hardcode the values as a string or use a variable of the “String” datatype. Below are the values that can be provided as variable,
i. URL or ID: After creating the workbook in the specified Google account, you will receive the workbook’s URL and ID. You can use these as a reference to add a new sheet within the workbook.
ii. Spreadsheet Name: You can either hardcode the name as a string or provide a variable of the “String” datatype. Sheet Name: This parameter indicates to choose the existing spreadsheet from where the range of row values needs to be retrieved. It offers multiple ways to choose the sheet name: 1. Browse Option: When selecting the “Sheet Name” option, it will automatically list the sheet name available in the specified workbook from the dropdown. The user must manually select the spreadsheet each time when using this option.
2. Three-Line Menu:Clicking on the “Three lines” icon will open a context menu with the following two options.
a. UpdateRange: Refreshes the selected sheet name and prompts to re-select the sheet name.
b. Use Variable: Allows you to provide the “Sheet Name” as a variable in “String” format. You can either hardcode the values as a string or use a variable of the “String” datatype. Below are the values that can be provided as variable,
i. Sheet Name: You can either hardcode the name as a string or provide a variable of the “String” datatype.
ii. Select Sheet: When selecting this option, it will automatically list the sheet name available in the specified workbook from the dropdown. The user must manually select the spreadsheet each time when using this option. Read Range: It indicates to provide the range of row values that needs to be processed from the specified workbook. You can either hardcode the values as a string or use a variable of the “String” datatype. ForEach: This parameter represents each row retrieved from the list of sheets in the specified workbook. You can customize its name as needed. IncludeColumnHeaders: Indicates to include the “Column Headers” in the spreadsheet while reading the data. If left blank, the column headers will not be considered. What To Read: Indicates to read either the value from the range of cells or values with formula from the range of cells. MISC DisplayName: Displays the name of the activity. The activity name can be customized, which aids in troubleshooting. SkipOnError: Specify the “Boolean” value as “True” or “False.”
True: Continue executing the workflow regardless of any errors thrown.
False: Halt the workflow if it encounters any errors.
None: If the option is left blank, the activity will, by default, behave as if “False” were chosen. Version: It indicates the version of the feature being used. OUTPUT Result: It provides the ability to view the execution status of the activity. It returns values in “Boolean.” True: Indicates that the activity has been executed successfully without any errors.
False: Indicates that the activity has been unsuccessful due to an unexpected error being thrown. The number of rows processed: This parameter helps you to get the count of the rows processed during the execution. It returns values in “Integer” datatype. * Represents mandatory fields to execute the workflow.
ForEachSheet
This activity helps the users to iterate through and retrieve the collection of sheets in the specified workbook. PropertiesConfiguration Each activity requires a connection with Google Sheets authentication. Once you select the respective project name where Google Sheets has been authenticated, the activity will automatically retrieve the available connections for that project. Below are the properties available after the project has been integrated: Google: *This parameter indicates the account name associated with the integration. INPUT WorkbookName: *This parameter specifies the existing spreadsheet where the sheet details needs to be retrieved. It offers multiple ways to choose the spreadsheet:
1. Browse Option: When selecting the “Click on Browse” option, it will automatically list the folders and spreadsheets available for the specified account. The user must manually select the spreadsheet each time when using this option.
2. Three-Line Menu: Clicking on the “Three lines” icon will open a context menu with the following two options. 1
a. Reload Folder Picker: Refreshes the selected folder or spreadsheet.
b. Use Variable: Allows you to provide the “Workbook Name” as a variable in “String” format. You can either hardcode the values as a string or use a variable of the “String” datatype. Below are the values that can be provided as variable,
i. URL or ID: After creating the workbook in the specified Google account, you will receive the workbook’s URL and ID. You can use these as a reference to add a new sheet within the workbook.
ii. Spreadsheet Name: You can either hardcode the name as a string or provide a variable of the “String” datatype. ForEach: This parameter represents each sheet retrieved from the list of sheets in the specified workbook. You can customize its name as needed. MISC DisplayName: Displays the name of the activity. The activity name can be customized, which aids in troubleshooting. SkipOnError: Specify the “Boolean” value as “True” or “False.”
True: Continue executing the workflow regardless of any errors thrown.
False: Halt the workflow if it encounters any errors.
None: If the option is left blank, the activity will, by default, behave as if “False” were chosen. Version: It indicates the version of the feature being used. OUTPUT Result: It provides the ability to view the execution status of the activity. It returns values in “Boolean.” True: Indicates that the activity has been executed successfully without any errors.
False: Indicates that the activity has been unsuccessful due to an unexpected error being thrown. The number of sheets processed: This parameter helps you to get the count of the sheets available in the specified workbook. It returns values in “Integer” datatype. * Represents mandatory fields to execute the workflow. How to Retrieve the Name of a Sheet? - Drag and drop the activity into the workflow.
- Double-click the activity and select the workbook from which the sheets should be retrieved.
- In the ForEach property, the default name will appear as CurrentSheet.
- Use this name in a Write Log activity inside the “Do” part of the “ForEachSheet” activity to display the name of each sheet in the specified workbook.
ForEachWriteRange
This activity enables users to write data iteratively to specified ranges in each sheet of the selected Google Sheet. Ensure this activity is used within the “ForEachSheet” activity which loops through all the sheets in the file. PropertiesConfiguration Each activity requires a connection with Google Sheets authentication. Once you select the respective project name where Google Sheets has been authenticated, the activity will automatically retrieve the available connections for that project. Below are the properties available after the project has been integrated: Google: *This parameter indicates the account name associated with the integration. INPUT IncludeColumnHeaders: Indicates to include the “Column Headers” in the spreadsheet while writing the data. If left blank, the column headers will not be considered. Write Range: *It indicates to select the range or provide the range where the values need to be written in the spreadsheet. It accepts the value in “String” datatype, which can be either hardcoded or provided as a variable in the “String” datatype. Sheet Name: *This parameter specifies the name of the sheet against which the range of data where it needs to be written. Utilize the “CurrentSheet” variable from “ForEachSheet” activity to automatically iterate and extract the values. What To Read: Indicates to read either the value from the range of cells or values with formula from the range of cells. MISC DisplayName: Displays the name of the activity. The activity name can be customized, which aids in troubleshooting. SkipOnError: Specify the “Boolean” value as “True” or “False.”
True: Continue executing the workflow regardless of any errors thrown.
False: Halt the workflow if it encounters any errors.
None: If the option is left blank, the activity will, by default, behave as if “False” were chosen. Version: It indicates the version of the feature being used. OUTPUT Result: It provides the ability to view the execution status of the activity. It returns values in “Boolean.” True: Indicates that the activity has been executed successfully without any errors.
False: Indicates that the activity has been unsuccessful due to an unexpected error being thrown. WriteStatus: It provides the output of the activity as the result of the values written in the sheets. Ite returns the values in “Boolean”. True: Indicates that the activity has been executed successfully without any errors.
False: Indicates that the activity has been unsuccessful due to an unexpected error being thrown. * Represents mandatory fields to execute the workflow.
ReadCell
This activity helps the user to read and extract the content from the specified cell in the spreadsheet. PropertiesConfiguration Each activity requires a connection with Google Sheets authentication. Once you select the respective project name where Google Sheets has been authenticated, the activity will automatically retrieve the available connections for that project. Below are the properties available after the project has been integrated: Google: *This parameter indicates the account name associated with the integration. INPUT WorkbookName: *This parameter indicates to provide the existing spreadsheet from where the content needs to be read from the cell. It offers multiple ways to choose the spreadsheet: 1. Browse Option: When selecting the “Click on Browse” option, it will automatically list the folders and spreadsheets available for the specified account. The user must manually select the spreadsheet each time when using this option.
2. Three-Line Menu: Clicking on the “Three lines” icon will open a context menu with the following two options.
a. Reload Folder Picker: Refreshes the selected folder or spreadsheet to select a new folder name.
b. Use Variable: Allows you to provide the “Workbook Name” as a variable in “String” format. You can either hardcode the values as a string or use a variable of the “String” datatype. Below are the values that can be provided as variable,
i. URL or ID: After creating the workbook in the specified Google account, you will receive the workbook’s URL and ID. You can use these as a reference to read the cell from this spreadsheet.
ii. Spreadsheet Name: You can either hardcode the name as a string or provide a variable of the “String” datatype. Sheet Name: *This parameter specifies the name of the sheet from where the content needs to be read. It provides multiple options for selecting the sheet:
1. Update Range: Refreshes and updates the list of available sheet names, which will appear in a drop-down menu.
2. Use Variable: Allows you to provide the sheet name as a variable in “String” format. You can either hardcode the value as a string or use a variable of the “String” datatype. The following values can be provided as a variable:
a. Spreadsheet Name: You can either hardcode the name as a string or provide a variable of the “String” datatype. (Click here to learn how to retrieve the sheet name from the spreadsheet.)
3. Select Sheet: Allows you to manually select the sheet name from the drop-down menu, which lists the available sheets in the spreadsheet. The user must manually select the spreadsheet each time this option is used. Cell Range: *This parameter indicates to provide the cell name from the sheet. You can either hardcode the name as a string or provide a variable of the “String” datatype. MISC DisplayName: Displays the name of the activity. The activity name can be customized, which aids in troubleshooting. SkipOnError: Specify the “Boolean” value as “True” or “False.”
True: Continue executing the workflow regardless of any errors thrown.
False: Halt the workflow if it encounters any errors.
None: If the option is left blank, the activity will, by default, behave as if “False” were chosen. Version: It indicates the version of the feature being used. OUTPUT Cell Value: This parameter helps view the output of the activity as the result of the value read from the specified cell. It returns the value in “String” datatype. Result: It provides the ability to view the execution status of the activity. It returns values in “Boolean.” True: Indicates that the activity has been executed successfully without any errors.
False: Indicates that the activity has been unsuccessful due to an unexpected error being thrown. * Represents mandatory fields to execute the workflow.
ReadRange
This activity helps the user to read and extract the specified range of value from the specified spreadsheet. PropertiesConfiguration Each activity requires a connection with Google Sheets authentication. Once you select the respective project name where Google Sheets has been authenticated, the activity will automatically retrieve the available connections for that project. Below are the properties available after the project has been integrated: Google: *This parameter indicates the account name associated with the integration. INPUT WorkbookName: *This parameter indicates to provide the existing spreadsheet from where range of data from must be read and extracted. It offers multiple ways to choose the spreadsheet: 1. Browse Option: When selecting the “Click on Browse” option, it will automatically list the folders and spreadsheets available for the specified account. The user must manually select the spreadsheet each time when using this option.
2. Three-Line Menu: Clicking on the “Three lines” icon will open a context menu with the following two options.
a. Reload Folder Picker: Refreshes the selected folder or spreadsheet to select a new folder name.
b. Use Variable: Allows you to provide the “Workbook Name” as a variable in “String” format. You can either hardcode the values as a string or use a variable of the “String” datatype. Below are the values that can be provided as variable,
i. URL or ID: After creating the workbook in the specified Google account, you will receive the workbook’s URL and ID. Click here to refer how to retrieve the URL and ID of the spreadsheet.
ii. Spreadsheet Name: You can either hardcode the name as a string or provide a variable of the “String” datatype. Sheet Name: *This parameter specifies the name of the sheet against which the range of data needs to be read. It provides multiple options for selecting the sheet: 1. Update Range: Refreshes and updates the list of available sheet names, which will appear in a drop-down menu.
2. Use Variable: Allows you to provide the sheet name as a variable in “String” format. You can either hardcode the value as a string or use a variable of the “String” datatype. The following values can be provided as a variable:
a. Spreadsheet Name: You can either hardcode the name as a string or provide a variable of the “String” datatype. (Click here to learn how to retrieve the sheet name from the spreadsheet.)
3. Select Sheet: Allows you to manually select the sheet name from the drop-down menu, which lists the available sheets in the spreadsheet. The user must manually select the spreadsheet each time this option is used. Read Range: *It indicates to select the range or provide the range to read the data from the spreadsheet. It accepts the value in “String” datatype, which can be either hardcoded or provided as a variable in the “String” datatype. IncludeColumnHeaders: Indicates to include the “Column Headers” in the spreadsheet while reading the data. If left blank, the column headers will not be considered. What To Read: Indicates to read either the value from the range of cells or values with formula from the range of cells. MISC DisplayName: Displays the name of the activity. The activity name can be customized, which aids in troubleshooting. SkipOnError: Specify the “Boolean” value as “True” or “False.”
True: Continue executing the workflow regardless of any errors thrown.
False: Halt the workflow if it encounters any errors.
None: If the option is left blank, the activity will, by default, behave as if “False” were chosen. Version: It indicates the version of the feature being used. OUTPUT Datatable: It provides the output of the activity as the result of the values read from the specified range in the spreadsheet in a table format. It returns the value in “Datatable” datatype. Result: It provides the ability to view the execution status of the activity. It returns values in “Boolean.” True: Indicates that the activity has been executed successfully without any errors.
False: Indicates that the activity has been unsuccessful due to an unexpected error being thrown. * Represents mandatory fields to execute the workflow.
RenameSheet
This activity helps the user to rename the existing sheet name in the specified spreadsheet. PropertiesConfiguration Each activity requires a connection with Google Sheets authentication. Once you select the respective project name where Google Sheets has been authenticated, the activity will automatically retrieve the available connections for that project. Below are the properties available after the project has been integrated: Google: *This parameter indicates the account name associated with the integration. INPUT WorkbookName: *This parameter indicates to provide the existing spreadsheet where a new sheet name to be renamed. It offers multiple ways to choose the spreadsheet: 1. Browse Option: When selecting the “Click on Browse” option, it will automatically list the folders and spreadsheets available for the specified account. The user must manually select the spreadsheet each time when using this option.
2. Three-Line Menu: Clicking on the “Three lines” icon will open a context menu with the following two options.
a. Reload Folder Picker: Refreshes the selected folder or spreadsheet to select a new folder name.
b. Use Variable: Allows you to provide the “Workbook Name” as a variable in “String” format. You can either hardcode the values as a string or use a variable of the “String” datatype. Below are the values that can be provided as variable,
i. URL or ID: After creating the workbook in the specified Google account, you will receive the workbook’s URL and ID. You can use these as a reference to add a new sheet within the workbook.
ii. Sheet Name: You can either hardcode the name as a string or provide a variable of the “String” datatype. Sheet Name: *This parameter indicates to provide the existing name of the “Sheet”. It accepts values in “String” format, which can be either hardcoded or provided as a variable in the “String” datatype. New Name: *This parameter indicates to provide the new name for the sheet to be renamed. It accepts values in “String” format, which can either be hardcoded or provided as a variable in the “String” datatype. MISC DisplayName: Displays the name of the activity. The activity name can be customized, which aids in troubleshooting. SkipOnError: Specify the “Boolean” value as “True” or “False.”
True: Continue executing the workflow regardless of any errors thrown.
False: Halt the workflow if it encounters any errors.
None: If the option is left blank, the activity will, by default, behave as if “False” were chosen. Version: It indicates the version of the feature being used. OUTPUT Result: It provides the ability to view the execution status of the activity. It returns values in “Boolean.” True: Indicates that the activity has been executed successfully without any errors.
False: Indicates that the activity has been unsuccessful due to an unexpected error being thrown. * Represents mandatory fields to execute the workflow.
WriteCell
This activity helps the user to write the specific value in the specified cell in the spreadsheet. PropertiesConfiguration Each activity requires a connection with Google Sheets authentication. Once you select the respective project name where Google Sheets has been authenticated, the activity will automatically retrieve the available connections for that project. Below are the properties available after the project has been integrated: Google: *This parameter indicates the account name associated with the integration. INPUT WorkbookName: *This parameter indicates to provide the existing spreadsheet name where the write cell needs to be performed. It offers multiple ways to choose the spreadsheet: 1. Browse Option: When selecting the “Click on Browse” option, it will automatically list the folders and spreadsheets available for the specified account. The user must manually select the spreadsheet each time when using this option.
2. Three-Line Menu: Clicking on the “Three lines” icon will open a context menu with the following two options.
a. Reload Folder Picker: Refreshes the selected folder or spreadsheet to select a new folder name.
b. Use Variable: Allows you to provide the “Workbook Name” as a variable in “String” format. You can either hardcode the values as a string or use a variable of the “String” datatype. Below are the values that can be provided as variable,
i. URL or ID: After creating the workbook in the specified Google account, you will receive the workbook’s URL and ID. You can use these as a reference to write a value against the specified cell in the spreadsheet.
ii. Spreadsheet Name: You can either hardcode the name as a string or provide a variable of the “String” datatype. Sheet Name: *This parameter specifies the name of the sheet where the value needs to be set in specified cell value. It provides multiple options for selecting the sheet: 1. Update Range: Refreshes and updates the list of available sheet names, which will appear in a drop-down menu.
2. Use Variable: Allows you to provide the sheet name as a variable in “String” format. You can either hardcode the value as a string or use a variable of the “String” datatype. The following values can be provided as a variable:
a. Spreadsheet Name: You can either hardcode the name as a string or provide a variable of the “String” datatype. (Click here to learn how to retrieve the sheet name from the spreadsheet.)
3. Select Sheet: Allows you to manually select the sheet name from the drop-down menu, which lists the available sheets in the spreadsheet. The user must manually select the spreadsheet each time this option is used. Cell Range: *This parameter indicates to provides the cell range against where the value needs to be written. For e.g., provide the value as “A1”. It accepts values in “String” datatype, which can be either hardcoded or provided as a variable in the “String” datatype. Cell Value/ Input Value: *It indicates to provide the value that needs to be written. It accepts values in “String” datatype, which can be either hardcoded or provided as a variable in the “String” datatype. MISC DisplayName: Displays the name of the activity. The activity name can be customized, which aids in troubleshooting. SkipOnError: Specify the “Boolean” value as “True” or “False.”
True: Continue executing the workflow regardless of any errors thrown.
False: Halt the workflow if it encounters any errors.
None: If the option is left blank, the activity will, by default, behave as if “False” were chosen. Version: It indicates the version of the feature being used. OUTPUT Result: It provides the ability to view the execution status of the activity. It returns values in “Boolean.” True: Indicates that the activity has been executed successfully without any errors.
False: Indicates that the activity has been unsuccessful due to an unexpected error being thrown. * Represents mandatory fields to execute the workflow.
WriteColumn
This activity allows the user to write the entire set of column values using a DataColumn variable into a specified cell range in a spreadsheet. PropertiesConfiguration Each activity requires a connection with Google Sheets authentication. Once you select the respective project name where Google Sheets has been authenticated, the activity will automatically retrieve the available connections for that project. Below are the properties available after the project has been integrated: Google: *This parameter indicates the account name associated with the integration. INPUT WorkbookName– *This parameter indicates to provide the existing spreadsheet. It offers multiple ways to choose the spreadsheet: 1. Browse Option: When selecting the “Click on Browse” option, it will automatically list the folders and spreadsheets available for the specified account. The user must manually select the spreadsheet each time when using this option.
2. Three-Line Menu: Clicking on the “Three lines” icon will open a context menu with the following two options.
a. Reload Folder Picker: Refreshes the selected folder or spreadsheet to select a new folder name.
b. Use Variable: Allows you to provide the “Workbook Name” as a variable in “String” format. You can either hardcode the values as a string or use a variable of the “String” datatype. Below are the values that can be provided as variable,
i. URL or ID: After creating the workbook in the specified Google account, you will receive the workbook’s URL and ID. Click here to refer how to retrieve the URL and ID of the spreadsheet.
ii. Spreadsheet Name: You can either hardcode the name as a string or provide a variable of the “String” datatype. Sheet Name: *This parameter specifies the name of the sheet where the data column needs to be inserted. It provides multiple options for selecting the sheet: 1. Update Range: Refreshes and updates the list of available sheet names, which will appear in a drop-down menu.
2. Use Variable: Allows you to provide the sheet name as a variable in “String” format. You can either hardcode the value as a string or use a variable of the “String” datatype. The following values can be provided as a variable:
a. Spreadsheet Name: You can either hardcode the name as a string or provide a variable of the “String” datatype. (Click here to learn how to retrieve the sheet name from the spreadsheet.)
3. Select Sheet: Allows you to manually select the sheet name from the drop-down menu, which lists the available sheets in the spreadsheet. The user must manually select the spreadsheet each time this option is used. Range: *It indicates to provide the cell range where the data column needs to be inserted. It accepts values in “String” datatype, which can be either hardcoded or provided as a variable in the “String” datatype. How to Write/ WriteType: If the specified cell range in the provided spreadsheet already contains data, the activity offers the following options: AppendRight: The data will be added after the last column that contains a value, extending to the right.
Overwrite: The data in the specified cell range will be replaced with the new values. What to Write / WriteType: This parameter allows you to choose the type of data to be written. By default, “DataRow” is selected. Data Row to Write / DataColumn: *This parameter specifies the “DataColumn” variable that needs to be written in the specified range. It accepts values of the “DataColumn” datatype. You can assign the data column from the datatable variable as follows, “Datatable.Columns(0)”. MISC DisplayName: Displays the name of the activity. The activity name can be customized, which aids in troubleshooting. SkipOnError: Specify the “Boolean” value as “True” or “False.”
True: Continue executing the workflow regardless of any errors thrown.
False: Halt the workflow if it encounters any errors.
None: If the option is left blank, the activity will, by default, behave as if “False” were chosen. Version: It indicates the version of the feature being used. OUTPUT Result: It provides the ability to view the execution status of the activity. It returns values in “Boolean.” True: Indicates that the activity has been executed successfully without any errors.
False: Indicates that the activity has been unsuccessful due to an unexpected error being thrown. * Represents mandatory fields to execute the workflow.
WriteRange
This activity allows the user to write a specified range of data, in a datatable format, into the specified spreadsheet. PropertiesConfiguration Each activity requires a connection with Google Sheets authentication. Once you select the respective project name where Google Sheets has been authenticated, the activity will automatically retrieve the available connections for that project. Below are the properties available after the project has been integrated: Google: *This parameter indicates the account name associated with the integration. INPUT WorkbookName: *This parameter indicates to provide the existing spreadsheet. It offers multiple ways to choose the spreadsheet: 1. Browse Option: When selecting the “Click on Browse” option, it will automatically list the folders and spreadsheets available for the specified account. The user must manually select the spreadsheet each time when using this option.
2. Three-Line Menu: Clicking on the “Three lines” icon will open a context menu with the following two options.
a. Reload Folder Picker: Refreshes the selected folder or spreadsheet to select a new folder name.
b. Use Variable: Allows you to provide the “Workbook Name” as a variable in “String” format. You can either hardcode the values as a string or use a variable of the “String” datatype. Below are the values that can be provided as variable,
i. URL or ID: After creating the workbook in the specified Google account, you will receive the workbook’s URL and ID. Click here to refer how to retrieve the URL and ID of the spreadsheet.
ii. Spreadsheet Name: You can either hardcode the name as a string or provide a variable of the “String” datatype. Sheet Name: *This parameter specifies the name of the sheet where the range of value needs to be written. It provides multiple options for selecting the sheet: 1. Update Range: Refreshes and updates the list of available sheet names, which will appear in a drop-down menu.
2. Use Variable: Allows you to provide the sheet name as a variable in “String” format. You can either hardcode the value as a string or use a variable of the “String” datatype. The following values can be provided as a variable:
a. Spreadsheet Name: You can either hardcode the name as a string or provide a variable of the “String” datatype. (Click here to learn how to retrieve the sheet name from the spreadsheet.)
3. Select Sheet: Allows you to manually select the sheet name from the drop-down menu, which lists the available sheets in the spreadsheet. The user must manually select the spreadsheet each time this option is used. Range: *It indicates to provide the cell range where the input datatable value needs to be written. It accepts values in “String” format, which can be either hardcoded or provided as a variable in the “String” datatype. Datatable: *It indicates to provide the input datatable value needs to be written. It accepts values in “Datatable” datatype. If Spreadsheet Already Exists / WriteCellType: If the specified cell range in the provided spreadsheet already contains data, the activity offers the following options: Append: The data will be written after the last cell that contains a value.
Overwrite: The data in the specified cell range will be overwritten. IncludeColumnHeaders – Indicates to include the “Column Headers” in the spreadsheet while reading the data. If left blank, the column headers will not be considered. MISC DisplayName: Displays the name of the activity. The activity name can be customized, which aids in troubleshooting. SkipOnError: Specify the “Boolean” value as “True” or “False.”
True: Continue executing the workflow regardless of any errors thrown.
False: Halt the workflow if it encounters any errors.
None: If the option is left blank, the activity will, by default, behave as if “False” were chosen. Version: It indicates the version of the feature being used. OUTPUT Result: It provides the ability to view the execution status of the activity. It returns values in “Boolean.” True: Indicates that the activity has been executed successfully without any errors.
False: Indicates that the activity has been unsuccessful due to an unexpected error being thrown. * Represents mandatory fields to execute the workflow.
WriteRow
This activity helps the user to write the value as array of row or data row in the specified row in the spreadsheet. PropertiesConfiguration Each activity requires a connection with Google Sheets authentication. Once you select the respective project name where Google Sheets has been authenticated, the activity will automatically retrieve the available connections for that project. Below are the properties available after the project has been integrated: Google: *This parameter indicates the account name associated with the integration. INPUT WorkbookName: *This parameter indicates to provide the existing spreadsheet. It offers multiple ways to choose the spreadsheet: 1. Browse Option: When selecting the “Click on Browse” option, it will automatically list the folders and spreadsheets available for the specified account. The user must manually select the spreadsheet each time when using this option.
2. Three-Line Menu: Clicking on the “Three lines” icon will open a context menu with the following two options.
a. Reload Folder Picker: Refreshes the selected folder or spreadsheet to select a new folder name.
b. Use Variable: Allows you to provide the “Workbook Name” as a variable in “String” format. You can either hardcode the values as a string or use a variable of the “String” datatype. Below are the values that can be provided as variable,
i. URL or ID: After creating the workbook in the specified Google account, you will receive the workbook’s URL and ID. Click here to refer how to retrieve the URL and ID of the spreadsheet.
ii. Spreadsheet Name: You can either hardcode the name as a string or provide a variable of the “String” datatype. Sheet Name: *This parameter specifies the name of the sheet where the data row needs to be inserted. It provides multiple options for selecting the sheet: 1. Update Range: Refreshes and updates the list of available sheet names, which will appear in a drop-down menu.
2. Use Variable: Allows you to provide the sheet name as a variable in “String” format. You can either hardcode the value as a string or use a variable of the “String” datatype. The following values can be provided as a variable:
a. Spreadsheet Name: You can either hardcode the name as a string or provide a variable of the “String” datatype. (Click here to learn how to retrieve the sheet name from the spreadsheet.)
3. Select Sheet: Allows you to manually select the sheet name from the drop-down menu, which lists the available sheets in the spreadsheet. The user must manually select the spreadsheet each time this option is used. Range: *It indicates to provide the cell range where the datarow needs to be inserted. It accepts values in “String” datatype, which can be either hardcoded or provided as a variable in the “String” datatype. How to Write/ WriteType: If the specified cell range in the provided spreadsheet already contains data, the activity offers the following options: Append: The data will be written after the last cell that contains a value.
Overwrite: The data in the specified cell range will be overwritten. What to Write / WriteType: This parameter allows you to choose the type of data to be written. By default, “DataRow” is selected. Data Row to Write / DataRow: This parameter specifies the “DataRow” variable that needs to be written in the specified range. It accepts values of the “DataRow” datatype. You cannot manually assign a value to the DataRow variable; instead, you can iterate and assign the DataRow value from the DataTable variable. IncludeColumnHeaders: Indicates whether to include the “Column Headers” in the spreadsheet when writing data. If left blank, the column headers will not be considered. Position: This parameter specifies the index position where the DataRow will be written within the specified spreadsheet. The index starts at “0”. By default, it is set to “0”. If no value is provided, the new DataRow will be inserted at position “0” if the write type is set to “Overwrite.” If the write type is set to “Append,” the DataRow will be written at the end of the spreadsheet. To write data continuously in the specified spreadsheet, you can use the “Append” option, which will add the value after the last filled row. MISC DisplayName: Displays the name of the activity. The activity name can be customized, which aids in troubleshooting. SkipOnError: Specify the “Boolean” value as “True” or “False.”
True: Continue executing the workflow regardless of any errors thrown.
False: Halt the workflow if it encounters any errors.
None: If the option is left blank, the activity will, by default, behave as if “False” were chosen. Version: It indicates the version of the feature being used. OUTPUT Result: It provides the ability to view the execution status of the activity. It returns values in “Boolean.” True: Indicates that the activity has been executed successfully without any errors.
False: Indicates that the activity has been unsuccessful due to an unexpected error being thrown. * Represents mandatory fields to execute the workflow.
GoogleDrive
Robility® provides seamless integration with Google Drive, allowing users to automate a variety of document management tasks. With this feature, bots can interact with Google Drive to handle tasks like file uploads, downloads, organizing folders. It allows the robots to store any data and access the files easily and securely. Key Features of Google Drive 1. File Operations: The API allows automated file management tasks, including uploading, downloading, updating, and deleting files within Google Drive.
2. Access Control: Automates the sharing of files and folders with specific users or groups by setting permissions (e.g., view, edit, or comment).
3. Real-Time Synchronization: Automatically syncs data between Google Drive and other platforms or local storage, ensuring up-to-date access to files.
4. File Search and Metadata: Provides automated search functionality to locate files based on name, type, or metadata, helping users retrieve documents faster.
5. Version Management: Bots can track and manage document versions, ensuring the latest versions are accessible and older versions are archived. Use cases1. Automated File Upload and Organization: Automatically upload documents to specific folders based on predefined rules.
2. Scheduled Backups: Bots can regularly back up critical documents from local storage to Google Drive.
3. Folder Management: Automates the creation, organization, and deletion of folders, keeping the file structure organized.
4. Bots can download the specific file from Google Drive to extract and process data from the file, updating systems (e.g., CRM, ERP) and generating reports. Pre – requisitesBuilding an automation workflow with Google Drive requires a connection in the “App Integration” menu in Robility Manager. There are two types of authentication that brings Google Drive into Robility, - OAuth 2.0 Authorization code – Enables you to provide the Gmail account address and password that has been authenticated with defined scopes.
- OAuth 2.0 Client credentials – Enables you to provide your own Client ID, Client Secret and Scopes manually.
Once the connection has been enabled, you are all set to build your automation workflow. ScopesScopes define what kind of data it accesses, and level of access needs to be provided. For detailed information, please check out the Google documentation. Below are the scopes that are mandatory to automate with Google Drive API. Refresh TokenGoogle has refresh token limitation for every individual Oauth 2.0 authorization that expires every one hour. If the token has been expired, Robility’s App Integration service will refresh the authentication without any warning or disruptions during your automation execution. Even though Robility refreshes the token, at some certain circumstances, it requires re-connection with Google Drive. 1. When you have revoked your access.
2. If the Google Drive connection has not been utilized for six months after configuration.
3. If you have changed your Google account password and if the scopes for user have been changed.
4. If the user account has exceeded a maximum number of granted (100 live) refresh tokens. Note: The limit is currently set to 100 refresh tokens per Google account per OAuth 2.0 client ID. This number can be subject to change. For the latest information, always check the Google documentation
CopyFile
This activity allows users to copy a file from one source folder to another destination folder within the connected Google account. PropertiesConfiguration Each activity requires a connection with Google Drive API. Once you select the respective project name where Google Drive has been integrated, the activity will automatically retrieve the available connections for that project. Below are the properties available after the project has been integrated: Google Drive: This parameter indicates the account name associated with the integration. INPUT SourceFile: This parameter indicates the user to provide the source path of the file from that needs to be copied. It offers multiple ways to choose the folder: 1. Browse Option: When selecting the “Click on Browse” option, it will automatically list the folders and files available for the specified account. The user must manually select the spreadsheet each time when using this option.
2. Three-Line Menu: Clicking on the “Three lines” icon will open a context menu with the following two options.
a. Reload Folder Picker: Refreshes the selected folder to select another folder if required.
b. Use Variable: Allows you to provide the “Folder Name” as a variable in “String” format. You can either hardcode the values as a string or use a variable of the “String” datatype. Below are the values that can be provided as variable,
i. URL or ID: After creating the folder in the specified Google account, you will receive the Folder’s URL and ID. You can use these as a reference to add a new folder. Destination Folder: This parameter indicates the user to provide the destination folder to where the file needs to be pasted. It offers multiple ways to choose the folder: 1. Browse Option: When selecting the “Click on Browse” option, it will automatically list the folders and files available for the specified account. The user must manually select the spreadsheet each time when using this option.
2. Three-Line Menu: Clicking on the “Three lines” icon will open a context menu with the following two options.
a. Reload Folder Picker: Refreshes the selected folder to select another folder if required.
b. Use Variable: Allows you to provide the “Folder Name” as a variable in “String” format. You can either hardcode the values as a string or use a variable of the “String” datatype. Below are the values that can be provided as variable,
i. URL or ID: After creating the folder in the specified Google account, you will receive the Folder’s URL and ID. You can use these as a reference to add a new folder. OverwriteOption: This option allows users to overwrite an existing file or folder in the specified folder within the connected Google account. Use this option if the file or folder at the provided path already exists in the destination folder. MISC DisplayName: Displays the name of the activity. The activity name can be customized, which aids in troubleshooting. SkipOnError: Specify the “Boolean” value as “True” or “False.” True: Continue executing the workflow regardless of any errors thrown.
False: Halt the workflow if it encounters any errors.
None: If the option is left blank, the activity will, by default, behave as if “False” were chosen. Version: It indicates the version of the feature being used. OUTPUT NewFileID: This parameter provides the output of the activity as the unique identifier of the new file copied to the destination folder. It returns values in the String datatype. NewFileURL: This parameter provides the output of the activity as the URL of the new file copied to the destination folder. It returns values in the String datatype. Result: It provides the ability to view the execution status of the activity. It returns values in “Boolean.” True: Indicates that the activity has been executed successfully without any errors.
False: Indicates that the activity has been unsuccessful due to an unexpected error being thrown.
CreateDocument
This activity helps the user to create a new (GoogleDocs) document within the connected google account. PropertiesConfiguration Each activity requires a connection with Google Drive API. Once you select the respective project name where Google Drive has been integrated, the activity will automatically retrieve the available connections for that project. Below are the properties available after the project has been integrated: Google Drive: This parameter indicates the account name associated with the integration. INPUT DocumentName: This parameter indicates to provide the name of the document to be created. It accepts values in “String” format, which can be either hardcoded or provided as a variable in the “String” datatype. DestinationFolder: This parameter specifies to provide the existing Folder against where the new document is to be created. It offers multiple ways to choose the folder: 1. Browse Option: When selecting the “Click on Browse” option, it will automatically list the folders available for the specified account. The user must manually select the spreadsheet each time when using this option.
2. Three-Line Menu: Clicking on the “Three lines” icon will open a context menu with the following two options.
a. Reload Folder Picker: Refreshes the selected folder to select another folder if required.
b. Use Variable: Allows you to provide the “Folder Name” as a variable in “String” format. You can either hardcode the values as a string or use a variable of the “String” datatype. Below are the values that can be provided as variable,
i. URL or ID: After creating the folder in the specified Google account, you will receive the Folder’s URL and ID. You can use these as a reference to add a new folder.
ii. Folder Name: You can either hardcode the name as a string or provide a variable of the “String” datatype. MISC DisplayName: Displays the name of the activity. The activity name can be customized, which aids in troubleshooting. SkipOnError: Specify the “Boolean” value as “True” or “False.” True: Continue executing the workflow regardless of any errors thrown.
False: Halt the workflow if it encounters any errors.
None: If the option is left blank, the activity will, by default, behave as if “False” were chosen. Version: It indicates the version of the feature being used. OUTPUT Document ID: It helps to view the unique ID of the newly created document as the output of the activity. It returns values in “String” datatype. DocumentURL: This parameter helps you to view the created Document’s URL as output of the activity. It returns values in “String” datatype. Result: It provides the ability to view the execution status of the activity. It returns values in “Boolean.” True: Indicates that the activity has been executed successfully without any errors.
False: Indicates that the activity has been unsuccessful due to an unexpected error being thrown.
CreateFolder
This activity helps the user to create a new folder in the connected google drive account. PropertiesConfiguration Each activity requires a connection with Google Drive API. Once you select the respective project name where Google Drive has been integrated, the activity will automatically retrieve the available connections for that project. Below are the properties available after the project has been integrated: Google Drive: This parameter indicates the account name associated with the integration. INPUT FolderName: This parameter indicates to provide the name of the folder to be created. It accepts values in “String” format, which can be either hardcoded or provided as a variable in the “String” datatype. ParentDirectory: This parameter specifies the existing Folder against where the new a folder is to be created. It offers multiple ways to choose the folder: 1. Browse Option: When selecting the “Click on Browse” option, it will automatically list the folders available for the specified account. The user must manually select the spreadsheet each time when using this option.
2. Three-Line Menu: Clicking on the “Three lines” icon will open a context menu with the following two options.
a. Reload Folder Picker: Refreshes the selected folder to select another folder if required.
b. Use Variable: Allows you to provide the “Folder Name” as a variable in “String” format. You can either hardcode the values as a string or use a variable of the “String” datatype. Below are the values that can be provided as variable,
i. URL or ID: After creating the folder in the specified Google account, you will receive the Folder’s URL and ID. You can use these as a reference to add a new folder.
ii. Folder Name: You can either hardcode the name as a string or provide a variable of the “String” datatype. MISC DisplayName: Displays the name of the activity. The activity name can be customized, which aids in troubleshooting. SkipOnError: Specify the “Boolean” value as “True” or “False.” True: Continue executing the workflow regardless of any errors thrown.
False: Halt the workflow if it encounters any errors.
None: If the option is left blank, the activity will, by default, behave as if “False” were chosen. Version: It indicates the version of the feature being used. OUTPUT FolderID: This parameter helps you to view the created Folder’s ID as output of the activity. It returns values in “String” datatype. FolderURL: It provides the output of the activity as the created Folder’s URL. It returns values in “String” datatype. Result: It provides the ability to view the execution status of the activity. It returns values in “Boolean.” True: Indicates that the activity has been executed successfully without any errors.
False: Indicates that the activity has been unsuccessful due to an unexpected error being thrown.
DeleteFileorFolder
This activity helps the user to delete a specific file or folder in the connected google account. PropertiesConfiguration Each activity requires a connection with Google Drive API. Once you select the respective project name where Google Drive has been integrated, the activity will automatically retrieve the available connections for that project. Below are the properties available after the project has been integrated: Google Drive: This parameter indicates the account name associated with the integration. INPUT FileorFolder: *This parameter indicates to provide the existing File/Folder that needs to be deleted. It offers multiple ways to choose the folder: 1. Browse Option: When selecting the “Click on Browse” option, it will automatically list the folders available for the specified account. The user must manually select the spreadsheet each time when using this option.
2. Three-Line Menu: Clicking on the “Three lines” icon will open a context menu with the following two options.
a. Reload Folder Picker: Refreshes the selected folder to select another folder if required.
b. Use Variable: Allows you to provide the “Folder Name” as a variable in “String” format. You can either hardcode the values as a string or use a variable of the “String” datatype. Below are the values that can be provided as variable,
i. URL or ID: After creating the folder in the specified Google account, you will receive the Folder’s URL and ID. You can use these as a reference to add a new folder. Force Delete: It indicates to delete the file or folder permanently without moving it to “Trash” folder and cannot be recovered. Normally, files deleted from Google Drive are moved to the trash, where they can be restored later. But this option will let you to delete the file/folder permanently. MISC DisplayName: Displays the name of the activity. The activity name can be customized, which aids in troubleshooting. SkipOnError: Specify the “Boolean” value as “True” or “False.” True: Continue executing the workflow regardless of any errors thrown.
False: Halt the workflow if it encounters any errors.
None: If the option is left blank, the activity will, by default, behave as if “False” were chosen. Version: It indicates the version of the feature being used. OUTPUT Result: It provides the ability to view the execution status of the activity. It returns values in “Boolean.” True: Indicates that the activity has been executed successfully without any errors.
False: Indicates that the activity has been unsuccessful due to an unexpected error being thrown. * Represents mandatory fields to execute the workflow.
DownloadFile
This activity helps the user to download the specific file from the connected google drive account folder. PropertiesConfiguration Each activity requires a connection with Google Drive API. Once you select the respective project name where Google Drive has been integrated, the activity will automatically retrieve the available connections for that project. Below are the properties available after the project has been integrated: Google Drive: This parameter indicates the account name associated with the integration. INPUT SelectFile: *This parameter allows you to specify the file that needs to be downloaded. It offers multiple methods to select the file: 1. Browse Option: When selecting the “Click on Browse” option, it will automatically list the folders and files available for the specified account. The user must manually select the file each time when using this option.
2. Three-Line Menu: Clicking on the “Three lines” icon will open a context menu with the following two options.
a. Reload Folder Picker: Refreshes the selected folder to select another file if required.
b. Use Variable: Allows you to provide the “File Name” as a variable in “String” format. You can either hardcode the values as a string or use a variable of the “String” datatype. Below are the values that can be provided as variable,
i. URL or ID: After uploading the file to the specified Google account, you will receive the File’s URL and ID. You can use these as a reference to download them. DownloadLocation: *This parameter specifies to provide the path where the file will be downloaded on the local system. It accepts values in the String format, which can either be hardcoded or passed as a variable of the String datatype. FileName: It indicates to provide a custom name for the file to be downloaded. It accepts values in the String format, which can either be hardcoded or passed as a variable of the String datatype. MISC DisplayName: Displays the name of the activity. The activity name can be customized, which aids in troubleshooting. SkipOnError: Specify the “Boolean” value as “True” or “False.” True: Continue executing the workflow regardless of any errors thrown.
False: Halt the workflow if it encounters any errors.
None: If the option is left blank, the activity will, by default, behave as if “False” were chosen. Version: It indicates the version of the feature being used. OUTPUT LocalFilePath: This parameter allows you to view the output of the activity as the file path of the downloaded file on the local system. It returns values in the String datatype. Result: It provides the ability to view the execution status of the activity. It returns values in “Boolean.” True: Indicates that the activity has been executed successfully without any errors.
False: Indicates that the activity has been unsuccessful due to an unexpected error being thrown. * Represents mandatory fields to execute the workflow.
Find Files or Folder
This activity allows users to search for and retrieve the File ID of a specific file or folder within a designated Google Drive account. PropertiesConfiguration Each activity requires a connection with Google Drive API. Once you select the respective project name where Google Drive has been integrated, the activity will automatically retrieve the available connections for that project. Below are the properties available after the project has been integrated: Google Drive: This parameter indicates the account name associated with the integration. INPUT FolderID: *This parameter indicates to provide the Folder ID against which the details need to be retrieved. It offers multiple ways to choose the folder: 1. Browse Option: When selecting the “Click on Browse” option, it will automatically list the folders available for the specified account. The user must manually select the spreadsheet each time when using this option.
2. Three-Line Menu: Clicking on the “Three lines” icon will open a context menu with the following two options.
a. Reload Folder Picker: Refreshes the selected folder to select another folder if required.
b. Use Variable: Allows you to provide the “Folder Name” as a variable in “String” format. You can either hardcode the values as a string or use a variable of the “String” datatype. Below are the values that can be provided as variable,
i. URL or ID: After creating the folder in the specified Google account, you will receive the Folder’s URL and ID. You can use these as a reference to add a new folder. MaxResult: Specifies to provide the size of files or folders to be retrieved from the provided input. It accepts values in “String” datatype. What to Return: Select an option from the dropdown to specify whether to retrieve files or folders from the designated Google account. MISC DisplayName: Displays the name of the activity. The activity name can be customized, which aids in troubleshooting. SkipOnError: Specify the “Boolean” value as “True” or “False.” True: Continue executing the workflow regardless of any errors thrown.
False: Halt the workflow if it encounters any errors.
None: If the option is left blank, the activity will, by default, behave as if “False” were chosen. Version: It indicates the version of the feature being used. OUTPUT File or Folder ID: It helps you to return the output of the activity as the file or folder ID retrieved from the specified folder and it returns in “String” datatype. File or Folder List: It helps to view the output of the activity as the list of files or folders ID retrieved from the specified folder. Result: It provides the ability to view the execution status of the activity. It returns values in “Boolean.”
True: Indicates that the activity has been executed successfully without any errors.
False: Indicates that the activity has been unsuccessful due to an unexpected error being thrown. * Represents mandatory fields to execute the workflow.
GetFileorFolder
This activity helps the user to retrieve the information of the specified file or folders in the connected google account. PropertiesConfiguration Each activity requires a connection with Google Drive API. Once you select the respective project name where Google Drive has been integrated, the activity will automatically retrieve the available connections for that project. Below are the properties available after the project has been integrated: Google Drive: This parameter indicates the account name associated with the integration. INPUT FileorFolder: *This parameter indicates to provide the File/ Folder against which the details need to be retrieved. It offers multiple ways to choose the folder: 1. Browse Option: When selecting the “Click on Browse” option, it will automatically list the folders available for the specified account. The user must manually select the spreadsheet each time when using this option.
2. Three-Line Menu: Clicking on the “Three lines” icon will open a context menu with the following two options.
a. Reload Folder Picker: Refreshes the selected folder to select another folder if required.
b. Use Variable: Allows you to provide the “Folder Name” as a variable in “String” format. You can either hardcode the values as a string or use a variable of the “String” datatype. Below are the values that can be provided as variable,
i. URL or ID: After creating the folder in the specified Google account, you will receive the Folder’s URL and ID. You can use these as a reference to add a new folder. MISC DisplayName: Displays the name of the activity. The activity name can be customized, which aids in troubleshooting. SkipOnError: Specify the “Boolean” value as “True” or “False.” True: Continue executing the workflow regardless of any errors thrown.
False: Halt the workflow if it encounters any errors.
None: If the option is left blank, the activity will, by default, behave as if “False” were chosen. Version: It indicates the version of the feature being used. OUTPUT DriveFileorFolder: This parameter provides the output of the activity as the details retrieved from the specified file or folder. Below is the information that can be retrieved: CreateDate: Displays the creation date of the file or folder.
ID: Provides the unique identifier of the file or folder.
Modified Date: Shows the latest modified date of the file or folder.
Name: Displays the name of the file or folder.
Owner: Indicates the account holder’s name for the file or folder in Google Drive.
Size: Provides the total size of the file or folder.
Type: Specifies the type of file and indicates “Folder” if a folder is selected. Result: It provides the ability to view the execution status of the activity. It returns values in “Boolean.” True: Indicates that the activity has been executed successfully without any errors.
False: Indicates that the activity has been unsuccessful due to an unexpected error being thrown. * Represents mandatory fields to execute the workflow. How to view the details of the file/ folder? The parameter DriveFileorFolder is of the datatype
List<Robility.GoogleDrive.DriveFileorFolder>. To view the list of details, follow these steps using the ForEach activity: 1. Drag and Drop the ForEach activity into your workflow.
2. In the Properties panel, set the Type Argument to Robility.GoogleDrive.UploadedFileInfo by selecting it from the Browse for types option.
3. Add a Write Log activity inside the ForEach sequence to print the output of the activity.
4. In the Write Log activity, set the input string as “Item.ID” to print the ID of the uploaded file.
5. Set the Log Level to Info.
6. You can follow the same steps to view additional details:
a. Item.Name – To view the name of the uploaded file.
b. Item.URL – To view the URL of the uploaded file.
GetFileorFolderList
This activity helps the user to retrieve the list of files and folders from the specified Folder ID in the connected google account. PropertiesConfiguration Each activity requires a connection with Google Drive API. Once you select the respective project name where Google Drive has been integrated, the activity will automatically retrieve the available connections for that project. Below are the properties available after the project has been integrated: Google Drive: This parameter indicates the account name associated with the integration. INPUT FolderID: *This parameter indicates to provide the Folder ID against which the details need to be retrieved. It offers multiple ways to choose the folder: 1. Browse Option: When selecting the “Click on Browse” option, it will automatically list the folders available for the specified account. The user must manually select the spreadsheet each time when using this option.
2. Three-Line Menu: Clicking on the “Three lines” icon will open a context menu with the following two options.
a. Reload Folder Picker: Refreshes the selected folder to select another folder if required.
b. Use Variable: Allows you to provide the “Folder Name” as a variable in “String” format. You can either hardcode the values as a string or use a variable of the “String” datatype. Below are the values that can be provided as variable,
i. URL or ID: After creating the folder in the specified Google account, you will receive the Folder’s URL and ID. You can use these as a reference to add a new folder. MISC DisplayName: Displays the name of the activity. The activity name can be customized, which aids in troubleshooting. SkipOnError: Specify the “Boolean” value as “True” or “False.” True: Continue executing the workflow regardless of any errors thrown.
False: Halt the workflow if it encounters any errors.
None: If the option is left blank, the activity will, by default, behave as if “False” were chosen. Version: It indicates the version of the feature being used. OUTPUT DriveFolderList: It helps you to view the output of the activity as the details retrieved from the specified folder. Below is the information that can be retrieved: CreateDate: Displays the creation date of the file or folder.
ID: Provides the unique identifier of the file or folder.
Modified Date: Shows the latest modified date of the file or folder.
Name: Displays the name of the file or folder.
Size: Provides the total size of the file or folder.
IsFolder: Specifies whether the indicates item is File or Folder in Boolean values. Result: It provides the ability to view the execution status of the activity. It returns values in “Boolean.” True: Indicates that the activity has been executed successfully without any errors.
False: Indicates that the activity has been unsuccessful due to an unexpected error being thrown. * Represents mandatory fields to execute the workflow. How to view the details of the file/folder? The parameter Drive File List is of the datatype
“List<Robility.GoogleDrive.FileorFolderList>”. To view the list of details, follow these steps using the ForEach activity: 1. Drag and Drop the ForEach activity into your workflow.
2. In the Properties panel, set the “Type Argument” to “Robility.GoogleDrive.FileorFolderList” by selecting it from the “Browse for types” option.
3. Add a Write Log activity inside the ForEach sequence to print the output of the activity.
4. In the Write Log activity, set the input string as “Item.ID” to print the ID of the uploaded file.
5. Set the Log Level to Info.
6. You can follow the same steps to view additional details:
a. Item.Name – To view the name of the uploaded file.
b. Item.URL – To view the URL of the uploaded file.
MoveFile
This activity helps the user to move a file or folder form one destination to another destination folder within the connected google account. PropertiesConfiguration Each activity requires a connection with Google Drive API. Once you select the respective project name where Google Drive has been integrated, the activity will automatically retrieve the available connections for that project. Below are the properties available after the project has been integrated: Google Drive: This parameter indicates the account name associated with the integration. INPUT SourceFile: *This parameter indicates the user to provide the source path of the file you want to move. It offers multiple ways to choose the folder: 1. Browse Option: When selecting the “Click on Browse” option, it will automatically list the folders and files available for the specified account. The user must manually select the spreadsheet each time when using this option.
2. Three-Line Menu: Clicking on the “Three lines” icon will open a context menu with the following two options.
a. Reload Folder Picker: Refreshes the selected folder to select another folder if required.
b. Use Variable: Allows you to provide the “Folder Name” as a variable in “String” format. You can either hardcode the values as a string or use a variable of the “String” datatype. Below are the values that can be provided as variable,
i. URL or ID: After creating the folder in the specified Google account, you will receive the Folder’s URL and ID. You can use these as a reference to add a new folder. Destination Folder: *This parameter indicates the user to provide the destination folder to where the file needs to be moved. It offers multiple ways to choose the folder: 1. Browse Option: When selecting the “Click on Browse” option, it will automatically list the folders and files available for the specified account. The user must manually select the spreadsheet each time when using this option.
2. Three-Line Menu: Clicking on the “Three lines” icon will open a context menu with the following two options.
a. Reload Folder Picker: Refreshes the selected folder to select another folder if required.
b. Use Variable: Allows you to provide the “Folder Name” as a variable in “String” format. You can either hardcode the values as a string or use a variable of the “String” datatype. Below are the values that can be provided as variable,
i. URL or ID: After creating the folder in the specified Google account, you will receive the Folder’s URL and ID. You can use these as a reference to add a new folder. MISC DisplayName: Displays the name of the activity. The activity name can be customized, which aids in troubleshooting. SkipOnError: Specify the “Boolean” value as “True” or “False.” True: Continue executing the workflow regardless of any errors thrown.
False: Halt the workflow if it encounters any errors.
None: If the option is left blank, the activity will, by default, behave as if “False” were chosen. Version: It indicates the version of the feature being used. OUTPUT NewFileID: This parameter provides the output of the activity as the unique identifier of the new file moved to the destination folder. It returns values in the String datatype. NewFileURL: This parameter provides the output of the activity as the URL of the new file moved to the destination folder. It returns values in the String datatype. Result: It provides the ability to view the execution status of the activity. It returns values in “Boolean.” True: Indicates that the activity has been executed successfully without any errors.
False: Indicates that the activity has been unsuccessful due to an unexpected error being thrown. * Represents mandatory fields to execute the workflow.
UploadFile
This activity allows users to upload any file from their local system to a specified folder in the connected Google account. LimitationsAll types of files can be uploaded, except for .exe files, which are restricted. PropertiesConfiguration Each activity requires a connection with Google Drive API. Once you select the respective project name where Google Drive has been integrated, the activity will automatically retrieve the available connections for that project. Below are the properties available after the project has been integrated: Google Drive: This parameter indicates the account name associated with the integration. INPUT FilePath: *This parameter allows users to select the file path to be uploaded to the specified folder. It provides multiple options for selecting the file: 1. BrowseFile: Enables users to browse and select files from the local system by opening the file explorer. Each file must be manually selected each time by the user.
2. BrowseFolder: Enables users to browse and select folders from the local system by opening the file explorer. Each folder must be manually selected each time by the user.
3. Clear: Allows users to clear all the selected file/folder values.
4. Use Variable: Allows users to specify the “File/Folder Path” using a variable in “String” format. The values can be hardcoded as a string or passed as a variable of the “String” datatype. DestinationFolder: *This parameter specifies to provide the existing Folder available in Google drive against where the file needs to be uploaded. It offers multiple ways to choose the folder: 1. Browse Option: When selecting the “Click on Browse” option, it will automatically list the folders available for the specified account. The user must manually select the spreadsheet each time when using this option.
2. Three-Line Menu: Clicking on the “Three lines” icon will open a context menu with the following two options.
a. Reload Folder Picker: Refreshes the selected folder to select another folder if required.
b. Use Variable: Allows you to provide the “Folder Name” as a variable in “String” format. You can either hardcode the values as a string or use a variable of the “String” datatype. Below are the values that can be provided as variable,
i. URL or ID: After creating the folder in the specified Google account, you will receive the Folder’s URL and ID. You can use these as a reference to add a new folder.
ii. Folder Name: You can either hardcode the name as a string or provide a variable of the “String” datatype. OverwriteOption: This option allows users to overwrite an existing file or folder in the specified folder within the connected Google account. Use this option if the file or folder at the provided path already exists in the destination folder. MISC DisplayName: Displays the name of the activity. The activity name can be customized, which aids in troubleshooting. SkipOnError: Specify the “Boolean” value as “True” or “False.” True: Continue executing the workflow regardless of any errors thrown.
False: Halt the workflow if it encounters any errors.
None: If the option is left blank, the activity will, by default, behave as if “False” were chosen. Version: It indicates the version of the feature being used. OUTPUT Result: It provides the ability to view the execution status of the activity. It returns values in “Boolean.” True: Indicates that the activity has been executed successfully without any errors.
False: Indicates that the activity has been unsuccessful due to an unexpected error being thrown. UploadedFileDetails: This option helps the user to view the details of the uploaded file, which includes the following information: ID: The unique identifier of the file uploaded to the specified folder.
Name: The full name of the uploaded file. URL: The link to access the uploaded file.
ParentID: The unique identifier of the folder where the file has been uploaded. * Represents mandatory fields to execute the workflow. How to View the Output?The parameter UploadedFileDetails is of the datatype
“List<Robility.GoogleDrive.UploadedFileInfo>”. To view the list of details, follow these steps using the ForEach activity: 1. Drag and Drop the ForEach activity into your workflow.
2. In the Properties panel, set the “Type Argument” to “GoogleDrive.UploadedFileInfo” by selecting it from the “Browse for types” option.
3. Add a Write Log activity inside the ForEach sequence to print the output of the activity.
4. In the Write Log activity, set the input string as “ID” to print the ID of the uploaded file.
5. Set the Log Level to Info.
6. You can follow the same steps to view additional details:
a. Name – To view the name of the uploaded file.
b. URL – To view the URL of the uploaded file.
c. ParentID – To view the ID of the folder where the file has been uploaded.
GoogleDocumentAI
AmazonS3
Amazon S3 (Simple Storage Service) is a scalable, secure, and durable cloud storage service provided by Amazon Web Services (AWS). It is designed to store and retrieve large amounts of data, making it an ideal choice for organizations seeking scalable and cost-effective cloud storage solutions. In Robility, Amazon S3 offers activities and integrations that allow automation bots to interact with S3 buckets and manage data seamlessly. Benefits1. Scalable Storage: Amazon S3 offers virtually unlimited storage capacity, allowing organizations to scale storage resources based on their needs without worrying about infrastructure limitations. 2. Cost-Effective: It provides cost-effective storage solutions with pay-as-you-go pricing, enabling organizations to pay only for the storage they use, reducing overall storage costs. 3. High Durability: Amazon S3 ensures high durability and data availability with multiple redundant copies of data stored across different availability zones, minimizing the risk of data loss. 4. Security Features: S3 offers robust security features such as encryption, access controls, and data lifecycle policies, ensuring data security and compliance with regulatory requirements. 5. Integration with AWS Services: It seamlessly integrates with other AWS services, enabling automated data management workflows, data processing, and analytics. 6. Data Management: Amazon S3 facilitates efficient data management, including storage, retrieval, versioning, replication, and data archival, enhancing data governance and data lifecycle management practices. Use Cases1. Data Backup and Recovery: Use Amazon S3 in automation workflows for automated data backup and recovery processes, ensuring data resilience and disaster recovery capabilities. 2. Document Storage and Management: Store and manage documents, files, and media assets generated or used in automation processes in Amazon S3 buckets, providing a centralized repository for document management. 3. Data Transfer and Integration: Transfer data between Robility and Amazon S3 buckets, enabling seamless data exchange and integration between systems. 4. Data Archival: Archive historical data and logs from automation processes in Amazon S3 for compliance, auditing, and long-term storage purposes, ensuring data retention and regulatory compliance. 5. Data Analytics and Reporting: Use Amazon S3 to store data for analytics and reporting purposes, enabling automation bots to analyze and derive insights from large datasets stored in S3 buckets. 6. Automated Data Processing: Utilize Amazon S3 for automated data processing tasks, such as data transformation, cleansing, and enrichment, supporting data-driven decision-making in automation processes.
LoadEnvironment
This activity helps the helps the user in setting up and configuring the runtime environment required for the execution of scripts, applications, or automation tasks. It encompass tasks such as loading necessary libraries, initializing variables, configuring connections to databases or external services, and preparing the environment for the successful execution of subsequent actions. PropertiesINPUT EnvironmentName: The “Name” mentioned in this parameter refers to the name of the downloaded “Python Script” used for automation.
By default, the name will be auto filled and disable to make any changes. EnvironmentVersion: It indicates the version of the script that is being used. PythonPath:* It indicates to provide the “Path” of the Python application. You can either hardcode the values in “String” datatype or can provide the values in the “String” format. This field accepts “String” datatype. MISC Body: Gets auto filled once the “Activity” is dropped into the body DisplayName: Displays the name of the activity. The activity name can be customized, which aids in troubleshooting. SkipOnError: Specify the “Boolean” value as “True” or “False.”
True: Continue executing the workflow regardless of any errors thrown.
False: Halt the workflow if it encounters any errors.
None: If the option is left blank, the activity will, by default, behave as if “False” were chosen. Version: It indicates the version of the feature being used. OUTPUT Result: It provides the ability to view the execution status of the activity. It returns values in “Boolean.”
True: Indicates that the activity has been executed successfully without any errors.
False: Indicates that the activity has been unsuccessful due to an unexpected error being thrown. * Represents mandatory fields to execute the workflow. Pre-RequisitesBefore executing the activity, verify the following prerequisites: - The system must have Python application version 3.11.6 with 64 bits installed. Versions below 3.11.6 or higher versions will not be supported for this activity. During the application installation, please choose the “Customize” installation mode and ensure to check the “Add Python to environment variables” option before proceeding.
Click here to know how the activity is used in the workflow.
AzureVM
Delete
The Delete VM operation is used to remove an existing virtual machine (VM) from the Azure environment. This operation can also handle associated resources such as disks and snapshots based on the specified properties. PropertiesINPUT DeleteAssociatedDisks: Indicates whether to delete the disks associated with the virtual machine along with the VM. When checked (true), all disks attached to the VM will be deleted. If unchecked (false), the disks will not be deleted and will remain in the resource group. DeleteSnapshots: Indicates whether to delete any snapshots associated with the VM’s disks. When checked (true), all snapshots linked to the VM’s disks will be deleted. If unchecked (false), the snapshots will remain in the resource group. WaitForCompletion: Indicates whether to wait for the deletion process to complete before returning control. When checked (true), the system will wait until the VM and specified resources are fully deleted before completing the operation. If unchecked (false), the system will return immediately after initiating the delete request, and you will need to manually check the status. VirtualMachineName*: Specifies the name of the virtual machine you want to delete. This field supports only strings and String variables. WaitIntervalSeconds: Specifies the interval (in seconds) between checks for completion if WaitForCompletion is enabled. This field allows the system to poll for the deletion status at regular intervals until the operation is complete. MISC DisplayName: The display name of the activity or operation. This field supports only strings and String variables. SkipOnError: Specify the “Boolean” value as “True” or “False.” True: Continue executing the workflow regardless of any errors thrown.
False: Halt the workflow if it encounters any errors.
None: If the option is left blank, the activity will, by default, behave as if “False” were chosen. Version: Indicates the version of the activity. OUTPUT Result: Provides the success status of the operation. This field indicates whether the VM and specified resources were successfully deleted or if there were any issues during the operation. * Represents mandatory fields to execute the workflow Notes1. Ensure that you understand the implications of deleting associated disks and snapshots, as this action is irreversible.
2. The WaitForCompletion property controls whether the system will wait for the entire delete process to finish. If enabled, the system will check for completion at intervals specified by WaitIntervalSeconds.
3. Deleting a VM will remove it and potentially its associated resources, so ensure that any important data is backed up before performing the delete operation.
GetVM
The Get VM operation is used to retrieve information about a Specific existing virtual machine (VM) in the Azure environment. This operation provides details about that specified VM configuration, status, and other relevant properties. PropertiesINPUT Name*: Specifies the name of the virtual machine whose details you want to retrieve. This field supports only strings and String variables. ResourceGroupName*: Specifies the name of the resource group that contains the virtual machine. This field supports only string. MISC DisplayName: Displays the name of the activity. The activity name can be customized which will help in troubleshooting. SkipOnError: Specify the “Boolean” value as “True” or “False.” True: Continue executing the workflow regardless of any errors thrown.
False: Halt the workflow if it encounters any errors.
None: If the option is left blank, the activity will, by default, behave as if “False” were chosen. Version: Indicates the version of the activity. OUTPUT Result: Provides the success status of the operation. This field indicates whether the VM was successfully stopped or if there were any issues during the operation. Status: Provides detailed information about the specified virtual machine. This field contains various details such as the VM’s status, configuration, size, operating system, and any associated resources. * Represents mandatory fields to execute the workflow Notes1. The output provides a comprehensive overview of the VM’s details, which can be useful for monitoring, troubleshooting, and management purposes.
2. This operation does not modify the VM; it is solely for retrieving and displaying information about the VM.
Create
Creates a new virtual machine from a disk or image on Azure environment. PropertiesINPUT AdminPassword*: Specifies the password for the provided username. This field supports only SecureString variables. AdminUsername*; Specifies the administrator’s username for the virtual machine. This field supports only strings and String variables. AzureRegion*: Establishes the Azure region (which is an area within a geographical place, containing one or more datacenters) of the virtual machine. If not specified, the region from the resource group is used. If a custom image is provided, then it uses the region specified for the image. This field supports only strings and String variables. The possible values are listed in the below drop-down list. More information about the Region parameter’s possible values can be found here. ComputerName*: Specifies the name of the computer. This field supports only strings and String variables. Disk:* Specifies the disk of the virtual machine. DNSName:* Specifies the name label of the DNS. This field supports only strings and String variables. Image: *Specifies the virtual machine image. Make sure to input a value for one of the following parameters: Disk or Image. If both parameters are set, then only Disk is taken into consideration. ImageLicensed :* Specifies the use of an Azure or on-premises license. The possible values are AzureLicensed, WindowsClient, and WindowsServer. The default value is AzureLicensed. Name: *Specifies the name of the new virtual machine. This field supports only strings and String variables. OSDiskType:* Specifies the OS disk type. This value is ignored if the virtual machine is created from disk. The possible values are StandardLRS, PremiumLRS, StandardSSDLRS, and UltraSSDLRS. The default value is StandardLRS. ResourceGroupName:* Specifies the name of the resource group. This field supports only strings and String variables. Size:* Specifies the size of the virtual machine. The possible values are listed in the below drop-down list. SSHPublicKey:* Specifies the SSH public key. This field supports only SecureString variables. MISC DisplayName: The display name of the activity. This field supports only strings and String variables. SkipOnError: Specify the “Boolean” value as “True” or “False.” True: Continue executing the workflow regardless of any errors thrown.
False: Halt the workflow if it encounters any errors.
None: If the option is left blank, the activity will, by default, behave as if “False” were chosen. Version: It indicates the version of the activity. OUTPUT Result: Gives the success status of the activity. * Represents mandatory fields to execute the workflow. Notes1. Make sure to input a value for one of the following parameters: Passwordor SSHPublicKey. If both parameters are set, then only SSHPublicKeyis taken into consideration.
Shutdown
The Shutdown VM operation is used to shut down an existing virtual machine (VM) in the Azure environment. This operation is typically used to turn off a VM without deallocating it, meaning that the VM remains in the resource group and its configuration is preserved, including its public IP address if applicable. PropertiesINPUT WaitForCompletion: When the value is True, it waits for the activity to be completed before moving to the next activity. When the value is False, the activity ends immediately after the API call is made. The default value is False. VirtualMachine*: Specifies the name of the virtual machine you want to shut down. This field supports only strings and String variables. WaitIntervalSeconds: Specifies how long to wait (in seconds) for the activity to run before an error is thrown. If not set, the activity runs until completion. It is executed only when the WaitForCompletion parameter has the value True. MISC DisplayName: Displays the name of the activity. The activity name can be customized which will help in troubleshooting. SkipOnError: Specify the “Boolean” value as “True” or “False.” True: Continue executing the workflow regardless of any errors thrown.
False: Halt the workflow if it encounters any errors.
None: If the option is left blank, the activity will, by default, behave as if “False” were chosen. Version: Indicates the version of the activity. OUTPUT Result: Provides the success status of the operation. This field indicates whether the VM was successfully shut down or if there were any issues during the operation. * Represents mandatory fields to execute the workflow Notes1. Shutting down a VM does not deallocate it, which means the VM retains its public IP address (if any) and is still billed for its reserved resources. This is different from stopping the VM, which deallocates it and can release associated resources.
Stop
The Stop VM operation is used to stop an existing virtual machine (VM) in the Azure environment. This operation can be useful for conserving resources or performing maintenance. PropertiesINPUT ReservePublicIPAddress: Indicates whether to retain the public IP address associated with the virtual machine when stopping it. When checked (true), the public IP address will be reserved and associated with the VM when it is restarted. If unchecked (false), the public IP address may be released, and a new IP address might be assigned when the VM is started again. WaitForCompletion: When the value is True, it waits for the activity to be completed before moving to the next activity. When the value is False, the activity ends immediately after the API call is made. The default value is True. VirtualMachine*: Specifies the name of the virtual machine you want to stop. This field supports only strings. WaitIntervalSeconds: Specifies the interval (in seconds) between checks for completion if WaitForCompletion is enabled. This field allows the system to poll for the stop status at regular intervals until the operation is complete. MISC DisplayName: Displays the name of the activity. The activity name can be customized which will help in troubleshooting. SkipOnError: Specify the “Boolean” value as “True” or “False.” True: Continue executing the workflow regardless of any errors thrown.
False: Halt the workflow if it encounters any errors.
None: If the option is left blank, the activity will, by default, behave as if “False” were chosen. Version: Indicates the version of the activity. OUTPUT Result: Provides the success status of the operation. This field indicates whether the VM was successfully stopped or if there were any issues during the operation. It provides the ability to view the execution status of the activity. It returns values in “Boolean.”
True: Indicates that the activity has been executed successfully without any errors.
False: Indicates that the activity has been unsuccessful due to an unexpected error being thrown. * Represents mandatory fields to execute the workflow Notes 1. When ReservePublicIPAddress is checked (true), the public IP address will be retained for the VM, ensuring that the same IP address is assigned when the VM is restarted. This is important for scenarios where a static IP address is needed.
2. The WaitForCompletion property controls whether the system waits for the VM to stop fully before completing the operation. If enabled, the system will check for completion at intervals specified by WaitIntervalSeconds.
3. Stopping a VM will deallocate it, releasing its compute resources but not necessarily its associated public IP address unless ReservePublicIPAddress is set to false.
Sequence
Collections
Compare collection
This activity helps the user to compare between two collections and provides the updated, modified or findings as result. PropertiesInput Compare Mode: Specifies how the rows in the collection are compared during matching or lookup operations. • Key comparison: Compares only the keys. • Value comparison: Compares only the values. • Key-Value pair comparison: Compares both the key and its corresponding value together. Ignore Case*: When enabled, it ignores letter casing while searching. Uppercase and lowercase letters are treated the same when matching values. First collection*: Specifies the source collection that contains the values to be matched. Second collection*: Specifies the target collection where the matching values will be searched. MISC Display Name: Displays the name of the activity. The activity name can be customized, which aids in troubleshooting. SkipOnError: Specify the “Boolean” value as “True” or “False.” True: Continue executing the workflow regardless of any errors thrown. False: Halt the workflow if it encounters any errors. None: If the option is left blank, the activity will, by default, behave as if “False” were chosen. Version: It indicates the version of the feature being used. Output Only In Second: Returns the rows that exist in the second collection but not in the first collection in a structured collection format. Only in First: Returns the rows that were present in the first collection but are missing in the second collection in a structured collection format Common items: Returns the rows that are identical in both the first and second collections in a structured collection format. Result: This parameter allows you to view the execution status of the activity and returns a value in “Boolean.” True: Indicates that the activity has been executed successfully without any errors. False: Indicates that the activity has been unsuccessful due to an unexpected error being thrown. * Represents mandatory fields to execute the workflow.
BuildCollection
The Build Collection activity is used to create and initialize a collection within a workflow. It generates a collection in which all items share the same data type as the first specified element, ensuring consistency across values. It allows users to define the collection type and populate it with values at design time, enabling structured data handling. It helps organize data efficiently and makes it easier to pass and reuse collections across different activities in the workflow. On the activity screen, provide the initial value (for example, an integer or a string). Additional items can then be added to the collection. Click the field to open the Collection Builder, within the Collection Builder, add the desired values to the collection. All items must be of the same data type as the first item. For example, if the first item is an integer, all subsequent items must also be integers. Adding a different data type (such as a string) is restricted and will result in a runtime validation error. PropertiesINPUT First Item*: Specifies the initial value of the collection. This determines the data type for all subsequent items. MISC DisplayName: Displays the name of the activity. This can be customized for better readability and easier troubleshooting. SkipOnError: Specifies a Boolean value (True or False).
True: Continues executing the workflow even if an error occurs.
False: Stops the workflow if an error is encountered.
None: If left blank, the default behavior is False. Version: Displays the version of the activity being used. This field is auto-populated and read-only. OUTPUT New Collection: Stores the created collection for use in other activities. The output type is Collection. Result: Indicates the execution status of the activity. Returns a Boolean value:
True: The activity executed successfully without errors.
False: The activity failed due to an error. *Represents mandatory fields to execute the workflow.
Collection to Datatable
This activity allows users to convert collection values into a structured DataTable format, which cannot be achieved directly through syntax. PropertiesINPUT Collection: * Specifies the existing collection variable to convert, using the ICollection<Object> data type. Refer to the documentation below for instructions on converting to an ICollection<Object> type. MISC DisplayName: Displays the name of the activity. The activity name can be customized, which aids in troubleshooting. SkipOnError: Specify the “Boolean” value as “True” or “False.”
True: Continue executing the workflow regardless of any errors thrown.
False: Halt the workflow if it encounters any errors.
None: If the option is left blank, the activity will, by default, behave as if “False” were chosen. Version: It indicates the version of the feature being used. OUTPUT Datatable: *Returns the output of the activity as a table format in datatable variable. Result: This parameter allows you to view the execution status of the activity and returns a value in “Boolean.” True: Indicates that the activity has been executed successfully without any errors.
False: Indicates that the activity has been unsuccessful due to an unexpected error being thrown * Represents mandatory fields to execute the workflow. Limitations1. Only a single collection can be converted to a DataTable.
2. If the collection contains nested collections (e.g., a list of lists), the Collection to DataTable activity cannot convert it directly into a DataTable. Steps to Convert to ICollection<Object> Data TypeThis activity accepts input collections only in the ICollection<Object> data type. To convert an existing collection, you can either provide the conversion syntax directly in the “Collection” properties or use an Assign activity. Option 1: Using syntax in the property field “collectionVariable.Cast(Of Object)().ToList()” Option 2: Using Assign activity Using Assign activity: 1. Drag and drop an Assign.
2. Create a variable with the ICollection<Object> data type.
3. In the To field, enter the created variable.
4. In the Value field, use the syntax “collectionVariable.Cast(Of Object)().ToList()”.
a. Here, collectionVariable refers to your existing collection variable.
AppendItemToCollection
This activity helps to adds one or more items to the end of a specific collection, supporting multiple data types via the Collection Builder. PropertiesINPUT Collection*: Specifies the collection variable to which the new items will be appended. This field accepts an ICollection<Object> type. MISC DisplayName: Displays the name of the activity. The name can be customized for better readability and troubleshooting. SkipOnError: Specifies the Boolean value as True or False. True: Continue executing the workflow regardless of any errors thrown.
False: Halt the workflow if it encounters any errors.
None: If this field is left blank, the activity will behave as if False were chosen by default. Version: Displays the version of the activity being used. This field is auto-populated and read-only. OUTPUT New Collection: Stores the resulting collection of type List<Object> after the new items have been appended. Result: Indicates the execution status of the activity. Returns a Boolean value.
True: Indicates that the activity has been executed successfully without any errors.
False: Indicates that the activity has been unsuccessful due to an unexpected error being thrown. How to Add a Collection Builder?The Append Item to Collection activity appears on the canvas with the following options: 1. Collection – Enter the collection item directly or a hardcoded variable.
2. Collection Builder – Click the button to open the Collection Builder window, which allows you to add multiple items to the collection at once. Collection Builder Window The Collection Builder dialog provides a structured way to manage multiple collection values. Once opened, you can: 1. Add multiple InArgument<Object> values at once, with each row accepting any object type as an input argument.
2. Click (+) to add a new row for an additional value.
3. Click (X) to remove an existing row.
4. Click (≡) to open the Expression Editor, where you can write expressions for a specific InArgument<Object> value.
5. Click Save to apply all entered values or Cancel to discard changes.
Find and Replace
This activity allows users to search for a specified value in the input collection and replace it with another value. PropertiesINPUT Input collection: Specifies to provide the input collection to search within the provided range. Case Sensitive: Ensures that the search matches the case (uppercase or lowercase) of the provided value exactly. Operation: Specifies the operation to be performed in the collection. Available options: 1. Find: Finds and returns the first matching value. 2. Find All: Finds and returns all matching values. 3. Replace: Finds and replaces the first matching value. 4. Replace All: Finds and replaces all matching values. Find Value*: Specifies the input value to be searched within the collection. Accepts values in String datatype. Replace Value*: Specifies the value to replace the found text with. This parameter is applicable only when Replace or Replace All is selected. Accepts values in String datatype. MISC Argument Type*: Select the type of elements contained in the collection from the drop-down.
For example, if the collection is a list of strings, choose “String” as the argument type. Display Name: Displays the name of the activity. The activity name can be customized, which aids in troubleshooting. SkipOnError: Specify the “Boolean” value as “True” or “False.” True: Continue executing the workflow regardless of any errors thrown. False: Halt the workflow if it encounters any errors. None: If the option is left blank, the activity will, by default, behave as if “False” were chosen. Version: It indicates the version of the feature being used. Output Found At: Returns the index where the matched value is found in String format. Updated collection: Returns the output with the updated values in a chosen format in Argument Type. Result: This parameter allows you to view the execution status of the activity and returns a value in “Boolean.” True: Indicates that the activity has been executed successfully without any errors. False: Indicates that the activity has been unsuccessful due to an unexpected error being thrown. * Represents mandatory fields to execute the workflow.
Filter Collection
This activity allows users to filter values from a collection based on specified conditions, either retaining or removing the matching items alone. LimitationThis activity supports collections of primitive data types—such as “Int, float, double and string” since filtering conditions can only be applied to these types. PropertiesInput Collection: *Specifies the collection variable that contains the data to be filtered. Filter Action: *Select the desired filter action from the dropdown: Keep matching items: Retains only the items that meet the specified condition.
Remove matching items: Removes the items that meet the specified conditions from the collection. Misc Argument Type: *Select the type of elements contained in the collection from the drop-down.
For example, if the collection is a list of strings, choose “String” as the argument type. Display Name: Displays the name of the activity. The activity name can be customized, which aids in troubleshooting. SkipOnError: Specify the “Boolean” value as “True” or “False.” True: Continue executing the workflow regardless of any errors thrown.
False: Halt the workflow if it encounters any errors.
None: If the option is left blank, the activity will, by default, behave as if “False” were chosen. Version: It indicates the version of the feature being used. Output CollectionOutput: *Returns a list of objects containing the filtered data from the collection. Result: This parameter allows you to view the execution status of the activity and returns a value in “Boolean.” True: Indicates that the activity has been executed successfully without any errors.
False: Indicates that the activity has been unsuccessful due to an unexpected error being thrown. * Represents mandatory fields to execute the workflow. Filter WindowThis wizard allows you to define specific conditions to filter and retrieve data from the provided collection. 1. AND: Returns TRUE only if allthe conditions separated by AND are true. 2. OR: Returns TRUE only if anyof the conditions separated by OR are true. 3. Name: Displays a datatype of the collection variable. 4. Operator: Specifies the comparison operator to apply on the field, such as:
a. Equals
b. Contains
c. In 5. Value: Provide the value against which the records should be filtered. 6. Add: Click on the Add button to add multiple conditions to filter. Click here to download and view the sample workflow using filter collection activity.
Merge Collections
This activity allows the user to merge two existing collections into a single collection variable. PropertiesINPUT Collection: *Specifies to provide the first existing collection variable in “Icollection<Object>” datatype. Refer to the documentation below for instructions on converting to an ICollection<Object> type. Second collection: *Specifies to provide the second existing collection variable. “Icollection<Object>” datatype. Refer to the documentation below for instructions on converting to an ICollection<Object> type. MISC DisplayName: Displays the name of the activity. The activity name can be customized, which aids in troubleshooting. SkipOnError: Specify the “Boolean” value as “True” or “False.”
True: Continue executing the workflow regardless of any errors thrown.
False: Halt the workflow if it encounters any errors.
None: If the option is left blank, the activity will, by default, behave as if “False” were chosen. Version: It indicates the version of the feature being used. OUTPUT Merged Collection: *Returns the output of the activity as the merged collections into one variable. Result: This parameter allows you to view the execution status of the activity and returns a value in “Boolean.” True: Indicates that the activity has been executed successfully without any errors.
False: Indicates that the activity has been unsuccessful due to an unexpected error being thrown * Represents mandatory fields to execute the workflow. Limitations1. Both input variables must be of the same data type. Throws exception if the two collections are of different data types.
a. Eg: Only String to String datatypes can be converted. 2. The activity merges all elements by default. If duplicate entries are not required, additional filtering logic should be applied after the merge.
a. After merge, if you need to filter any values, use filter collections Steps to Convert to ICollection<Object> Data TypeThis activity accepts input collections only in the ICollection<Object> data type. To convert an existing collection, you can either provide the conversion syntax directly in the “Collection” and “Second Collection” properties or use an Assign activity. Option 1: Using syntax in the property field “collectionVariable.Cast(Of Object)().ToList()” Option 2: Using Assign activity Using Assign activity: 1. Drag and drop an Assign
2. Create a variable with the ICollection<Object> data type.
3. In the To field, enter the created variable.
4. In the Value field, use the syntax “collectionVariable.Cast(Of Object)().ToList()”.
a. Here, collectionVariable refers to your existing collection variable.
Cryptography
EncryptFile
ReadCSV
Email Automation
SetCategory
The SetCategory activity is used to assign categories to one or more email messages, such as blue, green, yellow, etc. It allows users to organize and classify emails within a mailbox by applying predefined or custom categories. This activity accepts a collection of email items (for example, those retrieved from the Read Mail activity) and applies the specified category name to each email in the collection. It helps improve email management by enabling better filtering and grouping of messages based on their assigned categories. PropertiesINPUT Category Name*: Specifies the predefined or custom category name to be assigned to the email, such as blue, green, yellow, etc. MailItems*: Accepts a collection of email messages retrieved from the Read Mail activity, on which the specified category will be applied. SingleMailItem – Accepts a single Outlook mail item (MailItem) as input, to which the specified category will be applied. MISC DisplayName: Displays the name of the activity. This can be customized for better readability and easier troubleshooting. SkipOnError: Specifies a Boolean value (True or False).
True: Continues executing the workflow even if an error occurs.
False: Stops the workflow if an error is encountered.
None: If left blank, the default behavior is False. Version: Displays the version of the activity being used. This field is auto populated and read-only. OUTPUT Result: Indicates the execution status of the activity. Returns a Boolean value:
True: The activity executed successfully without errors.
False: The activity failed due to an error. UpdatedCount: Indicates the total number of email messages that were successfully processed and updated with the specified category. The output is returned as an Integer. UpdatedMailItems : Returns a collection of email messages that were successfully updated with the specified category. The output is of type List of mailitem. *Represents mandatory fields to execute the workflow.
AddNewRow
Delay
Integration Activities
Designer & Runner
System Requirements
Network Access & Message Traffic
Additional Requirements1. Administrator Rights:
Required for installation and specific features, such as setting up browser extensions. 2. Excel/Office Integration Requirements:
Microsoft Office (versions 2007, 2010, 2013, 2016, 2019, or 365 desktop editions) is required for automating tasks in Excel and Outlook. 3. Robility Manager Requirements:
For users integrating Robility Designer with Manager:
a. Ensure the system can establish communication with the Manager server.
b. SSL/TLS 1.2 is mandatory for secure communication. 4. Windows Registry:
Read & Write access is required during the installation of Robility Designer and Runner to configure essential registry entries for proper functionality.
Administrative Rights: Necessary for installing the Robility Runner. 5. Remote Desktop:
The Remote Desktop option must be enabled to support Robility Runner Auto Login for service accounts and user accounts. 6. URL Whitelisting:
Specified URLs must be whitelisted to ensure the proper functioning of Robility Designer and Runner across all deployment models. Click here to refer. 7. Group Policy:
For Robility’s Chrome and Edge browser automation, specific group policy configurations and prerequisites must be enabled. Click here to refer. 8. VM Name Requirements:
While creating virtual machines or Citrix environments, the machine name must not contain special characters. Only hyphens (-) and underscores (_) are permitted, and they should be used only within the name, not at the beginning. 9. User Account:
Dedicated service account with login rights, ideally non-interactive for unattended execution. 10. Auto-logon:
Auto Logon should be configured for unattended execution. Click here to refer.
Installation
Robility Designer and Runner can be installed using two convenient methods to suit different deployment requirements. Detailed below are the steps for each method: 1. Installation via Robility Manager:
This method lets users easily download and install the Robility Designer or Runner directly from the Robility Manager, simplifying setup. It’s quick, user-friendly, and ensures a smooth start to your automation projects. Click here to refer. 2. Installation from command-line prompt:
This method lets users to install the Robility Designer or Runner through a command-line interface, offering greater control and flexibility. This approach is ideal for automated or large-scale deployments, ensuring a streamlined process. Click here to refer. Before proceeding with the installation, it is important to ensure that your system meets the necessary hardware and software specifications. For detailed information about these specifications, click here. Installation via Robility ManagerFor DesignerFollow these steps to download and install the Designer MSI from Robility Manager. This process is straightforward and does not require additional assistance or administrative rights. 1. Log in to Robility Manager using your credentials.
2. If you have access to a single tenant, you will be directed to the Home page upon login.
a. For multiple tenants, choose the tenant where you want to download the Designer and start building automations.
3. Navigate to the “Products” page to explore Robility’s product offerings, including their latest versions.
4. Locate “Robility Designer” and click the Download button.
5. Before the download starts, review the user license agreement displayed on your screen and click Agree to proceed.
6. Once the MSI file is downloaded, double-click it to launch the installation wizard.
7. Follow the on-screen prompts:
a. Click Next to continue.
b. Accept the license agreement and click Next again.
8. The installation process will complete, and the Designer will be successfully installed on your system.
9. You’re now ready to start using Robility Designer for your automation needs. For RunnerAdministrative rights are required to install the Robility Runner. The following guide provides detailed steps to download and install the Runner MSI from Robility Manager. 1. Log in to Robility Manager using your credentials.
2. After logging in, if you have access to only one tenant, you will be redirected to the Home page automatically.
a. For users with access to multiple tenants, a selection screen will appear. Choose the specific tenant where you want to download the Runner.
3. Navigate to the “Products” page in Robility Manager. This section showcases all available Robility products, along with their latest versions and updates.
4. Locate “UnAttended Runner” and click the Download button.
5. Before the download begins, a user license agreement will appear on your screen. Carefully review the terms and conditions and click Agree to confirm and proceed with the download.
6. Once the MSI file is downloaded, locate it in your system’s downloads folder.
7. Double-click the file to open the installation wizard and initiate the setup process.
8. The installation wizard will guide you through the setup steps:
a. Click Next on the welcome screen to continue.
b. Review and accept the license agreement by selecting the checkbox and clicking Next again.
c. Choose the installation folder if prompted or proceed with the default location.
9. When prompted, grant the necessary administrative rights to allow the installation to proceed. This step ensures that the Runner is properly configured on your system.
10. After granting permissions, the installation wizard will finalize the process. Once complete, a confirmation message will appear indicating that the Runner has been successfully installed.
Installation via Command Prompt
Command-Line InstallationRobility Designer and Robility Runner can be installed, updated, or modified using command-line tools. This allows for streamlined deployment, especially in automated environments or when managing multiple installations. The following guide will walk you through the process of installing both the Designer and Runner MSI files using the command line. Key Requirements1. Authorized Users: Only users with valid access to Robility Manager can download the latest Designer and Runner MSI files.
2. Administrator Rights: You must have administrator privileges to run the installation commands.
3. Command Prompt Access: You will need access to the Command Prompt and the ability to run it with administrator privileges.
4. Silent Mode: You can run the installation in silent mode to update from a previous version without user interaction. Installing Designer via Command-LineFollow these steps to download and install the Robility Designer MSI using command-line instructions: - Create a Folder for the MSI File: Before starting the installation, you need to create a directory where the MSI file will be downloaded. Open the Command Prompt and execute the following command to create the folder – “MD C:\Robility_MSI”.
- Download the Robility Designer MSI File: Log in to Robility Manager to download the Robility Designer MSI file to the folder you just created. Once logged in, navigate to the product section and download the latest MSI version of Robility Designer. The MSI file should be saved in – “C:\Robility_MSI\RobilityDesigner2x.x.x.msi”.
- Run the Installation Command: After the MSI file is downloaded, you can install Robility Designer using the following command in the Command Prompt – “msiexec /iC:\Robility_MSI\RobilityDesigner2x.x.x.msi/qn/passive/l*v “C:\Robility_MSI\DesignerInstallationLog.txt”.
- Completion: Once the command is executed, Robility Designer will be installed on your system without further interaction. After installation, you can check the log file for details about the installation process.
Installing Robility Runner via Command-LineFollow these steps to download and install the Robility Runner MSI using the command-line method: 1. Create a Folder for the MSI File: Just like with Robility Designer, start by creating a folder where the Robility Runner MSI will be stored. Execute the following command to create the folder – “MD C:\Robility_MSI”.
2. Download the Robility Runner MSI File: Log in to Robility Manager to download the latest Robility Runner MSI file. Once you are logged in, navigate to the “Products” section, and download the MSI for Robility Runner. The file should be saved at “C:\Robility_MSI\RobilityRunner2x.x.x.msi”.
3. Run the Installation Command: With the MSI file downloaded, execute the following command in the Command Prompt to install Robility Runner: “msiexec /iC:\Robility_MSI\RobilityRunner2x.x.x.msi/qn/passive/l*v “C:\Robility_MSI\RunnerInstallationLog.txt”
4. Completion: Once the command is executed, Robility Runner will be installed silently without further user interaction. You can review the log file to confirm the installation process. Important Notes: 1. Silent Mode Installation: Both Designer and Runner can be installed without any user interaction by using the `/qn` flag. This is particularly useful for unattended installations or updates.
2. Log Files: The log files generated (`DesignerInstallationLog.txt` and `RunnerInstallationLog.txt`) provide a detailed overview of the installation process. If any issues occur during installation, the logs will be helpful for troubleshooting.
3. Administrative Rights: Running the installation from the command line requires administrative rights. Without these rights, the installation will fail.
4. Software Prerequisites: Ensure that your system meets the minimum hardware and software requirements for Robility Designer and Runner before starting the installation.
5. Updating from Older Versions: If you’re updating from an older version of Robility Designer or Runner, use the same command as above. The installer will automatically detect the existing version and update it. Using the `/qn` flag ensures that the update process occurs silently, without requiring user input. Common Arguments1. /quiet, /q, qn – Fully silent mode
2. /passive – Unattended mode, shows progress bar only.
3. /norestart – Do not restart the system after the installation.
4. /forcerestart – Restart the system after installation is complete.
5. /log, /l – Enable Logging.
Remote Installation
Remote InstallationRemote installation allows you to install and update Robility Designer and Robility Runner on multiple remote machines by executing the Designer.msi and Runner.msi installers from a central admin machine. This method is useful when you need to manage installations across many systems without manually visiting each machine. Below are the detailed steps and parameters involved in setting up a remote installation for both Robility Designer and Robility Runner. Key Points to Note1. Admin Machine: This is the machine used by the administrator to perform the installation. The admin machine will download the MSI files, create the necessary batch files for installation, and trigger the installation process remotely.
2. Remote Machine: These are the systems where the MSI files will be installed. It’s essential that these machines are prepared to receive and install the MSI files from the admin machine.
3. Authorized Users: Only authorized users of Robility Manager are permitted to download the latest versions of the Designer and Runner MSI files.
4. Administrator Rights: Both the admin machine and the remote machines require administrator rights to execute the installation commands. Ensure that you have the necessary permissions before proceeding.
5. Machine List: Prepare a list of remote machines on which the MSI needs to be installed. You will need the names or IP addresses of these machines to run the commands remotely.
6. PowerShell Access: The admin machine must have access to PowerShell to execute the batch file remotely. Ensure that PowerShell is enabled and that you have the necessary privileges to run scripts.
7. PsExec Requirement: The admin machine must have PsExec v2.43(or later) installed to allow for remote execution. PsExec is part of Sysinternals by Microsoft, and it facilitates remote command execution.
You can download PsExec from the official Microsoft Sysinternals page:(https://learn.microsoft.com/en-us/sysinternals/downloads/psexec)
8. Silent Installation: You can run the installer in silent mode, which ensures the installation happens without user intervention. This is particularly useful when updating from older versions of Robility Designer or Runner. Installation Process1. Download the MSI Files: Log into Robility Manager and download the latest versions of Robility Designer and Robility Runner MSI files. Ensure that these MSI files are compatible with your system.
2. Place the MSI Files in a Shared Folder: Store the MSI files in a shared folder that is accessible to both the admin machine and the remote machines. Example: “\\admin_machine\myfiles\RobilityRunner2x.x.x.msi”.
3. Share the Folder: Share the folder where the MSI files are stored with **read access** for the remote machines. This allows the remote systems to access and copy the MSI files needed for installation. Batch File Creation StepsThe installation process on remote machines is facilitated by creating a batch file on the admin machine. This batch file will contain commands for copying the MSI file to the remote machine and executing the installation. 1. Create a Folder on the Remote Machine: The batch file must first create a folder on the remote machine to store the MSI file. This folder will be used to copy the MSI from the admin machine. Use the following command: “MD C:\Robility_MSI”. This command ensures that the folder `C:\Robility_MSI` exists on the remote machine.
2. Copy the MSI File from the Admin Machine to the Remote Machine: After creating the folder on the remote machine, the next step is to copy the MSI file from the shared folder on the admin machine to the remote machine. This can be done using the `xcopy`command: xcopy\\admin_machine\myfiles\RobilityRunner2x.x.x.msi C:\Robility_MSI\RobilityRunner2x.x.x.msi”.
This command will copy the RobilityRunner2x.x.x.msi file from the shared folder on the admin machine to the “C:\Robility_MSI” directory on the remote machine.
3. Run the MSI Installation on the Remote Machine: Once the MSI file is copied to the remote machine, the batch file will trigger the installation using msiexec, the Windows Installer. The command for silent installation is as follows:
“msiexec/i C:\Robility_MSI\RobilityRunner2x.x.x.msi/qn/l*v”C:\Robility_MSI\RunnerInstallationLog.txt”
4. Sample Batch File: The batch file (`install.bat`) will include the above commands. Example:
MDC:\Robility_MSIxcopy\\admin_machine\myfiles\RobilityRunner2x.x.x.msi C:\Robility_MSI\RobilityRunner2x.x.x.msi
msiexec/iC:\Robility_MSI\RobilityRunner2x.x.x.msi/qn/l*v”C:\Robility_MSI\RunnerInstallationLog.txt” Batch File Execution Once the batch file is created, you can execute it remotely on the target machines using PowerShell. Ensure that PowerShell is running as Administrator on the admin machine. 1. Open PowerShell as Administrator: Right-click the PowerShell icon and select Run as Administrator to open an elevated PowerShell window.
2. Execute Command for a Single Remote Machine: To execute the installation on a single remote machine, use the following PsExec command in the PowerShell window:
“psexec.exe@remote_computer_name-s-udomain\user_id-ppassword\\admin_machine\myfiles\install.bat”. – `@remote_computer_name`: The name of the remote computer where the MSI is to be installed.
– `-s`: Run the command with system-level privileges.
– `-u domain\user_id -p password`: Provide the credentials of the user with administrator rights on the remote machine.
– `\\admin_machine\myfiles\install.bat`: The path to the batch file on the admin machine. 3. Execute Command for Multiple Remote Machines: To execute the installation on multiple remote machines simultaneously, use the following command:
psexec \\pc1,pc2,pc3-s-udomain\user_id -ppassword\\admin_machine\myfiles\install.bat”. – `\\pc1,pc2,pc3`: A comma-separated list of remote machine names or IP addresses.
– The batch file will be executed on all the specified remote machines, initiating the MSI installation on each.
Deploy through SCCM
Deploying Robility Designer or Runner using SCCM enables administrators to efficiently install or update these applications across multiple target computers. The steps below provide a detailed walkthrough of the process. For additional information on application creation and deployment using SCCM, refer to Microsoft’s official documentation: (https://learn.microsoft.com/en-us/mem/configmgr/apps/get-started/create-and-deploy-an-application). Step 1: Download the Robility MSI 1. Navigate to Robility Manager using your credentials. Ensure you have administrative rights to access the necessary download sections.
2. Locate the latest version of the required MSI files (Robility Designer or Runner). Save the file to a folder on your administrative machine. Example: “C:\Robility_MSI”. Step 2: Open SCCM Console 3. Launch the System Center Configuration Manager (SCCM) Console from your administrative machine.
4. Verify that you have the necessary permissions to create and deploy applications within SCCM. Step 3: Create the Application 5. Navigate to Application Management, in the SCCM Console, follow the path – “Software Library” > “Overview” > “Application Management”.
6. Initiate Application Creation
a. Right-click on Applications and select Create Application.
b. In the application wizard, select Manually specify the application information, then click Next.
7. Enter Application Details and fill in the application metadata such as:
a. Name: Specify the application name, e.g., Robility Designer or Robility Runner
b. Publisher: Sutherland.
c. Version: Enter the version of the MSI you are deploying.
8. Provide the MSI installation command in the Installation Program section. Use the appropriate command based on the MSI file:
a. msiexec /i “C:\Robility_MSI\RobilityRunner2x.x.x.msi” /qn (OR)
b. msiexec /i “C:\Robility_MSI\RobilityDesigner2x.x.x.msi” /qn Replace the filenames with the exact names of your downloaded MSI files, if different.
9. Choose an appropriate category or software classification to organize the application in SCCM.
10. Add deployment type information:
a. Deployment Name: Specify a unique name, e.g., “Robility Designer Deployment”
b. Content Location: Specify the path where the MSI is stored (e.g., `C:\Robility_MSI`)
11. Proceed through the application creation wizard, reviewing all configurations and making adjustments if necessary.
12. Finalize and close the wizard to complete application creation. Step 4: Deploy the Application 13. In the SCCM Console, navigate to “Software Library` > `Overview` > `Application Management”.
14. Select the application you created (e.g., Robility Designer or Runner) from the list and click Deploy in the ribbon menu at the top.
15. Choose the target collection(s) of devices where the application will be deployed. SCCM allows you to specify individual devices, user groups, or larger collections.
16. Configure Deployment Settings:
a. Purpose: Set the purpose of the deployment to Available (optional for users) or Required (mandatory installation.
b. Installation Deadline: Specify a deadline for the installation to ensure timely deployment.
17. User Experience Settings: Define how the application installation appears to users.
18. Adjust Additional Settings: Configure alerts, retry options, or other settings based on organizational requirements.
19. Complete Deployment Wizard: Review all deployment configurations and click Finish to complete the deployment setup. Step 5: Monitor Deployment Progress 1. In the SCCM Console, go to the Monitoring section to oversee deployment activities.
2. Under Monitoring, select Deployments to view the status of Robility application deployment.
3. If any devices report installation failures, review the SCCM logs for details.
Uninstallation-Command Prompt
Project Management
Project Management in Robility Manager provides a structured management to creating, configuring, and managing automation projects within a tenant. It ensures that automation workflows are organized, resources are efficiently allocated, and access is properly controlled, enabling smooth execution and monitoring of automated processes. Key Capabilities of Project Management:1. Project Creation and Organization: Administrators and authorized users can create projects within the tenant, defining their scope and purpose. Projects serve as dedicated spaces for managing automation workflows, ensuring that related processes, resources, and configurations are grouped logically. 2. Resource Allocation: Users can assign resources such as bots and developers to specific projects, ensuring the right personnel and automation agents are linked to each initiative. Proper resource allocation helps streamline execution and optimize workload distribution. 3. Role-Based Access Control: Project Management allows administrators to define project-level roles and permissions, ensuring that users have appropriate access based on their responsibilities. This enhances security and governance by preventing unauthorized modifications to automation workflows. 4. Deploy Robots and Scheduler: Users can manage automation workflows by deploying them in the Robility Runner. The scheduler ensures that automated tasks run at predefined times, improving efficiency and reducing manual intervention. 5. Integration and Credential Management
Project Management facilitates seamless integration with various tools and platforms, including: - Interact: To enable human-in-the-loop interactions within automated workflows.
- Credential Vault: For secure storage and retrieval of sensitive authentication details.
- App Integrations: To connect with external applications and services, expanding automation capabilities.
By bringing all these elements together, Project Management in Robility Manager ensures a structured, secure, and scalable automation environment. It fosters collaboration, governance, and efficiency, making it easier for enterprises to deploy and maintain automation solutions effectively.
Workflows
Workflows are automation solutions created, configured, and published through Robility Designer. They represent the backbone of Robility’s automation ecosystem, defining the logic, sequence, and execution flow of automated processes. Once published, workflows are deployed to this section, which serves as a centralized command center for managing, organizing, and overseeing all operational automations within the enterprise. This section enables users to maintain complete visibility and control over every deployed automation, ensuring that business processes run seamlessly, efficiently, and with minimal manual intervention. Key Capabilities1. View and Organize Workflows: Browse and filter workflows by projects. 2. View Workflow History: Access a complete historical record of workflow published status. 3. Manage Versions: Every workflow version is recorded, allowing users to: a. Audit prior versions
b. Compare logic changes
c. Roll back if an update causes execution issue
d. Publish enhancements safely Version control ensures continuity and controlled evolution of automations. 4. Security Scan Status: View automated security scan results to ensure workflows follow secure coding standards and do not introduce vulnerabilities. This helps maintain enterprise-grade compliance and trust. 5. Workflow Analyzer Report: Access analyzer reports generated during workflow build and publish cycles. These reports highlight best-practice deviations, performance issues, and optimization recommendations—helping designers improve workflow quality and reliability. Click here to learn more about how to publish workflows. Explanation of Tags on the Workflow Screen1. Serial Number: Displays the count of workflows published, helping users identify and organize the sequence of solutions efficiently.
2. Solution Name Lists the name of each published solution, enabling users to easily recognize and differentiate between workflows.
3. Latest Version: Indicates the most recently published version associated with each solution, ensuring users can access the latest updates and modifications.
4. File Size (MB): Shows the size of the most recently published file, providing an overview of storage requirements for each solution.
5. Updated By: Tracks and displays the name of the person who last updated the resource. This tag reflects changes made by the resource itself or by an individual, ensuring accountability.
6. Updated On: Records the date and time when the resource was last updated. Similar to “Updated By,” this tag captures both manual updates and changes initiated by the resource.
7. Publish Status: Displays the current status of the published solution, offering visibility into whether the workflow is active, inactive, or under review.
8. History: Provides detailed tracking of workflow-related actions, enabling users to monitor and manage workflows effectively. The following options are included:
a. Inactive: Allows users to mark a specific version of the solution as inactive, preventing further use while retaining version history.
b. Download: Enables users to download the workflow.
9. Scanned Status: Provides the status of the security scan of the solution.
How to Inactive and download the workflows?1. Login to the “RobilityManager” portal.
2. Select the “Tenant” against which the “Project” has been configured and navigate to it.
3. Select the “Workflows” from the Menu.
4. Choose the respective “workflows” and click on the “view” option.
a. Here choose the “Inactive” or “Download” option against the version number.
Credential Vault
The Robility Credential Vault is a secure feature designed to store and manage sensitive information such as credentials, API keys, and confidential data within the Robility platform. It ensures secure access to secrets during automation workflows, minimizing exposure risks. By default, the Credential storage is set to “Robility Manager Instance”. This option can be configured in the tenant selection area. Click here to learn more about it. This step is crucial for the tenant admin because all credentials will be stored in the area based on the storage configuration. Click here to view where all the credentials configured in Robility Manager are stored. How the Credential Vault is Secured1. Tenant Isolation: Credentials for each tenant are stored in isolated databases that are physically separate and hosted in Azure SQL Managed Instances (Azure SQL MI). These databases are protected with Transparent Data Encryption (TDE) to secure data at rest, ensuring tenant-specific security. 2. Encryption Mechanism: AES-256 Encryption: The Robility Credential Vault employs AES (Advanced Encryption Standard) with a 256-bit key to encrypt sensitive data. This industry-leading encryption ensures robust security for stored secrets. Encryption keys are securely managed and stored within the Robility infrastructure. 3. Secure Communication: All communication between Robility components, such as bots, the Credential Vault, and the Robility Manager, is secured using TLS 1.2 (Transport Layer Security), safeguarding data in transit. 4. Role-Based Access Control (RBAC): Robility enforces strict role-based access controls, ensuring that only authorized users and processes can access or modify stored credentials. 5. Audit Logs: Credential Vault activities, such as storing, retrieving, or modifying credentials, are logged to support audit and compliance requirements. Third Party Vault IntegrationRobility integrates seamlessly with external credential management systems, allowing organizations to leverage existing solutions for secure credential storage and retrieval. Supported Third-Party Vaults: Azure Key Vault: Allows secure storage and management of credentials using Azure’s encryption and policy controls.
Aws: Provides secure storage, automatic rotation, and fine-grained access control for secrets, ensuring safe integration with AWS services and applications.
Google: Enables secure storage and access management of API keys, passwords, and other sensitive data, integrated with Google Cloud’s IAM and audit logging. Click here to configure third party vault integrations. Advantages1. Enhanced Security: Implements advanced encryption and access controls to protect sensitive data.
2. Centralized Management: Streamlines credential management by centralizing sensitive information storage.
3. Zero Trust Enforcement: Access is strictly granted only to authenticated users or bots with appropriate permissions, aligning with Zero Trust security principles.
4. Flexible Infrastructure Options: Works with both Robility Manager’s instance vault and external third-party vaults, allowing organizations to choose based on their infrastructure preferences.
5. Auditability and Compliance: Tracks and logs credential access to meet compliance requirements such as GDPR, ISO 27001, and HIPAA. Click here to learn more about the best practices while configuring credentials.
Best Practices
Understanding best practices for storing data in a vault is essential for maintaining security and efficiency in automation processes. This section outlines what is suitable to store in a vault and what to avoid, ensuring optimal use of secure storage while minimizing risks. What can be stored in the vault1. Application Credentials: Store application-specific usernames, passwords, or API keys securely for automated logins and integrations. 2. PIN & Key Combinations: Securely store PIN codes or cryptographic keys used for encrypting/decrypting sensitive data or accessing protected systems. 3. Access Tokens: Save time-bound access tokens used for authenticating with external services or APIs during automation. 4. JWT Tokens: Manage and protect JSON Web Tokens used for secure data exchange and authentication in modern web services. 5. Assets: Store reusable values such as environment-specific configurations, connection strings, or constants needed across automation workflows. What is Good to Store in the Vault1. User Credentials: a. System or application usernames and passwords.
b. Service account credentials with scoped access. 2. Use Specific Accounts: Store service or automation accounts rather than individual user credentials whenever possible. Service accounts are more secure and can be tightly scoped to the specific automation. 3. Scope Access: Ensure that only the robots or processes that require specific credentials have access to them in the vault. 4. Regular Rotation: Automate or manually rotate credentials stored in the vault to mitigate risks in case of a breach. 5. Use Least Privilege: Limit the stored credentials to the minimum level of access required for the automation. What is Bad to Store in the Vault1. Do Not Store Generic or Shared User Accounts: Avoid storing credentials for shared or generic accounts unless absolutely necessary, as they can be harder to monitor. 2. Personal Accounts: Storing individual user credentials for personal systems is generally discouraged, as it introduces compliance and privacy challenges. If you store credentials for personal user accounts, ensure this complies with company and regulatory policies, such as GDPR or HIPAA. 3. Volatile or Temporary Credentials: Frequently changing credentials may not be ideal for the vault unless you have automated rotation. 4. High-Privilege Admin Accounts: While possible, it is better to avoid storing root or highly privileged credentials unless critical, as the risks of compromise are higher. 5. Large Files: Credential Vaults are not intended for file storage. Use appropriate file storage solutions for such data. 6. Frequently Changing Data: Avoid storing data that changes frequently, as this can lead to inefficiencies in retrieval and maintenance. 7. Personal Identifiable Information (PII): While the vault is secure, avoid storing excessive PII that may be subject to stringent compliance regulations. Only store what is necessary for operations. 8. Non-Sensitive Information: Avoid storing data that does not require encryption, as it consumes unnecessary resources. Click here to learn how to access the Credential Vault during automation.
Managing Credentials
Managing credentials allows users to efficiently handle their configured credentials by performing tasks such as updating, removing, and tracking them, ensuring secure and organized credential management. Activate/ Inactivate the credentialsCredentials can be activated and inactivated to control their usage. When activated, credentials are available for automation processes, while inactivated credentials prevent unauthorized access, reducing security risks. This functionality ensures better control over sensitive data and allows for easier management. Follow the steps below: 1. Log in to the RobilityManager portal.
2. Navigate to the respective Projects.
3. Select Credential Vault from the menu.
4. Find the respective Credential and click on the “Active/Inactive” option under the Action field.
5. The credentials will now be successfully activated or inactivated accordingly. Updating the credentialsThe Edit option allows users to update the password and modify the expiration date required for the application. The Username field cannot be edited and will be disabled. Follow the steps below: 1. Log in to the RobilityManager portal.
2. Navigate to the respective Projects.
3. Select Credential Vault from the menu.
4. Find the respective Credential and click on the Edit option under the Action field.
a. You can now update the credential details such as password, and expiration date.
7. Click the Update button.
8. The credentials will now be successfully updated. How to Re-activate Expired Credentials?Each credential is set to expire after the duration specified during its configuration. Once a credential expires, it cannot be used for any automation processes, ensuring compliance with security protocols and preventing unauthorized access. To continue using the credential, users must reactivate it by following the reactivation steps outlined above. This process ensures that credentials remain secure, up-to-date, and aligned with organizational policies for managing sensitive information. Lock/Unlock CredentialsCredentials can be locked and unlocked to ensure secure and exclusive access during automation processes. They can be locked during the execution of the bot while retrieving the credentials, preventing unauthorized access or conflicts with other machines. Click here to learn how to lock credentials during bot execution. Once the execution is complete, credentials are unlocked for secure utilization by other processes. This helps maintain control over sensitive data and ensures compliance with security protocols. How to unlock credentials: There are two ways to unlock credentials after the execution process: 1. The bot can automatically unlock the credential once the process is complete. Click here for details. This option is recommended as the best practices of automation.
2. The user can manually unlock the credential in Robility Manager by following these steps: a. Navigate to the respective Projects.
b. Select Credential Vault from the menu.
c. Locate the credential and click the “Unlock” button under the action field. History optionThe history option enhances standards and security compliance by allowing users to track and monitor the usage of credentials. It provides transparency and accountability by providing actions such as usage, lock/unlock status changes, updates, and status changes. 1. Usage: Provides details about credential usage, including the machine name and the last used date and time.
2. Lock/Unlock: Shows the history of lock/unlock actions, along with the machine name and the date/time for the past 24 hours.
3. Updates: Lists the updates made, detailing who performed the update and when, within the last 24 hours.
4. Status Change: Displays the history of status changes, including who made the changes and when, for the last 24 hours.
Application Credentials
Managing Application CredentialsYou can manage Application entries from the Vault in Robility Manager. Depending on your permissions, you can create, edit, delete, activate, or inactivate entries. Creating an Application Entry1. Navigate to Vault and click Add.
2. In the Add Application modal window, select an input method:
a. Webform: Enter details manually.
b. Excel: Upload multiple entries using an .xlsx or .xls file.
3. Select Type as Application.
4. Fill in the required application details:
a. Application Name: Enter the name identifying the target application.
b. Domain: Enter the domain name (optional/if applicable).
c. User Name: Enter the login account username.
d. Password: Enter the password associated with the username.
e. Expiry Date: Select the expiration date for the credentials.
5. Click Save. The new application credential will be created and displayed on the credentials list page. Editing an Application Entry1. Locate the required Application entry and click the Edit icon.
2. Update the User Name, Password, Domain, or Expiry Date as required.
3.Click Update to save all changes. Note: The Application name cannot be modified after creation. All modifications are recorded in the item history for audit and traceability. Deleting Application Entriesa. Single Entry: Locate the required entry and click the Remove icon.
b. Multiple Entries: Select the checkboxes for all target entries, then click Remove. Activating or Inactivating Application EntriesApplication entries can be set to Inactive when they are temporarily unavailable or no longer required.
An inactive entry cannot be used in workflows until it is re-activated. Viewing HistorySelect View on an Application entry to inspect its detailed activity history: a. Usage: Logs when and how the credential was accessed by users or workflows.
b. Lock/Unlock: Tracks when the entry state was locked or unlocked.
c. Updates: Details modifications made to the entry, including the user, timestamp, and status.
d. Status Change: Tracks state transitions between Active and Inactive.
Pin & Key Management
Managing Pin & KeyYou can manage Pin & Key entries from the Vault in Robility Manager. Depending on your permissions, you can create, edit, delete, activate, or inactivate entries. Creating a Pin & Key Entry1. Navigate to Vault and click Add.
2. In the Add Pin & Key window, select an input method:
a. Webform: Enter details manually.
b. Excel: Upload multiple entries using an .xlsx or .xls file.
3. Select Type as Pin & Key.
4. Enter the Application Name.
5. Enter the PIN and Key values.
6. Click Save. The new entry will be created and displayed on the Pin & Key page. Editing or Renewing a Pin & Key Entry1. Locate the required Pin & Key entry and click the Edit icon.
2. Update the PIN or Key value as required.
3. Renew Expiry Date (if expired): If the entry is expired, click Renew to update the expiry date as needed. A confirmation message will confirm: “Tenant expiry date renewed successfully.”
4. Click Update to save all changes. Note: The Pin & Key name and username cannot be modified after creation. All modifications are recorded in the item history for audit and traceability. Deleting Pin & Key Entriesa. Single Entry: Locate the required entry and click the Remove icon.
b. Multiple Entries: Select the checkboxes for all target entries, then click Remove. Activating or Inactivating Pin & Key EntriesPin & Key entries can be set to Inactive when they are temporarily unavailable or no longer required. a. An inactive entry cannot be used in workflows until it is re-activated. Viewing HistorySelect View on a Pin & Key entry to inspect its detailed activity history: i. Usage: Logs when and how the entry was accessed by users or workflows.
ii. Lock/Unlock: Tracks when the entry state was locked or unlocked.
iii. Updates: Details modifications made to the entry, including the user, timestamp, and status.
iv. Status Change: Tracks state transitions between Active and Inactive.
Token Management
The Token feature allows automation workflows to securely store, and access tokens used for authentication and authorization. Instead of embedding token values directly in workflows, they are securely maintained in the Vault and retrieved at runtime. Tokens are commonly used for API authentication, session validation, and secure integration with external services and applications. Key Benefits1. Tokens are securely stored in the Vault.
2. Token values are encrypted and never exposed in plaintext within workflows.
3. Access to tokens is governed by role-based permissions.
4. The maximum allowed token length is 800 characters. Common Use Cases 1. Authenticating API requests to external services.
2. Securing communication between automation workflows and applications.
3. Centralizing token management across multiple environments.
Note: Tokens are sensitive values and must be stored in the Vault. They should not be stored as regular or hardcoded within workflows. User Roles & PermissionsAccess to Token entries depends on permissions configured in Robility Manager: 1. Interact User: Does not have access to view or use Token in workflows.
2. Process Admin: Can assign Token to processes but cannot create, edit, or delete them.
3. Credential Admin: Has full access to create, edit, delete, and inactivate token entries.
4. Developer: Can use existing Token in workflows but cannot manage them.
5. Project Admin: Can manage project-level access but cannot create items; they can edit and remove existing entries. Managing TokenManaging Token entries in Robility Manager helps securely store and control sensitive credentials used by robots. You can create, edit, delete, activate, or inactivate Token entries using the steps below. Creating Token1. Navigate to the Vault page and click Add.
2. In Add Token, choose an upload type:
Webform – for manual entry
Excel – for bulk upload and upload files in .xlsx or .xls format
3. Enter an Application Name.
4. Provide the Token values in the Token field.
5. The expiration date will automatically populate.
6. Click Save.
7. The Token will be created and listed on the Token page. Editing Token1. Locate the Token entry you want to modify and click the Edit icon.
2. Update the Token values as required.
3. Click Update to save the changes.
4. All modifications are logged and can be reviewed in history for audit and traceability.
Note: The application name cannot be modified after creation. Deleting Token1. To delete a single Token entry, click the Remove icon next to it.
2. To delete multiple Token entries:
Select one or more entries.
Click Remove to delete them in bulk. Inactive TokenToken entries can be set to Inactive when they are temporarily not required. Once inactivated, they cannot be used in workflows until reactivated. Viewing HistoryTo view the history of an item, click the View option. The history displays all actions performed on the item and is categorized as follows: 1. Usage: Records when and how the item was used.
2. Lock/Unlock: Shows when the item was locked or unlocked.
3. Updates: Displays any modifications made to the item, including who made the change, when it was made, and the item’s status (active or inactive).
4. Status Change: Tracks changes in the status of the item.
JWT Token Management
JWT Tokens (JSON Web Tokens) provide a secure, verifiable way to store and use signed tokens required for authentication and authorization in automation workflows. Instead of embedding JWT token values directly into workflows, these tokens are stored securely in the Vault and retrieved at runtime. This ensures secure access and controlled use of sensitive credentials. Key Benefits1. Secure Storage: JWT tokens are securely stored and encrypted in the Vault, minimizing the risk of leakage.
2. Signed and Verifiable: Each JWT token enabling validation of token authenticity during retrieval or use.
3. Centralized Management: All JWT tokens for your project are managed in one place, supporting reusability.
4. Role-based Access Control: Permissions to create, edit, view, or delete JWT tokens are governed by roles defined in Robility Manager, ensuring proper governance. User Roles & PermissionsAccess to JWT Token entries depends on permissions configured in Robility Manager: 1. Interact User: Does not have access to view or use JWT Token in workflows.
2. Process Admin: Can assign JWT Token to processes but cannot create, edit, or delete them.
3. Credential Admin: Has full access to create, edit, delete, and inactivate entries.
4. Developer: Can use existing JWT Token in workflows but cannot manage them.
5. Project Admin: Can manage project-level access but cannot create items; they can edit and remove existing entries. Managing JWT TokensThe following sections describe how to create, edit, delete, and inactivate JWT token entries in Robility Manager. Creating a JWT Token1. Navigate to the Vault page in Robility Manager.
2. Click Add to open the Add Credential dialog.
3. In the Upload Type, select
Webform – for manual entry
Excel – for bulk upload and upload files in .xlsx or .xls format
4. Enter the application Name to identify the token.
5. Provide the JWT Token Value in the designated field.
6. Click Save.
7. The JWT token will be stored in the Vault and listed on the JWT Token page. Editing a JWT Token1. On the JWT Token page, locate the entry you want to modify.
2. Click the Edit icon next to it.
3. Update the JWT Token Value as needed.
4. Click Update to save changes.
5. All edits are logged automatically, supporting auditing and traceability. Deleting a JWT Token1. To delete a single JWT token, click the Remove icon beside the entry.
2. To delete multiple tokens at once:
Select the relevant entries using the checkboxes.
Click the Remove button to delete them in bulk. Inactive JWT TokenJWT Token entries can be set to Inactive when they are temporarily not required. Once inactivated, they cannot be used in workflows until reactivated. Security ConsiderationsDo not hardcode JWT tokens within workflows; always retrieve them securely via the Credential Vault.
Access to JWT tokens should be limited based on roles and responsibilities defined in Robility Manager.
Rotate tokens periodically and ensure proper expiration claims are configured to maintain security. Viewing HistoryTo view the history of an item, click the View option. The history displays all actions performed on the item and is categorized as follows: 1. Usage: Records when and how the item was used.
2. Lock/Unlock: Shows when the item was locked or unlocked.
3. Updates: Displays any modifications made to the item, including who made the change, when it was made, and the item’s status (active or inactive).
4. Status Change: Tracks changes in the status of the item.
Asset Management
Asset Management in Robility Manager offers a centralized and secure way to store and manage key data required by robots during automation. Instead of embedding values directly into workflows, developers define reusable assets—configurable data points that streamline and standardize information across automations. Key Benefits1. Centralized Configuration: Store configuration values such as API keys and reusable variables in one place, keeping workflows organized and manageable. 2. Reusability: Use the same asset across multiple workflows and robots, preventing duplication and conflicts. 3. Simplified Maintenance: Update an asset’s value once (e.g., API endpoints or variable values) without needing to modify and republish each workflow. 4. Environment Flexibility: Manage distinct asset values for Dev, Test, and Production environments without altering workflow logic. 5. Audit and Traceability: All asset modifications are logged to support accountability and troubleshooting. Managing AssetsTo optimize robot configurations by managing assets in Robility Manager, you can create, edit, and delete assets through the following steps: Creating Assets1. Navigate to the Vault page and click Add.
2. In the Add Asset window, select either the Webform or Excel input option for manual or bulk input.
3. Choose Type as Asset, provide a meaningful Name, and select the appropriate Asset Type (Text, Boolean, Numeric).
4. Enter the asset Value and optionally add a Description.
5. Click Create to add the asset, which will then appear on the Assets page. Editing Assets1. Locate the asset you want to modify and click the Edit icon beside it.
2. Update the Value as needed.
3. Click Update to save changes.
4. All modifications are logged and can be reviewed in the asset’s history to maintain traceability. Asset and Asset type cannot be changed. Deleting Assets1. To remove an asset, click the Remove icon next to it.
2. Alternatively, select one or multiple assets and use the Remove button to delete them in bulk. What types of assets are supported and how do I choose the right one for my data?Robility Manager supports three main types of assets to store different kinds of data in automation workflows.
Admin Console
Notes 1. System Monitoring: Memory Usage, CPU Usage, and Disk Usage display results in the Live Console panel instead of opening separate reports.
2. Maintenance: After using Reset Runner or Disconnect Runner, reconnect the Runner using the Manager Connection Key. Important 1. Kill Running Applications
Warning – Terminating a process can impact running automations, active applications, or unsaved data on the target machine. Use the Kill option with caution and verify the selected process before proceeding. Once a process is terminated, any associated tasks may fail, applications may close unexpectedly, and unsaved changes may be lost. The Running Processes and Top Processes commands allow you to terminate applications using the Kill option. A confirmation prompt is displayed before termination. 2. Export and Email Process Details
For Running Processes and Top Processes, you can send the process details via email or export them as a PDF. Export as PDF: Click the Export option to download the process details as a PDF file to your local machine, making it easy to save, review, or share reports offline.
Send Email: Click the Send Email option to open an email configuration pop-up. The pop-up allows you to specify the To, CC, Subject, and Email Body fields. The Subject and Email Body are pre-populated with default content, which can be modified as needed. Once the details are updated, click Send Email to share the process report directly with the intended recipients. 3. Log Level Synchronization
Changes to Activity Log or Product Log levels in Robility Manager are automatically synchronized with the Runner. Command Execution and Viewing ResultsAfter sending a command from the Admin Console, the result is displayed automatically in the Live Console panel. The panel shows the response returned by the executed command. Live ConsoleThe Live Console is a real-time activity log that displays timestamped command execution details and responses from the connected Runner machine. It allows you to monitor command progress, verify results, and identify errors without requiring direct access to the machine. Options: Copy — Copies the console log to the clipboard for sharing or troubleshooting.
Clear — Removes all entries from the console view. Admin Audit Analytics DashboardThe Admin Audit Analytics Dashboard provides a centralized view of all commands executed through the Admin Console across all machines. Administrators can use this dashboard to monitor command activity, review execution status, and track administrative actions performed by users for auditing and troubleshooting purposes. FiltersUse the following filters to narrow down audit results:
Resolution Settings
You can now manually configure the screen resolution settings that were initially defined during workflow development, directly from the Automation Ops menu in RobilityManager. This enhancement provides greater flexibility and control during deployment, particularly in environments where screen resolutions differ from one machine to another. In many cases, workflows rely on UI elements that are resolution dependent. When a robot is deployed to machines with different display settings, mismatches in resolution can lead to failed automation or element detection issues. By allowing configuration of resolution settings during deployment, RobilityManager ensures that the robot operates consistently and reliably across various machines. This feature is especially beneficial for unattended robots running on virtual machines, remote desktops, or devices with non-standard display setups. It eliminates the need to modify the workflow or republish the solution just to accommodate a new screen resolution. How Does This Feature Work?When deploying a robot using the Automation Ops menu in RobilityManager, the resolution settings from the original development environment are automatically applied. These settings are crucial for ensuring that the robot performs UI-based automation accurately, especially when working with elements that are sensitive to screen resolution or scaling factors. Automatic Resolution DetectionWhen a solution is published from the developer’s machine, RobilityManager automatically captures and stores the screen configuration details within the solution’s JSON file. This includes: Resolution – The screen dimensions (e.g., 1920×1080)
Scale – The display scaling setting (e.g., 100%, 125%)
Resolution Depth – The color depth of the display (e.g., 24-bit, .32-bit)
Font Smoothing – Indicates whether font smoothing is enabled on the machine
These values are used as a reference for future deployments. During DeploymentWhen you select a solution while adding resources to a project, RobilityManager: 1. Automatically reads the resolution details from the JSON file of the selected solution.
2. Applies those settings to the deployment configuration.
3. Ensures that the robot runs under the same screen settings as the development environment. To learn more about how to deploy resources and configure related settings, click here. Points to Note1. The Resolution settings will apply exclusively to “Unattended and High-density Runner.”
2. This option is not supported for Attended robots.
3. After configuring the settings and initiating the Run process, if the resource is at logged off state, the changes will be reflected upon auto-login functionality.
4. If the machine is already in at unlocked state, initiating the robot won’t execute the specified resolution changes.
5. The specified resolution changes will be executed only when an auto-login functionality is applied or when the manual unlock action is performed in the machine.
6. Resolution setting changes apply only to virtual machines; they are not supported for local systems.
7. Click here to know about “Auto-Logon” functionality. Why is it important?Configuring resolution is important for several reasons: 1. Optimal Performance: Configuring the resolution ensures that the workflow performs optimally on different machines and environments. Matching the resolution to the target machine enhances performance and reduces compatibility issues.
2. Consistent User Experience: By configuring the resolution, you ensure a consistent user experience across different devices and platforms. Users can interact with the workflow without experiencing distortion or display issues.
3. Quality Control: Configuring the resolution allows for quality control, ensuring that images and visual elements appear as intended. It prevents pixelation, blurriness, or distortion that can occur when the resolution is not properly set.
4. Efficient Deployment: Proper resolution configuration streamlines the deployment process. It eliminates the need for manual adjustments or troubleshooting related to resolution discrepancies, saving time and effort during deployment.
5. Compatibility: Different machines and environments may have varying display capabilities. Configuring the resolution ensures compatibility across a wide range of devices, including Virtual Machines, without compromising on image quality or functionality. Configure resolutionOnce you’ve created and published the workflow in the Manager, follow these steps to add the resolution: 1. Go to Projects and click “GO” for the desired project.
2. If the resource has been already added, proceed. Otherwise, click here to add the resource.
3. Go to Automation Ops → click “Add”.
4. Select License Type, then choose the Resource Name, Workflow, and Version.
5. At the resolution settings, the options will be auto filled from the published machine, but you can adjust:
a. Resolution (Width x Height)
b. Depth (e.g., 32-bit)
c. Scaling (e.g., 100%)
d. Font Smoothing
6. Click “Save” to complete deployment. If you want to change the resolution settings for the existing deployed machines, you can click on “EDIT” option and configure the resolution settings as per the project specifications.
Robot Utilization
The Machine Utilization page provides a detailed view of machine activity where robots are executed within a project. It helps users monitor machine status, execution timelines, and utilization metrics to understand how automation resources are being used over time. It enables operational teams to track execution health, identify inefficiencies, and ensure optimal machine allocation by presenting execution data in a structured and easy-to-analyze format. Overview of the DetailsMachine Utilization Details: Each record on the Machine Utilization page represents a robot execution instance on a machine and includes the following fields: Machine Name: Displays the name of the machine on which the robot execution was performed. This helps users quickly identify and differentiate machines in environments with multiple execution nodes. Robot Name: Shows the name of the robot executed on the machine, providing clarity on which automation process was running during the execution cycle. Execution Start Time: Indicates the exact date and time when the robot execution started on the machine. Current StatusDisplays the current or last known status of the machine during execution. Possible statuses include: 1. Executing: The robot is actively running on the machine.
2. Allocated: The machine is reserved for execution but the robot has not started yet.
3. Faulted: The execution encountered an error or unexpected interruption.
4. Check State: The machine is in a verification or transitional state before execution proceeds. Status Transition Time
Shows the timestamp at which the machine moved from one state to another (for example, from Executing to Faulted or Allocated). Execution Duration
Displays the total time taken for the execution cycle, calculated from the execution start time to completion or faulted state. Completed Cycle Count
Indicates the number of execution cycles successfully completed on the machine within the selected time range. Total Hours Executed
Represents the cumulative number of hours the machine has been used for robot execution. This metric helps evaluate overall machine utilization and workload distribution. View Status
Provides a detailed view of the execution status, allowing users to inspect execution progress, completion state, or fault information for deeper analysis and troubleshooting. Key BenefitsCentralized Monitoring: View all machine execution data in a single dashboard
Better Resource Planning: Analyze total hours and cycle counts to optimize machine usage
Execution Transparency: Track execution start times, durations, and state transitions
Improved Troubleshooting: Quickly identify faulted executions and investigate their status Use Cases1. Monitoring real-time and historical machine execution status
2. Identifying machines with frequent faults or idle time
3. Analyzing execution duration trends for optimization
4. Supporting operational audits and performance reporting The Machine Utilization page acts as a comprehensive monitoring and analysis tool for tracking robot execution across machines. By providing detailed status information, execution timelines, and utilization metrics, it enables users to maintain efficient automation operations and make informed resource management decisions.
Flow
Stop Running Flow ExecutionsThe Stop functionality allows you to initiate a stop request for a running Robility Flow from the Automation Ops page. It supports flows triggered by both time-based and queue-based schedulers. When you initiate a stop request from Manager, the flow stops when it reaches the next Stop Workflow component. If the workflow does not contain this component, the request can still be initiated, but the flow continues executing until completion and then moves to the Idle state. PrerequisitesBefore initiating a stop request, ensure that: 1. The Robility Flow execution is in the Running state.
2. You have access to the Automation Ops page. For the flow to stop through this mechanism, the workflow must contain a Stop Workflow component. Stop a Running FlowFollow these steps to initiate a stop request for a running Robility Flow execution: 1. Navigate to the Automation Ops page.
2. Open the Flow tab to view flow executions.
3. Locate the flow execution that you want to stop.
4. Verify that the execution is in the Running state.
5. Click Stop for the selected execution to initiate the stop request.
6. Monitor the execution status on the Automation Ops page.
7. Verify that the status changes to Stopped after the flow has actually stopped. The Stop action applies only to the selected flow execution. Other running executions remain unaffected. How the Stop Functionality WorksAfter you initiate a stop request from Manager, the flow processes the request when it reaches the next Stop Workflow component. a. When the flow reaches a Stop Workflow component: The flow stops when it reaches the next Stop Workflow component after the request is initiated. b. When the flow has already passed a Stop Workflow component: The flow continues executing. If another Stop Workflow component exists later in the workflow, the flow stops when it reaches that component. c. When the workflow does not contain a Stop Workflow component: A stop request can be initiated from Manager, but the flow continues until execution is complete. It then transitions to Idle if the execution succeeds or To Check if further review is required. The execution status does not change to Stopped, as this status is displayed only when a Stop Workflow component halts the flow. d. When the flow has stopped: Manager updates the execution status to Stopped only after the flow has actually stopped. This behavior applies to both time-based and queue-based scheduler executions. Understand the Stop Status LifecycleThe execution status indicates the progress of the stop request.
Scheduler
The Scheduler menu streamlines processes between robots and humans without manual intervention. It enables scheduling of automation workflows at regular intervals, facilitating efficient management and real-time monitoring of robot execution in RobilityManager. This automation of scheduling tasks reduces human error and ensures timely execution of critical processes. By setting up scheduled triggers, you can automate repetitive tasks, manage resources efficiently, and monitor workflow progress seamlessly. Schedulers are essential in automation for several reasons: 1. Efficiency: Schedulers automate repetitive tasks, ensuring they are executed at predefined intervals without manual intervention. This improves overall process efficiency.
2. Resource Optimization: By scheduling tasks, you can allocate resources more effectively, ensuring that critical processes are executed when needed without overburdening systems during peak times.
3. Timely Execution: Scheduled tasks ensure that important processes are executed at the right time, reducing delays and improving overall workflow timelines.
4. Error Reduction: Automation through schedulers reduces human errors that can occur during manual execution, leading to more accurate and reliable results.
5. Real-Time Monitoring: Many schedulers provide real-time monitoring capabilities, allowing you to track task progress, identify issues promptly, and take corrective actions as needed.
6. Productivity: By automating routine tasks, schedulers free up time for employees to focus on more strategic and value-added activities, boosting overall productivity. Within Robility Manager, the scheduler is a vital tool used to organize bot deployment using five distinct scheduling methods. 1. Daily Schedulers
2. Daily Multiple Schedulers
3. Weekly Schedulers
4. Weekly Multiple Schedulers
5. Monthly Schedulers Scheduler EssentialsLet’s delve deeper into each type of scheduler to grasp how they operate within the automation framework. Before proceeding with scheduling robots, it’s crucial to adhere to and maintain the following steps: 1. Publishing Solutions: Begin by publishing the solutions to the project in RobilityManager. This step ensures that the latest versions of your automation workflows are available for scheduling. You can find detailed instructions on how to publish solutions here. 2. Resource Allocation: Next, add the necessary resources with their respective licenses. This step ensures that the correct resources are available for executing the scheduled tasks. Refer to the documentation here for guidance on adding resources. 3. Resource Configuration: Finally, configure the resources inside the project to define their roles and permissions. This configuration step ensures that resources are utilized efficiently and securely during automation execution. Refer to the guide here for detailed instructions on resource configuration. How to navigate to the scheduler section?Once you have followed and configured the above three steps, you can navigate to the Scheduler section to schedule and deploy your robots on a timely basis. 1. Login to Robility manager.
2. Click on Projects from the left side menu bar and navigate to the respective project.
3. Now, click on scheduler from the left side menu bar.
4. Now we can see the different types of schedulers available on this screen.
Queue-Based Scheduler for Robility Flow
The Queue-Based Scheduler enables scheduling of published Robility Flows for execution using queue-based triggers. Workflows are automatically initiated when items are available in the selected queue from Interact, supporting continuous and event-driven processing. The scheduler checks the configured Interact queue for new transactions every one minute and initiates the workflow accordingly. Pre-requisites 1. A queue must be configured in Interact before you can set up a Queue-Based Scheduler.
2. Publish the queue to the manager from Robility Flow. Ensure the “Enable External Flow” option is enabled while publishing, if not enabled, the published flow will not appear in the Workflow Name dropdown when configuring the Queue-Based Scheduler. Configuration Fields1. Queue*: Select the Interact queue to associate with this scheduler trigger. The scheduler monitors this queue and initiates workflow execution based on incoming items. 2. Flow Type*: Defines the type of workflow to be executed. This must be set to Robility Flow for queue-based scheduling. 3. Workflow Name*: Displays a list of published queue workflows. Select the workflow that should be executed. 4. Timezone: Specifies the timezone for the scheduler to ensure trigger execution aligns with the selected regional time settings. 5. Non-Working Days: Upload an .xlsx or .xls file containing dates on which the trigger should not execute. A predefined template is available under the Non-Working Days Template option, and the uploaded file must follow the required format. 6. Save: After configuring all required fields, save the scheduler configuration to activate the queue-based trigger and enable automated workflow execution based on queue activity. Scheduler Trigger BehaviorWhen Does the Scheduler Trigger? The scheduler triggers each time a new item is detected in the monitored Interact queue and is available for processing. Business Rules and Queue Transitions When a business rule is configured in the scheduled queue, the business rule is evaluated first. If the rule moves the transaction to another queue, the Queue-Based Scheduler on the source queue will not be triggered. For example, if Sample 1 has a business rule that moves any incoming transaction to Sample 2, and a Queue-Based Scheduler is configured on Sample 1, the scheduler will not be triggered. The business rule is completed first, moving the transaction out of Sample 1.
Time-Based Scheduler for Robility Flow
Types of Schedulers
Steps to Schedule a Bot for Multiple Runs in a Day1. Click on the Add button from the main screen.
2. The Scheduler screen will appear.
3. Fill in all the required details on the scheduler screen:
a. Ensure the selected solution is already added in the “Deploy Robots” menu, as this will automatically populate the “Resource” parameter with the resource name.
b. If the solution has not been added, click here to learn how to configure the robot in the resource menu.
4. In the “Frequency” option, for the Daily Multiple option:
a. Select the start date. The end date will automatically default to the same day but can be modified using the drop-down.
5. Specify the Start Time and End Time for the bot’s run.
a. Click the Add (+) icon to add another time slot for the same day.
b. You can schedule the bot to run multiple times in a day. For example, set two different time slots for the bot to run.
6. Under the TimeZone parameter, select the appropriate time zone from the drop-down menu to match the machine’s time settings.
7. Click Save to complete the scheduling. The bot will now execute multiple runs within the scheduled day. Block out DatesThe Block Out Dates option in the Scheduler allows you to configure all planned non-working days for the bot in advance. Instead of manually stopping the scheduler each time there is a holiday, maintenance window, or any operational downtime, you can simply add these dates to the block-out list. Once configured, the bot will automatically skip execution on those days.
This ensures uninterrupted operations, reduces manual intervention, avoids accidental bot triggers on restricted days, and provides better control over your automation schedule throughout the year. How to add Block Out Dates? 1. Navigate to the project in Robility Manager.
2. Go to the Schedule Robots
3. Select an existing scheduler or create a new one.
4. Under Non-Working Days, select Non-Working Days Template to automatically download the Excel file.
5. Update the non-working dates in the template, then return to the Schedule Robots
6. Click Browse File and upload the updated template.
7. Save the scheduler to apply the changes. Weekly SchedulerThe Weekly Scheduler option is used when you need to schedule a bot to run multiple times on specific days of the week. This configuration ensures that the bot operates on the selected days every week, at the same designated times. By automating recurring tasks, this scheduler streamlines operations and ensures consistency in executing processes at regular intervals To configure the Weekly Scheduler, follow the same steps outlined for the Daily Multiple Scheduler. Adjust the settings to specify the days on which the bot should run. This ensures seamless automation for recurring processes. Weekly MultipleSimilar to the daily multiple schedulers, the weekly multiple schedulers let you schedule RPA tasks multiple times within a week. You can set RPA robots to run on specific days at different intervals during the week, ensuring timely automation of diverse tasks. To configure the Weekly Multiple Scheduler, follow the same steps outlined for the Daily Multiple Scheduler. Adjust the settings to specify the days on which the bot should run. This ensures seamless automation for recurring processes. Monthly SchedulerThe monthly scheduler is selected when we want to schedule the bot only for the scheduler can be configured to run on specific days of the month at the same time. To configure the Monthly Scheduler, follow the same steps outlined for the Daily Multiple Scheduler. Adjust the settings to specify the days on which the bot should run. This ensures seamless automation for recurring processes.
Connectors
AboutConnectors in Robility act as bridges between third-party applications and the Robility platform, enabling automated workflows through Designer and Runner. These connectors allow users to integrate external systems, facilitating smooth automation of complex processes. Key connector categories include: 1. CRM Connectors: Seamlessly connect to CRM platforms like Salesforce, Microsoft Dynamics CRM, and Zoho CRM for managing customer data. 2. Cloud Service Connectors: Integrate with cloud platforms like Microsoft Azure, AWS, Google Cloud, and Salesforce. – a. Google Sheets Connector: Automate and manage workflows involving Google Sheets.
b. Google Docs Connector: Streamline document management tasks with Google Docs. 3. Document Management Connectors: Connect to document storage systems like SharePoint, Google Drive, OneDrive, and Dropbox to automate file storage and retrieval. 4. Customer Support Connectors: Integrate with helpdesk platforms such as Zendesk, Freshdesk, and ServiceNow to manage customer support workflows. 5. Google Speech-to-Text Connector: Convert spoken language into text for automation involving voice-based inputs. 6. Google Text-to-Speech Connector: Transform text into speech to enhance voice-based automation processes. Each connector comes with detailed specifications and user guides, so always refer to the activity’s documentation for setup and usage. Pre-requisitesBefore integrating any application, ensure the necessary authentication details are collected. Common prerequisites include: 1. Client ID
2. Client Secret
3. Username and Password
4. Scope
5. Account Key
6. Account Name
7. OAuth credentials How to Integrate the Connectors?1. Log in to RobilityManager and navigate to your tenant.
2. Select the project where you want to configure the integration.
3. In the left-hand panel, click on App Integrations.
4. Choose the application you wish to integrate.
5. Enter the required details on the setup page.
6. Once the details are provided, click Submit. After successfully integrating, manage the connectors through the Connections tab. All roles mapped to the project will have access to connect and manage integrations. Activity PackagesRobility simplifies API-based integrations by offering a set of dedicated activities for each third-party application. These activities allow robots to communicate directly with external applications, reducing development effort. Users can leverage pre-built activities for common tasks in connected systems, improving efficiency in automation design. Click here to learn about the App Integration activities.
Connections
This section allows you to manage your connected applications and monitor their status. The following information is available: 1. Connector: Displays the name of the connector. 2. Connection: Shows the name of the individual who initiated the connection. 3. Created On: Provides the date the connection was created. 4. Status: Indicates whether the connection is “Connected” or “Expired.” 5. Action: Offers the following options:
a. View: Displays the details of the integration, including the “Integration Name” and the “Access Token.”
b. Disconnect: Allows you to terminate the connection. How to Manage token expiration?Robility does not support or handle token expiration for connectors, users will need to manage token renewals and updates manually. This includes regularly checking token status, renewing tokens as they approach expiration, and updating connector configurations accordingly. For applications like Google Sheets, Google Drive, and Google Docs, the token expires every hour. To refresh the token: 1. Navigate to App Integrations within your project on RobilityManager.
2. In the Connections tab, check the status of your Google application connection.
3. If the connection has expired:
a. Re-establish the connection from the Connectors tab.
b. The process automatically handles previously stored authentication details.
c. Click Connect to refresh the token. Connectors like Zendesk support long-lived tokens that remain valid until manually revoked, whereas Salesforce connectors typically use tokens that expire after a certain duration or session timeout. To ensure proper authentication handling, always refer to the respective activity documentation for detailed guidance on token usage and management.
Automation Orchestration
Use Scheduler when an automation needs to run on a fixed schedule. Use Automation Orchestration when the next execution depends on the status of another automation. What You Can Do with Automation Orchestrationa. Route execution from one RPA robot to another RPA robot.
b. Route execution from an RPA robot to a Robility Flow.
c. Define different execution paths based on configured conditions.
d. Define a fallback path when none of the configured conditions are satisfied.
e. Centralize routing logic instead of implementing it separately in individual automations.
f. Connect multiple automation steps into a coordinated execution sequence. How Automation Orchestration WorksAutomation Orchestration uses the Robility Business Rule Engine (BRE) to evaluate configured rules and determine the next execution target. The routing process is: 1. Monitor Robot Status – Automation Orchestration monitors the selected robot’s status from the Automation Ops page.
2. Trigger the Rule – When the robot reaches the configured trigger status, the associated rule is triggered.
3. Evaluate Conditions – The BRE evaluates the conditions configured for the rule.
4. Route Execution – When a condition is satisfied, execution is routed to the configured RPA or Robility Flow target.
5. Apply Fallback – If no condition is satisfied, the ELSE path routes execution to the configured fallback destination, when available. Configuring a Rule1. Define Rule Details
a. Open Automation Orchestration and click + Create New Rule.
b. Enter a unique Rule Name.
c. Enter a Description, if required. The rule name identifies the rule, while the description provides context about its purpose and routing logic. 2. Configure the TriggerTrigger Configuration defines when the rule should be evaluated. a. Under Trigger Configuration, select RPA (currently the only supported trigger type — see Availability table below).
b. Select the required Trigger Event.
c. Select the Robot to monitor. Automation Orchestration uses the selected robot’s status from the Automation Ops page to determine when the trigger event occurs. For example, if Robot Completed is selected, Automation Orchestration checks the robot’s status and, once it reaches Completed, triggers the rule and evaluates its conditions.
Troubleshooting Steps
This page highlights the most common issues that may affect the functionality of the Robility Automation extension installed on Chrome and Edge browser and provides step-by-step solutions to help users diagnose and resolve them efficiently. Exception with Open Web Browser Activity: Browser Not RespondingThe “Open Web Browser” activity may throw an exception “Browser Not Responding. Close and reopen the browser” if the CPU utilization is high. In some cases, the activity may fail, but the browser might still launch. When CPU usage is high, system resources are heavily utilized, causing the browser take longer to launch, leading to a timeout or failure in the activity. Click here to know about the minimum system requirements for Robility. How to resolve this?1. Optimize CPU Utilization: Ensure that CPU usage is stable. If necessary, verify that the system meets the hardware requirements for running Robility Designer and Runner.
2. Modify Activity Properties: In the “Open Web Browser” activity, set the “WaitForReady” property to “Complete” and increase the wait time to allow the browser to launch properly. If the issue persists, contact your Robility Support for further troubleshooting. Extensions are removed automatically If the Robility Automation extension is removed automatically after installation, it may need to be reinstalled manually. This issue can occur due to various factors as below, 1. User Profile Reset: If your browser profile is reset or corrupted, it may result in the removal of installed extensions.
2. IT Security Policies: Many organizations enforce group policies that restrict or remove extensions. Click here to know how to install the extension. How to Resolve This Issue?1. Manually reinstall the extension if it has been removed.
2. Verify browser settings to ensure extensions are allowed.
3. Whitelist Robility Automation in security software or IT policies.
4. Check with your IT administrator if the extension is being removed due to organizational policies. If the issue persists, contact your Robility Support for further troubleshooting. Extensions May Be CorruptedIf the Robility Automation extension displays the message “Extension may be corrupted,” it means the browser has detected potential issues that may affect its functionality. This could be due to security risks, firewall restrictions, or a corrupted installation. Possible Causes:1. Browser Security Alerts: Chrome and other browsers automatically check for extension integrity. If they detect unusual behavior or incomplete files, they may flag the extension as corrupted.
2. Firewall or Antivirus Interference: Certain security policies or firewall settings may block extensions, causing them to malfunction.
3. Incomplete Installation or Browser Updates: A failed installation or an interrupted browser update can corrupt the extension files.
4. Third-Party Software Conflicts: Some browser extensions or installed applications may interfere with Robility Automation, leading to corruption warnings. How to Check and Fix the Issue?1. Open Chrome Extensions by navigating to “Chrome:extensions”
2. Locate the Robility Automation extension and if marked as corrupted, you will see an option to “Repair” the extension.
3. Click the “Repair” button to allow Chrome to reinstall and fix the extension automatically.
4. Restart the browser and check if the issue is resolved.
5. Ensure your firewall, antivirus, or endpoint security is not blocking or restricting the extension.
6. If repairing does not resolve the issue, try removing and reinstalling the Robility Automation extension. If the issue continues, contact your IT administrator for further troubleshooting. Activity is not working properly, please close and re-open the browser and try againIf you encounter the message “Activity is not working properly, please close and re-open the browser and try again” while executing the robot, follow these steps to resolve the issue. Step 1: Check If Extensions Are Installed and Enabled The first step is to ensure that the Robility Automation extension is installed and enabled in your browser. If the extensions are not enabled, follow the instructions here to learn how to install them. Step 2: Verify Native Messaging Host Functionality If the extensions are installed and enabled but the issue persists, we need to check whether the Native Messaging Hosts are running. What is Native Messaging Host? The Native Messaging Host is a communication port that enables interaction between the browser extension and the Robility activities. In Robility, the Native Messaging Hosts are: a. RobilityChromeNativeApp (for Chrome)
b. RobilityEdgeNativeApp (for Edge) Step 3: How to Check If the Robility NativeApp is Running To verify that the Native Messaging Host is functioning properly, follow these steps: 1. Open Task Manager and navigate to the “Details” tab.
2. Check if RobilityChromeNativeApp.exe (for Chrome) or RobilityEdgeNativeApp.exe (for Edge) is running.
3. If the Native App is running or unavailable, move to the “Extensions” tab in your browser.
4. Enable “Developer Mode” at the top of the page.
5. Find the “RobilityAutomation” extension and click on the “Service Worker” link.
6. A new DevTools window will open, displaying the Native Messaging app logs.
7. If the log shows “Failed to connect”, it means the communication port is disabled, preventing the activities from working. Note: The Native Messaging Host may be blocked by group policies in your organization. Click here to learn more about group policies. Step 4: Checking the Native Messaging Host in the Registry Editor We also need to check the Registry Editor because it contains essential configuration data for both the extension and its communication with Robility activities. If the registry entries are missing or misconfigured, it could prevent the extension from properly connecting with Robility activities. Here are the two key registry entries you need to locate: 1. Extension ID – lgnoojafhdgcpllpgolgpmjjdejnneom (Robility Automation). This entry ensures that the extension is correctly installed in the browser.
2. Robility.Runtime.Automation – Facilitates communication between the extension and Robility activities. Where to Find These Entries: 1. Verify Extension Installation: Navigate to: HKEY_USERS → Unique SID (e.g., S-1-5-21-2144601217-6038991-817656539) → SOFTWARE → Google → Browser → Extensions → lgnoojafhdgcpllpgolgpmjjdejnneom. This confirms that the extension is installed correctly in the browser.
2. Verify Extension-Activity Communication: Navigate to: HKEY_CURRENT_USER → SOFTWARE → Browser → Chrome → NativeMessagingHosts → Robility.Runtime.Automation.This ensures proper communication between the extension and Robility activities Step 5: What to Do If Registry Entries Are Missing? If the registry entries for RobilityAutomation or Robility.Runtime.Automation are missing: 1. Reinstall the Robility Extension: Reinstalling the extension ensures that these registry entries are created automatically. If the entries are not present after reinstalling, it indicates an issue with the installation process, and you may need to troubleshoot further with Robility Support team. 2. Check Group Policies: In some cases, group policies in your organization may prevent the registry entries from being created. Contact your IT administrator to ensure that these policies allow the installation and configuration of the required registry keys.
Preview Release Features
Welcome to the preview release of our new features. This document provides key information, best practices, and usage guidelines for preview features so you can make informed decisions while exploring early-stage innovations. Overview of Preview Release FeaturesWhat are Preview Features?
Preview features are early versions of upcoming functionalities, labeled with the “Preview” tag, and shared for your evaluation and feedback. They are not production ready. Purpose of Preview Release
Preview releases allow us to gather valuable user insights, test usability, and identify improvements before finalizing features in a stable release. Important Usage Guidelines1. Non-Production Ready – Preview features may be incomplete or experimental and may lack full quality assurance testing. Please use with caution and do not deploy in production environments. 2. Feature Evolution and Potential Changes – The product team continually evolves preview features based on user feedback, market needs, and competitive analysis. Features and functionalities may be modified, enhanced, or even disabled during the preview period to better align with product strategy and priorities. 3. Feedback Collection, Not Bug Reporting – Any issues or unexpected behavior with preview features should be submitted as feedback. These are not treated as formal bug reports. Feedback is used to guide the final product but does not guarantee immediate fixes or updates. 4. General Release Cycle for Updates – Preview feature updates and any issue resolutions are incorporated in line with our standard major release cycle, rather than through urgent or ad-hoc patches. 5. No Dedicated Support – There is no dedicated technical support or troubleshooting assistance for preview features. For help, use available resources like community forums, documentation, or FAQs for self-service solutions. Best Practices for Using Preview Releases1. Test in Non-Production Environments: Use preview features in sandbox or test environments to avoid disrupting production systems. 2. Regularly Backup Data: Backup important data before enabling preview features to safeguard against potential data loss. 3. Stay Current with Documentation: Preview features may change rapidly. Review release notes and documentation frequently for the latest details. 4. Participate in Feedback Channels: Submit clear, actionable feedback through official channels. Your input directly influences the final design and implementation. 5. Prepare for Changes or Feature Disabling: Be aware that features may change substantially—or be disabled—based on feedback or strategic direction. Plan your workflows so you can adapt quickly when features evolve or are retired. 6. Plan for Transition to General Availability: Workflows may need adjustment once preview features reach general availability due to changes in APIs or functionality. Summary Table
Use the visual editor
Connect applications to agents
This tutorial shows you how to connect a JavaScript application to a Robility flow agent. With an agent, your application can use any connected tools to retrieve more contextual and timely data without changing any application code. The tools are selected by the agent’s internal LLM to solve problems and answer questions. Prerequisitesa. Create a Robility flow API key
b. Install the Robility flow JavaScript client
c. Create an OpenAI API key This tutorial uses OpenAI LLM. If you want to use a different provider, you need a valid credential for that provider. Create an agent flowThe following steps modify the Simple Agent template to connect a Directory component and a Web Search component as tools for an Agent component. The Directory component loads all files of a given type from a target directory on your local machine, and the Web Search component performs a DuckDuckGo search. When connected to an Agent component as tools, the agent has the option to use these components when handling requests. 1. In Robility flow, click New Flow, and then select the Simple Agent template.
2. Remove the URL and Calculator tools and then add Directory and Web Search components to your flow.
3. In the Directory component’s Path field, enter the directory path and file types that you want to make available to the Agent component. In this tutorial, the agent needs access to a record of customer purchases, so the directory name is customer_orders and the file type is .csv. Later in this tutorial, the agent will be prompted to find email values in the customer data. You can adapt the tutorial to suit your data and save it in a customer_orders folder on your local machine. 4. In the Directory and Web Search components’ header menus, enable Tool Mode so you can use the components with an agent.
5. Connect the Directory and Web Search components’ Toolset ports to the Agent component’s Tools port.
6. In the Agent component, enter your OpenAI API key. If you want to use a different provider or model, edit the Model Provider, Model Name, and API Key fields accordingly. 7. To test the flow, click Playground, and then ask the LLM a question, such as Recommend 3 used items for john.smith@example.com, based on previous orders. Given the example prompt, the LLM would respond with recommendations and web links for items based on previous orders in customer_orders.csv. The Playground prints the agent’s chain of thought as it selects tools to use and interacts with functionality provided by those tools. For example, the agent can use the Directory component’s as_dataframe tool to retrieve a DataFrame, and the Web Search components perform_search tool to find links to related items. Add a Prompt Template Component to the flowIn this example, the application sends a customer’s email address to the Robility flow agent. The agent compares the customer’s previous orders within the Directory component, searches the web for used versions of those items, and returns three results. 1. To include the email address as a value in your flow, add a Prompt Template component to your flow between the Chat Input and Agent components.
2. In the Prompt Template component’s Template field, enter Recommend 3 used items for {email}, based on previous orders. Adding the {email} value in curly braces creates a new input in the Prompt Template component, and the component connected to the {email} port is supplying the value for that variable. This creates a point for the user’s email to enter the flow from your request. If you aren’t using the customer_orders.csv example file, modify the input to search for a value in your dataset. At this point your flow has six components. The Chat Input component is connected to the Prompt Template component’s email input port. Then, the Prompt Template component’s output is connected to the Agent component’s System Message input port. The Directory and Web Search components are connected to the Agent component’s Tools port. Finally, the Agent component’s output is connected to the Chat Output component, which returns the final response to the application. Send requests to your flow from a JavaScript applicationWith your flow operational, connect it to a JavaScript application to use the agent’s responses. 1. To construct a JavaScript application to connect to your flow, gather the following information: a. ROBILITY FLOW _SERVER_ADDRESS: Your Robility flow server’s domain. The default value is 127.0.0.1:7860. You can get this value from the code snippets on your flow’s API access pane.
b. FLOW_ID: Your flow’s UUID or custom endpoint name. You can get this value from the code snippets on your flow’s API access pane.
c. ROBILITY FLOW _API_KEY: A valid Robility flow API key. 2. Copy the following script into a JavaScript file and then replace the placeholders with the information you gathered in the previous step. If you’re using the customer_orders.csv example file, you can run this example as-is with the example email address in the code sample. If not, modify the const email = “isabella.rodriguez@example.com” to search for a value in your dataset.
Supported Libraries & Packages
Dependency Groups OverviewThe following dependency groups will provide the technical foundation for building, orchestrating, and operating AI-driven flows and agents across the platform. Each group will address a specific layer of functionality, from core orchestration to observability and infra integration. Core Flow & Agent FrameworksThis group will form the backbone of the platform’s orchestration layer. - Langgraph-base and Langchain will provide the visual and programmatic building blocks for creating flows, chains, and agents that combine LLMs, tools, and data sources.
- dspy-ai, pydantic-ai, and smolagents will enable more structured, programmatic agent design, helping you define tool-using agents with typed inputs/outputs, deterministic behavior, and optimization capabilities.
- litellm will act as a unified LLM interface and proxy, allowing the platform to route calls across multiple model providers while centralizing configuration, logging, and throttling.
- mcp (Model Context Protocol) will standardize how agents will talk to external tools and services, making the platform more extensible and interoperable.
Collectively, this group will orchestrate how flows and agents will execute end-to-end across the platform. LangChain IntegrationsThis group will unlock the wider AI ecosystem through plug-and-play integrations. - Model provider integrations (langchain-google-genai, langchain-cohere, langchain-anthropic, langchain-openai, langchain-groq, langchain-mistralai, langchain-aws, langchain-nvidia-ai-endpoints, langchain-sambanova, etc.) will let flows switch between different LLMs and embedding models without changing the core logic.
- Vector and storage integrations (langchain-pinecone, langchain-chroma, langchain-milvus, langchain-astradb, langchain-elasticsearch, langchain-
- mongodb, langchain-chroma, langchain-graph-retriever) will allow retrieval-augmented generation (RAG) patterns across multiple databases.
- Tooling and service integrations (langchain-unstructured, langchain-google-vertexai, langchain-google-calendar-tools, langchain-google-community, langchain-ollama, langchain-community) will give the platform access to document loaders, calendar operations, local models, and community-maintained connectors.
This group will ensure that LangChain-based flows will connect seamlessly to the models, storages, and services required by enterprise use cases. AI / LLM Provider SDKs & ToolsThese dependencies will provide direct access to commercial AI providers and LLM utilities outside LangChain, giving more flexibility in how the platform will use models. - Provider SDKs such as openai, huggingface-hub[inference], qianfan, ibm-watsonx-ai, langchain-ibm, assemblyai, twelvelabs, and jigsawstack will let the platform call text, vision, speech, and multimodal models directly.
- mem0ai will add long-term memory capabilities for agents, improving continuity across sessions.
- cleanlab-tlm will help evaluate and improve output quality, especially around noisy or low-quality labels.
- gassist will introduce platform-specific helper capabilities on Windows where required.
This group will allow the platform to mix high-level orchestration (via LangChain) with low-level, provider-specific capabilities when needed. Vector DB & RetrievalThis group will power semantic search, embeddings storage, and graph-based retrieval across structured and unstructured content. - Hosted or managed vector stores such as qdrant-client, weaviate-client, zep-python, upstash-vector, astra-assistants[tools], and metal_sdk will let the platform scale RAG workloads with external services.
- Local / embedded vector solutions like chromadb, faiss-cpu, and pgvector will support on-prem or lightweight deployments.
- Search-layer integrations like opensearch-py and elasticsearch will combine full-text and vector search patterns.
- graph-retriever will allow graph-based retrieval, enabling more advanced knowledge graph and relationship-based querying.
Together, this group will enable flexible retrieval strategies ranging from simple document search to complex knowledge graph–driven reasoning. Databases, Storage & ORMThis group will handle application state, logs, configuration, and analytical data. - sqlalchemy (with aiosqlite and Postgres drivers) will provide the primary ORM and SQL abstraction for relational data.
- aiosqlite, pymongo, supabase, oracledb, and pyodbc will allow the platform to connect to SQLite, MongoDB, Supabase (Postgres), Oracle, and ODBC-compatible databases.
- redis will be used for caching, queues, and ephemeral state management.
- azure-storage-blob will support blob storage for large artifacts such as files, logs, and attachments.
- Serialization and analytics tools like fastavro, pyarrow, and fastparquet will handle efficient storage and processing of large datasets and event streams.
This group will ensure the platform will persist and manage data in a reliable, scalable, and provider-agnostic way. Cloud & External Platform SDKsThese SDKs will connect flows and agents to cloud infrastructure and external SaaS platforms. - boto3 will enable interactions with AWS services (S3, Lambda, Bedrock, etc.).
- kubernetes will allow the platform to query and manage K8s resources, for example to orchestrate workloads or monitor deployments.
- google-api-python-client will open up access to Google services like Drive, Sheets, and Gmail.
- msal will provide secure authentication against Microsoft identity platforms (Azure AD).
- atlassian-python-api will connect to Jira, Confluence, and other Atlassian tools for ticketing and documentation workflows.
This group will let agents move beyond pure “chat” and interact with real operational environments. Web Search, Scraping & Data SourcesThis group will allow the platform to pull information from the public web and external data sources for RAG and enrichment. - Search wrappers such as google-search-results, duckduckgo_search, metaphor-python, yfinance, and wolframalpha will provide search, semantic search, financial data, and computational knowledge.
- Web automation and scraping tools like scrapegraph-py, apify-client, spider-client, beautifulsoup4, and fake-useragent will allow robust crawling and HTML extraction while mimicking realistic user agents.
- Content APIs like wikipedia and datasets (Hugging Face Datasets) will provide ready-to-use corpora and reference data.
This group will ensure that agents will ground their reasoning in real-world, up-to-date information where appropriate. NLP, Parsing & Data ProcessingThese libraries will handle text processing, parsing, structural transformations, and numeric computation. - nltk and lark will support classic NLP tasks and grammar-based parsing (e.g., for DSLs or configuration languages).
- jq and json_repair will help query, transform, and repair JSON structures produced by LLMs or external APIs.
- Markdown will convert Markdown documents into HTML, which the platform will then reduce to text as needed.
- Numeric and scientific computation will be handled by numexpr and scipy.
- networkx will model and analyze graph structures, useful for knowledge graphs and flow graphs.
- docling_core and docling will manage document parsing for complex formats like PDFs and office documents.
This group will give the platform the tools required to normalize, clean, parse, and analyze data before it is passed to models or stored. Document, OCR & VisionThis group will focus on extracting text and information from documents and images. - easyocr and opencv-python will enable OCR and basic computer vision operations for scanned documents, screenshots, and image-based inputs.
- pdfkit will convert HTML content back into PDF, allowing the platform to generate human-readable reports or exports.
These capabilities will allow the platform to handle both digital and scanned content end-to-end. Agent Tooling & Automation BridgesThese dependencies will make it possible for agents to call rich sets of external tools without custom glue code for each integration. - composio and composio-langchain will provide a tool hub that exposes many SaaS and productivity tools (e.g., calendars, task systems, communication apps) as callable actions from within a LangChain agent.
This group will turn agents into real “doers” by enabling workflows that perform actions across the user’s SaaS landscape. Observability, Tracing & ExperimentationThis group will provide full visibility into LLM behavior, performance, and reliability. - langfuse, langwatch, langsmith, opik, and traceloop-sdk will capture traces, metrics, and evaluations of flows and agent runs.
- arize-phoenix-otel and openinference-instrumentation-langchain will integrate with OpenTelemetry-style pipelines for standardized tracing.
- newrelic will act as an APM layer to monitor application performance and error rates.
- pytest-codspeed will support performance benchmarking at the test level, while needle-python will provide code instrumentation and telemetry.
This group will ensure that the platform will remain observable, debuggable, and continuously improvable as workloads grow. System, Security & Utility LibrariesThese cross-cutting libraries will handle configuration, security, logging, and other foundational concerns. - pydantic-settings will standardize configuration via environment variables and typed settings objects.
- filelock and aiofile will support safe, concurrent file access, including async workloads.
- MarkupSafe and certifi will handle HTML escaping and TLS certificate validation.
- cryptography will provide secure primitives for encryption, key handling, and secure communication.
- uv will improve Python environment and dependency management, particularly in containerized deployments.
- GitPython will allow programmatic interactions with Git repositories (e.g., pulling flows or scripts from version control).
- sseclient-py, types-cachetools, and structlog will support streaming, caching, and structured logging.
This group will underpin the non-functional aspects of the platform—security, reliability, and maintainability. Feature Flags & ConfigThis group will control runtime behavior via feature flags. - unleashclient will let the platform expose and evaluate feature flags, enabling gradual rollouts, experiments, and tenant-specific configurations without redeploying core services.
Feature-flagging will be critical for safely evolving the platform and testing new capabilities. Platform-Specific (Windows / Conditional)This group will cover OS-specific needs. - pywin32 will expose Windows APIs (COM, registry, etc.), enabling automations or integrations that are only possible or necessary on Windows environments.
This group will be used selectively, ensuring the platform will support Windows-specific scenarios without affecting cross-platform deployments.
v.1.3.9
v.1.0.8
v.1.2.8
v.3.2.3
v.2.3.0
Virtual Machine (Docker) Deployment Prerequisites
AWS Deployment Prerequisites
Agent Management
Agent Group
Tracing Actions
v.1.0.4
2026
Oct'26 Release
The October 2026 release brings enhancements across Robility Designer, Robility Manager, Robility Runner, Robility Flow, and Robility Activities. These updates are designed to simplify workflow management, improve execution control, strengthen automation capabilities, and provide greater flexibility across the Robility platform. ROBILITY DESIGNERPinned Solutions for Quick Access
Keep frequently used solutions within easy reach by pinning them from the Home page and accessing them through a dedicated Pinned tab. Debugging
Simplify workflow troubleshooting with Retry, Ignore, and Variable Editing options to handle failed activities, skip execution steps, and modify variable values during debugging. Execution Profiling
Understand workflow performance in greater detail with execution insights that help identify bottlenecks and investigate failures. Pause and Resume Controls
Manage workflow execution more flexibly by pausing running workflows and resuming them using the Continue option from the Designer Home page or Activity Tray. Customizable Workspace Panels
Create a more flexible working environment with individual toggle controls for the Left Pane, Right Pane, and Bottom Panel. ROBILITY MANAGERRobility Flow Execution Control
Take greater control of running schedule-based and queue-based Robility Flow executions by stopping them directly from the Automation Ops page. The flow must include a Stop Workflow component for the stop request to take effect. Error Screenshot and PDF Viewer
Investigate automation failures more easily by viewing associated screenshot PDFs directly from the Automation Ops error details window. ROBILITY RUNNERRunner Error Reporting
Access Exception Details PDFs and Runner Logs ZIP files separately, enabling independent storage and management through Robility Manager. Runner Log and Screenshot Management
Improve the reliability of Runner log and screenshot handling with enhanced validation and error management across Azure Cloud, Google Cloud, and Database storage. ROBILITY FLOWAzure Document Intelligence
Extract information from supported documents, including text, tables, selection marks, and structured data, using Microsoft Azure AI services. SharePoint File and Folder Management
Simplify SharePoint file and folder management with a single component that supports uploading, downloading, moving, copying, deleting, and checking file or folder existence. Amazon S3 File Management
Manage Amazon S3 files more efficiently with operations for uploading, downloading, listing, copying, moving, deleting, retrieving metadata, checking existence, and generating presigned URLs. Workflow Execution Stop Control
Stop workflows through requests initiated from Robility Manager. The Stop Workflow component handles the request or passes its input unchanged when no stop request is triggered. Data Table Row Limits
Process data with greater control by setting row limits from 1 to 100 in the Get Row, Update Row, and Data Table Operation components. Flow and Component Export Encryption
Protect exported flows and components with encryption, adding an extra layer of security to exported content. Action Required: Re-export flows and components from the updated environment before importing files exported from earlier versions. Playground Experience
Organize chats and files more easily with an expandable side panel, centralized Chat Files, a filterable Chats dropdown with date and time stamps, and file previews in Deep Agent. ROBILITY ACTIVITIESSAP Application Automation
Automate SAP-related tasks within workflows, including starting SAP sessions, interacting with application elements, entering text, selecting values, and retrieving tabular data. AI Connection and AI Assist Support
Bring AI-powered capabilities into ScreenPlay automation with AI provider and model configuration through Robility Interaction Scope. Generate and refine task instructions, success conditions, execution plans, and review notes with AI Assist to improve task execution reliability.
UI Recorder
The UI Recorder observes and captures user interactions within the application under test and automatically converts them into executable automation steps. Activities such as button clicks, text input, navigation, and other user interactions are recorded in sequence, enabling testers to rapidly create automated test workflows without manually defining each step. This approach accelerates test development, improves consistency, and reduces human error during workflow creation. Enter the Testcase ID and Description. Configure the required settings under Configuration, and then click Launch Recorder to start the recording process. PropertiesINPUTTestcase ID: Specifies a descriptive name for the test case. The name is displayed in generated reports. This property accepts a String value and can be provided either as a hardcoded value or through a String input. Description: Specifies a summary of the test case, including the functionality being validated and the expected behavior. This property accepts a String value and can be provided either as a hardcoded value or through a String input. Is Active: Enables or disables the UI Recorder activity for the selected test case. This property uses a Checkbox control and accepts a Boolean value. When selected (True), the activity is enabled and executed. When cleared (False), the activity is disabled and skipped during execution. Is Configured: Enables or disables UI Recorder configuration for supported HTTP request methods. This property uses a Checkbox control and accepts a Boolean value. Supported methods include GET and POST. When selected (True), the configuration is enabled. When cleared (False), the configuration is disabled. Report File Type: Specifies the format of the execution report. The supported report format is PDF. Report File Path: Specifies the location where the execution report is saved. This property accepts a String value and can be provided either as a hardcoded value or through a String input. MISCDisplay Name: Specifies the name of the activity displayed within the workflow. This value can be customized to improve workflow readability and simplify identification of the activity. Global SkipOnError: Specifies how the workflow handles errors encountered during the execution of this activity. This property accepts a Boolean value. When set to True, workflow execution continues even if the activity encounters an error. When set to False, workflow execution stops when an error occurs. If no value is provided, the property defaults to False. Version: Displays the current version of the activity. This field is read-only and is automatically populated by the system. OUTPUTExecution Report: Contains detailed execution results for all recorded and executed steps. This output can be stored or returned as a String for validation, analysis, and reporting purposes. Failed Report: Contains information about all steps that failed during execution. This output can be stored or referenced for troubleshooting and debugging and is returned as a String value. Overall Status: Displays the final execution status of the test case. This output is returned as a String and can have a value of Passed or Failed. If one or more recorded steps fail during execution, the overall status is returned as Failed. Result: Indicates whether the UI Recorder activity completed successfully. This output is returned as a Boolean value. A value of True indicates that the activity executed successfully without unexpected errors, while a value of False indicates that the activity failed due to an unexpected error. XML File Path: Specifies the location where the XML execution report will be generated and saved. Providing a valid XML file path is mandatory to generate the report successfully. This property accepts a String value and can be provided either as a hardcoded value or through a String input. The report is generated in .xml format and stored at the specified location.
The report follows the naming convention ReportName_YYYYMMDD_HHMMSS.xml. For example, a generated report may be named UIRecorderReport_20260728_153045.xml.
Configuration
The Configuration module acts as the primary bridge between your platform and external systems, services, or third-party applications. It utilizes REST APIs to facilitate a two-way flow of information, allowing your application to send requests and process responses efficiently. Core ObjectivesUtilize this feature when your integration requires: 1. Data Retrieval: Fetching information from external services.
2. Data Submission: Sending data to systems for processing.
3. Record Management: Creating, updating, or deleting records in third-party databases.
4. Workflow Orchestration: Triggering external business processes, automated workflows, or notifications.
5. System Synchronization: Maintaining data consistency across multiple platforms. Key Components of an API RequestEvery API request consists of the following structure: a. API Protocol: The communication standard used.
b. HTTP Method: The action to be performed (e.g., GET, POST).
c. Endpoint URL: The destination address for the request.
d. Request Headers: Metadata for authentication and content types.
e. Query Parameters: Key-value pairs appended to the URL.
f. Request Body: The data payload sent with the request.
g. API Response: The information returned by the external system. HTTP MethodsGET (Retrieve Data)Used strictly to fetch data without modifying existing records. Characteristics: Read-only, safe, typically uses query parameters. Example URL: https://api.example.com/employees?employeeId=1001&status=Active POST (Submit Data)Used to send data for processing, creating records, or initiating actions. Characteristics: Often modifies state; requires a request body payload. Example Payload: json { “employeeId”: “1001”, “employeeName”: “Hana”, “department”: “IT”}
|