Business Rules
Business rules allow the user to define rules and conditions for the transaction process. These rules are crucial during project configuration as they help the user to make decisions based on the real time data.
In simpler terms, this step acts as a checkpoint for every transaction, ensuring that each transaction is validated, and further actions are processed seamlessly during bot execution.
Benefits
1. The business rules allow the user to reduce the workflow process by handling complex cases with multiple conditions at the project configuration level.
2. It minimizes the manual intervention during runtime and processes the cases within minutes.
3. This makes transaction movement easier and swifter through “If/Else” functionality compared to the traditional process of transaction movement.
4. It improves flexibility and enhances efficiency in data management by customizing field values and copying one field value to another queue.
How do business rules work?
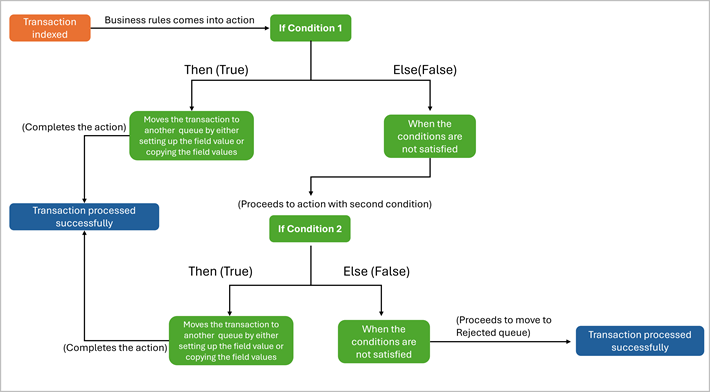
Traditionally, the business rules model wouldn’t allow users to process transactions with multiple conditions. To overcome this hurdle, the “If/Else” functionality implements a comprehensive and structured model, enabling users to pre-determine and define their own criteria in all possible ways. This functionality allows the user to create multiple conditional parameters that can execute actions based on the specified criteria.
The below diagram represents the diagrammatic flow of the model of the business rules.
- If: This part specifies the condition that must be met for the action in the “Then” part to be executed.
- Then: This part specifies the action to be taken if the condition in the “If” part is true.
- Else: This part specifies the action to be taken if the condition in the “If” part is false.
Please note that the below picture demonstrates a sample example of a process flow model.
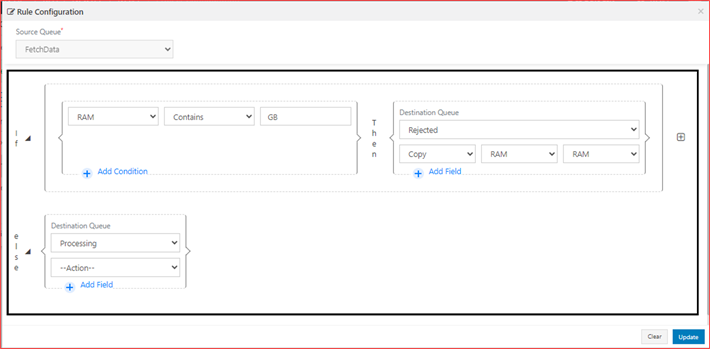
Visual Representation of Business rule window:
How to implement and configure the rules?
Let’s understand the key concepts and configuration steps in the business rule window.
Step 1: To access the “Rule Configuration” window, select the “Create Rule” button.
If Part:
This section allows the user to choose the fields, specify the condition and provide the conditional value that is to be actioned and processed. Let’s see how to add rule condition in the “IF” part.
Step 2: Select the “Source Queue” name from where the fields have to be configured. In the “If” part, there will be three options to configure.
1. Field: This drop-down displays the “fields” that are available for the current chosen queue. Select the required fields which needs to be actioned.
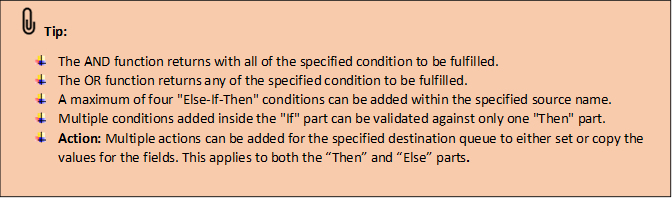
2. Operator: There are 12 operators with which the user can define the values. Choose the operation from the drop-down.
a. Equals: It validates to check whether the input “FieldName” value received is equal to the specified condition value.
b. Not Equals: It validates to check whether the input “FieldName” value received is not equal to the specified condition value.
c. Greater than: It validates to check whether the input “FieldName” value received is greater than the specified condition value.
d. Less than: It validates to check whether the input “FieldName” value received is lesser than the specified condition value.
e. Greater than or equals: It validates to check whether the input “FieldName” value received is greater than or equal to the specified condition value.
f. Lesser than or equals: It validates to check whether the input “FieldName” value received is lesser than or equal to the specified condition value.
g. Contains: It validates to check whether the input “FieldName” value received contains the specified condition value.
h. Does Not Contains: It validates to check whether the input “FieldName” value received does not contain the specified condition value.
i. Starts With: It validates to check whether the input “FieldName” value received starts with the specified condition value.
j. Ends With: It validates to check whether the input “FieldName” value received ends with the specified condition value.
k. Empty: It validates to check whether the “FieldName” value is empty. When this operator is chosen, there will be no “Value” field to provide, the values can be directly moved to “Then” part condition.
l. Not Empty: It validates to check whether the “FieldName” value is not empty. When this operator is chosen, there will be no “Value” field to provide, the values can be directly moved to “Then” part condition.
3. Value: It enables the user to provide the conditional values to action the process with the values against the selected field name.
Then Part:
This part will be actioned when the transactions meet the conditions specified in the “If” part. It provides the user with two options: they can move the transactions directly without setting or copying any field values, or they can move the transaction by setting up and copying the values.
1. Destination Queue: Select the “Destination Queue” name where the fields has to be moved if the transactions met the specified criteria/ condition in the “If” part.
2. Action: This additional step lets the user to set or copy the values for the transactions against any field value. There are two options,
a. Set: It lets the user to set any default values once the transactions are processed and moved to the specified queue. By choosing this option, the user can set the values to one or more fields in the destination queue.
b. Copy: It lets the user to copy the values from any source field and paste them into the destination field. By choosing this option, the user can set the values to one or more fields in the destination queue.
Else Part:
This section will be actioned when the transactions does not meet the condition and criteria mentioned in the “If” part. It provides the user with two options: they can move the transactions directly without setting or copying any field values, or they can move the transaction by setting up and copying the values.
1. Destination Queue: Select the “Destination Queue” name where the fields have to be moved if the transactions do not meet the specified criteria/ condition in the “If” part.
2. Action: This additional step lets the user to set or copy the values for the transactions against any field value. There are two options,
a. Set: It lets the user to set any default values after the transactions are processed and moved to the specified queue. By choosing this option, the user can set the values to one or more fields in the destination queue.
b. Copy: It lets the user to copy the values from any source field and paste them into the destination field. By choosing this option, the user can set the values to one or more fields in the destination queue.
Multiple Conditions
There are options to add multiple conditions within the “IF”, “Then” and “Else” parameters as well as there is option to add multiple “Else-If-Then” parameters.
A. Adding “Multiple Conditions” in If part:
Adding multiple conditions in the “If part” allows the user to combine them using “AND” or “OR” logic. This flexibility enables the creation of complex rules that can accurately reflect real time scenarios and decision-making processes.
All the fields accessible in the specified source queue can be validated multiple times with the below logics.
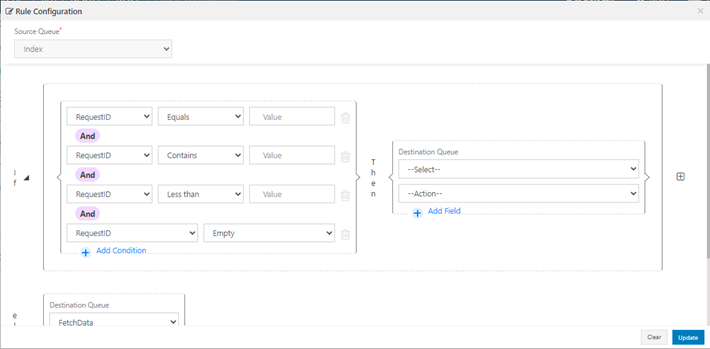
AND Condition: When the user is adding more fields with this logic, all specified conditions must be true for the action in the “Then” part to be executed. This is useful for scenarios where multiple criteria need to be met simultaneously.
OR Condition: At least one of the specified conditions must be true for the action in the “Then” part to be executed. This is useful for scenarios where any one of multiple criteria being met is sufficient.
B. Adding “Multiple fields” in Then and Else part:
Adding multiple fields in the “Then” and “Else” part allows the user to set/copy the values to the destination field. All the fields accessible can be added multiple times to set or copy the values.
