Use Robility flow agents
Robility Flow Agents help you create intelligent workflows by combining the power of Large Language Models (LLMs) with custom tools and external systems. Agents allow your automation to not just respond—but to reason, act, and adapt.
With Robility Flow Agents, you can:
1. Integrate with multiple LLM providers (like OpenAI)
2. Use tools to perform external actions
3. Add custom instructions to guide your agent’s behavior
4. Focus more on logic, and less on configuration
How Do Robility Agents Work?
Think of an agent as a smart assistant that can:
a. Understand input (using an LLM)
b. Decide what action to take
c. Either respond with text or perform real tasks (e.g., update files, call APIs)
Agents are more powerful than plain LLMs because they can use tools—custom functions that provide access to your data, knowledge base, or other systems.
Example: Instead of just replying to “What’s the status of Project X?”, an agent can check your internal tracker and respond with the latest updates.
Agents = LLM + Tools
At the heart of every agent is:
a. A reasoning engine (the LLM)
b. A set of tools (functions that the agent can use)
Each Tool:
a. Has a clear description
b. Is packaged as a standardized Tool object
c. Is registered during agent setup
d. Helps the agent decide when and how to use it autonomously
Creating an Agent Flow in Robility Flow
To build an agent-powered flow:
Step 1: Start a New Flow – Click New Flow > Blank Flow
Step 2: Add an Agent Component – Drag the Agent component into your workspace
Step 3: Set Up Your LLM
a. Enter a valid OpenAI API key
b. Want to use a different model? Update the Model Provider, Model Name, and API Key fields
See Agent Component Parameters for more details
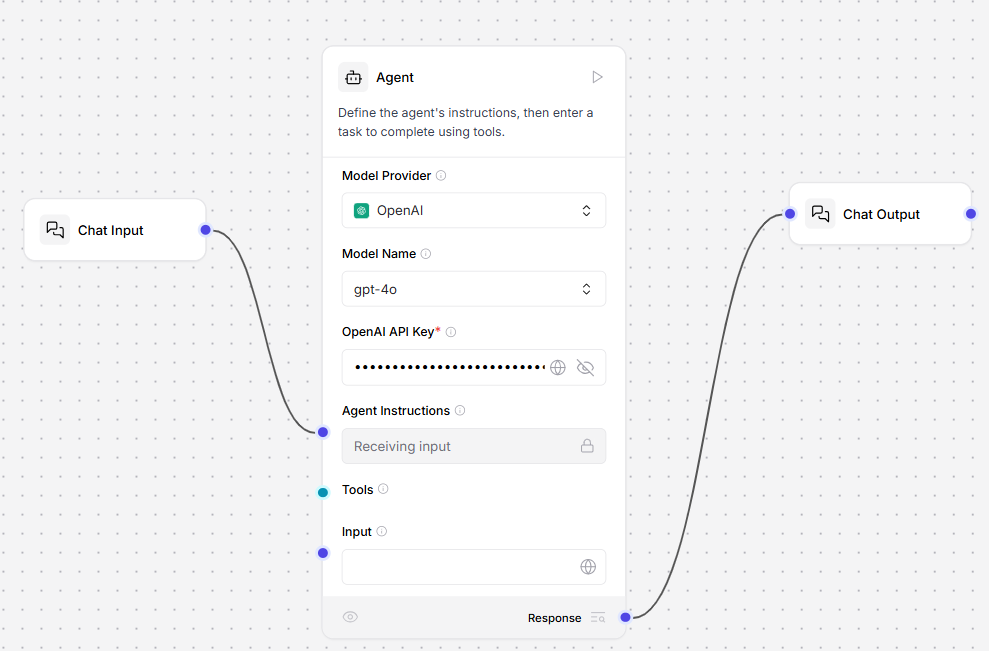
Step 4: Connect Chat Components
a. Add Chat Input and Chat Output components
b. Connect them to the Agent
At this stage, you’ve built a simple LLM-based chatbot.
Make It Agentic: Add Tools
To turn your chatbot into a real agent:
a. Add Tool components to your flow
b. Register them with your Agent
c. Each tool gives your agent real-world capabilities like calling APIs, accessing data, or triggering actions
Try It Out
You can:
a. Use the Simple Agent template for a ready-made example
b. Try the Robility Flow Quickstart for step-by-step guidance
Step5: Add Components
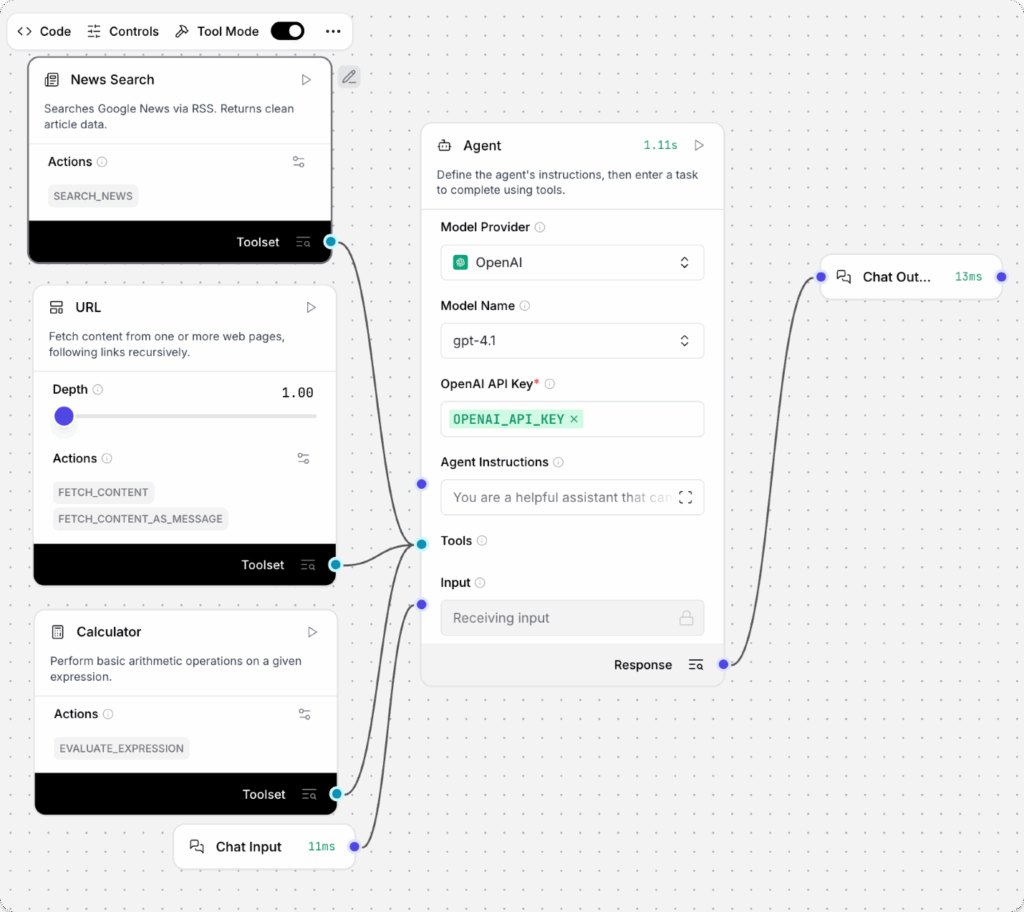
Add the News Search, URL, and Calculator components to your flow.
6. Enable Tool Mode
Turn on Tool Mode for each of the components:
a. Click on each component (e.g., News Search) to reveal its header menu.
b. Enable Tool Mode from the menu.
c. Repeat this for the URL and Calculator
7. Connect to the Agent
a. Once Tool Mode is enabled, each component will display a Toolset
b. Connect the Toolset port of each component to the Tools port on your Agent
Enabling Tool Mode allows a component to be used as a tool by the Agent. This changes how the component receives input, letting the Agent trigger specific actions during the conversation.
For details, refer to Configure tools for agents.
8. Open the Playground, and then ask the agent, what tools are you using to answer my questions?
The agent should respond with a list of the connected tools. It may also include built-in tools.
I use a combination of my built-in knowledge (up to June 2024) and a set of external tools to answer your questions. Here are the main types of tools I can use:
Web Search & Content Fetching: I can fetch and summarize content from web pages, including crawling links recursively.
News Search: I can search for recent news articles using Google News via RSS feeds.
Calculator: I can perform arithmetic calculations and evaluate mathematical expressions.
Date & Time: I can provide the current date and time in various time zones.
These tools help me provide up-to-date information, perform calculations, and retrieve specific data from the internet when needed. If you have a specific question, let me know, and I’ll use the most appropriate tool(s) to help!
9. To test a specific tool, ask the agent a question that uses one of the tools, such as Summarize today’s tech news.
To help you debug and test your flows, the Playground displays the agent’s tool calls, the provided input, and the raw output the agent received before generating the summary. With the given example, the agent should call the News Search component’s search_news action.
You’ve successfully created a basic agentic flow that uses some generic tools.
To continue building on this tutorial, try connecting other tool components or use Robility flow as an MCP client to support more complex and specialized tasks.
For a multi-agent example, see Use an agent as a tool.
Agent Component Parameters
The Agent component in Robility Flow can be configured to use your preferred model provider, custom instructions, and tools. It also supports memory and various advanced settings to customize agent behavior.
Model Provider and Model Selection
Use the Model Provider and Model Name settings to choose which LLM the agent will use. Robility Flow supports several built-in models from popular providers.
a. To use other providers, set the Model Provider to Custom and connect a compatible Language Model component.
b. For embedding generation, use a separate Embedding Model
API Key Configuration
If you’re using a built-in provider (e.g., OpenAI), enter a valid API key for that provider in the API Key field.
- This key must have permission and credits to access the selected model.
- It’s recommended to store API keys securely using environment variables or global variables.
- For custom providers, API authentication should be handled in the connected Language Model component.
Agent Instructions and Inputs
Use the Agent Instructions field to define system-level prompts or behavior guidelines for the agent.
- These instructions are always included with each conversation.
- The Input field can receive user input directly or from components like Chat Input.
Tools
Agents become more powerful when integrated with tools.
- You can convert any Robility Flow component into a tool by enabling Tool Mode on it.
- After enabling Tool Mode, connect the component’s output to the Tools port on the Agent component.
- Tools may include utilities like calculators, search components, or even other agents.
To connect tools hosted on external MCP servers, use the MCP Tools component.
Agent Memory
Agents have built-in chat memory enabled by default. This allows them to recall past interactions within a session.
- Chat memory is tied to a session ID. By default, this is the flow ID.
- For more controls such as isolating conversations between different users—use custom session IDs.
- The number of past messages retrieved is controlled by the Number of Chat History Messages
To enable more advanced memory filtering and external storage, use the Message History component.
Additional Parameters
The Agent component offers several advanced settings. Some parameters are hidden by default and can be enabled through the component’s controls.
Examples include:
- Current Date Tool: Adds a built-in tool that allows the agent to fetch the current date.
- Handle Parse Errors: Allows the agent to recover from input errors like typos.
- Verbose Logging: Enables detailed logging to help with debugging and tracking agent decisions.
Settings may vary depending on the chosen model or provider.
Agent component Output
The Agent component generates a Response, which contains the raw reply from the agent.
- This response is typically passed to a Chat Output component for display.
- It can also be routed to other components for additional processing or automation.


