
Quick Start
Begin using Robility Flow by loading a template, running a flow, and serving it via the /run API endpoint.
Prerequisites
Before you start, ensure you have the following:
a. An OpenAI API key
b. Create a Robility flow API key
The Robility API key is a project specific token that you can use within Robility Flow.
To create Robility flow API key, do the following:
1. Publish your flow to the Robility Manager.
2. Navigate to the project in the Robility Manager.
3. Go to the “Workflows” page.
4. It will list the flows published against the Manager and choose your respective flow.
5. Click on “Generate API Key” and choose the published version of the flow.
6. Once the key is generated, click on “History” button and you can view the API key generated against each version of the flow published.
7. Copy the API key and store it securely.
To use your Robility flow API key in a request, set a ROBILITYFLOW_API_KEY environment variable, and then include an x-api-key header or query parameter with your request. For example:
# Set variable
export ROBILITYFLOW_API_KEY="sk..."

# Send request
curl --request POST \
  --url "http://ROBILITYFLOW_SERVER_ADDRESS/api/v1/run/FLOW_ID" \
  --header "Content-Type: application/json" \
  --header "x-api-key: $ROBILITYFLOW_API_KEY" \
  --data '{
    "output_type": "chat",
    "input_type": "chat",
    "input_value": "Hello"
  }'
Run the Simple Agent Template Flow
To quickly test a flow:
1. In Robility Flow, click New Flow.
2. Select the Simple Agent template from the list.
You can now configure, run, and serve the flow using the /run API endpoint.
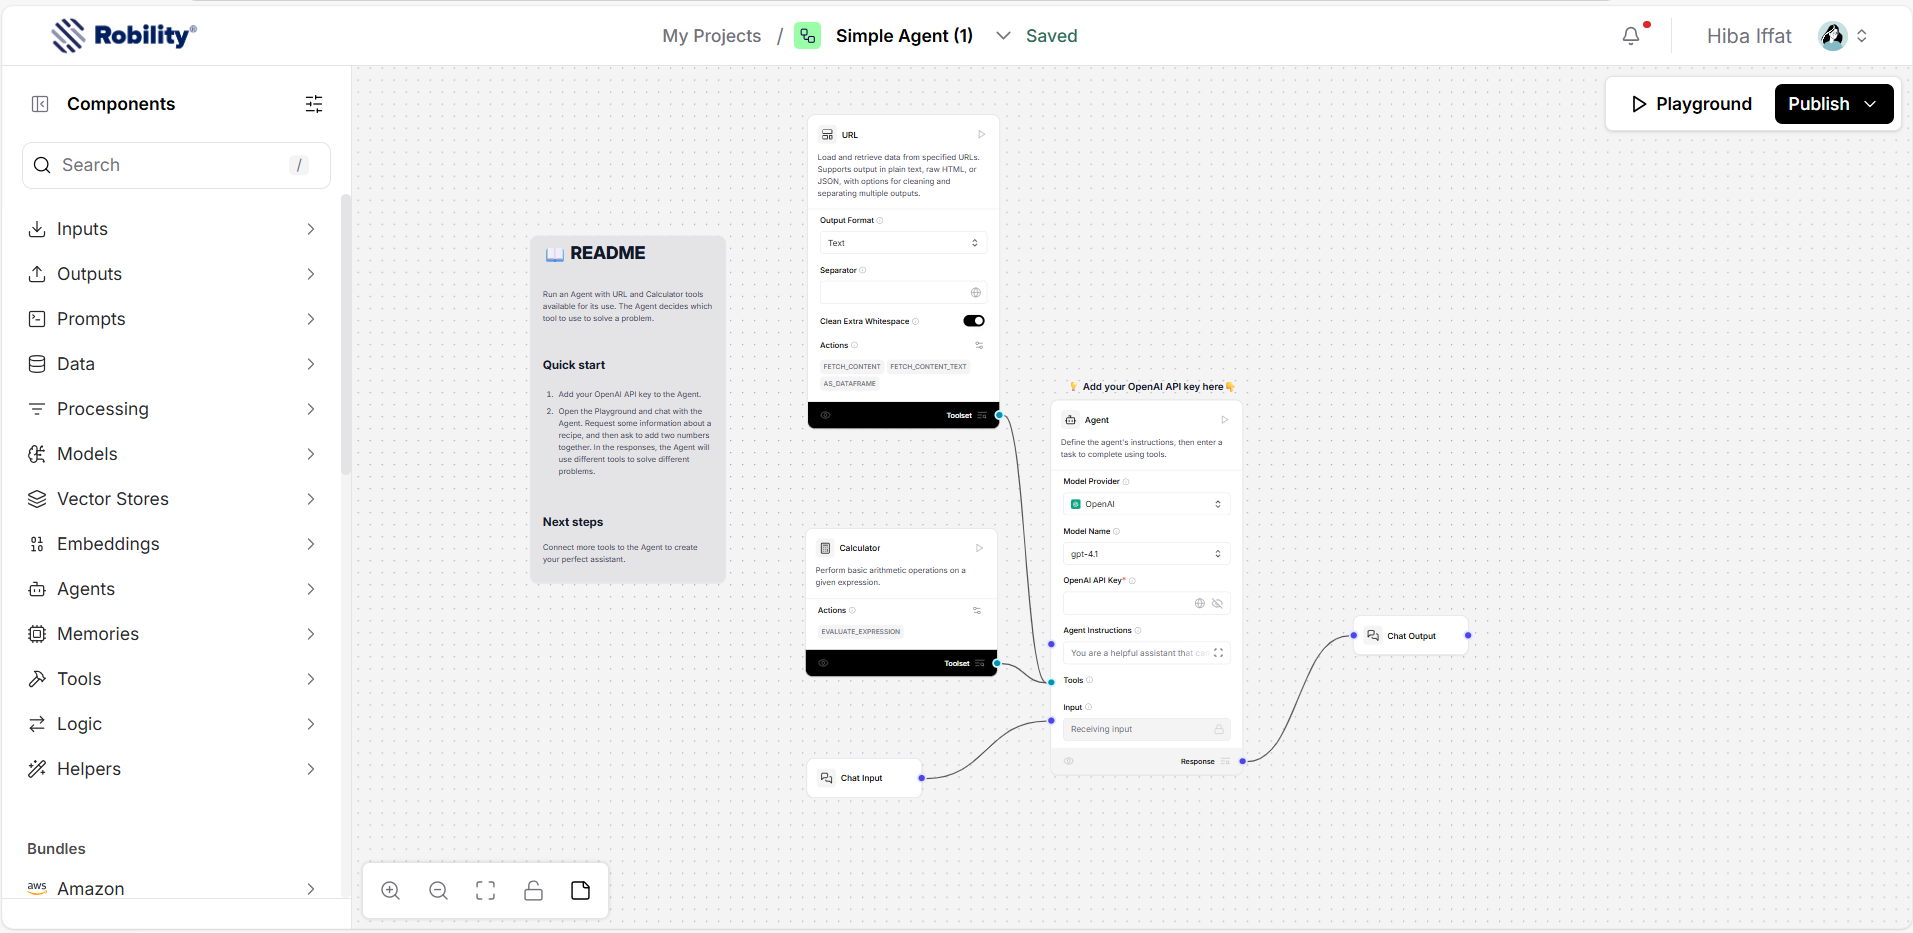
The Simple Agent flow includes an Agent component connected to Chat I/O components, a Calculator tool, and a URL tool. When you run the flow, it processes user input from the Chat Input, invokes the appropriate tool (Calculator or URL), and returns the result via Chat Output.
1. User Input is submitted through the Chat Input
2. The Agent analyzes the query and decides which tool(s) to invoke:
a. For math-related questions, it uses the Calculator tool.
b. For current events or external content, it calls the URL tool to fetch data.
3. The response is displayed through the Chat Output
4. Agents can also use other tools, such as Model Context Protocol (MCP) servers, depending on flow configuration and context.
5. In the Agent component settings, locate the OpenAI API Key
6. Enter your key directly or click the Globe icon to create a global variable.
Note: This example uses OpenAI. You can change the provider and model by updating the Model Provider and Model Name fields and supplying the relevant credentials.
Run and Test the Flow
1. Click Playground to open the test environment.
2. To test the Calculator: Ask a math question (e.g., “I want to add 4 and 4”). The Agent will call the Calculator tool using the evaluate_expression action.
3. To test the URL tool: Ask a current events question (e.g., “What’s the latest news?”). The Agent will call the fetch_content action and summarize the fetched content.
4. Click Close once you’re done testing.
What’s Next
Now that you’ve successfully run your first flow, you can:
a. Customize the Simple Agent flow by adding new tools or components.
b. Build a flow from scratch or explore other templates.
c. Integrate Robility flows with external apps via the Robility Flow API.
Running Flows from External Applications
Robility Flow functions both as an IDE and a runtime server. You can call through the Robility flow API using Python, JavaScript, or HTTP (cURL).
To test locally, send requests to your local server. For production, deploy a persistent instance of Robility Flow.
Access API Snippets
1. In the Playground, click Share, then API Access.
2. You’ll find code snippets for:
a. Python
b. JavaScript
c. cURL
These snippets are pre-filled with:
a. Your server URL
b. Flow ID
c. A sample payload
d. Your Robility Flow API key (if defined as an environment variable)
Sample Python Snippet
python
import requests
url = “http://ROBILITY_FLOW_SERVER_ADDRESS/api/v1/run/FLOW_ID”
payload = {
“output_type”: “chat”,
“input_type”: “chat”,
“input_value”: “hello world!”
}
headers = {
“Content-Type”: “application/json”,
“x-api-key”: “$ROBILITY_FLOW_API_KEY”
}
try:
response = requests.post(url, json=payload, headers=headers)
response.raise_for_status()
print(response.text)
except requests.exceptions.RequestException as e:
print(f”API request error: {e}”)
Run the script to test your flow. If using cURL, you can execute the command directly in your terminal.
Sample API Response
A successful response includes:
a. session_id
b. Inputs and outputs
c. Components used
d. Durations
e. and more
In production, extract only relevant parts of the response for your application, such as displaying the final output or storing logs.
Extract data from the response
The following example builds on the API pane’s example code to create a question-and-answer chat in your terminal that stores the agent’s previous answer.
1. Incorporate your Simple Agentflow’s /run snippet into the following script. This script runs a question-and-answer chat in your terminal and stores the agent’s previous answer so you can compare them.
Example: Python Script
python
import requests
url = “http://ROBILITY_FLOW_SERVER_ADDRESS/api/v1/run/FLOW_ID”
headers = {
“Content-Type”: “application/json”,
“x-api-key”: “ROBILITY_FLOW_API_KEY”
}
def ask_agent(question):
payload = {
“output_type”: “chat”,
“input_type”: “chat”,
“input_value”: question
}
try:
response = requests.post(url, json=payload, headers=headers)
response.raise_for_status()
data = response.json()
return data[“outputs”][0][“outputs”][0][“outputs”][“message”][“message”]
except Exception as e:
return f”Error: {str(e)}”
previous_answer = None
while True:
print(“\nAsk the agent a question (e.g., ‘What is 15 * 7?’) or type ‘compare’ to see the previous answer, or ‘quit’ to exit.”)
user_input = input(“Your question: “)
if user_input.lower() == ‘quit’:
break
elif user_input.lower() == ‘compare’:
print(f”\nPrevious answer: {previous_answer}” if previous_answer else “\nNo previous answer available.”)
continue
result = ask_agent(user_input)
print(f”\nAgent’s answer: {result}”)
previous_answer = result
2. To view the agent’s previous answer, type compare. To close the terminal chat, type exit.
Use Tweaks to Override Flow Parameters
You can include tweaks with your requests to temporarily modify flow parameters. Tweaks are added to the API request and temporarily change component parameters within your flow. Tweaks override the flow’s components’ settings for a single run only. They don’t modify the underlying flow configuration or persist between runs.
Tweaks are added to the /run endpoint’s payload. To assist with formatting, you can define tweaks in Robility flow’s Input Schema pane before copying the code snippet.
1. To open the Input Schema pane, from the API access pane, click Input Schema.
2. In the Input Schema pane, select the parameter you want to modify in your next request. Enabling parameters in the Input Schema pane doesn’t permanently change the listed parameters. It only adds them to the sample code snippets.
3. For example, to change the LLM provider from OpenAI to Groq, and include your Groq API key with the request, select the values Model Providers, Model, and Groq API Key. Robility flow updates the tweaks object in the code snippets based on your input parameters and includes default values to guide you. Use the updated code snippets in your script to run your flow with your overrides.
Example Payload with Tweaks
json
CopyEdit
{
“output_type”: “chat”,
“input_type”: “chat”,
“input_value”: “hello world!”,
“tweaks”: {
“Agent-ZOknz”: {
“agent_llm”: “Groq”,
“api_key”: “GROQ_API_KEY”,
“model_name”: “llama-3.1-8b-instant”
}
}
}
Tweaks apply only for the current execution—they don’t alter the original flow configuration.
url = "http://ROBILITY_SERVER_ADDRESS/api/v1/run/FLOW_ID" # The complete API endpoint URL for this flow
payload = {
"output_type": "chat",
"input_type": "chat",
"input_value": "hello world!"
}
headers = {
"Content-Type": "application/json",
"x-api-key": "$ROBILITY_API_KEY"
}
try:
response = requests.request("POST", url, json=payload, headers=headers)
response.raise_for_status() # Raise exception for bad status codes
print(response.text) # Print response
except requests.exceptions.RequestException as e:
print(f"Error making API request: {e}")
except ValueError as e:
print(f"Error parsing response: {e}")
