1. Robility Manager

1.1 Get Started

Robility Manager is a centralized platform designed to manage, monitor, and deploy robotic process automation (RPA) workflows seamlessly across an organization. It serves as the command center for all automation activities, ensuring efficient execution and orchestration of processes at scale.

Key Features of Robility Manager

Robot Management

a. Facilitates the management of attended and unattended robots within the automation ecosystem.
b. Allows efficient assignment and monitoring of robot activities to optimize resource utilization.

Scheduling Robots

a. Provides advanced scheduling capabilities to trigger automation processes at specific times or events.
b. Supports recurring schedules and ad-hoc executions for flexible task automation.

Asset Management

a. Centralizes management of critical assets like credentials, configuration data, and reusable components.
b. Ensures secure storage and controlled access to sensitive information.

Interact

a. Enables the creation and management of dynamic work queues to distribute tasks across robots effectively.
b. Offers prioritization, retry mechanisms, and workload balancing for enhanced productivity.

Monitoring and Logging

a. Delivers real-time monitoring of robots, workflows, and processes.
b. Provides detailed logs and insights to troubleshoot issues and maintain operational efficiency.

Analytics and Reporting

a. Generates performance metrics and customizable dashboards for tracking automation outcomes.
b. Provides actionable insights to optimize processes and scale automation efforts.

Role-Based Access Control (RBAC)

a. Ensures secure and role-based access to Manager functionalities.
b. Enables granular permissions for different users, enhancing security and compliance.

Version Control

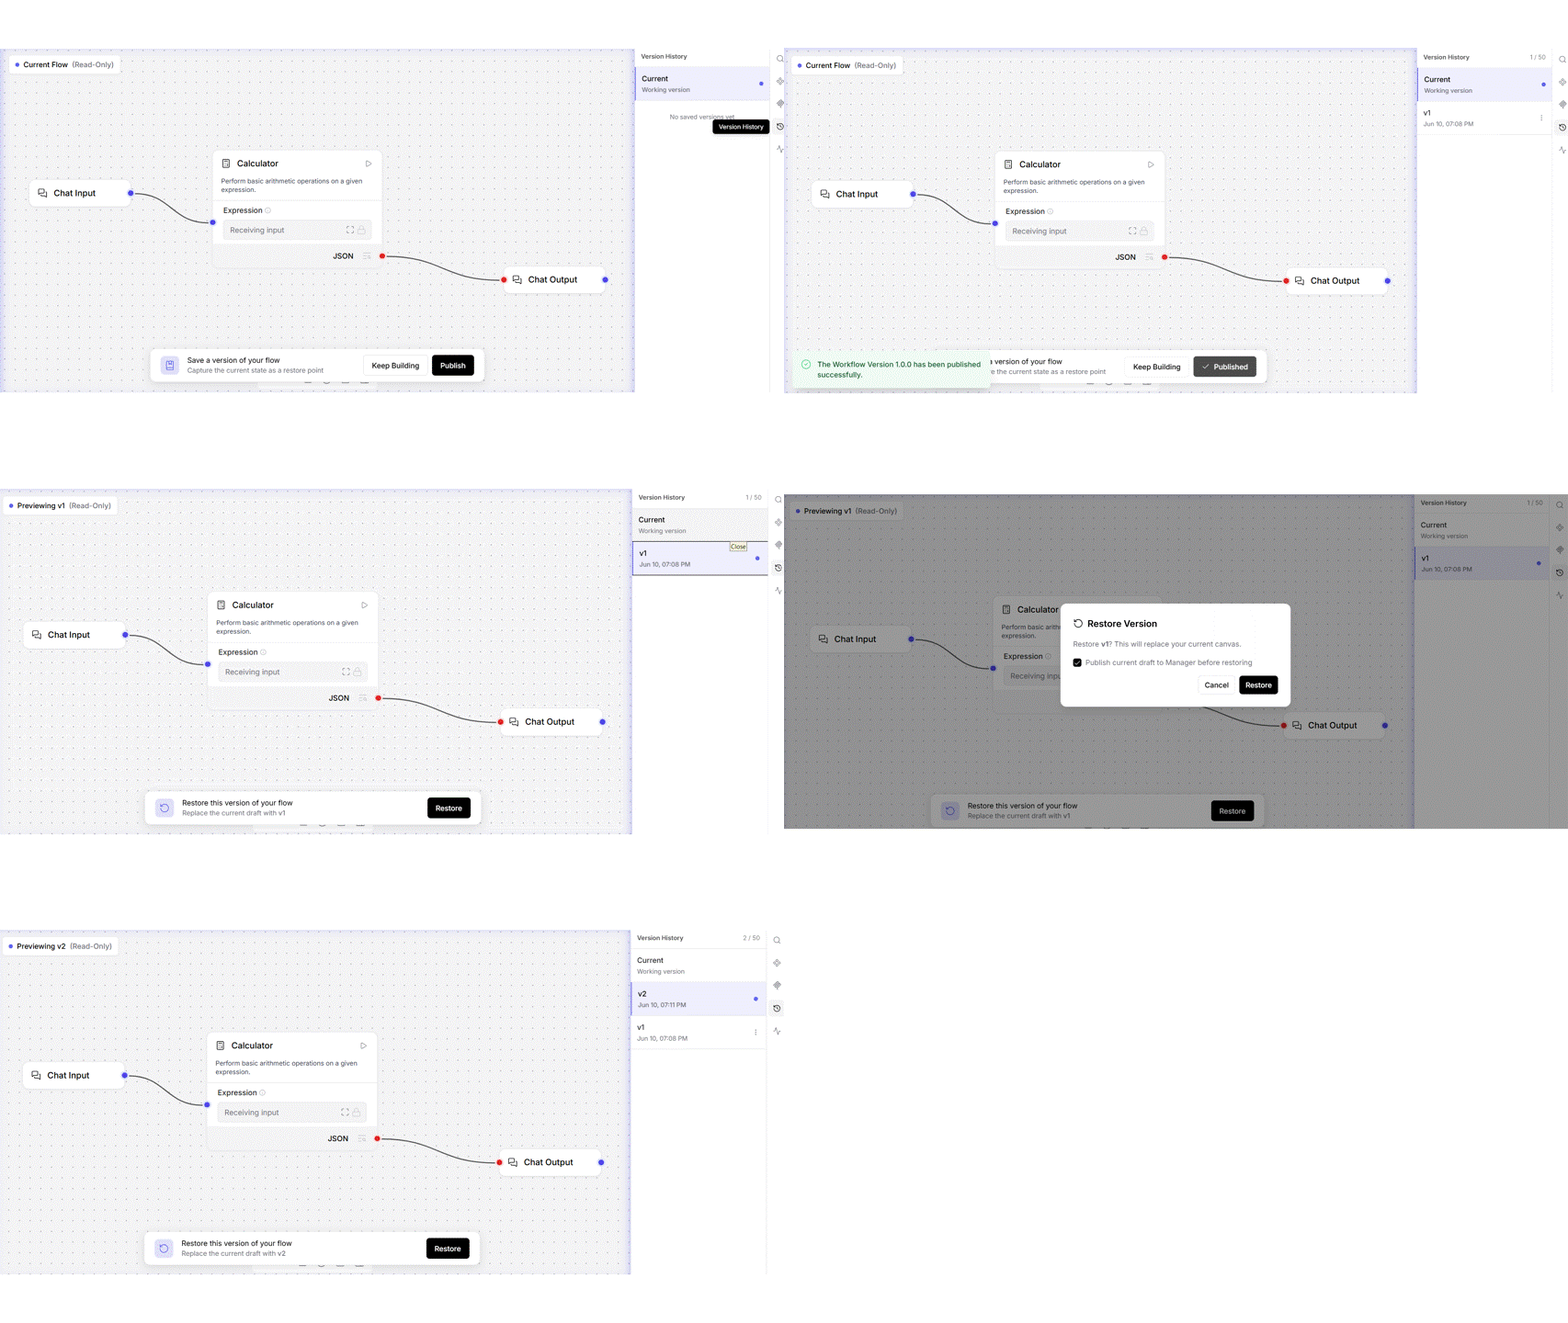
a. Maintains a history of deployed workflows, allowing easy updates or rollbacks when needed.
b. Supports managing multiple versions of automation processes.

API Integration

a. Offers robust APIs for integrating Robility Manager with third-party tools and custom applications.
b. Ensures seamless orchestration of automation workflows within broader enterprise systems.

Multi-Tenancy

a. Supports multiple tenants on the same platform, providing resource isolation and scalability.
b. Ideal for organizations with diverse departments or multiple client environments.

Deployment Options

a. Available as a cloud-based solution or on-premises deployment, tailored to meet business requirements.
b. Scalable to align with organizational growth and automation needs.

Customizable Workflows

a. Empowers users to define and customize workflows with ease, enhancing automation flexibility.
b. Promotes faster deployment of solutions that align with specific business processes.


1.1.1 Sign-In

To access Robility Manager, users must first receive an invitation to the platform. (Click here to refer) Once invited, they can sign in using one of two methods, depending on the identity provider chosen by their organization. Robility’s identity provider ensures secure authentication, providing seamless and protected access to the platform.

Using Username and password:

The username and password method is the initial and default sign-up process for all users, even when Azure SSO is selected. It is essential for account creation and identity verification within the platform.

1. Users can set up their own username and password to access Robility Manager.
2. This foundational step ensures a secure and seamless onboarding experience.

Using Azure AD authentication:

Following the initial sign-up with a username and password, users can log in using the Azure AD Single Sign-On (SSO) option if the organization has configured the setup with Azure. This ensures secure account creation and identity verification. Once set up, Azure AD SSO manages authentications for all future logins, providing seamless and secure access.

Click here to know how to setup with Azure AD authentication.  


1.1.2 Tenancy

In Robility, tenants provide self-contained environments for centrally managing data, resources, users, and configurations, streamlining automation processes within a single platform. Organizations can create multiple tenants with the same structure to address specific business needs.

Who Can Create Multiple Tenants?

The organization admin has the privilege to add multiple tenants under their organization, but this depends on the chosen structure:

a. Multiple-organization, multiple-tenant structure
b. Single-organization, multiple-tenant structure

However, if the admin selects a single-organization, single-tenant structure, they will not be able to create or add additional tenants later. Click here for more details.

Who manages the tenant?

The Tenant Admin is responsible for centralized control, ensuring seamless operations and optimizing automation processes. The Tenant Admin can manage the following features:

1. User Management:
Admins can invite users, assign roles, and manage access rights to ensure appropriate permissions.

2. Configuring Projects
Admins can create and customize multiple projects to meet business needs, including defining scope and aligning resources.

3. Storage and Key Vaults
Admins can manage storage and key vault configurations to securely handle project data, ensuring reliable automation processes.

4. License Management
Admins can procure and manage licenses for Robility products and resources at the tenant level.

5. HarmonyAI Integration
Admins can configure HarmonyAI and integrate it into projects to enhance automation capabilities.

When will tenant expire?

Tenants with a 365-day or 90-day license package will expire at the end of their license period unless renewed. The organization administrator will receive an email notification five days before the license expiration, ensuring sufficient time to take necessary action. Click here for more details.

To avoid disruptions, timely renewal is essential.

Who can renew the license? 

Both the organization administrator and the tenant administrator can renew the license. To ensure uninterrupted operations:

1. Navigate to the “License” page under the Settings menu in the Robility Manager platform.
2. Submit a request for a new license.
3. Review the remaining days of the current license, displayed for reference.

If license expiration affects products such as Robility Designer and Runner, these must also be reactivated. Click here for detailed guidance.

What happens after a tenant expires?

Failure to renew the license will result in:

a. Loss of access for all users and resources within the tenant.
b. Halted automation processes, including bot deployment.

To restore services, administrators should promptly request a license renewal. Follow the steps below to renew:

1. After logging in to the Robility platform, the tenant status will appear as Expired.
2. Click the Renewal button.
3. You will be redirected to the License Request page within the tenant and prompted to submit the renewal request.
4. Click Submit to complete the process.

1.2 Tenant Management

Tenant Management serves as the backbone of efficient automation in Robility. It simplifies operations, ensures secure access, and empowers tenant administrators to oversee all critical aspects of automation. 

Key Functionalities for Tenant Administrators

Tenant administrators have the privilege to manage resources, users, and configurations effectively. The key functionalities include:

1. User Management

2. Project Creation and Management

3. Resource Allocation and Optimization

4. Templates and Marketplace Access

5. License Management

6. Feature and Product Updates

7. Key Vault and Storage configuration

8. IP Configuration and Security

9. Harmony AI Integration

1.2.1 User Management

User management is a centralized section for adding users, assigning roles, and managing access within the tenant. Only the tenant administrators have the privilege to access this section to modify the permissions of the users and ensures secure and efficient access control.

This section uses a Role-Based Access Control (RBAC) system, enabling users to have role-dependent capabilities in Robility Manager. The primary goals of the RBAC system ensure users have the appropriate level of access based on their roles, to streamline access management, and to enhance overall security. For detailed information on default roles and their permissions, click here.

Roles in the platform

Each role comes with predefined permissions that determine what users can access and modify within the platform. The roles are as follows,

1. Tenant Admin: This role has full administrative privileges across the platform, allowing users to configure settings, manage users, and access all platform features. Tenant Admins are responsible for overseeing the platform’s operations and ensuring that everything is set up according to the organization’s needs. 

2. RPA Developer: RPA Developers is intended for users who are responsible for designing and deploying automation workflows with Designer and Runner. 

3. User: The User role typically refers to standard users who interact with the platform without needing access to the administrative or any Robility products. These users can perform tasks assigned to them but have limited access in the platform. 

Learn more about project roles here.

1.2.2 Project Creation

Creating a Project

Each organization has unique automation needs. Based on these requirements, different projects are created, and robots are assigned accordingly. This customization ensures that each project receives the automation support it requires, tailored to the specific tasks and processes of the organization.

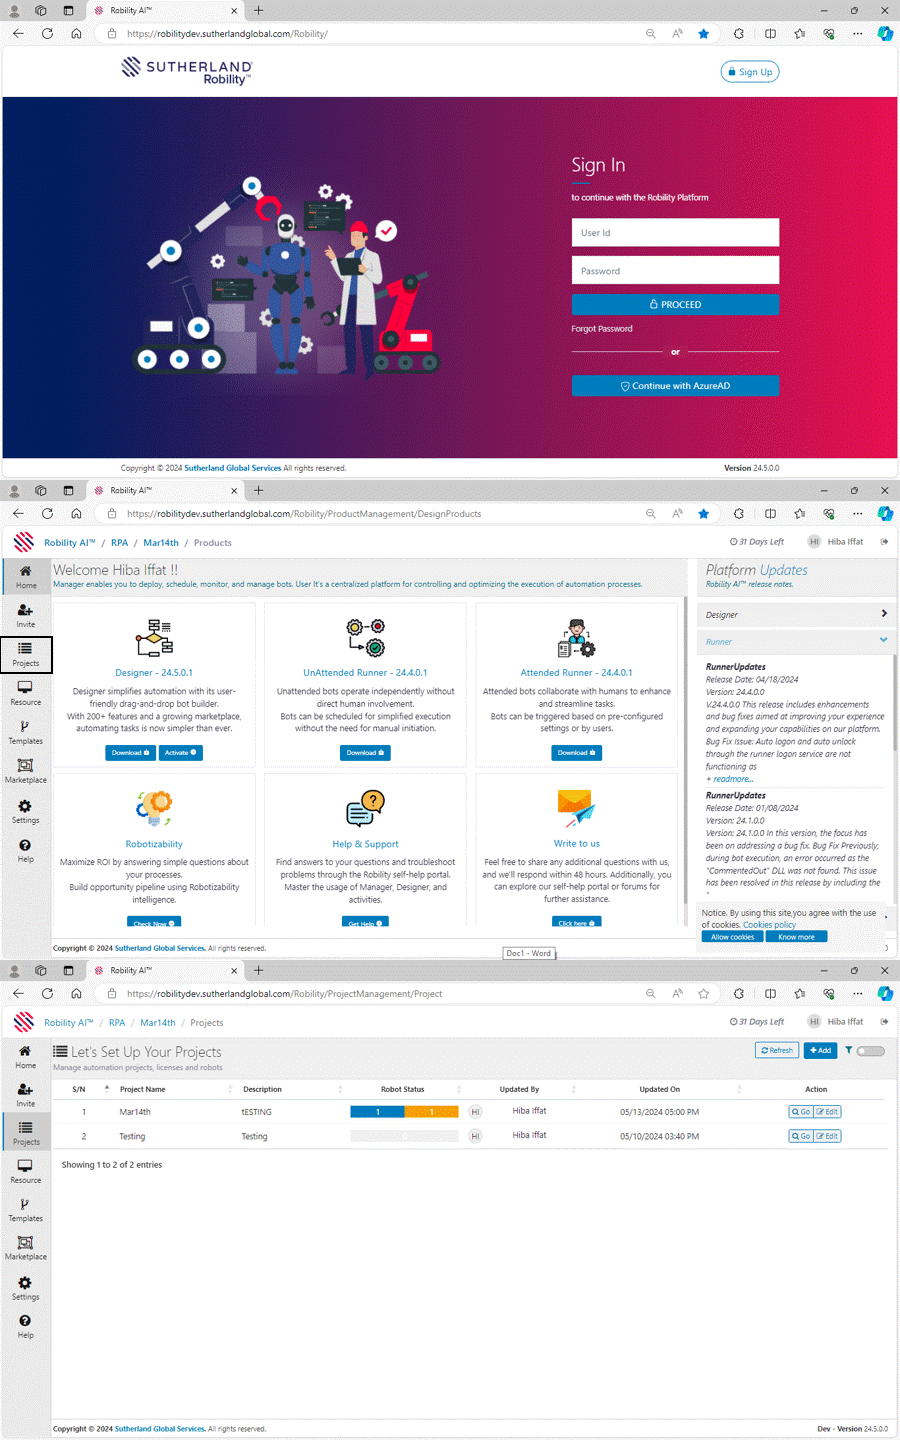
How to navigate to the projects?

1. Login to Robility AI™ using your credentials.
a. To learn how to sign up with Robility Manager, click here.
2. If you have access to only one tenant, upon logging in, you will be directed to the Home page of Robility Manager.
a. If you have access to multiple tenants, select the tenant to which you want to invite users.
3. On the left-hand side menu, click on the “Projects”.
4. Here we can view, manage and perform action of all the projects created under this tenant.
How to add a project?

1. Click on the “Add” from the right-hand side top corner.
2. An “Add project” screen will pop up to fill out the basic information about the project.
3. Fill in all the mandatory fields. Below is a detailed explanation of what each field desribes.

Default Settings

ProjectName: Indicates to specify the name for your project to start automation.

Project Code: Indicates to specify the “Code” for unique identification during the automation.  

Project Description: Indicates to specify the description of what your automation project does.

Project Owner: Indicates to choose the active users to set as owner of the project.

Project Logo: Indicates to choose the “Logo” of your project.  

Skin Color: Customize your project’s skin color with options available. By default, “Charcoal” will be selected.  
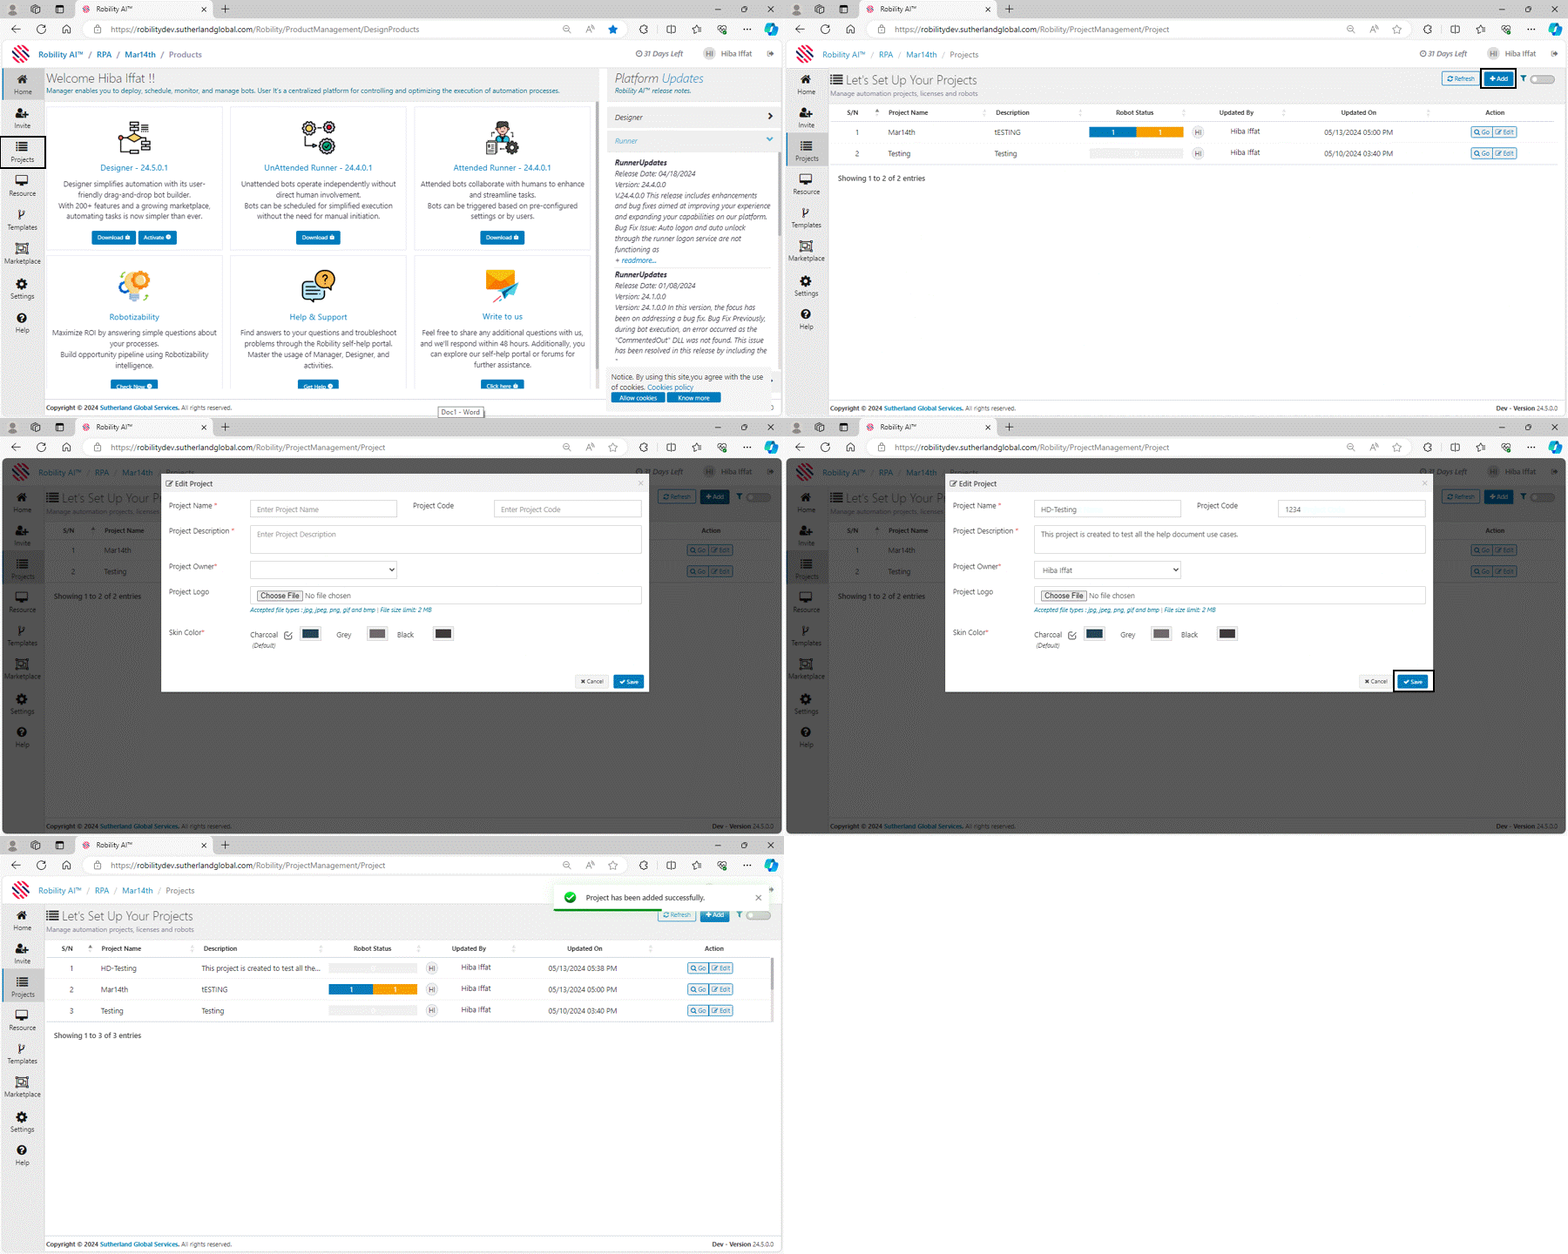
Overview

1. Serial number: Shows the number of projects under this tenant.
2. Project Name: Shows the project name created by the client.
3. Description: Shows the description given against the specific project.
4. Robot Status: Shows a number and color code depending on the status of the robot inside a project.
    a. Red: When the robot status shows red with a number, it means that those many numbers of robots are idle.
    b. Green: When the robot status shows green with a number, it means that those many numbers of robots are running.
    c. Yellow: When the robot status shows yellow with a number, it means that those many numbers of robots are in ToCheck.
    d. No Color: When the robot status doesn’t have any number or color code to it, there are no robots assigned to that project.

5. Updated by: Displays the username who has updated the project recently.
6. Updated On: Shows the date in which the project was updated.

7. Action: There are two different actions that can be performed in a project.
    a. Edit: Click on this to make any changes to the project. 
    b. Go: Click on this to get into the project’s command center where we can add the robots to be deployed to the machines.

What can be seen on the command center screen?

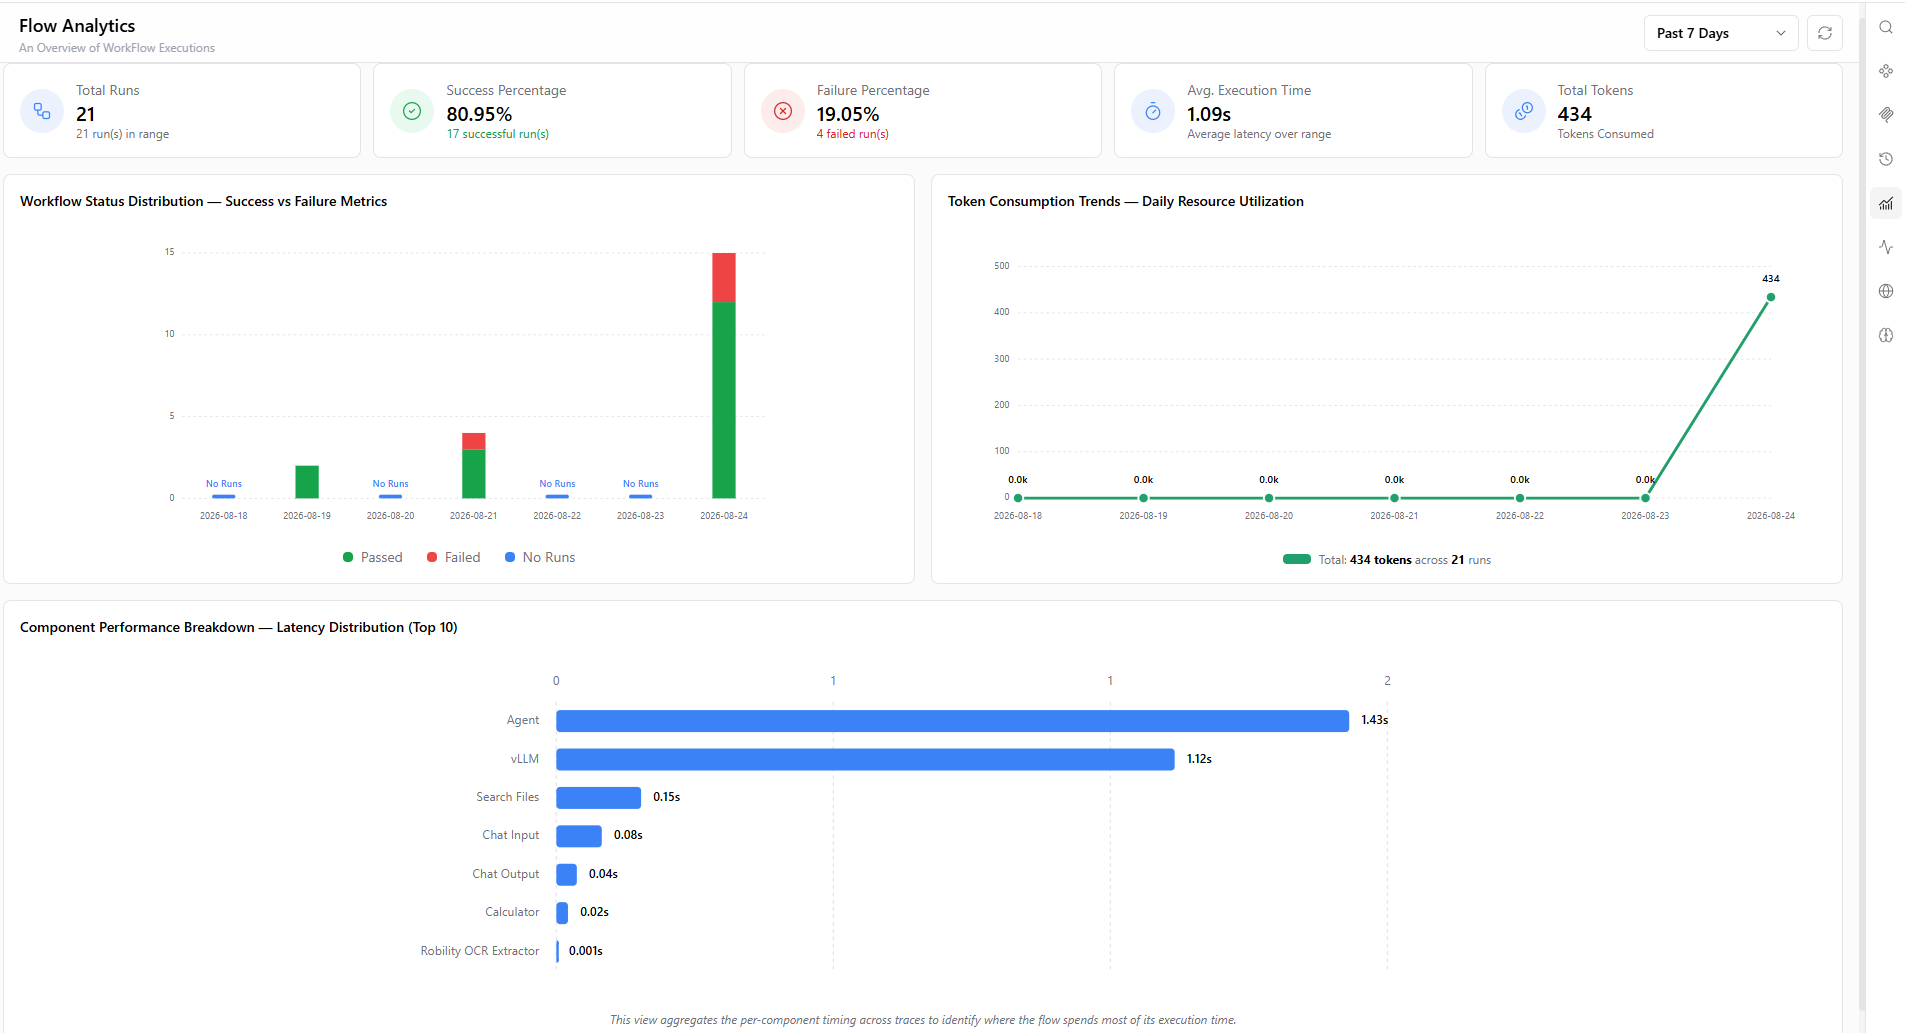
1. Dashboard: This screen overviews the status of all the bots under the project, number of machines utilized, and summary of the projects automated from “Interact.”

2. Roles and Users: This menu is used to invite users to the current project and assign different roles based on the work assigned to them.

3. InteractWorkflow: RobilityInteract’ s advanced features make it a powerful tool for businesses seeking to enhance their automation processes. Click here to get more information.

4. Workflow: This menu list downs the workflows published within the “Project” from Designer.

5. Credential Manager: This is useful for keeping the tools or applications credentials always secure. Click on it to configure and start to set up your vault credentials. To get more information, refer the documentation of Credential Manager.

6. DeployRobots: This menu allows the user to map and manage the “Robots” assigned inside the project.

7. License: This menu allows the “Project admin” to request more licenses required for the Project.

8. Scheduler: This menu allows the user to schedule and manage the bots and machines here. 


1.2.3 Resources

Resources are the machines allocated for scheduling and executing automation robots. In Robility, the “Resources” menu on the tenant page serves as a centralized interface for managing these machines across all projects within the tenant.

This menu allows you to view, add, and manage resources, ensuring seamless allocation and utilization. When adding resources, you can choose from two types of licenses based on your automation needs.

Types of Licenses

There are two types of licenses available for automation:

1. Unattended Robots – Use this license when the bot operates without user intervention. Each machine can have only one unattended bot, which is ideal for automating repetitive, rule-based tasks that do not require supervision.

2. High-Density Bots – Suitable for machines with multiple users logged in simultaneously, without requiring user intervention. This functions similarly to unattended bots but supports multiple users on the same system. 

Machine Provisioning at the Tenant Level

Users can provision machines at the tenant level rather than assigning them to individual projects, enabling centralized control and efficient resource allocation across multiple projects. The license key required to connect the Runner with Robility Manager on the provisioned machine will be managed at the tenant level, ensuring consistency and eliminating the need for repetitive configuration at the project level.

Multi-Project Machine Assignment

A single machine can be assigned to multiple projects without requiring the removal of resources, enabling flexible utilization across various automation workflows. However, if a machine is actively connected and executing a process in one project, it cannot be used concurrently in another project.

How to add a resource?

Let’s walk through the following steps to add a machine to the manager.

1. Login to RobilityAI Manager using your credentials.
2. Navigate to the “Resources” menu.
3. Click on “Add” from the top right corner to add a new machine.
4. Choose the license type from the license type drop down.
5. Fill in the other mandatory details and click on save.

Overview

1. Serial Number: Shows the number of machines added.
2. Resource: Shows the name of the machine added.
3. Username: Displays the username of the machine added. 
4. Updated By: Shows the track of the person who has updated recently.
5. Status: Indicates the current status of the machine. There are three statuses:
a. Not Connected – The machine has been added but is yet to be provisioned.
b. Not Provisioned – The machine has been added, and the license is connected, but it has not yet been provisioned to any projects.
c. Provisioned – The machine has been added, the license is connected, and it has been successfully provisioned to one or more projects
6. Updated On: Shows the date and time when the machine was added to the manager.
7. License Key Enables users to copy the license key for executing the bot in Runner. The license key will be enabled only when the machine is deployed in the project. 
8. Action: There are two action buttons in the machine screen. 
a. Manage: This option displays another set of action where it allows the user to perform the following,
i. Edit the password of the machine added.
ii. View and remove the projects provisioned when it is in “Idle” state. 
iii. View all the information about the machine details. 
b. Delete: This allows us to remove the machine from the manager.

Click here to learn more about adding the resource to the projects.  

1.2.4 Templates

Templates

Templates act as reusable workflows that can be customized and deployed across your automation solutions within the tenant. These pre-built templates offer detailed outlines or processes of automation workflows, providing a structured framework for building specific automation solutions. They serve as starting point for various solutions, allowing users to easily integrate them into their workflows and are beneficial for performing repetitive tasks or actions efficiently.

How to publish the templates through Designer? 

Once the template has been completed, the users can publish the templates in two different options. Private and Public.

To publish the templates privately, follow the below steps,

1. Save the template solution.
2. Navigate to the bottom of the Designer and click on the Publish option.
3. Choose the option as “Private (TenantName)”.
4. Now, under the home menu, go to the Publish option.

5. Mention the solution description and choose the release type either as Major, Minor or Bug.
6. Based on the release type the new version will change accordingly.
7. Enter the release notes for the template and click on Publish.

8. A success message will appear on the screen displaying that your template has been published.

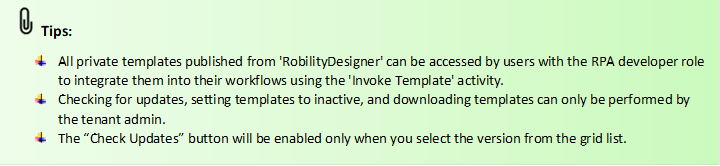
When the user publishes the templates against the tenant’s name, it will be viewable and re-usable only to the users invited to the tenant.

After publishing the templates, it might take a few minutes to upload them to the cloud and to the tenant.

How to check updates, inactive and download the templates?

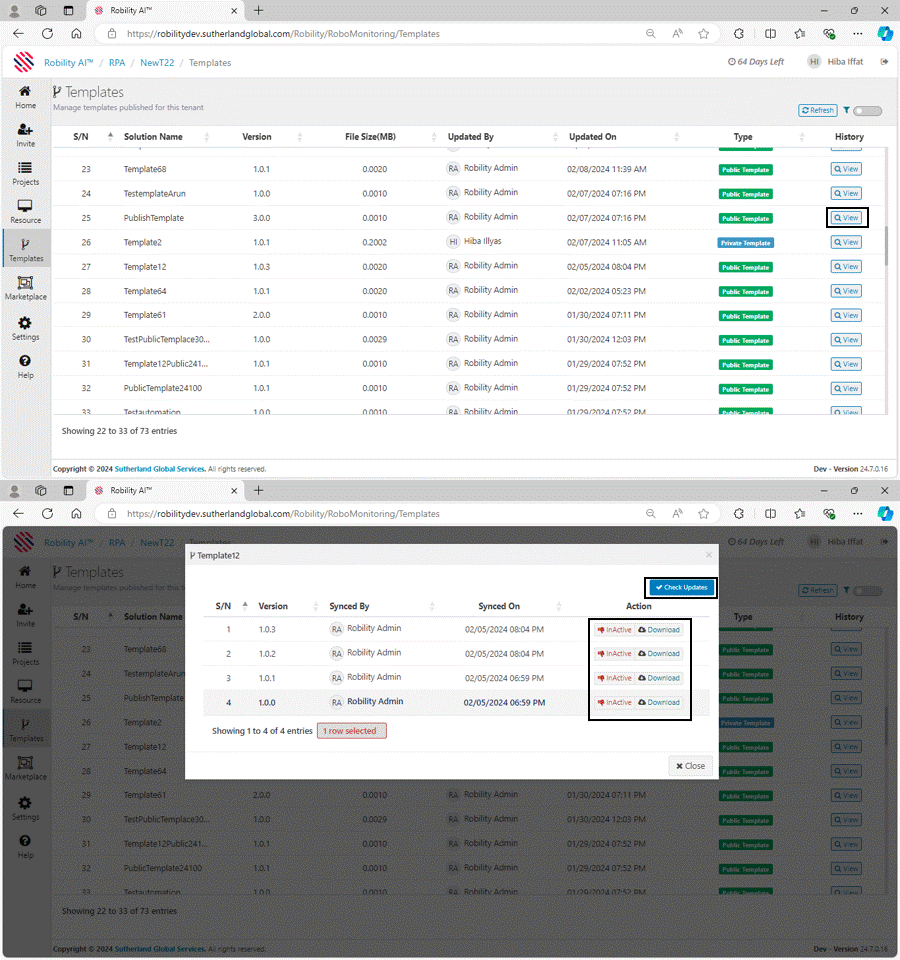
The published templates will be available in the RobilityManager at “Templates” menu. The templates that are published within the tenant can be accessed and re-used by the invited RPA developers in the tenant. can check if there are any updates available for the published templates in the Robility Manager. 

1. Login to the Robility Manager. 
2. Navigate to the Tenant where the published templates are available. (Only when published privately).

3. Select the “Templates” Menu.
4. Now, click on the “View” button under the “History” field. 
     a. This ‘View’ option provides a list of versions published for each specific template and allows the tenant admin to check for updates, setting inactive status for templates or download the templates.
1.2.5 MarketPlace

MarketPlace

MarketPlace is designed to be the go-to centralized hub for a meticulously curated collection of automation scripts and connectors, meticulously crafted to elevate and expedite your automation projects. Whether you are a seasoned automation professional or a newcomer looking to streamline your processes, MarketPlace offers a diverse array of tools and resources to meet your specific needs.

Our platform brings together a vibrant community of developers, engineers, and automation enthusiasts who contribute their expertise to create a dynamic ecosystem. Each script and connector undergo a rigorous vetting process to ensure quality, reliability, and security. This commitment to excellence ensures that users can confidently integrate these resources into their projects without compromising performance or stability.

Discover an extensive range of automation solutions, spanning various industries and applications. From IT and finance to healthcare and manufacturing, MarketPlace hosts a rich assortment of scripts tailored to address the unique challenges of different sectors. This diversity empowers users to find the perfect automation tools that align with their industry requirements.

The user-friendly interface of MarketPlace facilitates easy navigation, allowing users to quickly search, preview, and download scripts and connectors that suit their project objectives.

In addition to individual scripts and connectors, MarketPlace also features curated collections and bundles that address specific automation needs. These collections streamline the process of finding complementary resources, saving users time and effort in building comprehensive automation solutions.

As automation continues to play a pivotal role in transforming industries, MarketPlace stands as a beacon of innovation and collaboration.

How to download the listings?

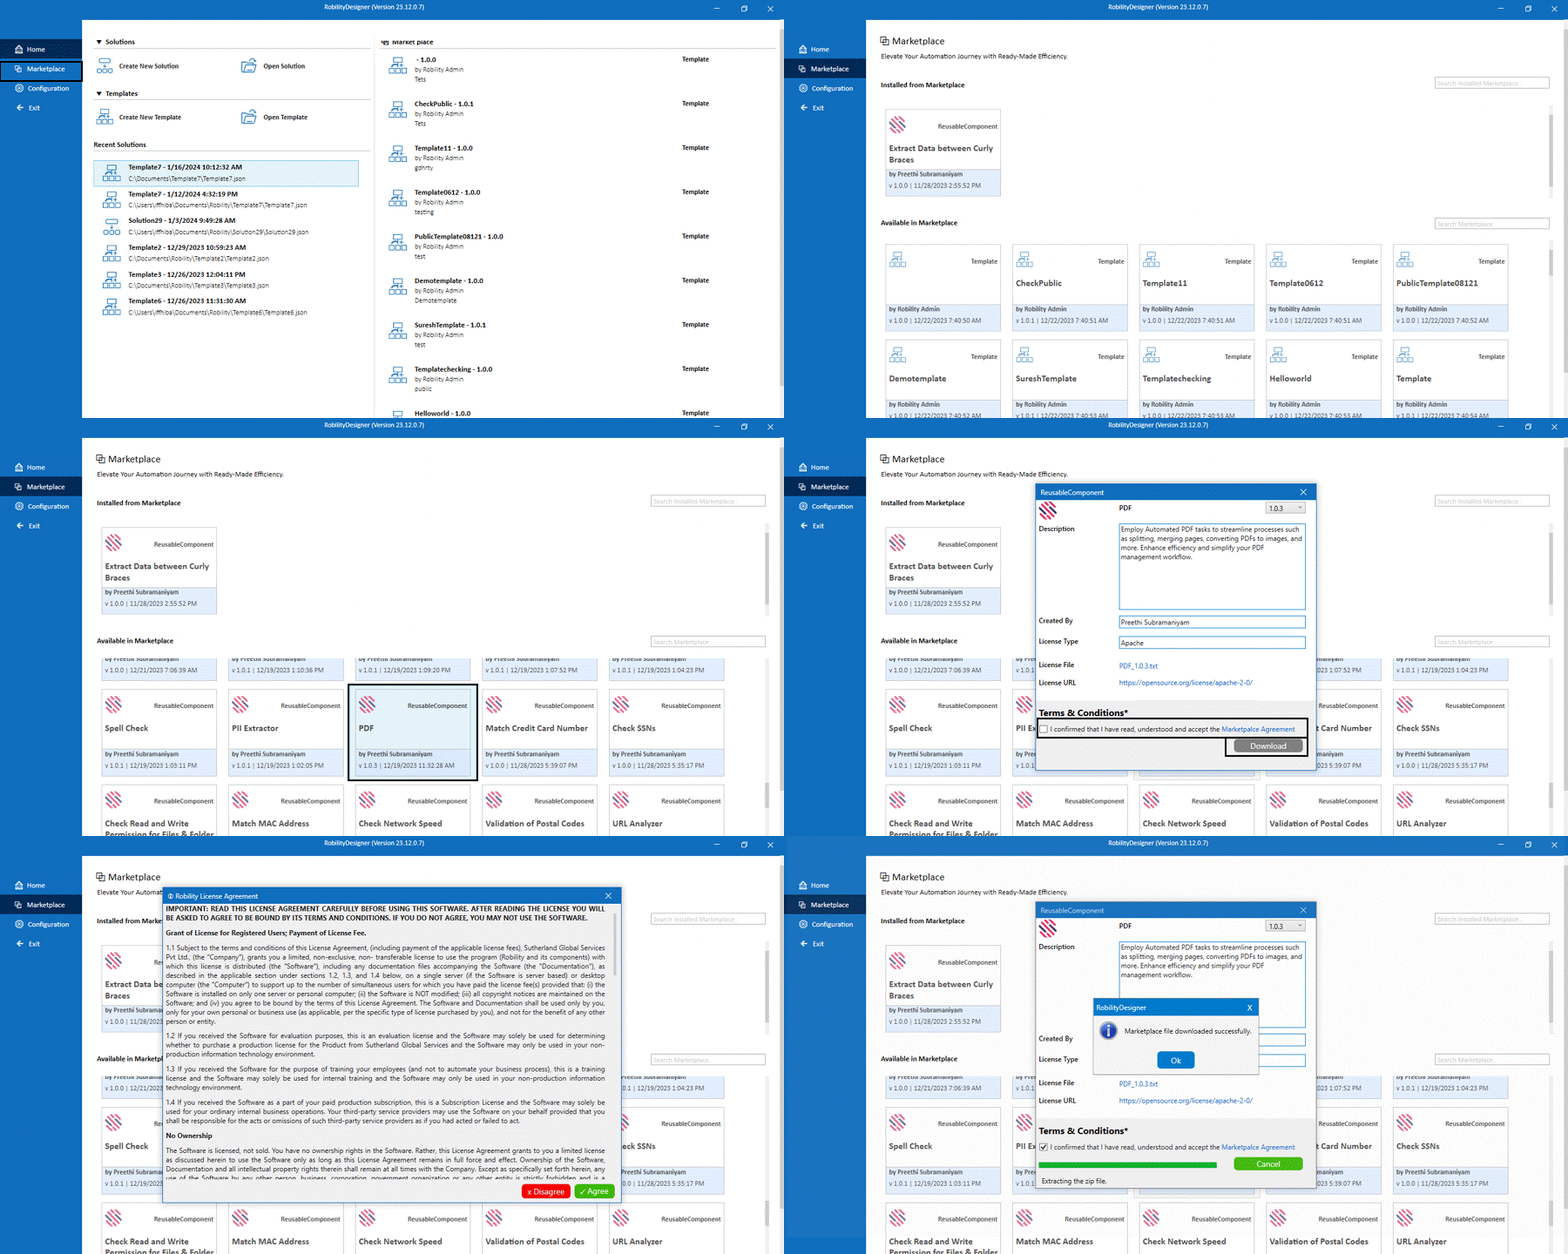
All the scripts and solutions added in the Marketplace will be able to access in the Manager, empowering users with a rich library of pre-built components. This library includes integrations that facilitate seamless connections to external services, as well as custom activities, allowing users to incorporate specialized functionalities into their automation workflows.

Follow the below steps to download and integrate the scripts:

1. Launch the RobilityManager.
2. Navigate to the “MarketPlace”.

3. Here chose the specified template that is suitable for your solutions.
4. Here I am choosing the “OpenCV” specified as “Reusable component” and select the “Download” button.

     a. Review the “Terms & Conditions” and then proceed to click on the “Agree” button.
     b. Now, the listing will be downloaded in your local system, you can easily integrate the script in your automations.

1.2.6 Data Retention and Policy

Data Retention enables organizations to store project data for a defined duration to meet operational, compliance, regulatory, and audit requirements. Once the configured retention period expires, the system securely archives or permanently removes the data based on the defined policy, ensuring controlled and structured data lifecycle management. 

Configuration & Management

The retention policy can be configured by the Tenant Administrator at the project level. Each project may have its own retention period based on business or regulatory needs.

Scope of the Policy

The data retention policy specifically governs the storage and retrieval of Interact workflow data only. It does not impact other components inside the Project.

Key Benefits

Controlled Data Storage: Ensures project data is stored only for the required period.
Compliance: Helps meet organizational, security, and audit requirements.
Data Protection: Automatically removes outdated or unnecessary records to safeguard sensitive information.
System Performance: Manages database size efficiently to maintain smooth operations.

Configuring Data Retention

Data retention settings are configured at the project level. Only users with the Tenant Admin role can manage these settings.

Steps to Enable and Configure: 

1. Navigate to the Edit option for the project.
2. Enable the Data Retention option.
3. Configure the retention parameters by selecting values from:
     a.  Archival Days
     b.  Purge Days

Default Settings: Archival Days: 90 and Purge Days: 180

Archival Days

1. Defines the period during which data remains fully accessible for review, reporting, and workflow operations.
2. After the archival period ends, data moves to the purge phase.
3. Configurable values: 30, 60, or 90 days

Purge Days

1. Defines the duration after archival during which data is retained in a purged state before permanent deletion.
2. After this period, data is permanently deleted and cannot be recovered.
3. Configurable values: 120, 160, or 180 days

1.2.7 License Expiry Notification

The License Expiry Notification panel provides a consolidated view of licenses that have expired or are approaching their expiry date. Licenses are categorized into four groups:

a. Tenant 
b. Designer
c. Resource
d. Machine Template

This centralized view enables administrators to efficiently monitor and manage license statuses across applications from a single location.

Administrators can directly navigate to the License Request and License Renewal pages to take appropriate action and ensure uninterrupted platform access.

Expiring Soon Criteria

A license is marked as Expiring Soon when it is within 7 days of its expiry date. Once the expiry date has passed, the license status is automatically updated to Expired.

Categories

Category Description
Tenant Displays expired and expiring licenses associated with tenants.
Designer Displays expired and expiring licenses associated with designer accounts.
Resource Displays expired and expiring licenses associated with resources.
Machine Template Displays expired and expiring licenses associated with machine templates.

Each category displays a count badge indicating the number of licenses requiring attention.

Status Indicators

Indicator Status Description
🔴 Dark Red Expired The license expiry date has passed
🟡 Amber Expiring Soon The license will expire within the next 7 days

Closing the Panel

The panel can be closed using the × icon at the top-right or the Close button at the bottom-right.

1.2.8 Settings

Settings

RobilityManager provides real-time monitoring that helps to keep track of the health and state of the system. With the enhanced version, it’s easier to monitor and configure mails,
schedule jobs and have visibility over the logs of the system.

User Tracks
Features & Products
License Management

1.3 Project Management

Project Management in Robility Manager provides a structured management to creating, configuring, and managing automation projects within a tenant. It ensures that automation workflows are organized, resources are efficiently allocated, and access is properly controlled, enabling smooth execution and monitoring of automated processes.

Key Capabilities of Project Management:

1. Project Creation and Organization: Administrators and authorized users can create projects within the tenant, defining their scope and purpose. Projects serve as dedicated spaces for managing automation workflows, ensuring that related processes, resources, and configurations are grouped logically.

2. Resource Allocation: Users can assign resources such as bots and developers to specific projects, ensuring the right personnel and automation agents are linked to each initiative. Proper resource allocation helps streamline execution and optimize workload distribution.

3. Role-Based Access Control: Project Management allows administrators to define project-level roles and permissions, ensuring that users have appropriate access based on their responsibilities. This enhances security and governance by preventing unauthorized modifications to automation workflows.

4. Deploy Robots and Scheduler: Users can manage automation workflows by deploying them in the Robility Runner. The scheduler ensures that automated tasks run at predefined times, improving efficiency and reducing manual intervention.

5. Integration and Credential Management
Project Management facilitates seamless integration with various tools and platforms, including:

    • Interact: To enable human-in-the-loop interactions within automated workflows.
    • Credential Vault: For secure storage and retrieval of sensitive authentication details.
    • App Integrations: To connect with external applications and services, expanding automation capabilities.

By bringing all these elements together, Project Management in Robility Manager ensures a structured, secure, and scalable automation environment. It fosters collaboration, governance, and efficiency, making it easier for enterprises to deploy and maintain automation solutions effectively.

1.3.1 Roles & Permissions

The roles and permissions in project level provides the users to perform actions within the specific project inside the tenant. 

Roles:

1. ProjectAdmin
2. ProcessAdmin
3. InteractUser
4. Developer

5. CredentialAdmin

The below is the detailed documentation of each role and their permissions within the project.  To learn more about the roles in the tenant, click here

Project Admin

Users invited as “Project Admin ” are referred as the administrator of the specific project created and assigned to them. They will be granted access to manage project-level data. 

Permissions:

1. Map and manage users in the project.
2. Add or remove resources as needed.
3. Schedule robots for automation tasks.
4. Request licenses for Runner (Unattended, Attended, Service account and High density).
5. Add, edit and manage credentials for applications.
6. Have overall control over the Interact menu.
a. Note that access to the Interact queues can be restricted to view and manage for this role. 
7. Manage workflows published for projects.

The below table guides you with the permissions and actions assigned to the Project Admin.

Pages View Add Edit Delete Action
Dashboard
Roles & Users - Manage Users
Roles & Users - Manage Roles
Vault

x

Automation Ops
License
Schedule Robot
Interact Workflow - Queues
Interact Workflow - URN Management
Interact Workflow - Reports
Interact Workflow - Project Configuration
Workflow
App Integrations

Process Admin

The process admin is assigned to users who are responsible for overseeing and managing the automation processes within the specific project. Users with this role have the below permissions, 

Permissions:

1. Access, review, manage, and generate reports in the Interact menu for specific projects.
    a. Access to the Interact queues can be restricted to viewing and managing for this role.
2. Access to view credentials for applications and can perform actions to deactivate, lock, and unlock credentials within the project.
3. Request licenses for additional Runner required for project.
4. Add the resource, schedule and manage robots for automation processes within the project.
5. Monitor the status of deployed robots in real-time.

The below table guides you with the permissions and actions assigned to the Process Admin with each module.

Pages View Add Edit Delete Action
Dashboard
NA
NA
NA
Roles & Users - Manage Users

x

NA
NA
NA
NA
Roles & Users - Manage Roles

x

NA
NA
NA
NA
Vault

x

x

x

Automation Ops
License
NA
NA
NA
Schedule Robot
Interact Workflow - Queues
NA
NA
Interact Workflow - URN Management
NA
NA
Interact Workflow - Reports
NA
NA
Interact Workflow - Project Configuration

x

NA
NA
NA
NA
Workflow

x

NA
NA
NA
NA
App Integrations

Interact User

The Interact User role is assigned to users who are responsible for viewing and managing cases in the assigned Interact queues. The permissions associated with this role are listed below:

Permissions:

1. Access the dashboard for project monitoring.
2. Monitor transactions on the Interact page for the assigned queues.
3. Review transaction details, and perform actions such as back-pushing, unlocking, and viewing the history of transactions within Interact

The below table guides you with the permissions and actions assigned to the Interact User with each module.

Pages View Add Edit Delete Action
Dashboard
NA
NA
NA
Roles & Users - Manage Users

x

NA
NA
NA
NA
Roles & Users - Manage Roles

x

NA
NA
NA
NA
Vault

x

NA
NA
NA
NA
Automation Ops

x

NA
NA
NA
NA
License

x

NA
NA
NA
NA
Schedule Robot

x

NA
NA
NA
NA
Interact Workflow - Queues
NA
Interact Workflow - URN Management

x

NA
NA
NA
NA
Interact Workflow - Reports

x

NA
NA
NA
NA
Interact Workflow - Project Configuration

x

NA
NA
NA
NA
Workflow

x

NA
NA
NA
NA
App Integrations

Developer

This role is responsible for developing, maintaining and deploying automation workflows, ensuring their seamless integration with Interact, the credential vault, and App Integrations within the specific project. Below are the permissions, 

Permissions:

1. Access the dashboard for project and robot monitoring in real time.
2. View credentials for applications and perform actions to deactivate, lock, and unlock credentials within the project.
3. Have overall access to the Interact menu.
4. View
and perform actions such as inactivating and downloading published workflows.
5. Has privilege to schedule robots for automation.
6. View and perform actions such as start and stop the deployed robots within the project.

The below table guides you with the permissions and actions assigned to the Developer with each module.

Pages View Add Edit Delete Action
Dashboard
NA
NA
NA
NA
Roles & Users - Manage Users

x

NA
NA
NA
NA
Roles & Users - Manage Roles

x

NA
NA
NA
NA
Vault

x

x

x

Automation Ops

x

x

x

License
NA
NA
NA

x

Schedule Robot
Interact Workflow - Queues
NA
Interact Workflow - URN Management
NA
Interact Workflow - Reports
NA
Interact Workflow - Project Configuration
NA
Workflow
NA
NA
NA
App Integrations

Credential Admin

This role will have access to manage application credentials utilized by robots. These users are entrusted with the critical responsibility of overseeing and managing application credentials used by robots in the system. Below are the permissions entitled with, 

Permissions:

1.Access the dashboard for project and robot monitoring in real time.
2. Manage application credentials utilized by robots.
3. Create, modify, and delete credentials within the role of Credential Admin.

The below table guides you with the permissions and actions assigned to the Credential Admin with each module.

Pages View Add Edit Delete Action
Dashboard
NA
NA
NA
NA
Roles & Users - Manage Users

x

NA
NA
NA
NA
Roles & Users - Manage Roles

x

NA
NA
NA
NA
Vault
Automation Ops

x

NA
NA
NA
NA
License

x

NA
NA
NA
NA
Schedule Robot

x

NA
NA
NA
NA
Interact Workflow - Queues

x

NA
NA
NA
NA
Interact Workflow - URN Management

x

NA
NA
NA
NA
Interact Workflow - Reports

x

NA
NA
NA
NA
Interact Workflow - Project Configuration

x

NA
NA
NA
NA
Workflow

x

NA
NA
NA
NA
App Integrations

1.3.2 Workflows

Workflows are automation solutions created, configured, and published through Robility Designer. They represent the backbone of Robility’s automation ecosystem, defining the logic, sequence, and execution flow of automated processes. Once published, workflows are deployed to this section, which serves as a centralized command center for managing, organizing, and overseeing all operational automations within the enterprise.

This section enables users to maintain complete visibility and control over every deployed automation, ensuring that business processes run seamlessly, efficiently, and with minimal manual intervention.

Key Capabilities

1. View and Organize Workflows: Browse and filter workflows by projects. 

2. View Workflow History: Access a complete historical record of workflow published status.

3. Manage Versions: Every workflow version is recorded, allowing users to:

a. Audit prior versions
b. Compare logic changes
c. Roll back if an update causes execution issue
d. Publish enhancements safely

Version control ensures continuity and controlled evolution of automations.

4. Security Scan Status: View automated security scan results to ensure workflows follow secure coding standards and do not introduce vulnerabilities. This helps maintain enterprise-grade compliance and trust.

5. Workflow Analyzer Report: Access analyzer reports generated during workflow build and publish cycles. These reports highlight best-practice deviations, performance issues, and optimization recommendations—helping designers improve workflow quality and reliability.

Click here to learn more about how to publish workflows. 

Explanation of Tags on the Workflow Screen

1. Serial Number: Displays the count of workflows published, helping users identify and organize the sequence of solutions efficiently.
2. Solution Name Lists the name of each published solution, enabling users to easily recognize and differentiate between workflows.
3. Latest Version: Indicates the most recently published version associated with each solution, ensuring users can access the latest updates and modifications.
4. File Size (MB): Shows the size of the most recently published file, providing an overview of storage requirements for each solution.
5. Updated By: Tracks and displays the name of the person who last updated the resource. This tag reflects changes made by the resource itself or by an individual, ensuring accountability.
6. Updated On: Records the date and time when the resource was last updated. Similar to “Updated By,” this tag captures both manual updates and changes initiated by the resource.
7. Publish Status: Displays the current status of the published solution, offering visibility into whether the workflow is active, inactive, or under review.
8. History: Provides detailed tracking of workflow-related actions, enabling users to monitor and manage workflows effectively. The following options are included:
     a. Inactive: Allows users to mark a specific version of the solution as inactive, preventing further use while retaining version history.
     b. Download: Enables users to download the workflow.
9. Scanned Status: Provides the status of the security scan of the solution. 

How to Inactive and download the workflows?

1. Login to the “RobilityManager” portal.
2. Select the “Tenant” against which the “Project” has been configured and navigate to it.
3. Select the “Workflows” from the Menu.
4. Choose the respective “workflows” and click on the “view” option. 
    a. Here choose the “Inactive” or “Download” option against the version number. 

1.3.3 Credential Vault

The Robility Credential Vault is a secure feature designed to store and manage sensitive information such as credentials, API keys, and confidential data within the Robility platform. It ensures secure access to secrets during automation workflows, minimizing exposure risks.

By default, the Credential storage is set to “Robility Manager Instance”. This option can be configured in the tenant selection area. Click here to learn more about it. This step is crucial for the tenant admin because all credentials will be stored in the area based on the storage configuration. 

Click here to view where all the credentials configured in Robility Manager are stored.

How the Credential Vault is Secured

1. Tenant Isolation: Credentials for each tenant are stored in isolated databases that are physically separate and hosted in Azure SQL Managed Instances (Azure SQL MI). These databases are protected with Transparent Data Encryption (TDE) to secure data at rest, ensuring tenant-specific security.

2. Encryption Mechanism: AES-256 Encryption: The Robility Credential Vault employs AES (Advanced Encryption Standard) with a 256-bit key to encrypt sensitive data. This industry-leading encryption ensures robust security for stored secrets. Encryption keys are securely managed and stored within the Robility infrastructure.

3. Secure Communication: All communication between Robility components, such as bots, the Credential Vault, and the Robility Manager, is secured using TLS 1.2 (Transport Layer Security), safeguarding data in transit.

4. Role-Based Access Control (RBAC): Robility enforces strict role-based access controls, ensuring that only authorized users and processes can access or modify stored credentials.

5. Audit Logs: Credential Vault activities, such as storing, retrieving, or modifying credentials, are logged to support audit and compliance requirements. 

Third Party Vault Integration

Robility integrates seamlessly with external credential management systems, allowing organizations to leverage existing solutions for secure credential storage and retrieval.

Supported Third-Party Vaults:

Azure Key Vault: Allows secure storage and management of credentials using Azure’s encryption and policy controls.
Aws: Provides secure storage, automatic rotation, and fine-grained access control for secrets, ensuring safe integration with AWS services and applications.
Google: Enables secure storage and access management of API keys, passwords, and other sensitive data, integrated with Google Cloud’s IAM and audit logging.

Click here to configure third party vault integrations. 

Advantages

1. Enhanced Security: Implements advanced encryption and access controls to protect sensitive data.
2. Centralized Management: Streamlines credential management by centralizing sensitive information storage.
3. Zero Trust Enforcement: Access is strictly granted only to authenticated users or bots with appropriate permissions, aligning with Zero Trust security principles.
4. Flexible Infrastructure Options: Works with both Robility Manager’s instance vault and external third-party vaults, allowing organizations to choose based on their infrastructure preferences.
5. Auditability and Compliance: Tracks and logs credential access to meet compliance requirements such as GDPR, ISO 27001, and HIPAA. 

Click here to learn more about the best practices while configuring credentials. 

1.3.4 Automation Ops

The “Automation Ops” menu is designed to streamline workflow automation within a project. It provides users with the ability to view, manage, and assign workflows to machines, ensuring seamless execution of automated processes.

Located at the Project level, this menu grants the Project Admin or Process Admin the authority to configure automation deployment. This section helps maintain operational control while optimizing task execution within the project.

Pre-requisites

Below are the points to note before deploying the machines to the robots. 

1. The resource must be added to the Tenant to map it to the respective project. If you haven’t added the license yet, click here.
2. Adequate licenses must be available to deploy them.
3. You cannot map the deployed machine to another solution.
4. The machine must be idle and not in use in order to map it to another solution.

Once you have added the machine in the “Resources” inside the tenant and published the automation solution within the respective project, you are all set to deploy them.  To learn about adding resources to your tenant, click here

Steps to Add Resources to a Project

1. Navigate to the respective project within your tenant.
2. In the “Automation Ops” section, click the “Add” button.
3. Ensure that workflows are published to the project before deploying resources.
4. Select the license type as “Unattended Robot.”
5. Choose the available resource name for the tenant, then select the workflow you wish to deploy.
6. You can select the version number to be deployed. This will display details such as the description, published by, published date, and any release notes provided during publishing.
7. Once the workflow version is selected, the Resolution Settings will be automatically populated based on your published solution’s JSON. Click here to learn more about it.
8. Finally, click the “Save” button.

What does each of the tag in the Automation Ops screen mean?

1. Serial number Shows the count of the number of machines added.

2. MachineName The name of the machine to which the robot is assigned is seen here.

3. LicenseType – Displays the type of license (Unattended Robot or Attended Robot) associated with the resource.

4. Solution Shows the name of the solution assigned to the machine. This corresponds to the solution published and deployed from the Designer. 

5. Version Displays the version number of the solution assigned to the robot.

6. Domain User The domain and the username for the robot is seen here.

7. Status The robot has different status based on its execution in runner. Click here to view the status in detail. 

8. Updatedby – Displays the name of the user or resource that last updated the resource. This field is also updated when the resource itself performs an action.

9. UpdatedOn – Shows the date and time of the most recent update to the resource. This timestamp is also refreshed when the resource performs an action. 

10. Action There are four different actions that we can use from the runner which are run, stop, edit and remove.
a. Run – This initiates the bot in the runner.
b. Stop – To stop the workflow during execution. This requires a stop activity to be used in the workflow.
c. Edit – To edit the workflow details assigned to the machine.
d. Remove – To remove the machine from the project.

Removing the machine 

When a machine is in a Locked or Running state, you cannot remove it from the Automation Ops page.

If the machine is linked to a scheduler, attempting to remove it from the Automation Ops will display a notification:
“The machine is being used by the scheduler. Do you want to remove it?”

a. If you click Yes, the machine along with the associated scheduler will be removed.
b. This happens only when a single machine is assigned to the scheduler.
c. If multiple machines are assigned to the same scheduler, the scheduler will remain active and only the selected machine will be removed.

1.3.5 Scheduler

The Scheduler menu streamlines processes between robots and humans without manual intervention. It enables scheduling of automation workflows at regular intervals, facilitating efficient management and real-time monitoring of robot execution in RobilityManager.  This automation of scheduling tasks reduces human error and ensures timely execution of critical processes. By setting up scheduled triggers, you can automate repetitive tasks, manage resources efficiently, and monitor workflow progress seamlessly. 

Schedulers are essential in automation for several reasons:

1. Efficiency: Schedulers automate repetitive tasks, ensuring they are executed at predefined intervals without manual intervention. This improves overall process efficiency.
2. Resource Optimization: By scheduling tasks, you can allocate resources more effectively, ensuring that critical processes are executed when needed without overburdening systems during peak times.
3. Timely Execution: Scheduled tasks ensure that important processes are executed at the right time, reducing delays and improving overall workflow timelines.
4. Error Reduction: Automation through schedulers reduces human errors that can occur during manual execution, leading to more accurate and reliable results.
5. Real-Time Monitoring: Many schedulers provide real-time monitoring capabilities, allowing you to track task progress, identify issues promptly, and take corrective actions as needed.
6. Productivity: By automating routine tasks, schedulers free up time for employees to focus on more strategic and value-added activities, boosting overall productivity.

Within Robility Manager, the scheduler is a vital tool used to organize bot deployment using five distinct scheduling methods.

1. Daily Schedulers
2. Daily Multiple Schedulers
3. Weekly Schedulers
4. Weekly Multiple Schedulers
5. Monthly Schedulers

Scheduler Essentials

Let’s delve deeper into each type of scheduler to grasp how they operate within the automation framework.

Before proceeding with scheduling robots, it’s crucial to adhere to and maintain the following steps:

1. Publishing Solutions: Begin by publishing the solutions to the project in RobilityManager. This step ensures that the latest versions of your automation workflows are available for scheduling. You can find detailed instructions on how to publish solutions here.

2. Resource Allocation: Next, add the necessary resources with their respective licenses. This step ensures that the correct resources are available for executing the scheduled tasks. Refer to the documentation here for guidance on adding resources.

3. Resource Configuration: Finally, configure the resources inside the project to define their roles and permissions. This configuration step ensures that resources are utilized efficiently and securely during automation execution. Refer to the guide here for detailed instructions on resource configuration.

How to navigate to the scheduler section?

Once you have followed and configured the above three steps, you can navigate to the Scheduler section to schedule and deploy your robots on a timely basis.

1. Login to Robility manager.
2. Click on Projects from the left side menu bar and navigate to the respective project.
3. Now, click on scheduler from the left side menu bar.
4. Now we can see the different types of schedulers available on this screen.

1.3.6 App Integrations

About

Robility’s App Integrations empower users to connect with third-party applications, seamlessly incorporating their services into automation workflows. Using API processes with secure authentication, Robility offers centralized control and customization for managing integrated systems. With a wide range of pre-built connectors for enterprise applications, Robility ensures quick and efficient automation, while also allowing for custom integration options to fit to unique business needs.

How does it help you?

1. Ensures secure and compliant data exchange between systems through robust authentication and encryption protocols, maintaining a higher level of compliance and governance through a standardized approach.
2. Simplifies the integration of a wide range of third-party applications to extend the functionality of your automation workflows.
3. Provides a unified environment for managing integrations, making it easier to maintain, troubleshoot, and update connections.
4. Access the ready-to-use library of connectors to streamline your automation processes. 

5. Ensures a consistent automation design experience across all Robility products.
6. Built on a cloud-native platform, enabling businesses to scale integrations and automation rapidly without worrying about infrastructure limitations.

Why Use App Integrations Over API Activities?

1. App Integrations streamline the process by offering pre-configured connectors, reducing the complexity of setting up API calls and handling authentication or data parsing manually.
2. App Integrations are often more scalable and easier to maintain. Changes in API endpoints or authentication can be managed centrally, preventing the need for modifications across numerous workflows.
3. You can easily reuse the same integration setup across multiple workflows, avoiding the need to re-implement API connection logic each time.

Click here to learn about the connectors. 

1.4 HarmonyAI

About

Harmony AI, the AI component of Robility, powers a comprehensive range of AI-driven automation capabilities designed to enhance workflow efficiency and intelligence. It offers prebuilt and custom AI models for tasks such as document processing, text analysis, and image recognition. With features like Document Intelligence, Harmony AI combines OCR and machine learning to accurately extract data from unstructured documents, while its Natural Language Processing (NLP) capabilities enable sentiment analysis, entity extraction, and text classification. Additionally, Harmony AI’s UI Vision allows for seamless recognition of UI elements in diverse environments, and its Generative AI integrations provide advanced text generation, summarization, and language translation features.

Harmony AI also integrates effortlessly with popular AI platforms such as Google AI, AWS, and Microsoft Azure, enabling organizations to leverage advanced machine learning capabilities within their automation workflows. AI-powered chatbots, voice and speech analysis, and seamless integration with third-party AI services, Harmony AI drives intelligent automation across industries such as healthcare, finance, and customer service, making Robility a leading solution for AI-powered automation. 

HarmonyAI’s Capabilities

UI Vision: Revolutionizing UI Interaction

Harmony AI’s UI Vision is a cutting-edge, vision-driven capability that effortlessly transforms UI screens into structured, actionable elements. This breakthrough empowers Robility robots to navigate and interact with UI layers more intelligently and efficiently. By enabling seamless engagement with complex UI components, Harmony AI’s UI Vision can identify tables, icons, button, labels and text boxes. Click here to learn more.

Generative AI Activities: Transforming Automation with Intelligence

Harmony Generative AI Activities empower businesses to leverage artificial intelligence within their automation workflows. By offering key capabilities such as email generation, PII detection, content summarization, and text translation, these features enhance robotic efficiency, enable human-like informed decision-making, and unlock new automation opportunities. Click here to learn more.

Document Intelligence: AI-Driven Document Processing

Harmony Document Intelligence utilizes AI and machine learning to extract, interpret, and process data from structured and unstructured documents. It enhances accuracy and efficiency by automating data entry and validation tasks. With customizable features, it streamlines business workflows and reduces manual effort. Its seamless integration with the Robility Interact platform enables comprehensive automation. Empower your organization with intelligent document processing for greater operational efficiency. 

AI Search: Revolutionizing Information Retrieval

Harmony AI Search enables robots and humans to efficiently locate information within documents, transactions, and audio files ingested through automation or manual input. It provides powerful features such as natural language search, field-based filtering, and context-driven retrieval for accurate results. Leveraging AI-driven insights enhances accessibility and speeds up information retrieval. Seamlessly integrated into automation workflows, it boosts productivity and informed decision-making. 

1.4.1 Autonomous Agent AI

Understanding Autonomous Agent AI and Robility’s Harmony AI Support

Autonomous Agent AI refers to an advanced artificial intelligence system capable of functioning independently without the need for constant human supervision. These intelligent agents are designed to perceive their surroundings, analyze situations, and make informed decisions to achieve specific objectives. By operating autonomously, they can streamline processes and improve efficiency across various industries. 

Key Characteristics of Autonomous Agent AI

1. Perception: Autonomous agents have the capability to gather and interpret data from their environment through various sources such as sensors, APIs, and other input mechanisms. This allows them to understand their surroundings and respond accordingly.

2. Decision-Making: Equipped with sophisticated AI models, rules, and heuristics, these agents can analyze information and make decisions that align with predefined goals. They can evaluate different options and take the most suitable course of action.

3. Autonomy: A defining feature of Autonomous Agent AI is its ability to function without direct human oversight. Once programmed with specific objectives, these agents can adapt and respond to changing conditions on their own.

4. Goal-Oriented Behavior: Autonomous agents work with a clear purpose, striving to accomplish specific tasks efficiently and effectively. Whether the goals are pre-defined or dynamically adjusted, these agents stay focused on achieving the desired outcomes.

5. Interaction: These AI systems are capable of communicating with humans, other AI agents, or external systems. This interaction enables seamless coordination, collaboration, and execution of tasks in complex environments.

1.4.2 Harmony AI Privacy Layer

Harmony AI Privacy Layer is an advanced solution designed to empower enterprises with comprehensive control over the utilization of AI models by users, automation bots, and various components within the Robility ecosystem. This privacy-focused layer provides a robust framework that ensures compliance, security, and governance while enabling organizations to tailor AI interactions to their specific business needs.

The Harmony AI Privacy Layer offers a wide range of configurable settings that allow administrators to manage AI model integrations at multiple levels, including tenant-wide and project-specific configurations. This flexibility enables organizations to dictate which AI models can be utilized across different projects, ensuring alignment with their security policies and operational requirements.

Key capabilities of the Harmony AI Privacy Layer

1. Granular AI Model Integration Control: Administrators can define which AI models are permitted within the organization, ensuring adherence to internal policies and regulatory requirements. The layer supports integration with a variety of AI models, including custom and third-party solutions. Click here to learn more.

2. Personally Identifiable Information (PII) Filtering: The privacy layer incorporates advanced mechanisms to detect and mask PII, such as names, addresses, and financial details, ensuring compliance with data protection regulations like GDPR, HIPAA, and CCPA. Customizable filtering rules allow organizations to define what constitutes sensitive information based on their compliance needs.

3. Abusive Content Prevention: To maintain a safe and professional environment, the Harmony AI Privacy Layer includes content moderation features that identify and prevent the generation of abusive, offensive, or inappropriate content. This functionality helps organizations enforce ethical AI usage policies and maintain brand integrity.

4. Role-Based Access Control (RBAC): Enterprises can enforce strict access controls by assigning AI usage permissions based on user roles and responsibilities. This ensures that only authorized users, robots, and components can access AI functionalities as per defined policies.

5. Audit and Monitoring Capabilities: The layer includes comprehensive logging and monitoring tools that track AI interactions, providing insights into how AI models are being utilized across projects. Detailed audit logs support compliance audits and help identify any potential misuse or anomalies.

With these features, the Harmony AI Privacy Layer ensures that enterprises can confidently deploy AI solutions within the Robility platform, balancing innovation with robust security and compliance measures.

1.4.3 Integrations

Robility® offers a comprehensive suite of AI services and built-in open-source models that can be seamlessly integrated into automation workflows. These services empower users to enhance the intelligence and efficiency of their automations by enabling them to process unstructured data, understand human input, and make informed decisions within workflows.

The AI services are tailored to handle routine yet data-intensive tasks such as extracting key fields from documents, analyzing customer sentiments from text inputs, identifying and validating signatures, and recognizing both printed and handwritten text formats. These capabilities significantly reduce manual effort, improve data accuracy, and accelerate processing times across various business operations.

Robility’s AI services are created using trusted open-source tools, which are then improved with custom-built models to make them work better for specific tasks. These services are designed to understand complicated data, filter inappropriate content, pull out useful information from text, and create human-like responses. All of this happens automatically as part of the automation process. Whether you use Robility’s built-in AI tools or connect with other AI services, these features help make your automation smarter and more adaptable to different situations.

Available AI Services Powered by Robility:

1. Generative AI – Create dynamic text content or responses using AI-based natural language generation. To learn more about the activities, click here

2. OCR & ICR – Extract printed (OCR) and handwritten (ICR) text from documents, forms, and images.

3. Sentiment Analysis – Understand the emotional tone of customer feedback, reviews, or support queries.

4. Entity Extraction – Identify and extract structured information such as names, dates, and locations from unstructured text.

5. Text Moderation – Detect and filter out inappropriate or harmful language from content inputs.

These AI capabilities bring intelligence to your automation journey, helping businesses respond faster, work smarter, and scale efficiently.

Third Party integrations

HarmonyAI also provide AI integration with third parties such as Azure and Google to further extend our capabilities and enhance document automation.

Azure Integration

Azure AI in Robility offers a wide range of models and services designed to cater to different AI and ML needs. These models and services are accessible through Azure’s cloud platform and can be used for tasks such as computer vision, natural language processing, anomaly detection, and more.

You can now easily plug Azure AI models into your automation workflow to enhance solutions.

AI services in Azure:

1. Document Understanding
2. Azure OpenAI
3. OCR

Google Integration

Google’s advanced AI and machine learning models leverages to improve document processing and automation. By incorporating Google’s Gemini and Vertex AI capabilities, users can achieve more accurate data extraction, better natural language understanding, and seamless integration with other Google services.

AI services in Google:

1. Document Understanding
2. Vertex AI

Click here to know how to activate the HarmonyAI within your tenant.

1.4.4 Settings

This section enables tenant administrators to configure and activate HarmonyAI for their projects, offering step-by-step instructions for setup. It also provides a comprehensive overview of the AI agent, its features, and the use cases. 

1.5 Interact Workflow

About Interact

Interact is Robility workflow platform empowering human in the loop automation model. We manage interactions between robots and humans seamlessly.

Use cases

1. Human-in-the-Loop: In scenarios where automation processes require human intervention at specific stages for decision-making, the interaction could occur between robot-human-robot, robot-robot-human, human-robot, or robot-human ecosystems.
2. Integration of Disparate Applications: When integrating multiple disconnected applications into a unified system, Interact can be used to bridge the gap.
Example: Interacting with CRM, ERP, and ticketing systems simultaneously, allowing humans and robots to exchange data across these platforms in real time.
3. Hybrid Automation: In scenarios where the robot completes its execution and requires human intervention to provide relevant data, such as follow-up scheduling or ticket creation.
4. Report Generation Automation: Automation processes that require report generation to review, monitor, and analyze the process and inputs received from the robot.
5. Handling exceptions: For processes where automation encounters exceptions, Robility Interact enables users to handle exceptions and resume automation after reviewing the cases.
    a. Example: A robot detects an issue in a data entry process, flags it for human review, moves it to either the system or business exception queue, and resumes the next step once the human verifies.

Limitations

DataTable and Attachment field types are not supported when uploading Queue transactions through Bulk Upload.

Key Features of Robility Interact

Robility Interact simplifies the automation process by offering a wide range of powerful features. Below are some highlights:

Fields:

Fields refer to individual pieces of data passed by robots and humans within the automation workflow. These fields represent the core information used in Interact to display, process, or retrieve data values. They can vary in type and purpose, depending on the specific requirements of the automation. In Interact, there are 16 types of fields that can be utilized for passing or retrieving data. This is the first step where the field description, purpose, and value types are defined and managed by both humans and robots.

For detailed information on field types, click here.

Queues:

Queues define the sequence in which the configured fields are processed. Robility Interact provides six distinct queue types, each serving a specific purpose within the automation flow:

  • Processing – Manages indexing, fetching, and processing of data.
  • HarmonyAI – Facilitates the integration of HarmonyAI into your automation workflows.
  • Business Exception – Handles data when it encounters business-related exceptions.
  • System Exception – Processes data that encounters system-level exceptions.
  • Rejected – Manages data that is rejected due to specific errors or exceptions.
  • Completed – Used when all processes related to the data are successfully finished.

The queue system allows users to control the flow of data from one queue to another seamlessly, ensuring efficient processing. For detailed information on queues, click here.

Business Rules:

Robility Interact includes a comprehensive yet easy-to-use rule engine that controls the movement of fields and queues based on If/Else conditions. This helps to streamline decision-making in the automation process, ensuring that data is processed correctly and efficiently based on predefined conditions.

For detailed information on configuring business rules, click here.

Email Configuration:

Interact also allows for the setup of automated email notifications, keeping users informed of queue movements and changes throughout the process. This feature ensures smooth communication and transparency during automation workflows. Click here to learn more. 

Master Data:

The Master Data Configuration feature enables the storage and management of standardized inputs for recurring processing over a defined period. This ensures consistency and efficiency when dealing with common data sets used across multiple automation tasks. Click here to learn more.  


1.5.1 Project Configuration

Project Configuration

Robility Interact offers a robust framework to manage automation workflows effectively by integrating robots and human operators. To get started, it’s crucial to configure key components such as fields, queues, and business rules. These configurations ensure a streamlined and structured process, providing clarity and consistency throughout the automation lifecycle.

Why is it essential?

1. Establishes a seamless interaction between automated processes and human intervention.
2. Reduces errors by setting clear parameters and rules for task execution.
3. Enhances efficiency by organizing workflows into well-defined structures.
4. Ensures consistent data handling and process standardization across tasks.

Key components

1. Field Configuration: Fields are the building blocks of your project setup, capturing data required for workflows. Proper field configuration ensures accurate data collection, storage, and usage in automation processes. Click here to learn more about field configuration. 

  • Define input fields such as text, numbers, or dropdowns based on the project requirements.
  • Map fields to specific tasks to ensure robots and users interact with data correctly.
  • Customize field properties to align with business needs, such as mandatory fields, default values, or validation rules.

2. Queue Configuration: Queues help in organizing tasks and managing workloads efficiently. They act as repositories for tasks awaiting processing, ensuring prioritization and orderliness. Click here to learn more about queue configuration. 

  • Define queues based on task categories or process stages.
  • Assign robots to specific queues for automated task execution.
  • Monitor and manage queue statuses to track task progress in real-time.

3. Business Rules: Business rules define the logic and decision-making criteria for your workflows. By establishing these rules, you can ensure that tasks follow a structured path with minimal manual intervention. Click here to learn more about business rules. 

  • Configure rules to handle task routing, prioritization, or exception handling.
  • Integrate conditions and triggers to automate decision-making processes.
  • Use rules to guide both robots and human operators in their respective roles.

4. Email Notifications: Email notifications play a vital role in keeping stakeholders informed about workflow activities and task statuses. Configuring notifications ensures timely communication and accountability. Click here to learn more about email notification.  

  • Set up automated alerts for task assignments, completions, or delays.
  • Customize email templates to include relevant details such as task IDs, deadlines, or instructions.
  • Enable notifications for exceptions or errors to ensure quick resolution.

5. Master Data: Master data serves as the foundation for maintaining consistency and accuracy across workflows. It provides a centralized repository for essential data used in automation tasks. Click here to learn more about Master data.  

  • Define and store key datasets, such as user roles, product information, or system parameters.
  • Ensure data integrity by standardizing formats and avoiding duplication.
  • Use master data to streamline task inputs and outputs, reducing manual dependencies.

1.5.2 Field Configuration

Fields are the foundational components of your project setup, serving as the primary means of capturing the data necessary for workflows. Proper configuration of these fields ensures the accuracy and reliability of data collection, storage, and usage, forming a critical part of seamless automation processes. Click here to learn more about field configuration.

1.5.3 Queue Configuration

Queue Configuration

The queue configuration helps the user to set up and manage queues. Queues are used to store and manage items fields, often in a First-In-First-Out (FIFO) order, for processing by robots. It can be customized to meet the needs of the user, such as setting different priorities, limits, and expiration times for different types of work items.

Proper queue configuration and management are essential for orchestrating complex processes efficiently and ensuring that your robots work seamlessly.

How to configure queues for your project?

The users will be able to configure the queues after fields has been set up. Follow the below documentation to walk through the Queue configuration page.

Queue Types

There are 6 queue types in which the fields are configured to set rules. Each queue type has its own set of parameters and rules that can be configured. This makes it easier to manage workload and keep the robots running smoothly. Additionally, queues can be used to manage exceptions and errors, ensuring that any issues that arise are handled quickly and efficiently.

Use Case

The following illustration helps you to understand how to configure queues against the project.

In this scenario, the input will consist of an Excel file containing a list of OS details. Using the information provided, including the OS type, RAM, HDD, and Applications, the server is to be created. Once the server creation process, specific to the relevant OS, is completed, it must be recorded back into the Excel file. The fields and queues can be established according to our specific use case. Here we are continuing the process from field configuration step.

Now let’s configure the queues:

The following steps helps you to set up the queues in your project.  In our specific use case, 6 queues need to be created and configured.

Queue 1 – Processing:

The processing queue enables the transactions to move into process for execution of the automation. The fields that need to be processed can be configured. Let’s see how this works. After setting up the fields, they need to be managed with rules during the automation process. This processing queue will move the transactions into the execution process to initiate the automation. Follow the below steps to create a queue name for processing queue.

1. Select the project in which you want to configure the Interact. Here chooses the project as “Server creation”.
2. Navigate to the “Smart Interact” at the left-hand side of the page.
3. You will be directed to the project configuration page.

4. Select the queue configuration step.
5. Choose the queue type as “Processing” from the drop-down list.
6. Enter the queue name as “FetchData”.
7. Select the “Click here” option on the queue access to provide the access to the users available in the project. (Refer queue access to know more).
8. Select the “Click here” option on the field Access to configure the fields to process. (Refer field access to know more).
9. Select the regex script and add script against the field name. (Refer custom scripts to get detailed information).
10. Select the Custom script and provide the javascript for the fields to process. 

Queue 2 – Harmony AI:

Harmony AI refers to the process of extracting meaningful information from structured & unstructured documents, such as text files, PDFs, images, and scanned documents.
This framework will facilitate the processing of incoming files, from file digitization to extracted information validation, all in an open, extensible, and versatile environment. It helps combine different approaches to extracting information from multiple document types. The main aim is to make the process of extracting data as easy as possible: creating one single workflow that will extract data from a variety of documents. The acceptable cards are Aadhar, PAN card, Voter card and driving license. Follow the below steps to create a queue name for business exception. Here we are continuing from Fetch data queue.

1. Select the project in which you want to configure the Interact. Here chooses the project as “Server creation”.
2. Navigate to the “Interact Workflow” at the left-hand side of the page.
3. You will be directed to the project configuration page.

4. Select the queue configuration field.
5. Choose the queue type as “HarmonyAI” from the drop-down list.
6. Enter the queue name as “Aadhar Card”.
7. Click here to know about the queue access for the fields.

How to upload the cards for processing through Harmony AI?

1. Select the “click here” on the Harmony AI.
2. A pop-up will appear on the window.
3. Upload the sample Aadhar card to be processed by the bot.
4. Click on the upload option and select the file from the local system.
5. Once the file has been uploaded, the type will be automatically chosen as “Aadhar card”.
6. Click on the Get taxonomy button to extract the details from the provided Aadhar card.

Queue 3 – Business exception:

The business exception refers to a situation where the workflow process is disrupted due to unexpected or abnormal conditions that occur while the bot is executing the automation. These exceptions can be caused by various factors such as data errors, system issues, user interactions or any other unexpected events that the bot may encounter while execution. To notify these exceptions to the user, the cases can be automated to move to business exception queue so that the user may take actions to prevent this in future. Follow the below steps to create a queue name for business exception. 

Queue 4 – System Exception:

The system exception refers to an unexpected error or issue that arises from the underlying technical systems or software applications with which the bot interacts. Unlike business exceptions, that re related to deviations from normal business rules or processes, system exceptions grow from problem like software crashes, connectivity errors, server downtime or any other technical glitches that disrupt the automation workflow. To notify these exceptions to the user, the cases can be automated to move to system exception queue so that the user may take actions to prevent this in future. Follow the blow steps to create a queue name for system exception. 

Queue 5 – Rejected:

The transactions which do not have sufficient information or incorrect data to proceed with the automation process can be categorized under rejected queue. These transactions need to be manually verified to check the accuracy of the data provided. If the data is accurate, then these transactions can be re-processed. Otherwise, the transaction can be cancelled. Follow the blow steps to create a queue name for Rejected. 

Queue 6 – Completed:

Once all automation process has been completed successfully and performed the required tasks, the transactions can be moved to completed queue. This queue enables you to view the completed transactions on the Manager portal. Follow the blow steps to create a queue name for business exception. 

1.5.4 Business Rules

Business rules allow the user to define rules and conditions for the transaction process. These rules are crucial during project configuration as they help the user to make decisions based on the real time data.

In simpler terms, this step acts as a checkpoint for every transaction, ensuring that each transaction is validated, and further actions are processed seamlessly during bot execution.

Benefits

1. The business rules allow the user to reduce the workflow process by handling complex cases with multiple conditions at the project configuration level.
2. It minimizes the manual intervention during runtime and processes the cases within minutes.
3. This makes transaction movement easier and swifter through “If/Else” functionality compared to the traditional process of transaction movement.
4. It improves flexibility and enhances efficiency in data management by customizing field values and copying one field value to another queue.

How do business rules work?

Traditionally, the business rules model wouldn’t allow users to process transactions with multiple conditions. To overcome this hurdle, the “If/Else” functionality implements a comprehensive and structured model, enabling users to pre-determine and define their own criteria in all possible ways. This functionality allows the user to create multiple conditional parameters that can execute actions based on the specified criteria.

The below diagram represents the diagrammatic flow of the model of the business rules. 

  1. If: This part specifies the condition that must be met for the action in the “Then” part to be executed.
  2. Then: This part specifies the action to be taken if the condition in the “If” part is true.
  3. Else: This part specifies the action to be taken if the condition in the “If” part is false.

Please note that the below picture demonstrates a sample example of a process flow model.   
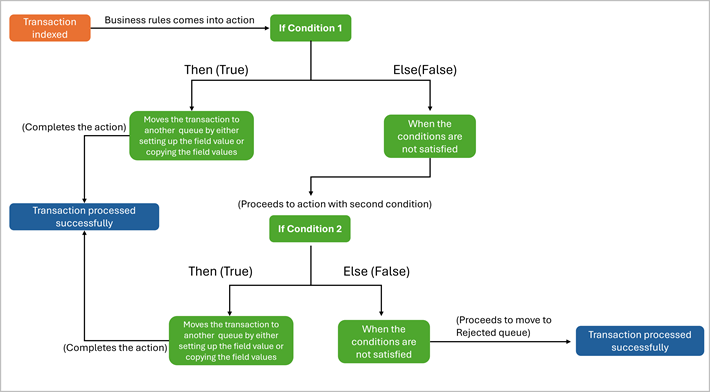
Visual Representation of Business rule window:
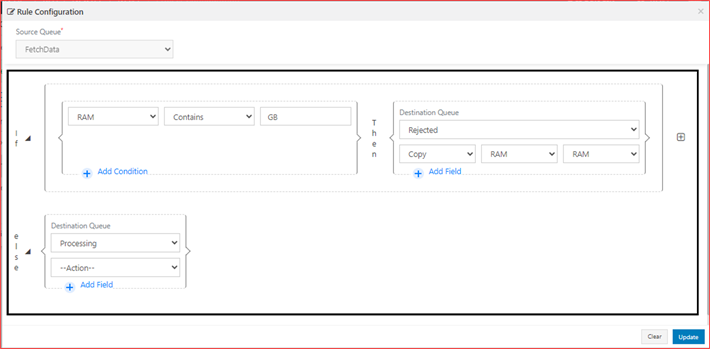
How to implement and configure the rules?

Let’s understand the key concepts and configuration steps in the business rule window.

Step 1: To access the “Rule Configuration” window, select the “Create Rule” button.  

If Part:

This section allows the user to choose the fields, specify the condition and provide the conditional value that is to be actioned and processed. Let’s see how to add rule condition in the “IF” part.

Step 2: Select the “Source Queue” name from where the fields have to be configured. In the “If” part, there will be three options to configure.

1. Field: This drop-down displays the “fields” that are available for the current chosen queue. Select the required fields which needs to be actioned.
2. Operator: There are 12 operators with which the user can define the values. Choose the operation from the drop-down.
    a. Equals: It validates to check whether the input “FieldName” value received is equal to the specified condition value.
    b. Not Equals: It validates to check whether the input “FieldName” value received is not equal to the specified condition value.
    c. Greater than: It validates to check whether the input “FieldName” value received is greater than the specified condition value.
    d. Less than: It validates to check whether the input “FieldName” value received is lesser than the specified condition value.
    e. Greater than or equals: It validates to check whether the input “FieldName” value received is greater than or equal to the specified condition value.
    f. Lesser than or equals: It validates to check whether the input “FieldName” value received is lesser than or equal to the specified condition value.
    g. Contains: It validates to check whether the input “FieldName” value received contains the specified condition value.
    h. Does Not Contains: It validates to check whether the input “FieldName” value received does not contain the specified condition value.
    i. Starts With: It validates to check whether the input “FieldName” value received starts with the specified condition value.
    j. Ends With: It validates to check whether the input “FieldName” value received ends with the specified condition value.
    k. Empty: It validates to check whether the “FieldName” value is empty. When this operator is chosen, there will be no “Value” field to provide, the values can be directly moved to “Then” part condition.
    l. Not Empty: It validates to check whether the “FieldName” value is not empty. When this operator is chosen, there will be no “Value” field to provide, the values can be directly moved to “Then” part condition.
3. Value: It enables the user to provide the conditional values to action the process with the values against the selected field name.

Then Part:

This part will be actioned when the transactions meet the conditions specified in the “If” part. It provides the user with two options: they can move the transactions directly without setting or copying any field values, or they can move the transaction by setting up and copying the values.

1. Destination Queue: Select the “Destination Queue” name where the fields has to be moved if the transactions met the specified criteria/ condition in the “If” part.
2. Action: This additional step lets the user to set or copy the values for the transactions against any field value. There are two options,
    a. Set: It lets the user to set any default values once the transactions are processed and moved to the specified queue. By choosing this option, the user can set the values to one or more fields in the destination queue.
    b. Copy: It lets the user to copy the values from any source field and paste them into the destination field. By choosing this option, the user can set the values to one or more fields in the destination queue.

Else Part:

This section will be actioned when the transactions does not meet the condition and criteria mentioned in the “If” part. It provides the user with two options: they can move the transactions directly without setting or copying any field values, or they can move the transaction by setting up and copying the values.

1. Destination Queue: Select the “Destination Queue” name where the fields have to be moved if the transactions do not meet the specified criteria/ condition in the “If” part.
2. Action: This additional step lets the user to set or copy the values for the transactions against any field value. There are two options,
    a. Set: It lets the user to set any default values after the transactions are processed and moved to the specified queue. By choosing this option, the user can set the values to one or more fields in the destination queue.
    b. Copy: It lets the user to copy the values from any source field and paste them into the destination field. By choosing this option, the user can set the values to one or more fields in the destination queue.

Multiple Conditions

There are options to add multiple conditions within the “IF”, “Then” and “Else” parameters as well as there is option to add multiple “Else-If-Then” parameters.
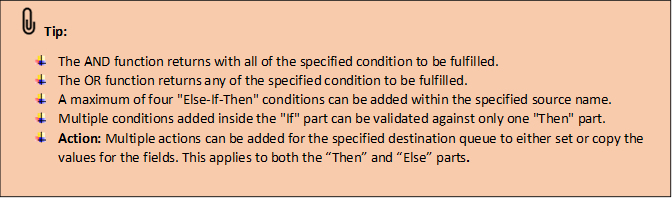
A. Adding “Multiple Conditions” in If part:

Adding multiple conditions in the “If part” allows the user to combine them using “AND” or “OR” logic. This flexibility enables the creation of complex rules that can accurately reflect real time scenarios and decision-making processes.

All the fields accessible in the specified source queue can be validated multiple times with the below logics.
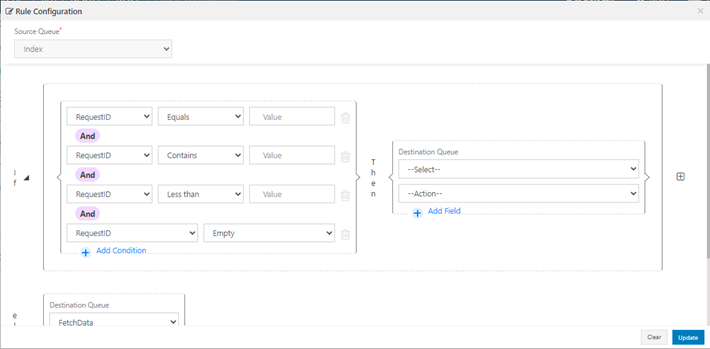
AND Condition: When the user is adding more fields with this logic, all specified conditions must be true for the action in the “Then” part to be executed. This is useful for scenarios where multiple criteria need to be met simultaneously.

OR Condition: At least one of the specified conditions must be true for the action in the “Then” part to be executed. This is useful for scenarios where any one of multiple criteria being met is sufficient.

B. Adding “Multiple fields” in Then and Else part:

Adding multiple fields in the “Then” and “Else” part allows the user to set/copy the values to the destination field. All the fields accessible can be added multiple times to set or copy the values.

1.5.5 Queue Reference Field

The Reference Field is a key feature in the Interact module designed to uniquely identify transactions within a queue. Its primary purpose is to detect and manage duplicate entries automatically. By comparing the reference values across transactions, the system ensures that the same transaction is not processed multiple times, reducing errors, improving efficiency, and maintaining data integrity during automation.

This feature is particularly useful for workflows handling high-volume transactions, where manual tracking of duplicates is not feasible. It also provides a structured mechanism for users and bots to manage duplicates by moving them to a designated queue for review.

Steps to configure the field:

Queue configuration

Upon each field creation, the reference will be created and available under queue configuration for field mapping. Click here to learn about field creation. Below are the steps to configure the reference field, 

Steps:

1. Open the queue and navigate to the Field Mapping section against the specific queue.
2. In the Reference column, select one of the fields that will serve as the unique identifier for duplicate validation. (e.g., Transaction ID, Order Number, or Invoice Number).
3. Update the queue configuration to include the selected reference field.
4. Save the configuration to ensure that the reference field is applied to the queue.
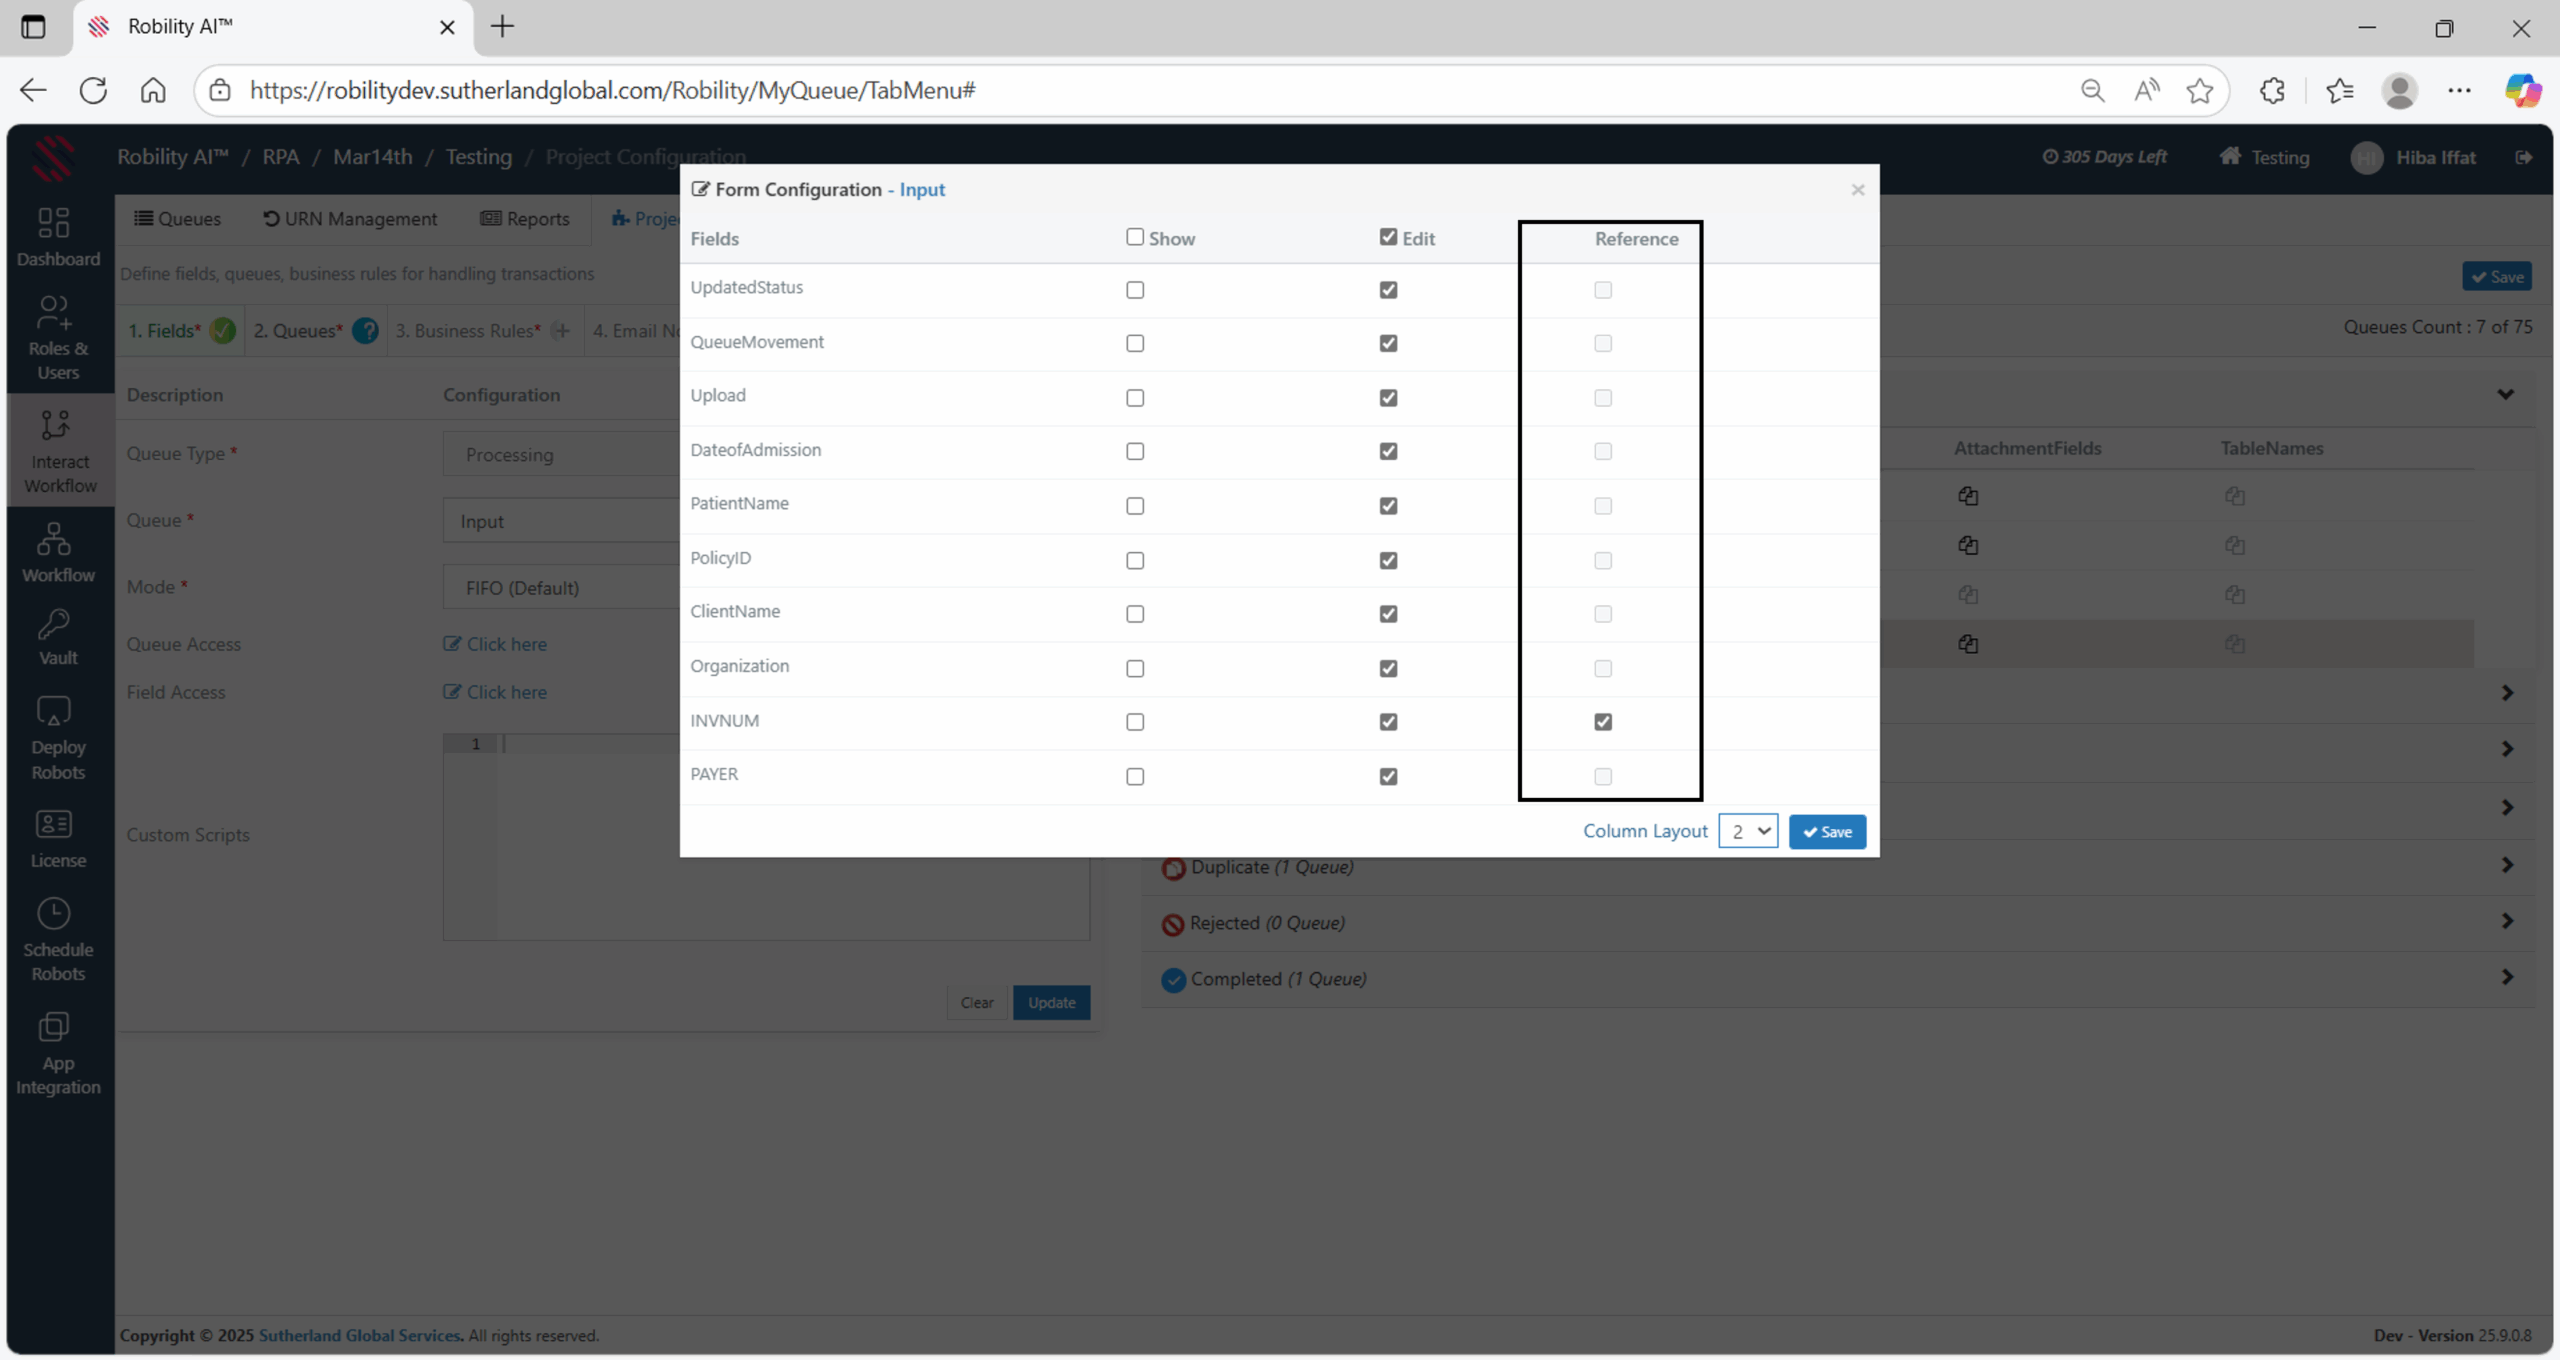
Business Rule Configuration

Once the queue has been updated with the reference field, a business rule must be created to handle duplicates.

Steps:

1. Navigate to the Business Rules section after configuring the queue.
2. Add a new rule for the queue.
3. Select the reference field from the list of available fields; it will appear as “Field Name (Reference)”.
4. Set the condition for the rule to “Duplicate”.
5. The application will automatically create a default “Duplicate” queue, where all detected duplicate transactions will be moved.
6. Save both the business rule and the project to apply the configuration.
7. Users can review these transactions in the Duplicate queue and process them according to their workflow policies.
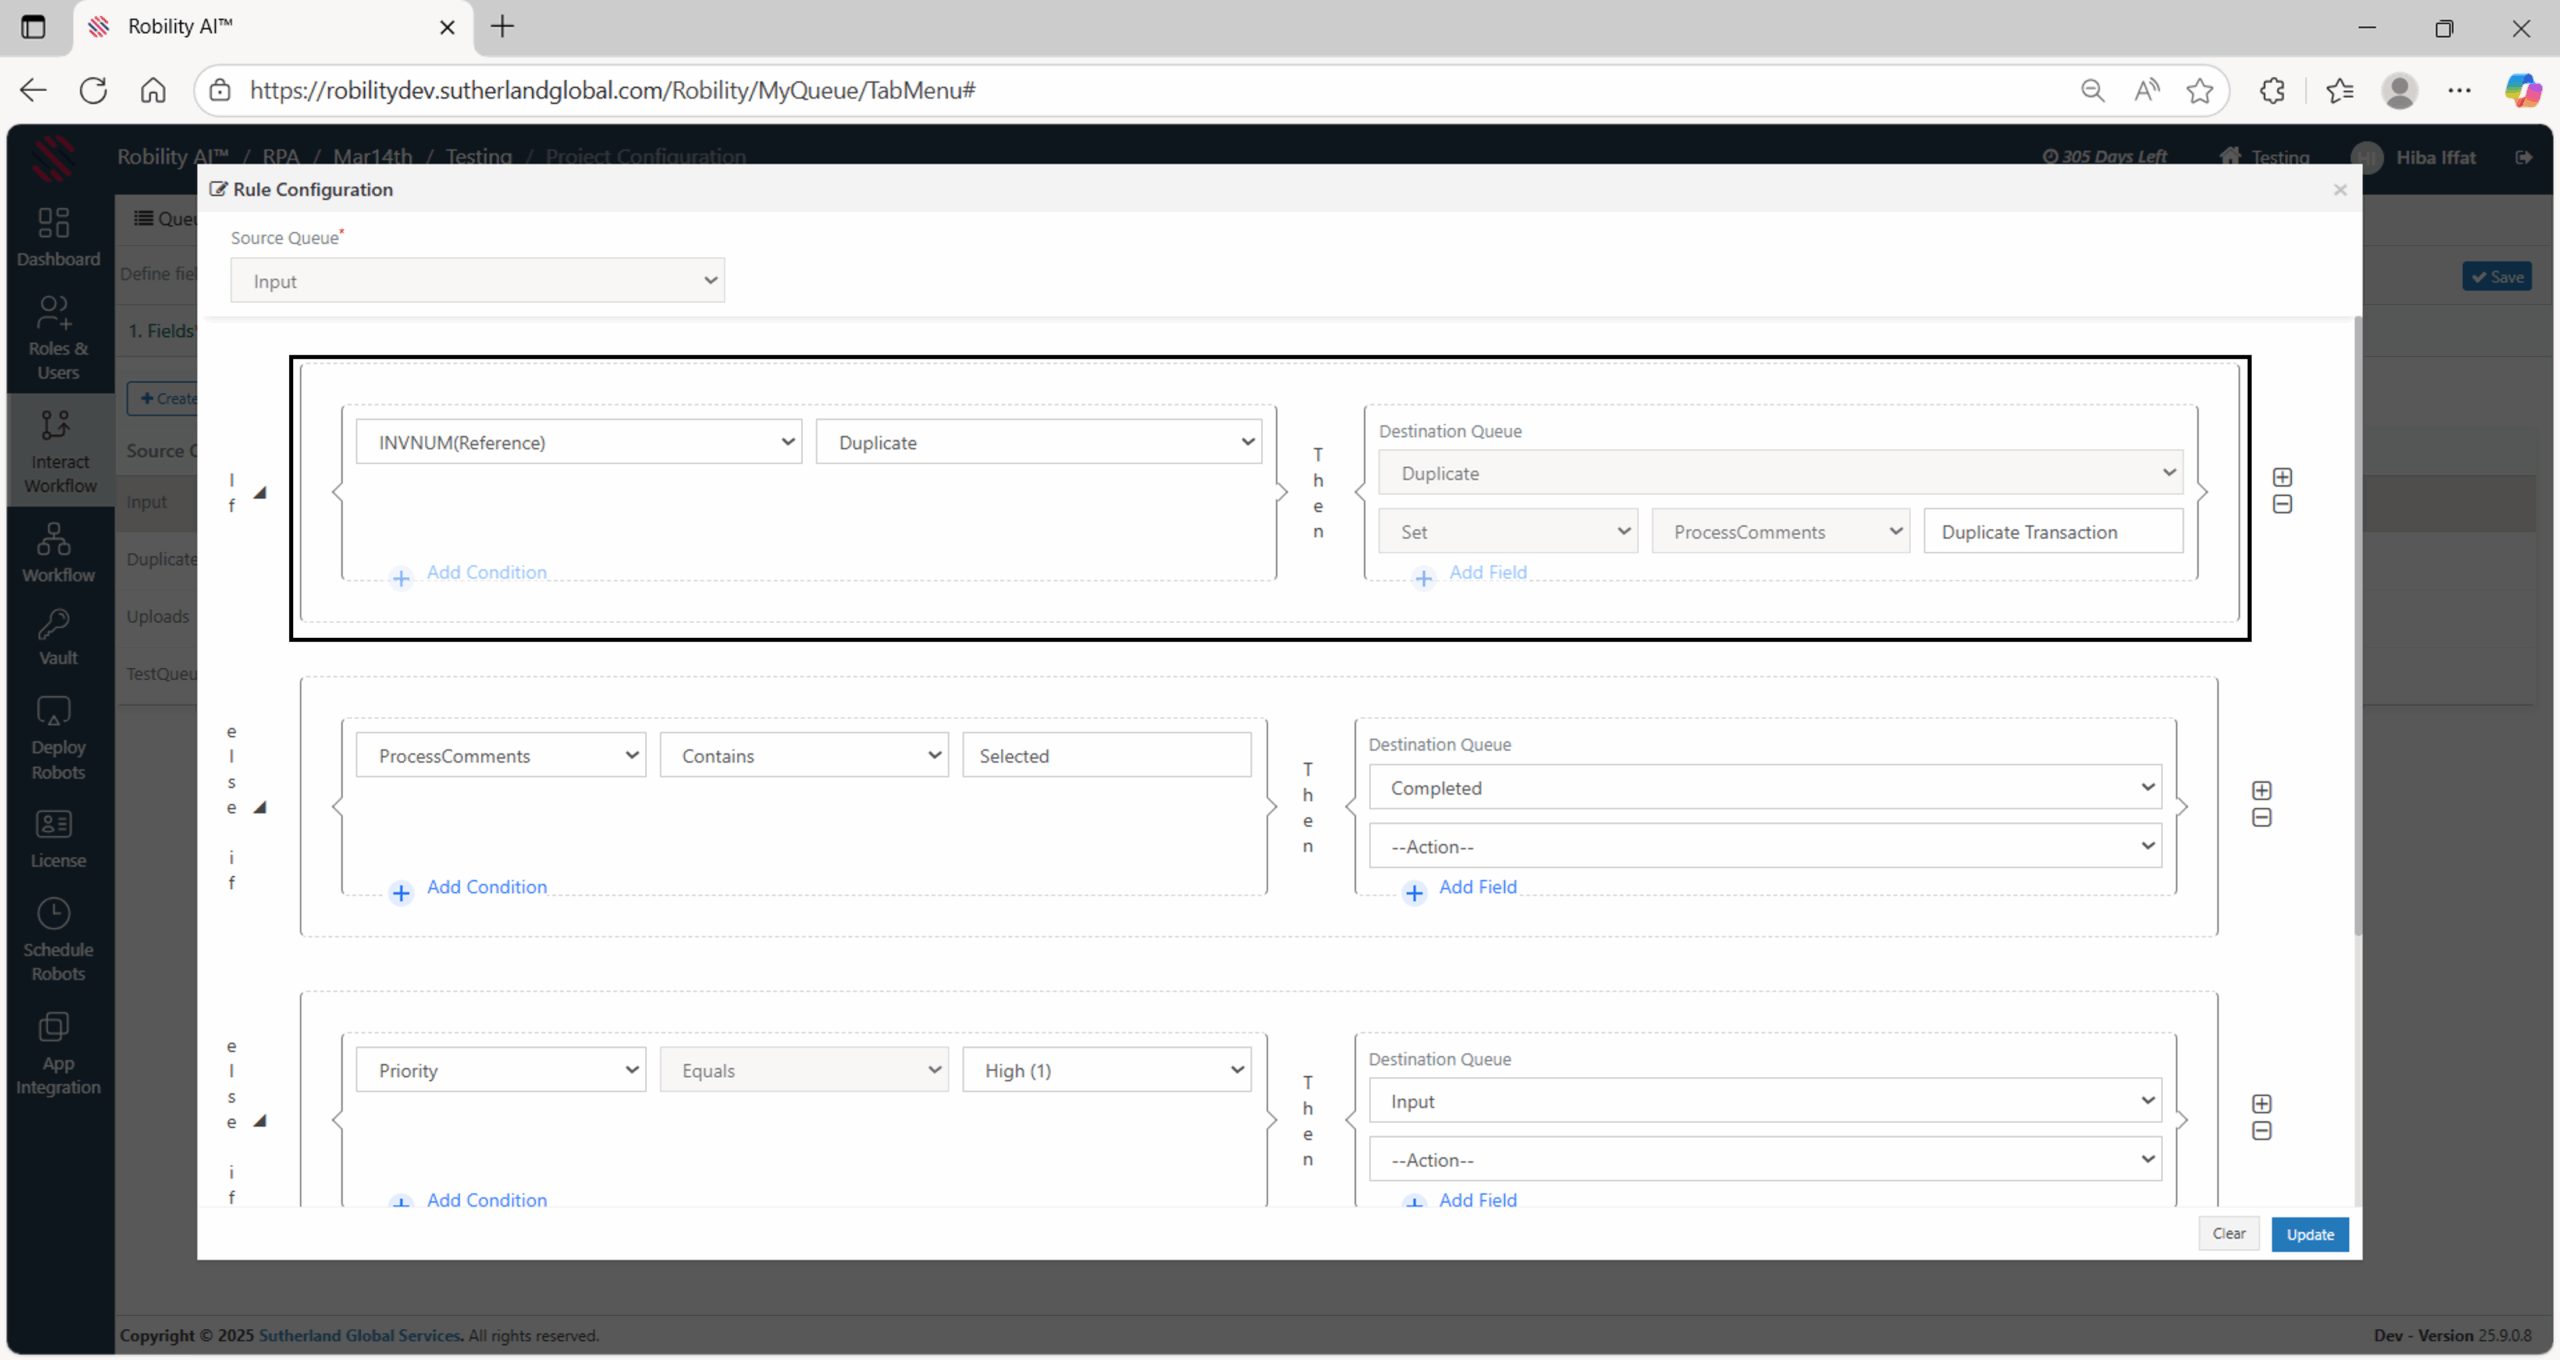
Key Considerations

1. Placing the Reference field rule at the top guarantees that duplicates are identified first, preventing incorrect processing of duplicate transactions.
2. Only one reference field can be selected per queue in the Queue Configuration section, and only one duplicate condition can be applied to that reference field within the Business Rules section for the queue.
a. However, you can have multiple queues, each with its own reference field and duplicate condition.
3. Multiple reference fields and multiple duplicate conditions cannot be added.

Adding Reference Field for Existing Projects

For all existing projects, the Reference field is already available in the Queues section. To implement duplicate handling in current workflows, business rules must be configured properly.

Steps to Configure for Existing Projects:

1. Select the reference field against the queues in Queue configuration section.
2. Open the business rules section for the relevant queue.
3. Ensure that the Reference field rule is placed at the top of the “If” branch.
4. After adding the Reference field rule, proceed to configure any additional rules for the queue as required.

1.5.6 Queue Priority

The Priority field in the Interact module defines the urgency level of a transaction and determines how it should be processed within a queue. It ensures that important transactions are handled first, improving response time and operational efficiency.

This field is available as a default field configured in Interact, viewable only in the Queue Review section, and can be updated only through Business Rules.

Key Benefits

1. Reduce delays and customer escalations.
2. Integrates seamlessly with existing queue modes for flexible prioritization.
3. Supports dynamic, rule-based processing without manual intervention.

Configuring Priority Using Business Rules

Business Rules automatically update priority levels based on the defined field conditions (such as equals, contains, etc.) ensuring that critical transactions are processed first without manual intervention.

Steps to Configure:

1. Navigate to Business Rules and select the queue where your transactions are indexed.
2. Create a new rule or edit an existing one.
3. Define the condition that determines when the rule should apply.
a. Example: If the “Payer Name” contains “Apollo,” apply the rule.
5. In the action section:
a. Select Set Field → choose Priority → assign High(1) (or desired level).
6. Save and apply the rule.

Once activated, it automatically marks transactions that met the specified conditions as high priority and processes them first according to the queue mode.
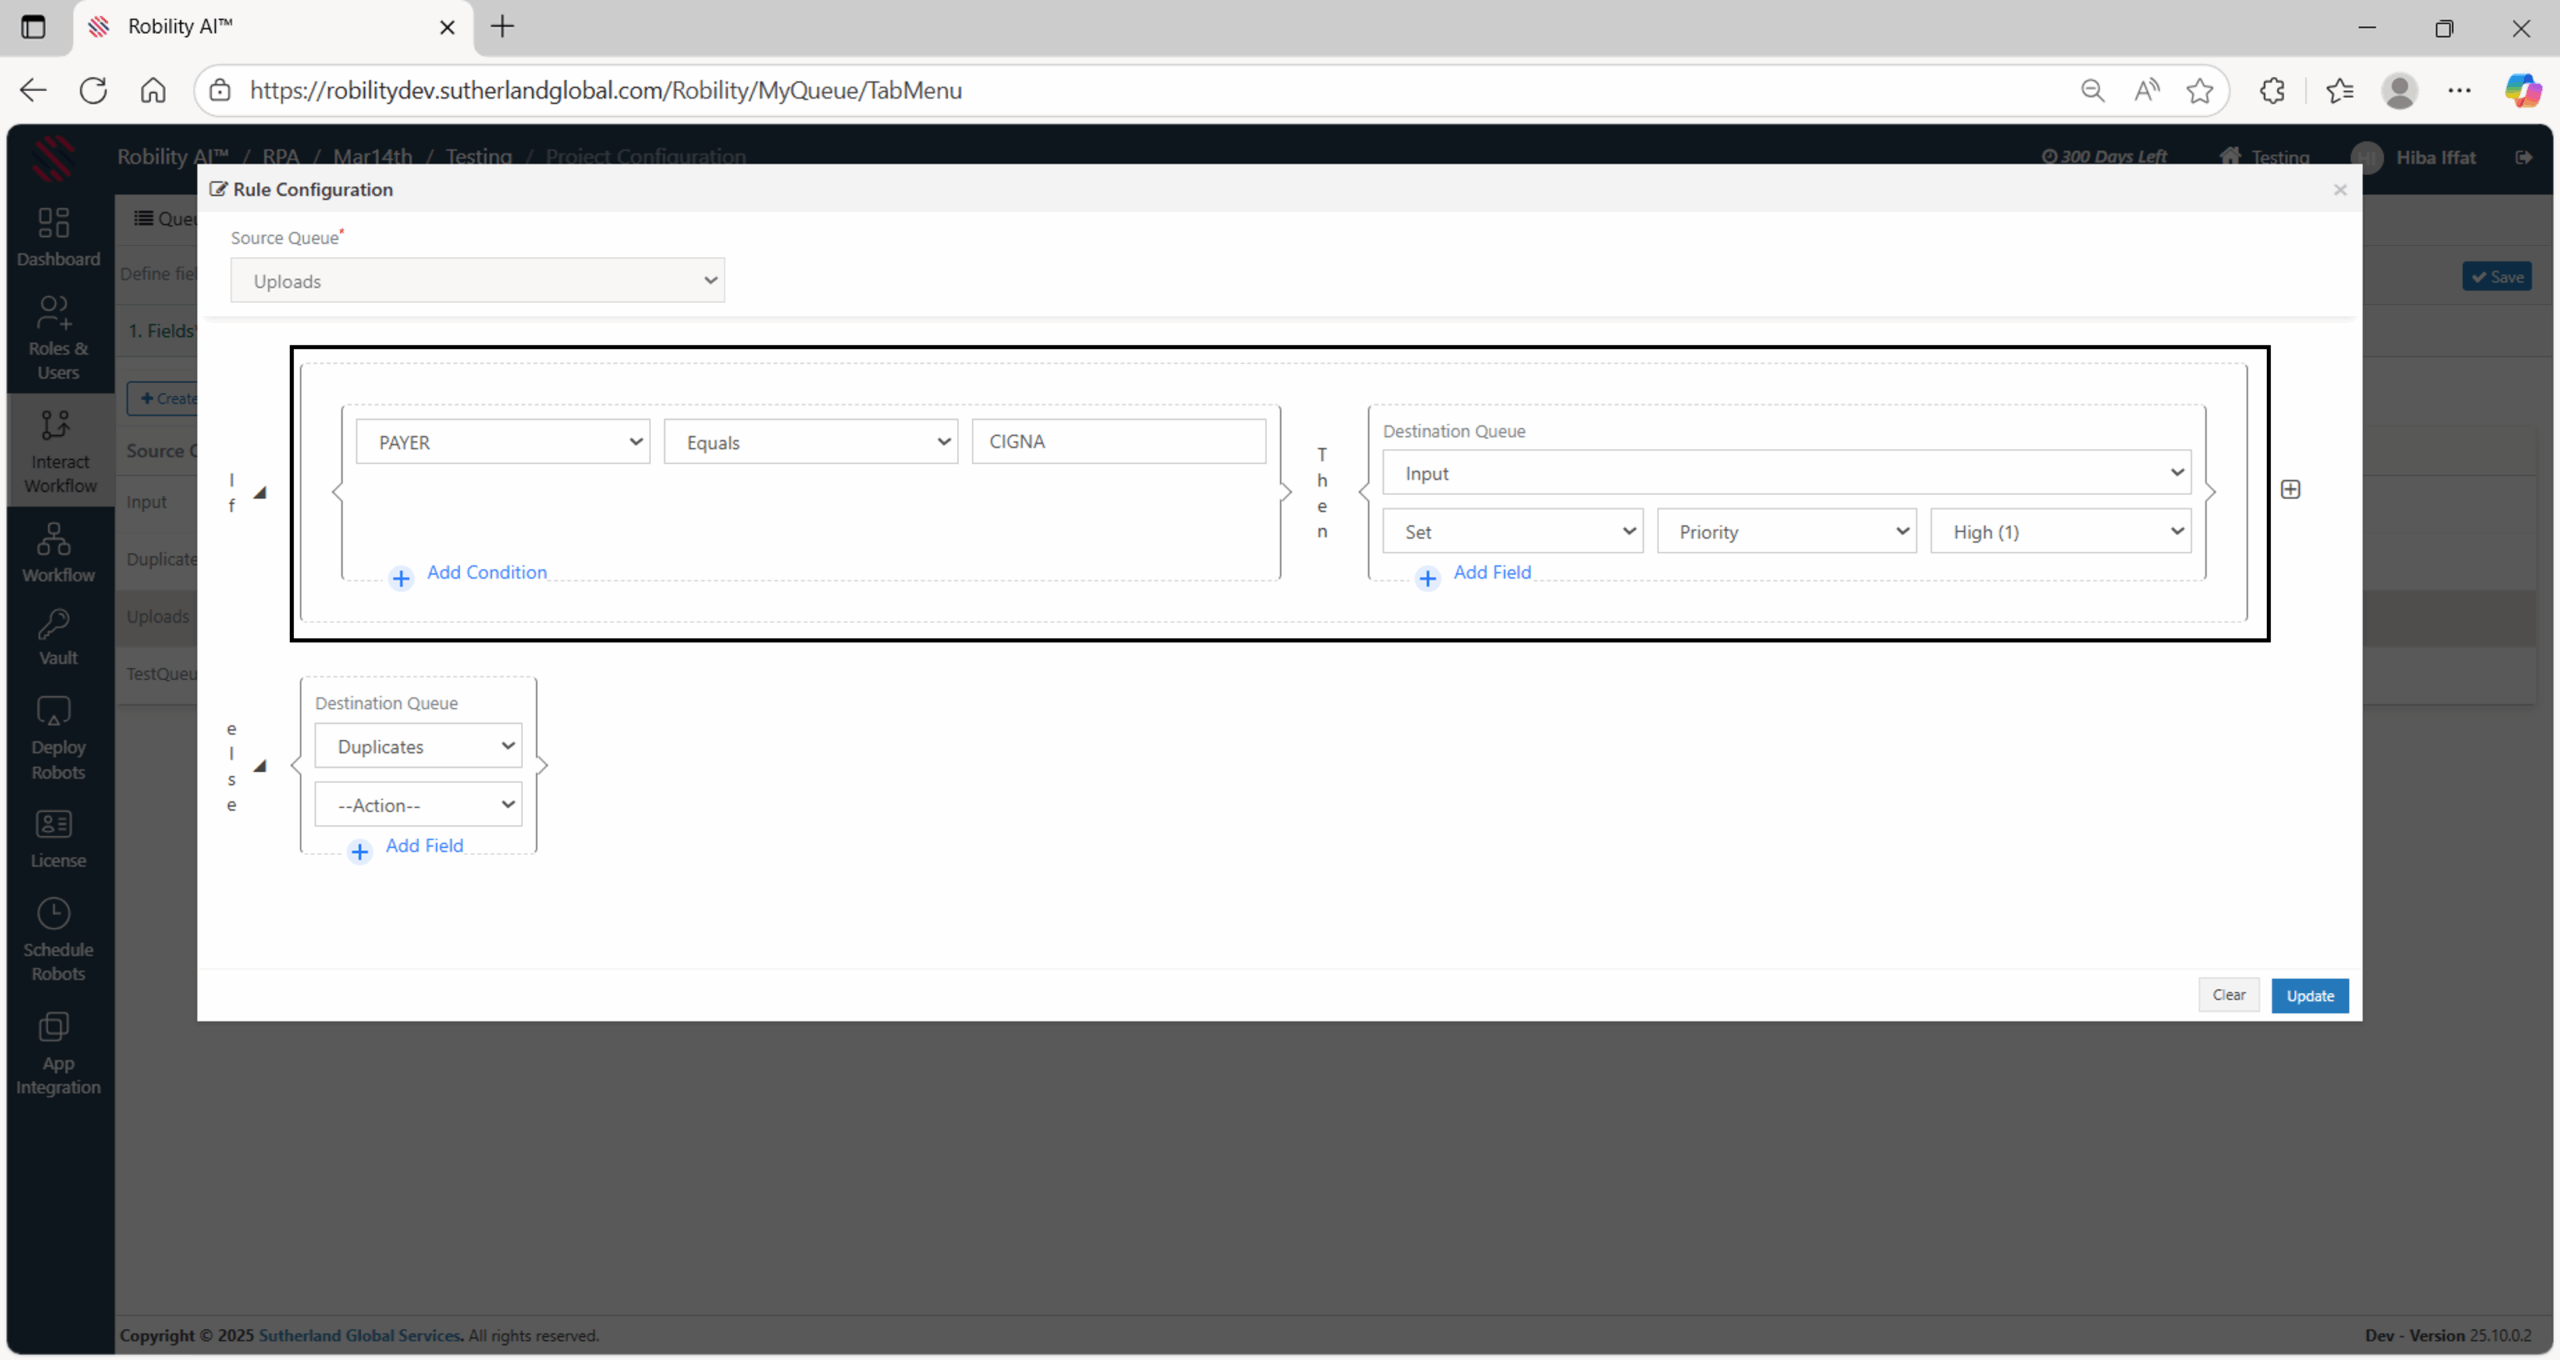
How does priority work?

Each transaction can have a priority levelHigh, Medium, and Low.

1. High priority transactions are processed before Medium and then Low.
2. If multiple transactions share the same priority, the order is determined by either of the following queue mode:

a. FIFO: Older transactions with priority set are processed first.
b. LIFO: Most recently added transactions with priority set are processed first.
c. Random: Transactions are processed in no specific order.

Default behavior: If a transaction has no priority set and no queue mode specified, it is processed in a FIFO manner according to the queue rules.

Example

Let’s say in a project, the index queue receives 10 transactions, out of which 2 are High, 5 are Medium, and 3 are Low.

The system will first process the two High priority transactions. Once completed, it will process Medium, and finally Low, following the order defined by the queue mode (FIFO, LIFO, or Random).

1.5.7 Email Notification

Email Notification

Interact also allows for the setup of automated email notifications, keeping users informed of queue movements and changes throughout the process. This feature ensures smooth communication and transparency during automation workflows.

Why do we need this step?

1. Emails can act as a form of record-keeping. They provide documented evidence of the completed transaction, which might be needed for auditing, compliance, or future reference purposes.
2. Notifications allow for real-time monitoring. In case of errors or issues, they can trigger an alert to relevant personnel for immediate action.
3. It improves communication by informing relevant parties about the progress, completion, or any issues related to the transaction, maintaining transparency within the organization or between systems.
4. Integrating email notifications as part of the workflow can further automate the process, ensuring that stakeholders receive timely updates without manual intervention.

How to configure email notification in your project?

Let’s continue from the use case, here I am going to set the email address to notify whenever the transactions has been completed successfully or if there are any errors thrown during the runtime.

Follow the below steps,

1. Login to the Manager and navigate to the “Projects” where you have configured the Interact.
2. Click on the “Interact Workflow” and choose the “EmailNotification” step.
     a. This is not a mandatory step while configuring the project. You can also skip this step to move forward.

     b. In this case, I am going to add the “Email Address” with two different mail subjects.
3. There will be two options available “Bulk” index and “Manual” index notification. You can configure both of these, and you can also configure either of them.
4. Let’s first create the “Bulk Index” to send the notification configuration.
    a. This notification will be triggered whenever the transactions are indexed as bulk to the project to the specified mail address along with the CC mail addresses provided.

    b. Here I am specifying CC mail address as my mail address to send a notification to myself every time the transactions are uploaded.
5. Next, moving to the “Manual index Notification” option.
     a. Here, I am choosing the “Queue” name as “Completed”, so that once the transactions are moved to completed queue, an email will be triggered for each transaction.
     b. Next, moving to the “TO” field, you need to mention the mail address to whom the notification needs to be triggered.
     c. Next, “CC” field, here you need to mention the “CC” mail addresses. In this case, I left out this option.
     d. Now, moving to the “Subject” to provide the subject for the mail to be notified.Here I am specifying the subject as “Transactions completed”.
     e. Finally, the “Body” helps you to provide the content that needs to be sent along with the mail. You can configure the mail body as per project preference.
         i. Here I am specifying the Body as “The transaction has been completed successfully.”
6. Now, Add and save the project.
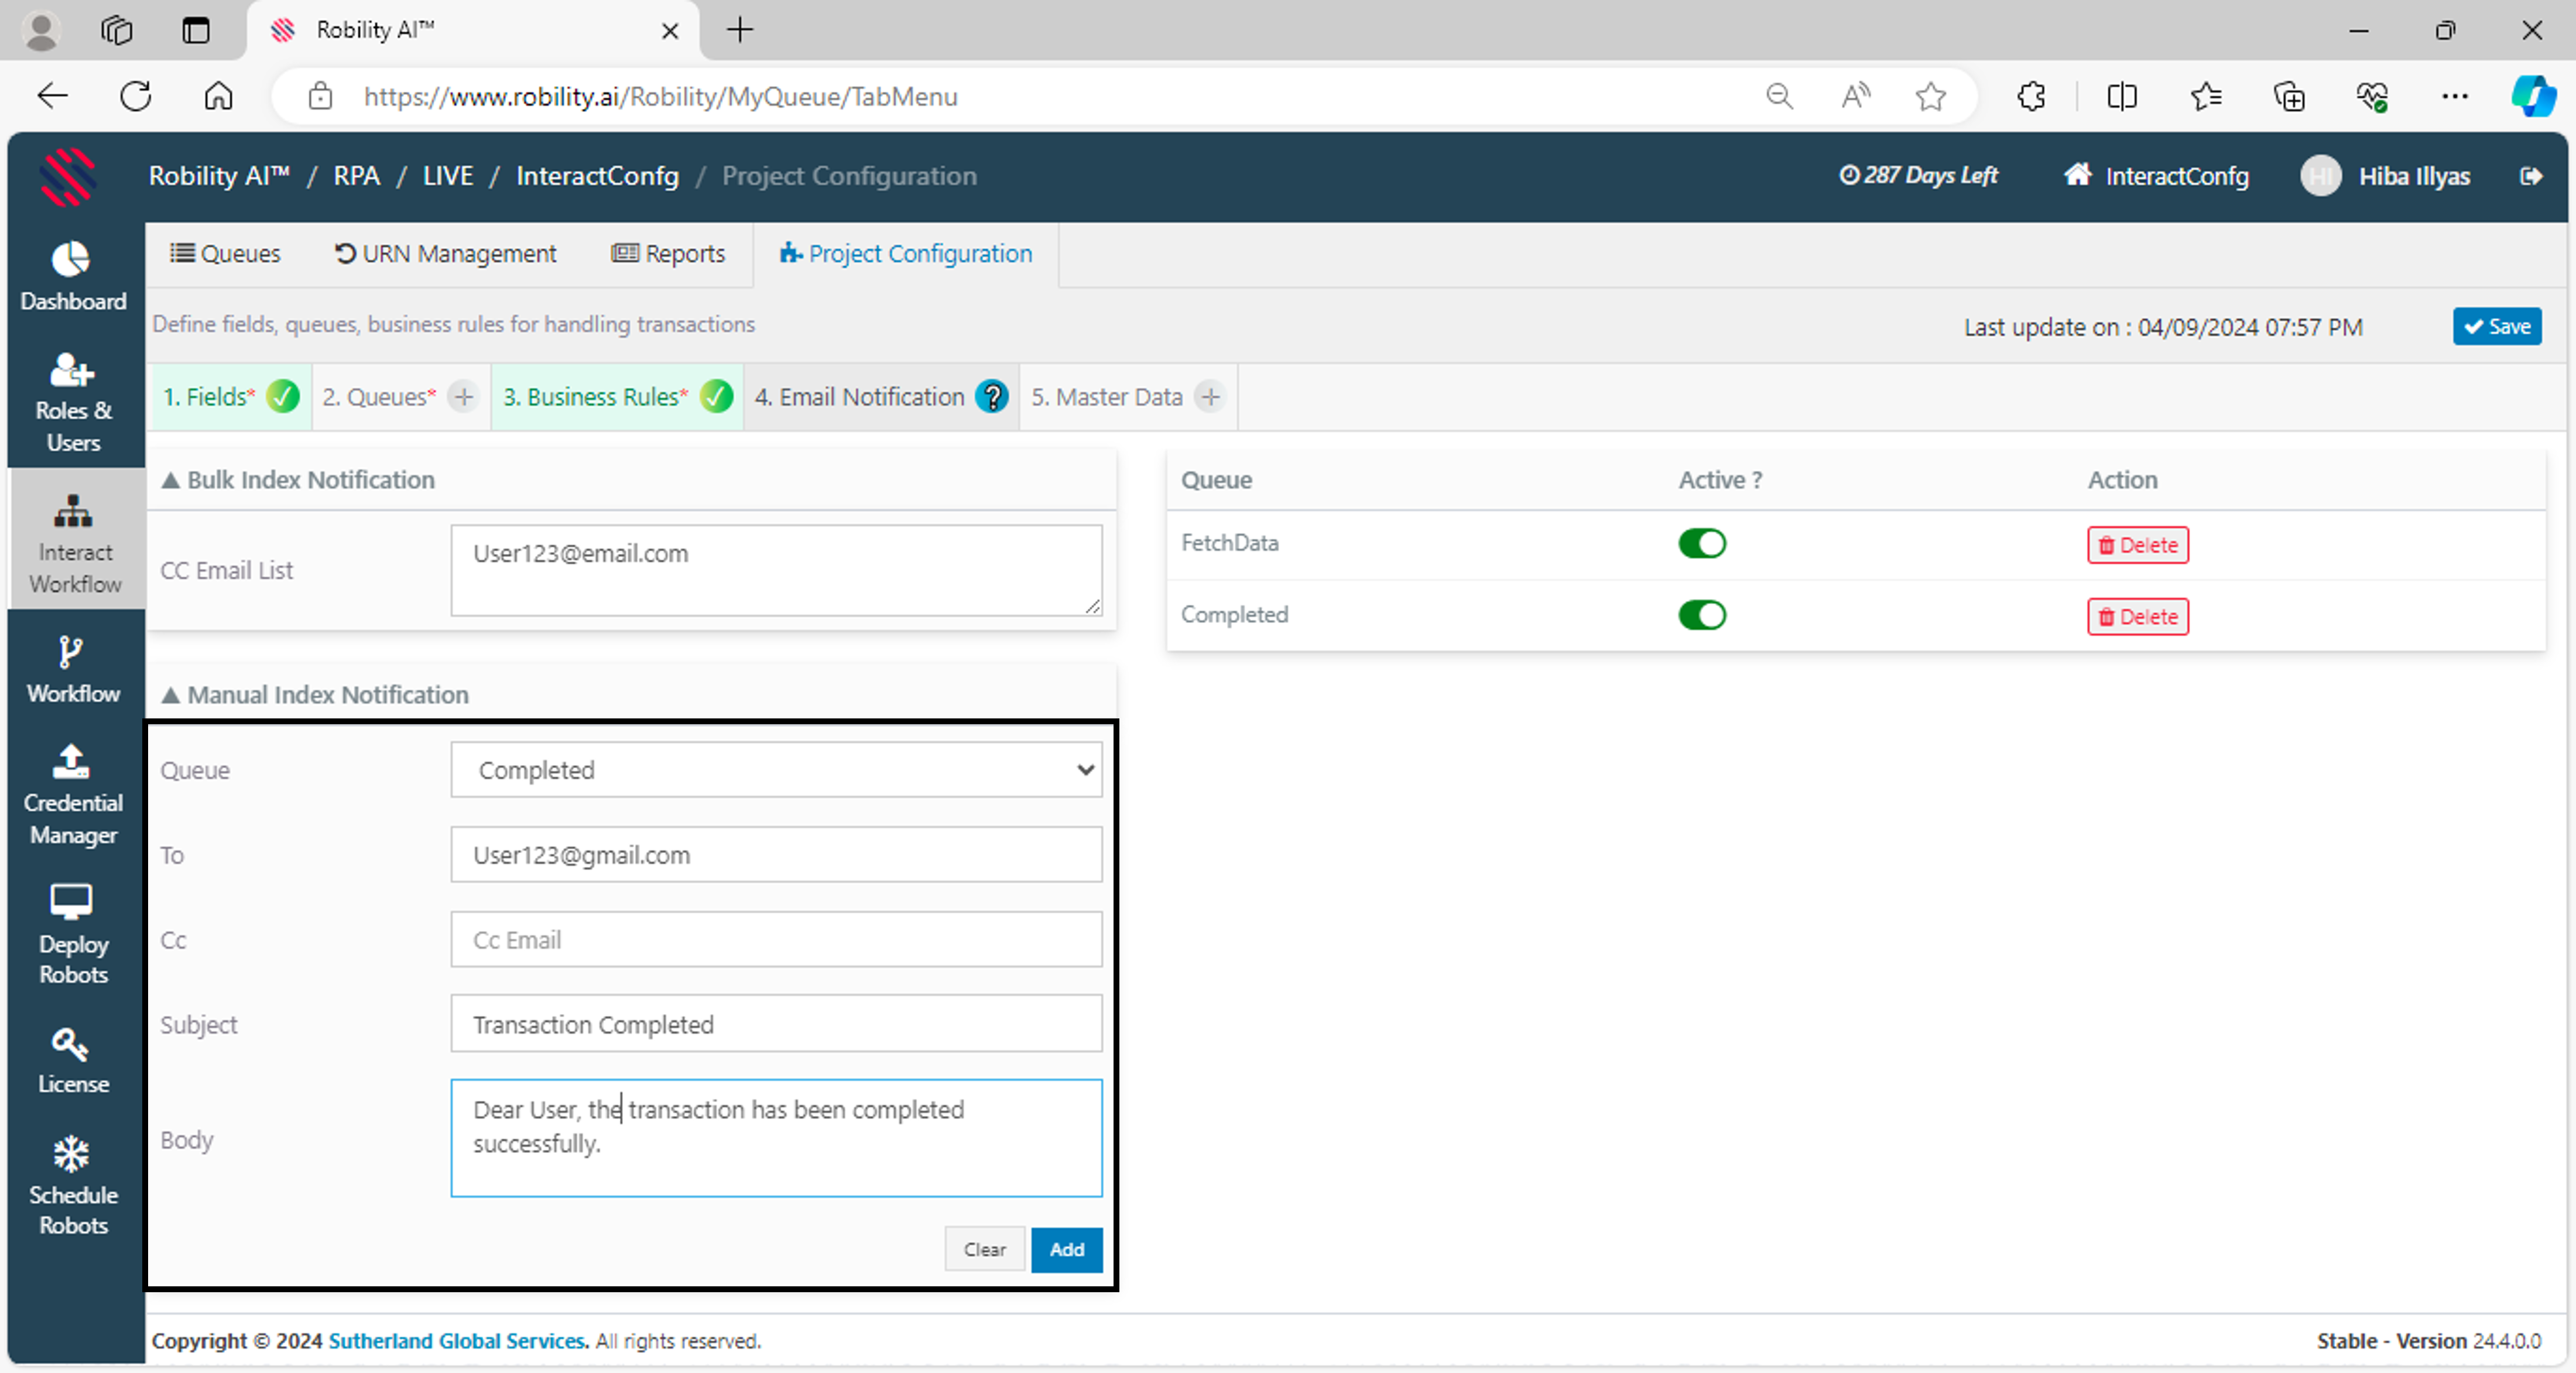
1.5.8 Master Data

MasterData

The MasterData Configuration enables the storage of a standardized set of inputs for processing over a specified period. It also allows modification by adding or removing data within MasterData.

The flexibility offered by the MasterData Configuration empowers users to swiftly adapt to alterations in input requirements, facilitating smoother and more adaptable data processing.

How to configure MasterData in your project?

Let’s continue from the use case, here I am going add the Master data in an excel sheet.

1. Login to the Manager and navigate to the “Projects” where you have configured the Interact.
2. Click on the “Interact Workflow” and choose the “MasterData” step.
     a. Here I am providing the “MasterData” name as “InputFile”.

     b. Now, click on the “Browse file” option and choose the respective file from the system folder.
     c. In this case, I am uploading the sample excel sheet.
3. Now, click on “ADD” button and save the project.

Now, you have configured your project successfully and refer the activities to know how to add transactions to your project.

1.5.9 Other Components

1.6 Security

Robility ensures the security of its platform through a combination of best practices, robust encryption standards, and compliance with international security regulations. The platform protects its infrastructure, APIs, and user data to safeguard automation workflows from unauthorized access, breaches, and other vulnerabilities.

Robility maintains secure and reliable communication between its core components – Manager, Designer, and Runner-by implementing advanced security mechanisms. This guide provides an overview of how API communications are safeguarded to protect your automation workflows.

1.6.1 Authentication

The Robility Manager provides users with the option to choose their preferred authentication method based on their organization’s requirements. There are two types of authentications available which ensures both convenience and security in the login process.

Authentication Types

Username and Password Authentication:

The tenant will be configured with default authentication as Username and password. The users have to enter their registered mail ID and Password created while activating the account when accessing the platform.  Click here to know about the user invite process.

Single Sign on with Microsoft:

The SSO can be integrated with Microsoft when the Tenant/ Organization Admin has configured with the Azure AD account. The authentication with Microsoft can be processed only when the admin has completed the signup process. To sign up with Microsoft Azure, click here.

How to authenticate and sign in?

Once the Organization and the tenant has been created. The users can be invited to the platform. The invitation to the platform for signing up can be authenticated through Microsoft. Follow the below steps to configure the Microsoft Azure account.

1. Login to the platform.
2. Click on the settings icon against the organization name.
3. Choose Identity provider option.
4. The default option will be selected as Username and Password.
5. Click on the Microsoft option and save button.
6. The page will be refreshed and logged out.
7. Now, you will be able to sign with Microsoft Azure AD account.
8. Further, you can invite the users to the platform.
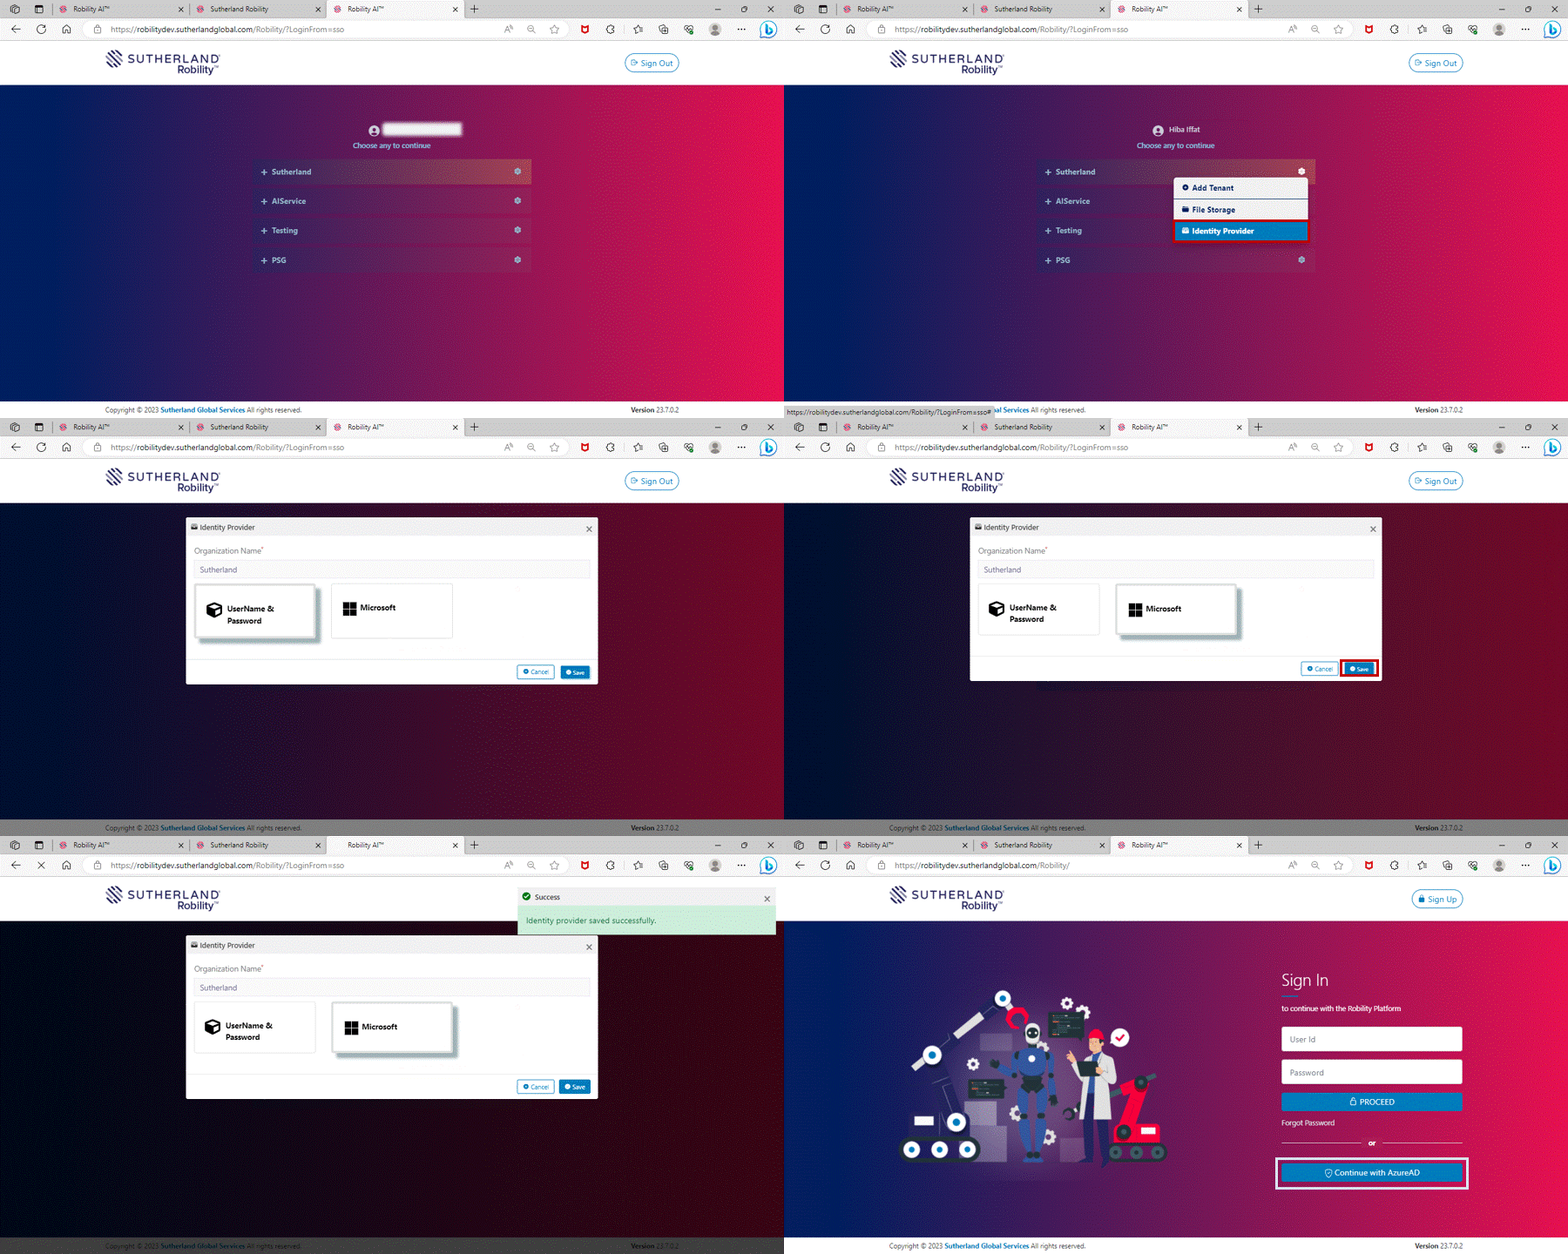
Password Recovery

If a user forgets their password to access the platform, they can easily reset it by following the steps below:

1. On the login screen, click the “Forgot Password” link to begin the password recovery process.
2. In the provided field, enter the email ID that is registered with the platform, and then click the Proceed button.
3. The system will send a password reset email to the entered email address with further instructions.
4. Open the email and click the Reset Password button to initiate the password reset process.
5. After clicking the reset button, a second email will be sent containing a temporary password that you can use to log in.
6. Open the second email and click the Click Here to Login link. This will redirect you to the login page where you can enter your credentials.
7. On the login page, enter your registered email ID and the temporary password provided in the email, and log in.
8. Once logged in with the temporary password, you will be redirected to a page where you can set a new password.
9. On the reset page, enter your new password, confirm it, and save the changes. Your new password will now allow you to access the platform.
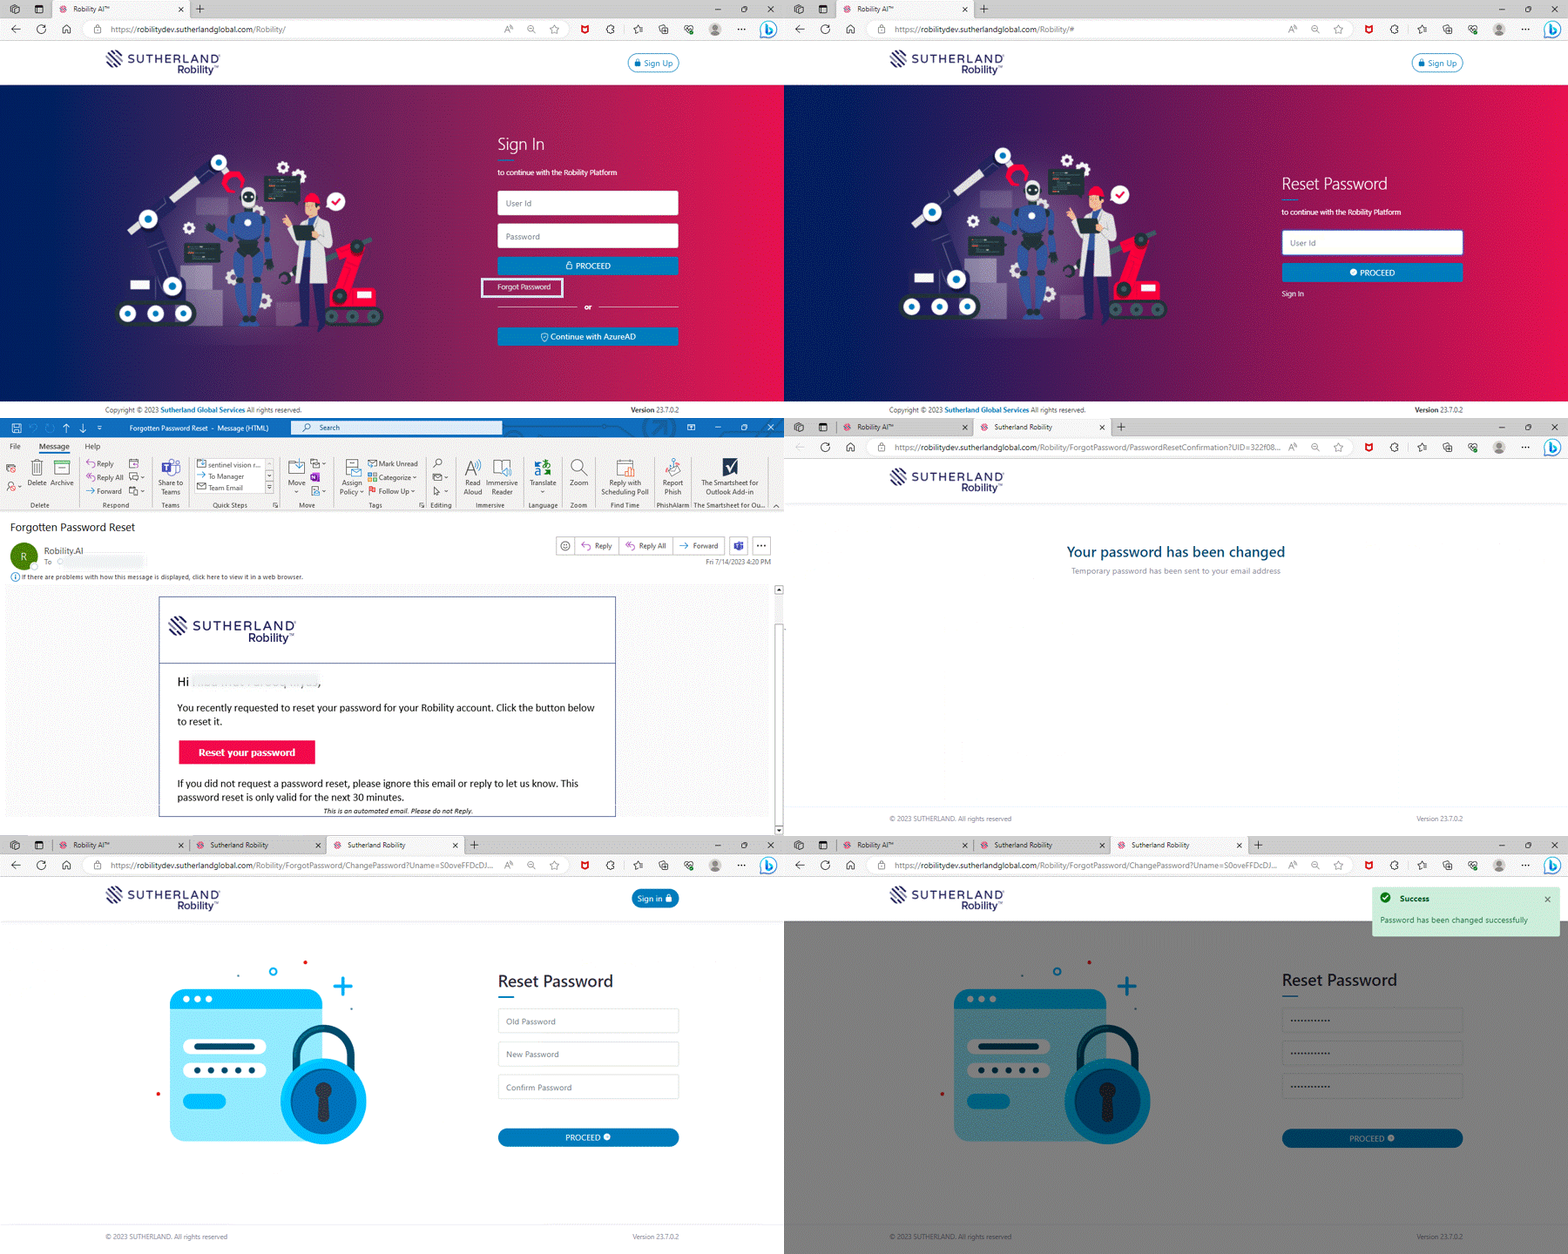
Troubleshooting steps

When authenticating with Microsoft, if the provided business mail id( Robility Manager) is not registered with Azure App registration services, they will have to create a new one. An error message will be thrown displaying as “Azure AD authentication failed.” To configure with Azure AD App Registration, click here.

1.6.2 Authorization

This section provides a detailed overview of the default roles and permissions assigned to each user role within a tenant.

In Robility Manager, tenant-level roles and permissions define the scope of platform management and configuration for a specific tenant. These roles determine what actions users can perform, ensuring a structured and secure automation environment.

Each developer can be assigned only one role, ensuring clear responsibilities and preventing conflicts in access control. By default, all users invited to the platform are assigned the “User” role, which grants them basic access to the tenant’s features. Administrators can later update user roles to provide additional privileges based on their responsibilities.

To learn how to modify user roles and permissions, click here.

Default Permissions

1. TenantAdmin: This role has full administrative privileges across the platform, allowing users to configure settings, manage users, and access all platform features. Tenant Admins are responsible for overseeing the platform’s operations and ensuring that everything is set up according to the organization’s needs. 

Note that the tenant administrator can fully utilize the platform but will not have the access to activate the designer license. To Activate the designer license, their roles needs to be modified as “RPA Developer”. 

Permissions:

The below table guides you with the permissions and actions assigned to the Tenant.

Pages View Add Edit Delete Action
Products
Yes
Yes
Yes
Yes
Yes
Harmony AI
Yes
Yes
Yes
Yes
Yes
MarketPlace
Yes
Yes
Yes
Yes
Yes
Projects
Yes
Yes
Yes
Yes
Yes
Invite Page
Yes
Yes
Yes
Yes
Yes
Resources
Yes
Yes
Yes
Yes
Yes
Templates
Yes
Yes
Yes
Yes
Yes
Settings & its components
Yes
Yes
Yes
Yes
Yes
Help
Yes
Yes
Yes
Yes
Yes

2. RPA Developer: RPA Developers is intended for users who are responsible for designing and deploying automation workflows with Designer and Runner. 

Permissions:

The below table guides you with the permissions and actions assigned to the RPA Developer.

Pages View Add Edit Delete Action
Products
Yes
NA
NA
NA
Yes
Harmony AI
Yes
NA
NA
NA
No
MarketPlace
Yes
NA
NA
NA
Yes
Projects
Yes
No
No
NA
No
Invite Page
No
No
No
No
No
Resources
Yes
Yes
Yes
Yes
NA
Templates
Yes
NA
NA
NA
No
Settings & its components
No
No
No
No
NA
Help
Yes
NA
NA
NA
NA

3. User: The User role will be standard users who interact with the platform without needing access to the administrative or any Robility products. These users can perform tasks assigned to them but have limited access in the platform. 

Permissions:

The below table guides you with the permissions and actions assigned to the User.

Pages View Add Edit Delete Action
Products
Yes
NA
NA
NA
NA
Harmony AI
No
NA
NA
NA
NA
MarketPlace
Yes
NA
NA
NA
No
Projects
Yes
NA
NA
NA
No
Invite Page
No
NA
NA
NA
NA
Resources
No
NA
NA
NA
NA
Templates
No
NA
NA
NA
NA
Settings & its components
No
NA
NA
NA
NA
Help
Yes
NA
NA
NA
NA

Click here to know about the Project level roles and permissions in the RobilityManager.

1.6.3 Setting up Azure AD

Robility Manager allows users to authenticate using Microsoft Azure App registration. The Organization Administrator who creates the tenant will be responsible for configuring it. If the organization’s tenant admin has already completed Azure App Registration, they can connect it to their tenant directly with existing user account. 

If you have decided to use Azure AD for your organization, please ensure that you have followed the steps below.

Pre-requisites

To configure with Azure AD, the following are the pre-requisites,

1. The Organization Administrator needs to acquire Enterprise license.
2. Needs Administrative access in both Robility Manager Cloud and Azure AD account. If you do not have administrator access, coordinate with Azure admin to complete the process.

To create an application, kindly follow the below steps. Here we are configuring the account and have to setup against each menu.

Steps to configure

A. App registration:

1. To create an app registration in your account with Organization business mail ID, click here.
2. Select App registration under Azure services.
3. Click on the New registration.
4. Enter the name for the application. This can be changed later.
5. Under Support account types, select only “Accounts in the Organizational directory only” to configure the access for the Application/API.
6. Under Redirect URI, select the platform as “WEB” and set the Redirect URI as WebsiteURL+SSO/SSOAuthCheck.
7. Then click on the Registration button.
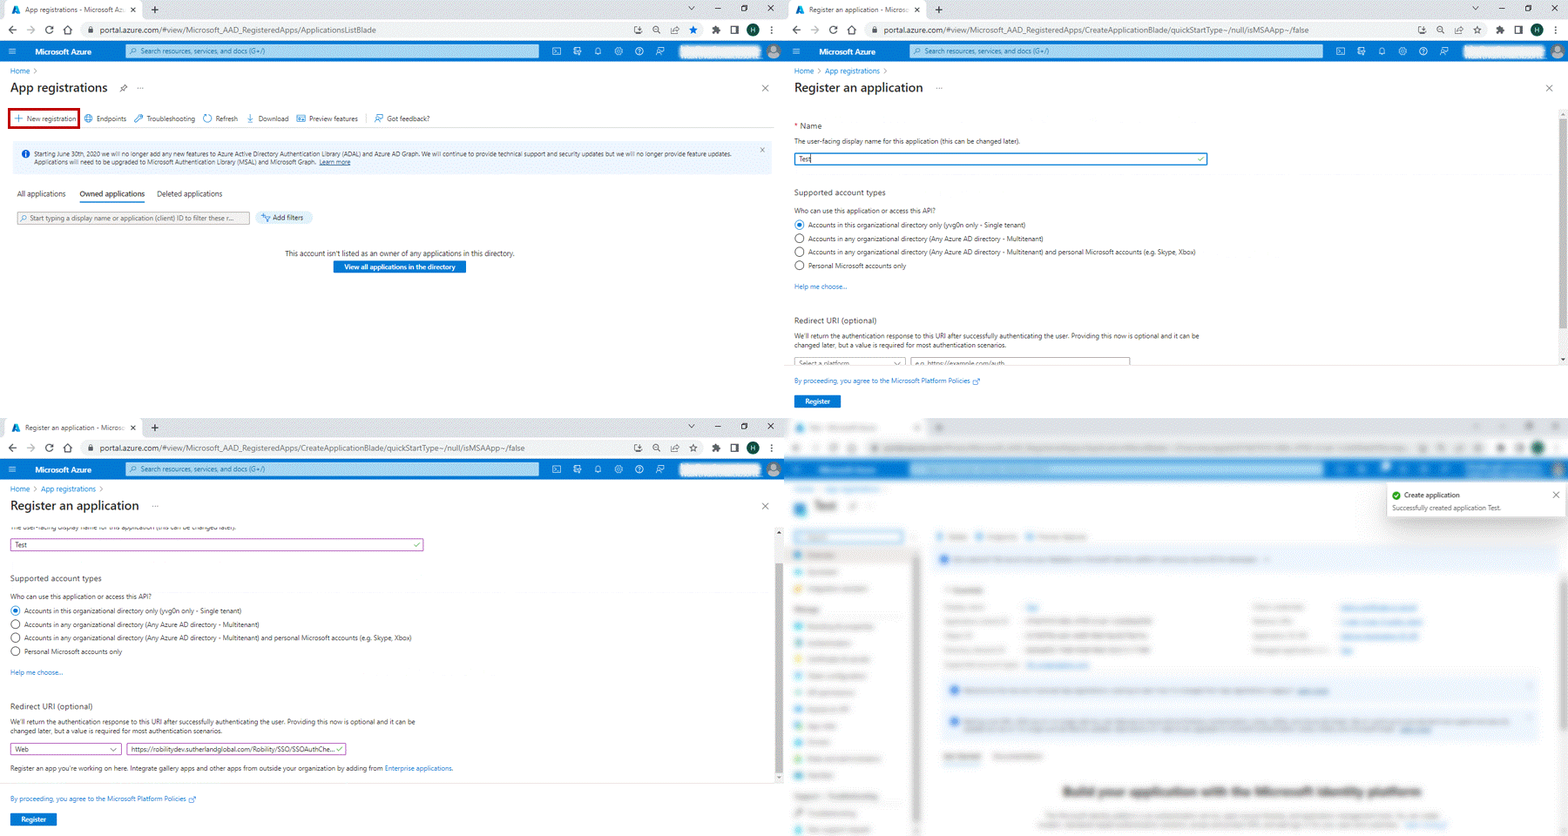
Now that the app has been registered, we are going to configure the Azure for integration. Follow the below steps:

B. Application Overview:

Once the application has been registered, the user will be able to view the application name under “All Applications” field.

1. Click on the application name and you will be redirected to the Application overview page.
2. Under Essentials, you can find the Application (Client ID) and Directory (TenantID), this can be viewed anytime. But when integrating with Robility Manager under Azure AD authentication, the Client ID, Tenant ID will not be required.
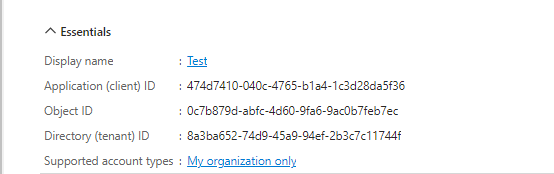
C. Authentication page:

1. Navigate to the Authentication page on the left-hand side of the page.
2. Under the Redirect URIs, enter the “website url + /SSO/SSOAuthCheck”.
3. Under Implicit grant and hybrid flows, select the token authentication as “ID Tokens”.
4. Now, click on save.

To learn more about Implicit grant and hybrid flows, follow the documentation –https://learn.microsoft.com/en-us/azure/active-directory/develop/v2-oauth2-implicit -grant-flow
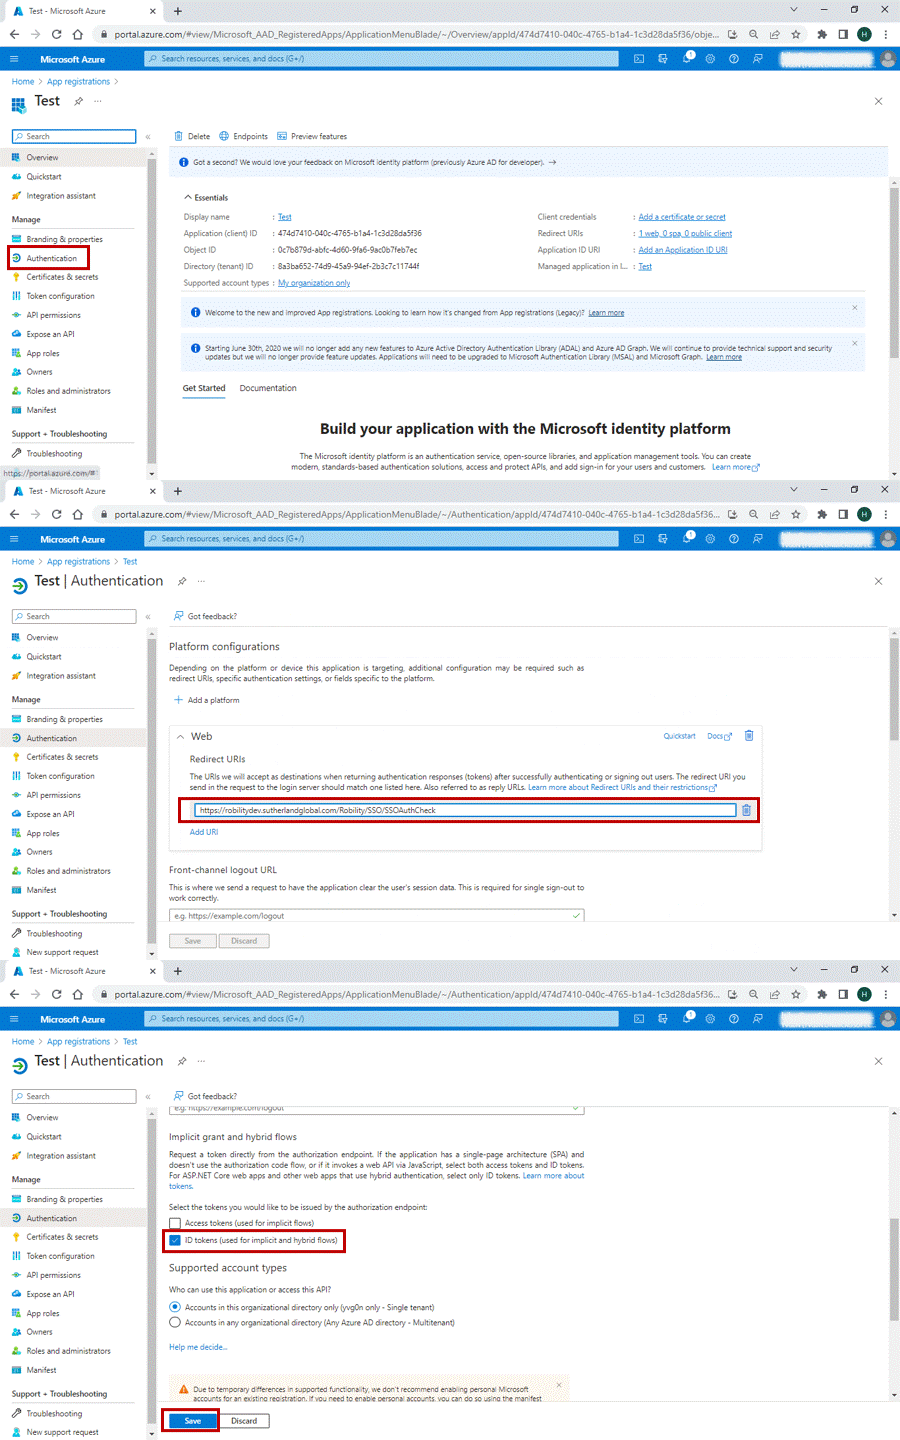
D. Token Configuration page:

1. Navigate to the token configuration page from the left-hand side menu.
2. Select Add Optional Claim.
3. Under Token type, select ID.
4. Select the check boxes for family_name ,given_name, and upn to add them as optional claims.

To learn more about optional claims configuration, follow the documentation – https://learn.microsoft.com/en-us/azure/active-directory/develop/optional-claims .
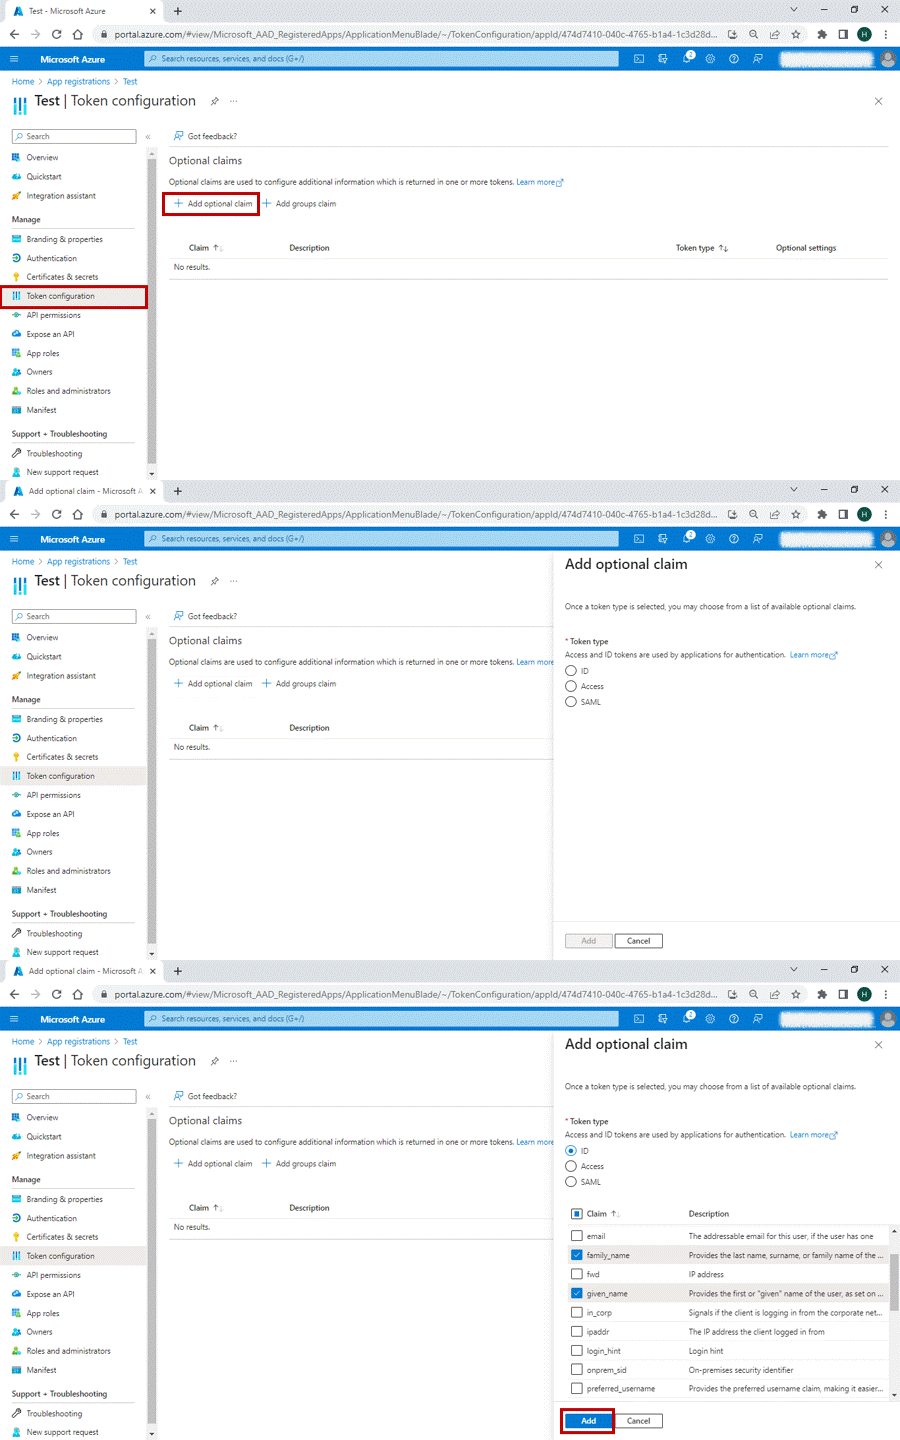
E. API Permissions page:

1. Navigate to the API Permissions from the left-hand side menu.
2. Click on “Add permissions” button.
3. A pop will be opened to request API permissions. Select “Microsoft Graph API”.
4. Then choose “Delegated permissions” under it.
5. Under OpenID permissions – choose email, OpenID, profile.
6. Under Group member permissions – choose GroupMember.Read.All.
7. Under User permissions – choose User.Read, User.ReadBasic.All.
8. Select the Grant Admin consent checkbox.

For more information about the access and permissions, see the Azure AD permissions documentation.
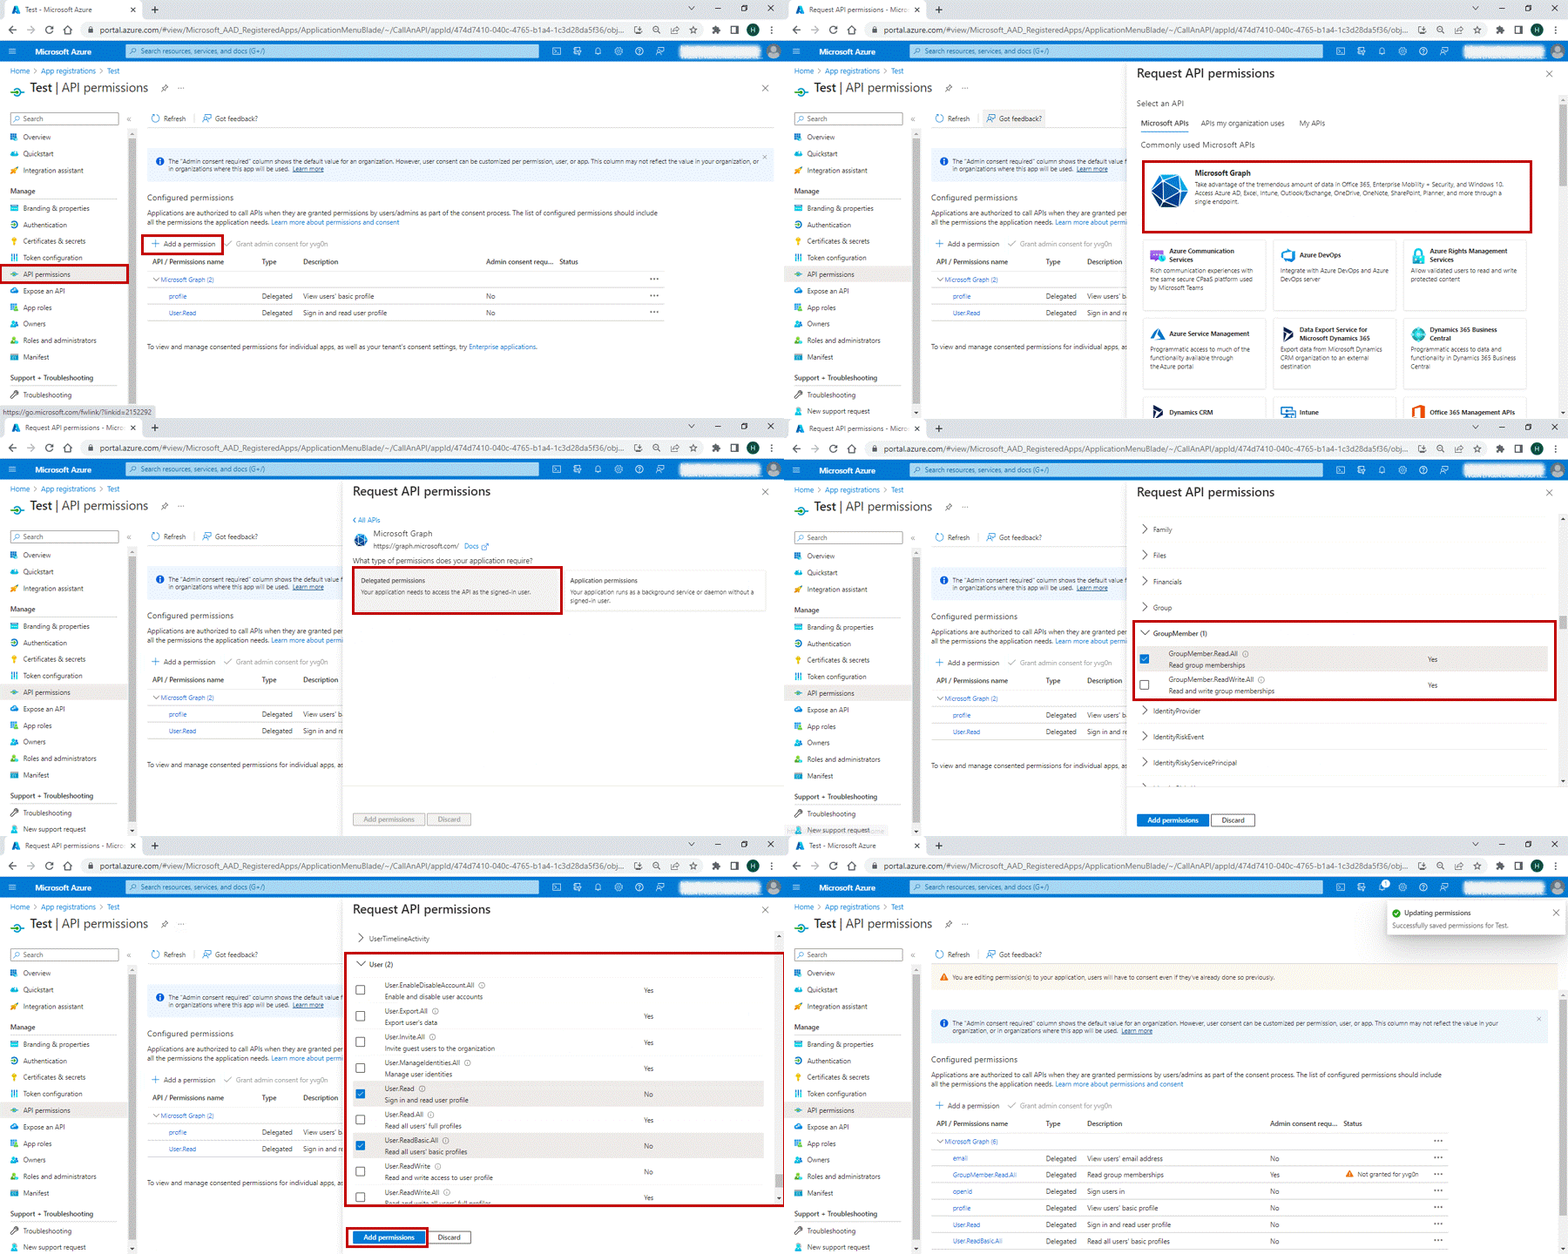
F. Certificates and Secrets:

Under the certifications and secrets page, you need to create a new client secret for your account. Follow the below steps to create a client secret.

1. To learn how to Create a client secret, follow the documentation steps – https://learn.microsoft.com/en-us/azure/active-directory/develop/quickstart-register-
app#add-a-client-secret

2. Take note of the secret code and save it to use later. But this is not required for the integration with Robility Manager under Azure AD authentication.

Now, the configuration set up has been completed for the app registered. Once all the above steps have been completed, the admin can integrate with Microsoft.

1.6.4 API Security Guide

Robility’s robust security mechanisms provide a foundation for safe and efficient automation workflows. These measures ensure that communication between Manager, Designer, and Runner remains secure and reliable. 

1. Authentication and Authorization

a. OAuth 2.0 Authentication: Robility APIs leverage OAuth 2.0 for secure token-based authentication.   
b. User Authentication: Access requires valid credentials or API keys, with support for Multi-Factor Authentication (MFA) for enhanced security. 
c. Role-Based Access Control (RBAC): Permissions are assigned based on user roles, ensuring that only authorized individuals can perform specific actions. 

2. TLS Encryption 

a. Encrypted Communication: All API communications between Manager, Designer, and Runner are encrypted using HTTPS with TLS.
b. Certificate Validation: Certificates are validated by Manager to ensure secure connections and prevent unauthorized access. 

3. Session Management 

a. Token-Based Authentication: Sessions are secured with time-limited tokens. Refresh tokens allow for seamless re-authentication. 
b. Automatic Session Timeout: Sessions automatically expire after a set period of inactivity to reduce risks. 

4. Data Security 

a. Payload Encryption: Sensitive data within API requests and responses is encrypted to prevent unauthorized access.
b. Secure Data Storage: Credentials and other sensitive information are stored in encrypted formats. 

5. Input Validation 

a. Sanitized Inputs: All API inputs are validated and sanitized to prevent injection attacks like SQL injection or cross-site scripting (XSS). 
b. API Rate Limiting: Throttling mechanisms are in place to prevent overuse and mitigate denial-of-service (DoS) attacks. 

6. Secure Manger Hosting 

a. Tenant Data Isolation: In multi-tenant deployments, each tenant’s data is logically isolated to maintain privacy and security.  

Best Practices for API Security 

1. Use strong, unique passwords and enable MFA for all accounts.
2. Regularly update and rotate API keys and access tokens.  
3. Monitor audit logs for unusual activity and configure alerts for anomalies.  
4. Limit API access to specific IP ranges or VPNs.  
5. Regularly review and update permissions to ensure minimal access for each role. 

1.6.5 SDK Security

Robility SDKs are built with enterprise-grade security measures to ensure safe development, deployment, and integration with the Robility platform. This guide explains the mechanisms and practices implemented to secure Robility SDKs. 

Standard SDKs are available as separate packages upon request to enable masking integration with Robility Manager. These SDKs are exclusively offered for the on-premises deployment model.

1. Secure Communication

a. TLS Encryption: All communication between SDKs and the Robility platform is encrypted using TLS (Transport Layer Security) to prevent data interception or tampering. 
b. HTTPS Protocol: SDKs require secure HTTPS endpoints to ensure safe data transmission. 

2. Authentication and Authorization 

a. OAuth 2.0: Robility SDKs use OAuth 2.0 for secure access to APIs, ensuring only authorized applications can connect to the platform. 
b. API Keys: Access to SDKs requires scoped API keys, restricting access to only necessary functionalities. 
c. Role-Based Access Control (RBAC): SDKs respect RBAC policies, ensuring users or services only have permissions relevant to their roles. 

3. Token Security 

a. Access Tokens: SDKs use short-lived access tokens for secure API interactions, minimizing the risk of token misuse. 
b. Refresh Tokens: Secure mechanisms allow refresh tokens to obtain new access tokens without reusing sensitive credentials. 
c. Session Management: Sessions expire automatically after a set period of inactivity, reducing exposure to session hijacking. 

4. Data Security 

a. Payload Encryption: Sensitive information in API requests, such as credentials or configurations, is encrypted to prevent unauthorized access. 
b. Data Masking: SDKs ensure sensitive information like passwords is not exposed in logs or debugging outputs. 

5. Secure Dependencies 

a. Validated Dependencies: SDKs rely on secure, verified libraries and dependencies to reduce the risk of vulnerabilities. 
b. Frequent Updates: Robility regularly patches SDKs and dependencies to address security concerns. 

6. SDK Version Control 

a. All SDK are regularly updated to patch vulnerabilities and improve security. 
b. Notify developers to deprecate older versions and enforce the use of updated ones. 

Best Practices for Using Robility SDKs Securely 

1. Use scoped API keys to grant the least privilege necessary for a task. 
2. Rotate access tokens and API keys periodically to reduce the risk of compromise.
3. Validate endpoint URLs and certificates to protect against man-in-the-middle (MITM) attacks. 
4. Monitor API logs to identify unauthorized access or potential misuse. 

1.7.1 v.26.8.0.7

This release introduces enhancements, and bug fixes across multiple areas of the platform.

Prerequisites: Cache must be cleared once after deployment to ensure Robility Manager functions as expected.

Enhancements

1. License Expiry Notification
Enhanced the License Expiry Notification modal to provide direct navigation to the License Request and License Renewal pages, enabling quicker access to license management actions.

2. Admin Console

a. Migration to Project Layer
Migrated the Admin Console implementation from the Tenant layer to the Project layer. Integrated Admin Console functionality within the Project layer in the Automation Ops page, improving project-level operational management capabilities.

b. UI Enhancements
Redesigned the Admin Console interface by replacing the partial-view slider with a modal popup, delivering a more streamlined and user-friendly experience.

c. PDF Export for Command
Added PDF export functionality for the Top Process and Running Process modal popups within Admin Console command views, allowing users to easily download and share process details.

3. Scheduler – Time-Based Execution
Added support for a new Execution Type field in the Time-Based Scheduler, allowing users to choose between Parallel and Sequential processing. Parallel execution now includes configurable Execution Count and Retry Count, enabling automatic retries of failed queue items within the scheduled window, while Sequential execution processes items one after another in order.

Limitation: Parallel execution supports a maximum of 40 concurrent executions at a time.
 

Bug Fix

Interact

1. Fixed an issue where uploaded attachments were not visible on the Interact Review page for specific projects despite being successfully saved. Enhanced the file loading logic to ensure attachments are retrieved and displayed correctly across projects

2. Fixed an issue where items were not moved to the Completed queue when a business rule was configured with the “Empty” Updated the rule evaluation logic to correctly identify fields with no value and execute the configured queue transition.

Known Issue 

1. Time-Based Scheduler: Retry functionality is currently not working for workflows configured with the Advanced Time-Based Scheduler.

Existing Limitations

1. When the storage type is set to Local Storage in the Storage tab, workflows larger than 60 MB cannot be downloaded using RunnerApi.
2. The Priority field is currently visible only in the Queues tab and is not yet available in other Interact menus, such as URN Management or Reports.
3. The user limit in Machine Templates is currently restricted to 200 users per machine template. This limit will be increased in a future release.
4. The asset text limit has been increased to 20,000 characters on the Manager side; however, the Activity side does not yet support this limit.
5. Microsoft O365:Access tokens are valid for one hour. After expiration, OAuthconnections can automatically obtain a new access token using the refresh token, while Client Credentials connections must be reconnected manually.

Release Date: 29.08.2026

1.7.2 v.26.7.0.9

This release introduces new features, enhancements, and bug fixes across multiple areas of the platform.

Prerequisites: Cache must be cleared once after deployment to ensure Robility Manager functions as expected.

New Feature

1. Admin Console
Introduces a centralized administrative console that enables real-time monitoring and remote management of machines running the Unattended Runner. Administrators can execute commands, monitor machine health, and manage runner logs through a live connection between the Manager and Runner.

New Integration

1. Microsoft SharePoint Integration
Microsoft SharePoint integration is now available on the Robility platform, enabling users to manage SharePoint sites, files, folders, and documents seamlessly within their automation workflows using the Microsoft Graph API.

Note: SharePoint activities are not included in the current release. These features are currently available only in Integration. SharePoint activities will be included in an upcoming release.

Enhancements

1. MasterData Grid – Updated By Column
Added an Updated By column in the MasterData Grid under Interact Project Configuration to display the user who last modified each record, improving audit tracking.

2. Robot Status
The Robot Status page now includes a Move to Idle option for locked robots. Clicking this updates the robot’s status to Idle, making it available for task execution again.

3. Transaction Report Download in Email Notifications
Improved the Download Report functionality so users can download transaction reports in Excel format directly to their local system.

4. UI Enhancements 
a.  Automation Ops – Flow: Flow status is now represented with color-coded indicators for improved visibility — Idle (Blue), Running (Green), and To Check (Amber).
b. Grid Messages: Added a “No Data Found” message to empty grids across Robility Manager, providing clearer feedback when no records are available.

5. Robility Flow – Automated API Key Management
Robility automatically regenerates API keys for Flows used in scheduled executions.
If a Flow API key is generated for a solution in the Workflow section and the solution is associated with a Scheduler, the key is automatically renewed before expiration. This ensures uninterrupted scheduler execution and eliminates the need for manual key renewal.

Bug Fixes

1. Interact Manager

a. Transaction Details
Fixed an issue where transaction details failed to load due to incorrect queue-project mappings, causing the “No Fields configured against the Queue” Added validation to ensure queues are mapped only to their respective projects, preventing configuration issues and ensuring correct data retrieval.

b. Transaction Processing
Fixed an issue where transactions were routed to incorrect queues. Updated validation now allows only project-specific queues to be assigned during business rule execution, preventing invalid mappings.

 c. Data Table Field Updates
Fixed an issue where Data Table field values were not displayed when reopening existing queue transactions. Improved Data Table handling ensures values are retrieved and displayed correctly across transaction views.

d. Business Rule Processing
Fixed an issue where transactions with Data Table fields were not routed correctly. Enhanced Data Table support now ensures accurate rule evaluation and reliable queue routing based on configured business rules.

Limitations

1. When the storage type is set to Local Storage in the Storage tab, workflows larger than 60 MB cannot be downloaded using RunnerApi.
2. The Priority field is currently visible only in the Queues tab and is not yet available in other Interact menus, such as URN Management or Reports.
3. The user limit in Machine Templates is currently restricted to 200 users per machine template. This limit will be increased in a future release.
4. The asset text limit has been increased to 20,000 characters on the Manager side; however, the Activity side does not yet support this limit.
5. Microsoft O365: Access tokens are valid for one hour. After expiration, OAuth connections can automatically obtain a new access token using the refresh token, while Client Credentials connections must be reconnected manually.

Release Date: 25.07.2026

1.7.3 v.26.5.0.4

In this release, we have introduced enhancements and bug fixes across multiple areas of the platform.

Prerequisites

Cache must be cleared once after deployment to ensure Robility Manager functions as expected.

Enhancements

1. LLM Configuration: The LLM Configuration page has been enhanced with Active and Inactive states for each provider. Providers can be deactivated and reactivated as needed. Provider details can be edited only when the provider is in the active state; editing is disabled while the provider is inactive.

2. UI Enhancements: Tenant-level features such as Invite, Projects, Resources, and Templates, along with project-level features including Roles & Users, Workflow, Vault, Automation Ops, and License in Robility Manager, now feature a streamlined card-based UI. This improves clarity, speeds up setup, and ensures consistent configuration across workflows.

3. Robility Flow History for Time-Based Scheduler: The Time-based scheduler for Robility Flows has been enhanced to provide visibility into execution history. In Automation Ops, under Flow, users can access the time-based scheduler to view past executions along with their status. This enables better monitoring, troubleshooting, and debugging of scheduled workflows through access to historical execution data.

Bug Fixes

1. Machine Templates: Resolved an issue on the Resource page, where adding users to Machine Templates resulted in duplicate entries and inaccurate license count calculations.

2. Time-Based Scheduler: Fixed an issue where scheduled executions were not triggered for the Weekly Multiple Schedule option due to missing Daylight-Saving Time (DST) handling in the time zone logic. Updated the scheduler’s time zone logic to correctly support DST.

3. Robility Lens Workflow Execution: Resolved an issue where workflow execution failures in Robility Lens showed only a generic “Activity Not Found” message when required features were unavailable in Hub or not mapped to the target environment. The warning popup now displays the exact missing feature name and version, making dependency issues easier to identify and troubleshoot.

Limitations

1. When the storage type is set to Local Storage in the Storage tab, workflows larger than 60 MB cannot be downloaded using RunnerApi.
2. The Priority field is currently visible only in the Queues tab. It is not available in other Interact menus such as URN Management or Reports.
3. User limit in Machine Templates – You can add up to 200 users per machine template. This limit will be increased in the future release.

Released Date: 30.05.2026

1.7.4 v26.4.0.5

In this release, we have introduced new integration, enhancements and bug fixes across multiple areas of the platform.

Prerequisites

1. Cache must be cleared once after deployment to ensure Robility Manager functions as expected.

What’s New

1. Microsoft 365 Integration
Microsoft 365 integration is now available in the Robility platform, enabling users to seamlessly send emails, download attachments, and access user profiles via Microsoft Graph API within their automation workflows.

Enhancements

1. Vault Page
The maximum allowed character limit for text input in Asset Type has been increased to 20,000 characters.

2. UI Enhancements
The LLM Configuration Management and Tenant Environment Setup pages in Robility Manager now offer a streamlined and consistent experience. They centralize model settings and tenant environment selection for simpler management. This enables faster setup, improved clarity, and uniform configuration across Robility workflows.

3. Login Page Security 
Improved handling of user credentials on the login page to ensure they are no longer directly exposed during rendering or runtime.

Bug Fixes

1. Machine Template
Fixed an issue preventing multiple users from being added to the Machine Template on the Resource page, and a maximum of 200 users can now be added.

2. User Profile Picture
Fixed an issue where user profile images were not displayed correctly for some users in the Manager.

3. Scheduler
Resolved an issue in the Daily and multiple Schedules where a flow scheduled to trigger for a count of 1, was instead triggered multiple times rather than the intended number.

Limitations

1. When the storage type is set to Local Storage in the Storage tab, workflows larger than 60 MB cannot be downloaded using RunnerApi.

2. The Priority field is currently visible only in the Queues tab. It is not available in other Interact menus such as URN Management or Reports.

3. User limit in machine templates – You can add up to 200 users per machine template. This limit will be raised in the future release.

Released Date: 02.05.2026

1.7.5 v.26.3.0.4

In this release, we have introduced enhancements and bug fixes across multiple areas of the platform.

Enhancements

1. LLM Configuration
The LLM Configuration management has been enhanced to support 10 providers with provider-specific basic configuration and authentication settings. It also introduces unified advanced settings such as model parameters, network settings, and enterprise compliance options. These enhancements provide improved flexibility, security, and consistent control over model behavior and data handling. Click here to learn more

2. Robility Flow Execution Using Queue-Based Trigger
A queue-based trigger has been introduced for Robility flows, enabling execution when new transactions are added to the queue. This allows flows to be triggered automatically based on incoming queue items, eliminating the need for manual or time-based triggers. It improves responsiveness, scalability, and ensures timely processing of transactions as they arrive in the system.

Bug Fixes

1. Resource Page
Users were unable to add machines on the Resource page. The page remained in a continuous loading state displaying only the Sutherland loading icon without any success or error message. This issue has been fixed.

2. Scheduled Robots
The Advanced Scheduler was not functioning correctly, as it failed to trigger robot execution, and the scheduled time displayed on the tile appeared in an incorrect color. This issue has now been fixed.

3. Interact
In the Interact table, hovering over multiple data items simultaneously caused multiple hover effects to appear at the same time.
This issue has been fixed. The hover effect is now displayed only for the last hovered item.

4. URN Management
a. All Transactions were selected and a few transactions were subsequently unselected, the unselected transactions were also being unlocked. This issue has now been fixed.
b. Previous queue information was being populated incorrectly, resulting in inconsistent data. This issue has now been fixed.5.

5. Robot Utilization
The Total Hours Executed value was previously incorrect when filtering by a date range. This has been fixed, and it now reflects only the accurate execution hours within the selected period.

6. MarketPlace
The downloaded version did not match the version displayed on the marketplace page. This issue has been fixed.

7. Time-Based Scheduler
The Cron expression note was incorrectly displayed in the center of the popup. This issue has been fixed. b. The “No File Chosen” text was not fully visible in the popup. This issue has been fixed.

Limitations

1. When the storage type is set to Local Storage in the Storage tab, workflows larger than 60 MB cannot be downloaded using RunnerApi.
2. The Priority field is currently visible only in the Queues tab. It is not available in other Interact menus such as URN Management or Reports.

Released Date: 28.03.2026

1.7.6 v.26.2.0.4

In this release, we have introduced enhancements and bug fixes in the following areas:

Enhancement

1. JIRA App Integration
A new JIRA connection has been introduced under the App Integration section. This integration enables seamless synchronization between Robility and JIRA, allowing automated ticket creation, status updates, and real-time data exchange. It improves cross-team collaboration, enhances visibility into issue tracking, and streamlines overall workflow management for better operational efficiency.

2. Package Upgradation
Updated the core activity packages within Robility Manager to the latest supported versions for improved security, performance, and vendor support continuity.

Prerequisites

1. Cache must be cleared once after deployment to ensure Robility Manager functions as expected.

Bug Fixes

1. Automation Ops
a. Dropdown Content Overlapping
On the Automation Ops page, while adding a robot, dropdown items extended beyond the visible boundary, making options difficult to view or select. This has now been fixed, and all items are displayed properly within the visible area.

b. Robot Utilization
The Total Hours Executed value was previously incorrect when filtering by a date range. This has been fixed, and it now reflects only the accurate execution hours within the selected period.

2. Scheduler Robot
a. Monthly Scheduler
When clicking the Time Zone dropdown in the Monthly Scheduler, the list of available options did not appear. The dropdown now displays correctly, allowing users to select their desired time zone.

b. Tile Color Not Changed
On the Schedule robots pages, fixed an issue where schedule status tiles (Allocated, Scheduled, and Failed) were incorrectly displayed in green. This has been fixed. Tiles now reflect their respective status colors.

3Machine Template
The “Provisioned” status was displayed for only one user when creating a machine template with multiple users. The status now reflects all connected users correctly.

4. Reset Password
The Cancel button in the Reset Password popup was unresponsive. The button is now fully functional, allowing users to close the popup without issues.

5. Vault
a. Previous Dates Not Disabled
While creating an application in Vault against a project, users were able to select past dates. Date validation has been corrected, and past dates can no longer be selected during application creation.

b. Pins & Key Visibility
Previously, PIN and key values were visible to all users. Access has now been restricted to Credential Admins for viewing and modification.

6. User Access Issue
Users in the Robility Manager were able to access both RPA and Tenant roles. This has been corrected; users now have either the RPA or Tenant role based on their assigned permissions.

7. Invite Page
a. Unable to Remove Additional Member
On the Invite User page, when multiple members were added, clicking the remove icon did not delete the selected row. This issue has now been fixed.

b. Requested License Issue
License requests from expired tenants were displayed at the project level. This issue has now been fixed.

8. Page Counts
When selecting the page size as “All,” the table displayed incorrect row information across all tables in the Robility Manager.  This has now been fixed.

Released Date: 07/03/2026

1.7.7 v.26.1.0.7

In this release, we have introduced new features, enhancements, and bug fixes in the following areas:

What’s New

1. TAT Report
The TAT Report has been introduced in Robility Interact Reports to track transactions across multiple queues. The report captures key time metrics, including Received Time, Start Time, and End Time at each queue level.

2. User Tracks – Audit Reports
Audit Reports are now available under the User Tracks section to capture all user actions, supports audits and overall system management.
Reports: Login / Logout, Invalid Attempts, VM Add, Privileged User Actions

3. Machine Utilization Page
The Machine Utilization page provides a detailed view of machine activity where robots are executed within a project. It provides monitoring and analysis tools for tracking robot execution across machines.

Enhancements

1. Robility Flow Schedule Execution
The Schedule Robot option now supports Robility Flow automation. Users can configure, schedule, and execute flows automatically using the time-based scheduler without manual intervention.

2. Integration of TOTP-Based MFA Login with QR Expiry and CAPTCHA
The login page now supports TOTP-based multi-factor authentication (MFA) with QR code setup and CAPTCHA validation to enhance account security.

3. Data Retention and Policy
Introduced the Data Retention to manage the storage and lifecycle of Interact workflow data. Project data is retained for a defined period, safely archived, and removed automatically when no longer needed, ensuring compliance and optimized storage.

4. LLM Configuration Management
LLM configuration management is a key capability for organizations to securely set up and manage Large Language Models (LLMs) across different environments.
It supports LLM providers such as Azure OpenAI and Google Vertex AI, and includes the management of embeddings and runtime configurations, including Azure OpenAI embeddings.

5. Vault Page
Access to the Vault page is restricted based on user roles. The Credential Admin role has access to the Add button, enabling users to add, edit, and update Tokens, PINs & Keys, Assets, JWT tokens, and Applications.
All sensitive data within the Robility platform is securely managed using the Key Vault configured in the settings. Secrets are stored and retrieved based on the vault type configured for each tenant or project.

Released Date: 31/01/2026                                

1.7.8 v.25.10.0.2

This release introduces significant enhancements across the platform to improve usability, efficiency, and overall user experience.

Enhancements

1. Tenant Management Enhancements

a. Tenant Renewal: Tenant Admins can now renew expired tenants directly from the tenant selection page, simplifying the renewal process.
b. Tenant Switch: Switching tenants are now seamless and faster. With a single click, users can move between tenants without logging out.
c. Tenant Expiry Display: Expiry information is now visible in user profiles, making it easier to monitor account validity.

2. Invite User Page Updates

a. A new tile displays user role counts for a quick overview.
b. License Renewal: Simplified renewal process supporting both individual and bulk renewals for RPA developers at invite page, reducing administrative effort.
c. License Expiration Date: The Users list now includes a separate column showing the license expiration date for RPA Developer roles.

3. Analysis Count Updates

Simplified layouts make it easier to track and review large datasets such as user lists, projects, and resources. Changes are applied to the following pages:

a. Resource
b. Templates

4. Marketplace Updates

The Marketplace page now features a simplified and interactive user interface for easier navigation.

5. Vault Page Enhancements

a. Expiry dates for tokens, keys, and assets are automatically aligned with tenant expiry and cannot be manually edited, ensuring security and compliance.
b. The Application names and usernames for applications, assets, and other credentials cannot be updated once created.

6. Improved User Interface

a. Tabular grids across the platform have been upgraded for smoother navigation and faster performance.

7. Interact Module Updates

a. Queue Prioritization: Critical tasks are now processed faster through priority settings.
b. Duplicate Prevention: Duplicate entries are automatically prevented, reducing errors and improving workflow accuracy.

1.7.9 v.25.8.0.3

This update includes important fixes and improvements to enhance security.

Enhancements

URN Review Page – File Support

Users can now view PDF files within the URN review page, eliminating the need to download and open them externally.

Revamped UI for Improved Experience:

Sign-In Page

1. A cleaner, modern design makes login faster and more straightforward, reducing friction for both new and returning users.
2. Simplified layouts make it easier to track and review large datasets such as user list, projects, resources, helping users find the insights quickly. You can view these changes applied in the below pages,

a. Invite page
b. Projects page
c. Deploy robots
d. Roles and users. 

Note 

Post-deployment: Clear the cache and reopen the browser before launching the website for the first time.

Bug Fixes

1. Previously, features were unavailable during automation execution due to sync delay after job execution. This issue has now been resolved.
2. Resolved an issue where the logic to handle usernames containing underscores in email addresses was missed. This has now been validated and addressed.

1.7.10 v.25.7.0.9

This update introduces critical bug fixes and powerful feature enhancements designed to improve stability, security, and usability.

Bug Fixes

1. Business Rules Deletion Issue
Previously, business rules were automatically deleted due to missing validation logic. This has now been fixed, ensuring rules remain intact as expected.

2. Transaction Creation Failure
In certain cases, transactions were not created because the project key was not properly saved in the database. This issue is resolved with additional validation to ensure correct storage during creation.

3. Deploy Robot Page Loading Issue
When resolution settings were left empty, the Deploy Robot page would get stuck in a loading state during edits. We’ve implemented logic to handle null resolution scenarios, ensuring reliable page loading.

Feature Enhancements

1. Cron Expression Scheduler
Schedule your bots with precision using cron-based scheduling. Configure rules for tasks to run at specific times, intervals, or days with complete flexibility. [Click here to learn more]

2. Secure Asset Management
Manage API keys, tokens, passwords, and configuration values in a centralized vault—eliminating hardcoded credentials and ensuring secure, controlled access for authorized bots and users. [Click here to learn more]

3. FIFO/LIFO Queue Processing
Define transaction execution order with FIFO (First-In-First-Out) or LIFO (Last-In-First-Out) modes, aligning task prioritization with business needs.

4. AWS & Google Cloud Integration
Seamlessly integrate Robility Manager with AWS and Google Cloud for secure data storage and retrieval, supporting enterprise-grade scalability. [Click here to learn more]

5. Revamped UI for Improved Experience
Key pages have been redesigned for a cleaner, more intuitive interface:
• Login Page
• Tenant Selection
• Landing Page
• Settings
• Key Vault
• Storage

Known Issue

The Runner status on the “Resources” page may not update to “Provisioned” at times, even when the machine is successfully connected and provisioned in the “Deploy Robots” page. This will be addressed in the upcoming version. In the meantime, restarting the VM once should resolve the issue when it occurs.

1.7.11 v.25.5.0.0

This update delivers essential fixes and improvements on the Robility Manager.

Bug Fixes

1. Resource Page:

a. Case Sensitivity in Resource Names –
Previously, when resources were connected using lowercase letters, the license key could not be connected due to case sensitivity issues. This has now been resolved by allowing the resource name to be recognized in both uppercase and lowercase formats.

b. Runner Status Update
In earlier versions, the Robility Runner status did not update correctly when a machine transitioned from a “Not Connected” state to a “Running” state. This caused inconsistencies on the Resources and Deploy Robots This issue has now been fixed to ensure accurate status updates. Click here to learn more.

2. Interact Workflow:

a. Duplication of URN: Previously, an exception was occasionally thrown due to URN duplication when adding transactions to the queue. This issue has now been addressed and properly handled.

b. Unable to Download File: Previously, users were unable to download files from the “Completed” queue. This issue has now been resolved, and files can be downloaded from the “Completed” queue.

Enhancement

App Integrations: Robility Doc Intelligence has been renamed to Robility Copilot. Click here to learn more. 

1.7.12 v.25.4.0.2

This update introduces key enhancements to optimize resource management and enhance automation capabilities.

Enhancements

1. Revamped Resource Management

The Resources page has been redesigned to improve efficiency at the tenant level. Users can now assign a single machine to multiple projects, enabling centralized resource management and optimizing utilization.

Click here to learn more about resources.

2. Harmony AI – Gen AI Integration

This release integrates Gen AI into Harmony AI, enhancing automation with advanced intelligence. The model streamlines complex workflows by handling dynamic and cognitive tasks, reducing the need for human intervention.

Click here to learn more about HarmonyAI.

3. Deploy Robots – License Validation
The Deploy Robots page has been enhanced with validations tied to the license key status. It now displays the last seen active timestamps for each machine, providing improved control and visibility during deployment.

Click here to learn more about deploying robots.

4. License Page – Harmony AI Activation Status
The License page now enables the activation status of Harmony AI licenses, which provides the validity and usage across projects. Click here to learn more about license management.

5. Scheduler Calendar – Unified View
The Scheduler Calendar now features a unified view of all scheduled items, includes end date validation aligned with the tenant’s expiration, and uses color-coded indicators to highlight scheduler or bot-related issues, enhancing visibility and scheduling control.

Click here to learn more about the scheduler.

1.7.13 v.25.2.0.0

In this major release, the RobilityManager will support cross-platform compatibility, providing several advantages, especially in terms of performance, flexibility, and scalability.

What’s New 

1. Cross-Platform Functionality – Robility AI runs seamlessly on Linux, macOS, and Windows, offering your organization the flexibility to deploy on your preferred systems.

2. Optimized Performance – The Robility AI Manager has been fine-tuned to reduce latency, ensuring smoother and faster automation workflows.

3. Cloud-Ready Integrations – Improved compatibility with top cloud platforms simplifies deployment and scaling, making it easier than ever to leverage cloud solutions.

Bug Fixes

1. Schedulers: Previously, when a single machine was connected to multiple projects, the scheduler triggered regardless of the mapped project. Now, removing a machine from a project also removes its associated scheduler, preventing unintended triggers.

2. System exception retry validation: Previously, retrying cases from the System Exception queue in Designer was unsuccessful due to an exception. Now, users will receive a notification preventing them from retrieving cases from the system exception queue from the runtime. Instead, cases must be manually back pushed in Robility Manager.

3. Designer activation issue:
Previously, there was an issue with character length when activating the designer from Robility Manager. This issue has now been resolved, allowing seamless activation. 

Release Date: 12-Feb-2025

1.7.14 v.24.11.0.32

This version 24.11.0.32 addresses critical issues in Robility Manager and enhancements to improve your experience and streamline processes within our platform.

Enhancements

Export to excel option: We have introduced the Export to Excel functionality on the Invite Users and Roles and Users pages to enhance usability and data management. This feature enables you to easily download the user list displayed on these pages in an Excel format.

Email Notification: We have introduced an enhanced email notification system to keep tenant admins informed about user invitations. When a tenant admin invites a user to the platform, they will now receive an email notification as soon as the invited user accepts the invitation.

Interact Review screen – The review screen in Interact has been upgraded to refresh automatically every minute. This improvement ensures the session remains active, preventing expiration and maintaining a seamless user experience.

Bug Fixes

1. Interact Workflow:
Resolved an issue where the Import option was unavailable during the initial configuration of Interact. This option is now accessible as expected.

2. Scheduled Reports: Fixed an issue where the configured email address would disappear after saving a scheduled report. The email address now remains intact.

Known Issues

1. Queue Configuration: Attempting to “Save/Update” all queues simultaneously during project configuration may result in an unresponsive warning message. This issue occurs only when the total number of queues exceeds eight.

2. Invite User Page: If a user’s role is updated at the project level, the Invite User page does not display the list sorted by the updated date

3. Bulk Case Upload with Multiple Queue Movements: Bulk case uploads are not supported when multiple queue movements are configured for a single transaction in business rules.
a. Example: If a transaction progresses through stages such as Index → Fetch → Process → Complete with specific conditions, bulk uploads will fail to process.

4. App Integration API Key: For existing projects, the API key required for App Integration may be missing. This can result in an error message such as “Invalid grant: Interact API key is empty” when accessing the App Integration page.
Workaround: Navigate to the project, click on “Edit” against the project and save it again to regenerate the API key.

Released date: 02-Dec-2024

1.7.15 v.24.10.0.56

v.24.10.0.56

This version 24.10.0.56 addresses critical issues in Robility Manager and enhancements to improve your experience and streamline processes within our platform.

Enhancements

1. App Integrations: We have implemented a “Refresh Token” method for connections, enabling tokens to renew automatically upon expiration without requiring any manual intervention.

2. Pagination: To improve navigation through the pages with ease, we have implemented pagination on the following pages:
    a. Templates
    b. Template History
    c. Projects
    d. Resources

HarmonyAI – Document Understanding: We’ve introduced a “JSON Viewer” for fields in HarmonyAI’s Document Understanding, allowing output to display in a well-formatted JSON view for easier readability.

Bug Fixes

1. License Page – The License count for Occupied, Available and expired was incorrect earlier. Now, this has been fixed and the counts are displayed accurately.
2. App Integrations
     a. Previously the “Search box” in App integrations page had some default characters whenever the page was loaded, now this has been removed.
     b. Previously, deleted connections were not removed from the grid. This issue has now been fixed.
3. Project Expiration – Previously, the production team faced an issue while trying to retrieve the credentials from the credential vault, an exception was thrown as the project expired. Now, we have removed the project expiration logic.
4. Harmony AI – Previously, the business rules created against “Document Understanding” in HarmonyAI was working since a field was missed. Now, we have fixed this and the transactions are moving successfully.
5. Project Configuration
    a. SearchBox – Previously, if the “Enable Search” box was checked for a textbox field type and when we change field type, the box remained checked for other field types. This issue has now been fixed.
    b. The “Maximum size” field was not getting cleared and disabled to make any changes. Now it has been fixed.
    c. When updating the Master data in Interact, it was not saved properly. Now it has been fixed.
6. Deploy Robots
    a. Previously, the “Runner” status would not be updated and stays in the “Run Initiated” state even if the license has been disconnected in the machine. Now, If the “Run Initiated” status is active for more than 3 minutes after selecting the “Run” option, it will now automatically switch to “Not Connected” status.
    b. Earlier there was a slowness while editing the robots in deploy robots page, now it has been addressed.
    c. Previously, attempting to add a new robot in “Deploy Robots” after removing resources would not allow the addition, even when resources were available. This issue has now been fixed.

Known Issues

1. When you are trying to “Save/Update” all the queues at same time during the project configuration, the page may show an unresponsive warning message. It occurs only when the overall number of queues exceed more than 8.
2. The “Invite User” page does not display the list in the correct order when roles are updated at the project level.
3. If multiple queue movements are configured for a single transaction in the business rules, uploading bulk cases will not be supported.
Example: If a transaction moves through stages like Index → Fetch → Process → Complete with specified conditions, cases uploaded in bulk will not be supported.
4. For existing projects, the API key for App Integration may be missing. As a result, accessing the App Integration page may display an error like ‘Invalid grant: Interact API key is empty.’ To fix this, please click “Edit” for the project and save it again.

Released date: 4-11-2024

1.7.16 v.24.10.0.24

v.24.10.0.24

This version 24.10.0.24 addresses critical issues in Robility Manager and enhancements to improve your experience and streamline processes within our platform.

Enhancements

Performance optimization:

To optimize performance and provide a more customized view without latency issues, we have implemented the below functionalities on the “Interact” pages instead of the “Eye” filter option.

1. Custom Field Search: The custom field search functionality has been implemented across all the pages in Interact, allowing to configure “Search” for any two fields during project setup. This option supports only textbox field types.

2. Pagination: Additionally, we have implemented pagination in the following pages:
     a. URN Management
     b. Reports
     c. Queues

3. Search functionality: The search bar has now been implemented in the “Reports” page as well which helps the user to search and export the required data.

Auto Renewal for Designer and Runner:

Previously, licenses were reassigned using a FIFO model, which led to allocation of existing licenses that are closer to expiration even though new licenses have been acquired.

To address this, we have enhanced the license allocation logic for Designer and Runner. The system now prioritizes licenses with the longest remaining duration during renewal.

Bug Fixes

1. Roles and Users: The screen used to freeze whenever a user attempted to map or select any user in the “Select users” option without specifying a role. This issue has been fixed, and the screen now functions properly.
2. HarmonyAI Icon: Below are the issues that have been addressed on “HarmonyAI”.
     a. The HarmonyAI icons were enhanced.
     b. Previously, the values provided in the “Advance Settings” of the “AI Agent” were not properly passed to the Harmony AI service. This issue has now been resolved, and the values are available as a separate field called “Queue_name_Params.”
3. URN Management – History: In the previous version, the History page only displayed checkboxes instead of hyperlink option. Now, the checkboxes have been replaced with hyperlinks, allowing users to access the corresponding URN data directly.
4. Live Report: Below are the issues that have been addressed on the Live Report page:
    a. Headers in the Live Report were misaligned, and columns did not resize properly if the name contained more characters. All headers are now uniformly aligned.
    b. A double loader used to appear whenever an input was provided in the search box and when navigating to the next page using pagination options. This issue has been fixed, and the double loader no longer appears.
    c. When no transactions were available, the history of Live report would display ‘Showing entries.’ This has now been fixed.
5. Search Box: Previously, if the user entered specific input in the search box on the “Reports” page, the results were irrelevant, returning all values. The search functionality has now been fixed to retrieve and provide accurate results.
6. Resource Management: The “Updated By” column was not correctly updating when users edited machine names. This issue has been addressed, and the column is now properly updated.
7. Queue Name Duplication: Users were able to create the same queue name in two different sections (e.g., Processing and Exception), leading to duplicate names. Validation has now been implemented to prevent duplication, ensuring only unique names are allowed.
8. Queue Access Update: When users tried to provide or update field/queue access, they were unable to do so due to a warning message saying, “Queue already exists.” This issue has been fixed, and the queue can now be updated without an error.
9. Key Vault – Azure Secret Expiry: If the client secret key provided in the “Azure Key Vault” was expired, no proper warning message was displayed. Now, this has been resolved with a proper warning message.
10. Credential Vault – Below are the issues that have been addressed on the credential vault page:
       a. In previous versions, the expiration date for new credentials exceeded the tenant’s expiration date. Now, validation ensures that the credential expiration date does not surpass the tenant’s expiration.
       b. The ‘Lock/Unlock’ status was incorrectly displayed for newly created credentials. This issue has now been resolved.
11. Bulk Upload – Popup Issue: During the bulk upload process, if the user canceled or closed the process, the popup to upload again would not appear. This issue has been fixed, and the popup now functions correctly after canceling or closing.
12. Deploy Robots – Below are the issues that have been addressed on the Deploy robots page:
       a. Using the same machine name for different license types, such as Unattended and High Density, caused the page to keep loading indefinitely. This issue has been resolved, and the page now loads correctly.
       b. The filter functionality was not working, now it has been fixed.
13. Scheduler: In LSC environment, users were unable to schedule robot via scheduler due to the time gap in the scheduled time. Now, the issue has been fixed and the scheduler now functions properly.
14. The search functionality has been fixed to prevent triggering on every key press and now includes both a search and clear icon for improved usability.
15. All queues and reports have been aligned to display a uniform column structure for consistency.
16. All the unassigned fields were displayed in the queue while adding the cases manually, now it has been fixed.
17. Business Rules – The priority order used to change with every update, causing the bot to improperly move transactions. This issue has now been resolved. 

Known Issues

1. When you are trying to “Save/Update” all the queues at same time during the project configuration, the page may show an unresponsive warning message. It occurs only when the overall number of queues exceed more than 8.
2. The “Invite User” page does not display the list in the correct order when roles are updated at the project level.
3. If multiple queue movements are configured for a single transaction in the business rules, bulk upload cases will not be supported.
      a. Example: If a transaction moves through stages like Index → Fetch → Process → Complete in a single process, cases uploaded in bulk will not be supported.

Released date: 14-10-2024

1.7.17 v.24.8.0.26

v.24.8.0.26

This hotfix release addresses key issues in Robility Manager, including enhancements to the search functionality on the Interact workflow page and improvements in managing user access.

Bug Fixes

1. Search Functionality on the Interact Workflow page – Previously, users faced difficulties reviewing transactions on the Interact page due to the lack of a search option, making it challenging to locate and review specific URNs. We have now implemented a search box, enabling users to easily search with specific data.
2. Roles and Users at the Project Level – The following issues have been addressed on this page:
    a. User Search in Drop-Down Menu: Users were unable to search and select specific users when mapping roles. Now, users can search for names and provide access more efficiently.
    b. “Select All” Option: The “Select All” option did not work when the list contained more than 20 users. This issue has been resolved, and the “Select All” option will be disabled if the user list exceeds 20.
    c. Filtered User List: The user list will now only display users who do not already have access to the selected role.

Known issue

1. Business rule – The “Copy” functionality will only work when the source and destination fields are of the same field type.
2. Currently we have not implemented multiple queue movement when indexing the transactions via BulkIndex option.
3. If the user’s role is updated at the project level, the Invite User page does not display the list in order of the updated date.

Released date: 16-09-2024

1.7.18 v.24.8.0.25

v.24.8.0.25

This version 24.8.0.25 addresses critical issues in Robility Manager and enhancements to improve your experience and expand your capabilities on our platform.

What’s New

App Integrations(beta): With Robility’s App Integrations, you can effortlessly connect with various software applications. Share data and functionalities to create a smooth, interconnected workflow. It helps you to streamline the setup and management of third-party connections with standardized authentication. This is exclusively available for integrating with Zendesk, simplifying and securing your automation processes—all in one convenient place.

HarmonyAI: We’re thrilled to unveil a major transformation in HarmonyAI’s Playground, set to elevate your prompt responses to new heights. But that’s not all—our AI services have reached the next stage with the integration of Google Vertex AI and enhanced text moderation capabilities.

Enhancements

1. Improved Performance – To boost performance in Reviews, URN Management, and Reports, we’ve introduced pagination. This will enhance loading times and streamline navigation through large datasets.

Bug Fixes

Sign up – Users were previously able to sign up using links that had expired for more than 48 hours. We’ve fixed this issue, so now, expired links will no longer grant access, ensuring a secure and timely signup process.

Template – Alerts for activating and deactivating templates now appear immediately, without needing to refresh the page. This ensures you get prompt notifications about your template status.

Settings –

1. License Page –
     a. We’ve resolved the issue where you couldn’t send a Tenant license request due to an error asking for a license count. You can now submit requests without any problems.
     b. Previously, old license details would appear on the “Buy License” page. This has been fixed, so you’ll see only current information when you’re ready to purchase.
2. Features – All previously mapped and available versions of Designer & Runner were not showing up. This issue has been fixed, so you can now see and access all versions as expected.

Credential Manager-
     a. Lock/Unlock status – Earlier there was a glitch on updating the details and status of the credentials, now every time you utilize the credential through Designer, the Lock/Unlock status in the Manager’s Action Category will mirror your actions perfectly.
     b. Expiration date – Previously, you could provide past the 90-day limit when updating or adding new credentials. Not anymore—now, everything is in line, keeping your credentials secure and compliant.
     c. History – Previously, the history option will list out all the details for more than 24hours. Now, user details will vanish right on schedule, 24 hours later, just as they should.

Business rules –
     a. We’ve tackled an issue where you couldn’t update and save a new condition in an existing business rule. Previously, trying to save would throw an error, especially when there was only one rule in the project. Now, updates save effortlessly—no more errors!
     b. The “Else” condition was mandatory before, causing transactions to fail if the rule wasn’t met. We’ve made it optional, allowing for a smoother transaction process.
     c. Previously, when using text fields with conditions like “Less than,” “Greater than” or “Greater than or equal to,” in the business rule, the transactions were not updated and throwed an error. Now, we have fixed that glitch, so now you can index queues.

Roles and Users – 
     a. We’ve resolved the issues where clicking outside the “Select Users” field would clear your selections, leading to unnecessary warning messages. Now, your selections stay intact, even if you navigate away and return.
     b. The “Select All” feature now works reliably, displaying the correct count of selected users. No more mismatches between the displayed count and actual selections.

Interact – 
     a. Special Characters – Now Fully Supported: Earlier when the “UNICODE” characters were provided in the field values, it was not accepted. Now, All special characters are seamlessly handled in Interact, ensuring a smooth experience with varied inputs.
     b. Picture Field – ‘Fit to Screen’ Fixed: We’ve resolved the issue with the “Fit to Screen” option for images in the “Picture” field. It now works as expected, giving you a perfect fit every time.
     c. Drop down field – Previously, there was no status indication for dropdown values uploaded to Excel. We’ve added clear status notifications, so you know exactly when your upload is completed.
     d. Queue Inactivation – When a queue was inactivated, you could still copy “Json” and “Attachment details.” This has been fixed to ensure proper access controls.
     e. Queue Details Display – The copy icons for Json and attachment fields were mistakenly enabled for Completed and Business Exception Queues. This has been corrected to match appropriate permissions.
     f. Project Configuration Page –We’ve fixed the loading issue on the Interact Project Configuration page, so you can access your configurations without delays.
     g. Invalid Rule Conditions –Adding invalid rule conditions used to cause confusing alerts. Now, you’ll see a clear “Rule not satisfied” message for better clarity.
     h. Field Access –You can now select only one option between Show & Edit in the Interact Field Access settings, ensuring clearer permissions.
     i. User & API Access Checkboxes –We’ve corrected the header checkbox issue, ensuring that selections for User and API Access are accurately reflected.
     j. Field Name Matching Issue –If you named a field the same as its type (like “Group”), the page would get stuck loading. This has been fixed for smooth transaction additions.
     k. Bulk Index Loading –After a successful file upload, Bulk Index used to keep loading indefinitely. This issue is resolved, ensuring that you can proceed without unnecessary delays.
     l. Master Data –If you deleted master data and tried to add new data, it used to overwrite the existing records. This has been fixed to avoid unintentional overwrites.
    m. Queue Details –When you click on a queue and use the copy icons for Json, Attachment Fields, or Table Names, you’ll now clearly see which details were copied, fixing previous visibility issues.
     n. Project Configuration Save – “Saved successfully” message now appears correctly after saving changes in the Project Configuration page, and clicking during the loading phase no longer disrupts the process.
     o. Review Page Headers – Unchecking headers in a queue and then refreshing causes all headers to appear selected, but none are visible in the grid; switching queues and returning restores the headers. Now it has been resolved.
     p. Queue Access Options – Previously, when providing API access for the queue was not reflecting and resulted in exception. Now you can update and save changes to queue access options correctly, even when API access is provided

Deploy Robots –
     a. Edit Option –The “Edit” option was previously available even when the machine was in an “IDLE” state. We’ve updated this so that the “Edit” option is now disabled in the “IDLE” state and will only be enabled if the machine moves to a “not connected” or “faulted” state.
     b. Resolution Settings –Users could previously save and submit resolution settings for “W/H” set to the maximum allowed values. This issue has been resolved to prevent saving and submitting with such settings, ensuring optimal resolution management

Known issue

1. Business rule – The “Copy” functionality will only work when the source and destination fields are of the same field type.
2. Currently we have not implemented multiple queue movement when indexing the transactions via BulkIndex option.

Released date: 26-08-2024

1.7.19 v.24.7.0.13

v.24.7.0.13

This version 24.7.0.13 addresses critical issues in Robility Manager and enhancements to improve your experience and expand your capabilities on our platform.

What’s New

HarmonyAI(beta): Dive into the world of AI-powered automations with HarmonyAI, Robility’s standalone platform. Imagine creating agentic automations that learn from your data, make decisions, and execute bot tasks across your automation solutions—all without needing to be a machine learning expert.

Experience the ultimate flexibility and power with seamless integrations of major cloud platforms like Azure and Google. 

MarketPlace (beta): The Robility Marketplace will serve as a comprehensive platform, providing a broad selection of connectors and reusable RPA templates developed by seasoned experts and practitioners. It acts as a hub for top-tier RPA solutions, featuring integration packs, automation components, and readymade automation workflows. These resources are designed to expedite and expand automation initiatives across organizations.

Co-pilot(beta): Revolutionize your transactions with the new Co-pilot integration in RobilityManager. This cutting-edge AI assistant is designed to enhance your productivity and ensure the highest standards of accuracy and clarity in every transaction review.

Imagine an AI assistant helping you summarize, review, and spell-check your transactions—amazing, right? Discover how Co-pilot minimizes your routine tasks and maximizes efficiency.

AzureKeyVault: Unlock the next level of security with Robility Manager’s cutting-edge feature for safeguarding your most sensitive information. Imagine effortlessly storing secrets, passwords, and files for each tenant, leveraging the unmatched security of Azure Key Vault and Blob Storage.

Discover the power of robust security measures that adapt to your needs, without compromising on accessibility or performance. Learn more and take the first step towards impeccable data security with Robility Manager.

Business Rules: Boost decision-making and streamline your workflows with Robility’s powerful, low-code rule engine. This engine offers seamless integration capabilities, allowing you to manage complex logic and deploy rules with ease. 

Enhancements

1. History Option: Utilize the “History” option within the following menus to enhance security and monitor user’s usage This option is exclusively available for: 
    a. Credential Vault
    b. Workflows
2. Queue Enhancement: The “Queues” that are displayed in the “Interact workflow” has been vamped to show the queues based on the configured group type.

Bug Fixes

1. An exception was thrown when publishing the workflow from designer due to mismatch of the versions. Now it has been addressed.
2. Sign Up page – Resolved the issue where it displayed “Object Object error” exception message when attempting to sign up for the Robility Manager.
3. Resource – Unable to remove the machine even when the machine was disconnected and deleted from the deploy robots page, now it has been fixed.
4. Workflow Page
     a. In the workflow page, we have resolved alignment issues where the header was not properly aligned, and the workflow list grid size was changing whenever the ‘View’ button was clicked.
     b. Addressed the ability to download workflows when it was in “Inactive” state.
     c. The “Check update” button remained enabled after checking workflow updates, now it has been resolved.
5. Business Rules –
    a. Business Rule Queue Issues: Previously, when an existing rule for the queue was deleted, attempting to add a new rule with the same queue would result in an exception being thrown. This issue has now been resolved.
    b. Else Destination and Condition Value Field: Addressed the Else Destination issue where if two rules contained the same destination queue in ‘Else,’ only one rule would be updated, and the other would not retain the same destination queue.
    c. Loader issue – Faced the loading issue when switching between rules, now it has been addressed.
   d. Deleted Fields – The deleted fields were available when creating new rules. This issue has now been addressed.
   e. Fields in dropdown – Even before choosing the source queue, the fields were displayed in the drop-down in the “If Part”, now it has been addressed.
6. Interact Workflow
    a. Bulk Index Transactions: Previously, the business rule was not working when transactions were uploaded through bulk index. This issue has now been fixed.
    b. Email Notification: The “From Process Queue” name in triggered emails was incorrect. This has now been corrected.
    c. Add Transaction: Previously, adding transactions for a project was not possible. This issue has been addressed by making changes to the database.
    d. MasterData: The MasterData file was not deleted previously, now this issue has been addressed.

Known issue

1. Business rule – The “Copy” functionality will only work when the source and destination fields are of the same field type.
2. Currently we have not implemented multiple queue movement when indexing the transactions via BulkIndex option.

Released date: 15-07-2024

1.7.20 v.24.5.1.1

v.24.5.1.1

This release includes bug fixes to improve your experience and expand your capabilities on our platform.

Enhancements

1. Project – Roles & Users: The drop-down in “Select Roles” within the project level was not visible to users. This issue has now been fixed.
2. User Management – When a user is invited as “Tenant Admin,” the default role “User” was not being selected for the respective user upon first sign-in. This issue has now been fixed.
3. Invite Page – Previously, both “RPA Developer” and “Tenant Admin” roles were being provided to the user by default. This issue has now been fixed.
4. Resolution Settings – The resolution was not changing according to the workflow, and manually inputted values were not being reflected upon saving. This issue has now been fixed.

Limitation

OCR & Entity Extract Review Page: Enhancements are currently in progress.

Known Issues

1. When user system’s display scale is set as 125%, the scroll bar option is not available in the Interact menu. 
2. Robility Manager is getting logged out too soon when the user is inactive on the page.
3. While saving/updating inside the interact configuration page, it shows unresponsive warning message.  

Released date: 28-05-2024

Hotfix Release

This hotfix release addresses critical issues in Robility Manager, including the timeout issue on the Interact page and the failure of email triggers for transaction movement in the LIVE environment.

Please note that this “Hotfix release” has been implemented into the existing version 24.5.1.1 of RobilityManager.

1. Timeout Issue on Interact Page: Users experienced timeouts when reviewing the transactions in the Interact page. Now we have fixed the issue by impementing optimizations and handling the process in the backends.

2. Email Trigger Failure: Emails were not being triggered upon creating or updating the transactions to any other queues in the LIVE environment. Now it has been rectified and the emails will be triggered automatically.

Released date: 04-07-2024
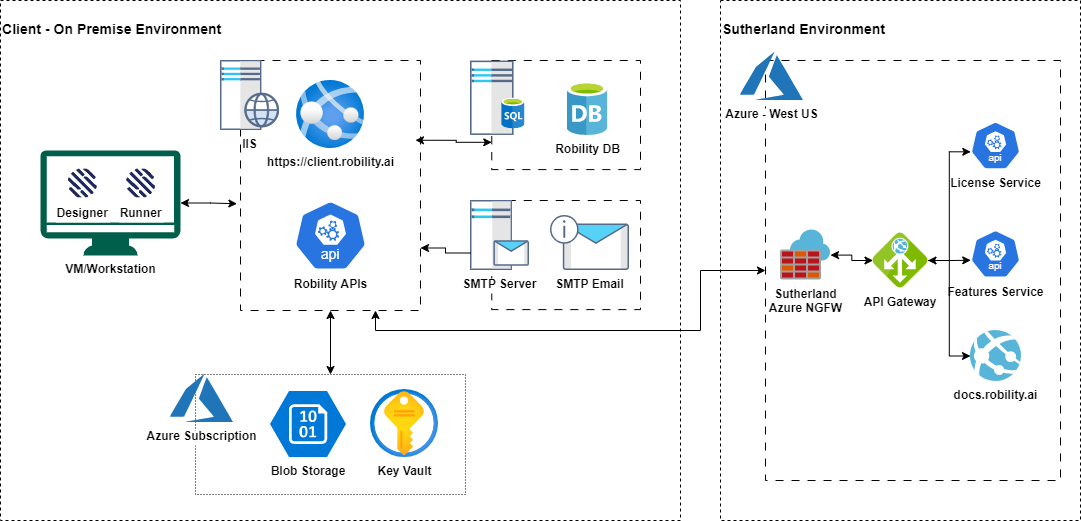
2. Platform Deployment Guide

2.1 Product Differences

Robility offers you second-to-none flexibility on delivery options, with two ways to get the full, cloud-native platform as well as continued support for installing key individual products yourself.

Robility Cloud is designed and optimized to offer the complete Robility Platform as a service, so you can focus on automation and leave the infrastructure to us.

Robility On – premises is designed and optimized to deliver a similar full-platform experience, but self-hosted in cloud or on-premises. Accordingly, it contains platform, container, and infrastructure configurations and management as part of the single installation.

We also offer support and new functionality for standalone product installations.

This table highlights some of the key feature differences between the options.

available– Available
not available– Not applicable

Capability Hybrid OnPremises Cloud Details

Support for multiple tenants with in an organization

All Robility deployment model support multiple tenants within a single organization.
Note: On-Premises deployment will require a separate license to use this feature.

Tenants within an organization has the highest level of resources isolation

The tenants with in an organization represents the highest level of resource isolation. Resources such as accounts, roles, and packages are exclusively shared within the boundaries of the organization, ensuring secure and controlled access.

Platform license procurement

x

License procurement is unavailable in On-Premises installations.

Tenant level settings available for each client

Each client can manage the following at the tenant level: Storage, Secure Vault, IP Restrictions, Product Auto-Update (On/Off), Marketplace License and License Auto-Renewal (On/Off).

Basic authentication for external users

x

x

Only secure authentication mechanisms, such as AD OAuth, are supported for Cloud and Hybrid deployments. For On-Premises deployments, Basic authentication can be configured, allowing the use of custom usernames and passwords for authentication.

Marketplace listing for public use

Control the publication of marketplace libraries across tenants using the host feed. For restricting access within an organization and tenant, a private feed should be utilized.

Custom credential store plugins

x

Robility supports secure storage options tailored to different deployment models. For Cloud and Hybrid deployments, only Azure Key Vault is supported, ensuring enhanced security. In contrast, On-Premises deployments provide flexibility, allowing the use of either Azure Key Vault or the built-in secure storage options.

File Storage Options

Robility Cloud and Hybrid deployments support storage-as-a-service options exclusively from Azure and AWS. On-Premises deployments support all storage-as-a-service options, including databases and document stores.

Robility Robots - VM

Each robot machine is hosted in a dedicated environment where everything is managed and hosted for you. This is a Cloud-only feature.

2.2 Deployment Pre-requisites

This document outlines the deployment prerequisites and infrastructure requirements necessary for the successful installation, configuration, and operation of the Robility Platform within a customer environment. The objective is to ensure that all hardware, software, network, security, and licensing dependencies are identified and validated before deployment activities begin.

The scope of this document covers the four core Robility Platform components:

1. Robility Manager – A server-side web application that serves as the central orchestration platform for managing automation workflows, scheduling robots, processing transactions, monitoring operations, and controlling user access.
2. Robility Designer – A development environment used by automation developers to design, build, test, debug, and publish automation workflows.
3. Robility Runner – An execution client installed on robot machines that runs published automation workflows and reports execution status back to Robility Manager.
4. Robility AI Services – A workflow automation platform that enables users to create, manage, and execute business processes, integrations, and AI-driven workflows using a visual low-code development environment. 

Component Architecture Overview

The Robility Platform follows a distributed, three-tier architecture designed to provide scalability, security, and centralized management of automation operations. The platform consists of a web-based management layer, execution and development clients, and a database layer for data persistence.

Robility Manager is hosted on a Windows Server environment using Internet Information Services (IIS) and utilizes Microsoft SQL Server as its backend database for storing platform configurations, workflow metadata, execution logs, transaction data, and user information.

Robility Designer is installed on developer workstations and is used to create, test, and publish automation workflows. Robility Runner is deployed on designated robot machines to execute published workflows and report execution status back to the platform.

Robility Flow is a cloud-based workflow orchestration and automation platform that enables users to build, manage, and execute business processes, integrations, and AI-powered workflows through a visual low-code interface.

All platform components communicate securely with Robility Manager over HTTPS, ensuring encrypted data transmission, centralized orchestration, and secure access to platform resources.

Component Role Deployment Location
RobilityManager Web platform hosting orchestration, scheduling, transactions, monitoring, and administrative functions. Windows Server (IIS)
RobilityDesigner Workflow design studio used by RPA developers to build, test, and publish automation workflows. Developer Workstation
RobilityRunner Runtime agent responsible for executing published automation workflows and robots. Robot Endpoint (1 per Robot)
SQL Server Platform database that stores configuration data, transactions, logs, audit information, and system metadata. Dedicated Database Server
Cloud Storage Stores platform binaries, feature packages, transaction files, documents, user uploads, and other platform-generated content. AWS S3, Azure Blob Storage, Google Cloud Storage, or Database Storage

2.2.1 Robility Manager

This section outlines the server infrastructure, operating system, software, and access requirements necessary for the successful installation and operation of Robility Manager. These prerequisites must be validated and available before deployment activities commence to ensure a stable, secure, and supported platform environment. 

Operating System & Platform

1. Server Type: Windows Server – on-premises physical, virtual machine, or cloud VM.
2. Operating System: Windows Server 2022 and above Newer LTS releases are acceptable provided they support .NET Framework 4.8.1 + and IIS 7.5+.
3. File System Access: Administrative rights to create custom folders for web binaries, log archives, and configuration files.

Required Software Stack 

Component Minimum Version Notes
.NET Core 8.0 and above Required for hosting applications using the ASP.NET Core hosting model.
Internet Information Services (IIS) 7.5 IIS role and required features must be installed and configured as described in Section 3.5.
Microsoft SQL Server 2019 The service account used for installation must have permissions to create and manage databases.
SSL Certificate TLS 1.2+ Certificate should be issued by a trusted Certificate Authority (CA) or a valid self-signed certificate for non-production environments.

Hardware Sizing – Pilot

This section outlines the recommended hardware configuration for Pilot, Proof-of-Concept (POC), or limited-scale deployments of the Robility Platform. The following minimum topology is recommended:

Module Unit Description
Server Module 1 Server Hosts the Robility Platform web modules, including RobilityManager, RobilityService, and the platform log file storage location.
Server Module 1 Server Hosts the Microsoft SQL Server database engine. For pilot or small-scale deployments, a shared SQL Server instance may be used.

Hardware Sizing – Production

This section provides the recommended infrastructure sizing for production deployments of the Robility Platform. Resource requirements may vary based on the number of active robots, concurrent workflow executions, transaction volumes, data retention policies, and overall platform utilization. The sizing recommendations below represent the minimum baseline for a production environment and should be scaled appropriately as the deployment grows.

Component CPU Memory (RAM) Storage
Robility Manager Web Tier 8 vCPU 32 GB 250 GB SSD
Robility SQL Database Tier 8 vCPU 64 GB 512 GB SSD

IIS Roles & Features

Robility Manager is hosted on Microsoft Internet Information Services (IIS). Prior to installation, the required IIS Server Roles and Features must be enabled on the target Windows Server to support application hosting, authentication, secure communications, and administration.

The following IIS components should be installed and configured:

Common HTTP Features

These features enable the web server to serve application content and handle standard HTTP requests.

a. Default Document
b. HTTP Errors
c. Static Content

Security

These security components support authentication, authorization, SSL/TLS communication, and access control.

a. Request Filtering
b. Basic Authentication
c. Centralized SSL Certificate Support
d. Client Certificate Mapping Authentication
e. IP and Domain Restrictions
f. URL Authorization
g. Windows Authentication

Management Tools

These tools provide administrative capabilities for managing and maintaining IIS.

a. IIS Management Console
b. IIS Management Scripts and Tools (Optional)

Additional Recommendations

1. Configure HTTPS using a valid SSL/TLS certificate issued by a trusted Certificate Authority (CA).
2. Ensure the IIS Application Pool identity has the necessary permissions to access application files, logs, and configuration directories.
3. Enable IIS logging for troubleshooting, auditing, and operational monitoring.
4. Apply the latest Windows Server and IIS security updates before deployment.

Note: All required IIS roles and features should be installed and verified before commencing the Robility Manager installation process.

Database Prerequisites

1. SQL Server Edition: Standard or Enterprise, version 2019 or higher.
2. Database: An empty database named ‘Robility’ to be pre-created.
3. Service Account: Dedicated SQL login with database creation, db_owner, and DDL permissions.

Information to be collected and shared with the Robility Support team:

a. Server name / instance
b. Database name
c. User ID (must have database create permission)
d. Password 

Networking, DNS & SSL

1. Domain Name: A fully qualified domain such as ‘Robility.companyname.com’ to be registered in the customer DNS server, pointing to the IIS web server.
2. SSL Certificate: A trusted CA-issued certificate (preferred) or a self-signed certificate bound to the FQDN in IIS for HTTPS communication.
3. Inbound Ports: 443 (HTTPS) open from all Designer and Runner endpoints to the Manager server. Port 80 may remain open during initial validation only.
4. Outbound Ports: 443 from Manager to Blob Storage, license server, and CDN endpoints (see Section 6).

Mail Server

RobilityManager triggers notifications, password resets, and workflow alerts via SMTP. The mail relay must support modern authentication (OAuth 2.0 / token-based). Provide:

1. SMTP host and port
2. Authentication type and credentials / app password
3. From-address (e.g., noreply-robility@companyname.com) provisioned in the mail tenant

Storage

RobilityManager uses Storage for platform files, features, and uploads. Provision a storage account and provide:

1. Azure
2. AWS
3. GCP or DB

Storage Allocation for RobilityManager

Asset Size Comments
Core Binaries 2500 MB – 2750 MB Web application binaries deployed on the IIS server, including all platform components and supporting libraries required for execution.
Log Files 300 MB Max (30 Files) Log files are limited to a maximum size of 10 MB per file per day. Older log files are automatically archived and purged using a FIFO (First-In, First-Out) retention policy to control storage utilization.

End-User Browser Requirements

RobilityManager web console is supported on the following browsers from any user machine that needs portal access:

1. Microsoft Edge – latest and stable
2. Google Chrome – latest and stable
3. Internet Explorer 11 (for legacy compatibility)

Security, Identity & Account Requirements

1. Service Accounts: Pre-provisioned service accounts for IIS application pool, SQL Server connection, and Runner robot logon. Document each account with intended scope and rotation policy.
2. Firewall Rules: Approved inbound 443 from Designer/Runner subnets to Manager; outbound 443 from Manager and all clients to Azure CDN and Sutherland endpoints (Section 6).
3. Endpoint Protection: Antivirus / EDR exclusions configured for the Robility install paths, log folders, and binaries on Manager, Designer, and Runner machines. Coordinate with the Infosec team for the exclusion list.
4. Group Policy: Ensure that GPOs do not block .NET Framework, IIS WCF activation, or unattended logon required by Runner.
5. SSL / TLS: TLS 1.2 enabled on the OS; legacy TLS 1.0/1.1 may be disabled per customer security baseline.

Licensing

1. Customer ID and Password: Issued by Sutherland for license activation against the Robility license server.
2. License Activation: Performed post-installation through the Manager web console; the Manager server must have outbound HTTPS access to https://licenseserver.sutherlandglobal.com.
3. Initial Admin Sign-up: After license activation, the first administrator user is created through the Sign-up flow on the Manager portal. 

URL Whitelisting

The following URLs must be allow-listed at the proxy, firewall, and endpoint protection layers from both the Manager server and all client machines. These endpoints handle license validation, feature downloads, and product updates.

1. Robility Hub: https://robility.sutherlandglobal.com/Robilityrepository  
2. License App: https://licenseserver.sutherlandglobal.com
3. Document Portal: https://docs.robility.ai/

2.2.2 Robility Flow

This document defines the deployment prerequisites required to install and operate the RobilityFlow Platform in a customer environment. It consolidates the infrastructure, software, network, security, and licensing requirements that must be in place before installation activities begin.

RobilityFlow is Robility’s AI-assisted workflow orchestration platform built on a containerised, cloud-native architecture. It enables business and technical users to visually design, publish, and execute multi-step automated flows that can integrate with enterprise systems, REST APIs, databases, and large-language-model (LLM) services.

Scope covers the two core platform components:

1. RobilityFlow Designer – Browser-based visual canvas for building, testing, and publishing automation flows. Delivered as a containerised application.
2. RobilityFlow Runtime – Backend execution engine that processes published flows, manages state and credentials, and exposes REST and WebSocket APIs. Runs in headless / backend-only mode.

RobilityFlow supports two deployment models:

1. Kubernetes – Recommended for production environments requiring high availability, automated scaling, and multi-zone resilience. Click here to learn more
2. Virtual Machine (VM) with Docker – Suitable for pilot deployments, resource-constrained environments, or customers who prefer a simpler operational model. Click here to learn more

Component Architecture Overview

RobilityFlow is a cloud-native, container-first platform. Both the Designer and the Runtime (back-end) are distributed as OCI-compliant container images. All persistent state is externalised to PostgreSQL, Redis, and object storage — the containers themselves are stateless and horizontally scalable.

The platform supports deployment on Kubernetes (orchestrated) and directly on Virtual Machines using Docker Compose (standalone).

Component Role Deployment Target
RobilityFlow Designer Web-based visual workflow design studio. Runs as a containerized React application served through NGINX and provides an intuitive interface for creating, editing, testing, and publishing workflows. Kubernetes Pod (Deployment) or Docker Container on a Virtual Machine.
RobilityFlow Runtime Backend execution engine responsible for processing workflow executions, managing runtime state, handling orchestration logic, and exposing REST and WebSocket APIs. Operates in headless/API-only mode. Kubernetes Pod (Deployment) or Docker Container on a Virtual Machine.
PostgreSQL Persistent data store for workflow definitions, execution history, variables, configuration settings, metadata, and audit records. Kubernetes StatefulSet, Managed Cloud Database Service, or Docker Container on a Virtual Machine.
Redis Provides session caching, real-time publish/subscribe messaging for execution events, distributed locking, and task queue brokering. Kubernetes StatefulSet, Managed Cache Service, or Docker Container on a Virtual Machine.
Object Storage Stores uploaded files, workflow exports, generated artifacts, backups, and large payload attachments used by workflows and runtime services. S3-Compatible Storage Service (AWS S3, Azure Blob Storage, Google Cloud Storage, MinIO, or equivalent).
Ingress / API Gateway Routes external HTTPS traffic to the Designer and Runtime services, performs TLS termination, load balancing, request routing, and ingress security controls. Kubernetes Ingress Controller (NGINX, Traefik, Kong, AWS ALB, etc.) or NGINX Reverse Proxy on a Virtual Machine.

2.3 Designer & Runner

This document provides a detailed overview of the system requirements and installation procedures for Robility Designer and Runner in the infrastructure designated for process automation development and execution. Robility Designer and Runner are essential components of the Robility platform, facilitating the design and execution of automation processes. They are provided as an MSI package, which offers flexibility in installation methods.

Depending on the specific infrastructure setup and the preferences of the system administrators, several installation options are available to ensure seamless integration into the organization’s existing environment. This document will guide you through these options, ensuring that the platform is effectively implemented according to organizational needs and technical specifications.

2.3.1 System Requirements

This section outlines the hardware and software requirements to ensure the optimal performance of Robility Designer and Runner Enterprise across all deployment models—on-premises, cloud, or hybrid.

By following the recommended system configurations, you can maintain system stability, avoid compatibility issues, and achieve seamless and efficient operations. Meeting these requirements is key to delivering a secure, reliable, and high-performing Robility environment for your organization.

Hardware

Component Minimum Recommended Comments
Designer 1 Machine 1 Machine RobilityDesigner installation for workflow developers to design, test, and publish automation workflows.
Runner As Needed As Needed One machine per robot execution environment with RobilityRunner installed to execute published automation workflows.
Note: Runner supports both persistent and non-persistent execution environments.
Component Minimum Recommended Comments
Processor Quad-core (4 CPU cores), 2.0 GHz or faster, 64-bit (x64) Octa-core (8 CPU cores), 2.0 GHz or faster, 64-bit (x64) A 64-bit processor is required.
RAM 16 GB 32 GB or more Higher memory is ideal for large automation projects or enterprise-grade applications.
Display Resolution 1920 × 1080 1920 × 1080 Applies to both desktop and laptop environments. Robility Manager is not optimized for resolutions below 1920 × 1080.
VDI Display Resolution Dynamic / Native Matching Dynamic / Native Matching Default User Experience: When a VDI session is launched through standard clients such as Citrix Workspace, VMware Horizon, or Azure Virtual Desktop, the remote session automatically scales to match the endpoint's screen resolution, including 1080p (1920 × 1080), 1440p, 4K (3840 × 2160), or multi-monitor layouts.
Storage 100 GB HDD with at least 20 GB of free disk space 100 GB or larger SSD with at least 40 GB of free disk space Refer to the disk space requirements below.
Installer 100 MB 100 MB Installed on the developer workstation. Includes the core application binaries required for Robility Designer.
Features / Activities 300 MB – 1 GB 300 MB – 1 GB Storage requirement varies depending on the activity packages, connectors, extensions, and features installed.
Log Files 300 MB Max (30 Files) 300 MB Max (30 Files) Each log file is limited to a maximum size of 10 MB per day. Archived log files are managed using a FIFO (First-In, First-Out) purge policy to control disk usage.

Disk Space

Component Size Comments
Installer 100 MB Installed on the developer workstation. Includes the core application binaries required for Robility Designer.
Features / Activities 300 MB – 1 GB Storage requirement varies depending on the activity packages, connectors, extensions, and features installed.
Log Files 300 MB Max (30 Files) Each log file is limited to a maximum size of 10 MB per day. Archived log files are managed using a FIFO (First-In, First-Out) purge policy to control disk usage.

Software

Software Minimum / Supported Comments
Operating System Windows 10 (22H2, 21H2, and 20H2, Pro, Enterprise; 64-bit)
Windows 11 (64-bit) and above
Windows 11 24H2 (64-bit)
Windows Server 2019, 2022 and above
A supported 64-bit Windows operating system is required.
.NET Framework Version 4.8.1 or higher .NET Framework 4.8.1 is recommended. Ensure the latest .NET Framework updates are installed.
Browser Google Chrome – Latest stable version
Microsoft Edge – Latest stable version
Internet Explorer 11 – Legacy compatibility
Browser extensions must be installed for browser automation.

Recommended Cloud VM services

The recommended Windows Virtual Machine (VM) services for hosting Robility Designer and Robility Runner in the cloud provider.

Cloud Provider Recommended VM Service
Microsoft Azure Azure Virtual Machine (Windows) configured with the recommended Windows Server operating system and sizing based on the deployment environment.
Amazon Web Services (AWS) Amazon EC2 Windows Instance configured with the recommended Windows Server AMI and compute resources required for the Robility platform.
Google Cloud Platform (GCP) Compute Engine Windows Virtual Machine configured with the recommended Windows Server image and appropriate CPU, memory, and storage allocation.

Network Access & Message Traffic

Component Requirement Comments
Network Access HTTPS connectivity to the RobilityManager FQDN Required for communication with RobilityManager.
Outbound Connectivity Outbound HTTPS access to license, CDN, and feature update URLs Refer to the applicable URLs for required outbound access.
Network Connectivity Stable internet or private network connectivity Required for reliable connectivity to RobilityManager.
TLS TLS 1.2 or later TLS 1.2 or later must be enabled.
Runner Traffic 2 heartbeat requests / minute Baseline traffic generated by each Runner to RobilityManager.
2 workflow requests / minute when idle Traffic generated by each idle Runner.
2 status requests / minute when running Traffic generated while a workflow is running.
20 transaction requests / minute when waiting on a transaction Traffic generated when the Runner is waiting on a transaction.
5 transaction requests / minute on average Average traffic depends on workflow processing time.

Additional Requirements

1. Administrator Rights:
Required for installation and specific features, such as setting up browser extensions.

2. Excel/Office Integration Requirements:
Microsoft Office (versions 2007, 2010, 2013, 2016, 2019, or 365 desktop editions) is required for automating tasks in Excel and Outlook.

3. Robility Manager Requirements:
For users integrating Robility Designer with Manager:
    a. Ensure the system can establish communication with the Manager server.
    b. SSL/TLS 1.2 is mandatory for secure communication.

4. Windows Registry:
Read & Write access is required during the installation of Robility Designer and Runner to configure essential registry entries for proper functionality.
Administrative Rights: Necessary for installing the Robility Runner. 

5. Remote Desktop:
The Remote Desktop option must be enabled to support Robility Runner Auto Login for service accounts and user accounts. 

6. URL Whitelisting:
Specified URLs must be whitelisted to ensure the proper functioning of Robility Designer and Runner across all deployment models. Click here to refer. 

7. Group Policy:  
For Robility’s Chrome and Edge browser automation, specific group policy configurations and prerequisites must be enabled. Click here to refer.

8. VM Name Requirements:
While creating virtual machines or Citrix environments, the machine name must not contain special characters. Only hyphens (-) and underscores (_) are permitted, and they should be used only within the name, not at the beginning.

9. User Account:
Dedicated service account with login rights, ideally non-interactive for unattended execution.

10. Auto-logon:
Auto Logon should be configured for unattended execution. Click here to refer

2.3.2 Installation

Robility Designer and Runner can be installed using two convenient methods to suit different deployment requirements. Detailed below are the steps for each method:

1. Installation via Robility Manager: 
This method lets users easily download and install the Robility Designer or Runner directly from the Robility Manager, simplifying setup. It’s quick, user-friendly, and ensures a smooth start to your automation projects. Click here to refer. 

2. Installation from command-line prompt: 
This method lets users to install the Robility Designer or Runner through a command-line interface, offering greater control and flexibility. This approach is ideal for automated or large-scale deployments, ensuring a streamlined process. Click here to refer. 

Before proceeding with the installation, it is important to ensure that your system meets the necessary hardware and software specifications. For detailed information about these specifications, click here.

Installation via Robility Manager

For Designer

Follow these steps to download and install the Designer MSI from Robility Manager. This process is straightforward and does not require additional assistance or administrative rights.

1. Log in to Robility Manager using your credentials.
2. If you have access to a single tenant, you will be directed to the Home page upon login.

     a. For multiple tenants, choose the tenant where you want to download the Designer and start building automations.
3. Navigate to the “Products” page to explore Robility’s product offerings, including their latest versions.
4. Locate “Robility Designer” and click the Download button.
5. Before the download starts, review the user license agreement displayed on your screen and click Agree to proceed.

6. Once the MSI file is downloaded, double-click it to launch the installation wizard.
7. Follow the on-screen prompts:

    a. Click Next to continue.
    b. Accept the license agreement and click Next again.
8. The installation process will complete, and the Designer will be successfully installed on your system.
9. You’re now ready to start using Robility Designer for your automation needs.

For Runner

Administrative rights are required to install the Robility Runner. 

The following guide provides detailed steps to download and install the Runner MSI from Robility Manager.

1. Log in to Robility Manager using your credentials.
2.  After logging in, if you have access to only one tenant, you will be redirected to the Home page automatically.
     a. For users with access to multiple tenants, a selection screen will appear. Choose the specific tenant where you want to download the Runner.
3. Navigate to the “Products” page in Robility Manager. This section showcases all available Robility products, along with their latest versions and updates.
4. Locate “UnAttended Runner” and click the Download button.
5. Before the download begins, a user license agreement will appear on your screen. Carefully review the terms and conditions and click Agree to confirm and proceed with the download.
6. Once the MSI file is downloaded, locate it in your system’s downloads folder.
7. Double-click the file to open the installation wizard and initiate the setup process.
8. The installation wizard will guide you through the setup steps:
     a. Click Next on the welcome screen to continue.
     b. Review and accept the license agreement by selecting the checkbox and clicking Next again.
     c. Choose the installation folder if prompted or proceed with the default location.
9. When prompted, grant the necessary administrative rights to allow the installation to proceed. This step ensures that the Runner is properly configured on your system.
10. After granting permissions, the installation wizard will finalize the process. Once complete, a confirmation message will appear indicating that the Runner has been successfully installed.

2.3.3 Uninstallation-Command Prompt

You can uninstall Robility Designer and Runner using the MSI installer via the command line. This process is efficient, silent, and minimizes manual intervention, ensuring proper removal of all components. Follow the detailed instructions below for a seamless uninstallation experience.

Key Considerations:

1. Matching MSI Version: Ensure the same version of the MSI file used during the initial installation is available in the specified path (e.g., `C:\Robility_MSI`). Using a mismatched version may result in errors or incomplete uninstallation.
2. Administrative Rights: Administrative privileges are mandatory for executing uninstallation commands. Confirm that you have the required access level on the machine.
3. Command Prompt Access: Launch the Command Prompt in Administrator mode (`Run as Administrator`) before proceeding with the commands. This ensures the process executes without permissions-related interruptions.
4. Silent Mode Support: The uninstallation process can run in silent mode to minimize user interaction. Logs are generated to record the process details for auditing or troubleshooting purposes.

Step-by-Step Uninstallation Process

For Robility Designer

1. Open the Command Prompt in Administrator mode.
2. Navigate to the directory where the MSI file is stored (e.g., `C:\Robility_MSI`) or use the full file path directly in the command.
3. Run the following command to initiate the uninstallation process: “msiexec /x C:\Robility_MSI\RobilityDesigner2x.x.x.msi/qn/passive/l*v “C:\Robility_MSI\DesignerUnInstallationLog.txt”
4. Monitor the process through the log file to ensure that all components are successfully removed.

For Robility Runner

1. Open the **Command Prompt** in Administrator mode.
2. Ensure the correct MSI file for the Runner is available in the designated path (`C:\Robility_MSI`) or use the full file path directly.
3. Run the following command to uninstall Robility Runner – “msiexec /x C:\Robility_MSI\RobilityRunner2x.x.xmsi/qn/passive/l*v “C:\Robility_MSI\RunnerUnInstallationLog.txt”
4. Review the log file to confirm the uninstallation was successful and to identify any errors that might have occurred during the process.

2.3.4 Group Policy

For Robility’s Chrome and Edge browser automation plugins to operate without interruptions, specific group policy configurations and prerequisites must be enabled. These configurations ensure robust and seamless integration between Robility’s tools and browser automation functionalities.

Key Requirements:

1. Dynamic Port Connections: Allow the following applications to create dynamic ports for plugin communication: “RobilityEdgeNativeApp” and “RobilityChromeNativeApp”. It enables smooth data exchange between the plugins and the browser during automation workflows.

2. Access to Chrome Web Store: The target machine must have network access to the following URLs to install and update Chrome extensions: 
a.[https://clients2.google.com/service/update2/crx](https://clients2.google.com/service/update2/crx)
b. [https://clients2.googleusercontent.com/crx](https://clients2.googleusercontent.com/crx)

This access is crucial for downloading, updating, and managing browser plugins required for automation.

3. Additional Chrome Plugin Configuration Resources:  For detailed information on Chrome applications and native messaging configurations, refer to the official Chrome developer documentation:
[https://developer.chrome.com/docs/extensions/mv3/nativeMessaging/](https://developer.chrome.com/docs/extensions/mv3/nativeMessaging/)

2.4 Robility Manager

This section provides a comprehensive and detailed guide for the cloud deployment of Robility Manager. It is specifically designed for IT administrators, serving as a resource to ensure the successful setup and configuration of the infrastructure based on organizational needs and requirements.

The guide covers essential steps, including assessing infrastructure prerequisites, selecting the appropriate cloud platform, configuring server environments, and integrating necessary components to support Robility Manager’s functionality. By following this guide, administrators can ensure a scalable, secure, and efficient deployment that aligns with the organization’s operational goals and technical standards.

2.4.1 Deployment Model

Carefully evaluate all relevant factors before selecting your deployment model. Once the model is deployed on-premises, it cannot be switched to a different model, and the same restriction applies if you choose another deployment option. It is important to consider your long-term needs and requirements, as changing the deployment model after implementation will not be possible.

Robility Cloud

Robility Manager, Designer, Runner, and all associated components will be deployed, fully configured, and completely managed by Sutherland as part of a comprehensive automation-as-a-service solution for enterprise clients. This service ensures that all aspects of the automation platform are expertly handled, from installation and setup to ongoing management and support, allowing clients to focus on their core business operations while leveraging the power of automation without the need to manage the underlying infrastructure themselves.

Robility Manager is equipped with a High-Availability architecture that leverages a load balancer to distribute workloads effectively and ensure seamless functionality. In the event of a server or database failure, this setup minimizes downtime by redirecting operations to other active components in the system. By maintaining continuous availability, Robility ensures that business-critical operations can proceed without disruption, providing enterprises with the reliability needed to manage their automation processes efficiently.

Robility Designer and Runner will be deployed in either an on-premises environment or a public cloud setup Windows class machine, depending on the client’s requirements. Each deployment will incorporate comprehensive security measures to safeguard the automation processes and associated data. These measures are designed to protect against potential threats, ensure data integrity, and maintain compliance with industry standards, providing a secure and reliable environment for all automation operations.

Enterprise clients opting for this deployment model are required to provide access to their applications through secure methods such as the internet, VPN, or Citrix. This access is essential for developers and robots to interact with the necessary systems and perform the required automation tasks. Ensuring secure and reliable connectivity will enable seamless automation execution, while maintaining the integrity and security of the client’s environment.

Robility On-Premises / Public Cloud

The Robility Manager, Designer, Runner, and all supported associated platform components can be deployed and hosted directly on the enterprise client’s on-premises infrastructure. This allows the client to maintain full control over their environment, ensuring that the platform operates within their internal network and meets their specific security, compliance, and performance requirements.

This setup is entirely air-gapped and isolated, meaning it operates in a completely secure environment with no access to the internet. This ensures that all systems and data within the setup are completely separated from external networks, providing an additional layer of security and minimizing the risk of cyber threats or unauthorized access.

This deployment model places the responsibility on the enterprise to manage and maintain all infrastructure components. This includes tasks such as ensuring disaster recovery processes are in place, applying security patches to protect the system, and overseeing the upgrading of the platform to newer versions. The enterprise must allocate resources and expertise to effectively handle these critical functions to ensure the continued stability and security of the system.

Robility Hybrid

Robility Manager (Orchestrator) will be hosted and managed by Sutherland as a Software-as-a-Service (SaaS) model, with each client provided their own dedicated tenant. Additionally, Robility Manager is designed with high availability, utilizing a load balancer to ensure continuity during disasters or server/database outages. This setup guarantees that Robility remains online and fully operational, supporting business-critical functions without interruption.

Robility Designer and Runner can be installed within the client’s environment to support the development and deployment of automation solutions effectively. To ensure seamless integration and functionality, the client is required to provide a Windows-class machine that meets the specified technical requirements. Additionally, the client must implement the necessary network and firewall configurations to establish secure and reliable access to the Robility Manager, which is hosted over the internet. These provisions are critical for maintaining connectivity and enabling smooth operation of the automation environment.

2.4.2 Robility Cloud & Hybrid

The Robility Manager web application is securely hosted on a SaaS platform, providing users with a reliable and scalable solution. This platform leverages the power of Azure services, ensuring the application benefits from enhanced scalability, robust security measures, and continuous high availability. By utilizing Azure’s cloud infrastructure, Robility Manager can seamlessly scale according to user demands, adapt to growing business needs, and ensure optimal performance.

2.4.3 Robility On-Premises

The Robility Manager for on-premises installation is deployed within the client’s own IT infrastructure, offering a fully customizable solution while maintaining complete control over their environment. This deployment model ensures that all data, processes, and systems are managed internally, providing greater security, compliance, and flexibility for enterprises with specific operational requirements.

The architecture of Robility Manager for on-premises installation integrates seamlessly with existing infrastructure, utilizing a robust architecture designed to ensure scalability, reliability, and efficient performance. It is built to work with internal servers, storage systems, and security frameworks, while still supporting advanced automation capabilities.

To establish the Robility Manager within a customer-managed on-premises setup, the following detailed steps provide guidance based on the prescribed architecture. This approach ensures robust functionality, security, and scalability while maintaining the flexibility to integrate with Azure services for advanced features.

I. Installation of Core Components

1. VM/Workstation Setup
Install the Designer and Runner application on customer-managed virtual machines (VMs) or workstations. These installations ensure localized access for users, offering a seamless experience for designing and running workflows.

2. Deployment of Robility APIs and Web Application
a. Robility Manager Web Application:

  • Host the application on IIS (Internet Information Services) within a designated server in the customer’s environment.
  • Configure IIS to serve the application securely over HTTPS using a customer-specific domain (e.g., https://client.robility.ai).
  • Enable proper binding and SSL/TLS certificates for encrypted communication.

b. Robility APIs: Deploy associated APIs to support modular functionalities, including workflow execution, configuration management, and user authentication.

3. Database Setup

a. Install SQL Server 2019 or above to host the Robility database (Robility DB).
b. Configure database schemas and tables for storing application data, user credentials, and operational logs.
c. Implement multi-tenancy support for organizations requiring separate logical databases.

4. SMTP Server Configuration

a. Set up an SMTP server within the customer’s network to facilitate email notifications, including alerts, updates from Robility.
b. Integrate the SMTP server settings within the Robility Manager application for seamless email communication.

II. Integration with Azure Services

While most components reside on-premises, integrating with Azure enhances functionality, security, and storage management.

1. Azure Blob Storage

a. Use Azure Blob Storage for managing workflow storage and versioning.
b. Establish secure connectivity to the customer’s Azure subscription by setting up the necessary credentials and permissions.
c. Implement role-based access controls (RBAC) to restrict storage access to authorized users and applications.

2. Azure Key Vault
Configure Azure Key Vault to securely manage and store sensitive information such as:

a. API keys
b. Database connection strings
c. Encryption keys

Use the Key Vault for dynamic retrieval of credentials during application runtime, ensuring security and compliance.

III. Network Connectivity and Security Considerations

1. External Connections
Ensure seamless communication between on-premises components and external services hosted in Sutherland’s Azure environment:

a. License Service: API calls for license validation are routed through the Sutherland Azure API Gateway.
b. Features Service: Access advanced automation components by downloading and upgrading through the Features Service.
c. Documentation: Provide users with access to https://docs.robility.ai for guidance and resources.

2. Firewall and Security Configurations

a. Configure firewalls to permit required traffic between on-premises servers and Azure services while blocking unauthorized access.
b. Apply SSL/TLS certificates to secure endpoints, ensuring encrypted communication for URLs like https://client.robility.ai.
c. If needed, establish VPN or private network connectivity to ensure a secure channel for communication with Azure services.

IV. Operational Workflow

1. User Access: End users access Robility Manager via a secure web interface or use the Designer/Runner applications installed on workstations.
2. Internal Communications: The application interfaces with the on-premises Robility DB, SMTP server, and Azure services (Blob Storage and Key Vault) to handle workflows and automation data. 3. Licensing and Features Management: Requests for licensing validation or feature upgrades are routed through the Sutherland Azure API Gateway to maintain up-to-date service integration.

V. High Availability (HA) and Backup Strategies

1. Web Application (IIS Hosting)
Load Balancer:
a. Deploy a load balancer to distribute incoming traffic evenly across multiple IIS servers.
b. Utilize solutions such as F5, NGINX, or Microsoft Load Balancer to enhance fault tolerance.

Server Redundancy:
Set up multiple IIS servers with identical configurations to ensure service continuity during maintenance or server failures.

2. Database Backup
Implement a comprehensive backup strategy:
a. Schedule nightly full backups, hourly transaction log backups, and weekly differential backups.
b. Regularly test the backups to verify their integrity and usability for disaster recovery scenarios.

3. Web Application and Configuration Backup
a. Automate the backup of IIS configuration files (applicationHost.config) and application content.
b. Use enterprise-grade backup tools like Windows Server Backup or Veeam for server protection.

4. Azure Blob Storage Backupa
a. Enable Soft Delete and Versioning in Azure Blob Storage to safeguard against accidental deletions or modifications.
b. Periodically download backups of Blob Storage data to an on-premises location or an alternate cloud environment for redundancy.

VI. Disaster Recovery (DR) Plan

1. Disaster Recovery Site
a. Establish a DR site in Azure or a secondary on-premises location.
b. Synchronize data and configurations between the primary site and the DR environment to ensure readiness in case of a disaster.

2. Disaster Recovery Drills

a. Conduct regular DR drills to test recovery procedures and identify any gaps in the recovery plan.
b. Maintain a documented recovery strategy with defined roles and responsibilities for all stakeholders.

2.5 Security Report

The Vulnerability Assessment and Penetration Testing (VAPT) report for Robility is a critical component in evaluating the security posture of the Robility Manager. This report offers a comprehensive analysis of vulnerabilities identified during rigorous security assessments, aiming to uncover potential weaknesses that could be exploited by malicious actors.

By detailing the findings, the report provides valuable insights into the nature and severity of vulnerabilities, categorizing them based on risk levels. It highlights possible threats to the system, ensuring stakeholders are equipped with the necessary information to prioritize and address security gaps effectively.

This report serves as a guide for implementing proactive measures to mitigate risks, strengthen security controls, and enhance the overall resilience of Robility Manager against cyber threats.

Robility Manager

Robility Designer and Runner

2.6 FAQs

1. How is the product deployed?

Deployment Model – RobilityAI®

2. How is the product licensed?

 All Robility components are licensed on an annual basis. Sutherland also offers automation development as a service, which incorporates Robility licenses as bundle.

3. How is the product supported?
Documentation and Resources: Robility offers extensive documentation, guides, and information regarding licensing of Robility products. These resources are available through the Robility Documentation Portal.

Technical Support: All active Robility Enterprise Licensed customers are provided with support to address queries relating to the product via email and call.

4. What is the RTO / RPO for the product?

Robility Manager Cloud’s Recovery Time Objective (RTO) and Recovery Point Objective (RPO) are not universally fixed values; they are tailored to meet the specific needs of each client. Robility team collaborates closely with clients to define RTO and RPO values that align with their business continuity requirements, ensuring minimal disruption and data loss in the event of a system failure.

For instance, in scenarios involving disaster recovery for Robility Manager, the deployment model can be configured to ensure both high availability and disaster recovery. In such configurations, both Manager nodes are active, and the load balancer directs traffic to them using a specific algorithm, such as Round Robin or one of its variants. This setup requires good network connectivity between the datacenters, which are located in different geographical areas.

It’s important to note that the specific RTO and RPO values will depend on the deployment model and the client’s specific requirements. Therefore, it’s recommended to consult with

Robility Product team to determine the appropriate RTO and RPO for your specific use case.

In general, Robility Manager Cloud managed by Sutherland is designed with robust disaster recovery capabilities to ensure business continuity. The platform offers a Recovery Time Objective (RTO) of 6 hours and a Recovery Point Objective (RPO) of 15 minutes. This means that in the event of a disruption, Robility aims to restore services within 6 hours, with a maximum data loss of 15 minutes.

5. How does the product meet GDPR compliance requirements?

Yes. Robility is committed to complying with General Data Protection Regulation (GDPR) and implementing the below measure to ensure adherence.
Privacy by Design: Robility incorporates privacy considerations into the development of all its components, ensuring data protection is a fundamental aspect of the design language.
Security Measures: Robility employs industry standard security practices, including encryption and access control, to protect personal data from unauthorized access.

6. Does the product store PII data?

Robility products do not store any PII by default.

PII collected during automation processes remains the property of Robility’s customers. Customers have full control over the data, including decisions on processing and purposes. Users can view and edit data collected and stored locally on their devices, ensuring transparency and control.

All data transmitted to Robility is encrypted both in transit and at rest. This encryption ensures that PII is protected from unauthorized access during transmission and storage.

7. Is it possible to configure data retention events and periods?

We currently do not have this option to configure data retention events and periods.

8. High-level technical diagrams

3. Robility Runner

3.1 UnAttended Runner

Unattended Robot

Unattended bots can run autonomously, providing comprehensive end-to-end automation for processes, typically in the back-office environment. These bots are designed to operate without human intervention and can handle tasks from start to finish. They are particularly useful for repetitive tasks, large-scale data processing, and operations that require minimal human oversight.

One of the key advantages of unattended bots is their ability to work on a predefined schedule or be triggered by specific logic within the process flow. This scheduling flexibility allows organizations to optimize their workflow and allocate resources more efficiently. Unattended bots can perform tasks at times when human intervention may not be available, such as outside of regular working hours, ensuring continuous operation and productivity.

Additionally, unattended bots are capable of handling complex workflows and interacting with multiple systems or applications seamlessly. They can navigate through various steps of a process, retrieve and process data, make decisions based on predefined rules or conditions, and perform actions such as data entry, file manipulation, report generation, and more. This level of automation reduces errors, improves accuracy, and accelerates the execution of tasks, leading to increased productivity and cost savings for organizations.

Steps to deploy a bot to the runner

1. Design a workflow in the designer.
2. Publish the workflow to the manager.
3. Add a machine to the manager to which the workflow has to be deployed. Choose the license type here.
4. Then navigate to the projects. Either add the machine to an existing project or create a new project to add the machine.
5. Get into the projects and assign the robot to it by navigating to the robot screen.

Click here to refer how to publish the robots to the RobilityManager. 

To see how to navigate in the runner screen, click on the respective links.

How to connect an assigned robot to the runner?
How to use the feature, health and disconnect feature in runner?
How to use the archive settings in runner?
How to use the logs in the runner?

3.1.1 Configuring Robot

The Robility Manager’s function includes adding machines, creating projects, and assigning robots to projects. The manager can send these designated robots to the runner. To assign a robot to the runner, we must first add a machine, create a project, and then assign a robot inside the project.

Adding a resource to the tenant

1. Publish the workflow from designer. (Click here to see how the workflow is published).
2. Add a resource, deploy the workflow to the Runner by choosing the respective license type.

There are 3 types of licenses that are available to automate your process,

1. Unattended robotsChoose this type of license when the bot does not require any user intervention. We can assign only one unattended bot to a machine. Unattended bots are typically employed for automating repetitive, rule-based tasks in business processes that can be performed without constant supervision.
2. High Density BotsChoose this type of license when a single machine has multiple users and does not require any user intervention. This is similar to Unattended bots but with multiple users are logged in to same system.

3. Attended BotsChoose this type of license when the bot encounters situations or tasks that require human intervention or decision-making.

To add a resource to the manager, click on add and fill in the mandatory details.

In the manager, there is room for up to 10 machines. If adding more machines becomes necessary, we must purchase additional licenses for them. To do this, navigate to the license tab on the home page and select the option labeled “Buy license.” Additionally, we have the flexibility to view, edit, or remove machines at any time.

Adding robot to the project

To add a robot to a project,

1. Navigate to the “Projects” menu.
2. Click on “Go” against the project where the robot needs to be added. 
3. Navigate to the “Deploy Robots” menu to add the robot.
4. Click on “Add” and provide the mandatory details. The username and password here is the system username and password.
5. The Solutions will be available only when you have published it against the project. Click here to refer. 

6. Click on save and the robot is added to the project.

Assigning the robot to an existing project

There might be a situation where we want to add another robot to an existing project. However, we can only add multiple robots to the existing project if a suitable number of licenses have been assigned to the project.

To add another robot to an existing project, follow the below steps.

1. Select the desired project into which the robot must be added.
2. Click on Go against the project.
3. To add a robot into the existing project, click on add and enter the robot details to be added.
4. Click on save to add the robot to the project.
5. Once the robot is added, a key is generated for the respective robot.

3.1.2 Connecting the Runner

Connect to Runner with license key

Let’s see how to connect the Runner by configuring the license key.

1. Copy the license key which is the activation code for the respective robot in runner by clicking on the “Key” button.
2. Launch the runner and enter the copied key to the activation code and click on connect.

Robot status and color codes

The color codes define the status of the ‘Runner’ connected to the project. They are available against each project where the robot is connected.

1. When the robot status shows Blue, it indicates that robots are idle.
2. When the robot status shows Green, it indicates that robots are in running state.

3. When the robot status shows Yellow, it indicates that the robots are in Tocheck state.
4. When the robot status shows Red, it indicates that the robots are in Faulted state
5. When the robot status doesn’t have any number or color code to it, there are no robots assigned to that project.

Execution of robot

Once the activation code has been entered in runner, the bot is ready to run. (Activation code is the key mentioned against the robot)

To execute the bot in the runner,

1. Open the “Deploy Robots” page in the Robility manager.
2. Click on Run against the machine which is in “Idle” state. It gives a message that the robot is initiated successfully.
3. We also get a pop-up message from the system tray where Runner is available as “Request received to run.”
4. Once it is completed, a message is popped up from system tray. “Run completed”.

Once the run is initiated the bot completes the run and executes the assigned workflow in the designated machine. Click here to know more about the status of the Robot. 

3.1.3 Managing Runner

Health Check

The Health Check tab in the Runner application is an essential tool for monitoring and diagnosing the bot’s health status. It provides critical insights into the bot’s readiness and operational condition, particularly when errors or unexpected issues occur during execution.

When a bot encounters an error, the Health Check tab should be the first point of reference. This feature helps identify potential issues and ensures the bot meets all necessary conditions for successful execution. By regularly reviewing the health status, users can prevent downtime and maintain smooth operations.

The Health Check tab highlights several important aspects:

1. Error Diagnosis: When a bot fails or encounters an issue during execution, the tab provides details about its health status, offering clues about what might have gone wrong.
2. Execution Readiness: It also verifies that the bot fulfills all required conditions for execution through the Runner. These conditions include system configurations, resource availability, and connectivity, which are vital for the bot to operate without interruptions.
3. Troubleshooting Guidance: By reviewing the health status, users can quickly identify problems, such as missing dependencies or misconfigurations, and address them efficiently.

Refer to the image below for a detailed overview of the prerequisites and conditions that must be fulfilled for the bot to execute successfully. 

Overview

The main screen of the Health Status tab displays four critical conditions that must be satisfied for the bot to run. These conditions are visually represented, and the bot will only execute if all four are marked with a green check. If any condition is incorrect, the following actions may be required:

1. Error Indication: If there is an issue with a condition, the corresponding status will turn red. The bot will not proceed and moves to the “ToCheck” status, to halt the execution until the error is resolved.
2. Repairing Issues: Use the Repair button to address plugin-related issues. This action removes and reinstalls the plugin, resolving most errors and allowing the bot to function. If the bot still fails to launch, review the log file to identify and resolve the underlying problem.
3. Scheduler Issues: If the scheduler’s configuration or functionality is problematic, attempt to repair the bot first. If repairing does not resolve the issue, use the Reset button as an alternative solution.
4. Browser Extensions: Errors related to Chrome or Edge extensions can be fixed by enabling the Robility Automation extension in the respective browsers. Open the affected browser, navigate to the extensions section, and activate the required plugin to restore functionality.

Repair and Reset

The Repair and Reset options in the Runner are essential tools for addressing issues and maintaining the smooth operation of bots. These functionalities ensure that the Runner’s configuration and settings are restored or refreshed as needed.

Repair

The Repair option is used when there is an issue with the health check status. It allows for a quick fix by removing and reinstalling the plugin associated with the Runner.

How it Works:

  1. Click the Repair button to address plugin-related errors.
  2. Once initiated, the plugin is reinstalled, and the health status should change to green if the issue is resolved.
  3. If the status doesn’t update, refresh the screen using the top Refresh button to display the updated health check information.

Reset

The Reset option restores the Runner to its factory default settings. This is useful when a complete reset is required due to persistent issues or to prepare the Runner for a new setup.

Key Features:

  1. Tenant-Specific Data Removal: All information about the current and previous bots saved for the tenant in the Runner is deleted.
  2. Package Deletion: Any packages installed when the Runner was launched from the Manager are removed.
  3. Activation Code Reset: The license key or activation code previously copied from the Manager is cleared, and the Runner returns to the login screen.
  4. Factory Defaults: The reset ensures that the Runner is restored to its initial configuration, ready for new configurations or troubleshooting.

3.1.4 Archive Settings

Archive Settings

Archives are places where documents or files are preserved for future reference. They are used to collect multiple data files together into a single folder for easier storage. The runner application has archive properties that can be edited by navigating to the log settings on the logs screen. Please refer to the image below.

1. Archive Numbering: Specify the way the archive numbering should be performed.
   a. Rolling– Rolling style numbering where the most recent file is always numbered 0. Like if there are 4 files, the recently added file will have the number 0.
   b. Date– Date style numbering. The previous period’s date and time will be imprinted on all archives. Sequence style numbering, where the most recent file has the highest numbering. Like if there are 4 files, the recently added file will have the number 5.
   c. Date and Sequence– Archives will be stamped with prior period date and time and the most recent has the highest numbering. (In combination with the date)

2. Archive Period: This drop down is used to select the period to archive the files. We can choose not to archive the files or choose to archive on a daily, monthly, or yearly basis.
None– Choosing this option will not archive any files.
Daily- Choosing this option will archive the files daily.
Monthly– Choosing this option will archive the files monthly.
Yearly– Choosing this option will archive the files yearly.

3. Concurrent writes: Gets or sets a value indicating if many processes running on the same host are writing to the log file simultaneously. For example if we have more than
one process running in a single system, keeping this option to true will write the log file of all the process simultaneously.

4. File size: The file size is the size of the file that we set in the log settings of the runner. Any file which crosses the size limit mentioned here is automatically archived.

5. Maximum number of files: This shows the count for the files to be archived. When we choose a number from the drop down, for example if we choose 5, once the archived
folder reaches more than the number of files specified; the oldest file will be automatically deleted.

3.1.5 Managing Logs

Logs in Runner

The log files are those that has all the details of the running status of the bots. Any activity that is executed through the runner is printed in the logs. The logs tab in the runner has only the execution log printed in it. To see the product log, activity log and the runner log, navigate to the Appdata folder.

The logs in the runner can be turned on or off using the toggle key. When it is turned on, we can see the execution log printed in the logs screen of the runner. When it is turned off, the execution log is not printed in the logs screen of the runner.

Log Settings

To edit the log settings, navigate to the settings icon within the log page on the left-hand side. The log page also has four icons which is info, debug, error, and trace and these are used as filters which when enabled shows the log only of the enabled log type.

Log Type

There are three types of logs available for selection: the execution log, the activity log, and the product log.

1. Execution log: This log provides a detailed record of the steps executed by the bot, offering insights into the sequence of actions taken during its operation.

2. Activity log: In the activity log, you’ll find a comprehensive list of all activities utilized within the workflow, accompanied by their respective execution states. This log serves as a valuable resource for tracking and analyzing the workflow’s performance.

3. Product log (Runner log): The product log, also referred to as the runner log, offers a focused view of the runner’s activities and highlights any errors encountered within the application. It provides crucial information for debugging and troubleshooting issues.

By default, the execution log is visible within the application interface, allowing users to toggle its visibility as needed for monitoring and review purposes.

Log Level

Choose the log level based on what you wish to be printed on the screen. The log levels that are applied can be categorized between Debug, Info, Trace and error.

Any execution that is done will be printed in the logs. What we will see in the output panel or the execution log, is
Execution started – Generated every time a workflow starts execution
 Execution start time – Generates the exact time when the execution started.
• Execution ended – Generated every time a workflow has ended.
• Execution end time – Generates the exact time when the execution ended.
• Total execution duration – Generates the total execution duration of the workflow.

The execution log and the output panel will show the log level, message and timestamp. To see the detailed log file based on the log level chosen, we need to navigate to the log files inside app data where we can view what is printed in the log file based on the log level chosen.

Clear Logs

Clicking on clear, clears all the log details of the current bot.

Click here to see how the archive settings work.

3.1.6 How to Troubleshoot the Runner

When troubleshooting an unattended Runner configured in a Virtual Machine (VM), it’s essential to ensure that all foundational components are correctly set up. Below documentation details the different troubleshooting scenarios in Runner.

1. Restart VM

Sometimes, issues may arise due to system resource locks, stuck processes, or other VM-specific problems that can hinder the performance of your Robility Runner.

When is this required?

Identify Issues: Performance issues are identified, such as a robot failing to execute tasks, unusual delays, processes getting stuck, and failure to update the system “Unlock” status.

Action: A simple restart of the VM can often resolve these issues, freeing up locked resources and resetting processes. Post restart, ensure to check the issues have been resolved.

2. Check for Active Sessions

To ensure that the Runner can execute its tasks without interference from other active user sessions on the VM, please ensure that the following are not being interfered during the execution of bot in Runner.

If there are multiple active sessions (e.g., a user is logged in remotely or another robot is active), it can cause various issues such as:

1. Screen Resolution Conflicts: Different sessions may have different screen resolutions, causing UI elements to be positioned incorrectly.
2. Application Access Issues: Applications might open in the wrong session, or the robot might not be able to interact with them as expected.
3. Execution Failures: The robot might fail to execute tasks properly if it cannot control the environment as expected.

When is this required?

These issues are identified when someone tries to log in to the VM during bot execution or while running any background processes. This disruption occurs because changes in screen resolution can cause image-based automation to fail, as the bot may not recognize the expected visual elements.

Action: Terminate all active sessions and close any background processes. Avoid using the machine or VM during the automation process. By ensuring there are no conflicting active sessions, the robot can execute tasks in a controlled environment, minimizing errors related to screen resolution or application access.

3. Check Resource Availability

Scenarios: When the allocated VM does not have sufficient CPU, memory, and disk space available for the robot to run effectively. Resource constraints can lead to issues such as the robot hanging, running slowly, or failing entirely.

When is this required?

1. CPU Usage: Ensure that the CPU is not overly taxed by other processes. High CPU usage could cause the robot’s tasks to lag or fail.
2. Memory (RAM): Check the available RAM to ensure that the robot has enough memory to load and process applications. Insufficient memory can cause the robot to hang or crash.
3. Disk Space: Verify that there is adequate disk space, especially if the automation involves handling large files or generating logs. Running out of disk space can disrupt the robot’s operations.

Action:

1. Set thresholds for each resource (e.g., CPU usage below 80%, at least 2 GB of free RAM, and at least 10 GB of free disk space).
2. Ensure that no other processes or users are consuming excessive resources or interfering with the robot’s operation.
3. Terminate/Reduce Resource Usage: If a process or user session is found to be consuming excessive resources, kill the unnecessary or non-critical process.
4. By ensuring that system resources are available and not overburdened, the robot can execute tasks efficiently without delays or failures.

4. Ensure Runner service is Running

Scenario: When Robility Runner service is not actively running on the VM. This service is necessary for the robot to execute tasks and update the machine status, Runner status and workflow updates to the RobilityManager.

How to check the Service Status?

1. Access Services App: Open the Services application on the VM. This can be done by typing services.msc in the Run dialog or search bar.
2. Locate the Service: Find the “Robility Runner” service in the list of services.
3. Verify Status: The service should have a status of “Running.” This indicates that the robot is ready to execute tasks.
4. Stopped/Paused: If the service is stopped or paused, the robot won’t be able to run. In this case, you’ll need to start or restart the service.

Action:

1. Start Service: If the service is not running, right-click on “Robility Runner” and select “Start.”
2. Troubleshoot: If the service fails to start, further troubleshooting may be needed, such as checking system logs or reinstalling the Robility Runner. If the issue persists after these steps, restart the machine and then contact the Robility Support team.

5. Workflow Not Stopped Despite Using GetStopStatus in VM

Scenario: The GetStopStatus activity is designed to check if a stop command has been issued to the robot. However, if the workflow is stuck in a loop or a long-running transaction, the bot may not respond to the stop command in a timely manner.

The loop or ongoing transaction may prevent the workflow from reaching a point where it can check the stop status or gracefully exit.

Actions:

1. Optimize Loop Handling: Set break conditions or timeouts in loops to enable exits and respond to stop commands.
2. Graceful Exit Strategy: Use Try-Catch blocks to handle exceptions and stop commands gracefully.
3. Workflow Design: Divide complex workflows into smaller components for easier stop command management.
4. System Monitoring: Regularly check the robot and VM to ensure responsiveness to stop commands.

3.1.7 Troubleshoot

The Automatic Failure Screenshot Capture feature helps diagnose automation failures by capturing the application state when an activity fails during workflow execution.
When a failure occurs, the Runner automatically captures a screenshot of the application and, when possible, identifies and highlights the associated UI element. The captured diagnostics provide visual context, making it easier to identify and resolve automation issues.

Prerequisites

Before using this feature, ensure that:
a. The Troubleshoot option is enabled in the Runner Configuration.
b. The Runner has permission to create and store diagnostic files in the local troubleshooting directory.

Limitations

This feature is available only for the supported automation packages.

Configuration

To enable automatic failure screenshot capture:

1. Open the Runner Configuration window.
2. Enable the Troubleshoot option. When enabled, the Runner creates the following local directory:
    C:\Users\(Username)\AppData\Local\RobilityRunner\
This directory contains the Troubleshoot.config file, which controls failure screenshot capture and UI element highlighting.
When a failure is detected, the Runner automatically stores failure screenshots and diagnostic artifacts in workflow-specific folders under the Exceptions directory.

Note: Each workflow has its own folder within the Exceptions directory.

Supported Automation Packages

This feature supports activities from the following automation packages:

1. Desktop Automation
2. Desktop Automation UIA3
3. Modern Desktop Automation
4. Image Automation
5. Web Automation

How It Works

During workflow execution, the Runner enters the To Check Status stage, where it monitors the outcome of each supported activity.
If an activity fails and the configured trigger conditions are met, the Runner automatically:
1. Records diagnostic information.
2. Captures the application state.
3. Identifies and highlights the associated UI element, when available.
4. Stores the collected diagnostics in the workflow-specific Exceptions folder.

Failure Capture Behavior

Capture Screenshot

When a supported activity fails, the Runner captures the current application state.
Each screenshot:
a. Reflects the application state at the time of failure.
b. Is stored in the corresponding workflow folder.
c. Uses a unique filename to prevent overwriting existing screenshots.
Example filename: ActivityName_Timestamp.png

Highlight Failed UI Element

After capturing the screenshot, the Runner attempts to identify the UI element associated with the failed activity.
If the UI element is identified:
a. The element is highlighted in the screenshot.
b. An automation snapshot of the element is included, when available.
If the UI element cannot be identified, the Runner still captures the screenshot to preserve the application state at the time of failure.

Failure Screenshot Trigger Conditions

Failure screenshots are captured only when the Troubleshoot option is enabled. The capture behavior depends on the Skip on Error setting.

Skip on Error Behavior
True Workflow execution continues after the error is logged. A failure screenshot is captured only if the activity contains a Result property and its value is False.
False Workflow execution stops when the activity throws an exception, and the Runner immediately captures a failure screenshot and diagnostic information.

Note: Failure screenshot capture applies only to activities from the supported automation packages.

Troubleshooting Benefits

Automatic failure screenshot capture helps users:

1. Identify the failed activity and associated UI element.
2. Preserve the application state at the time of failure.
3. Reduce troubleshooting time.
4. Accelerate root cause analysis.

3.2 Machine Template

A Machine Template provides a standardized way to onboard and manage Robility Runner deployments across multiple host machines using a single template configuration. Instead of performing machine-by-machine setup, each Runner instance uses the template configuration to register and establish connectivity with Robility Manager automatically.

Machine Templates are recommended for golden image deployments, pooled or auto-scaled VMs, VDI/Citrix environments, and other scenarios where machines are frequently created, refreshed, or replaced.

Automation executes on available/online machines associated with the template. If a machine is unavailable, execution will start when a compatible machine becomes available.

Pre-requisites

1. A Machine Template must be created in Robility Manager.
2. The generated Machine Template XML must be downloaded.
3. The XML must be placed in the required folder under the Robility Runner installation path.

Limitations

1. Machine Template support adding up to 200 users per template from the Resource page in Robility Manager.

Key Features

1. Centralized template configuration: Define connection and execution settings once in Robility Manager and apply them across multiple machines.
2. Scalable onboarding: Enable rapid provisioning for pooled or dynamically created machines without per-machine setup.
3. Automatic registration and connection: Robility Runner reads the Machine Template XML from the standard location and connects to Robility Manager automatically.
4. Resilient connectivity: Runner supports periodic reconnect attempts when connectivity is interrupted or the Runner state changes.
5. Standardized provisioning: Ensures a consistent Runner setup across multi-user and multi-machine environments.

Where Machine Templates Apply

Machine Templates are recommended for environments where machines are shared, frequently recreated, or non-persistent, and you need consistent unattended onboarding without per-machine configuration.

1. VDI/Citrix-hosted environments: Where Runner instances run on centrally hosted machines and must be provisioned consistently across sessions.
2. Pooled / auto-scaled / non-persistent VMs: Where machines are frequently created, refreshed, or replaced and require repeatable onboarding.
3. Multi-user Windows servers: Where Runner instances run under separate Windows accounts to maintain isolation and permissions.
4. Unattended automation deployments: Where Runner instances must run reliably without interactive user login.

Step 1 — Create a Machine Template in Robility Manager

1. Log in to Robility Manager. 
2. In the left panel, go to Resources.
3. Click + Add and select Machine Template.
4. Provide the following details:
           a. Machine Template Name: Enter a unique name
               (example: Invoice_Automation_Template).
           b. Domain: Specify the domain where machines and bot users are registered.
           c. User Accounts: Add the bot execution user(s) (example: Bot_admin).
           d. Password: Enter the password required for unattended execution
               (as applicable).
5. To add additional bot users, click the + (Add) icon and enter the usernames and passwords.
6. Click Save.

After saving, Robility Manager generates the Machine Template XML for Runner onboarding.

Step 2 — Configure the Machine Template on Robility Runner (Golden Image / Host Machines)

2.1 Download the XML from Robility Manager  

1. In Robility Manager, locate the created Machine Template.
2. Download the XML shown next to the template.

2.2 Copy the XML to the Runner installation path  

1. Navigate to the Robility Runner installation path using one of the following methods:
         a.Right-click the Robility Runner shortcut and select Open file location
            OR
         b. Open the path directly using Run: C:\Program Files (x86)\RobilityRunner
2. Create a folder named exactly: MachineTemplate
3. Copy the downloaded XML file and paste it into: 
    …\RobilityRunner\MachineTemplate\
4. Restart Robility Runner (recommended).

Runner detects the XML and connects successfully within ~60 seconds.

Step 3 — Deploy Robots using Automation Ops (Robility Manager)

Automation Ops deploys robots by mapping a published solution to a Machine Template and one or more user accounts for execution.

Deploying the Robot

1. Go to Automation Ops → Robot tab.
2. Click + Add.
3. Provide the deployment details:
          a. License Type: Select Machine Template.
          b. Machine Template: Select the template to map for execution.
          c. Username: Select the user account(s) under which the robot will execute
              (multiple users can be selected).
          d. Solution Name: Select the published solution (example: Solution_1).
          e. Version: Select the required solution version (example: 1.2.4).
4. Click Deploy/Save to complete deployment.

Once deployed, Robility Runner uses the Machine Template XML stored in the MachineTemplate folder to connect and execute under the selected template and user accounts.

3.2.1 Auto Logon

Auto Logon enables a machine to automatically sign in to a specified Windows user account. Instead of requiring manual login after every system startup, restart, or when the machine returns to a locked state, the system automatically restores the configured user session. This ensures the machine is ready for automation without requiring manual intervention.

This feature is particularly useful in automation environments where workflows interact with desktop applications or UI-based automations that require an active Windows session. If the machine is at the login screen, such automations cannot proceed until a user signs in.

Auto Logon manages the Windows user session and helps ensure that the machine remains available for automation workflows.

Auto Logon provides the following capabilities:
    • Automatically signs in to the configured Windows user account.
    • Restores the user session after machine restarts or when the session is locked.
    • Enables UI-based automation that requires an active desktop environment.
    • Helps maintain a consistent session environment for automation workflows.

Auto Logon is commonly used in the following scenarios:

• Remote Access Environments (RDP)
When machines are accessed through Remote Desktop, sessions may become locked or return to the login screen. Auto Logon ensures the machine signs in automatically so that automation workflows can continue to run.
• Dedicated Automation Machines or Virtual Machines
Automation machines and virtual machines may restart as part of infrastructure maintenance or system updates. Auto Logon ensures that the system automatically restores the user session after startup, making the machine ready for automation.
• Image-Based Automation Workflows
Workflows that rely on image recognition or screen-based interactions require a stable desktop session. Auto Logon helps establish the session using the configured display settings, which helps maintain consistency during automation execution.

It is important to note that Auto Logon manages the Windows user session, not the machine’s connection to the Manager. A machine may remain connected to the Manager, but UI-based automations still require an active user session for execution.

Prerequisites

Before using Auto Logon, ensure the following conditions are met:

• Auto Logon Configuration
Workflow execution begins only after the Auto Logon feature successfully restores the user session.
• Remote Desktop Protocol (RDP)
Remote Desktop Protocol (RDP) must be enabled on the machine to support remote automation scenarios. This allows the Runner to establish a remote session and execute workflows.
• User Account Permissions
The user account configured for the machine must have permission to log in through RDP. The user should belong to the Remote Desktop Users group or have equivalent access rights.
• Single Active Session per User
Multiple users can be configured for Auto Logon on the same machine. However, only one active session per user is allowed at a time. If multiple sessions exist for the same user, Auto Logon or Auto Unlock may not function as expected.

Resolution Behavior in VDI Environments

Auto Logon creates a Windows user session and applies the resolution and scaling settings configured for the workflow. This helps provide a consistent display environment for automation, particularly for workflows that rely on image-based activities.

However, depending on the VDI platform configuration, the desktop resolution may still change after the session is created. In many cases, the VDI infrastructure manages the display settings and may override the resolution applied during Auto Logon.

This may occur in situations such as:

• Dynamic resolution allocation
Some VDI platforms adjust the desktop resolution based on the client device used to access the virtual desktop.
• No active client session
When no client device is connected, the VDI environment may fall back to a default resolution.
• Session recreation
In some cases, the VDI platform creates a new session instead of unlocking the existing one, which can reset the display settings.
• Display protocol policies
Certain remote display protocols may enforce their own resolution settings.

Since image-based automation relies on a stable screen layout, any change in resolution or display scaling may affect execution.

Recommendation: For environments that depend on image-based automation, configure a fixed resolution and consistent display scaling within the VDI platform to maintain a stable execution environment.

Limitations
Manual unlocking of the machine through RDP may not apply the resolution settings configured for the workflow.

Machine Remains Locked for an Extended Period

If the machine remains unused for a long period, the system may enter a locked state (Windows lock screen). When this occurs, UI-based automation workflows may not run automatically.

In such situations, the connection between the Manager and Runner may also be interrupted, which stops the bot from executing workflows. When the Runner becomes unavailable, the Manager may display a warning message such as: “The machine was not last seen for 15 minutes.”

To restore automation, the machine may need to be manually unlocked.

Steps to Restore the Session

1. Log in to the machine manually using the required credentials.
2. Ensure the machine is active and properly connected to the Manager.
3. Once the Runner reconnects automatically (usually within 60 seconds), you can initiate the bot to run again if required.

3.3 Auto Logon

The “Auto Logon” feature in RobilityRunner is designed to enhance automation efficiency by enabling a robot to automatically log in to a Windows system when it has been signed out or locked. This feature plays a critical role in scenarios where automation needs to function independently of human intervention, such as in unattended automation processes.

In environments where multiple robots share a single system or when systems are configured to log off users after a period of inactivity, the Auto Logon feature ensures that the robot can quickly regain access and resume its operations without manual input. Additionally, this functionality is particularly valuable after system restarts, where the login screen would otherwise prevent the robot from continuing its tasks.

Pre-requisites

1. The workflow execution will only commence once the “Auto Logon” feature has successfully unlocked the machine.
2. Remote Desktop Protocol (RDP) must be enabled on the machine for the robot to connect remotely. Enabling RDP allows users or robots to access the system from another machine, making it crucial for remote automation scenarios.

3. The username associated with the machine connection must be part of a user group (such as the “Remote Desktop Users” group) that has the necessary permissions to use RDP. Without this, even if RDP is enabled, the robot will not be able to auto log in remotely.
4. Robility Runner supports multi-user auto logon on a single machine; however, it allows only one active session per user at a time. If a VM or machine is configured with multiple sessions for the same user, auto logon or auto unlock will not function.

Points to note

1. The Resolution settings will apply exclusively to “Unattended and High-density Runner.”
2. This option is not supported for Attended robots.
3. After configuring the settings and initiating the Run process, if the resource is at logged off state, the changes will be reflected upon auto-login functionality.

4. If the machine is already in at unlocked state, initiating the robot won’t execute the specified resolution changes.
5. The specified resolution changes will be executed only when an auto-login functionality is applied or when the manual unlock action is performed in the machine. Click here to refer the Resolution Settings.
6. The user session must be active while executing the bot.  

Limitations

1. If the credentials provided are incorrect, the Auto Logon process will continue attempting to log in until manual intervention is required to unlock the virtual machine with the correct credentials.
2. The Auto Logon feature is not supported with the Attended robot license type.

How to set up the robot with credentials? 

1. Navigate to the Robility Manager.
2. Select the “Resources” menu to add the machine that will be used for provisioning and executing the workflow.
3. Select the type of license you need: either “Unattended” or “MachineTemplate” robot.
4. Next, go to the “Projects” menu and select the project to which you want to provision the machine for the workflow.

5. Go to the “Automation Ops” menu, click on the “Robot” tab, and then select “Add” to provision the machine.
6. Select the same license type that you chose for the machine.

7. Choose the “Resource Name” you added, where the workflow will be executed.
8. Select the desired solution for execution.
9. Enter the “Username and Password” for the machine to log in via RobilityRunner.
10. Click on the save button. Now, the license key will be created/ available for the runner connection.

How does it differ from normal start vs auto log on start?

When the system is already unlocked, the Runner will not perform the “Auto-logon” functionality and will proceed to initiate the workflow to start the process. Below is a sample log file:

Auto Log on:

The bot will check whether the machine is in locked state, and then proceeds to unlock the machine with the user credentials provided. In the below log file, the success message will be printed.

3.4 Hardware Acceleration

Robility Runner 

In Robility Runner user can find this option under Setting section. Default configuration is set to off. (Refer below image). Designer CPU & RAM consumption changes based on this setting by approximately 35 %to 50% less or more CPU and RAM depending on system configuration and application loaded into the memory. All components associated with the Runner (instance, run-time, etc.) will execute in force software rendering mode.

 Additional details – Implementation within Robility is customized to fit the application design. Technical reference for this implementation: https://learn.microsoft.com/en-us/dotnet/api/system.windows.media.renderoptions.processrendermode?view=windowsdesktop-7.0

3.5.1 v.26.8.0.10

This release includes the following bug fix:

Bug Fix

Bot Execution Locking: Fixed an issue where a stopped bot could be incorrectly selected for execution when multiple bots were available. The bot locking mechanism has been enhanced to ensure the correct available bot is selected for execution.

Important

If you continue using existing versions of Runner, they will work without affecting execution, and no action is required.

To use the Admin Console or Troubleshooting features, the Runner must be upgraded with latest version. In this case, you must follow these steps:
a. Upgrade the latest Runner.
b. Copy the latest license key from Robility Manager.
c. Connect it within Robility Runner.

Once these prerequisites are completed, Robility Manager will be able to securely communicate with and manage the connected Runner machine through the Admin Console

Limitations

1.The Dynamic Troubleshoot option is disabled and is currently unavailable in the Runner.
2. In the Admin Console, the Restart functionality currently displays the message “Machine is Restarting”when the respective commands are initiated from Robility Manager. For more information, refer to theAdmin Console documentation.
3. When a workflow is triggered from Robility Manager on a logged-off or locked machine, it may take up to 2 minutes for the workflow status to update to “Run Initiated.”
4. Starting from version 25.8.0.1, a parameter has been introduced to validate the license key connection. As a result, existing license keys will no longer work and may cause connection or execution failures. Click here to learn more.
5. Resolution settings configured in Robility Manager are applied only when using the Auto Logon option. If the system is manually unlocked through RDP, the configured resolution settings will not be applied immediately and will take effect only after a restart.

Limitations for Machine Template

1. The Machine Template XML file must be downloaded from Robility Manager.
2. If it does not already exist, the MachineTemplatefolder must be created manually inside the Runner installation directory:
   C:\Program Files (x86)\RobilityRunner\MachineTemplate\
3.The downloaded XML file must be copied into the MachineTemplate folder.

Released Date: 29.08.2026

3.5.2 v.26.7.0.10

In this release, we have introduced a new feature and enhancements.

Important

If you continue using existing versions of Runner, they will work without affecting execution, and no action is required.

To use the Admin Console or Troubleshooting features, the Runner must be upgraded with latest version. In this case, you must follow these steps:
a. Upgrade the latest Runner.
b. Copy the latest license key from Robility Manager.
c. Connect it within Robility Runner.

Once these prerequisites are completed, Robility Manager will be able to securely communicate with and manage the connected Runner machine through the Admin Console.

New Feature

Runner Troubleshoot

Introduced support for automatic failure screenshot capture for supported Desktop, Image, and Web automation activities. When UI Automations is enabled, the Runner automatically captures screenshots and UI element diagnostics for failed activities, providing visual context to help accelerate troubleshooting and issue resolution.

Limitations

1. In the Admin Console, the Restart functionality currently displays the message “Machine is Restarting” when the respective commands are initiated from Robility Manager. For more information, refer to the Admin Console documentation.
2. When a workflow is triggered from Robility Manager on a logged-off or locked machine, it may take up to 2 minutes for the workflow status to update to “Run Initiated.”
3. Starting from version 25.8.0.1, a parameter has been introduced to validate the license key connection. As a result, existing license keys will no longer work and may cause connection or execution failures. Click here to learn more.
4. Resolution settings configured in Robility Manager are applied only when using the Auto Logon option. If the system is manually unlocked through RDP, the configured resolution settings will not be applied immediately and will take effect only after a restart.

Limitations for Machine Template

1. The Machine Template XML file must be downloaded from Robility Manager.
2. If it does not already exist, the MachineTemplate folder must be created manually inside the Runner installation directory:
     C:\Program Files (x86)\RobilityRunner\MachineTemplate\
3.The downloaded XML file must be copied into the MachineTemplate folder.

Released Date: 25.07.2026

3.5.3 v.26.4.0.2

This release includes the following bug fix:

Prerequisites

It is mandatory to update to the latest version.

Bug Fix

Fixed an issue where bots used WebAutomation activities showed “Please close and reopen the browser” and triggered an “Unknown exception” during execution. The issue was caused by outdated .exe files after recent NLog package updates.

Action Required

Note: If you continue using existing versions of Runner 26.3.0.12, they will work without affecting execution, and no action is required.

1. If the Runner was auto updated, or if you have installed the latest version, the existing automation workflow may fail. In this case, you must follow these steps:
a. Update the Designer.
b. Update the corresponding activities in your workflow.
c. Republish the workflow in the Designer.
d. Execute the workflow in the Runner.

Limitations for Runner 

1. Resolution Settings Enforcement: Resolution settings configured in Robility Manager are applied only when using the Auto Logon option. If the system is manually unlocked via RDP, these settings will not apply immediately and will take effect only after restart.
2. Starting from version 25.8.0.1, a parameter has been implemented to validate the license key connection. As a result, existing license keys will not work and cause connection or execution failures. Click here to learn more.
3. Workflow Initiation Delay: When a workflow is triggered from Robility Manager on a logged-off or locked machine, it may take up to 2 minutes for the status to update to “Run Initiated.”

Released date: 19.04.2026

3.5.4 v.26.3.0.19

In this release, we have fixed the following bugs:

Bug Fixes

1. Runner Connection Across Tenants
When a user has more than one tenant and pastes a key into the Runner, then disconnects and later pastes another tenant’s key, the Runner incorrectly shows the key as “invalid” even though the previous key got disconnected.
This issue has been fixed.

2. Incorrect Status for Machine Templates
Previously, when a VM was configured with both a Machine Template and an Unattended Robot, the system incorrectly displayed the “Logged Off” status for the Machine Template after logging out of the Unattended Robot.
This issue has been fixed, and the status is now displayed correctly.

3. All Logs Displayed in Runner Page
Previously, the Runner execution page displayed all activity log levels instead of only execution output logs. This issue has been fixed.

Action Required

Note: If you continue using existing versions of Runner 26.3.0.12, they will work without affecting execution, and no action is required.

1. If the Runner was auto updated, or if you have installed the latest version, the existing automation workflow may fail. In this case, you must follow these steps:
a. Update the Designer.
b. Update the corresponding activities in your workflow.
c. Republish the workflow in the Designer.
d. Execute the workflow in the Runner.

Limitations for Runner

1. Resolution Settings Enforcement: Resolution settings configured in Robility Manager are applied only when using the Auto Logon option. If the system is manually unlocked via RDP, these settings will not apply immediately and will take effect only after restart.
2. Starting from version 25.8.0.1, a parameter has been implemented to validate the license key connection. As a result, existing license keys will not work and cause connection or execution failures. Click here to learn more.
3. Workflow Initiation Delay: When a workflow is triggered from Robility Manager on a logged-off or locked machine, it may take up to 2 minutes for the status to update to “Run Initiated.”

Released Date: 28.03.2026

3.5.5 v.26.3.0.12

In this release, we have introduced enhancements and fixed bugs in the following areas:

Enhancements

Machine Template
a. AutoLogon
Introduced Auto Logon functionality for Machine Templates, enabling machines to automatically sign in using the configured credentials. This ensures that the Runner starts and workflows execute without requiring manual login.

b. Auto-Launch Runner
Once the Runner is installed on the system, it automatically launches within 60 seconds of installation.
Behavior Details
• Users must manually follow the Machine Template setup steps to establish the connection.
• Once the XML key is pasted into the designated folder, the Runner automatically connects to the Machine Template.

Bug Fixes

1. Manager URL Not Displayed Correctly
When the Runner was automatically connected to the Machine Template, the Manager URL was not displayed properly in the Profile section. This issue has now been fixed.

2. Assigned and History Tabs Showing Old Data
When the Runner was disconnected and reconnected, the Assigned and History tabs incorrectly displayed old data. This issue has now been fixed.

Action Required

1. If the Runner was auto updated, or if you have installed the latest version, the existing automation workflow will fail. In this case, you must follow these steps:
a. Update the Designer.
b. Update the corresponding activities in your workflow.
c. Republish the workflow in the Designer.
d. Execute the workflow in the Runner.
Note: If you continue using existing versions of the Runner, they will work without affecting execution and no action is required.

Limitations for Machine Template

• The Machine Template XML must be downloaded from Robility Manager.
• The MachineTemplate folder must be created manually inside the Runner directory if it does not already exist:
   C:\Program Files (x86)\RobilityRunner\MachineTemplate\
• The downloaded XML file must be copied into the MachineTemplate folder.

Limitations for Runner

• Resolution Settings Enforcement: Resolution settings configured in Robility Manager are applied only when using the Auto Logon option. If the system is manually unlocked via RDP, these settings will not apply immediately and will take effect only after restart.
• Starting from version 25.8.0.1, a parameter has been implemented to validate the license key connection. As a result, existing license keys will not work and cause connection or execution failures. Click here to learn more.
• Workflow Initiation Delay: When a workflow is triggered from Robility Manager on a logged-off or locked machine, it may take up to 2 minutes for the status to update to “Run Initiated.”

3.5.6 v.26.2.0.8

In this release, we have introduced a new feature and enhancements in the following areas:

New Feature

Machine Template

A Machine Template enables standardized onboarding and management of Robility Runner deployments using a single template configuration. Instead of performing machine-by-machine setup, each Runner instance uses the template configuration to automatically register and establish connectivity with Robility Manager.

Limitations

• The Machine Template XML must be downloaded from Robility Manager.
• The MachineTemplate folder must be created manually in the Runner directory:
C:\Program Files (x86)\RobilityRunner\MachineTemplate\
• The downloaded XML file must be copied into the MachineTemplate folder.
• The Runner may take up to approximately 60 seconds to detect the XML file and establish a successful connection.

Click here for more information.

Enhancement

NLog Package

The NLog package has been upgraded to version 6.0.7, improving logging reliability, performance, and compatibility. This update supports both existing and new workflows.

Released Date: 09/02/2026

3.5.7 v.25.12.0.1

This update includes bug fixes that improve stability and enhance the overall user experience.

Bug Fixes

  1. Download Large Workflows
    Fixed an issue where large workflow files could not be downloaded. The runner now supports downloading large workflows directly, improving reliability and performance.

Released Date: 31/01/2026

3.5.8 v.25.9.0.5

This update includes important bug fixes to improve stability and enhance the overall user experience.

Bug Fixes

1. In earlier versions of Runner, if a resource was in a Locked or Not Provisioned state when the Auto Update option was enabled and later if disabled, the Runner was still being updated automatically. This issue has now been addressed and following are the action items:

a. If the machine is in Locked state and the Auto Update option is disabled, the Runner will not be updated.
b. If the resource is in Not Provisioned state and the Auto Update option is enabled, the Runner will be updated as expected.

2. In previous versions of Runner, when a Stop command was triggered from Robility Manager, and the workflow did not stop within 3 minutes, the Runner automatically terminated the process. This issue has now been resolved.

Limitations

1. Resolution Settings Enforcement: Resolution settings configured in Robility Manager are applied only when using the Auto Logon option. If the system is manually unlocked via RDP, these settings will not apply immediately and will only take effect after a restart.
2. Starting from version 25.8.0.1, a parameter has been implemented to validate the license key connection. As a result, existing license keys will not work and cause connection or execution failures. Click here to learn more.
3. Workflow Initiation Delay: When a workflow is triggered from Robility Manager on a logged-off or locked machine, it may take up to 2 minutes for the status to update to “Run Initiated”.

3.5.9 v.25.8.0.1.

This release of Robility Runner brings significant improvements in flexibility and compatibility.

What’s New

The Runner’s connection and communication with Robility Manager have been upgraded to enhance security between the Runner and the Manager.

Action Required

1. Starting from version 25.8.0.1, a parameter has been implemented to validate the license key connection. As a result, existing license keys will not work and cause connection or execution failures.

2. If the Runner is auto updated/or if you have reinstalled the latest version, the existing license key(Runner) will become incompatible due to the new security parameter. After the upgrade, you will be redirected to the sign-in page in Runner and proceed with these steps:

a. Remove the existing resource
b. Re-map the resource
c. Generate a new license key
d. Paste the new license key into the Runner

Note: If you continue to use existing versions of Runner, it will work without affecting execution and does not require any action.

Limitations

1. Resolution Settings Enforcement
Resolution settings configured in Robility Manager are applied only when using the Auto Logon option. If the system is manually unlocked via RDP, these settings will not apply immediately and will only take effect after a restart.

2. Workflow Initiation Delay
When a workflow is triggered from Robility Manager on a logged-off or locked machine, it may take up to 2 minutes for the status to update to “Run Initiated”.

3.5.10 v.25.7.0.4

This update delivers essential fixes and improvements on the Robility Runner.

Bug Fix 

UIA3 Desktop Automation Instance 
Previously, when an activity in UIA3-based desktop automation encountered an exception, the associated automation instance continued running in the background—even after the Runner transitioned to the “To Check” state. This issue has now been resolved with enhanced validation, ensuring the instance is properly terminated as expected.

Current Limitations

1. Resolution Settings Enforcement
The resolution settings configured in Robility Manager are applied only when using the Auto Logon option. If the system is manually unlocked via RDP, these settings will not take effect immediately. They will be enforced after the system is restarted.

2. Workflow Initiation Delay
When a workflow is triggered from Robility Manager while the target machine is in a logged-off or locked state, it may take up to 2 minutes for the status to update to “Run Initiated”.

Known Issue

The Runner status on the “Resources” page at Robility Manager may not update to “Provisioned” at times, even when the machine is successfully connected and provisioned in the “Deploy Robots” page. This will be addressed in the upcoming version. In the meantime, restarting the VM once should resolve the issue when it occurs.

3.5.11 v.25.7.0.2

This update delivers essential fixes for the Robility Runner.

Bug Fixes

In earlier versions, if the system language was set to any variant of English other than English (US), the Runner failed to launch and displayed a white screen. This issue has now been resolved. The Runner now supports all languages. 

Limitations

1. The specified resolution settings in the Manager are applied only during auto logon option. If the system is manually unlocked via RDP, the resolution settings will not be enforced. However, it will be reflected after the system is restarted.
2. If a workflow is initiated from the Manager while the machine is in a logged-off or locked state, it may take up to 2 minutes for the status to change to “Run Initiated”. 

Released date: 15-July-2025

3.5.12 v.25.5.0.26

This update delivers essential fixes on the Robility Runner.

Bug Fixes

Runner Status Update:
In earlier versions, the Robility Runner status did not update correctly when a machine transitioned from a “Not Connected” state to a “Running” state. This caused inconsistencies on the Resources and Deploy Robots. This issue has now been fixed to ensure accurate status updates. Click here to learn more.

Limitations

1. The specified resolution settings in the Manager are applied only during auto logon option. If the system is manually unlocked via RDP, the resolution settings will not be enforced. However, it will be reflected after the system is restarted.
2. If a workflow is initiated from the Manager while the machine is in a logged-off or locked state, it may take up to 2 minutes for the status to change to “Run Initiated”.

3.5.13 v.25.5.0.7

This release includes key enhancements and bug fixes to improve the efficiency of Robility Runner.

Enhancements

Previously, the Runner license key was tied to a specific project. With this update, users can now retrieve and manage the license key at the tenant level via the Resources page.

Why this change?

This enhancement allows users to assign multiple projects to a single machine simultaneously, eliminating the need to manually remove the license key from one project before assigning it to another.

Impact on Users

  • Users can now deploy robots across multiple projects without reconfiguring machines.
  • This saves time and simplifies the deployment process.

Important Note

When assigning multiple projects to a machine, ensure that robots scheduled for deployment do not have overlapping execution times to avoid conflicts.

Bug Fixes

1. Runner Disconnection Issue
a. Previously, when a robot entered the “Not Connected” state in Robility Manager, the Runner remained connected, requiring manual intervention.
b. Now, this has been fixed, the Runner disconnects automatically when the robot is no longer connected.

2. License Expiry Notification
a. Users will now receive a notification alert when they try to connect with the expired license key.

Limitations

1. These features are only available for Unattended and High-Density Robots.
2. Resolution settings applied during workflow deployment are only enforced when using Auto Logon. Manually unlocking the system will not apply the resolution settings.
3. If the machine is logged off or locked, the process initiation from Robility Manager may take up to two minutes.
4. If a robot remains in the “Run Initiated” state for more than three minutes, Robility Manager will automatically change its status to “Not Connected”.

3.5.14 v.24.10.0.0

v.24.10.0.0

This release introduces improvements and resolves key issues to enhance your experience on our platform.

Bug Fixes

  1. In high-density robot, when one user machine was disconnected and another was locked, the status in RobilityManager incorrectly displayed as “Not connected.” This issue has now been fixed.
  2. The license expiry notification previously appeared multiple times during workflow execution; this has been resolved.
  3. The robot status was not updated to “Running” when user machines were locked or logged off in high-density robot; now this has been fixed.
  4. Previously, users could initiate a workflow for execution even when the runner license had expired. This issue has now been fixed.
  5. When the interact key and vault key were not configured for the project, executing it in Runner would throw an exception. This has been resolved.
  6. The Runner status was not being updated in Robility Manager; this issue has now been addressed.
  7. Previously, when we connect the license key after updating the workflow version, it threw an exception as “Invalid key”. Now it has been fixed.

Limitations

  1. Auto logon and auto unlock will support only for Unattended and high-density robot.
  2. The given resolution settings will be applied through auto logon only. Manually unlocking the system using RPD won’t enforce resolution settings.
  3. If workflow is initiated in manager when machine is logged off or locked, it won’t move to next status immediately.
  4. If robot status stays in “Run initiated” for more than 3 minutes, then manager will automatically move to “Not connected” status.  But runner won’t show disconnected status if it is already connected.    

3.5.15 v.24.5.0.0

v.24.5.0.0

This release includes enhancements aimed at improving your experience and expanding your capabilities on our platform.

Enhancements

Enhanced Auto Logon Features: The Auto Logon feature in Robility Runner now incorporates options for Resolution, Scaling, Depth, and Font Smoothing during logon. The Robility Logon service retrieves these details from the Manager and applies them to the VM for each initiated workflow based on user input.
2. Updated System Status Notifications: Previously, when a user signed off, the system would lock without any notification in Robility regarding the system status. Now, Robility Logon updates the Manager with the Locked and Logged Off statuses upon user sign-off.
3. Credential Error Notifications: If incorrect credentials are entered during unlock or logon, the Robility Logon Service will now update the Manager with the status “Incorrect Credential,” prompting users to update their credentials.
4. Extension Variables for Runner Instances: Added extension variables in Runner instances for Resolution, Scaling, and Screen Name. These details are read from the solution JSON file and sent as extension variables to be used in future activities.

Known issues

The Resolution Depth and Font smoothing values will not be printed in the logon logs.

3.5.16 v.24.4.0.0

v.24.4.0.0

This release includes enhancements and bug fixes aimed at improving your experience and expanding your capabilities on our platform.

Bug Fix

Issue: Auto logon and auto unlock through the runner logon service are not functioning as expected.
Fix: The Robility Logon Service has been modified to unlock the machine using the credentials configured in Robility Manager when the system status is locked or logged off.

Known Issues

1. If auto-logon fails, the system doesn’t log the status and continues attempting to logon.
2. The logon service will enforce the system resolution to match that used in the Designer environment. However, this enforcement does not apply to system scaling.

Limitations

1. Auto logon and auto unlock will only support unattended and high-density robots.
2. This version of the runner is compatible with Manager version 24.4.0.0.

3.5.17 v.24.3.0.0

v.24.3.0.0

This version includes bug fixes and enhancements for execution process handling, download methods, and new functionalities in RobilityRunner v.24.3.0.0.

Bug Fix

Execution Process Updates: Improved process handling during DesktopUIA3 and Marketplace activity execution by automatically closing AutomationRuntimeUIA3.exe and Robility.MarkplacePythonExecution.exe after workflow completion.

Enhancements

Download Method Enhancement: Removed the previous download method and implemented a unified approach for handling all storage types like DB, Azure, etc., for better efficiency and consistency.

New Functionalities: Added new functionalities to download workflow solutions from the manager with specified storage types, enhancing flexibility and usability for users.

3.5.18 v.24.2.0.1

v.24.2.0.1 

This release includes enhancements to improve your experience and expand your capabilities on our platform.

 Enhancements

Integration of dependency DLL for InvokeDLL in Runner: A crucial addition, this update ensures seamless integration and compatibility between InvokeDLL and Runner, enhancing the overall performance and reliability of these components.

3.5.19 v.24.1.0.0

V.24.1.0.0

In this version, the focus has been on addressing a bug fix.

Bug Fix

Previously, during bot execution, an error occurred as the “CommentedOut” DLL was not found. This issue has been resolved in this release by including the “CommentedOut DLL.”

Known issue

1. Upon installation, a folder named “Runner” is created in the “ProgramFiles(x86)” directory instead of “RobilityRunner.”
2. Additionally, workflows containing “Dictionary” activities may throw an exception. This issue is expected to be resolved in the upcoming revised version.

4. Robility Designer

4.1 Get Started

Robility Designer is a low-code platform for streamlined workflow creation, offering an intuitive drag-and-drop interface and over 200 features to simplify automation. It facilitates easy workflow creation and seamless bot deployment while allowing customization to meet specific business needs.

The platform provides cognitive automation capabilities for tasks requiring human-like decision-making. Additionally, the Designer includes a growing marketplace of automation scripts and connectors to accelerate your automation projects.

How to Access Robility Designer?

Let’s Get Started!

To access the Designer, sign in to Robility Manager. You can choose between two login methods: Single Sign-On (SSO) or Username and Password.

Sign Up or Log In:

  • New Users: Visit the Robility website and sign up for an account. Click here to get detailed information. 
  • Existing Users: Log in to your Robility account. (Robility AI™)

Components

Solutions: One of the first and foremost step in Designer is to create solution. The solution serves as a workspace for constructing and automating bots efficiently. It aids in developing automation solutions for repetitive tasks and furnishes an intuitive interface enabling users to swiftly configure and oversee their automation solutions.

Templates: Templates act as reusable workflows that can be customized and deployed across your automation solutions within the tenant. These pre-built templates offer detailed outlines or processes of automation workflows, providing a structured framework for building specific automation solutions.

Marketplace: MarketPlace is designed to be the go-to centralized hub for a curated collection of automation scripts and connectors, meticulously crafted to elevate and expedite your automation projects. 

Reusable Objects:  This feature allows the user to re-use the elements multiple times which have been detected already in the workflow. This reduces the need to create the same element again and again when it is used in different places. The re-usable objects feature also makes it simpler to maintain the automation scripts, making the entire process more efficient and cost-effective.

Dynamic Resilience: Enabling this option assists robots in adapting to dynamically changing UI elements during the element search. To ensure successful execution, this option allows robots to capture surrounding elements, enabling them to precisely select the native element. This feature is accessible for both WebAutomation and ImageAutomation.

Visual Debugging: This feature proves especially useful in the development and troubleshooting phases, as it provides visual cues to identify the specific UI element being interacted with during the debugging process. The visual highlighting helps ensure the accuracy of the automation by confirming that the intended UI elements are correctly identified and interacted with as the robot executes the workflow. 

Workflow Analyzer: The Workflow Analyzer is a static analysis tool designed to assist developers in adhering to best practices, such as consistent naming conventions, proper error handling, and efficient variable usage. By automating the detection of these areas, it helps ensure workflows maintain high-quality standards and best practices.

Security Scan: The Security Scan is a protective feature within Robility Designer that helps safeguard automation workflows before deployment. It analyzes the execution log files generated during workflow runs and provides real-time alerts if it detects any security risks, such as hardcoded credentials, embedded secrets, or personally identifiable information (PII), that might be overlooked during development.

4.1.1 Activation

Once Designer is installed, activate your license to begin automating. Make sure the appropriate license and user role are assigned for activation. Click here to learn more about license procurement. Follow the steps below to complete the activation process.

Prerequisites:

1. The activation button in RobilityManager will be available only for users with the “RPA Developer” role. It is important to note that only they can activate and utilize the designer. For more information, click here.
2. If you have not been invited as an “RPA Developer,” please contact your tenant admin and request a role change.

Key Points

1. Activation unlocks all features and functionalities of Designer, allowing users to leverage its complete capabilities for automation.
2. Activating Designer ensures compliance with licensing agreements, avoiding potential legal issues or disruptions in usage.
3. Activated licenses are often linked to security measures, such as user authentication and access controls, enhancing overall system security.
4. Activated licenses typically come with access to support services and regular updates, ensuring users have the latest features and bug fixes.

Steps to activate 

There are two ways to activate Designer, both of which require user authentication. Follow the steps below for each activation method.

From Robility Manager:

1. Once the Designer has been installed in your system, sign in to “RobilityManager” to access activation.
2. After signing in, you’ll land on the Home page.
3. Navigate to the “Designer” section, where you’ll find an “Activation” button.
4. Click on the “Activation” button, and a prompt for authentication will appear.
5. Click “Open” to proceed.
6. Designer will be launched for use.

From Designer Application:

1. Launch Designer application.
2. Upon launching, you will be prompted to sign in using the provided URL on the display screen.
3. Click on the “Sign in” button, which will direct you to the “RobilityManager” page.
4. Sign in to “RobilityManager” on this page.
5. An authentication prompt will appear on the screen.
6. Click “Open” to complete the authentication process.
7. Designer will then be launched for use.

What happens when the designer is logged out?

The designer will log out every 48 hours, even if the user is actively using it. Upon launching the designer, it will prompt the user to re-activate from “RobilityManager.” Follow these steps:

1. When the reactivation prompt appears, sign in to “RobilityManager” to access the activation button.
2.
After signing in, you’ll land on the Home page.
3. Navigate to the “Designer” section, where you’ll find the “Activation” button.
4. Click on the “Activation” button, and an authentication prompt will appear.
5. Click “Open” to proceed.
6. The Designer will launch successfully.
7. Note that this process will not remove or erase any workflow details from the system.

4.1.2 Extensions

Robility Extensions are mandatory for utilization of Web Automation feature, allowing bots to interact seamlessly with web applications. These extensions are designed to:

1. Detect and locate all editable UI elements in browsers.
2. Facilitate communication between the Robility application (Designer and Runner) and supported browsers (Google Chrome and Microsoft Edge).
3. Enable bots to perform automation tasks efficiently on web-based applications.

To ensure proper automation, the Robility Extension must be installed and activated in the browser.

How to install the extensions from Robility Designer?

There are two methods to install the extensions from Robility Designer to automate with Web Automation:

During Designer Launch:

When launching Robility Designer, the application automatically checks for the required browser extensions:

1. If the extensions are not detected, a prompt appears requesting installation.
2. Once installed, users must manually enable the extension in their browser settings.
3. Launch Google Chrome or Microsoft Edge after installation, a prompt appears asking for permission to enable the extension.
4. Click “Enable” to activate the extension and allow the automation to function properly.
5. If the prompt does not appear, go to “Extensions” on the browser and enable them manually.

From the Configuration Menu:

If the extensions were not installed during the initial launch, users can manually install them later via Robility Designer:

1. Open Robility Designer.
2. Navigate to the “Configuration” menu on the home screen.
3. Under “Robility Extensions” (on the right-hand side), install the required extensions for your preferred browser.

How to install extensions from Robility Runner?

1. During the installation of Robility Runner, the application validates whether the Robility Automation Extension is available.
2. If the extension is missing, it will be installed automatically without requiring user intervention.
3. However, when launching the browser for the first time, users will see a message prompting them to enable the extension.
4. Click “Enable” to activate it and start using automation on Chrome or Edge.

For troubleshooting steps related to extension installation and automation, click here to view the detailed guide.

4.1.3 Build Your Automation

Now, the designer is launched and ready to build in your automation solutions. To create your workflow, first let’s create a new solution. Follow the below steps to create a new solution:

1. To get started using the Designer, the user needs to create a new solution by selecting “CTRL +N” or by clicking on “Create New Solution” button.
2. A Pop- up window labelled as “New solution”, appears to fill out the details of the Solution Name, Solution Description, Workflow Name, Workflow Description, and location path to be saved.
3. After filling out the details, the user needs to click on the “Create” button to create the new solution.
4. The solution will be created and saved in the specified location.

And then you are all set to build the automation solution. As you can see on the left-hand side of the designer interface, there will be “Toolbox” panel. Here you can view the list of features are installed on the system. There will be a set of features that are installed by default. But wait there are a lot of features that awaiting to be explored.

Installing the features

On the top of the designer, you can see “Manage Features” option. The Manage Features option enumerates the list of all features that are available for the Designer. It also displays the features which has been installed, features which have updates, any new features available currently for the designer and a browse option to browse and use any feature located in our system.

To get more detailed information, click here.

Now, let’s install the features using this option.

1. Click on the “Manage Features” option.
2. Navigate to the “New features” option to discover and download the latest features.
3. Now, you can click on “Select All” option on the top of the window and select “Install” option.
    a. It will install all the features available in the designer.
    b. This process might take a time since all the features are being installed one by one.
4. The designer will be refreshed, and you can view all the installed features on the “Toolbox” section. 

Now let’s start building our automation solution. In the interface you can now drag and drop any activities into the flowchart and start creating the solution.

Steps to build the bot

Here I am going to showcase a demonstration of how to prompt a notification to the user.

1. Navigate to the “Toolbox” section and search for the activity as “MessageBox”.
2. Drag and drop the “MessageBox” activity from the “Notification” feature and set it as start node.
    a. Setting the activity as the start node helps to initiate the execution process from that activity.
    b. It helps the user to showcase any input either by hardcoding the values or by providing the input variable. Click here to get more information.
3. Double click on the activity.
4. Here, provide the input value as “Hello, Welcome to Automation”.
    a. This field accepts only “String” datatype; hence we are providing the value within the double quotes.

4.1.4 Switching between tenants

Creation of Tenant’s Solution Folder

When the user activates the designer for a specific tenant, a new folder will be created in the following path, named with the tenant’s name:

“C:\Users\Username\Documents\Robility”

By default, all users activating the Designer will have a folder named “Robility” created in the above path. This path contains all the solutions and templates created using the Designer. Below is a list of items that will be available:

1. SolutionName.json: This file is automatically generated for each “.xaml” file marked as the “Main” workflow during the solution creation process. It contains metadata about the entire solution, including dependencies, solution settings, and package versions. It helps Robility Designer manage the solution’s configuration and ensure compatibility across different environment.

2. Workflowname.Xaml: This is also an automatically generated file created as the “Main” workflow during the solution creation process. It acts as the starting point for the entire automation solution. When you create a new solution, Robility Designer sets up this file with some basic configurations and structure to help you get started quickly.

Folder Creation Based on the “Tenant” Name

Robility Designer creates a folder in the location path where the solutions are stored. This folder is created based on the “Tenant” name associated with the designer activation. Refer to the image below, where the folder is created based on the tenant’s name within the location path. 

Example Folder Structure

Here’s an example of how the folder structure might look for a tenant:

Tenant Switch

When the user has access to multiple tenants and switches from one tenant’s solution to another, a prompt will appear on the screen. If the user opts to select “Yes”, the solution will be moved from one tenant to another. If there is already another solution with the same name, it will prompt the user to overwrite it.

Note: The solution folder will be completely moved from the previous tenant folder.

4.1.5 Configuration

The Configuration menu in Robility Designer provides a centralized interface for users to customize and manage settings. This feature enables fine-tuning of the Designer to meet specific project requirements, ensuring seamless automation workflows and enhanced operational efficiency. Within the Configuration menu, users can explore options such as Core Configuration, Activity Configuration, Product Configuration, and Robility Extensions, each catering to different aspects of the Designer’s functionality.

Core Configuration

Core Configuration focuses on the fundamental settings that define how the Designer operates at its core. It allows users to customize essential components like logging levels and storage preferences, which play a crucial role in maintaining the efficiency and reliability of the Designer and its associated modules.

Key Elements of Core Configuration:

1. Product Log:

a. This setting enables users to manage the logging framework for tracking the performance and behavior of the core product, individual activities, and all associated modules in Robility Designer.
b. By configuring the log level, users can control the granularity of information captured in logs, making it easier to debug issues, monitor system performance, and ensure accountability.
c. Log levels range from basic details to highly detailed traces, with the default set to “Info”. This level strikes a balance by capturing significant events without overwhelming users with excessive details.
d. Configuring this setting enhances transparency and ensures traceability throughout the automation process, making it easier to monitor and audit workflows. 

2. Save All Files: 

The Save ALL Files option in Core Configuration allows users to customize the storage path for all files and information related to workflows, activities, and the Core product. By specifying a central storage location, users can maintain better control over the management of critical data across projects. This functionality serves as a central repository for saving and organizing user files, ensuring that information is stored consistently across all workflows.

4.1.6 Auto Update

Auto Update

Auto update refers to the automated process by which the system enables to upgrade to the latest version without requiring manual intervention from the user. Auto updates enhance user experience by ensuring that the latest features, improvements, and security patches are promptly delivered to the end-users, reducing the need for manual interventions, and keeping the Designer up to date.

How to enable?

The Auto-update option can be enabled for all users in the tenant only if the tenant admin activates it in the Robility Manager. Note that the following steps can be performed only by the tenant admin:
1. Log in to the respective tenant in the Robility Manager.
2. Click on the “Features” menu.
    a. Choose the “Settings” option.
    b. A pop-up will be enabled; click on the “Designer” auto-updates option if it is disabled.
    c. By default, the option will be enabled in the tenant.
3. If users have already installed Designer, request them to relaunch the designer to refresh the changes.
4. The update will be scheduled every hour by the system and will notify the user if there are any latest versions available.
5. When the update is notified, users need to click on the “Update” option, and the latest version of Designer will be installed and launched.

Default Option

The default status of the auto-update option will depend on the configuration set by the tenant admin. Upon activation by the tenant admin, users can customize this option through the “Designer” configuration menu.

Auto-update Enabled:
1. Tenant Admin Activation: When the tenant admin activates auto-update, users will benefit from seamless updates upon installation.
2. Best Practices: Following best practices, scheduled routine maintenance windows for auto-updates are implemented to ensure a smooth and controlled update process, minimizing any potential disruptions to users.

Auto-update Disabled:
1. Tenant Admin Configuration: If the tenant admin opts to disable auto-update, users’ machines will have the auto-update option deactivated upon installation.
2. Manual Intervention: Disabling auto-update might lead to the need for manual intervention, requiring users to manually update the product to access the latest features. This approach is not recommended, especially in organizations with a larger user base.
3. Risk of Disruptions: Manually installing each version poses the risk of unwanted disruptions, making it less advisable, particularly when dealing with a substantial number of users.

4.1.7 Designer Taskbar

On the Top

Save – This shortcut is used to save the current workflow.
Run– This shortcut is used to execute the current workflow.
Abort– This short icon is used to abort/ stop the current workflow while execution.
Search – This shortcut enables the quick search pop-up to access the features / activities / variables in the workflow.
Customize Ribbon – This enables to customize the shortcut toolbar.
Help – This icon navigates the user to provide the help documentation page and a feedback link to provide the overall experience with the Robility Designer.
Profile – This icon displays the user details along with their mail ID, license expiry date and log out option. 

On the Bottom

Active workflows: The workflow that is active on the interface will be displayed along with the path. 
Connected: It indicates the tenant’s name in which you have been activated the Designer along with the “Project” name. This tenant shall be used to connect to the cloud. It also used to deploy the designed workflow to the cloud and execute it. Clicking on this hyperlink will lead you to the “Robility Manager”.
Publish: This option enables the user to choose the location of the project/ tenant to publish the solutions and templates accordingly. Click here to know more.  

4.2 Home Menu

The Home tab provides a variety of tools and options designed to assist users in creating and managing workflows effectively. Below is a detailed overview of the available menus and their functionalities.

New

1. The New menu enables users to create a fresh workflow or solution within the Designer.
2. Selecting the New Solution option allows users to start a new solution. Upon selection, a pop-up window appears prompting the user to provide essential details such as the solution name, solution description, workflow name, workflow description, and the file path to save the solution.
3. To create a New Workflow, users can select the corresponding option. A pop-up window will appear with pre-filled details, including the workflow name, workflow description, and the file path where the workflow should be saved. 

Open

The Open menu allows users to access workflows, whether within the same solution, across different solutions, or from templates. This feature streamlines the process of retrieving previously saved solutions or workflows while enabling the extraction of encrypted packages that have been published, ensuring smooth access to their content.

Open a Solution or Workflow: Users can open existing solutions or workflows by selecting this option. The process mirrors opening an existing solution or template. Simply click on the option and choose the required workflows from the designated folder.

Save 

The Save option will be enabled at the beginning of the workflow creation and whenever users make a change in the workflow. The workflow will be saved automatically as the
user has already entered the location path while creating. The user can save a particular or the current workflow by clicking on the Save workflow and if the user wants to save
all the workflows at one go, then click on Save all workflows.

Click here to refer how does publish works. 

4.2.1 Execution & Features

Execution

The Execution section provides users with various options to run or manage their workflows efficiently. These options offer flexibility and control over how workflows are executed, debugged, or stopped. Below is a detailed explanation of the available choices:

1. Workflow: This drop-down menu lists all the workflows available within the current solution. Users can easily navigate through the list, select the workflow they wish to execute, and proceed with the desired operation. This feature simplifies workflow management, ensuring quick access to the desired process.

2. Run as Debug: Selecting this option executes the workflow in debug mode. Debug mode is a critical tool for troubleshooting and refining workflows. It allows users to monitor each step of execution, identify errors or inefficiencies, and make necessary adjustments. This feature is especially useful during the development phase, where precision and accuracy are paramount.

3. Run: This option runs the selected workflow in standard execution mode. Unlike debug mode, this provides a streamlined execution path, ideal for testing or deploying finalized workflows. It ensures that the workflow is carried out as designed without the additional overhead of step-by-step debugging.

4. Stop: This option halts the execution of the currently selected workflow. It is particularly useful in scenarios where an error occurs during execution or if the workflow needs to be aborted for any reason. The Stop feature ensures users have full control over workflow operations, minimizing disruptions or unintended consequences.

Manage Features

The Manage Features screen offers a centralized location for viewing, managing, and updating features available for the Designer. This section is designed to enhance the user experience by providing seamless access to the tools and functionalities that support automation processes. Here are the details of the key functionalities:

1. Installed Features: This section lists all the features currently installed in the Designer. It helps users keep track of the capabilities already integrated into their setup, ensuring they can make the most of available tools.

2. Updates: This highlights any installed features that have updates available. Keeping features up-to-date is crucial for maintaining optimal performance, fixing bugs, and accessing new enhancements. This option ensures users can stay current with minimal effort.

3. New Features: This area showcases the latest features available for the Designer. It allows users to explore and integrate new tools that can expand the Designer’s capabilities, providing opportunities to innovate and improve workflows.

4. Browse for Features: The Browse option enables users to locate and add features stored locally on their systems. This flexibility allows for a customized setup, where users can incorporate features that suit their specific needs or workflows.

Clear

The Clear option provides a comprehensive set of cleanup features designed to optimize your workflow and solution. Over time, as workflows evolve, various unused elements such as variables, workflows, and arguments etc., may accumulate, leading to unnecessary clutter and possible runtime issues. This option allows users to remove such unused components, ensuring the solution remains organized, efficient, and error-free.

1. Clear Unused Variables: Removes variables that are declared but not referenced anywhere in the workflow.

2. Clear Unused Workflows: Deletes workflow files that are no longer being invoked or utilized within the main automation solution.

3. Clear Unused Arguments: Eliminates arguments that are defined in workflows but not passed or used, reducing confusion and ensuring data flow accuracy.

4. Clear Unused Dependencies: Removes and uninstalls packages and their dependencies that are not being used within the main automation solution.

5. Clear Unused Sequences: Removes unused sequences from the main automation solution.

4.2.2 Advance & Settings

Search Functionality

The Search feature is designed to enhance user productivity by providing a streamlined and user-friendly way to locate and interact with various elements within the Designer. It offers three distinct search options to cater to different user needs:

1. Add Activity: This option allows users to seamlessly add activities to their workflow. It displays a list of all activities associated with the installed features in the Designer. Users can simply select the desired activity from the list, and it will be directly added to the workflow, streamlining the design process.

2. Search by Display Name: This option enables users to locate activities within the current workflow based on their display names. These names can either be the default activity names or custom names assigned by the user. Selecting a name from the dropdown will navigate the user directly to the corresponding activity within the workflow, ensuring quick access and efficient editing.

3. Search by Variable/Argument Name: With this feature, users can search for any variable or argument utilized within the current workflow. By selecting the Search by Variable/Argument Name option, users can locate and highlight the activity where the variable or argument is being used. This functionality simplifies debugging and enhances clarity in complex workflows.

Form Builder

The Form Builder tab, located within the home menu, provides users with a powerful tool to create custom forms directly within the Designer. This feature is designed to streamline the process of building interactive forms for automation workflows. If the Form Builder is not yet installed in your environment, clicking on this tab will automatically begin the installation process. During installation, the required components are downloaded and set up, ensuring that the feature is available for use.

Once the installation is complete, the tab will refresh, and you can easily click on it again to launch the Form Builder interface. This opens a dedicated window where users can design and configure their forms, specifying fields, actions, and conditions for a seamless user experience in automation processes.

The Form Builder tool allows users to create complex forms with ease, leveraging a wide range of customization options, including field types, validation rules, and interactive elements. Whether you need to collect data from users, enable inputs for automation, or create customized workflows, the Form Builder offers all the necessary features for efficient form creation.

Logs

The Logs option in the Home menu offers two essential features: Open Logs and Log Settings, designed to help users monitor and troubleshoot workflows effectively.

Open Logs

The Open Logs feature provides direct access to the log files stored in the system. By clicking this option, users can view detailed logs related to workflow execution. These logs capture important information about the system’s activities, including timestamps, error messages, warnings, and other critical data. Accessing these logs is crucial for troubleshooting, identifying system performance issues, or simply reviewing the outcomes of automated processes. Users can filter and analyze log data to gain insights into how their workflows are performing, making it easier to detect errors or optimize workflows for improved efficiency.

Log Settings

The Log Settings feature allows users to customize the log level for their workflow execution. By adjusting the log settings, users can control how much information is captured and displayed during the execution process. This feature provides five different log levels, each suited for specific use cases. Here’s a detailed breakdown of each:

1. Trace

Purpose: The Trace log level is the most detailed level of logging. It captures fine-grained information about the execution of specific portions of the code. This level is primarily used for tracing function calls, variable states, and other minute details that are helpful for diagnosing subtle or complex issues.
When to Use: Trace logs are typically used during development or debugging phases to understand the flow of the automation process at a very granular level. It’s particularly helpful for developers who need to trace the execution step-by-step to pinpoint the cause of problems.

2. Debug

Purpose: The Debug log level is used to record messages specifically related to the debugging process. This log level helps developers by capturing information that provides insight into how code is executing, without overwhelming them with excessive details.
When to Use: Use this level during development to capture useful debug messages. It’s ideal when you’re testing new workflows or troubleshooting development-stage issues and want to monitor the workflow’s behavior in real-time.

3. Info

Purpose: The Info log level records general informational messages that don’t indicate errors. These messages provide context about the workflow’s execution, such as progress updates, completion confirmations, or routine status updates.
When to Use: Info logs are best for capturing events that represent normal operation, such as successfully completing tasks or reaching checkpoints. This level allows users to understand the general flow of the workflow without being distracted by unnecessary details.

4. Error

Purpose: The Error log level is designed to capture serious issues that impact the workflow’s functionality. This level logs critical errors that may prevent the process from continuing or result in workflow failure.
When to Use: Error logs are essential when a workflow encounters a fault that stops its execution. It’s particularly important to monitor this level during production or mission-critical workflows, as it helps identify and address major issues promptly.

5. Warn

Purpose: The Warn log level captures warnings related to potential issues or deviations from the expected behavior that do not necessarily stop the workflow from running. These warnings are meant to alert users to conditions that could become problems in the future, such as slow performance or minor exceptions.
When to Use: Use Warn logs when you suspect there might be an issue that doesn’t require immediate action but should be monitored. For example, a workflow might be running slower than expected, or a deprecated feature might be used—Warn logs help catch such conditions before they escalate.

4.2.3 Run Till this Activity

Run Till This Activity is a workflow execution option that allows users to execute a workflow from the beginning up to a selected activity. This feature supports efficient development, testing, and debugging by enabling users to validate a specific section of a workflow without executing activities that follow the selected point.

How It Works

When a user selects an activity and triggers the Run Till This Activity option, the workflow executes sequentially from the beginning and stops after completing the selected activity. Activities that follow the selected activity are not executed.

a. The Run Till This Activity option is available only for activities that are connected to a node within the workflow.
b. Activities that are not connected to any node will not have this option enabled and cannot be used with this feature.

During execution, the Debug Watcher panel automatically opens and displays the variables, arguments, and properties associated with the currently executing activity.

Debug Watcher

The Debug Watcher is a dedicated debugging panel in Robility Designer that provides real-time visibility into the internal state of a workflow during a Run Till This Activity session. It allows users to monitor variables, arguments, and the properties of the selected activity while the workflow executes up to the specified activity.

Sections in Debug Watcher

1. Variables – Displays all variables defined in the workflow along with their current runtime values during execution.

Each entry includes:
a. Variable Name – The name of the variable.
b. Variable Type – The data type of the variable, such as Boolean, String, or Int32.
c. Scope – Indicates the scope within which the variable is available.
d. Value – The current runtime value of the variable.

2. Arguments – Displays all arguments passed into or out of the workflow during execution.

Each entry includes:
a. Argument Name – The name of the argument.
b. Argument Type – The data type of the argument.
c. Direction – Indicates whether the argument is used as an input, output, or input/output argument.
d. Value – The current runtime value of the argument.

 3. Properties of the Selected Activity – The Properties panel displays the properties of the activity for which the Run Till This Activity option is selected.

Each entry includes:
a. Property Name – The name of the property.
b. Property Type – Indicates whether the property is an input (InArgument) or output (OutArgument) and displays its data type.
c. Value – The current value assigned to the property.

4. Immediate – Allows users to evaluate variables, expressions, or properties during the debug session and retrieve the output for the required value. This helps users quickly verify values and troubleshoot workflow logic without modifying the workflow.

For example, users can enter a variable or expression in the Immediate panel to view its current runtime value.

Execution Behavior

When Run Till This Activity is triggered, the workflow executes sequentially from the beginning and stops at the selected activity.

1. Activities before the selected activity are executed normally.
2. Once execution reaches the selected activity, the workflow is paused at that activity.
3. The selected activity is highlighted in yellow to indicate the current execution point.
4. The Debug Watcher displays the runtime information available at this point, including variables, arguments, and the properties of the selected activity in the Debug Watcher side panel.
5. Once the activity is reached successfully, execution remains paused at the selected activity.
6. After reviewing and debugging the selected activity, you can stop the workflow to end the debug session.

Visual Indicators

During execution, Robility Designer provides visual feedback to help track workflow progress.

Yellow – Indicates the selected activity where the workflow is paused after successful execution of the preceding activities.

The yellow highlighting clearly identifies the selected execution point and indicates where the workflow has been paused.

Key Benefits

1. Saves Time: Eliminates the need to execute activities beyond the selected point when validating a specific section of the workflow.
2. Improves Debugging: Allows developers to inspect the workflow state at a specific activity.
3. Enhances Development Efficiency: Simplifies testing and validation without executing unnecessary downstream activities.
4. Targeted Validation: Enables developers to verify variables, arguments, and activity properties at the selected execution point.

4.2.4 Run from this Activity

Run from This Activity is a workflow execution option that allows users to start a workflow from a selected activity instead of executing the entire workflow from the beginning. This feature supports efficient development, testing, and debugging by enabling users to target and validate specific sections of a workflow without repeating previously completed steps.

How It Works

When a user selects an activity and triggers the Run from This Activity option, the workflow engine skips all preceding activities and begins execution from the selected point. The workflow then continues to execute sequentially from that activity onward until it either completes successfully or encounters an error.

a. The Run from This Activity option is available only for activities that are connected to a node within the workflow.
b. Activities that are not connected to any node will not have this option enabled and cannot be executed using this feature.

During execution, the Debug Watcher panel automatically opens and displays the variables, arguments, and properties of the currently executing activity.

Debug Watcher

The Debug Watcher is a dedicated debugging panel in Robility Designer that provides real-time visibility into the internal state of a workflow during a debug session. It allows users to monitor and inspect variables, arguments, and activity properties as the workflow executes step by step, making it an essential tool for identifying issues, validating logic, and ensuring the workflow behaves as expected.

Sections in Debug Watcher

1. Variables – Displays all variables defined in the workflow along with their current runtime values during execution.

Each entry includes:
a. Variable Name – The name of the variable. 
b. Variable Type – The data type of the variable, such as Boolean, String, or Int32.
c. Value – The current runtime value of the variable.
This section helps track how variable values change as activities are executed.

2. Arguments – Displays all arguments passed into or out of the workflow during execution.

Each entry includes:
a. Argument Name – The name of the argument.
b. Argument Type – The data type of the argument.
c. Value – The current runtime value of the argument.
This section is useful for debugging workflows that are invoked by other workflows and rely on input or output arguments.

3. Properties of the Selected Activity – Displays the input and output properties of the currently executing activity.

Each entry includes:
a. Property Name – The name of the property.
b. Property Type – Indicates whether the property is an input (InArgument) or output (OutArgument) and displays its data type.
c. Value – The current value assigned to the property.
This section helps verify that the correct values are being passed into and returned from each activity during execution.

Visual Indicators
During execution, Robility Designer provides real-time visual feedback to help users track workflow progress:
Yellow – Indicates the activity that is currently being executed.
Green – Indicates activities that have completed successfully.
This color-coded highlighting provides a clear visual trail of workflow execution, making it easier to monitor progress and identify the current execution state.

Key Benefits

1. Saves Time: Eliminates the need to rerun the entire workflow when only a specific section needs to be tested or validated.
2. Improves Debugging: Allows developers to isolate and focus on a particular activity or workflow section without interference from earlier steps.
3. Enhances Development Efficiency: Especially useful when working with large or complex workflows containing numerous activities.
4. Targeted Validation: Enables precise testing of specific automation logic without rerunning previously completed steps.

Important

Activities that depend on variables, application states, or outputs generated by earlier steps may require those dependencies to be available before execution. If the selected starting activity relies on data or conditions established by preceding activities, those prerequisites must be manually configured or ensured before triggering Run from This Activity. Failure to do so may result in errors or unexpected behavior.

4.2.5 Immediate Window

The Immediate Window allows you to evaluate expressions, inspect runtime variables, and execute supported commands while a workflow is paused during debugging. It provides access to the current execution context, enabling you to validate logic, troubleshoot issues, and inspect runtime values without modifying the workflow or restarting the debugging session.

How It Works

The Immediate Window is available only during an active debugging session when workflow execution is paused, such as at a breakpoint or while stepping through activities.

To use the Immediate Window:

1. Start debugging the workflow.
2. Pause execution at a breakpoint or use a step action.
3. Open the Immediate Window.
4. Enter an expression or supported command.
5. Press Enter to evaluate the expression and view the result.

Running a Workflow in Debug Mode

1. Right-click the activity where you want the workflow to pause and select Toggle Breakpoint.
2. Run the workflow. 
3. A confirmation dialog appears asking: Do you want to run the workflow in Debug Mode?
4. Click Yes to start debugging or No to cancel.
5. When the workflow reaches the breakpoint, execution is paused, allowing you to inspect and evaluate runtime data.

4.2.6 Workspace

Workspace

The Workspace is the central area where users build and manage their workflows. It serves as the canvas for creating and executing automation tasks. In the workflow, users can perform various actions by adding activities. These activities are easily dragged and dropped from the Toolbox onto the workspace, where they are arranged to form the sequence of tasks the robot will execute.

The Workspace is positioned between the Toolbox and Properties panels in the Designer, providing a seamless and intuitive environment for users to design, test, and modify their workflows. This layout ensures that users have quick access to all the necessary tools and settings, streamlining the process of building effective and efficient automations.

4.2.7 Add Try Catch

Robility offers a feature that allows users to encapsulate activities within the “TryCatch” structure with a single click. The “Add Try catch” functionality simplifies the process of adding a try-catch block to an activity. By right-clicking on the activity and selecting the “Add Try catch” option, the activity will be encapsulated within the try-catch block.

This feature significantly streamlines error handling and enhances the robustness of automation workflows. The “TryCatch” structure is a crucial element for managing exceptions and ensuring smoother execution of activities.

The simplicity of adding a try-catch block with just a right-click on the activity provides an efficient way to enhance the resilience of automation workflows. It enables users to define specific actions to be taken in case of exceptions, facilitating effective debugging and troubleshooting.

Benefits

1. Error Resilience: The primary benefit is enhanced error resilience. By encapsulating a sequence of activities within a Try-Catch block, the workflow can gracefully handle exceptions without abruptly terminating the automation process.
2. Effective Debugging: When an exception occurs within the Try block, the Catch block captures and handles the error. This facilitates effective debugging, as developers can identify and troubleshoot issues more efficiently.
3. Graceful Handling of Exceptions: The Try-Catch structure allows developers to define specific actions to be taken in case of different types of exceptions. This ensures a more controlled and graceful response to unexpected errors.
4. Prevention of Unintended Termination: Without a Try-Catch structure, a single exception in the workflow could lead to the termination of the entire automation process. Surrounding critical activities with Try-Catch prevents such unintended terminations.
5. Controlled Flow of Execution: The Try-Catch structure provides a controlled flow of execution. Even if an exception occurs, the workflow can proceed with defined actions or recovery mechanisms specified in the Catch block.
7. Efficient Troubleshooting: For large and complex workflows, the Try-Catch structure facilitates efficient troubleshooting. Developers can isolate and address issues within specific activities, making it easier to identify and resolve problems.

How to utilize this feature in the workflow?

1. Drag and drop any activity to the workflow.
2. Add or pass the required inputs.
3. Now, right click on the activity and choose “Add Try Catch” option.
4. The activity will be encapsulated inside the try catch block.

4.2.8 Publish

Publishing automation bots provides users with the ability to store their solutions in the cloud, offering seamless access and execution through the Runner. By publishing bots to the cloud or locally, users can ensure that they are always working with the most up-to-date versions of their automation. This flexibility allows for efficient deployment and management of automation processes, regardless of the location of the solution. Whether it’s for local execution or cloud-based execution, the solution remains easily accessible, ensuring smooth workflows and up-to-date performance.

Once the automation bots are published, they are available under the Workflow Menu in the Manager. This central hub allows users to quickly retrieve and execute their solutions, making it convenient to manage different versions and configurations of their automation projects. Whether you’re deploying a new automation or updating an existing one, publishing provides a streamlined way to keep everything current and accessible for efficient operation.

Version Control

Version control helps the developer to save the solutions for best practices. This allows developers to have a record of their workflow versions and to easily revert back to an older version if needed. It helps the users to simplify the iteration tracking against each robot.

How does the version control work?

The version control functions with the release type chosen at the time of publishing the solutions. The solutions are published as three types – Major, Minor and Bug.

Major

The Major type allows the user to enable when there has been a major change in the functionality done in the workflows. The version number of the solution will be changed to the next serial number. For e.g., (from 1.0.0. to 2.0.0).

Properties

Solution Name: The solution name will be generated automatically. The user will not be able to edit the name.
Solution Description: Provide a solution description for what automation has it been developed, and it uses.
Current Version: The current version of the solution will appear here. It will be disabled to edit.
Release Type: Three radio buttons Major, Minor and Bug will be available. Choose Major when there is whole functionality change, and the version number will be changed. For e.g., (from 1.0.0. to 2.0.0).
New Version: The new version will appear here based on the release type chosen. It will be disabled to edit. When Major type is chosen, the version number will be changed to next series. For e.g., (from 1.0.0. to 2.0.0).
Release Notes: Enter the release notes of each version and the type of changes that has been implemented in the new version.

Minor

The Minor type allows the user to enable when there has been some minor change in the functionality implemented in the workflows. The version number of the solution will have minor change in the serial number. For e.g., (from 1.0.0 to 1.1.0).

Properties

Solution Name: The solution name will be generated automatically. The user will not be able to edit the name.
Solution Description: Provide the solution description for what automation has it been developed, and it uses.
Current Version: The current version of the solution will appear here. It will be disabled to edit.
Release Type: Three radio buttons Major, Minor and Bug will be available. Choose Minor when there is minor functionality change, and the version number will be changed. For e.g., (from 1.0.0. to 1.1.0).
New Version: The new version will appear here based on the release type chosen. It will be disabled to edit. When Minor type is chosen, the version number will be changed to next series. For e.g., (from 1.0.0. to 1.1.0).
Release Notes: Enter the release notes of each version and the type of changes that has been implemented in the new version.

Bug

The Bug type allows the user to enable when there have been minor bug fixes implemented in the workflows. The version number of the solution will be increased orderly. For e.g., (from 1.0.0 to 1.0.1).

Properties

Solution Name: The solution name will be generated automatically. The user will not be able to edit the name.
Solution Description: Provide the solution description for what automation has it been developed, and it uses.
Current Version: The current version of the solution will appear here. It will be disabled to edit.
Release Type: Three radio buttons Major, Minor and Bug will be available. Choose Minor when there is minor functionality change and the version number will be changed. For e.g., (from 1.0.0. to 1.1.0).
New Version: The new version will appear here based on the release type chosen. It will be disabled to edit. When Minor type is chosen, the version number will be changed to next series. For e.g., (from 1.0.0. to 1.1.0).
Release Notes: Enter the release notes of each version and the type of changes that has been implemented in the new version.

4.3 Co Pilot

Introducing Copilot feature in Robility Designer which aids the users in assisting them with providing development support in three core areas: generating VB.NET code, providing a dedicated GenAI Playground for testing the GenAI activity’s outcomes, and responding to queries related to Robility products, features and activities. 

How Does It Help Developers?

Generate Code

One of Copilot’s most powerful features is the ability to generate ready-to-use VB.NET code to handle routine development tasks.

Developers can:

a. Using this feature, developers can create and apply conditional logic within default validation activities such as Assign, If Else, While, and Do While. It enables data transformation, value filtering, extraction, and conversion through the generation of VB.NET code.
b. You can apply the generated VB.NET code using the Invoke Code activity in Robility Designer which allows you to embed and execute custom VB.NET logic directly within your workflow. It is particularly helpful when dealing with complex logic or data operations that are not easily achievable using standard activities.

GenAI Playground

The GenAI Playground is a dedicated testing space within Robility Designer that enables developers to experiment with and validate the outcomes of GenAI activities before executing them.

Key Capabilities:

1. Test and Preview Output: Developers can input sample data and immediately see how the GenAI activity responds—making it easy to evaluate the activity.
2. Model Switching and Comparison: Before finalizing an activity configuration, users can switch between different available GenAI models within the Playground to observe how each model interprets and responds to the same input.

Click here to learn more about how to use GenAI activities. 

Search Docs

The “Search Docs” feature in Copilot responds to user queries related to Robility activities and features by retrieving information directly from the Robility Help Documentation. This enables users to quickly access relevant guidance—such as activity properties, queries related to products and other features, best practices—without the need to manually browse through the documentation.

How to connect Co-pilot into Designer? 

1. Acquire a license for HarmonyAI and connect the Robility Copilot connectors from the App Integrations menu in Robility Manager.
2. Select the relevant project in your Designer at “designer taskbar” to activate and sync the Copilot.
3. Relaunch the Copilot — it’s now ready for use.

4.3.1 Interact Workflow Assistant

Interact Workflow Assistant is designed to simplify how you build Interact workflows. Instead of manually creating each activity, configuring JSON structures, and mapping fields, this feature generates the entire flowchart for you. By selecting the target queue and the operation you want to perform, AI Interact automatically creates the underlying activities, prepares the JSON input/output structure, and sets up the field requirements needed to read, process, or update data within Interact.

This feature significantly reduces manual effort, minimizes configuration errors, and accelerates the development of Interact-based automations, making it easier even for users to build consistent and reliable workflows.

How to use this feature:

Important:

Ensure the Robility Copilot integration is activated. Interact Workflow Assistant is available only when Copilot is enabled.

1. Select VB.NET and Interact Workflow Assistant option.
2. Choose the Interact workflow assistant
3. It checks whether the Interact package is already installed in your project.

a. If installed, it proceeds.
b. If not, it automatically installs and configures the required package, ensuring no manual setup is needed.

4. You will receive AI-assisted prompts to select:

a. The queue you want to work with, and
b. The action/activity you wish to automate (e.g., fetch data, update data, create a new record, etc.).
Based on your selection, AI Interact understands what type of flowchart and data mappings are needed.

5. Click “Create Workflow” and it generates a complete flowchart that includes:

a. The required Interact activities
b. Pre-configured JSON input/output schemas
c. Hardcoded field names
d. Property mappings
e. Auto-generated variables to store and retrieve output data

4.4 Workflow Analyzer

The Workflow Analyzer is a static analysis tool designed to assist developers in adhering to best practices, such as consistent naming conventions, proper error handling, and efficient variable usage. By automating the detection of these areas, it helps ensure workflows maintain high-quality standards and best practices. Here’s how it works:

1. Naming Convention: The tool ensures variables and arguments follow consistent naming patterns and adhere to character limits, improving readability and maintainability.

2. Design Best Practices: It checks for design consistency by ensuring workflows are not empty, contain necessary try-catch blocks, and avoid excessive complexity from too many arguments, making workflows more resilient and manageable.

3.Maintainability: The analyzer identifies disconnected or commented-out activities and unused variables, helping clean up and optimize workflows, improving clarity, and boosting efficiency.

4. Security String Usage: It flags improper handling of sensitive data, ensuring SecureString arguments are used correctly and adhering to security best practices.

By guiding developers to follow these best practices, the Workflow Analyzer promotes proactive improvements, reduces errors, and enhances workflow efficiency.

How It Works

The Robility Workflow Analyzer helps you check your workflows during development without needing to run them. It scans your workflow to ensure it follows best practices and standards.

Key Areas Checked:

A. Naming conventions for variables and arguments. 
B. Error handling (e.g., empty catch blocks or incomplete workflows)
C. Unused resources (e.g., unnecessary variables or commented-out activities)
D. Security practices
E. Workflow maintainability and modularity

Features of the Robility Workflow Analyzer

The Robility Workflow Analyzer focuses on three main features:

1. Analyze Workflow – This option allows you to check the current workflow you’re working on. It scans the workflow and compares it against the selected rules in the Analyzer. A report will be generated, showing areas for improvement and suggestions for enhancement. This feature helps you refine your workflow, ensuring it’s clean and ready for the next step. 

2. Analyze Solution – This option allows you to analyze the entire solution and validate each process against the selected automation rules.

3. Workflow Analyzer Settings – The Workflow Analyzer Settings let you customize the validation process by choosing the automation rules you want to apply during workflow or solution analysis. These settings provide control over the level of validation and help tailor the analyzer to meet your project or organizational standards.

Analyzer Settings Wizard

Each rule in the wizard includes metadata to explain its purpose and impact. Here’s what each field means:

Code: A unique identifier that indicates the rule’s origin, category, and sequence.

Different rule categories serve specific purposes in the validation process.

  • Naming- NMG
  • Design Best Practices-DBP
  • Project Rule-PRR
  • Maintainability Rules-MNR
  • Usage-USG
  • Security- SEC

 Example: DE-NMG-001

1. DE – Indicates the rule originates from Designer.
2. NMG – Denotes the rule category, such as Naming Convention.
3. 001 – The sequential number of the rule. 

Name: The title of the rule, giving a quick summary of what it validates.

Scope: Specifies where the rule is applied. Currently, all rules apply at the workflow level, meaning they check elements within an individual workflow file.

Default Action: Defines the logging behavior when the rule is triggered during analysis. You can choose the logging level:

1. Error Marks the issue as critical and logs it as an error.
2. Warning Indicates a potential issue that may not break the workflow but should be addressed.
3. Info Logs informational notes for developer awareness without suggesting immediate action.

Recommendation: Provides guidance on how to fix or avoid violations if this rule is triggered during validation.

Regex / Length / Threshold:  Displays the default regex patterns, threshold limits, and parameter lengths, with the option to customize them based on your preferences.

4.4.1 Managing & Customizing the rules

To customize your preferred set of rules, follow these steps:

1. Select Workflow Analyzer Settings to open the configuration wizard.
2. In the wizard, you’ll see a list of available automation rules.
3. Choose or uncheck specific rules based on your project’s validation requirements.
4. Click Save to apply your custom rule set.

A – Changing the Default Action for Rules

1. Select the drop-down next to each rule and choose your desired log level: Info, Warning, or Error.
2. Once all changes are made, click Save to apply your customized rule set.

B – Customizing the Recommended Pattern

Each rule has default regex, threshold, or length limits. To modify them:

1. Select a rule in the Workflow Analyzer Settings Wizard.
2. At the bottom, modify the regex pattern, threshold, or length as per your project needs.
3. Click Save.

C – Resetting Values to Default

To reset rule values to their defaults:

1. Select the rule and click the Reset to Default icon at the end of the rule row.
2. Alternatively, select the rule and click the Reset button at the bottom of the wizard.
3. Click Save to apply the changes.

D – Analyzer Report Status in Solution Explorer

The analysis report can be viewed in the Solution Explorer for each workflow. It shows the status and the count of identified issues for each log level—Warning, Info, and Error.

4.4.2 Rules Category

The table below provides a detailed description of each predefined rule in the Workflow Analyzer. Click here to learn more about managing and customizing the rules. 

Category Code Rule Name Description
Naming ConventionDE-NMG-001Variables Naming ConventionEnsures variable names follow defined naming standards (e.g., camelCase, descriptive names) for consistency and readability.
DE-NMG-002Arguments Naming ConventionValidates that input/output arguments adhere to naming standards (e.g., in_, out_, io_) for clarity in direction and usage.
DE-NMG-003Display Name DuplicationFlags activities sharing the same display name, improving debugging and workflow clarity.
DE-NMG-004Variable Length ExceededWarns if variable names exceed the 30-character limit (modifiable in settings).
DE-NMG-005Argument Length ExceededFlags arguments exceeding the default 30-character limit for improved readability.
DE-NMG-006Variables Overrides ArgumentEnsures variable and argument names are unique to avoid confusion during debugging.
DE-NMG-007Arguments Default ValuesEnsures arguments have default values defined for flexibility and reusability in workflows.
Design Best PracticesDE-DBP-001High Arguments CountWarns when argument count exceeds best practice thresholds; configurable in settings.
DE-DBP-002Empty Catch BlockDetects empty Catch blocks that can hide errors and hinder debugging.
DE-DBP-003Empty WorkflowIdentifies workflows containing empty sequences, flowcharts, or state machines.
DE-DBP-004Hardcoded Timeouts & DelaysFlags hardcoded timeouts exceeding recommended limits defined in settings.
DE-DBP-005Undefined Output PropertiesEnsures all activity outputs are assigned to variables to avoid data loss.
DE-DBP-006Multiple Flowchart LayersFlags excessive flowchart layers for improved readability and maintainability.
DE-DBP-009Open Application MisusageRecommends using Open Web Browser instead of Launch Application for browsers.
DE-DBP-010Stop Activity PlacementEnsures “GetStopStatus” is properly placed at workflow start or end for control.
Solution Anatomy RulesDE-ANA-001Solution Workflow CountReports the total workflows in the solution, including invoked ones.
DE-ANA-002File Activities StatsProvides workflow-level activity usage statistics for analysis.
DE-ANA-003SkipOnError TrueHighlights activities where “Skip On Error” is True to avoid unnoticed issues.
DE-ANA-004List OCR/Image ActivitiesLists OCR/Image Automation activities for review and optimization.
Maintainability RuleDE-MNR-001Unreachable ActivitiesIdentifies disconnected or commented-out activities in workflows.
DE-MNR-002Redundant SequencesFlags unnecessary nested sequences to simplify workflows.
DE-MNR-003Empty SequenceDetects unused or empty sequence containers.
DE-MNR-004Write Line UsageIdentifies Write Line activities that should be removed before publishing.
DE-MNR-005Incomplete IFFlags incomplete or empty IF statements to prevent logic errors.
DE-MNR-006Activity Name DefaultDetects default activity names; recommends descriptive naming for clarity.
DE-MNR-007Deeply Nested ActivitiesFlags workflows exceeding activity nesting thresholds for readability.
DE-MNR-008Repeated Log MessagesIdentifies duplicate log messages to ensure clean and meaningful logging.
DE-MNR-009Nested If ClausesFlags workflows with excessive nested Ifs for better maintainability.
UsageDE-USG-001Hardcoded Activity PropertiesDetects hardcoded activity properties that should use variables or configs.
DE-USG-002Unused VariablesFlags declared but unused variables in workflows.
DE-USG-003Unused DependenciesDetects installed but unused packages in the solution.
DE-USG-004Minimum Log MessagesEnsures at least one Write Log activity is used for traceability.
DE-USG-006Check Stop ActivityChecks for the GetStopStatus activity to manage controlled process stops.
SecurityDE-SEC-001Secure String Argument UsageFlags SecureString arguments to ensure proper sensitive data handling.
DE-SEC-002Secure String Variable UsageIdentifies improper use of secure string variables outside allowed contexts.
DE-SEC-003Secure String MisusageDetects sensitive data passed as plain text; recommends secure alternatives.
DE-SEC-004App/URL RestrictionIdentifies restricted apps/URLs to prevent unauthorized automation.
DE-SEC-005ExecuteBy Email DataFlags hardcoded email addresses in ExecuteBy properties to avoid exposure.
ReliabilityDE-REL-001Infinite LoopIdentifies potential infinite loops by checking self-connecting or unending nodes.

4.4.3 Analyzer Report

The Analyzer Report is automatically generated after the Workflow Analyzer completes its analysis of a workflow or solution. It provides a structured view of all detected rule violations, helping users quickly identify areas that need attention. Each entry in the report is broken down into key components:

Fields in the Analyzer Report:

Code: A unique identifier associated with each rule, allowing quick reference and tracking. For example, a rule for checking variable naming conventions may be labeled as DE-NMG-001.

Name: A short, descriptive title for the rule, such as “Display Name Duplication” or “Missing Annotation.”

Description: A detailed explanation of the rule, its importance, and the specific violation in the workflow. For example, if the rule involves naming conventions, the description will explain why a variable name doesn’t follow the required format (e.g., camelCase or prefix conventions).

File: Indicates the specific workflow file where the violation was found. This is useful in multi-workflow solutions, allowing users to quickly locate the file with the issue.

4.4.4 Example

Let’s see you’ve created a sample workflow that reads text from two different Notepad files and prints the content using two separate Write Log activities.

In the Workflow Analyzer Settings, you enable the following two rules:

  • Variable Naming Convention (DE-NMG-001)
  • Display Name Duplication (DE-NMG-003)
  • Unused variables (DE-USG-002)
  • Unreachable Activites (DE-MNR-001)

Now, when you click on the “Workflow Analyzer” option and choose “Analyze Workflow”, the analyzer begins scanning your workflow against the selected rules.

Once the analysis is complete, the results are displayed in the “Analyzer Report” panel at the bottom of the Designer. The report lists any exceptions found in the workflow, along with a detailed description of each violated rule.

4.5 Security Scan

The Security Scan is a protective feature within Robility Designer that helps safeguard automation workflows before deployment. It analyzes the execution log files generated during workflow runs and provides real-time alerts if it detects any security risks, such as hardcoded credentials, embedded secrets, or personally identifiable information (PII), that might be overlooked during development.

Unlike the Workflow Analyzer, which focuses on design issues and inconsistencies, the Security Scan specifically targets security compliance based on the data exposed during workflow execution. Once a solution passes the scan, it is certified as free from compliance issues related to customer information or client data and can be safely published to Robility Manager.

This feature not only helps prevent potential security breaches but also fosters trust among business users by ensuring that sensitive information is not logged. 

Key Benefits

1. Data Protection: Prevents sensitive data exposure in logs and ensures compliance with client data protection policies when publishing to Robility Manager.

2. Flexible Publishing: Allows workflows to be published without certification while clearly indicating their security status and associated risks.

3. Automated Security Review: Automates execution log reviews for security compliance, minimizing manual intervention.

4. Enhanced Governance: Provides automated protection for projects under strict data governance (e.g., healthcare, finance), securing workflows prior to production deployment.

What are these secrets?

Secrets are sensitive pieces of information that must be protected to prevent unauthorized access and data breaches. Examples of these secrets include access tokens, API keys, authentication credentials, database connection strings, and encryption keys.

These secrets are essential for secure integration with third party services or infrastructure. However, if mishandled especially if printed or logged during workflow execution, they can cause significant security risks such as unauthorized access, data breaches, and non-compliance with regulatory standards.

To address this risk, security scans within automation platforms are designed to detect any exposure of these secrets in execution logs. For instance, these tools currently support identification of secrets and access tokens for over 70 commonly used applications, helping to proactively prevent potential leaks. [click here].

How it works? 

The Security Scan can be run at any point: during the design phase or after the automation solution is fully developed. When initiated, it executes the automation process and thoroughly scans the resulting log file. A summary of the scan results then appears in the Robility Copilot window.

In cases where vulnerabilities are detected, a detailed Json format Textfile is generated and saved within the solution folder. This report precisely identifies the locations and categories of security issues, enabling users to implement timely corrective measures.

Scan duration may vary, typically ranging from a few minutes, contingent on the solution’s scale and intricacy.

4.5.1 Publishing the Solution

Once the scan is complete, you can publish your solution to Robility Manager.

Certified Solutions

If your solution passes the security scan and is certified, it will be published with the label:
“Secure & Compliant for Remote Logging.”

This label signifies that the solution has undergone a thorough scan and validation, with no security vulnerabilities detected. Certified solutions are deemed safe for deployment.

Security Scan Failure and Publishing Options

Even if the solution fails the security scan, you still have the option to publish it to Robility Manager. However, in such cases:

1. The solution will be flagged with the label: “Secure & Compliant Failed for Remote Logging.”

2. A notification prompt will appear, alerting the user that the solution is not certified for secure remote logging.

3. The user will be presented with two options:

a. Re-run the scan to attempt resolution of the identified vulnerabilities.
b. Skip the scan and proceed with publishing the solution, acknowledging the potential risks.

It is strongly recommended to address all flagged vulnerabilities before publishing to ensure compliance and mitigate security risks.

4.6 View Menu

Solution Explorer

The Solution explorer menu tab will navigate to the solution explorer tree, adjacent to the toolbox at the left-hand side of the designer. This panel provides information about the solution properties and references of the respective solution.

Right clicking on the solution enumerates few more options. These options help the user to view solution properties, import workflows from another solution, and to create a folder and workflows under a solution.

New workflow: The user can also create a new workflow under the respective solution by selecting the new workflow option.
Open Solution folder: This helps the user to open a folder which was created in the solution.
New folder: A new folder can be created under the current solution.
Import workflows: The user can import the workflows from another solution also.
Step1: Select the Import workflows option.
Step2: an open dialog window will be opened.
Step3: Select the solution from which the user intends to import the workflow.
Solution Properties: The user will be able to view the properties of the solution such as description, location path, startup workflow and name of the solution.

How to update missing features through solution explorer?

The solution explorer allows the user to track and update the latest version here. The update notification for the feature will be available under the Solution dependencies 
indicating to download the feature. Right click on the feature and select download latest version option to install it.

Quick Navigation

The quick menu tab will help to quickly navigate to any specific activity or a part of the workflow. This is particularly helpful in the event of maneuvering through a complex workflow, since it displays the workflow hierarchy. This helps in easy navigation through multiple steps in the workflow for swift and easy identification of activities. Clicking on the chosen action displays the corresponding activity’s properties.

ToolBox

Clicking on this menu will list down the activities under the toolbox pane. There are 200 plus activities that the user can avail to create robust robots. These are drag and drop activities and minimal programming skills are required to use these simple yet proficient activities. Vertical scroll bars can be used for easy navigation.

Properties

Each activity has a different set of property for its execution. All details should be filled in accordingly to execute the activity. The display name will be auto populated, and it can be changed anytime.

4.6.1 Execution

Errors

The Errors menu tab opens the errors window, where any issues encountered during the development and execution of the workflow are displayed. These errors will appear below the workflow, providing clear visibility to help users troubleshoot and resolve issues effectively.

Output

The Output menu tab offers a comprehensive view of the results from executing the workflow. After a workflow is executed, the output is displayed below the workflow window, allowing users to review all messages, logs, and results generated during execution. This feature provides transparency into the process, helping users quickly assess the success of the workflow or identify any issues that need attention. It serves as an essential tool for troubleshooting and understanding the detailed execution flow of the automation.

Breakpoints

The Breakpoints option highlights and provides easy navigation to the activities where breakpoints have been set during workflow execution. Breakpoints allow users to pause the execution of the workflow at specific points to inspect variables, parameters, or system behavior. By clicking on this option, users can quickly identify the paused activities, enabling them to step through the workflow for in-depth debugging. This feature is particularly useful for debugging complex workflows where tracking execution step by step is necessary for pinpointing issues. Users can easily jump between breakpoints for a more efficient debugging process.

Invoked Workflows

The Invoked Workflows section displays the details of any workflows that are being invoked or called within the current workflow. If no invoked workflows are present, this section will be blank. This feature provides visibility into the broader workflow structure, especially in cases where workflows are designed to call other workflows as part of a modular, reusable automation strategy. It enables users to keep track of how multiple workflows are interconnected and to verify that invoked workflows are executing as expected. If there are any errors or unexpected results in the invoked workflows, users can quickly trace them to the source for further investigation.

Missing Activities

The Missing Activities section highlights any activities that are missing following an update or reinstallation of the Designer to a newer version. When users upgrade their Designer or install a new version, some activities may no longer be compatible, or their underlying functionality may have changed. This section alerts users when certain activities in the workflow are no longer available and are marked as “missing.” In some cases, the Designer will automatically reinstall these activities. However, if the missing activities have undergone changes in functionality or behavior with the update, users are prompted to review and update those activities to ensure they are aligned with the new version. This proactive feature helps ensure that workflows continue to operate correctly after updates and that any compatibility issues are addressed promptly.

Commented Activities

The Commented Activities option provides a way to temporarily disable certain activities in a workflow without deleting them. This is useful when a workflow contains activities that are not needed during a particular execution cycle but may be required later. Instead of removing these activities, users can right-click on them and select Comment to disable their execution while maintaining them in the workflow for future use. Commented activities are visually distinct in the workflow, making it easy for users to track which elements have been temporarily excluded. This feature is valuable for iterative development and testing, as it allows users to modify workflows quickly and easily without losing critical components for future iterations.

4.6.2 Full View Mode

The Full-View Mode option enhances the user’s ability to design, view, and automate workflows by expanding the workspace to its maximum size. This mode removes unnecessary distractions, allowing for a clear, uninterrupted view of the entire process, which improves both workflow creation and editing efficiency. Users can better visualize each activity, the flow of logic, and the overall structure of the workflow in a larger, more spacious canvas.

In Full-View Mode, activities and their properties are displayed in a more detailed manner, making it easier to make adjustments, identify potential errors, and ensure accuracy across the entire process. This mode allows users to zoom in on specific areas of the workflow, making complex automations simpler to manage and edit.

Additionally, Full-View Mode offers a smoother user experience for automating tasks by providing quick access to tools, activities, and options. This enhanced visibility accelerates the design process and allows users to make more informed decisions about the structure of their automation. It also facilitates the creation and editing of workflows, ensuring users can work with ease and clarity, saving both time and effort.

By working in Full-View Mode, users can optimize their automation experience, reduce errors, and increase productivity. This is especially beneficial when working on large or complex workflows, as it enables users to focus on individual components without distractions, helping streamline the overall process.

4.7 Execute Menu

The Execute Menu option provides users with seamless control over the execution, debugging, and management of workflows. It offers several critical features for testing, troubleshooting, and optimizing workflows. Let’s explore the available options in detail.

Run

The Run option allows users to execute the workflow. Once triggered, the system runs the workflow, and the execution details, including the start time, end time, and duration, are displayed in the Output window. This feature enables users to monitor the progress of the workflow and review its performance.

Debug

The Debug option is essential for identifying and resolving issues during workflow execution. When debugging, a pop-up window appears on the left side of the Designer, displaying the values of variables and arguments passed within the workflow in real-time. This helps users closely monitor the behavior of the workflow, ensuring that all values are processed correctly. Debugging results are also shown in the Debug section of the Output window, providing detailed feedback on each step. Click here to learn about advanced debugging options. 

Abort

The Abort option allows users to terminate the workflow’s execution, whether it is running or being debugged. This is useful if the user needs to stop the process immediately due to errors or unexpected behavior, providing control over the execution environment.

Continue

While debugging, the Continue option is highlighted when the execution reaches a Breakpoint. Clicking this option resumes the workflow’s execution from the breakpoint, allowing users to proceed with testing or troubleshooting without restarting the entire process.

Delete All Breakpoints

Workflows can contain multiple breakpoints to pause execution at specific steps. The Delete All Breakpoints option allows users to remove all breakpoints in the workflow at once. A confirmation pop-up will appear before the breakpoints are deleted, ensuring users have control over this action.

Toggle Breakpoint

The Toggle Breakpoint feature enables users to pause execution at a specific point within the workflow. By selecting a particular activity and enabling the Toggle Breakpoint, users activate a breakpoint at that activity, which will be marked with a red icon. This allows users to halt the execution at critical points to analyze and troubleshoot the workflow more effectively.

Debug Timer

The Debug Timer function in the Debug menu provides even greater control during the debugging process. It allows users to set a specific time interval, from a drop-down menu, to monitor the timing of workflow execution. This can be helpful in scenarios where precise timing and delays are critical to understanding and troubleshooting workflow performance.

With these options in the Execute Menu, users can efficiently execute, debug, and optimize their workflows, ensuring seamless and accurate automation.

4.7.1 Log Analytics

Log Analytics turns workflow errors into actionable insights, enabling users to detect issues quickly and maintain stable, reliable automations.

This feature allows users to identify the exact activity where an exception occurred using a uniquely generated log ID. Execution details and error messages are displayed clearly in the Output Window after workflow execution, providing better visibility into what happened and where it failed.

Log Analytics captures execution details for all activities, including those inside invoked or nested workflows. When an error occurs, the logs highlight the precise activity that failed and enable direct navigation to that activity in the Designer. This significantly simplifies troubleshooting, especially in large and complex workflows where the same activity may be used multiple times.

Why do we need this feature?

1. A unique log ID for each activity helps users pinpoint the exact instance of a failure, even when the same activity appears multiple times within a workflow.
2. Direct navigation to the failed activity eliminates manual searching, reducing debugging time and minimizing workflow downtime.

Watch the demonstration video below to see how Log Analytics helps identify errors and navigate directly to failed activities in the Designer.

4.7.2 Debugging Options

The Debug feature in Robility allows you to identify, monitor, and resolve issues during workflow execution. It provides real-time insights into how the workflow processes each activity and the values passed to it in live execution, making it easier to understand how that automation runs. The debugger offers multiple options, each designed to give you different levels of control over workflow execution.

Debug Options

Step In

a. Starts execution at the root node of the workflow.
b. Pauses at each activity, allowing you to move step-by-step through the workflow.
c. Useful for detailed inspection when you want to understand how each node operates or trace the flow of variables.

Step Over

a. Executes the workflow continuously without pausing at every activity.
b. Stops only when it encounters a breakpoint or reaches the end of the workflow.
c. Ideal when you want to run most of the workflow at normal speed but still monitor specific points using breakpoints.

Breakpoints

a. Allow you to pause execution automatically at specific activities or nodes.
b. Multiple breakpoints can be set, modified, or cleared at any time.
c. On hitting a breakpoint, control is returned to you, allowing you to decide whether to Step In, Continue, or Abort the workflow.

Debug Timer

a. Introduces a controlled delay between activities during execution.
b. Delay is configurable (0, 1, or 2 seconds) to suit your observation needs.
c. Helps you visualize transitions between activities without manually stepping through each one.

Restart

a. Automatically restarts the workflow from the root node whenever a breakpoint is toggled on the current activity.
b. Useful when you want to re-run a portion of the workflow to observe changes or verify variable updates without manually stopping and restarting the session.
c. Ensures that the workflow state is reset, providing a clean execution environment for debugging.

Hotkeys for Debugging

1. Abort: Shift + F5
2. Continue / Step Over: F10
3. Step In:

a. Press Ctrl + F11 to start Debug with Step In from the root node.
b. Press F11 to continue Step In for navigating through further nodes.

How to Use Debug Options

1. Set Breakpoints

a. Identify the activity or node where you want execution to pause.
b. Toggle a breakpoint on that activity.

2. Start Debugging

a. Press Ctrl + F11 to start Debug with Step In from the root node.
b. Execution will halt at the root node, allowing you to inspect variable and argument values.

3. Step Through Activities

a. Use F11 to move to the next activity sequentially.
b. Observe the Debug pop-up window for real-time variable and argument values.

4. Continue Execution

a. Press F10 (Continue / Step Over) to run the workflow continuously until the next breakpoint or workflow end.
b. Use Debug Timer (Optional)
c. Enable a Debug Timer to add a short delay between activities (0, 1, or 2 seconds).
d. This allows you to visualize the workflow step-by-step without manually stepping through each node.

5. Stop Debugging

a. Press Shift + F5 (Abort) to stop the debugging session at any time. 

4.8 Solution

Solution

The solution serves as a workspace for constructing and automating bots efficiently. It aids in developing automation solutions for repetitive tasks and furnishes an intuitive interface enabling users to swiftly configure and oversee their automation solutions.

How to create a solution?

1. Once the “Designer” has been installed, double click on the application name to launch it.
2. It will set up the interface and initializes the “DESIGNER”.
3. From the landing page, i.e., “Home” menu, the option will be “Create a New solution”.
4. Click on the option and fill in the details to create your first automation solution.

Creation of New solution

The creation of a solution is the initial and pivotal step.  The user can create a new solution either by pressing “CTRL + N” or clicking the “Create New Solution” button. This action triggers a pop-up window labeled “New Solution,” prompting the user to enter details such as “Solution Name, Solution Description, Workflow Name, Workflow Description, and the location path” for saving.

Let’s walk through the properties in detail.
1. Solution Name: Enter the “Name” of the solution you intend to automate. The solution name must commence with an ‘Alphabet’ character, and special characters (including space between each character) are not permissible.
2. Solution Description: Provide the “Description” of the solution to elucidate the purpose of the automation for subsequent validations.
3. Workflow Name: Assign a name to the workflow, which will be designated as the “Startup” workflow. The workflow panel is utilized to drag and drop activities, constructing the automation. Learn more about Workflow by clicking here.
4. Workflow Description: Provide a description for the workflow, outlining the purpose behind each automation workflow.
5. Location: Specify the location for saving solutions locally. By default, the location path is “C:\Users\Username\Documents\Robility.” You can modify this location by selecting the “File” option or manually entering the location path. This location is used to store “Json” and “Xaml” files and folders pertaining to the solution.

Open an existing solution

When we need to navigate to another solution or to continue the development in the solution, the “Open an existing solution” menu can be utilized. The solutions can be opened or launched in three ways,
1. To open an existing solution, the user can either select “CTRL + O” or click on the “Open Solution” button from the Designer landing page.
a. The user will be presented with a dialog window to select the solution they wish to open.
b. After selecting the solution, the user can click “OK” to open the solution.

2. The existing solutions can be opened through “Recent Solution” panel from the designer landing page.
a. The existing solutions or recently developed solutions will be available in the “Recent Solution” panel.
b. Click on the “Solution” name from the “Recent” panel and the solution will be opened.

3. The existing solution can be opened when another solution is opened on the designer through the “Open” menu from the “Home” at the designer workspace area.

4.8.1 Solution Explorer

The Solution Explorer provides a comprehensive view of all the components and resources required for building a workflow. It organizes dependencies, workflow references, files, and folders, allowing users to efficiently manage and navigate the various elements of their project. It also simplifies adding or removing files and folders, ensuring a well-structured workflow.

Where to Find?

1. The Solution Explorer is located on the left-hand side of the Designer, next to the Toolbox.
2. This panel offers a clear overview of the solution’s properties and references, while enabling users to easily organize and manage solution components and workflow references.

Key Features

1. Add and Remove Files: Users can quickly add new files or remove existing ones, ensuring the workflow remains organized.
2. Create New Folders: It allows for the creation of new folders to better categorize and structure the workflow components.
3. View Dependencies: The explorer displays all files and folders associated with the solution, providing a convenient way to manage references.
4. Organize Workflow Elements: Users can reorganize and navigate through files and folders, simplifying the workflow development process.

The Solution Explorer serves as an essential tool for managing the files and resources tied to a workflow, improving efficiency and clarity during development.

To get the detailed information on the properties of Solution Explorer, click here

4.8.2 Activities in Use

Activities in Use

The “Activities in Use” option, found within the Solution Explorer tree, plays a vital role in managing the activities within your workflow. It provides an organized view of the activities that are currently utilized in the solution, ensuring that all elements are up-to-date and aligned with the latest version of the automation platform.

This feature allows users to track any changes made to the activities, ensuring that any new features, enhancements, or bug fixes introduced in the most recent updates are properly incorporated. By keeping the activities up to date, it ensures that workflows continue to run smoothly, with access to the best possible tools for automation.

How to use?

Right clicking on the option, enables the user to view the following,

1. It contains the feature’s package along with the version that are currently used in the solution.
a. Right click on it –
b. “Manage Features” – It enables to open the “Manage Features” window to update, uninstall or downgrade the features. Click here to know about Manage Features.
c. “Update All features” – This option enables the update of all features used within the workflow if updates are available. This helps to maintain compatibility and enhance the overall performance of the automation process.
2. Below is the list of options associated when we right click on the “Feature” name.
a. “Manage Features” – It enables to open the “Manage Features” window to update, uninstall or downgrade the features. Click here to know about Manage Features.
b. Help Document – It helps to navigate to the “Help Document” portal to get a detailed information on how the feature works.

Update missing feature

The update notification for the feature will be available under the Activities in Use indicating to download the feature. Right click on the feature and select download latest version option to install it.

4.8.3 Workflow.xaml

Workflow.xaml

The workflows utilized within the “Solution” can be conveniently accessed from this interface. This section serves as a central repository for the various workflows that contribute to the automation solution’s functionality.

Options in Workflow.xaml

When right-clicking the workflow XAML file, a menu of options appears. These choices aid users in tasks such as opening the XAML file’s location, generating new workflows, and duplicating workflows within the solution.
1. New workflow: A new workflow is created to enhance the automation process within the solution, choose the option as “New Workflow”.  Follow the below steps to create a
workflow.
a. Select on “New Workflow” option and provide the “Name” and “Description” of the workflow.
b. Enter the “Location” path. By default, the path will be same location path specified at the time of creation of the solution.
c. The location path can be modified when you need to create a workflow inside the “Folder.”
d. The location path cannot be specified outside the solution folder.
e. Click on “create workflow” button.

Click here to know about “New workflow” functionality.

2. Open Solution folder: It enables the user to open the “File Explorer” application, allowing to view the folder associated “Solution Name.” Upon creation, each solution is locally saved in the designated path. It helps to view and access the following,
a. By default, the folder created against the solution will be available in this path – “C:\Users\Username\Documents\Robility\Solution1”.  The user have the flexibility to modify the path during the creation of the solution by specifying the “Location Path”.
b. The “Json” file of the solution serves as a configuration file that contains important information about the Solution Name, its dependencies, settings, version, and other properties required for proper execution within the RobilityDesigner.
c. Each Automation solution is stored in a “XAML file,” which contains the complete workflow, including the sequence of activities, their properties, input/output arguments, variables, and any defined user interactions.

3. Delete: It enables to delete the workflow from the solution.
a. The delete option can be used when the workflow is not necessary or when the workflow has been duplicated which will not be required in solution.
b. The deleted workflows will also be removed in the “Solution folder” and in the “Json” file.

4. Open file location: It enables the user to open the “XAML” file location that is available in the local. The file will be available in the “C:\Users\Username\Documents\Robility\Solution1”.

5. Copy: Workflows can be duplicated by copying and pasting them within the same workflow. This feature is particularly useful when you need to create similar sequences of activities or when you want to reuse a portion of the workflow in different parts of the project. Copying allows for quick replication of logic without starting from scratch.  

Workflow references

The workflow references are the same as the solution dependencies, it populates the features that are used in the workflow along with the version number, but update option will not be possible from here.

4.8.4 Resources

Resources encompass a range of critical assets used to securely store and manage sensitive information, such as DLLs, Vault keys, Interact keys, Project keys, and various types of files. These resources serve as a central repository where all sensitive data can be stored in an encrypted format, allowing secure access by automation processes when necessary.

The primary purpose of using resources is to safeguard critical information while ensuring that automation workflows can still operate efficiently without exposing this sensitive data. By leveraging secure storage, resources prevent unauthorized access to important credentials and configuration values, reducing the risk of data breaches or misuse.

Furthermore, resources facilitate centralized management, meaning all sensitive data can be accessed and controlled from a single location, simplifying the maintenance of security protocols. This structure supports workflows by allowing the automation process to retrieve sensitive information securely, without having to embed sensitive details directly within the workflow. As a result, it significantly enhances the overall security posture of automation processes by keeping private data confidential and accessible only to authorized entities. This also ensures that critical data, such as keys and passwords, is protected from unauthorized exposure or tampering.

4.8.5 External DLL

External DLL

Robility allows the user to invoke an external DLL(Dynamic Link Library) to their automation workflows. Integrating external DLLs into your automation solutions can extend the capabilities of your automation by leveraging existing code and functions. Additionally, it helps to reduce development time and effort.

When to use?

The external DLL can be added to your solutions whenever your automation needs a method which are not available in the Designer. These methods will be created according to the project specifications. The following are some of the use cases where an external DLL might be advantageous to your workflows.
1. Advanced Calculations: If the automation requires complex and statistical calculations that are not supported by Robility Designer, the external dll can be added.
2. Performance Optimization: When your automation leads to high performance it can be optimized through external DLL.
3. Integration with External Systems: When there is a requirement to interact with other software applications, databases, APIs, or services that have functionalities embedded with DLL.
4. Third Party services: when there is a requirement to interact with other third-party libraries, components or services can be integrated with DLL.
Always ensure that the DLL is from a trusted source and follows best practices for integration and usage.

Benefits of DLL

The following are the benefits of adding the external DLL into your automation.

1. It enables the developers to reuse the existing code and functionality in the automation. This leads to faster development of automation processes.
2. It allows the bot to seamlessly integrate with external applications, software, APIs and databases by customizing and leveraging the code functions written in the DLL.
3. Access third-party libraries and APIs that are embedded with DLL functionalities.
4. Utilizing external DLLs can accelerate the development by focusing on core logic of automation while relying specific tasks with DLL.
There are also considerations to keep in mind, such as version compatibility, security, and proper error handling. The developers need to carefully assess the suitability of incorporating an external DLL based on the specific requirements of their automation projects.

Upload DLL

The external DLL can be added to the workflow through solution dependencies option. Follow the below steps to upload the DLL.
1. Launch your automation workflow in Designer.
2. On the left-hand side, you will find the “Solution explorer”.
3. Right click on the solution name and select the “ADD DLL” option.
4. The file explorer window will appear on the screen to choose the DLL from the system.
5. Select the DLL and add it to the workflow.
6. The added dll will appear under the Resources — > References –> Added DLL option along with the version against it.

7. Further, you can find the DLL in the local path where the solution has been created and saved.

Remove/Update DLL

The DLL can be removed from the solution as well. To remove the DLL, follow the below steps to remove it.
1. Navigate to the Resources option and select the DLL.
2. Right click on the DLL and select “Remove DLL” to remove.

The same DLLs can be updated as well. Follow the below steps to update it.
1. Navigate to the Resources option and select the DLL.
2. Right click on the DLL and select “Update DLL” to remove.
3. The updated DLL version along with numbers will appear on the Designer.

Click here to know how the DLL is utilized in the workflow.

4.9 Variables

A variable is a value that can change depending on conditions or on information passed to the workflow. It is also used to store multiple types of data. In Robility Designer, we support large types ranging from generic value, text, number, data table, time, and date, to any .Net variable type.

Creation of Variables

From the Properties panel:

The Variables can be created from the properties panel of the activities. Enter the variable name and press Ctrl + Q , the variables will be declared. 

From the expression editor

Variables can also be created in the expression editor. Open any expression editor, enter the variable name and press ctrl+Q to declare the same inside the expression editor. 

From the Variables panel:

Variables are primarily created using the properties panel, but activities like the “Assign from Primitives” feature can only be created using the variables panel.
1. Click on the variables on the bottom of the designer pane.

2. Select the create variable option.
3. Enter the variable name and choose the variable type respectively.

Removing the variables

Clear unused variable

Robility Designer provides a flexible option to clear the un-sed variables in the workflow to avoid any conflicts. Select the Clear unused variable option from the menu bar. All the un-used variables will be removed.

From the Variables panel

Alternately, you can remove any duplicated or error-prone variable through the variables panel. Go to the variables panel, select the variable and right click on it. Choose the either Delete option or right click and press delete key. 

Existing variables

The designer suggests existing variables whenever you begin entering text in the expression editor or in the variable box. This feature aims to enhance user efficiency by offering prompt suggestions based on the context of your input, facilitating a smoother workflow in the expression editing process. 

4.9.1 Variables Panel

Variables Panel

The variables panel is available at the bottom of the workflow designer pane. Click on it to create and manage the variables inside the flowchart. 

Properties

Name: The names of the variable will appear here. If any variables are duplicated or invalid, there will be an error symbol shown against the name.
Variable Type: The variable type can be chosen and managed here. Click on the variable type and a drop down will appear below displaying the types of the variables.
Scope: This displays the scope of the variable at where the variables has been created. For e.g., either inside the flowchart or in sequence.
Default: This area is used to provide any default values to the variables. Click on it to provide the default values. You can also pass the values as variables inside the default.

Context menu

Right clicking on the variables in the variables panel displays a context menu for the variable.

1. Delete: This option enables the user to delete the variable from the workflow. Alternatively, it can be used to remove the un-used variable from the workflow.
2. Add Annotation: This option allows to create comments to the variable. Click on the option and a pop-window appears to add the annotation.
3. Edit Annotation: This allows to edit the comments added to the variable. 
4. Delete Annotation: This removes the comments for the variable.

4.9.2 Convert Variable to Argument

The Convert Variable to Argument feature allows you to convert an existing workflow variable into a workflow argument without recreating it manually. During conversion, the platform preserves applicable properties, reducing manual effort and ensuring consistency.

To convert a variable:

1. Open the Variables panel.
2. Right-click the variable you want to convert and select Convert to Argument.
3. The variable is converted into a workflow argument and moved to the Arguments panel.

After the conversion:

1. The selected variable is removed from the Variables panel.
2. A new argument is created in the Arguments panel.
3. The argument is assigned the In direction by default.
4. The argument can be configured further and mapped when the workflow is invoked.

Conversion Behavior

Default Argument Direction

When a variable is converted to an argument, the platform assigns the In direction by default. You can change the direction to Out or In/Out from the Arguments panel after the conversion.

Preserved Properties

During conversion, the platform preserves the following properties wherever applicable:

a. Name
b. Data type
c. Default value
d. Scope compatibility

Name Validation

Argument names must be unique within a workflow.

If an argument with the same name already exists, the platform prompts you to provide a unique name before completing the conversion.

Example

If you convert a variable named CustomerName and an argument with the same name already exists, you must rename the converted argument to a unique name, such as CustomerName_New, before the conversion can be completed.

4.10 Arguments

Arguments are as similar as variables. But Arguments are used to pass the data from one project to another project. This also stores the data as collection and can be passed through project using the Invoke workflow activity. In Robility Designer, we support large types ranging from generic value, text, number, data table, time, and date to any .Net variable type.

Arguments Panel

Name: This displays the name of the argument passed in the workflow.
Direction: Select the direction of the Arguments to pass / invoke.
In- The argument mentioned can be used only within the project.
Out- The argument mentioned can be used to pass to another project.
In/Out– The argument can be used either within the project or outside the project.
Argument Type: The Argument type is as same as variable type. The basic types of arguments are as below,

Boolean: This returns the provided value either as True or False.
Int32: This accepts the numeric format values to be stored in the arguments.
String: This accepts text format information in the arguments.
Object: This type of argument accepts different argument types to store in it. This can be used as a flexibility to store any type of data.
Array: This accepts the list of particular format value/information to store in the arguments.
Browse for types: This option enables to browse for various .NET types of arguments.
Default: This area is used to provide any default values to the Arguments. Click on it to provide the default values. You can also pass the values as variables inside the default.

Context menu

Right clicking on the arguments in the arguments panel displays a context menu for the arguments.

Delete: This option enables the user to delete the arguments from the workflow. 
Add Annotation: This option allows to create comments to the arguments. Click on the option and a pop-window appears to add the annotation.

Edit Annotation: This allows to edit the comments added to the arguments. 
Delete Annotation: This removes the comments for the arguments.

Existing Arguments

The designer suggests existing arguments whenever you begin entering text in the expression editor or in the variable box. This feature aims to enhance user efficiency by offering prompt suggestions based on the context of your input, facilitating a smoother workflow in the expression editing process.

4.11 Import Namespaces

Imported Namespace is used to import the class of elements that are available in the namespace. All imported namespaces are displayed in the Import Panel. For instance, if you have imported the System. Data namespace, you can use the DataTable, Data View, Data Column, Data Row and other classes that are available in the namespace.

From the Import panel

1. Click on the Import panel at the bottom of Designer.
2. Enter the namespace that needs to be imported into the workflow. 
3. The available namespaces will be recommended. It will be added to the designer once you click on it.

4.12 Reusable Objects

Reusable Objects

The Robility Designer has now made automation easier by implementing the Re-usable object in our solutions. This feature is available for Desktop, and WebAutomation. This feature allows the user to re-use the elements multiple times which have been detected already in the workflow. This reduces the need to create the same element again and again when it is used in different places. The re-usable objects feature also makes it simpler to maintain the automation scripts, making the entire process more efficient and cost-effective.

How does it work?

The elements which have been detected already can be re-used in the workflow and in multiple activities respective to the feature. The following steps below illustrates how to utilize the Re-usable object. Here we are adding the application name as “Microsoft Word” to detect the elements and to automate on it. Open the designer and create a solution.

1. On the right-hand side, adjacent to the properties section, you will find the Reusable objects.
2. Click on it and select the Add option on the top as shown in the below GIF.
3. The reusable object wizard appears on the screen. Click on the Indicate on screen option.
4. Navigate to the screen to detect the elements and click on “ok”.
5. The Application name and its exe path will be updated automatically.

Now we have added the application, to add the screen name on which the action is to be performed can be detected. Follow the below steps to add the screen. Here we are adding the Menu option as screen name where the action needs to be performed in the application.
1. Click on the application name and select the Add option at the top.
2. Enter the screen name. Here it as “File menu”.
3. Click on the File menu name and select the Add option again.
4. The Robility spy window appears on the screen.
5. Click on the option “Spy” to detect the elements on the Word page.
6. Here we are navigating to the File menu and spy over the “File” option.
7. Click on the Save button.
8. Now the element has been saved in the Re-usable objects.
9. Then add another 4 elements to spy over the SaveAs, ThisPC, and SAVE button. 

Let’s create a workflow and see how the reusable objects work.

In the following example, we are going to Save a word document which is already opened in the desktop. Here we are using the click and set text activity to click the options and enter the text to save the file name.

1. Drag and drop the Click activity from the Desktop Automation.
2. Double click on it and click on the Link from re-usable object.
3. Now, navigate to the reusable object panel and double click on the element to link it. Here we are choosing the File tab.
4. Now, the element has been added to the activity.
5. Let’s, continue the same steps for another two-click activity and link the elements from reusable objects.
6. Then drag and drop the set text from desktop automation.
7. Double click on it and select the link from reusable object hyperlink.
8. Navigate to the reusable panel and double click on the “Enter the file name” element.
9. Enter the string as “Re-usable object” in the input string.
10. Finally, add another click activity and link the element “Save” from the reusable object.
11. Now, execute the workflow.

The bot executes the workflow and automates on the Word document to save the file in the specified name.

4.12.1 Managing Reusable Objects

Delete, edit and find references

The “Delete” and “Edit” options allow you to manage the elements captured in the Reusable Object. You can delete or modify these elements directly as needed. Additionally, the “Find References” option enables you to identify where specific elements are being reused within the activities.

To locate references for a particular element:

1. Right-click on the element name.
2. Select the Find Reference option.
3. The Designer will open the Object Reference window, displaying all instances where the element has been utilized in activities.

This functionality helps streamline workflow management by providing a clear view of element usage and facilitating updates or modifications.

Re-use objects in another workflow

The Reusable object can be used in another workflow within the same solution. Here we are going to illustrate how to re-use the elements in another workflow. In the following
example, we are saving another word document.

1. Open the same solution and create another workflow.
2. Here, drag and drop the click activity from the desktop automation.
3. Double click on it and select the link from reusable objects.
4. Navigate to the reusable object panel and select the “File Menu” element.
5. Now, execute the workflow.

4.13.1 v.26.8.0.9

This release introduces new execution visibility and debugging capabilities in Robility Designer, along with enhancements to the project publishing experience. Several stability, usability, and performance improvements have also been implemented.

Limitation

1. The Run till this activity and Run from this activity options are not supported for the Invoke Flow activity.

What’s new

Run Till This Activity

Users can now execute workflows up to a selected activity using the Run Till This Activity option. This enables faster testing and debugging by automatically running all preceding activities and pausing execution at the chosen activity for validation and analysis. Click here to learn more.

Enhancements

Publish Flow

The Publish workflow process has been enhanced to streamline solution deployment and improve release readiness. During publishing, projects are automatically validated, analyzed, security-checked, versioned, and packaged, ensuring that only compliant and deployment-ready solutions are made available through Robility Manager. Click here to learn more.

Known Issues

1. Double-clicking an activity outside its name text area does not drop it into the workspace.
2. The previous SFTP version is not supported in the latest Designer. Upon deploying to production, the SFTP package must be upgraded to v1.1.1 for proper functionality. This has been validated in both Designer and Runner.
3. When the Copilot window is active, focus does not automatically shift to the Properties window of the selected activity.
4. Step In and Step Over actions are not supported in Invoke Scenarios in this release. This will be addressed in an upcoming release.

Release Date: 29.08.2026

4.13.2 v.26.6.0.19

This release introduces the Immediate Window, Convert Variable to Argument, and bug fixes to improve stability and reliability across Robility Designer.

What’s New

1. Immediate Window
An Immediate Window provides real-time expression evaluation and value inspection while a workflow is paused during debugging. This helps users validate logic and troubleshoot issues without modifying the workflow or restarting the debugging session. Click here to learn more.

2. Convert Variable to Argument
A Convert Variable to Argument option allows users to convert an existing workflow variable directly into an argument from the Variables panel. This eliminates the need to manually recreate the variable, preserving its name, data type, default value, and scope compatibility during conversion. Click here to learn more

Bug Fixes

1. Resolved an issue where the Activity Tray continued to display the workflow status as Running after the workflow was aborted or stopped from the Designer.
2. Fixed an issue where the Designer allowed workflow editing, saving, and re-execution while a workflow was already running, ensuring the UI remains in the correct execution state and preventing concurrent executions.
3. Addressed an issue where opening a workflow from a recently opened solution containing missing features failed in the Designer.
4. Fixed an issue where the workflow publishing process stopped responding during solution validation, preventing the workflow from being published.

Known Issues

1. Double-clicking an activity outside its name text area does not drop it into the workspace.
2. The previous SFTP version is not supported in the latest Designer. Upon deploying to production, the SFTP package must be upgraded to v1.1.1 for proper functionality. This has been validated in both Designer and Runner.
3. When the Copilot window is active, focus does not automatically shift to the Properties window of the selected activity.
4. Step In and Step Over actions are not supported in Invoke Scenarios in this release. This will be addressed in an upcoming release.

Released Date: 08.07.2026

4.13.3 v.26.5.0.10

This release introduces new execution visibility and debugging capabilities in Robility Designer, along with enhancements to the configuration experience. Several stability, usability, and performance issues have also been addressed.

New Features

Configuration Layout Enhancement

Runtime configuration settings have been consolidated into a single, organized section on the Designer Home Page. This simplifies the management of execution visibility, monitoring, and resilience settings, enabling users to easily configure workflows for development, testing, or production environments.

Activity Tray

A new Activity Tray provides real-time visibility into workflow execution by displaying the currently running activities. This helps users monitor workflow progress and identify bottlenecks during testing and troubleshooting.

Execution Trail

The Execution Trail captures the complete execution path of a workflow, including branching decisions and execution insights. It provides both real-time monitoring and post-execution analysis, supporting debugging, auditability, and root-cause investigation.

Start From Here

Users can now start workflow execution from any selected activity by using the Start From Here option. This enables faster testing and debugging by skipping preceding activities and executing only the desired workflow section.

Known Issues

1. Double-clicking an activity outside its name text area does not drop it into the workspace.
2. The previous SFTP version is not supported in the latest Designer. Upon deploying to production, the SFTP package must be upgraded to v1.1.1 for proper functionality. This has been validated in both Designer and Runner.
3. When the Copilot window is active, focus does not automatically shift to the Properties window of the selected activity.
4. Step In and Step Over actions are not supported in Invoke Scenarios in this release. This will be addressed in an upcoming release.

Released Date: 30.05.2026

4.13.4 v.26.5.0.2

This release includes the following bug fix:

Bug Fix:

Fixed an issue in the Invoke Flow activity after upgrading Designer to version 26.4.0.5, where the unhandled exception shown in the log did not match the actual exception. The correct exception is now displayed in the log.

Known Issues

1. Double-clicking an activity outside its name text area does not drop it into the workspace.
2. The previous SFTP version is not supported in the latest Designer. Upon deploying to production, the SFTP package must be upgraded to v1.1.1 for proper functionality. This has been validated in both Designer and Runner.
3. When the Copilot window is active, focus does not automatically shift to the Properties window of the selected activity.
4. Step In and Step Over actions are not supported in Invoke Scenarios in this release. This will be addressed in an upcoming release.

Released Date: 05.05.2026

4.13.5 v.26.4.0.5

This release delivers targeted bug fixes to improve stability, usability, and reliability across Robility Designer.

Bug Fixes

1. Image Activity
Fixed an issue in Manage Features where Image Automation and Web Automation activities were not updated correctly, continued to show the existing package version, and lead to unintended package removal. This issue has now been resolved, and the packages are upgrading properly.

2. Invoke Workflow Activity
a. Fixed an issue where imported workflows were not visible in the Invoke Workflow Activity’s dropdown when the activity was added to a sequence.
b. Fixed an issue where no proper error message was displayed when running the activity. The activity now shows a clear and descriptive error message upon failure.

3. Marketplace
Fixed an issue where using keyboard arrow keys to select a Marketplace template unintentionally opened it. Templates are now opened only upon a deliberate click, allowing seamless keyboard arrow navigation.

4. Fixed an issue where opening a published solution with non-compatible lower-version activities caused the Designer to freeze. The Designer now remains stable and responsive in such scenarios.

5. Resolved an issue where the Designer displayed an outdated Robility icon on the Manage feature page.

Known Issues

1. Double-clicking an activity outside its name text area does not drop it into the workspace.
2. The previous SFTP version is not supported in the latest Designer. Upon deploying to production, the SFTP package must be upgraded to v1.1.1 for proper functionality. This has been validated in both Designer and Runner.
3. When the Copilot window is active, focus does not automatically shift to the Properties window of the selected activity.
4. Step In and Step Over actions are not supported in Invoke Scenarios in this release. This will be addressed in an upcoming release.

Released Date: 17.04.2026

4.13.6 v.26.3.0.9

This release delivers targeted bug fixes to improve stability, usability, and reliability across Robility Designer.

Bug Fixes

1. Workflow & Naming Behavior
Fixed an issue where imported workflows were incorrectly appended with a duplicate suffix. The workflow name is now retained as imported; a suffix is applied only when a duplicate already exists.

2. UI & Alignment Fixes
Resolved a misalignment in the sign-in popup where the “URL should start with https” alert appeared off-screen. The alert is now properly centered on the Activation screen.

3. Button State Corrections
Fixed the Stop button remaining enabled during an active security scan. The button is now correctly disabled to prevent unintended interruptions.

4. Publish Dropdown Accuracy
Addressed an issue where incorrect project names appeared in the Publish dropdown when Designer was activated by another user within the same tenant.

5. Feature & Dependency Management
Fixed an issue where older feature folders were not removed post-update due to active dependency usage within the Designer.

6. Feature Uninstall Identification
Resolved difficulty in distinguishing in-use and unused features during batch uninstallation. A confirmation dialog now indicates which features are active, prompting the user to confirm before proceeding.

7. Invoke Template Activity
Fixed compatibility issues with the Invoke Template activity when the tenant was configured locally. The activity now supports Azure-only configurations.

8. Variable Handling in Notification Activity
Addressed an issue where active variables (e.g., integer types) within the Notification activity were incorrectly deleted. Variables in use are now protected from deletion.

9. Workflow Reload on Publish
Fixed an issue where workflows failed to reopen correctly after a project reload during multi-workflow publishing.

10. Sign-in URL Validation & Persistence
Resolved a validation gap that allowed invalid URLs to persist, causing inconsistent sign-in states (e.g., displaying “Activate” instead of “Sign in”). The last valid URL is now retained and restored on reload.

Known Issue

1. Double-clicking an activity outside its name text area does not drop it into the workspace.

2. The previous SFTP version is not supported in the latest Designer. Upon deploying to production, the SFTP package must be upgraded to v1.1.1 for proper functionality. This has been validated in both Designer and Runner.

3. When the Copilot window is active, focus does not automatically shift to the Properties window of the selected activity.

4. Step In and Step Over actions are not supported in Invoke Scenarios in this release. This will be addressed in an upcoming release.

Released Date: 28.03.2026

4.13.7 v.26.3.0.1

This release includes bug fixes and enhancement in the following areas:

Enhancement

1. Library Updates
All dependent libraries have been upgraded to their latest stable versions. This improves security, performance, and workflow reliability while ensuring seamless compatibility with both existing and new workflows.

Action Required

1. When upgrading to Designer v26.3.0.1, ensure that all associated activities are upgraded to versions compatible with this Designer release. Activities from earlier versions are not supported with Designer v26.3.0.1.
2. If you encounter any issues with the upgraded activity versions, you may need to downgrade both the Designer and the related activities to compatible lower versions to ensure stable functionality.

Bug Fixes

1. Published Solution
When publishing a solution from the designer using the “This PC” option, the “Local Path” field in the “Publish Solution in Local” popup did not correctly reflect the actual destination path of the published solution. This issue has now been fixed.

2. Variables Removed After Uncommenting Activity
When any activity is dragged into a sequence, a variable is created for that activity, if you comment and then uncommented the activity, the created variables were removed. This issue has now been fixed.

3. Update Popup
When the solution is opened using the “Open Solution” option, the Update popup does not appear. This issue has now been fixed.

4. Solution Workflow Count
When multiple workflows in the solution were displayed, the Analyze Solution screen showed duplicated counts of the workflows. This issue has now been fixed.

Known Issues 

1. Log Analytics – Error Highlighting in Multiple Invoked Workflows
When multiple workflows are invoked, the activity causing an error may not be highlighted in the subsequent workflows. This issue will be resolved in the upcoming release.

Released Date: 09/03/2026

4.13.8 v.26.2.0.4

This release includes enhancements to the NLog package.

Enhancement

The NLog package has been upgraded to version 6.0.7, delivering improved logging reliability, performance, and compatibility. The update supports both existing and new workflows.

Released Date: 09/02/2026

4.13.9 v.26.1.0.5

In this release, we have introduced new features and bug fixes to improve workflow design, publishing reliability, access control, and error visibility within the Workflow Designer.

What’s New

  1. Remove Surrounding Sequence
    The Remove Surrounding Sequence option is now available in the Workflow Designer. Users can remove a nested sequence and move all contained activities directly into the parent sequence. The original execution order of activities is preserved after removing the nested sequence.
  2. Log Analytics Improvements
    Error identification within Designer log analytics has been improved. When you click on an exception cause in the output, the activity where the error occurred is now highlighted.

Bug Fixes

  1. Workflow Save Issue
    Fixed an issue where workflows were not saved correctly when multiple workflows were open during a Designer feature update or uninstallation. Workflows now reopen without losing any unsaved changes after a feature update or uninstallation.
  2. Designer Update Notifications with Different Date Formats
    Fixed an issue where Designer update notifications did not display correctly for certain system date formats. Notifications now display correctly regardless of the date format configured on the user’s machine.
  3. Publish Large Workflows
    Fixed an issue that caused errors when publishing large workflow files. Large workflows can now be published directly from the Designer without errors.
  4. Restricted User Permissions for Project Access
    Fixed an issue where projects shared with users without access caused unexpected behavior. Now, when a published project is shared with a user who does not have access, it opens in This PC mode by default.

Released Date: 31/01/2026

4.13.10 v.25.11.0.21

In this release, we have introduced enhancements to improve debugging, workflow management, and usability within the Designer.

What’s New

Interact Workflow Assistant: Introducing Interact Workflow Assistant in your Designer now, which guides you through selecting queues, choosing actions, and automatically generating the entire workflow structure with only Interact activities. It creates all required Interact activities, sets up the JSON schemas, maps fields, and prepares variables—eliminating most of the manual configuration.

Enhancements

Workflow Management:

1. Workflow Analyzer Rules– New rules have been added to help developers adhere best practices and ensure higher consistency across automation projects.
2. Clear Unused Dependencies, Imports & Sequence– Remove unused dependencies(activities), imports and sequence that are not referenced or used anywhere in the solution, keeping projects cleaner and more manageable.
3. Security Scan result: The latest version of Designer now publishes the security scan status to Robility Manager as Passed, Failed, or Yet to Scan ensuring clear visibility for all users in the project.
4. Designer Updater Notification: Starting with this Designer version, the updater notification is enhanced to work seamlessly with all date formats.


4.13.11 v.25.11.0.1

This update includes an essential fix to improve the overall development experience in Robility Designer.

Bug Fixes

Resolved: An issue where users were unable to publish a workflow. The validation error occurred when an argument was used within the workflow. This issue has now been fixed.

Released Date: Nov-11-2025

4.13.12 v.25.10.0.43

This update includes an essential fix to enhance your development experience in Robility Designer.

Bug Fixes

ResolvedAn issue where the Web Automation Extract Data activity failed during element spying due to a version mismatch in the ActiproSoftware.Wizard.Wpf.dll on the Designer. This issue has now been fixed.

Released Date: Nov-07-2025

4.13.13 v.25.10.0.26

In this release, we have introduced enhancements to improve debugging, workflow management, and usability within the Designer.

What’s New

Advanced Debugging Options – The Debug feature now includes enhanced functionalities to improve troubleshooting and workflow analysis:

a. Step In – Pauses at each activity to allow step-by-step validation.
b. Step Over – Executes the workflow without pausing at each activity.
c. Restart – Restarts the debugging process from the beginning.
d. Debug Watcher – A live window that displays real-time values assigned to variables during execution.

Toggle Breakpoint – The Toggle Breakpoint option is now available in the Context Menu, simplifying the process of adding breakpoints to activities.

Enhancements

Workflow Management:

a. Workflow Analyzer Rules – New rules have been added to help developers adhere best practices and ensure higher consistency across automation projects.
b. Clear Unused Workflows and Arguments – Remove unused workflows and arguments that are not referenced or used anywhere in the solution, keeping projects cleaner and more manageable.
c. Delete Variables and Arguments – Variables and arguments can now be easily deleted using the Delete key for faster cleanup.

Workflow Canvas Improvements:

a. Zoom In and Zoom Out – Users can now zoom in and out of the workflow canvas using Ctrl + Mouse Wheel, Ctrl + “+” / “–”, or the zoom control dropdown, improving visualization for complex workflows.

Bug Fixes

1. Addressed an issue where importing a workflow failed and threw an exception when the source and destination solutions had the same name.
2. Previously, workflows could be published even if they contained errors within it. This issue has now been addressed. 

Known Issue

When debugging a workflow, if an exception is thrown, the workflow execution will be aborted; however, the activity highlighter may remain visible. To remove it, double-click the activity or click outside of it.

4.13.14 v.25.8.0.25

This release of Robility Designer delivers enhanced flexibility and reliability.

What’s New

The Designer’s activation and communication processes have been enhanced to improve security between the Designer and Robility Manager.

Note: If you continue to use existing versions of Designer, it will work without affecting execution and does not require any action.

Bug Fix

License Activation Error

1. Resolved an issue where Designer activation could fail with the error “License has expired” if the system date format was set to MM/dd/yyyy instead of dd/MM/yyyy.
2. Activation now works reliably across different system date formats.

4.13.15 v.25.7.0.52

This update includes critical fixes to enhance your development experience in Robility Designer.

Bug Fixes

Resolved: An issue where the workflow or solution failed to launch when an Invoke Workflow activity was used within an already invoked sub-workflow. This scenario is now properly handled.

Known Issue

Designer activation may fail with the error “License has expired” if the system date format is set to “MM/dd/yyyy” instead of “dd/MM/yyyy”.
This issue will be resolved in the upcoming version. In the meantime, please change your system’s date format to “dd/MM/yyyy” to activate the license successfully.

Released Date: Jul-31-2025


4.13.16 v.25.7.0.41

This update brings key enhancements and critical fixes to improve your development experience in Robility Designer.

Enhancements

1. Workflow Analyzer
Build with confidence using real-time design validations. The analyzer checks workflows against best practices and flags inconsistencies early ensuring higher reliability before deployment. Click here to learn more. 

2. Security Scan
Strengthen automation security by detecting hardcoded sensitive values such as passwords or credentials. This proactive check ensures your workflows are secure by default. Click here to learn more. 

3. UI Enhancements
Enjoy a refreshed user interface for a modern, intuitive, and seamless workflow-building experience across Robility Designer.

Bug Fixes

Resolved: An issue where resolution values were passed as null in the solution JSON during publishing to Robility Manager has been fixed.

Known Issue

Designer activation may fail with the error “License has expired” if the system date format is set to “MM/dd/yyyy” instead of “dd/MM/yyyy”.
This issue will be resolved in the upcoming version. In the meantime, please change your system’s date format to “dd/MM/yyyy” to activate the license successfully.

Released Date: Jul-26-2025

4.13.17 v.25.7.0.24

This update delivers essential fixes and improvements for the Robility Designer.

Bug Fix

The latest Designer version resolves an issue where multiple versions of the same feature were displayed in the Solution Explorer. In cases of duplicate features, a Version Analyzer now allows users to identify and update to the latest version of the feature.

Limitations

The previous SFTP version (v1.0.6) is not compatible with the latest Robility Designer. To ensure proper functionality, users must upgrade the SFTP package to v1.0.7.

Known Issue

1. On the first attempt, intelligence-based predictions may not load in expression editor boxes. As a workaround, delete the existing text and re-enter to trigger the prediction. 
2. While a workflow is running, certain irrelevant context menu options may appear enabled in the Solution Explorer. 
3. There is a known dependency conflict with the “Editor Controls” DLL used in Core Activities and other features such as Excel, FS, Salesforce, and Notification etc. This conflict may cause an exception when loading the activity. To resolve the issue, uninstall all the related features and then reinstall them.

4.13.18 v.25.5.0.36

This update delivers essential fixes and improvements on the Robility Designer.

Enhancement

Introducing Copilot feature in Robility Designer, your built-in AI assistant for automation development, offering documentation guidance for Robility, VB.NET code generation, and a dedicated playground to test GenAI activity outcomes. Click here to learn more. 

Limitations

The previous SFTP version (v1.0.6) is not compatible with the latest Robility Designer. To ensure proper functionality, users must upgrade the SFTP package to v1.0.7.

Known Issue

1. On the first attempt, intelligence-based predictions may not load in expression editor boxes. As a workaround, delete the existing text and re-enter to trigger the prediction. 
2. While a workflow is running, certain irrelevant context menu options may appear enabled in the Solution Explorer. 
3. There is a known dependency conflict with the “Editor Controls” DLL used in Core Activities and other features such as Excel, FS, Salesforce, and Notification etc. This conflict may cause an exception when loading the activity. To resolve the issue, uninstall all the related features and then reinstall them.

4.13.19 v.25.5.0.15

This release includes important bug fixes to enhance the user experience and improve workflow reliability.

Bug Fixes

1. Previously, when a business exception was thrown inside a Try block, it was not correctly caught as a business exception in the Catch block. This issue has now been resolved.
2. The Desktop Automation UIA3 version was incorrectly displayed as v2.2.7. This has been corrected to reflect the accurate version.
3. Some missing activities were only partially updated in the solution explorer due to activity incompatibility. This issue has now been addressed to ensure proper updates.
4. Users were unable to activate Robility Designer from the URL available in designer due to an extra slash (“/”) in the link. This has now been fixed, allowing smooth activation.
5. Previously, support files were deleted cleared when Robility Designer was uninstalled. The uninstallation process now removes all related files properly.
6. Resolved an issue that prevented opening the solution when multiple versions of the same published workflows were present in the folder path.

Limitation

The previous SFTP version (v1.0.6) is not compatible with the latest Robility Designer. To ensure proper functionality, users must upgrade the SFTP package to v1.0.7.

4.13.20 v.24.10.0.13

This release includes enhancements and bug fixes designed to improve your experience and expand your capabilities on our platform.

Enhancements

1. New Designer Interface: The Designer has been revamped with an updated UI.
2. Solution Folder Path Update: Previously, solutions were placed inside the “Robility” folder. Now, if a user has access to multiple tenants, folders will be organized as follows:
    a. Tenant Name → Solution Name
3. Overwrite/Rename Functionality: We’ve added the option to open existing solutions from one tenant folder to another. Users can now move solutions to a destination folder with options to overwrite or rename the solution.
4. Publish Enhancement: In the Designer, when switching from ‘This PC’ to publish a workflow against a new project, a message box will prompt users to confirm syncing of the Credential Vault, Interact Key, Solution Explorer, and related activities.
5. Toolbox Search: Advanced search options have been added to the Designer toolbox, enabling users to find items with partial matches and case-insensitive searches.
6. Auto – Update: The Updater will auto-activate if a lower version of Designer is installed and implements force update within 48 hours.
7. Connection Status Icon: A new icon has been added to indicate Connect and Disconnect status for Robility Designer Enterprise.
8. Latest Activity Versions: Only the latest available versions of activities used in a workflow will be displayed upon opening the workflow.
9. Project Key Visibility: To support integration activities (Google Sheets & Google Drive), we’ve added the “Project Key” in Solution Explorer alongside Interact and Vault keys whenever a project, other than “This PC,” is selected.

Bug Fixes

1. Manage Feature:
a. The “Select All” option was not working, and user have to manually select the features, now this has been fixed.
b. Previously, the Manage Features menu was accessible while workflow execution was running. Now, this is fixed.
2. Marketplace: In Designer home page, Dynamic loading has been implemented for the Marketplace section, adjusting the number of visible templates based on the window size.
3. DLL Error Message Delay: There was a delay in displaying the error message when updating or adding the same DLL. This issue has now been resolved.
4. Designer Restart Issue: The designer was previously closing automatically upon restart; this has been fixed.
5. Offline Mode Restrictions: The Manage Feature and Publish options are now disabled when the designer is launched in offline mode.

Known issue

The IntelliSense menu that pops up while pressing “CTRL + SPACE” will not be displayed for the first launch of designer. Once the workflow has been saved, it will appear.

Released date: 4-11-2024

4.13.21 v.24.5.0.3

This release includes enhancements and bug fixes designed to improve your experience and expand your capabilities on our platform.

Enhancements

These enhancements improve the accuracy and consistency of workflow automation, ensuring seamless integration and better user experience.

Resolution and Font Smoothing Settings:

1. The Designer now retrieves bit depth and font smoothing settings from Windows and saves them in the solution JSON file as “Resolution Depth”: 32, “Font Smoothing”: “True”.
2. These settings are included in the Solution JSON file, capturing Windows resolution and scale settings when creating a new solution.
3. Existing solutions will be updated with these parameters when opened in the latest version of Designer.

Desktop Automation Integration:

1. The Desktop Automation UIA3 and Desktop Automation features have been merged into a tree-like structure, which includes Common activities, UIA, and UIA3.
2. Users will now be able to download Desktop UIA along with UIA3.

Workflow Import Enhancements:

1. When a workflow is imported, the system will automatically compare its resolution, scale, and ClearType status with the master (development) workflow.
2. If the imported workflow matches the master workflow data, the system will allow the RPA Developer to invoke the workflow.
3. If discrepancies are found, the system will display a warning message: “Image automation may fail due to mismatch in resolution, scale.”

Home Tab Updates: Recent solutions and marketplace scroll bars are now right aligned and all text fonts are standardized.

Create New Solution and New template Window Changes:

In the Create New Solution and New Template windows, “Location” has been renamed to “Path,” and the “Create Solution” button has been renamed to “Save.”

Marketplace Window Changes:

The MarketPlace window has undergone Ui changes to enhance user experience by improving usability, and functionality. 

Tenant and Project Management Enhancements:

1. Ensured seamless switching between tenants without affecting existing projects and folder structures.
2. Enabled RPA developers to save and manage workflows/templates in tenant-specific directories.

Bug fixes

1. The Marketplace menu changes when we change the resolution 150. Now we changed based on resolution it will work.
2. Designer – Project Screen UI Fixes: Fixed button alignment issue when changing resolution to 1024*768.
3. Designer – Update Screen UI Fixes: Completed UI cleanup with slightly rounded smooth edges.
4. Toolbox Section Fixes: Fixed delay in loading upon exiting Full View mode.
5. Docking Panel Fix: Fixed issue with docking panel being enabled after reloading the designer workflow page.
6. Publishing Workflow Fix: Fixed issue preventing error message thrown when workflow is published with same versions to Manager.
7. Run and Debug Options Fix: Fixed issue with “Run” and “Run as Debug” options being enabled during the workflow execution if it contains invoked workflow.
8. Fixed issue where the designer became unresponsive when updating Python files if the template already contained 5 Python files.

Known issues

1. The intelligence and methods won’t display on the first time.
2. If the PythonScriptLoader activity is used without loading the environment and the filename property is not selected, the name retrieval will not work.
3. The Publish dropdown option does not move along with the designer. However, if the user performs any click action, the changes take effect.

4.13.22 v.24.2.0.0

This release includes enhancements and bug fixes designed to improve your experience and expand your capabilities on our platform.

New Features

In this release, we’re glad to introduce two new feature that would help the user to improve efficiency and code robustness.

1. “OpenPublished” – workflow menu on the Homepage to open the published package to improve navigation efficiency.
2. Surround with Try-Catch Feature: To simplify error handling and enhance code reliability, we’ve added a feature that allows users to easily wrap code blocks with a try-catch structure, improving code robustness.

Enhancements

Our latest update includes implemented intelligence and auto-suggestion features for variables and arguments. This makes the development process faster and more error-free.

Bug Fixes

1. Toolbox and Property Window Resizing: We’ve addressed issues related to the resizing of the toolbox and property window, ensuring a smoother user interface experience.
2. Marketplace Download Window Glitch: We’ve fixed the recurring issue where the marketplace download window would persistently appear even after being closed, allowing for uninterrupted downloads and a better user experience.

Known Issue

1. The intelligence and methods won’t display on the first time. – The Auto suggestion for the variables will not occur on the first instance, clear the name or press CTRL+ Spacebar to view the suggestion list. 
2. The Designer and Runner cannot be installed in the same machine. 

4.13.23 v.24.1.0.1

This release contains enhancements and addresses bug fixes. 

Enhancements

1. Enhanced log file: While running the workflow in debug mode, write the variable name and value in the specified format when the value of the variable has changed. It supports “String, Boolean and double values”.
2. MarketPlace: Discover our latest addition, the “Marketplace” feature, live in the application. It acts as a centralized hub for various RPA-related objects.

Bug Fixes

1. Previously encountered an object reference error when opening a solution. Now, it has been fixed
2. Save functionality was not working while downloading from the existing marketplace. Now resolved. Users are prompted to confirm workflow save before restarting the designer.
3. “Get Help” and “Help Document” options were not working for some features. Fixed the issue by handling case validation in the activity name.
4. After opening the solution, activities in the workflow were not loaded in the toolbox. Now it has been fixed
5. Templates published to the marketplace were not functioning as expected. Resolved the problem and fixed in Feature Service.

Known Issues

1. IntelliSense and methods will not be updated the first time.
2. Once downloaded the Marketplace listing, the window will appear continuously, please close and re-open the designer.  

4.13.24 v.23.12.0.3
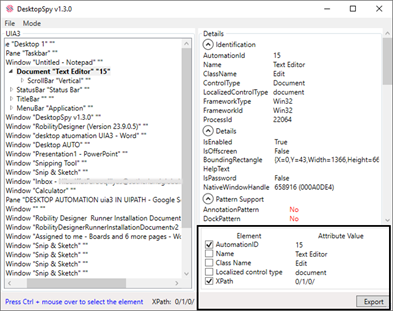
This release contains only bug fixes. 

Bug Fixes

1. We have implemented the service changes to download the feature in the private blob. 
2. The “Robility.Core” activities name was mismatched in Runner, hence the activities were deleted during execution. Now, it has been resolved. 

Known Issue

1. IntelliSense and methods will not be updated the first time 
2. Designer and runner cannot be installed on the same machine. 
3. We cannot publish the public template from designer to hub. 
4. The following features cannot be downloaded from the “ManageFeatures”, 
    a. Microsoft.Activities
    b. TestFeature
    c. Robility.CognitiveServices 

5. UI Automation Activities

5.1 Overview

Introduction

The UI Automation package in Robility provides a comprehensive set of activities designed to automate graphical user interface interactions within a variety of software applications. These activities include tasks such as selecting elements, entering data into text fields, clicking buttons, navigating between web pages, and verifying information, among others.

By replicating human interactions with the application interface, UI Automation enables tasks to be executed with efficiency, accuracy, and consistency. It plays a crucial role in automation strategies, driving productivity, reducing errors, cutting costs, ensuring compliance, and enhancing customer experiences across diverse industries.

About the UI Automation package

Web Automation: These activities are tailored for automating web-based applications and processes. Users can interact with web elements, extract data, fill out forms, click buttons, and navigate between pages.

Desktop Automation: Desktop Automation activities automate tasks related to desktop applications. These include interacting with desktop UI elements, extracting data, simulating keyboard and mouse actions, and performing various operations within desktop-based applications.

Image Automation: Image Automation activities use image recognition to automate tasks based on screen elements. This includes actions like identifying and clicking on specific screen areas, verifying visual elements, and triggering automation actions based on images.

Form Builder: These activities streamline form-filling processes within applications. Users can automate the input of data into forms, validate form fields, submit forms, and handle related actions.

Screen Recording: Screen recording activities capture, and document actions performed on the screen. This feature is useful for creating automated workflows by recording user interactions, generating automation scripts, and replaying recorded steps.

Terminal: Terminal in Robility is designed to interact with and automate legacy mainframe systems accessed through terminal emulators. These activities allow users to seamlessly automate data entry, retrieval, and system navigation within terminal applications, improving efficiency and reducing the need for manual intervention.

UI involved Activities

The following are the list of activities that involves UI:

  • Web Automation
  • Desktop Automation
  • Image Automation
  • Terminal

These activities are segregated based on their interaction with different aspects of the user interface for several reasons:

Target Platform: Activities like Web Automation are specifically designed to interact with elements within web browsers, such as HTML elements, buttons, and forms. These activities are optimized for web-based applications and workflows.

User Interface Elements: Desktop Automation activities focus on interacting with UI elements within desktop applications, such as windows, buttons, input fields, and menus. These activities are tailored for desktop-based tasks and workflows.

Interaction Methods: Image Automation activities use image recognition and processing techniques to interact with elements represented as images on the screen. They are used when direct access to UI elements or conventional interaction methods is not feasible or available.

Certain applications have dynamic or constantly changing UI elements, making it challenging to target them accurately, in that we do recommend to use “Dynamic” accuracy option in “Image Automation”.

Unsupported Applications

Project Compatibility

5.2 Desktop Automation

About

Robility® offers an intuitive and interactive feature that allows users to automate desktop-based applications. Commonly automated desktop applications include ERP systems, CRM tools, file management systems, Microsoft applications, and more. Desktop Automation enables the robot to capture elements and perform specified actions within the application. These activities are similar to web automation, with the key difference being that the robot operates on desktop/Windows applications.

Integration with Desktop Automation UIA3

Desktop Automation will be installed and integrated alongside the Desktop Automation UIA3 feature. Both features offer the same list of activities, with UIA3 providing more advanced technology. Desktop Automation UIA3 is more compatible and accurate in capturing the “Automation ID,” which Desktop Automation may sometimes struggle to detect.

Neither feature supports SAP applications unless “GUI scripting” for SAP has been enabled. But don’t worry—we offer another feature that helps you automate SAP applications. Click here to learn more.

Common Activities

Desktop Automation and Desktop Automation UIA3 share few common activities, such as “Launch Application,” “Get Attributes All,” and “Get Full Window Title.” These activities do not have any dependencies and can be easily combined and automated with other activities.

Dependencies

Desktop Automation may not support some applications, or specific elements might not be detected; in such cases, only the application itself will be detected. For better accuracy in detecting and identifying elements, Desktop Automation UIA3 may be necessary for certain applications.

In other scenarios, neither feature may support automation if the “Automation ID” attribute is indicated as “Not supported” in the application. The “Automation ID” is crucial for automating both desktop UIA and UIA3 activities. You can use the “Spy Explorer” option or the “UIA3 Spy Window” to check whether the element has an automation ID.

The robot will perform the specific action only if the “Automation ID” is supported for the element in the application.

Use Case

Here are some practical scenarios where Desktop Automation can be effectively utilized:

Report Generation: Automate the creation of reports in various formats (e.g., Excel, PDF) by extracting and consolidating data from multiple desktop applications.

Data Validation: Ensure data accuracy by cross-referencing information from different sources and flagging any discrepancies or inconsistencies.

HR and Employee Onboarding: Streamline employee onboarding processes, including account creation, document submission, and completion of training modules.

Data Entry: Automate repetitive data entry tasks, such as transferring information from one section to another within an application.

5.2.1 Release Notes

v.2.3.5

This release includes enhancements that improve interaction flexibility and control.

Enhancements

1. Offset X and Y Support
The Click and Set Text activities now support Offset X and Offset Y properties, allowing you to specify the click position relative to the target UI element.

Note: Downgrading the latest Desktop Automation package may result in missing activities.
 
Released Date: 08/07/2026

5.2.2 Robility Spy

The Robility Spy Window provides various components designed to simplify the selection of elements within an application. This makes the automation setup process more intuitive and efficient.

How to Use?

1. To start:  To initiate the automation process, you need to identify and interact with the elements involved. The Robility Spy plays a crucial role in this by helping you efficiently select and configure these elements.

2. Selecting Elements: Begin by choosing the element in the application that you wish to automate. The Spy Window will assist in highlighting and selecting this element.

3. Understanding Attributes: Each element within an application is associated with several attributes. The Robility Spy helps you identify and select the necessary attribute for the specific element you are targeting.
Example: If you need to automate a button, click, the attribute might be its “ID” or “Name,” depending on how the button is defined in the application.

4. Automatic Attribute Selection: When you click on an element within the Spy Window, default attributes are automatically selected. This feature typically covers most automation scenarios, ensuring that you have the essential attributes for successful automation.

Default Attributes

The Robility Spy Window for Desktop Automation automatically selects certain default attributes. These attributes are mandatory for the successful automation of desktop applications. The default attributes include:

a. App: Specifies the root directory path of the application.
b. Cls: Represents the class name of the detected application.
c. Title: Indicates the window title of the element within the application.
d. ApplicationName: Provides the name of the detected application.
e. Id: Refers to the unique ID of the UIA (User Interface Automation) element.
f. Name: Shows the name assigned to the UIA element.
g. Cls: Identifies the class of the UIA element.

Configuring Attributes

1. Variable Assignment: You can assign variables to these attributes in the “ExecuteBy” section to dynamically adjust the automation process.

2. Hardcoding Values: Alternatively, you can hardcode default values for any of these attributes, depending on your specific automation needs.

5.2.3 BringToFront

BringToFront

The ‘BringToFront’ activity helps you bring the application into focus when it has been minimized during runtime.

Properties

INPUT

DelayAfter: It assists the user to add a delay before initiating subsequent activities. The delay duration here is in milliseconds. By default, it is set to “300” milliseconds. When the option is left blank, the delay will not be considered.

DelayBefore: It assists the user in adding a delay before starting the execution of the activities. The delay duration here is in milliseconds. By default, it is set to “200” milliseconds. When the option is left blank, the delay will not be considered.

ExecuteBy: Gets auto filled once the “Active Application” is selected. This contains the set of attributes for the specific spied element.

UIA3: It indicates the user to integrate “UIA3” functionality within the workflows. It accepts values in “Boolean” datatype. 
True: It will enable “UIA3” functionality within the workflow.
False:  It will disable “UIA3” functionality within the workflow.
By default, the parameter is set to false. When left empty, it will not consider UIA3 functionality. 

WaitTime: It enables the user to introduce a delay before initiating subsequent activities. The delay is specified in milliseconds.
By default, it is set to 10000 milliseconds. Leaving the option blank will result in no delay being applied.

WindowState: This parameter allows you to configure the application behavior.
Maximize: Maximizes the application.
Restore: Restores the application.
None: Does not perform any action.
By default, the ‘Maximize’ option will be selected.

MISC

DisplayName: Displays the name of the activity. The activity name can be customized, which aids in troubleshooting.

SkipOnError: Specify the “Boolean” value as “True” or “False.”
True: Continue executing the workflow regardless of any errors thrown.
False: Halt the workflow if it encounters any errors.
None: If the option is left blank, the activity will, by default, behave as if “False” were chosen.

Version: It indicates the version of the feature being used.

RESULT

Result: It provides the ability to view the execution status of the activity. It returns values in “Boolean.”
True: Indicates that the activity has been executed successfully without any errors.
False: Indicates that the activity has been unsuccessful due to an unexpected error being thrown.

Represents mandatory fields to execute the workflow

Tips:

1. Enable the “UIA3” functionality when you have employed “DesktopAutomationUIA3” activities in the workflow. 
2. If “UIA3” is enabled, and there are no “UIA3” activities used in the workflow, it will not execute properly. 

5.2.4 CheckAppState
CheckAppState

This activity helps the user to check the state of a desktop application by verifying the specified element in it. It enables automation processes based on the availability or disappearance of a particular element on the application, enhancing the control and flexibility of your automation workflows.

Properties

INPUT

DelayAfter: It assists the user to add a delay before initiating subsequent activities. The delay duration here is in milliseconds. By default, it is set to “300” milliseconds. When the option is left blank, the delay will not be considered.

DelayBefore: It assists the user in adding a delay before starting the execution of the activities. The delay duration here is in milliseconds. By default, it is set to “200” milliseconds. When the option is left blank, the delay will not be considered.

ExecuteBy:Gets auto filled once the “Active Application” is selected. This contains the set of attributes for the specific spied element. This parameter accepts values in “String” datatype. You can either hardcode the values in “String” format or can enter the values in the “String” datatype.

WaitFor: Indicates to choose the event of the action to be performed.
Element to appear: It will wait for the detected element to appear in the UI on the webpage until the wait time provided.
Element to vanish: It will wait for the detected element to vanish from the UI on the webpage until the wait time provided.

WaitTime: It helps the user to add a delay for activity execution, either to wait for the element to appear or to disappear. The format of the delay here is milliseconds. The property provides 5,10,15,30 milliseconds in the drop-down. You can also provide the time in milliseconds.

MISC

DisplayName: Displays the name of the activity. The activity name can be customized which will help in troubleshooting.

Version: It specifies the version of the web automation feature in use.

Represents mandatory fields to execute the workflow.

Use Case

Let’s start with the example provided in the “Click” activity. (Click here to refer to the activity). In this example, we are automating the “Calculator” application. In the following scenario, I will check whether the application is accessible and available for automation.

 Steps to build the bot

1. Create a new solution or open an existing solution.
2. Install the latest feature of DesktopAutomation from the Manage features.
3. Drag and drop the “CheckAppState” activity to the workflow and set it as start node.
4. Double click on the activity to choose the element.
a. Here I have already launched the Calculator application.
b. Click on the “Select Element” option to detect the application.
c. Navigating to the application and detecting over the application.
d. Now, here I am not considering other attributes and going forward with default selected attributes.

e. Click on “Save” button, the attributes will be auto filled in the properties.
5. Now, select the “WaitFor” property as “Element to appear” since we are verifying the availability of the application. And I am choosing “WaitTime” as “10”. 
6. Now, if the calculator application is on the screen, the bot will continue to perform the next steps provided in the “Click” activity.
7. Next, In the “Target appear” we are adding the “WriteLog” activity to write a message.
a. In the “InputString” , provide the input as “Application is launched successfully!”.
b. Now, choose the log level as “Info” from the drop- down.
8. Here, in the “Target does not appear” area, I am adding the same “Writelog” activity to write the failure message. 
9. Now, save and execute the workflow.  

5.2.5 CloseApplication

Close Application

This activity helps you close the desktop-based application at runtime.

Properties

INPUT

DelayAfter: It assists the user to add a delay before initiating subsequent activities. The delay duration here is in milliseconds. By default, it is set to “300” milliseconds. When the option is left blank, the delay will not be considered.

DelayBefore: It assists the user in adding a delay before starting the execution of the activities. The delay duration here is in milliseconds. By default, it is set to “200” milliseconds. When the option is left blank, the delay will not be considered.

ExecuteBy:* Gets auto-filled once the “Active Application” is selected. This contains the set of attributes for the specific spied element.
UIA3: It indicates the user to integrate “UIA3” functionality within the workflows. It accepts values in “Boolean” datatype. 
True: It will enable “UIA3” functionality within the workflow.
False:  It will disable “UIA3” functionality within the workflow.
By default, the parameter is set to false. When left empty, it will not consider UIA3 functionality.

UseWindowsTitle: This parameter helps you take action based on the window title. By default, this option will be checked.

WaitTime: It enables the user to introduce a delay before initiating subsequent activities. The delay is specified in milliseconds. By default, it is set to 10000 milliseconds. Leaving the option blank will result in no delay being applied.

MISC

DisplayName: Displays the name of the activity. The activity name can be customized, which aids in troubleshooting.

SkipOnError: Specify the “Boolean” value as “True” or “False.”
True: Continue executing the workflow regardless of any errors thrown.
False: Halt the workflow if it encounters any errors.
None: If the option is left blank, the activity will, by default, behave as if “False” were chosen.

Version: It indicates the version of the feature being used.

OUTPUT

Result: It provides the ability to view the execution status of the activity. It returns values in “Boolean.”
True: Indicates that the activity has been executed successfully without any errors.
False: Indicates that the activity has been unsuccessful due to an unexpected error being thrown.

* Represents mandatory fields to execute the workflow

Tips:

1. Enable the “UIA3” functionality when you have employed “DesktopAutomationUIA3” activities in the workflow. 
2. If “UIA3” is enabled, and there are no “UIA3” activities used in the workflow, it will not execute properly. 

5.2.6 Click

The click event allows users to interact with applications by clicking on specified target elements.

Properties

INPUT

DelayAfter: It assists the user to add a delay before initiating subsequent activities. The delay duration here is in milliseconds. By default, it is set to “300” milliseconds. When the option is left blank, the delay will not be considered.

DelayBefore: It assists the user in adding a delay before starting the execution of the activities. The delay duration here is in milliseconds. By default, it is set to “200” milliseconds. When the option is left blank, the delay will not be considered.

ExecuteBy: Gets auto filled once the “Active Application” is selected. This contains the set of attributes for the specific spied element.

Offset X: Specifies the horizontal offset, in pixels, for the click position relative to the target UI element. A positive value moves the click position to the right, and a negative value moves it to the left. The default value is 0.

Offset Y: Specifies the vertical offset, in pixels, for the click position relative to the target UI element. A positive value moves the click position downward, and a negative value moves it upward. The default value is 0.

WaitTime: It enables the user to introduce a delay before initiating subsequent activities. The delay is specified in milliseconds.
By default, it is set to 10000 milliseconds. Leaving the option blank will result in no delay being applied.

MISC

Action_by:* This parameter helps you trigger the action that needs to be performed. It has two options:
Native: Once the action is captured in the spy window, it is executed in the background of the code.
Human: Once the element is found, the trigger’s action will be performed as per the ‘Human’ option. By default, ‘Native’ will be chosen.

Click_type: When the ‘Native’ option is chosen, the default action of the trigger will be selected, and it will not be enabled for editing. The click type will be enabled when we choose the ‘Human’ option from the ‘ActionBy’ parameter. It has two options:
Single Click – Allows you to perform a single-click action.
Double Click – Allows you to perform a double-click action.

DisplayName: Displays the name of the activity. The activity name can be customized, which aids in troubleshooting.

Mouse_button: When the ‘Native’ option is chosen, the default action of the trigger will be selected, and it will not be enabled for editing. The click type will be enabled when we choose the ‘Human’ option from the ‘ActionBy’ parameter. It has two options:
LeftClick: Allows you to perform a left-click action as on the mouse button.
RightClick: Allows you to perform a Right-click action as on the mouse button.
MiddleButton: Allows you to perform the “Scroll” button click on the mouse button

SkipOnError: Specify the “Boolean” value as “True” or “False.”
True: Continue executing the workflow regardless of any errors thrown.
False: Halt the workflow if it encounters any errors.
None: If the option is left blank, the activity will, by default, behave as if “False” were chosen.

Version: It indicates the version of the feature being used.

RESULT

Result: It provides the ability to view the execution status of the activity. It returns values in “Boolean.”
True: Indicates that the activity has been executed successfully without any errors.
False: Indicates that the activity has been unsuccessful due to an unexpected error being thrown.

Represents mandatory fields to execute the workflow.

Tips:

When the “Native” action is chosen, the “Single click” and “left click” will be chosen as default trigger action to be performed. 

5.2.7 ExpandCollapse

ExpandCollapse

This action allows you to expand or collapse the menu of the selected application on the desktop.

Properties

INPUT

Action: * This parameter allows you to trigger the action that needs to be performed and offers two options:
Expand: This option indicates expanding the ‘Menu’ to view the available options.
Collapse: This option indicates collapsing the ‘Menu’ to hide the options. By default, it is set to the ‘Expand’ option.

DelayAfter: It assists the user to add a delay before initiating subsequent activities. The delay duration here is in milliseconds. By default, it is set to “300” milliseconds. When the option is left blank, the delay will not be considered.

DelayBefore: It assists the user in adding a delay before starting the execution of the activities. The delay duration here is in milliseconds. By default, it is set to “200” milliseconds. When the option is left blank, the delay will not be considered.

ExecuteBy:* Gets auto-filled once the “Active Application” is selected. This contains the set of attributes for the specific spied element.
UIA3: It indicates the user to integrate “UIA3” functionality within the workflows. It accepts values in “Boolean” datatype. 
True: It will enable “UIA3” functionality within the workflow.
False:  It will disable “UIA3” functionality within the workflow.
By default, the parameter is set to false. When left empty, it will not consider UIA3 functionality.

WaitTime: It enables the user to introduce a delay before initiating subsequent activities. The delay is specified in milliseconds. By default, it is set to 10000 milliseconds. Leaving the option blank will result in no delay being applied.

MISC

DisplayName: Displays the name of the activity. The activity name can be customized, which aids in troubleshooting.

SkipOnError: Specify the “Boolean” value as “True” or “False.”
True: Continue executing the workflow regardless of any errors thrown.
False: Halt the workflow if it encounters any errors.
None: If the option is left blank, the activity will, by default, behave as if “False” were chosen.

Version: It indicates the version of the feature being used.

OUTPUT

Result: It provides the ability to view the execution status of the activity. It returns values in “Boolean.”
True: Indicates that the activity has been executed successfully without any errors.
False: Indicates that the activity has been unsuccessful due to an unexpected error being thrown.

* Represents mandatory fields to execute the workflow.

5.2.8 FindChildren

FindChildren

This activity helps the user to retrieve a collection of child UI elements from the specified element. It is particularly useful for scenarios where the user needs to interact with multiple child elements within a parent UI element, such as extracting data from a table, navigating through a list of items, or performing actions on a set of buttons or input fields.

Properties

INPUT

DelayAfter: It assists the user to add a delay before initiating subsequent activities. The delay duration here is in milliseconds. By default, it is set to “300” milliseconds. When the option is left blank, the delay will not be considered.

DelayBefore: It assists the user in adding a delay before starting the execution of the activities. The delay duration here is in milliseconds. By default, it is set to “200” milliseconds. When the option is left blank, the delay will not be considered.

ExecuteBy:Gets auto filled once the “Active Application” is selected. This contains the set of attributes for the specific spied element.This parameter accepts values in “String” datatype. You can either hardcode the values in “String” format or can enter the values in the “String” datatype.

Scope: This parameter indicates the scope for collecting UI child elements.
Children: It retrieves the collection of immediate child elements from the parent element.
Descendants: It also retrieves the descendants of the parent UI element, including all nested child elements.

WaitTime: It helps the user to add a delay to start the execution of the further activity. The format of the delay here is milliseconds. By default, it will be set to 10000. When the option is left blank, no delay is considered.

MISC

DisplayName: Displays the name of the activity. The activity name can be customized which will help in troubleshooting.

SkipOnError: Specify the “Boolean” value as “True” or “False.”
True: Continue executing the workflow regardless of any errors thrown.
False: Halt the workflow if it encounters any errors.
None: If the option is left blank, the activity will, by default, behave as if “False” were chosen.

Version: It specifies the version of the web automation feature in use.

OUTPUT

Children: This parameter displays the output of the activity as a collection of UI child elements retrieved from the detected element.
The values returned by this parameter are of the “LIST<UIChildren>” datatype. Please refer to the document below for guidance on declaring the variable.

Result: It provides the ability to view the execution status of the activity. It returns values in “Boolean.”
True: Indicates that the activity has been executed successfully without any errors.
False: Indicates that the activity has been unsuccessful due to an unexpected error being thrown.

Represents mandatory fields to execute the workflow

What is referred to as Child & Descendants UI elements?

Child UI Elements: These are the direct elements within a parent element. For example, in a file explorer window (the parent), each file or folder displayed is a child element of that window.
Descendants: These refer to the values or elements nested further inside child elements. For instance, if the child element is a folder, the files or subfolders inside that folder are its descendants.

Hence, child elements are directly within the parent, while descendants go one step deeper, being contained within the child elements.

How to view the output from the activity?

The “FindChildren” activity provides the output in the “List<UIChildren>” format. This list includes the following four types as output:

  1. AutomationName – Provides the “name” of the detected element during the execution of the bot.
  2. AutomationID – It indicates the unique identification for the detected element to identify it and making easier to interact with it. It returns the “AutomationID” as output. When there is no AutomationID, it will be returned as null value.
  3. ClassName – It indicates the “Class” of the detected element and returns the output. When there is no  ClassName available, it will be returned as null value.
  4. UIChildren – It provides the count of the UI child and descendant elements associated with the parent element.

If you want to view any of the above types as output, you need to specify this along with the ‘ForEach’ variable. For example, “Item.AutomationName”.

Tips

1. The “UIchildren” output is used to view the number of child and descendants’ elements associated with parent element.
2. If you need to view the output as “UIChildren”, please choose the “Scope” as “Descendants” in the “FindChildren” properties. Since, it is used to retrieve all the child and its descendant’s count as output.
3. To view the output as “UIChildren”, you need to mention the value as “Item.UIchildren.Count.ToString”.
4. If the values of the above fields contain special XML entity characters, they need to be replaced and assigned before executing the activity.

5. For example, if the detected element contains “&” symbol in the name, replace the value as “Replace(“&”,”&amp”) along with the variable name.

5.2.9 ExtractTable

This activity helps to extract the “Table” from the desktop applications. The extracted “Table” can then be manipulated and used in a variety of ways, such as data analysis or creating reports. This makes it easier for users to work with and access data stored in desktop applications.

Properties

INPUT

DelayAfter: It assists the user to add a delay before initiating subsequent activities. The delay duration here is in milliseconds. By default, it is set to “300” milliseconds. When the option is left blank, the delay will not be considered.

DelayBefore: It assists the user in adding a delay before starting the execution of the activities. The delay duration here is in milliseconds. By default, it is set to “200” milliseconds. When the option is left blank, the delay will not be considered.

ExecuteBy: Gets auto filled once the “Active Application” is selected. This contains the set of attributes for the specific spied element.

WaitTime: It enables the user to introduce a delay before initiating subsequent activities. The delay is specified in milliseconds.
By default, it is set to 10000 milliseconds. Leaving the option blank will result in no delay being applied.

MISC

DisplayName: Displays the name of the activity. The activity name can be customized, which aids in troubleshooting.

SkipOnError: Specify the “Boolean” value as “True” or “False.”
True: Continue executing the workflow regardless of any errors thrown.
False: Halt the workflow if it encounters any errors.
None: If the option is left blank, the activity will, by default, behave as if “False” were chosen.

Version: It indicates the version of the feature being used.

RESULT

Datatable: It helps to view the output as extracted range in “Datatable” format. It returns values in “Datatable” datatype.

Result: It provides the ability to view the execution status of the activity. It returns values in “Boolean.”
True: Indicates that the activity has been executed successfully without any errors.
False: Indicates that the activity has been unsuccessful due to an unexpected error being thrown.

Represents mandatory fields to execute the workflow.

5.2.10 GetText

GetText helps you extract values from specific elements or controls within the desktop application’s user interface.

Properties

INPUT

DelayAfter: It assists the user to add a delay before initiating subsequent activities. The delay duration here is in milliseconds. By default, it is set to “300” milliseconds. When the option is left blank, the delay will not be considered.

DelayBefore: It assists the user in adding a delay before starting the execution of the activities. The delay duration here is in milliseconds. By default, it is set to “200” milliseconds. When the option is left blank, the delay will not be considered.

ExecuteBy: Gets auto filled once the “Active Application” is selected. This contains the set of attributes for the specific spied element.

WaitTime: It enables the user to introduce a delay before initiating subsequent activities. The delay is specified in milliseconds.
By default, it is set to 10000 milliseconds. Leaving the option blank will result in no delay being applied.

MISC

DisplayName: Displays the name of the activity. The activity name can be customized, which aids in troubleshooting.

SkipOnError: Specify the “Boolean” value as “True” or “False.”
True: Continue executing the workflow regardless of any errors thrown.
False: Halt the workflow if it encounters any errors.
None: If the option is left blank, the activity will, by default, behave as if “False” were chosen.

Version: It indicates the version of the feature being used.

RESULT

Text:* The extracted value is stored in the declared variable as a string. This parameter returns the value in “String” datatype.(Check the workflow to see how to store the extracted value in the variable.)

Result: It provides the ability to view the execution status of the activity. It returns values in “Boolean.”
True: Indicates that the activity has been executed successfully without any errors.
False: Indicates that the activity has been unsuccessful due to an unexpected error being thrown.

Represents mandatory fields to execute the workflow.

5.2.12 GetAttributesAll

This activity helps to extract all the “Attributes” and its corresponding “Values” from the detected application on the desktop.

The extracted attributes can be used in subsequent activities for further processing. It also helps to validate the element before performing any action.

Properties

INPUT

DelayAfter: It assists the user to add a delay before initiating subsequent activities. The delay duration here is in milliseconds. By default, it is set to “300” milliseconds. When the option is left blank, the delay will not be considered.

DelayBefore: It assists the user in adding a delay before starting the execution of the activities. The delay duration here is in milliseconds. By default, it is set to “200” milliseconds. When the option is left blank, the delay will not be considered.

ExecuteBy: Gets auto filled once the “Active Application” is selected. This contains the set of attributes for the specific spied element.

WaitTime: It enables the user to introduce a delay before initiating subsequent activities. The delay is specified in milliseconds.
By default, it is set to 10000 milliseconds. Leaving the option blank will result in no delay being applied.

MISC

DisplayName: Displays the name of the activity. The activity name can be customized, which aids in troubleshooting.

SkipOnError: Specify the “Boolean” value as “True” or “False.”
True: Continue executing the workflow regardless of any errors thrown.
False: Halt the workflow if it encounters any errors.
None: If the option is left blank, the activity will, by default, behave as if “False” were chosen.

Version: It indicates the version of the feature being used.

RESULT

AttributesAndPatterns: This parameter helps to view the output of the activity, displaying all “Attributes” with their corresponding values from the detected application. It returns the values in a “Datatable” data type.

Result: It provides the ability to view the execution status of the activity. It returns values in “Boolean.”
True: Indicates that the activity has been executed successfully without any errors.
False: Indicates that the activity has been unsuccessful due to an unexpected error being thrown.

Represents mandatory fields to execute the workflow

Tips

Null value will be returned if the chosen “Attribute” type does not contain any value.

5.2.13 GetFullWindowTitle

This activity helps you retrieve the window title of the desktop-based application for use in further validation steps within the workflow.

Properties

INPUT

DelayAfter: It assists the user to add a delay before initiating subsequent activities. The delay duration here is in milliseconds. By default, it is set to “300” milliseconds. When the option is left blank, the delay will not be considered.

DelayBefore: It assists the user in adding a delay before starting the execution of the activities. The delay duration here is in milliseconds. By default, it is set to “200” milliseconds. When the option is left blank, the delay will not be considered.

ExecuteBy: Gets auto filled once the “Active Application” is selected. This contains the set of attributes for the specific spied element.

WaitTime: It enables the user to introduce a delay before initiating subsequent activities. The delay is specified in milliseconds.
By default, it is set to 10000 milliseconds. Leaving the option blank will result in no delay being applied.

MISC

DisplayName: Displays the name of the activity. The activity name can be customized, which aids in troubleshooting.

SkipOnError: Specify the “Boolean” value as “True” or “False.”
True: Continue executing the workflow regardless of any errors thrown.
False: Halt the workflow if it encounters any errors.
None: If the option is left blank, the activity will, by default, behave as if “False” were chosen.

Version: It indicates the version of the feature being used.

RESULT

FullWindowTitle: It helps to view the output of the activity, displaying the specified “window’s” title for the spied element. It returns the values in a “String” data type.

Result: It provides the ability to view the execution status of the activity. It returns values in “Boolean.”
True: Indicates that the activity has been executed successfully without any errors.
False: Indicates that the activity has been unsuccessful due to an unexpected error being thrown.

Represents mandatory fields to execute the workflow.

5.2.14 LaunchApplication

The “launchApplication” activity assists you in launching any type of desktop application.

Properties

INPUT

DelayAfter: It assists the user to add a delay before initiating subsequent activities. The delay duration here is in milliseconds. By default, it is set to “300” milliseconds. When the option is left blank, the delay will not be considered.

DelayBefore: It assists the user in adding a delay before starting the execution of the activities. The delay duration here is in milliseconds. By default, it is set to “200” milliseconds. When the option is left blank, the delay will not be considered.

ExecuteBy: Gets auto filled once the “Active Application” is selected. This contains the set of attributes for the specific spied element.

MISC

DisplayName: Displays the name of the activity. The activity name can be customized, which aids in troubleshooting.

SkipOnError: Specify the “Boolean” value as “True” or “False.”
True: Continue executing the workflow regardless of any errors thrown.
False: Halt the workflow if it encounters any errors.
None: If the option is left blank, the activity will, by default, behave as if “False” were chosen.

Version: It indicates the version of the feature being used.

RESULT

Result: It provides the ability to view the execution status of the activity. It returns values in “Boolean.”
True: Indicates that the activity has been executed successfully without any errors.
False: Indicates that the activity has been unsuccessful due to an unexpected error being thrown.

Represents mandatory fields to execute the workflow.

5.2.15 GetAttributes

This activity helps to extract the specified “Attribute’s value” from the detected UI element from the desktop applications. It provides a list of “Attributes” options for the detected element to choose from. The extracted attributes can be used in subsequent activities for further processing. It also helps to validate the UI element before performing any action.

Properties

INPUT

DelayAfter: It assists the user to add a delay before initiating subsequent activities. The delay duration here is in milliseconds. By default, it is set to “300” milliseconds. When the option is left blank, the delay will not be considered.

DelayBefore: It assists the user in adding a delay before starting the execution of the activities. The delay duration here is in milliseconds. By default, it is set to “200” milliseconds. When the option is left blank, the delay will not be considered.

ExecuteBy: Gets auto filled once the “Active Application” is selected. This contains the set of attributes for the specific spied element.

WaitTime: It enables the user to introduce a delay before initiating subsequent activities. The delay is specified in milliseconds.
By default, it is set to 10000 milliseconds. Leaving the option blank will result in no delay being applied.

MISC

DisplayName: Displays the name of the activity. The activity name can be customized, which aids in troubleshooting.

SkipOnError: Specify the “Boolean” value as “True” or “False.”
True: Continue executing the workflow regardless of any errors thrown.
False: Halt the workflow if it encounters any errors.
None: If the option is left blank, the activity will, by default, behave as if “False” were chosen.

Version: It indicates the version of the feature being used.

RESULT

Attributes:* This parameter helps to view the output of the activity, displaying all “Attributes” with their corresponding values for the spyed element. It returns the values in a “Datatable” data type.

AttributesValue: It helps to view the output of the activity, displaying the specified “Attribute’s value” for the spied element. It returns the values in a “String” data type.

Result: It provides the ability to view the execution status of the activity. It returns values in “Boolean.”
True: Indicates that the activity has been executed successfully without any errors.
False: Indicates that the activity has been unsuccessful due to an unexpected error being thrown.

Represents mandatory fields to execute the workflow.

TIPS

1. The single attribute and its values can be extracted using the “String” property in the activity.
2. Using the “Data_table” property, all the attributes from the list provided in the activity can be extracted for the detected element.
3. Null value will be returned if the chosen “Attribute” type does not contain any value.

5.2.16 SetText

This activity allows you to set values in a specific field within a desktop-based application during runtime.

Properties

INPUT

Action_by:  Specifies the actions to be performed in the application during the execution. Select the actions from the drop-down.
Native: Action is performed by the bot and the details are entered character wise.
Human: Action is performed by a human
Paste: Action is performed by the bot and the details are entered in a copy paste format.

ClearAndType: Specifies to clear and type the text in the selected application if it already has values. By default, the value is False.
True, will clear the data in the existing field and enter the new value.
False, will not clear the existing data and the new value will get appended.

DelayAfter: It assists the user to add a delay before initiating subsequent activities. The delay duration here is in milliseconds. By default, it is set to “300” milliseconds. When the option is left blank, the delay will not be considered.

DelayBefore: It assists the user in adding a delay before starting the execution of the activities. The delay duration here is in milliseconds. By default, it is set to “200” milliseconds. When the option is left blank, the delay will not be considered.

DelayBetweenChar It helps the user to add a delay between the characters. The delay duration here is in milliseconds. By default, it is set to “150” milliseconds. When the option is left blank, the delay will not be considered.

ExecuteBy:  Gets auto filled once the “Active Application” is selected. This contains the set of attributes for the specific spied element.

Offset X: Specifies the horizontal offset, in pixels, for the click position relative to the target UI element. A positive value moves the click position to the right, and a negative value moves it to the left. The default value is 0.

Offset Y: Specifies the vertical offset, in pixels, for the click position relative to the target UI element. A positive value moves the click position downward, and a negative value moves it upward. The default value is 0.

Text:Specify the “Input” variable” which has stored the input values to be provided in the “SecureString”value. This field accepts only the variables in “SecureString” format.

WaitTime: It enables the user to introduce a delay before initiating subsequent activities. The delay is specified in milliseconds.
By default, it is set to 10000 milliseconds. Leaving the option blank will result in no delay being applied.

MISC

DisplayName: Displays the name of the activity. The activity name can be customized, which aids in troubleshooting.

SkipOnError: Specify the “Boolean” value as “True” or “False.”
True: Continue executing the workflow regardless of any errors thrown.
False: Halt the workflow if it encounters any errors.
None: If the option is left blank, the activity will, by default, behave as if “False” were chosen.

Version: It indicates the version of the feature being used.

RESULT

Result: It provides the ability to view the execution status of the activity. It returns values in “Boolean.”
True: Indicates that the activity has been executed successfully without any errors.
False: Indicates that the activity has been unsuccessful due to an unexpected error being thrown.

Represents mandatory fields to execute the workflow. 

5.2.17 ApplicationExist

The ‘Application Exist’ activity helps you determine whether the application exists at runtime. Based on the result of the ‘Application Exist’ activity, validation will be added to the workflow for further steps.

Properties

INPUT

DelayAfter: It assists the user to add a delay before initiating subsequent activities. The delay duration here is in milliseconds. By default, it is set to “300” milliseconds. When the option is left blank, the delay will not be considered.

DelayBefore: It assists the user in adding a delay before starting the execution of the activities. The delay duration here is in milliseconds. By default, it is set to “200” milliseconds. When the option is left blank, the delay will not be considered.

ExecuteBy: Gets auto filled once the “Active Application” is selected. This contains the set of attributes for the specific spied element.

UIA3: It indicates the user to integrate “UIA3” functionality within the workflows. It accepts values in “Boolean” datatype. 
True: It will enable “UIA3” functionality within the workflow.
False:  It will disable “UIA3” functionality within the workflow.
By default, the parameter is set to false. When left empty, it will not consider UIA3 functionality.

WaitTime: It enables the user to introduce a delay before initiating subsequent activities. The delay is specified in milliseconds.
By default, it is set to 10000 milliseconds. Leaving the option blank will result in no delay being applied.

MISC

DisplayName: Displays the name of the activity. The activity name can be customized, which aids in troubleshooting.

SkipOnError: Specify the “Boolean” value as “True” or “False.”
True: Continue executing the workflow regardless of any errors thrown.
False: Halt the workflow if it encounters any errors.
None: If the option is left blank, the activity will, by default, behave as if “False” were chosen.

Version: It indicates the version of the feature being used.

OUTPUT

Result: It provides the ability to view the execution status of the activity. It returns values in “Boolean.”
True: Indicates that the activity has been executed successfully without any errors.
False: Indicates that the activity has been unsuccessful due to an unexpected error being thrown.

* Represents mandatory fields to execute the workflow.

Tips

1. Enable the “UIA3” functionality when you have employed “DesktopAutomationUIA3” activities in the workflow. 
2. If “UIA3” is enabled, and there are no “UIA3” activities used in the workflow, it will not execute properly. 

5.2.18 ApplicationActions

Application Actions

The “ApplicationActions” activity assists you in minimizing, maximizing, closing, moving, resizing, and rotating the application

Properties

INPUT

Action_by: Specify which action needs to be taken:
Minimize: This option helps you minimize the application.
Maximize: This option helps you maximize the application.
Close: This option helps you close the application.
Move: This option helps you move the application.
Resize: This option helps you resize the application.
Rotate: This option helps you rotate the application.By default, it will be set to the ‘Minimize’ option.

DelayAfter: It assists the user to add a delay before initiating subsequent activities. The delay duration here is in milliseconds. By default, it is set to “300” milliseconds. When the option is left blank, the delay will not be considered.

DelayBefore: It assists the user in adding a delay before starting the execution of the activities. The delay duration here is in milliseconds. By default, it is set to “200” milliseconds. When the option is left blank, the delay will not be considered.

DelayBetweenChar It helps the user to add a delay between the characters. The delay duration here is in milliseconds. By default, it is set to “150” milliseconds. When the option is left blank, the delay will not be considered.

ExecuteBy: Gets auto filled once the “Active Application” is selected. This contains the set of attributes for the specific spied element.

UIA3: It indicates the user to integrate “UIA3” functionality within the workflows. It accepts values in “Boolean” datatype. 
True: It will enable “UIA3” functionality within the workflow.
False:  It will disable “UIA3” functionality within the workflow.
By default, the parameter is set to false. When left empty, it will not consider UIA3 functionality.

WaitTime: It enables the user to introduce a delay before initiating subsequent activities. The delay is specified in milliseconds.
By default, it is set to 10000 milliseconds. Leaving the option blank will result in no delay being applied.

MISC

DisplayName: Displays the name of the activity. The activity name can be customized, which aids in troubleshooting.

SkipOnError: Specify the “Boolean” value as “True” or “False.”
True: Continue executing the workflow regardless of any errors thrown.
False: Halt the workflow if it encounters any errors.
None: If the option is left blank, the activity will, by default, behave as if “False” were chosen.

Version: It indicates the version of the feature being used.

MOVE

XPos: Provide an X coordinate for horizontal movement of the application. Decimal numbers are acceptable. Leaving the option blank will result in no action required.

YPos: Indicate a Y coordinate for vertical movement of the application. Decimal numbers are acceptable. Leaving the option blank will result in no action required.

OUTPUT

Result: It provides the ability to view the execution status of the activity. It returns values in “Boolean.”
True: Indicates that the activity has been executed successfully without any errors.
False: Indicates that the activity has been unsuccessful due to an unexpected error being thrown.

RESIZE

WindowHeight: Specify the desired window height for resizing the application. Decimal numbers are acceptable. Leaving the option blank will result in no action required.

WindowWidth: Specify the desired window width for resizing the application. Decimal numbers are acceptable. Leaving the option blank will result in no action required.

ROTATE

RotateDegrees: Specify the degree of rotation for the application. Decimal numbers are acceptable. Leaving the option blank will result in no action required.

Represents mandatory fields to execute the workflow.

Tips:

1. Enable the “UIA3” functionality when you have employed “DesktopAutomationUIA3” activities in the workflow. 
2. If “UIA3” is enabled, and there are no “UIA3” activities used in the workflow, it will not execute properly. 

5.3 DesktopAutomationUIA3

About

In Robility, Desktop Automation UIA3 provides a specialized approach to automating tasks within desktop applications. It builds on the foundation of traditional desktop automation while introducing a distinct framework within the RobilitySpyWindow to enhance functionality. Although the overarching goal of both “Desktop Automation” and “Desktop Automation UIA3” is to streamline and optimize processes, the difference in their frameworks empowers developers and users to select the most appropriate tool for their specific automation requirements. This flexibility ensures robust and efficient desktop automation solutions.

Key Points

1. Automation for Desktop Applications
Desktop UIA3 enables the creation of bots that interact with desktop applications. Tasks like clicking, typing, navigating through menus, and interacting with complex UI elements can be automated efficiently.
2. Flexibility and Customization
Users and developers can choose between Desktop Automation and Desktop UIA3 based on specific project requirements. This flexibility ensures that Robility supports diverse automation scenarios with tailored tools.
3. Advanced Interaction Capabilities
With UIA3, bots can interact with application elements with greater precision and reliability. It enables advanced actions like selecting dropdown options, navigating complex UI structures, and handling custom controls, ensuring robust automation for detailed workflows.
4. Data Processing and Workflow Optimization
Desktop UIA3 supports efficient data handling within desktop applications. Bots can seamlessly extract, process, and input data, leading to streamlined workflows, reduced manual errors, and improved accuracy.
5. Enhanced Compatibility and Scalability
UIA3 is designed for compatibility with a wide range of desktop applications, making it a versatile choice for diverse industries. Its scalability allows users to automate both simple tasks and complex processes that involve integrations with other systems.

Why Desktop Automation UIA3?

Desktop Automation UIA3 offers a modern and enhanced framework that is tailored for precise, flexible, and reliable automation of desktop tasks. It is ideal for organizations looking to:

  • Increase operational efficiency through task automation.
  • Reduce the risk of human error in repetitive processes.
  • Save time and resources by automating complex workflows.
  • Enhance customer experiences by improving the accuracy and speed of application interactions.

Whether you are automating data entry, processing forms, or managing intricate workflows, Desktop UIA3 provides the tools and capabilities necessary to achieve your automation goals effectively.

Click here to know how to utilize the activity in the workflow. 

5.3.1 Release Notes

v.2.4.1

This release includes enhancements to UI automation, improving interaction flexibility and usability.

Enhancements 

1. Offset X and Y Support
The Click and Type Text activities now support Offset X and Offset Y properties, allowing you to specify the interaction position relative to the target UI element.

2. Click Before Typing
The Type Text activity now includes a Click Before Typing option. When enabled, the target UI element is clicked before entering text to ensure it receives focus.

3. Wildcard support added to UIA3 selectors.
UIA3 selectors now support wildcard patterns (*, ?) in supported string-based attributes, enabling flexible matching of UI elements with dynamic values while maintaining backward compatibility.

Note: Downgrading the latest Desktop Automation (UIA3) package may result in missing activities.
 
Released Date: 08/07/2026

5.3.2 Example

The following example illustrates how the activities from the “DesktopAutomationUIA3” are utilized in the “Notepad” application. Here I have already launched the “Notepad” application in my system.

1. Create or open an existing solution.
2. Install the latest feature “DesktopAutomationUIA3” from the “ManageFeatures” menu.
3. Drag and drop the “TypeText” activity and set it as start node.
a. Double-click the activity.
b. Here we are choosing the “Select Element” option.
c. You will be navigated to the “Notepad” application.
d. Select “CTRL + Mouse” point to detect the element from the application.
     i. Select the element where we need to pass/set the value. Here, I am selecting the element from the “Notepad” app.
e. Once you have chosen the “Element,” the attributes will be stored in the “Spy” window.
f. In this case, I am choosing the “AutomationID” and the “Xpath” as attributes values and click on the “Export” button.

g. Now, the elements will be stored in the activity window.
4. Now, navigating to the “InputString” in the properties to set the value to be entered in the specified element.
a. Here, I am setting the value as “Hello Everyone! Have a good day. ” in the Notepad application.
5. You can either hardcode the value or retrieve it from a variable.

6. To retrieve a value from a variable, simply update the variable in the “InputString” parameter that has been declared.
7. Now, save and execute the workflow.

The bot will enter the value in the “Notepad” application.

5.4 FormBuilder

Form builder in Robility enables automation where human intervention is necessary during automation. It facilitates seamless interaction between humans and robots, ensuring that manual inputs, approvals, or decision-making steps are efficiently integrated into the automation process.

This feature is particularly beneficial in attended automation, where bots and users work together in real time to complete tasks, improving accuracy, efficiency, and overall workflow collaboration.

Key Features

  1. Design and customize data-driven forms effortlessly while maintaining a professional look.
  2. Forms integrate smoothly into automation workflows, enabling efficient data input, validation, and processing.
  3. Create intuitive forms that enhance user interaction and improve workflow usability.
  4. Adapt form designs to match branding and specific process requirements for a consistent experience.

Role of Form Builder

Form Builder helps humans and robots work together efficiently in automation. Here are keyways it is used:

1. Data Input: Robots use Form Builder to collect user input and process it in web or desktop applications. For example, users enter data in a form, and the robot updates it in a system.
2. Notifications: Forms display information gathered by robots from users or external sources like websites and applications, ensuring accurate data integration.
3. Exception Handling: When automation encounters exceptions or unexpected situations, Form Builder allows users to provide input, helping the process adjust dynamically.
4. Process Monitoring and Reporting: Form Builder tracks automation progress and generates reports with key insights on performance and outcomes.

5.4.1 Release Notes

v.1.2.6

This release includes enhancements to the NLog package.

Enhancement

The NLog package has been upgraded to version 6.0.7, delivering improved logging reliability, performance, and compatibility. The update supports both existing and new workflows.

Released Date: 09/02/2026

5.4.2 Overview

This section provides an overview of the Form Builder and its key functionalities.

Launching the Form Builder

1. Drag and drop the Form Invoker activity into the workflow.
2. Double-click the activity and select the Open Form Designer button.
3. The Form Builder page will launch on the screen.

Main Window

The main window consists of:

1. Menu Bar (Top) – Provides options for form management.
2. Tool Window (Left) – Contains controls for building forms.
3. Property Window (Right) – Displays properties of the selected form or controls.
4. Default Design Form (“General”) – The initial form template.

Form Menu Options

1. New Form – Click Add Form, enter the Form Name and Title, and select Add to create a new form.
2. Save – Saves the form, including any added controls or modifications.
3. Preview – Displays a preview of the selected form before integrating it into the activity.

Edit Menu Options

1. Clear – Removes all controls from the selected form.
2. Delete – Deletes the selected control or the entire form.

Property Window

Displays properties for the default form and any controls added to it.

Tool Window

Provides 15 different control options for building forms.

Sample Form

Below is a sample form created using various available controls.

5.4.3 Variable Creation

In the Form Builder, variables are used to store and retrieve values from specific controls within a form. Assigning a variable to a control ensures that data entered by users can be accessed and utilized within the automation workflow.

Steps to Assign a Variable

1. Open the Form Builder and choose the control (e.g., text box, dropdown, checkbox) to which you want to assign a variable.
2. Navigate to the “Variable Name” property on the right-hand side.
3. Locate the “Variable Name” property of the selected control and click on the three dots to open the Expression Editor.
4. Define the Variable in the Expression Editor
5. The Expression Editor provides two ways to assign a variable:

Creating a New Variable:

1. Enter a variable name (e.g., “UserInput”) in the editor.
2. Press CTRL + Q to declare the variable within the workflow.

Using an Existing Variable:

1. If the variable has already been defined in the workflow, simply enter its name in the editor.
2. The form control will be linked to this variable, allowing data exchange between the form and the automation.

5.4.4 FormInvoker

This activity is used to invoke the form that has been created with the Form builder tools to integrate it into the workflow.

Properties

INPUT

FormName: *Choose the form name from the drop-down which needs to be integrated into the workflow.

WindowAction: *Choose the window action from the drop-down as,

  1. Show Dialog – Launches the form and automatically closes it upon human approval.
  2. Show – Opens the form while allowing the workflow to continue executing subsequent actions without closing the form.
  3. Close – Closes the form if it was opened using the Show option.

MISC

Display Name: Displays the name of the activity. You can also customize the activity name to help troubleshoot issues faster. This name will be used for logging purposes.

SkipOnError: It specifies whether to continue executing the workflow even if it throws an error. This supports only Boolean value “True or False”. By default, it is set to “False”
True: Continues the workflow to the next step
False: Stops the workflow and throws an error.

Version: It specifies the version of the Form builder feature in use.

* Represents the Mandatory fields to execute the workflow.

5.4.5 Tools

The Tool Window in the Form Builder provides a comprehensive set of 15 controls, each designed to enhance form creation and customization. These controls empower users to build forms tailored to their specific automation needs, offering flexibility and precision. Below is the list of controls available in the Tool Window, enabling seamless integration and efficient data handling within automation workflows.

5.5 Image Automation

Introduction

Image automation is the process of automating tasks by using images as inputs and developing robots to execute the automation process. It is particularly valuable in Citrix automation due to the challenges presented by virtualized environments and remote desktops.

Benefits

1. Universal Automation: Image automation can be applied to virtually any application or system since it operates based on visual recognition. This makes it versatile for automating legacy systems, virtual environments, or custom-built applications.
2. Accuracy: Image automation is highly accurate when set up correctly, as it relies on visual cues. This can reduce errors in tasks like data entry or interacting with complex user interfaces.
3. Robustness: It can handle changes in the target application’s layout or appearance, making it robust even in dynamic environments where UI elements change frequently.

Use Cases

1. Citrix Automation: Image automation is especially useful for automating processes within Citrix environments, where traditional automation methods may not work efficiently due to the virtualized nature of the environment.
2. Automation of Virtual Desktops: In scenarios where users work on virtual desktops or remote machines, image automation enables seamless automation of tasks within those environments.
3. Robotic Process Automation (RPA): Image automation is a key component of Robility, allowing robots to interact with any application, regardless of the underlying technology.
4. Automation of Web Applications: For web applications with dynamic elements, image automation can automate interactions and data extraction accurately.
5. Data Validation: Image automation can validate data by cross-referencing it with visual cues or predefined patterns.

5.5.1 Release Notes

v.2.2.0

This release includes the following bug fix:

Bug Fix:

Resolved an issue in Image Automation where the activity could fail because the window title was required for capture. Now, when the Window option is selected, actions are performed only within the specified window title; if it is left unchecked, the window title is ignored.

Released Date: 29/04/2026

5.5.2 Click

This activity assists the user in interacting with images, elements, files, icons, or applications by clicking on specified target elements using the provided image.

Properties

ACCURACY

Accuracy: This parameter helps the user find the similarity between the images that need to be identified. The accuracy range starts from 0 and ends at 1. The highest accuracy achievable is 0.8. This parameter accepts values of the ‘Double’ data type.

FindImage: Indicates to find the image based on the accuracy provided. Choose from the drop down,
Normal – It searches for the image until the specified accuracy is met.
Dynamic – It searches for the image more than the specified accuracy range.

BOUNDARY

Height: It gets automatically filled once the ‘Image’ has been selected. It indicates the ‘Height’ of the image snippet. If left blank, it will not be considered. This parameter accepts values of the ‘Int32’ data type.
You can also adjust the height of the image to be identified during runtime, increasing, or decreasing it.
This field will be automatically filled and required when ‘Advanced Automation’ is enabled.(Refer the Advanced Automation document.)

InBoundary: It gets automatically filled once the ‘Image’ has been selected. It indicates whether the image snippet is within the boundary or not. If left blank, it will not be considered. This parameter accepts values of the “Boolean” data type.
True: Indicates that the image snippet is within the boundary chosen.
False: Indicates that the image snippet is within the boundary chosen.
This field will be automatically filled and required when ‘Advanced Automation’ is enabled.(Click here to know about the boundary.)

Width: It gets automatically filled once the ‘Image’ has been selected. It indicates the “Width” of the image snippet. If left blank, it will not be considered. This parameter accepts values of the ‘Int32’ data type.
You can also adjust the width of the image to be identified during runtime, increasing, or decreasing it.
This field will be automatically filled and required when ‘Advanced Automation’ is enabled.(Refer the Advanced Automation document.)
X. It gets automatically filled once the ‘Image’ has been selected. It indicates the “horizontal position” of the image snippet from left side of the page. If left blank, it will not be considered. This parameter accepts values of the ‘Int32’ data type.
You can also adjust the range to be identified during runtime, increasing, or decreasing it.
This field will be automatically filled and required when ‘Advanced Automation’ is enabled.(Refer the Advanced Automation document.)
Y.  It gets automatically filled once the ‘Image’ has been selected. It indicates the “Vertical position” of the image snippet from top of the page. If left blank, it will not be considered. This parameter accepts values of the ‘Int32’ data type.
You can also adjust the range to be identified during runtime, increasing, or decreasing it.
This field will be automatically filled and required when ‘Advanced Automation’ is enabled. (Refer the Advanced Automation document.)

INPUT

DelayafterClick:  It assists the user to add a delay before initiating subsequent activities. The delay duration here is in milliseconds. By default, it is set to “100” milliseconds. When the option is left blank, the delay will not be considered.

DelayBeforeClick:  It assists the user in adding a delay before starting the execution of the activities.The delay duration here is in milliseconds. By default, it is set to “100” milliseconds. When the option is left blank, the delay will not be considered.

Offsetx: Indicates the horizontal position of the ‘cursor’ for performing the ‘drag and drop’ action on the image snippet. When this option is left blank, the “OffsetX” position will not be considered. It accepts values in the ‘Int32’ data type.

OffsetY.  Indicates the vertical position of the ‘cursor’ for performing the ‘drag and drop’ action on the image snippet.When this option is left blank, the “OffsetY” position will not be considered. It accepts values in the ‘Int32’ data type.”

Position:  Indicates to set the “Position” of the image snipped.  Select the options from the drop-down,
Centre – Choose this option when the “image” is centered within the page.  
TopRight- Choose this option when the “image” is positioned at “Top Right”  within the page.  
TopLeft – Choose this option when the “image” is positioned at “Top Left” on the page.  
BottomRight – Choose this option when the “image” is positioned at “Bottom Right” within the page.  
BottomLeft – Choose this option when the “image” is positioned at “Bottom Left” within the page.

UseWindowTittle:* It allows the user to perform actions only within the specified ‘Window’ title when the box is checked.When this option is left unchecked, it will not be considered.

Waittime: It enables the user to introduce a delay before initiating subsequent activities. The delay is specified in milliseconds.By default, it is set to 10000 milliseconds. Leaving the option blank will result in no delay being applied.

WindowTittle: It gets automatically filled once the ‘Image’ has been captured within the application. It represents the ‘title’ of the application from which the image has been captured.

MISC

DisplayName: Displays the name of the activity. The activity name can be customized, which aids in troubleshooting.

SkipOnError: Specify the “Boolean” value as “True” or “False.”
True: Continue executing the workflow regardless of any errors thrown.
False: Halt the workflow if it encounters any errors.
None: If the option is left blank, the activity will, by default, behave as if “False” were chosen.
Version: It indicates the version of the feature being used.

OUTPUT

Result: It provides the ability to view the execution status of the activity. It returns values in “Boolean.”
True: Indicates that the activity has been executed successfully without any errors.
False: Indicates that the activity has been unsuccessful due to an unexpected error being thrown.

Represents mandatory fields to execute the workflow.

5.5.3 Double Click

This activity assists the user to perform “Double Click” action on the specified image, elements, icons, files, and applications.

Properties

Accuracy

Accuracy: This parameter helps the user find the similarity between the images that need to be identified. The accuracy range starts from 0 and ends at 1. The highest accuracy achievable is 0.8. This parameter accepts values of the ‘Double’ data type.

FindImage: Indicates to find the image based on the accuracy provided. Choose from the drop down,
Normal – It searches for the image until the specified accuracy is met.
Dynamic – It searches for the image more than the specified accuracy range.

Boundary

Height: It gets automatically filled once the ‘Image’ has been selected. It indicates the ‘Height’ of the image snippet. If left blank, it will not be considered. This parameter accepts values of the ‘Int32’ data type. You can also adjust the height of the image to be identified during runtime, increasing, or decreasing it. This field will be automatically filled and required when ‘Advanced Automation’ is enabled.(Refer the Advanced Automation document.)

InBoundary: It gets automatically filled once the ‘Image’ has been selected. It indicates whether the image snippet is within the boundary or not. If left blank, it will not be considered. This parameter accepts values of the “Boolean” data type.
True: Indicates that the image snippet is within the boundary chosen.
False: Indicates that the image snippet is within the boundary chosen. This field will be automatically filled and required when ‘Advanced Automation’ is enabled.(Click here to know about the boundary.)

Width: It gets automatically filled once the ‘Image’ has been selected. It indicates the “Width” of the image snippet. If left blank, it will not be considered. This parameter accepts values of the ‘Int32’ data type.
You can also adjust the width of the image to be identified during runtime, increasing, or decreasing it. This field will be automatically filled and required when ‘Advanced Automation’ is enabled. (Refer the Advanced Automation document.)

X: It gets automatically filled once the ‘Image’ has been selected. It indicates the “horizontal position” of the image snippet from left side of the page. If left blank, it will not be considered. This parameter accepts values of the ‘Int32’ data type.
You can also adjust the range to be identified during runtime, increasing, or decreasing it. 
This field will be automatically filled and required when ‘Advanced Automation’ is enabled. (Refer the Advanced Automation document.)

Y: It gets automatically filled once the ‘Image’ has been selected. It indicates the “Vertical position” of the image snippet from top of the page. If left blank, it will not be considered. This parameter accepts values of the ‘Int32’ data type.
You can also adjust the range to be identified during runtime, increasing, or decreasing it.
This field will be automatically filled and required when ‘Advanced Automation’ is enabled. (Refer the Advanced Automation document.)

INPUT

DelayAfterClick: It assists the user to add a delay before initiating subsequent activities. The delay duration here is in milliseconds. By default, it is set to “100” milliseconds. When the option is left blank, the delay will not be considered.

DelayBeforeClick: It assists the user in adding a delay before starting the execution of the activities. The delay duration here is in milliseconds. By default, it is set to “100” milliseconds. When the option is left blank, the delay will not be considered.

OffSetX: Indicates the horizontal position of the ‘cursor’ for performing the ‘drag and drop’ action on the image snippet. When this option is left blank, the “OffsetX” position will not be considered. It accepts values in the ‘Int32’ data type.

OffsetY: Indicates the vertical position of the ‘cursor’ for performing the ‘drag and drop’ action on the image snippet. When this option is left blank, the “OffsetY” position will not be considered. It accepts values in the ‘Int32’ data type.”

Position: Indicates to set the “Position” of the image snipped.  Select the options from the drop-down,
Centre – Choose this option when the “image” is centered within the page.  
TopRight- Choose this option when the “image” is positioned at “Top Right” within the page.  
TopLeft – Choose this option when the “image” is positioned at “Top Left” on the page.  
BottomRight – Choose this option when the “image” is positioned at “Bottom Right” within the page.  
BottomLeft – Choose this option when the “image” is positioned at “Bottom Left” within the page. 

UseWindowTitle: It allows the user to perform actions only within the specified ‘Window’ title when the box is checked. When this option is left unchecked, it will not be considered. 

WaitTime: It enables the user to introduce a delay before initiating subsequent activities. The delay is specified in milliseconds.
By default, it is set to 10000 milliseconds. Leaving the option blank will result in no delay being applied.

Window Title:*  It gets automatically filled once the ‘Image’ has been captured within the application. It represents the ‘title’ of the application from which the image has been captured.

MISC

DisplayName: Displays the name of the activity. The activity name can be customized, which aids in troubleshooting.
SkipOnError: Specify the “Boolean” value as “True” or “False.”
True: Continue executing the workflow regardless of any errors thrown.
False: Halt the workflow if it encounters any errors.
None: If the option is left blank, the activity will, by default, behave as if “False” were chosen.
Version: It indicates the version of the feature being used.

OUTPUT

Result: It provides the ability to view the execution status of the activity. It returns values in “Boolean.”
True: Indicates that the activity has been executed successfully without any errors.
False: Indicates that the activity has been unsuccessful due to an unexpected error being thrown.

* Represents mandatory fields to execute the workflow

5.5.4 Hold

This activity helps the user hold any item, such as elements, images, files, or icons, and move them from one place to another.

Whether you’re rearranging elements on a webpage or organizing files in a folder, this activity simplifies the process of dragging and dropping items, making it easy to reposition them to the desired location with precision and ease.

Properties

ACCUARCY

Accuarcy: This parameter helps the user find the similarity between the images that need to be identified. The accuracy range starts from 0 and ends at 1. The highest accuracy achievable is 0.8. This parameter accepts values of the ‘Double’ data type.

FindImage: Indicates to find the image based on the accuracy provided. Choose from the drop down,
Normal – It searches for the image until the specified accuracy is met.
Dynamic – It searches for the image more than the specified accuracy range.

BOUNDARY

Height: It gets automatically filled once the ‘Image’ has been selected. It indicates the ‘Height’ of the image snippet. If left blank, it will not be considered. This parameter accepts values of the ‘Int32’ data type.You can also adjust the height of the image to be identified during runtime, increasing, or decreasing it. This field will be automatically filled and required when ‘Advanced Automation’ is enabled. (Refer the Advanced Automation document.)

InBoundary: It gets automatically filled once the ‘Image’ has been selected. It indicates whether the image snippet is within the boundary or not. If left blank, it will not be considered. This parameter accepts values of the “Boolean” data type.
True: Indicates that the image snippet is within the boundary chosen.
False: Indicates that the image snippet is within the boundary chosen.
This field will be automatically filled and required when ‘Advanced Automation’ is enabled. (Click here to know about the boundary.)

Width: It gets automatically filled once the ‘Image’ has been selected. It indicates the “Width” of the image snippet. If left blank, it will not be considered. This parameter accepts values of the ‘Int32’ data type.You can also adjust the width of the image to be identified during runtime, increasing, or decreasing it. This field will be automatically filled and required when ‘Advanced Automation’ is enabled. (Refer the Advanced Automation document.)

X. It gets automatically filled once the ‘Image’ has been selected. It indicates the “horizontal position” of the image snippet from left side of the page. If left blank, it will not be considered. This parameter accepts values of the ‘Int32’ data type. You can also adjust the range to be identified during runtime, increasing, or decreasing it. This field will be automatically filled and required when ‘Advanced Automation’ is enabled. (Refer the Advanced Automation document.)

Y: It gets automatically filled once the ‘Image’ has been selected. It indicates the “Vertical position” of the image snippet from top of the page. If left blank, it will not be considered. This parameter accepts values of the ‘Int32’ data type. You can also adjust the range to be identified during runtime, increasing, or decreasing it. This field will be automatically filled and required when ‘Advanced Automation’ is enabled. (Refer the Advanced Automation document.)

INPUT

DelayAfterHold: It assists the user to add a delay before initiating subsequent activities. The delay duration here is in milliseconds. By default, it is set to “100” milliseconds. When the option is left blank, the delay will not be considered.

DelayBeforeHold: It assists the user in adding a delay before starting the execution of the activities. The delay duration here is in milliseconds. By default, it is set to “100” milliseconds. \When this option is left blank, the “OffsetX” position will not be considered. It accepts values in the ‘Int32’ data type.

OffsetX: Indicates the vertical position of the ‘cursor’ for performing the ‘drag and  drop’ action on the image snippet. When this option is left blank, the “OffsetY” position will not be considered. It accepts values in the ‘Int32’ data type.”

OffsetY: Indicates to set the “Position” of the image snipped.  Select the options from the drop-down,
Centre – Choose this option when the “image” is centered within the page.  
TopRight- Choose this option when the “image” is positioned at “Top Right” within the page.  
TopLeft – Choose this option when the “image” is positioned at “Top Left” on the page.  
BottomRight – Choose this option when the “image” is positioned at “Bottom Right” within the page.  
BottomLeft – Choose this option when the “image” is positioned at “Bottom Left” within the page.  

UserWindowTittle: It allows the user to perform actions only within the specified ‘Window’ title when the box is checked. When this option is left unchecked, it will not be considered.

WaitTime: It enables the user to introduce a delay before initiating subsequent activities. The delay is specified in milliseconds. By default, it is set to 10000 milliseconds. Leaving the option blank will result in no delay being applied. 

WindowsTittle: It gets automatically filled once the ‘Image’ has been captured within the application. It represents the ‘title’ of the application from which the image has been captured.

MISC

DisokayName: Displays the name of the activity. The activity name can be customized, which aids in troubleshooting.
SkiponError: Specify the “Boolean” value as “True” or “False.”
True: Continue executing the workflow regardless of any errors thrown.
False: Halt the workflow if it encounters any errors.
None: If the option is left blank, the activity will, by default, behave as if “False” were chosen.
Version: It indicates the version of the feature being used.

OUTPUT

Result: It provides the ability to view the execution status of the activity. It returns values in “Boolean.”
True: Indicates that the activity has been executed successfully without any errors.
False: Indicates that the activity has been unsuccessful due to an unexpected error being thrown.

Represents mandatory fields to execute the workflow

5.5.5 Image Exists

The Image Exists activity is used to check the presence of a specified image on the screen and returns a Boolean value indicating the result: True if the image is found, and False if it is not.

Properties

INPUT

Accuracy: Defines the minimum similarity (0 to 1) required between the searched image and the found image. Default is 0.8.

a. Use higher accuracy (close to 1) when exact matching is critical.
b. Use lower accuracy (closer to 0.5–0.7) when images may differ slightly (e.g., size, color, resolution).

FindImage: Mode of searching:

Normal: Search until specified accuracy is met.
Dynamic: Searches beyond the specified accuracy range.

Boundary Parameters: Auto-filled when Dynamic Resilience is enabled.

Height, Width, X (horizontal position), Y (vertical position), InBoundary (Boolean)

These define the dimensions and location of the image snippet for searching and can be adjusted at runtime.

UseWindowsTitle: Restricts the search within a window specified by its title in the “Windows Title” property. 

Wait time: Delay before subsequent activities in milliseconds. Defaults to 10000 ms if not set.

Windows Title: Auto-filled title of the window where the image was captured. 

MISC

Display Name: Displays the name of the activity. The activity name can be customized, which aids in troubleshooting.

SkipOnError: Boolean to decide if the workflow continues on error (True) or halts (False). 

Version: It indicates the version of the feature being used.

OUTPUT

Result: Boolean status of the activity execution (True if successful, False if an unexpected error occurs).

Exist status: Boolean output indicating whether the image exists (True if found, False if not).

5.5.6 Move

This activity helps the user move the ‘cursor’ over the snipped image during runtime.

Properties

ACCURACY

Accurcy: This parameter helps the user find the similarity between the images that need to be identified. The accuracy range starts from 0 and ends at 1. The highest accuracy achievable is 0.8. This parameter accepts values of the ‘Double’ data type.

FindImage: Indicates to find the image based on the accuracy provided. Choose from the drop down,
Normal – It searches for the image until the specified accuracy is met.
Dynamic – It searches for the image more than the specified accuracy range.

BOUNDARY

Height: It gets automatically filled once the ‘Image’ has been selected. It indicates the ‘Height’ of the image snippet. If left blank, it will not be considered. This parameter accepts values of the ‘Int32’ data type. You can also adjust the height of the image to be identified during runtime, increasing, or decreasing it.
This field will be automatically filled and required when ‘Advanced Automation’ is enabled. (Refer the Advanced Automation document.)

Inboundary: It gets automatically filled once the ‘Image’ has been selected. It indicates whether the image snippet is within the boundary or not. If left blank, it will not be considered. This parameter accepts values of the “Boolean” data type.
True: Indicates that the image snippet is within the boundary chosen.
False: Indicates that the image snippet is within the boundary chosen.
This field will be automatically filled and required when ‘Advanced Automation’ is enabled. (Click here to know about the boundary.)

Width: It gets automatically filled once the ‘Image’ has been selected. It indicates the “Width” of the image snippet. If left blank, it will not be considered. This parameter accepts values of the ‘Int32’ data type.You can also adjust the width of the image to be identified during runtime, increasing, or decreasing it.
This field will be automatically filled and required when ‘Advanced Automation’ is enabled. (Refer the Advanced Automation document.)

X: It gets automatically filled once the ‘Image’ has been selected. It indicates the “horizontal position” of the image snippet from left side of the page. If left blank, it will not be considered. This parameter accepts values of the ‘Int32’ data type.
You can also adjust the range to be identified during runtime, increasing, or decreasing it.
This field will be automatically filled and required when ‘Advanced Automation’ is enabled. (Refer the Advanced Automation document.)

Y: It gets automatically filled once the ‘Image’ has been selected. It indicates the “Vertical position” of the image snippet from top of the page. If left blank, it will not be considered. This parameter accepts values of the ‘Int32’ data type.
You can also adjust the range to be identified during runtime, increasing, or decreasing it.
This field will be automatically filled and required when ‘Advanced Automation’ is enabled. (Refer the Advanced Automation document.)

INPUT

OffsetX: Indicates the horizontal position of the ‘cursor’ for performing the ‘drag and drop’ action on the image snippet. When this option is left blank, the “OffsetX” position will not be considered. It accepts values in the ‘Int32’ data type.

OffsetY: Indicates the vertical position of the ‘cursor’ for performing the ‘drag and drop’ action on the image snippet. When this option is left blank, the “OffsetY” position will not be considered. It accepts values in the ‘Int32’ data type.”

Position: Indicates to set the “Position” of the image snipped.  Select the options from the drop-down,
Centre – Choose this option when the “image” is centered within the page.  
TopRight- Choose this option when the “image” is positioned at “Top Right” within the page.  
TopLeft – Choose this option when the “image” is positioned at “Top Left” on the page.  
BottomRight – Choose this option when the “image” is positioned at “Bottom Right” within the page.  
BottomLeft – Choose this option when the “image” is positioned at “Bottom Left” within the page.  

UseWindowTittle: It allows the user to perform actions only within the specified ‘Window’ title when the box is checked. When this option is left unchecked, it will not be considered.

WaitTime: It enables the user to introduce a delay before initiating subsequent activities. The delay is specified in milliseconds. By default, it is set to 10000 milliseconds. Leaving the option blank will result in no delay being applied.

WindowTittle:* It gets automatically filled once the ‘Image’ has been captured within the application. It represents the ‘title’ of the application from which the image has been captured.

MISC

DisplayName: Displays the name of the activity. The activity name can be customized, which aids in troubleshooting.
SkipOnError: Specify the “Boolean” value as “True” or “False.”
True: Continue executing the workflow regardless of any errors thrown.
False: Halt the workflow if it encounters any errors.
None: If the option is left blank, the activity will, by default, behave as if “False” were chosen.
Version: It indicates the version of the feature being used.

OUTPUT

Result: It provides the ability to view the execution status of the activity. It returns values in “Boolean.”
True: Indicates that the activity has been executed successfully without any errors.
False: Indicates that the activity has been unsuccessful due to an unexpected error being thrown.

Represents mandatory fields to execute the workflow

5.5.7 Release

This activity assists the user in ‘releasing’ or ‘dropping’ items such as elements, images, files, or icons that have been ‘held’ in order to move them from one place to another.

Properties

ACCURACY

Accuracy: This parameter helps the user find the similarity between the images that need to be identified. The accuracy range starts from 0 and ends at 1. The highest accuracy achievable is 0.8. This parameter accepts values of the ‘Double’ data type.

FindImage: Indicates to find the image based on the accuracy provided. Choose from the drop down,
Normal – It searches for the image until the specified accuracy is met.
Dynamic – It searches for the image more than the specified accuracy range.

BOUNDARY

Height: It gets automatically filled once the ‘Image’ has been selected. It indicates the ‘Height’ of the image snippet. If left blank, it will not be considered. This parameter accepts values of the ‘Int32’ data type. You can also adjust the height of the image to be identified during runtime, increasing, or decreasing it. This field will be automatically filled and required when ‘Advanced Automation’ is enabled. (Refer the Advanced Automation document.)

InBoundary: It gets automatically filled once the ‘Image’ has been selected. It indicates whether the image snippet is within the boundary or not. If left blank, it will not be considered. This parameter accepts values of the “Boolean” data type.
True: Indicates that the image snippet is within the boundary chosen.
False: Indicates that the image snippet is within the boundary chosen.
This field will be automatically filled and required when ‘Advanced Automation’ is enabled. (Click here to know about the boundary.)

Width: It gets automatically filled once the ‘Image’ has been selected. It indicates the “Width” of the image snippet. If left blank, it will not be considered. This parameter accepts values of the ‘Int32’ data type. You can also adjust the width of the image to be identified during runtime, increasing, or decreasing it. This field will be automatically filled and required when ‘Advanced Automation’ is enabled. (Refer the Advanced Automation document.)

X: It gets automatically filled once the ‘Image’ has been selected. It indicates the “horizontal position” of the image snippet from left side of the page. If left blank, it will not be considered. This parameter accepts values of the ‘Int32’ data type. You can also adjust the range to be identified during runtime, increasing, or decreasing it. This field will be automatically filled and required when ‘Advanced Automation’ is enabled. (Refer the Advanced Automation document.)

Y: It gets automatically filled once the ‘Image’ has been selected. It indicates the “Vertical position” of the image snippet from top of the page. If left blank, it will not be considered. This parameter accepts values of the ‘Int32’ data type. You can also adjust the range to be identified during runtime, increasing, or decreasing it. This field will be automatically filled and required when ‘Advanced Automation’ is enabled. (Refer the Advanced Automation document.)

INPUT

DelayAfterRelease: It assists the user to add a delay before initiating subsequent activities. The delay duration here is in milliseconds. By default, it is set to “100” milliseconds. When the option is left blank, the delay will not be considered.

DelayBeforeRelease: It assists the user in adding a delay before starting the execution of the activities.
The delay duration here is in milliseconds. By default, it is set to “100” milliseconds.
When the option is left blank, the delay will not be considered.

OffSetX: Indicates the horizontal position of the ‘cursor’ for performing the ‘drag and drop’ action on the image snippet.
When this option is left blank, the “OffsetX” position will not be considered. It accepts values in the ‘Int32’ data type.

OffSetY: Indicates the vertical position of the ‘cursor’ for performing the ‘drag and drop’ action on the image snippet.
When this option is left blank, the “OffsetY” position will not be considered. It accepts values in the ‘Int32’ data type.”

Possition: Indicates to set the “Position” of the image snipped.  Select the options from the drop-down,
Centre – Choose this option when the “image” is centered within the page.  
TopRight- Choose this option when the “image” is positioned at “Top Right” within the page.  
TopLeft – Choose this option when the “image” is positioned at “Top Left” on the page.  
BottomRight – Choose this option when the “image” is positioned at “Bottom Right” within the page.  
BottomLeft – Choose this option when the “image” is positioned at “Bottom Left” within the page.  

UseWindowsTittle: It allows the user to perform actions only within the specified ‘Window’ title when the box is checked.
When this option is left unchecked, it will not be considered.

Waittime: It enables the user to introduce a delay before initiating subsequent activities. The delay is specified in milliseconds.
By default, it is set to 10000 milliseconds. Leaving the option blank will result in no delay being applied.

WindowsTittle:*It gets automatically filled once the ‘Image’ has been captured within the application. It represents the ‘title’ of the application from which the image has been captured.

MISC

DisplayName: Displays the name of the activity. The activity name can be customized, which aids in troubleshooting.
SkipOnError: Specify the “Boolean” value as “True” or “False.”
True: Continue executing the workflow regardless of any errors thrown.
False: Halt the workflow if it encounters any errors.
None: If the option is left blank, the activity will, by default, behave as if “False” were chosen.
Version: It indicates the version of the feature being used.

OUTPUT

Result: It provides the ability to view the execution status of the activity. It returns values in “Boolean.”
True: Indicates that the activity has been executed successfully without any errors.
False: Indicates that the activity has been unsuccessful due to an unexpected error being thrown.

Represents mandatory fields to execute the workflow.

5.5.8 Right Click

This activity assists the user in performing ‘Right-click’ actions on elements, images, files, icons, and applications.

Properties

ACCURACY

Accuracy: This parameter helps the user find the similarity between the images that need to be identified. The accuracy range starts from 0 and ends at 1. The highest accuracy achievable is 0.8. This parameter accepts values of the ‘Double’ data type.

FindImage: Indicates to find the image based on the accuracy provided. Choose from the drop down,
Normal – It searches for the image until the specified accuracy is met.
Dynamic – It searches for the image more than the specified accuracy range.

BOUNDARY

Height: It gets automatically filled once the ‘Image’ has been selected. It indicates the ‘Height’ of the image snippet. If left blank, it will not be considered. This parameter accepts values of the ‘Int32’ data type.
You can also adjust the height of the image to be identified during runtime, increasing, or decreasing it.
This field will be automatically filled and required when ‘Advanced Automation’ is enabled. (Refer the Advanced Automation document.)

InBoundaryline: It gets automatically filled once the ‘Image’ has been selected. It indicates whether the image snippet is within the boundary or not. If left blank, it will not be considered. This parameter accepts values of the “Boolean” data type.
True: Indicates that the image snippet is within the boundary chosen.
False: Indicates that the image snippet is within the boundary chosen.
This field will be automatically filled and required when ‘Advanced Automation’ is enabled. (Click here to know about the boundary.)

Width: It gets automatically filled once the ‘Image’ has been selected. It indicates the “Width” of the image snippet. If left blank, it will not be considered. This parameter accepts values of the ‘Int32’ data type.
You can also adjust the width of the image to be identified during runtime, increasing, or decreasing it.
This field will be automatically filled and required when ‘Advanced Automation’ is enabled. (Refer the Advanced Automation document.)

X: It gets automatically filled once the ‘Image’ has been selected. It indicates the “horizontal position” of the image snippet from left side of the page. If left blank, it will not be considered. This parameter accepts values of the ‘Int32’ data type.
You can also adjust the range to be identified during runtime, increasing, or decreasing it.
This field will be automatically filled and required when ‘Advanced Automation’ is enabled. (Refer the Advanced Automation document.)

Y: It gets automatically filled once the ‘Image’ has been selected. It indicates the “Vertical position” of the image snippet from top of the page. If left blank, it will not be considered. This parameter accepts values of the ‘Int32’ data type.
You can also adjust the range to be identified during runtime, increasing, or decreasing it.
This field will be automatically filled and required when ‘Advanced Automation’ is enabled. (Refer the Advanced Automation document.)

INPUT

DelayAfterClick: It assists the user to add a delay before initiating subsequent activities.
The delay duration here is in milliseconds. By default, it is set to “100” milliseconds.
When the option is left blank, the delay will not be considered.

DelayBeforeClick: It assists the user in adding a delay before starting the execution of the activities. The delay duration here is in milliseconds. By default, it is set to “100” milliseconds. When the option is left blank, the delay will not be considered.

OffsetX: Indicates the horizontal position of the ‘cursor’ for performing the ‘drag and drop’ action on the image snippet.
When this option is left blank, the “OffsetX” position will not be considered. It accepts values in the ‘Int32’ data type.

OffsetY:Indicates the vertical position of the ‘cursor’ for performing the ‘drag and drop’ action on the image snippet.
When this option is left blank, the “OffsetY” position will not be considered. It accepts values in the ‘Int32’ data type.”

Position: Indicates to set the “Position” of the image snipped.  Select the options from the drop-down,
Centre – Choose this option when the “image” is centered within the page.  
TopRight- Choose this option when the “image” is positioned at “Top Right” within the page.  
TopLeft – Choose this option when the “image” is positioned at “Top Left” on the page.  
BottomRight – Choose this option when the “image” is positioned at “Bottom Right” within the page.  
BottomLeft – Choose this option when the “image” is positioned at “Bottom Left” within the page.  

UseWindowstittle: It allows the user to perform actions only within the specified ‘Window’ title when the box is checked.
When this option is left unchecked, it will not be considered.

WaitTime: It enables the user to introduce a delay before initiating subsequent activities. The delay is specified in milliseconds.
By default, it is set to 10000 milliseconds. Leaving the option blank will result in no delay being applied.

WindowsTittle:It gets automatically filled once the ‘Image’ has been captured within the application. It represents the ‘title’ of the application from which the image has been captured.

MISC

DisplayName: Displays the name of the activity. The activity name can be customized, which aids in troubleshooting.

SkipOnError: Specify the “Boolean” value as “True” or “False.”
True: Continue executing the workflow regardless of any errors thrown.
False: Halt the workflow if it encounters any errors.
None: If the option is left blank, the activity will, by default, behave as if “False” were chosen.

Version: It indicates the version of the feature being used.

OUTPUT

Result: It provides the ability to view the execution status of the activity. It returns values in “Boolean.”
True: Indicates that the activity has been executed successfully without any errors.
False: Indicates that the activity has been unsuccessful due to an unexpected error being thrown.

Represents mandatory fields to execute the workflow.

5.5.9 Screen Capture

This activity assists the user in capturing a ‘screenshot’ of the page or application currently displayed on the screen. Users can then refer to these screenshots to identify problems, track changes and troubleshooting purposes.

Properties

INPUT

Filename:* Indicates to provide the “Name” of the file against which the image needs to be stored. It accepts values in the “String” data type. You can either hardcode the value in a string variable or input the “String” value here.

FilePath:* Indicates to provide the “Path” where the image needs to be stored. It accepts values in the “String” data type.
You can either hardcode the value in a string variable or input the “String” value here.

Screenon: This parameter is useful when the user has dual screens. Select an option from the drop-down menu.
Display1: Indicates taking a screenshot of the screen displayed on screen 1.
AllScreens: Indicates taking a screenshot of the page/application on both screens. When left blank, it will default to ‘screen1’ displayed in front.”

MISC

DisplayName: Displays the name of the activity. The activity name can be customized, which aids in troubleshooting.

SkipOnError: Specify the “Boolean” value as “True” or “False.”
True: Continue executing the workflow regardless of any errors thrown.
False: Halt the workflow if it encounters any errors.
None: If the option is left blank, the activity will, by default, behave as if “False” were chosen.

Version: It indicates the version of the feature being used.

OUTPUT

Result: It provides the ability to view the execution status of the activity. It returns values in “Boolean.”
True: Indicates that the activity has been executed successfully without any errors.
False: Indicates that the activity has been unsuccessful due to an unexpected error being thrown.

* Represents mandatory fields to execute the workflow

5.5.10 Vanish

This activity helps the user validate whether an image, elements, files, icons, or applications have disappeared from the screen display.

Properties

ACCURACY

Accuracy: This parameter helps the user find the similarity between the images that need to be identified. The accuracy range starts from 0 and ends at 1. The highest accuracy achievable is 0.8. This parameter accepts values of the ‘Double’ data type.

FindImage: Indicates to find the image based on the accuracy provided. Choose from the drop down,
Normal – It searches for the image until the specified accuracy is met.
Dynamic – It searches for the image more than the specified accuracy range.

BOUNDARY

Height: It gets automatically filled once the ‘Image’ has been selected. It indicates the ‘Height’ of the image snippet. If left blank, it will not be considered. This parameter accepts values of the ‘Int32’ data type.
You can also adjust the height of the image to be identified during runtime, increasing, or decreasing it.
This field will be automatically filled and required when ‘Advanced Automation’ is enabled. (Refer the Advanced Automation document.)

InBoundary: It gets automatically filled once the ‘Image’ has been selected. It indicates whether the image snippet is within the boundary or not. If left blank, it will not be considered. This parameter accepts values of the “Boolean” data type.
True: Indicates that the image snippet is within the boundary chosen.
False: Indicates that the image snippet is within the boundary chosen.
This field will be automatically filled and required when ‘Advanced Automation’ is enabled. (Click here to know about the boundary.)

Width: It gets automatically filled once the ‘Image’ has been selected. It indicates the “Width” of the image snippet. If left blank, it will not be considered. This parameter accepts values of the ‘Int32’ data type.
You can also adjust the width of the image to be identified during runtime, increasing, or decreasing it.
This field will be automatically filled and required when ‘Advanced Automation’ is enabled. (Refer the Advanced Automation document.)

X: It gets automatically filled once the ‘Image’ has been selected. It indicates the “horizontal position” of the image snippet from left side of the page. If left blank, it will not be considered. This parameter accepts values of the ‘Int32’ data type.
You can also adjust the range to be identified during runtime, increasing, or decreasing it.
This field will be automatically filled and required when ‘Advanced Automation’ is enabled. (Refer the Advanced Automation document.)

Y: It gets automatically filled once the ‘Image’ has been selected. It indicates the “Vertical position” of the image snippet from top of the page. If left blank, it will not be considered. This parameter accepts values of the ‘Int32’ data type.
You can also adjust the range to be identified during runtime, increasing, or decreasing it.
This field will be automatically filled and required when ‘Advanced Automation’ is enabled. (Refer the Advanced Automation document.)

INPUT

UseWindowsTittle: It allows the user to perform actions only within the specified ‘Window’ title when the box is checked.
When this option is left unchecked, it will not be considered.

WaitTime: It enables the user to introduce a delay before initiating subsequent activities. The delay is specified in milliseconds.
By default, it is set to 10000 milliseconds. Leaving the option blank will result in no delay being applied.

WindowTittle:It gets automatically filled once the ‘Image’ has been captured within the application. It represents the ‘title’ of the application from which the image has been captured.

MISC

DisplayName: Displays the name of the activity. The activity name can be customized, which aids in troubleshooting.

SkipOnError: Specify the “Boolean” value as “True” or “False.”
True: Continue executing the workflow regardless of any errors thrown.
False: Halt the workflow if it encounters any errors.
None: If the option is left blank, the activity will, by default, behave as if “False” were chosen.

Version: It indicates the version of the feature being used.

OUTPUT

Result: It provides the ability to view the execution status of the activity. It returns values in “Boolean.”
True: Indicates that the activity has been executed successfully without any errors.
False: Indicates that the activity has been unsuccessful due to an unexpected error being thrown.

Represents mandatory fields to execute the workflow

5.5.11 Wait

This activity helps the user to add a delay between the activities during the runtime.

Properties

ACCURACY

Accuracy: This parameter helps the user find the similarity between the images that need to be identified. The accuracy range starts from 0 and ends at 1. The highest accuracy achievable is 0.8. This parameter accepts values of the ‘Double’ data type.

FindImage: Indicates to find the image based on the accuracy provided. Choose from the drop down,
Normal – It searches for the image until the specified accuracy is met.
Dynamic – It searches for the image more than the specified accuracy range.

BOUNDARY

Height: It gets automatically filled once the ‘Image’ has been selected. It indicates the ‘Height’ of the image snippet. If left blank, it will not be considered. This parameter accepts values of the ‘Int32’ data type.
You can also adjust the height of the image to be identified during runtime, increasing, or decreasing it.
This field will be automatically filled and required when ‘Advanced Automation’ is enabled. (Refer the Advanced Automation document.)

InBoundary: It gets automatically filled once the ‘Image’ has been selected. It indicates whether the image snippet is within the boundary or not. If left blank, it will not be considered. This parameter accepts values of the “Boolean” data type.
True: Indicates that the image snippet is within the boundary chosen.
False: Indicates that the image snippet is within the boundary chosen.
This field will be automatically filled and required when ‘Advanced Automation’ is enabled. (Click here to know about the boundary.)

Width: It gets automatically filled once the ‘Image’ has been selected. It indicates the “Width” of the image snippet. If left blank, it will not be considered. This parameter accepts values of the ‘Int32’ data type.
You can also adjust the width of the image to be identified during runtime, increasing, or decreasing it.
This field will be automatically filled and required when ‘Advanced Automation’ is enabled. (Refer the Advanced Automation document.)

X: It gets automatically filled once the ‘Image’ has been selected. It indicates the “horizontal position” of the image snippet from left side of the page. If left blank, it will not be considered. This parameter accepts values of the ‘Int32’ data type.
You can also adjust the range to be identified during runtime, increasing, or decreasing it.
This field will be automatically filled and required when ‘Advanced Automation’ is enabled. (Refer the Advanced Automation document.)

Y: It gets automatically filled once the ‘Image’ has been selected. It indicates the “Vertical position” of the image snippet from top of the page. If left blank, it will not be considered. This parameter accepts values of the ‘Int32’ data type.
You can also adjust the range to be identified during runtime, increasing, or decreasing it.
This field will be automatically filled and required when ‘Advanced Automation’ is enabled. (Refer the Advanced Automation document.)

INPUT

UseWindowsTittle: It allows the user to perform actions only within the specified ‘Window’ title when the box is checked. When this option is left unchecked, it will not be considered.

WaitTime: It enables the user to introduce a delay before initiating subsequent activities. The delay is specified in milliseconds. By default, it is set to 10000 milliseconds. Leaving the option blank will result in no delay being applied.

WindowsTittle:* It gets automatically filled once the ‘Image’ has been captured within the application. It represents the ‘title’ of the application from which the image has been captured.

MISC

DisplayName: Displays the name of the activity. The activity name can be customized, which aids in troubleshooting.

SkipOnError: Specify the “Boolean” value as “True” or “False.”
True: Continue executing the workflow regardless of any errors thrown.
False: Halt the workflow if it encounters any errors.
None: If the option is left blank, the activity will, by default, behave as if “False” were chosen.

Version: It indicates the version of the feature being used.

OUTPUT

Result: It provides the ability to view the execution status of the activity. It returns values in “Boolean.”
True: Indicates that the activity has been executed successfully without any errors.
False: Indicates that the activity has been unsuccessful due to an unexpected error being thrown.

Represents mandatory fields to execute the workflow.

5.5.12 Use Case

5.6 Screen Recording

About

The Screen Recorder activity in Robility helps to capture visual representations of on-screen activities and interactions. This feature allows users to record the sequence of actions performed by a robot on a computer screen, creating a video or simulation of the automated process.

The primary purpose of the Screen Recorder activity is to provide a visual record of how a specific task or process is executed. This recording serves various purposes, including process documentation, troubleshooting, training, and collaboration. Users can review the captured footage to understand the flow, logic, and user interface interactions of automated processes.

Benefits

Process Documentation: Screen recording allows for the comprehensive documentation of processes. It captures each step visually, making it easier for developers and stakeholders to understand the sequence of actions taken by the robot.
Troubleshooting and Debugging: When a process encounters issues or errors, the recorded screen can be invaluable for troubleshooting and debugging.
Audit Trails: Screen recording acts as an audit trail, allowing organizations to maintain a visual record of automated processes. 
Enhanced Communication: Screen recordings are a powerful tool for communication between RPA developers, business analysts, and other stakeholders. They provide a shared visual reference, making it easier to discuss and improve automated processes.
User Interface Changes: In scenarios where websites or applications undergo frequent changes, screen recording helps developers adapt automation scripts quickly. They can visually analyze the changes and update the automation accordingly.

Limitations

1.    This activity does not function with the dual monitor system.  
2.    Currently, the activity exports the output only in Audio video Interleave format(.avi) but captures only the video. Audio will not be supported.  
3.    The Maximum frame rate is “3”.

5.6.1 Release Notes

v.1.0.8

This release includes enhancements to dependent DLLs.

Enhancement

All dependent DLLs have been upgraded to the latest stable versions, enhancing security, performance, and workflow reliability. This update ensures smoother execution and maintains compatibility with both existing and new workflows.

Released Date: 09/03/2026

5.6.2 Screen Recorder

The Screen Recording helps the user to record the set of activities built within it. It paves an easy way to troubleshoot the issue they encounter and enabling them to visually analyze the root cause.

Properties

INPUT

Framepersecond:* It denotes the frame rate at which each image should be captured per second. This parameter accepts values in “Integer” datatype. You can either hardcode the values in the “INTEGER” datatype or enter the values in integer format.
The maximum accepted frame rate is “3”.

OutputFilepath:* It indicates to provide the “Path” along with the name of the file to store the recorded video. This parameter accepts values in “String” datatype. You can either hardcode the values in the “String” datatype or enter the values in String format.

ScreenOn:* It indicates the “screen” from where the recorder is executed. By default, the option will be selected as “Display1”.

MISC

Body: Gets auto filled once the “Activity” is dropped into the body.

DisplayName: Displays the name of the activity. The activity name can be customized, which aids in troubleshooting.

SkipOnError: Specify the “Boolean” value as “True” or “False.”
True: Continue executing the workflow regardless of any errors thrown.
False: Halt the workflow if it encounters any errors.
None: If the option is left blank, the activity will, by default, behave as if “False” were chosen.

Version: It indicates the version of the feature being used.

OUTPUT

Result: It provides the ability to view the execution status of the activity. It returns values in “Boolean.” 
True: Indicates that the activity has been executed successfully without any errors.
False: Indicates that the activity has been unsuccessful due to an unexpected error being thrown.

Represents mandatory fields to execute the workflow.

5.6.3 Use Case

Scenario

In a basic automation task, website elements change dynamically. The manager wants to record actions for troubleshooting as the robot logs into the website and checks for specific elements. However, the process fails during the element check.

To address this, we use the ‘Screen Recorder’ activity. We place the necessary actions inside it for recording. The recorded data is stored in a specified filepath, allowing organized recording and troubleshooting, with data retained every 10 days.

Steps to execute the bot

1. Create a new solution or workflow as “Recorder”.
2. Install the latest version of “Screen Recorder” activity from the “Manage Feature”.
3. Drag and drop the “ScreenRecorder” activity and set it as start node. 
4. Double click on the activity.
a. It helps the user to record the activities in real time during the execution of the bot.

5. Navigating to the “FramePersecond” in the properties to provide the frame rate.
a. Here I am providing the value “3”.
6. Moving to the “OutputfilePath” to provide the filepath to store the output of the recorded data.
a. Here, the user has stored the value in variable as “FilePath”.
7. Now, we are adding the “OpenWebBrowser” from the WebAutomation feature into the scope.
a. It helps to launch the specified URL on the specified browser.
b. Here I am using the URL as https://www.sutherlandglobal.com.
c. You can provide the specified URL to proceed. 
8. Next, placing the “Click” activity from the WebAutomation feature to select the login username and password. (You can detect the specified element from your webpage to select).
 a. Double click on the activity.
b. Here, choose the “Select Active Application” option.
c. Double-click on the activity and choose the element where you want to perform the click, then proceed to the next step. In this case, I am spying over the “Contact” us button.
d. Once you have chosen the “Element,” the attributes will be stored in the “Spy” window, along with an “image” of the element.
e. If you wish to add or remove any attributes, you can edit the “Attributes Editor.” In this case, we are not making any changes in the “Editor.
f. Once you click on the “Save” button, the elements will be stored in the activity window.

9. Now, adding the “ElementExist” activity from the WebAutomation feature to check the element.
a. Double click on the activity.
b. Here, choose the “Select Active Application” option.
c. Double-click on the activity and choose the element where you want to perform the click, then proceed to the next step. In this case, I am spying over the “Contact” us button.
d. Once you have chosen the “Element,” the attributes will be stored in the “Spy” window, along with an “image” of the element.
e. If you wish to add or remove any attributes, you can edit the “Attributes Editor.” In this case, we are not making any changes in the “Editor.”
f. Once you click on the “Save” button, the elements will be stored in the activity window
g. Now, navigating to the “ExistStatus” in the properties to declare a variable to view the output.
10. Then place the “Writelog” activity from the Notification feature.
a. Double click on the activity.
b. Enter the input string as “Result.ToString” here.  The “.ToString” is advised to use along with any other data types other than string format. It converts any data type into string.
c. Choose the log level as “Info”.

11. Now, execute the workflow.

You can view the output of the activity in the specified filepath.

5.7 WebAutomation

Introduction

This feature provides the ability to automate a wide range of tasks on webpages, offering a powerful way to interact with web browsers programmatically. It allows users to perform actions such as navigating through web pages, filling out forms, clicking buttons, extracting data, and other common browser interactions—all without manual input. By automating these tasks, it significantly reduces the need for human intervention, resulting in increased speed, efficiency, and consistency. Automation also eliminates the risk of human error, making it an ideal solution for repetitive tasks, data collection, testing, or any situation where web interaction can be streamlined.

The Robility Platform is designed to support WebAutomation specifically within the Google Chrome and Microsoft Edge browsers. These browsers are fully compatible with the platform’s automation capabilities, ensuring optimal performance and stability during the execution of workflows.

Pre-Requisites

Before you can begin constructing a workflow using web activities, there are a few essential prerequisites to consider. These prerequisites are necessary to ensure that your WebAutomation tasks can be executed smoothly and effectively. Proper setup of these requirements will help avoid errors and maximize the efficiency of your workflows. For more detailed information on these prerequisites and guidance on how to configure them, please [Click here].

By meeting these requirements, you’ll be ready to start building automation workflows that can interact with web pages and perform tasks with ease.

5.7.1 Release Notes

v.2.6.8

This release introduces enhancements that provide more precise control over element interactions and improved text input behavior.

Enhancements

1. Offset X and Y Support
The Click and Set Text activities now support Offset X and Offset Y properties, allowing you to specify the interaction position relative to the target element.

2. Click Before Typing
The Set Text activity now includes a Click Before Typing option. When enabled, the target element is clicked before entering text to ensure it receives focus. When disabled, the activity enters text without performing a click.

Note: Downgrading the latest Web Automation package may cause activities to appear as missing in workflows.
 
Released Date: 08/07/2026

5.7.2 Element Editor

Robility Spy is a built-in tool in the Robility platform that supports Web Automation by detecting, capturing, and interacting with webpage elements. It reveals the underlying HTML properties of an element—such as tag, ID, name, or class and allows you to select the right attributes to uniquely identify it.

This is essential for reliable automation, as activities can only work when the correct element is targeted, such as a button to click, a text box to fill, a table to extract, or a link to open etc.

By bridging activities and the browser, Robility Spy ensures accurate execution and stable automation, even on webpages with dynamic elements. In situations where multiple elements share the same attributes, it further helps by offering a highlight option to visually identify and validate the correct element. Click here to learn more.

Best Practices for Using Robility Spy

1. Use Robility Spy to detect and select webpage elements for automation.
2. Each element has HTML tags and attributes—choose the most reliable ones to uniquely identify the element.
3. By default, attributes are auto selected when you click an element. In most cases, these default option works fine.
4. If an activity does not run as expected, or if the XPath or text values change dynamically, choose different attribute for stable automation.
5. Avoid using “innertext” as attribute for dynamic webpages, as changing text values may result in “Element not found”
6. For stable automation, follow these attribute selection guidelines:

a. Tables: Use tag, tabrow, or tabcol.
b. Single text box: Use tag.
c. Multiple text boxes: Use name, id, or class. For better accuracy, combine tag with name, id, or parent identifiers (parent id or parent class).

For more troubleshooting steps, click here to learn more.

Properties

IMAGE

Image: Displays the image of the element that has been detected on the webpage. The user will not be able to edit the image, they have to re-spy the element again to change it.

ATTRIBUTES EDITOR

XPath – This will display the highlighted element’s absolute Xpath.

1. The Xpath won’t function if any attributes are changed from the root to the element.
2. Using this attribute does not need other attributes along with it.
3. This is helpful while working on a dynamic webpage where the element’s unique attributes are not constant.
4. Once this attribute is selected, all other attributes will be disabled.

RelXPath – The Relative XPath helps to search the element anywhere on the webpage.

1. This works because it identifies the element directly and not from the root.
2. Using this attribute will disable all the attributes except XPath.
3. Though XPath will be enabled, we can choose either XPath or RelXpath and not both the attributes together.

ClassName – The class name of the element will be available here. This can be chosen along with the other attributes.

Tag The tag name of the highlighted element such as input tag, anchor tag or button tag will be available. This will be selected as default attribute. You can select/ deselect it as per your requirement.

InnerText – The Inner text of the highlighted element will be available here. You can select/deselect as per your requirement.

ParentClass – The Parent Class of the highlighted element will be available here. This will be selected as default attribute. You can select/deselect it as per your requirement.

Title– The title of the webpage will be available here. You can select/deselect as per your requirement.

Href– The Href attribute is used to specify the URL of the page that the link goes to.You can select/deselect based on your requirement.

Aria-Role– The Aria-role of the highlighted element to be treated on the website will be available here. If the selected element is a button, it will be treated as buttonYou can select/deselect based on your requirement.

ElementIndex – The index position of the highlighted element will be available here. You can select/deselect based on your requirement.

ParentTag –  The parent tag returns the parent element of the spied element. You can select/deselect based on your requirement.

ParentElementIndex –  The index position of the parent tag highlighted element will be available here.  You can select/deselect based on your requirement.

SecondParentTag – The second parent tag name of the highlighted element will be available here. You can select/deselect based on your requirement.

SecondParentElementIndex –  The index position of the second parent tag highlighted element will be available here. You can select/deselect based on your requirement.

EXECUTE BY – This area displays the element values and its attributes that has been chosen from the Attributes editor. Any changes made in the attribute’s editor field will be reflected here. This field cannot be edited, only changes will be reflected.

MATCHFULLURL – Users can choose this option when they need to perform or execute a set of activities within a specified URL only. Specify either “True” or “False.”
True: It will continue to match the full URL during execution.
False: It will continue to execute with only the domain name of the URL.
By default, it will be set to “False”

Highlight option

The Highlight option allows you to visually identify and validate which element has been detected on the webpage. When selected, the element is outlined or highlighted directly in the browser.

When to Use the Highlight Option?

The Highlight option is especially useful when multiple elements on a webpage share the same tag name or appear similar, such as two <button> elements (Click and Save) or links with identical labels (e.g. The save button will be available on several places on the webpage).

You can identify that elements share the same tag by checking the element details in the Robility Spy Window, which displays the tag name (e.g., <button>, <a>, <div>) along with attributes like ID, class, or name.

If two elements show the same tag, Highlight allows you to visually confirm which one is being targeted in the browser.

This real-time validation helps you distinguish between similar elements, ensures your automation points to the correct target, and reduces exception during execution.

How to use the Highlight option?

1. The option is available only when selecting elements in the Robility Spy Window (during design time) and will be available in all the activities.
2. Highlighting works only if the detected webpage is open and visible on your screen.
3. To highlight an element:

a. Open the target webpage.
b. Use the Robility Spy Window to detect the element.
c. Select the Highlight
d. The element will be highlighted directly in the browser for confirmation.

Once you select Highlight in the Robility Spy Window, the feature sends a signal to the browser to temporarily overlay a visible marker (such as a colored border) around the detected element.

5.7.3 Check App State

This activity helps the user to check the state of a web application by verifying the specified element in it.

Properties

INPUT

BrowserType: *Gets auto filled, once the element is indicated on the web page using Robility Spy. Here the browser type will be displayed.

BrowserVersion: *Gets auto filled, once the element is indicated on the web page using Robility Spy. Indicates the version of the browser in use.

DelayAfter: It helps the user to add a delay to start the execution of the further activity. The format of the delay here is milliseconds. By default, it will be set to 300. When the option is left blank, no delay is considered. 

DelayBefore: It helps the user to add a delay before the execution of the activities. The format of the delay here is milliseconds. By default, it will be set to 200. When the option is left blank, no delay is considered.

ExecuteBy:* Gets auto filled, once the element is indicated on the web page using Robility Spy. This contains the set of attributes for the specific spied element.

FramePath: *Gets auto filled, once the element is indicated on the web page using Robility Spy. The frame path is auto filled only if the selected element has a frame ID in the webpage.

URL: Gets auto filled, once the element is indicated on the web page using Robility Spy. Indicates the URL in which this activity is performed. 

ValueFindBy: Indicates to find the value of the detected element. Choose the option from the drop down,

Text: Mention the specific text which has to be found.
Index: Mention the index value of the element.
Value: Mention the value for the element that has to be found. 

WaitFor: Indicates to choose the event of the action to be performed.

Element to appear: It will wait for the detected element to appear in the UI on the webpage until the wait time provided.
Element to vanish: It will wait for the detected element to vanish from the UI on the webpage until the wait time provided.

WaitForReady: Runs the activity once the webpage loading matches the wait for ready state.
None – It will perform the activity functionality without checking the state of the browser.
Interactive– The activity will be performed once the web element is found even if the webpage is still in loading state.
Complete– The activity will proceed to the next step only if the web page is completely loaded.

WaitTime: It helps the user to add a delay to start the execution of the further activity. The format of the delay here is milliseconds. By default, it will be set to 30000. When the option is left blank, no delay is considered. 

MISC

Display Name: Displays the name of the activity. The activity name can be customized which will help in troubleshooting.

Version: It specifies the version of the web automation feature in use. 

* Represents mandatory field to execute the workflow.

5.7.4 Click Event

This activity is used to click on any element in the window in the web page. It searches for the given string in the indicated element and clicks on it. The click activity can be used to click on text boxes, URL’s (within the webpage), hyperlinks, buttons. The click
activity works only if the element is enabled.

Properties

INPUT

BrowserType:*  Gets auto filled, once the element is indicated on the web page using Robility Spy. Here the browser type will be displayed.

BrowserVersion: Indicates the version of the browser in use.

ClickType: Specifies the type of mouse click (single, double, up, down) used when simulating the click event. By default, single click is selected.
Click Single – Wherever a single click action is required in a webpage we can choose this type.
Click double – Wherever a double click action is required in a webpage we can choose this type.
Click up– This action helps you to hold the selected element in the webpage.
Click down – This action helps to release the element which is on hold.

DelayAfter:  It helps the user to add a delay to start the execution of the further activity. The format of the delay here is milliseconds. By default, it will be set to 300. When the option is left blank, no delay is considered.

DelayBefore:  It helps the user to add a delay to before the execution of the activities. The format of the delay here is milliseconds. By default, it will be set to 200. When the option is left blank, no delay is considered.

ExecuteBy:* Gets auto filled, once the element is indicated on the web page using Robility Spy. This contains the set of attributes for the specific spied element.

FramePath: Gets auto filled, once the element is indicated on the web page using Robility Spy. The frame path is auto filled only if the selected element has a frame ID in the webpage.

Offset X: Specifies the horizontal offset, in pixels, for the click position relative to the selected anchor point of the target web element. A positive value moves the click position to the right, and a negative value moves it to the left. The default value is 0.

Offset Y: Specifies the vertical offset, in pixels, for the click position relative to the selected anchor point of the target web element. A positive value moves the click position downward, and a negative value moves it upward. The default value is 0.

URL:* Gets auto filled, once the element is indicated on the web page using Robility Spy. Indicates the URL in which this activity is performed.

WaitForReady:  Runs the activity once the webpage loading matches the wait for ready state.
None – It will perform the activity functionality without checking the state of the browser.
Interactive The activity will be performed once the web element is found even if the webpage is still in loading state.
Complete–  The activity will proceed to the next step only if the web page is completely loaded. 

WaitTime:  It helps the user to add a delay to start the execution of the further activity. The format of the delay here is milliseconds. By default, it will be set to 30000. When the option is left blank, no delay is considered.

MISC

Display Name: Displays the name of the activity. The activity name can be customized which will help in troubleshooting.

SkipOnError: Specify the Boolean value as “True or False.”
True: Continues to execute the workflow irrespective of any error thrown.
False: Stops the workflow if it throws any error.
None: If the option is specified as blank, by default the activity will perform the “False” action.

Version: It specifies the version of the web automation feature in use

OUTPUT

Result: It helps to view the execution state of the activity. It returns the values in Boolean format.
True: It indicates that the activity has been executed successfully without any error.
False: It indicates that the activity has been unsuccessful due to some unexceptional error thrown.

* Represents mandatory fields to execute the workflow.

5.7.5 Close Browser

This activity allows users to close the entire browser window, including all open tabs. It currently supports only Google Chrome and Microsoft Edge.

Properties

INPUT

Browser: Gets auto filled, once the element is indicated on the web page using Robility Spy. Here the browser type will be displayed.

URL: Gets auto filled, once the element is indicated on the web page using Robility Spy. Indicates the URL in which this activity is performed.

WaitTime: It helps the user to add a delay to start the execution of further activity. The format of the delay here is milliseconds. By default, it will be set to 30000. When the option is left blank, no delay is considered.

MISC

Display Name: Displays the name of the activity. The activity name can be customized, which aids in troubleshooting.

SkipOnError: Specify the “Boolean” value as “True” or “False.”

True: Continue executing the workflow regardless of any errors thrown.
False: Halt the workflow if it encounters any errors.
None: If the option is left blank, the activity will, by default, behave as if “False” were chosen.

Version: It indicates the version of the feature being used.

OUTPUT

Result: This parameter allows you to view the execution status of the activity and returns a value in “Boolean.”

True: Indicates that the activity has been executed successfully without any errors.
False: Indicates that the activity has been unsuccessful due to an unexpected error being thrown.

5.7.6 Close Tab

This activity is used to close a particular tab within a session. It searches for the given URL and closes the tab.

Properties

INPUT

Browser: Gets auto filled, once the element is indicated on the web page using Robility Spy. Here the browser type will be displayed.

URL:* Gets auto filled, once the element is indicated on the web page using Robility Spy. Indicates the URL in which this activity is performed.

WaitTime:  It helps the user to add a delay to start the execution of the further activity. The format of the delay here is milliseconds. By default, it will be set to 30000. When the option is left blank, no delay is considered.

MISC

Display Name: Displays the name of the activity. The activity name can be customized which will help in troubleshooting.

SkipOnError: Specify the Boolean value as “True or False.”
True: Continues to execute the workflow irrespective of any error thrown.
False: Stops the workflow if it throws any error.
None: If the option is specified as blank, by default the activity will perform the “False” action. 

Version: It specifies the version of the web automation feature in use.

OUTPUT

Result: It helps to view the execution state of the activity. It returns the values in Boolean format.
True: It indicates that the activity has been executed successfully without any error.
False: It indicates that the activity has been unsuccessful due to some unexceptional error thrown. 

Represents mandatory fields to execute the workflow

Click here to see how the activity is used in a workflow.

5.7.7 ElementExist

This activity is used to see if an element which we are trying to find exists in the webpage or not. It can be used to verify the element and proceed to the next activity.

Properties

INPUT

BrowserType: Gets auto filled, once the element is indicated on the web page using Robility Spy. Here the browser type will be displayed.

BrowserVersion:  Gets auto filled, once the element is indicated on the web page using Robility Spy. Indicates the version of the browser in use.

ExecuteBy:* Gets auto filled, once the element is indicated on the web page using Robility Spy. This contains the set of attributes for the specific spied element.

FramePath: Gets auto filled, once the element is indicated on the web page using Robility Spy. The frame path is auto filled only if the selected element has a frame ID in the webpage

URL: Gets auto filled, once the element is indicated on the web page using Robility Spy. Indicates the URL in which this activity is performed.

ValueExistEnter the value with which we have to search if the element exists or not. This depends on the option that we choose from the “ValueFindBy” drop down.

ValueFindBy: Choose from the drop down.
Text: Mention the specific text which has to be found.
Index: Mention the index value of the element.
Value: Mention the value for the element that has to be found. 

WaitForReady:  Runs the activity once the webpage loading matches the wait for ready state.
None – It will perform the activity functionality without checking the state of the browser.
Interactive– The activity will be performed once the web element is found even if the webpage is still in loading state.
Complete– The activity will proceed to the next step only if the web page is completely loaded.

WaitTime:  It helps the user to add a delay to start the execution of the further activity. The format of the delay here is milliseconds. By default, it will be set to 30000. When the option is left blank, no delay is considered.

MISC

Display Name: Displays the name of the activity. The activity name can be customized which will help in troubleshooting.

SkipOnError: Specify the Boolean value as “True or False.”
True: Continues to execute the workflow irrespective of any error thrown.
False: Stops the workflow if it throws any error.
None: If the option is specified as blank, by default the activity will perform the “False” action. 

Version: It specifies the version of the web automation feature in use.

OUTPUT

ExistStatus:* Assign a variable here to know the exist status of the spied element. The result is stored in a Boolean format.

Result: It helps to view the execution state of the activity. It returns the values in Boolean format.
True: It indicates that the activity has been executed successfully without any error.
False: It indicates that the activity has been unsuccessful due to some unexceptional error thrown. 

ValueExistStatus: Assign a variable here to know the value exist status of the spied element. This shows the result of the value chosen in the “Valuefind” by property. The result can be seen in Boolean values

Represents mandatory fields to execute the workflow

Click here to see how this activity is used in a workflow.

5.7.8 Extract Data

This activity helps the user extract data from web applications that have a similar layout and structure across multiple pages.

Pre-requisites

This feature will be available from the designer version (25.5.0.36) and activity version (2.3.8)

Limitations

1. When extracting data from multiple pages, the activity will prompt you to spy on the ‘Next’ button element on the webpage to dynamically extract data from multiple pages. This button should have a static XPath; currently, dynamic XPath is not supported.
2. The surrounding elements are not supported, meaning the extraction is focused solely on the specified elements within the defined hierarchy and pattern.
3. This activity does not support lazy loading functionality, which means that it does not handle the automatic loading of content as the user scrolls down a webpage.
4. This activity functions similarly to “HTMLTabletoDatatable” where the table is not structured properly.

How does extraction process happens?

Recognizing Patterns: The process involves identifying specific patterns or structures in the HTML code of a webpage. These patterns are consistent across similar pages, making data extraction efficient.

Example: Extracting Product Data: Consider extracting product details from an e-commerce site. The activity uses RobilitySpy to spot patterns like:

  • Product Titles: Found in heading tags like <h1> or <h2>.
  • Prices: Located in designated price elements such as <span> or <div>.
  • Descriptions: Often within <p> tags or other identifiable elements.

Setting Up Data Extraction: Configure the “Extract Data” activity to target these elements. For example, create a pattern to capture <h1> tags for product titles, matching the HTML structure.

Data Retrieval: Once patterns are set, the activity retrieves data and stores it in a DataTable variable for further use.

Properties

INPUT

BrowserType: *Gets auto filled, once the element is indicated on the web page using Robility Spy. Here the browser type will be displayed.

BrowserVersion: *Gets auto filled, once the element is indicated on the web page using Robility Spy. Indicates the version of the browser in use.

DelayAfter: It helps the user to add a delay to start the execution of the further activity. The format of the delay here is milliseconds. By default, it will be set to 300. When the option is left blank, no delay is considered. 

DelayBefore: It helps the user to add a delay before the execution of the activities. The format of the delay here is milliseconds. By default, it will be set to 200. When the option is left blank, no delay is considered.

ExecuteBy:* Gets auto filled, once the element is indicated on the web page using Robility Spy. This contains the set of attributes for the specific spied element.

FramePath: *Gets auto filled, once the element is indicated on the web page using Robility Spy. The frame path is auto filled only if the selected element has a frame ID in the webpage.

URL: Gets auto filled, once the element is indicated on the web page using Robility Spy. Indicates the URL in which this activity is performed. 

WaitForReady: Runs the activity once the webpage loading matches the wait for ready state.
None – It will perform the activity functionality without checking the state of the browser.
Interactive– The activity will be performed once the web element is found even if the webpage is still in loading state.
Complete– The activity will proceed to the next step only if the web page is completely loaded.

WaitTime: It helps the user to add a delay to start the execution of the further activity. The format of the delay here is milliseconds. By default, it will be set to 30000. When the option is left blank, no delay is considered.

InputNextElement

DelayBetweenPages: It helps the user to add a delay between each page during the extraction of the data. The format of the delay here is milliseconds. By default, it will be set to 1000. When the option is left blank, no delay is considered.

NextLinkExecuteBy: Indicates the set of attributes of the “Next” button element detected on the webpage. It gets auto filled once the element is saved on the Robility Spy window.

When extracting data from multiple pages, the activity will prompt you to spy on the ‘Next’ button element on the webpage to dynamically extract data from multiple pages. It is optional to extract the pages from the subsequent pages. (Refer the use case).

MISC

Display Name: Displays the name of the activity. The activity name can be customized which will help in troubleshooting.

IsTable: This parameter will be enabled when the detected element is a table element. It gets auto filled from the extraction wizard and specifies the value either as True or False.

True: Indicates that the extracted element includes table element.
False: Indicates that the extracted element does not include table element.

By default, the value is set to “False”.

SkipOnError: Specify the Boolean value as “True or False.”
True: Continues to execute the workflow irrespective of any error thrown.
False: Stops the workflow if it throws any error.
None: If the option is specified as blank, by default the activity will perform the “False” action.

Version: It specifies the version of the web automation feature in use.

OPTIONS

Limit to extract: Specifies to choose the limit to extract on the webpage. Choose the options from the dropdown. 
Max Rows: Extracts maximum rows available on the webpage. 
Max Pages: Extracts the data from all the pages upto its maximum.  

Number of Items: Specifies to provide the maximum number of items from the page and it accepts values in “Int32” datatype. 

TableStructure: *Specifies the format of the table resulting from data extraction on the web application. It comprises two columns, one for the extracted text and another for the corresponding URL. By default, the “Extract Text” option is selected and mandatory, while the “Extract URL” option is optional.

OUTPUT

Datatable: *It helps to view the output of the activity as the extracted data from the website in a table format. You can customize the structure of this table output either in the “Extraction Wizard” or through the “TableStructure” property. It returns value in “Datatable” datatype. 

Result: It helps to view the execution state of the activity. It returns the values in Boolean format.
True: It indicates that the activity has been executed successfully without any error.
False: It indicates that the activity has been unsuccessful due to some unexceptional error thrown.

* Represents mandatory field to execute the workflow.

5.7.9 GetAttributes

This activity is used to retrieve the specified/all values of the attributes present in a webpage.

Properties

INPUT

BrowserType:* Gets auto filled, once the element is indicated on the web page using Robility Spy. Here the browser type will be displayed.

BrowserVersion:*  Gets auto filled, once the element is indicated on the web page using Robility Spy. Indicates the version of the browser in use.

ExecuteBy:* Gets auto filled, once the element is indicated on the web page using Robility Spy. This contains the set of attributes for the specific spied element.

FramePath: Gets auto filled, once the element is indicated on the web page using Robility Spy. The frame path is auto filled only if the selected element has a frame ID in the webpage.

OnFocus: Enable on Focus if required. This brings the webpage on focus.

OuterHtml: Gets auto filled, once the element is indicated in the web page using Robility Spy.

URL:* Gets auto filled, once the element is indicated on the web page using Robility Spy. Indicates the URL in which this activity is performed. 

WaitForReady:  Runs the activity once the webpage loading matches the wait for ready state.
None – It will perform the activity functionality without checking the state of the browser.
Interactive– The activity will be performed once the web element is found even if the webpage is still in loading state.
Complete– The activity will proceed to the next step only if the web page is completely loaded.

WaitTime:  It helps the user to add a delay to start the execution of the further activity. The format of the delay here is milliseconds. By default, it will be set to 30000. When the option is left blank, no delay is considered.

MISC

Display Name: Displays the name of the activity. The activity name can be customized which will help in troubleshooting.

SkipOnError: Specify the Boolean value as “True or False.”
True: Continues to execute the workflow irrespective of any error thrown.
False: Stops the workflow if it throws any error.
None: If the option is specified as blank, by default the activity will perform the “False” action. 

Version: It specifies the version of the web automation feature in use.

OUTPUT

Attributes:* All the attribute values extracted are stored in this variable in a “Datatable” datatype.

Result: It helps to view the execution state of the activity. It returns the values in Boolean format.
True: It indicates that the activity has been executed successfully without any error.
False: It indicates that the activity has been unsuccessful due to some unexceptional error thrown. 

AttributeValue: The specific attribute value is stored in this variable in a “String” datatype.

Represents mandatory fields to execute the workflow

Click here to see how this activity is used in a workflow.

5.7.10 GetText

This activity helps you to extract the text from a particular field/element/region of the webpage. 

Properties

INPUT

BrowserType:* Gets auto filled, once the element is indicated on the web page using Robility Spy. Here the browser type will be displayed.

BrowserVersion:  Gets auto filled, once the element is indicated on the web page using Robility Spy. Indicates the version of the browser in use.

ExecuteBy:* Gets auto filled, once the element is indicated on the web page using Robility Spy. This contains the set of attributes for the specific spied element.

FramePath: Gets auto filled, once the element is indicated on the web page using Robility Spy. The frame path is auto filled only if the selected element has a frame ID in the webpage.

SelectBy: The SelectBy option enables to select the value by indicating the element type.
Value: Select this option to extract the data using the value.
Text: Select this option to extract the data using the text.
Index: Select this option to extract the text using element index.
None: If you select none also, you will be able to detect and extract the data from the webpage.

URL:* Gets auto filled, once the element is indicated on the web page using Robility Spy. Indicates the URL in which this activity is performed.

WaitForReady:  Runs the activity once the webpage loading matches the wait for ready state.
None – It will perform the activity functionality without checking the state of the browser.
Interactive– The activity will be performed once the web element is found even if the webpage is still in loading state.
Complete– The activity will proceed to the next step only if the web page is completely loaded.

WaitTime:  It helps the user to add a delay to start the execution of the further activity. The format of the delay here is milliseconds. By default, it will be set to 30000. When the option is left blank, no delay is considered.

MISC

Display Name: Displays the name of the activity. The activity name can be customized which will help in troubleshooting.

SkipOnError: Specify the Boolean value as “True or False.”
True: Continues to execute the workflow irrespective of any error thrown.
False: Stops the workflow if it throws any error.
None: If the option is specified as blank, by default the activity will perform the “False” action. 

Version: It specifies the version of the web automation feature in use.

OUTPUT

Result: It helps to view the execution state of the activity. It returns the values in Boolean format.
True: It indicates that the activity has been executed successfully without any error.
False: It indicates that the activity has been unsuccessful due to some unexceptional error thrown. 

Text:* The extracted text is stored in the declared variable in string format. (Check in the workflow to see how to store the extracted value in the variable). If any other datatype is declared, the text box shows an error.

Represents mandatory fields to execute the workflow

Click here to see how this activity is used in a workflow.

5.7.11 BrowserControl

The “BrowserControl” activity enables users to execute various actions within the browser, such as going back, going forward, going home, and refreshing.

Properties

INPUT

ActionType:* Choose the action type from the drop down.
Go back: Go back activity helps you to return to the previous page within the same browsing session.
Go Forward: Go Forward is used to navigate to an earlier attempted screen within the same browsing session.
Go Home: Go home is used to navigate to the current home page of the specified URL.         
Refresh: This activity is used to refresh the current browsing session.

Browser: Indicate the browser in which the activity should be executed. There are two options of browser types: “Microsoft Edge” and “Google Chrome.”
The default browser type is “Google Chrome.”

URL:* Gets auto filled, once the element is indicated on the web page using Robility Spy. Indicates the URL in which this activity is performed.

WaitTime:  It helps the user to add a delay to start the execution of the further activity. The format of the delay here is milliseconds. By default, it will be set to 30000. When the option is left blank, no delay is considered.

MISC

Display Name: Displays the name of the activity. The activity name can be customized which will help in troubleshooting.

SkipOnError: Specify the Boolean value as “True or False.”
True: Continues to execute the workflow irrespective of any error thrown.
False: Stops the workflow if it throws any error.
None: If the option is specified as blank, by default the activity will perform the “False” action. 

Version: It specifies the version of the web automation feature in use.

OUTPUT

Result: It helps to view the execution state of the activity. It returns the values in Boolean format.
True: It indicates that the activity has been executed successfully without any error.
False: It indicates that the activity has been unsuccessful due to some unexceptional error thrown. 

Represents mandatory fields to execute the workflow

How to use this activity?

Drag and drop the activity into the workflow where you need to take action on “GoBack, GoForward, GoHome & Fresh”. To select the action type, double-click on the “BrowserControl” activity and choose the desired action from the dropdown list. 

Once the action type is selected, the title of this activity changes to the chosen action type, making it easier to understand the workflow. The browser control includes a field to enter the URL of the webpage for the action.

For instance, if we are utilizing the “GoForward” activity, we need to input the URL to which the bot should navigate forward and select the “ActionType” as “GoForward.”

5.7.12 HtmlTabletoDatatable

This activity helps in extracting the data table in HTML format from a webpage and then converting it into a structured data table, which is a common format for manipulating tabular data.

Properties

INPUT

BrowserType: Gets auto filled, once the element is indicated on the web page using Robility Spy. Here the browser type will be displayed.

BrowserVersion:  Gets auto filled, once the element is indicated on the web page using Robility Spy. Indicates the version of the browser in use.

ExecuteBy:* Gets auto filled, once the element is indicated on the web page using Robility Spy. This contains the set of attributes for the specific spied element.

FramePath: Gets auto filled, once the element is indicated on the web page using Robility Spy. The frame path is auto filled only if the selected element has a frame ID in the webpage

FirstRowAsHeader: It accepts Boolean value. 
True – Considers the first row as header.
False – Does not consider the first row as header.

URL: Gets auto filled, once the element is indicated on the web page using Robility Spy. Indicates the URL in which this activity is performed. 

WaitForReady:  Runs the activity once the webpage loading matches the wait for ready state.
None – It will perform the activity functionality without checking the state of the browser.
Interactive– The activity will be performed once the web element is found even if the webpage is still in loading state.
Complete– The activity will proceed to the next step only if the web page is completely loaded.

WaitTime:  It helps the user to add a delay to start the execution of the further activity. The format of the delay here is milliseconds. By default, it will be set to 30000. When the option is left blank, no delay is considered.

MISC

Display Name: Displays the name of the activity. The activity name can be customized which will help in troubleshooting.

SkipOnError: Specify the Boolean value as “True or False.”
True: Continues to execute the workflow irrespective of any error thrown.
False: Stops the workflow if it throws any error.
None: If the option is specified as blank, by default the activity will perform the “False” action. 

Version: It specifies the version of the web automation feature in use.

OUTPUT

DataTable:* The HTML table extracted from the webpage is stored in this variable in a “datatable” datatypes. This can be used as an input in other activities.

Result: It helps to view the execution state of the activity. It returns the values in Boolean format.
True: It indicates that the activity has been executed successfully without any error.
False: It indicates that the activity has been unsuccessful due to some unexceptional error thrown. 

Represents mandatory fields to execute the workflow

5.7.13 Mouse Hover

This activity allows the user to hover the mouse over the detected element without performing any action. It is useful for viewing tooltip values or additional information displayed on hover.

Properties

INPUT

BrowserType: *Gets auto filled, once the element is indicated on the web page using Robility Spy. Here the browser type will be displayed.

BrowserVersion: *Gets auto filled, once the element is indicated on the web page using Robility Spy. Indicates the version of the browser in use.

ExecuteBy:* Gets auto filled, once the element is indicated on the web page using Robility Spy. This contains the set of attributes for the specific spied element.

FramePath: *Gets auto filled, once the element is indicated on the web page using Robility Spy. The frame path is auto filled only if the selected element has a frame ID in the webpage.

URL: Gets auto filled, once the element is indicated on the web page using Robility Spy. Indicates the URL in which this activity is performed. 

WaitForReady: Runs the activity once the webpage loading matches the wait for ready state.
None – It will perform the activity functionality without checking the state of the browser.
Interactive– The activity will be performed once the web element is found even if the webpage is still in loading state.
Complete– The activity will proceed to the next step only if the web page is completely loaded.

WaitTime: It helps the user to add a delay to start the execution of the further activity. The format of the delay here is milliseconds. By default, it will be set to 30000. When the option is left blank, no delay is considered. 

MISC

Display Name: Displays the name of the activity. The activity name can be customized which will help in troubleshooting.

SkipOnError: Specify the Boolean value as “True or False.”
True: Continues to execute the workflow irrespective of any error thrown.
False: Stops the workflow if it throws any error.
None: If the option is specified as blank, by default the activity will perform the “False” action.

Version: It specifies the version of the web automation feature in use.

OUTPUT

Result: It helps to view the execution state of the activity. It returns the values in Boolean format.
True: It indicates that the activity has been executed successfully without any error.
False: It indicates that the activity has been unsuccessful due to some unexceptional error thrown.

* Represents mandatory field to execute the workflow.

5.7.15 OpenWebBrowser

Open browser is used to launch the specific URL in the required browser.

Properties

INPUT

Browser:* Specify the browser in which the activity needs to be performed. There are two options, Microsoft edge and Google chrome.

DelayAfter: It helps the user to add a delay to start the execution of the further activity. The format of the delay here is milliseconds. By default, it will be set to 1000. When the option is left blank, no delay is considered.

DelayBefore: It helps the user to add a delay to before the execution of the activities. The format of the delay here is milliseconds. By default, it will be set to 1000. When the option is left blank, no delay is considered.

Incognito Mode: Check this box if you wish to open the browser in “Incognito mode”. Incognito mode doesn’t store the browsed pages in the browsing history.

URL:* Gets auto filled, once the element is indicated on the web page using Robility Spy. Indicates the URL in which this activity is performed. 

WaitForReady:  Runs the activity once the webpage loading matches the wait for ready state.
None – It will perform the activity functionality without checking the state of the browser.
Interactive– The activity will be performed once the web element is found even if the webpage is still in loading state.
Complete– The activity will proceed to the next step only if the web page is completely loaded.

WaitTime:  It helps the user to add a delay to start the execution of the further activity. The format of the delay here is milliseconds. By default, it will be set to 30000. When the option is left blank, no delay is considered.

MISC

Display Name: Displays the name of the activity. The activity name can be customized which will help in troubleshooting.

SkipOnError: Specify the Boolean value as “True or False.”
True: Continues to execute the workflow irrespective of any error thrown.
False: Stops the workflow if it throws any error.
None: If the option is specified as blank, by default the activity will perform the “False” action. 

Version: It specifies the version of the web automation feature in use.

OUTPUT

Result: It helps to view the execution state of the activity. It returns the values in Boolean format.
True: It indicates that the activity has been executed successfully without any error.
False: It indicates that the activity has been unsuccessful due to some unexceptional error thrown. 

Represents mandatory fields to execute the workflow

Click here to see how this activity is used in a workflow.

How can we give a URL?

We can enter the URL in the property window by giving the URL till the domain name.

Example

“https://www.google.com/” and “https://www.sutherlandglobal.com/”

How should we not give URL?

A URL with all the components after the domain should not be entered.

Example

“https://www.google.com/searchq=sutherlandglobal&sca_esv=559361602&sx=AB5stBg4uup
2ZIzlFF4qaOW7QQ5QA8TOyw%3A16927983337&source=hp&ei=l_jlZLHvEPHi2roPjtWWoA
M&iflsig=AD69kcEAAAAAZOYGpcNXv6kOdxXJ9|z5L9CpRNome9Y9&oq=sutherlandglobal
&gs_ lp=Egdnd3Mtd2l6IhBzdXRoZXJsY W5kZ2xvYmFsKgIIADIHECMYigUYJzIFEAAYgAQy
BRAAGIAEMgUQABiABDIFE AAYgAQyBRAAGIAEMgUQABiABDIFEAAYgAQyBxAAGIAEGA
oyBRAAGIAESPUnUIMFWMYacAF4AJABAZgByAmgAeg4qgEHNS0xLjQuM7gBAcgBAPg
BAagCCsI CBxAjGOoCGCfCAg0QLhjHARjRAxiKBRgnwgIIEAAYgAQYsQPCAgsQABiABBixA
xiDAcICBRAuGIAE&sclient=gws-wiz”

Why is it required?

1.  Every time a process is automated, we must make sure that the element that we spy must be within the same browser that we have entered in the “OpenBrowser” activity. 
2.  If we use an activity where the element is spied from a different URL, the bot will stop and throw an error, “Element not found.”
     a. In such cases, we must use another open browser activity to open a browser with the desired URL in which we wish to automate.
3.  Let’s see an example below to see what happens when we try to automate from two different URL’s within the same workflow without using an open browser activity.
     a. Here we have used an “OpenBrowser” activity to launch https://www.google.com/ and then used a “GetText” activity to get the text from https://www.sutherlandglobal.com/.
     b. However, as you see in the below GIF, the activity throws an error since we have launched the google URL using the open browser activity, but we are trying to get a text from the Sutherland global URL. 

To make this activity work as expected, we must use another “OpenBrowser” activity to open https://www.sutherlandglobal.com/ from which we are trying to get the text.

5.7.16 SecureSetText

This activity is used to securely set a text in web applications during the automation process. It is used in scenarios where a password has to be entered, to give sensitive data input, in encrypted communication, in meeting compliance with security standards and in secure authentication.

Properties

INPUT

Action_By: This specifies the actions to be performed in the application during the execution. Select the actions from the drop-down.
Native: Action is performed by the bot and the details are entered character wise.
Human: Action is performed by a human
Paste: Action is performed by the bot and the details are entered in a copy paste format.

ClearAndType: By default, the value is True.
True, will clear the data in the existing field and enter the new value.
False, will not clear the existing data and the new value will get appended.

DelayAfter: It helps the user to add a delay to start the execution of the further activity. The format of the delay here is milliseconds. By default, it will be set to 300. When the option is left blank, no delay is considered.

DelayBeforeIt helps the user to add a delay to before the execution of the activities. The format of the delay here is milliseconds. By default, it will be set to 200. When the option is left blank, no delay is considered.

DelayBetweenChar:  It helps the user to add a delay between the characters. The format of the delay here is milliseconds. By default, it will be set to 100.  When the option is left blank, no delay is considered.

ExecuteBy:* Gets auto filled, once the element is indicated on the web page using Robility Spy. This contains the set of attributes for the specific spied element.

Text:* Specify the input variable here.(The input will be the get credential activity output.)This field accepts only the variables in secured string format.

WaitTime:  It helps the user to add a delay to start the execution of the further activity. The format of the delay here is milliseconds. By default, it will be set to 30000. When the option is left blank, no delay is considered.

MISC

Display Name: Displays the name of the activity. The activity name can be customized which will help in troubleshooting.

SkipOnError: Specify the Boolean value as “True or False.”
True: Continues to execute the workflow irrespective of any error thrown.
False: Stops the workflow if it throws any error.
None: If the option is specified as blank, by default the activity will perform the “False” action. 

Version: It specifies the version of the web automation feature in use.

OUTPUT

Result: It helps to view the execution state of the activity. It returns the values in Boolean format.
True: It indicates that the activity has been executed successfully without any error.
False: It indicates that the activity has been unsuccessful due to some unexceptional error thrown. 

Represents mandatory fields to execute the workflow

5.7.17 SelectValue

This activity helps to select an item from a drop-down list.

Properties

INPUT

BrowserType: Gets auto filled, once the element is indicated on the web page using Robility Spy. Here the browser type will be displayed.

BrowserVersion:  Gets auto filled, once the element is indicated on the web page using Robility Spy. Indicates the version of the browser in use.

DelayAfter: It helps the user to add a delay to start the execution of the further activity. The format of the delay here is milliseconds. By default, it will be set to 300. When the option is left blank, no delay is considered. 

DelayBefore:  It helps the user to add a delay to before the execution of the activities. The format of the delay here is milliseconds. By default, it will be set to 200. When the option is left blank, no delay is considered.

ExecuteBy:* Gets auto filled, once the element is indicated on the web page using Robility Spy. This contains the set of attributes for the specific spied element.

FramePath: Gets auto filled, once the element is indicated on the web page using Robility Spy. The frame path is auto filled only if the selected element has a frame ID in the webpage.

SelectBy: The SelectBy option enables to select the value by indicating the element type.
Value: Select this option to extract the data using the value.
Text: Select this option to extract the data using the text.
Index: Select this option to extract the text using element index.
None: If you select none also, you will be able to detect and extract the data from the webpage.

SelactedValue: Indicates the value that needs to be actioned.

URL: Gets auto filled, once the element is indicated on the web page using Robility Spy. Indicates the URL in which this activity is performed. 

WaitForReady:  Runs the activity once the webpage loading matches the wait for ready state.
None – It will perform the activity functionality without checking the state of the browser.
Interactive– The activity will be performed once the web element is found even if the webpage is still in loading state.
Complete– The activity will proceed to the next step only if the web page is completely loaded.

WaitTime:  It helps the user to add a delay to start the execution of the further activity. The format of the delay here is milliseconds. By default, it will be set to 30000. When the option is left blank, no delay is considered.

MISC

Display Name: Displays the name of the activity. The activity name can be customized which will help in troubleshooting.

SkipOnError: Specify the Boolean value as “True or False.”
True: Continues to execute the workflow irrespective of any error thrown.
False: Stops the workflow if it throws any error.
None: If the option is specified as blank, by default the activity will perform the “False” action. 

Version: It specifies the version of the web automation feature in use.

OUTPUT

Result: It helps to view the execution state of the activity. It returns the values in Boolean format.
True: It indicates that the activity has been executed successfully without any error.
False: It indicates that the activity has been unsuccessful due to some unexceptional error thrown. 

Represents mandatory fields to execute the workflow

Click here to see how this activity is used in a workflow.

5.7.18 SetText

This activity is used to type the input data into field or textbox in the webpage. It can be directly a string or a variable in string format.

Properties

INPUT

BrowserType: Gets auto filled, once the element is indicated on the web page using Robility Spy. Here the browser type will be displayed.

BrowserVersion:  Gets auto filled, once the element is indicated on the web page using Robility Spy. Indicates the version of the browser in use.

ClearAndType:* By default, the value is True.
True, will clear the data in the existing field and enter the new value.
False, will not clear the existing data and the new value will get appended.

ClickBeforeTyping: Specifies whether the activity clicks the target web element before entering text. By default, the value is False.
True: Clicks the target web element to ensure it receives focus before entering text.
False: Enters text without clicking the target web element first.

DelayAfter: It helps the user to add a delay to start the execution of the further activity. The format of the delay here is milliseconds. By default, it will be set to 300. When the option is left blank, no delay is considered. 

DelayBefore:   It helps the user to add a delay to before the execution of the activities. The format of the delay here is milliseconds. By default, it will be set to 200. When the option is left blank, no delay is considered.

DelayBetweenChar:  It helps the user to add a delay between the characters. The format of the delay here is milliseconds. By default, it will be set to 100.  When the option is left blank, no delay is considered.

ExecuteBy: Gets auto filled, once the element is indicated on the web page using Robility Spy. This contains the set of attributes for the specific spied element.

Focus Delay: Specifies the delay, in milliseconds, after the target web element receives focus before text is entered. The default value is 500.

FramePath: Gets auto filled, once the element is indicated on the web page using Robility Spy. The frame path is auto filled only if the selected element has a frame ID in the webpage.

InputString: Indicate the text to be entered in any field or textbox in a webpage. Here we can pass the values in two different ways.
Text – We can enter the text directly within strings.
Variable -We can call a variable here in which text is stored only in a string format.

Offset X
: Specifies the horizontal offset, in pixels, for the text entry position relative to the target web element. A positive value moves the interaction point to the right, and a negative value moves it to the left. The default value is 0.

Offset Y: Specifies the vertical offset, in pixels, for the text entry position relative to the target web element. A positive value moves the interaction point downward, and a negative value moves it upward. The default value is 0.

Send Type: Specifies the method used to enter text into the target web element. Select one of the following options:
Element: Sets the text directly on the target web element.
Paste: Enters text by copying it to the clipboard and pasting it into the target web element.
Character: Enters text one character at a time by simulating keyboard input.

URL: Gets auto filled, once the element is indicated on the web page using Robility Spy. Indicates the URL in which this activity is performed. 

WaitForReady: Runs the activity once the webpage loading matches the wait for ready state.
None – It will perform the activity functionality without checking the state of the browser.
Interactive– The activity will be performed once the web element is found even if the webpage is still in loading state.
Complete– The activity will proceed to the next step only if the web page is completely loaded.

WaitTime:  It helps the user to add a delay to start the execution of the further activity. The format of the delay here is milliseconds. By default, it will be set to 30000. When the option is left blank, no delay is considered.

MISC

Display Name: Displays the name of the activity. The activity name can be customized which will help in troubleshooting.

SkipOnError: Specify the Boolean value as “True or False.”
True: Continues to execute the workflow irrespective of any error thrown.
False: Stops the workflow if it throws any error.
None: If the option is specified as blank, by default the activity will perform the “False” action. 

Version: It specifies the version of the web automation feature in use.

OUTPUT

Result: It helps to view the execution state of the activity. It returns the values in Boolean format.
True: It indicates that the activity has been executed successfully without any error.
False: It indicates that the activity has been unsuccessful due to some unexceptional error thrown. 

Represents mandatory fields to execute the workflow

Click here to see how this activity is used in a workflow.

5.8 Terminal

About

The Terminal feature in Robility is specifically designed to simplify the automation of legacy mainframe systems that are accessed through terminal emulators. These systems, which often require manual interaction, can be challenging to manage efficiently. With Robility’s Terminal activities, users can seamlessly automate various tasks, including data entry, data retrieval, and complex system navigation.

By enabling communication with terminal applications, this feature eliminates the repetitive and error-prone nature of manual processes. It not only improves operational efficiency but also reduces the time and effort needed to perform routine tasks. Whether handling large-scale data transfers or executing specific commands, the Terminal feature ensures smooth integration with legacy systems while maintaining accuracy and consistency.

This automation capability empowers organizations to modernize their workflows without overhauling their existing infrastructure, making it an essential tool for businesses reliant on mainframe technology.

Limitations

1. This activity supports only AS400 mainframe, and the necessary application must already be installed on the system.
2. The emulator connection must be pre-configured manually in the system.
3. This feature supports a screen layout of 24 rows and 80 columns, commonly used in AS400 terminals. This layout allows Robility to interact with specific fields or elements by targeting precise row and column coordinates within the 24×80 grid.

Use Case

1. RPA bots can extract data such as invoice number, amounts, and payment status, process it, and update the relevant databases or send notifications.
2. Retail companies that still use legacy systems for order management can automate order retrieval, updates, and processing through terminal emulators. Bots can extract order details, update stock levels, and even trigger automatic order confirmation emails to customers.
3. In customer service, agents often need to access legacy systems to retrieve customer profiles or transaction history. Terminal automation can help bots quickly fetch customer information, enabling agents to respond faster and more accurately.
4. Healthcare providers often use mainframe systems to manage patient records. Automation can be used to retrieve patient data, appointment histories, or medical billing information from AS400 systems, streamlining workflows in clinics and hospitals.

5.8.1 Release Notes

v.1.2.0

This release includes enhancements to dependent DLLs.

Enhancement

All dependent DLLs have been upgraded to the latest stable versions, enhancing security, performance, and workflow reliability. This update ensures smoother execution and maintains compatibility with both existing and new workflows.

Released Date: 09/03/2026

5.8.2 FindText

This activity helps the user to search and retrieve the position from the specified text in the terminal screen. 

Properties

INPUT

DelayAfterIt assists the user to add a delay after initiating subsequent activities. The delay duration here is in milliseconds. When the option is left blank, the delay will not be considered.

DelayBeforeIt assists the user in adding a delay before starting the execution of the activities. The delay duration here is in milliseconds. When the option is left blank, the delay will not be considered.

IgnoreCase: Using this option allows the user to disregard the case of letters (uppercase or lowercase) when searching for a matching text. It finds the text regardless of capitalization.

Row/Column: This parameter indicates the starting row and column position from where the text needs to be retrieved. It accepts the input value in “String” datatype. You can either hardcode the values in “String” format variable or provide the values in “String” datatype.

The “Row/Column” position will be available in the “Terminal” screen at the bottom. Based on the cursor point, the row and column value can be retrieved.

Text: *This parameter prompts the user to enter the input text that should be searched and retrieved. It accepts the input value in “String” datatype. You can either hardcode the values in “String” format variable or provide the values in “String” datatype.

Timeout: This parameter specifies the maximum time allowed for searching and retrieving the text from the screen. If the text is not found within this time frame, an exception will be thrown.

MISC

DisplayName: Displays the name of the activity. The activity name can be customized, which aids in troubleshooting.

SkipOnError: Specify the “Boolean” value as “True” or “False.”
True: Continue executing the workflow regardless of any errors thrown.
False:
 Halt the workflow if it encounters any errors.
None:
 If the option is left blank, the activity will, by default, behave as if “False” were chosen.

Version: It indicates the version of the feature being used.

OUTPUT

Result: It provides the ability to view the execution status of the activity. It returns values in “Boolean.”

True: Indicates that the activity has been executed successfully without any errors.
False: Indicates that the activity has been unsuccessful due to an unexpected error being thrown.

Text Position: *It helps to view the output of the activity as the position of the text that has been extracted from the terminal system. It returns values in “String” datatype.

Represents mandatory fields to execute the workflow.

5.8.3 GetCursor

This activity helps the user to retrieve the position wherever it is pointed in the connected terminal screen.

Properties

MISC

DisplayName: Displays the name of the activity. The activity name can be customized, which aids in troubleshooting.

SkipOnError: Specify the “Boolean” value as “True” or “False.”
True: Continue executing the workflow regardless of any errors thrown.
False:
 Halt the workflow if it encounters any errors.
None:
 If the option is left blank, the activity will, by default, behave as if “False” were chosen.

Version: It indicates the version of the feature being used.

OUTPUT

Position: It helps to view the output of the activity as the position retrieved from the screen. It returns values in “String” datatype. 

Result: It provides the ability to view the execution status of the activity. It returns values in “Boolean.”

True: Indicates that the activity has been executed successfully without any errors.
False: Indicates that the activity has been unsuccessful due to an unexpected error being thrown.

5.8.4 GetField

This activity helps the user to extract the value from the specified rows/column’s position in the terminal system.

Properties

INPUT

Row/Column: *This parameter indicates the row and column position of the field from where the text needs to be retrieved. It accepts the input value in “String” datatype. You can either hardcode the values in “String” format variable or provide the values in “String” datatype.

The “Row/Column” position will be available in the “Terminal” screen at the bottom. Based on the cursor point, the row and column value can be retrieved.

Label Before: This parameter indicates the value prior to the specified row and column’s position. This field will be automatically detected once the row and column position has been provided. It accepts the input value in “String” datatype. You can also hardcode the values either in “String” format variable or provide the values in “String” datatype.

Label After: This parameter indicates the value following to the specified row and column’s position. This field will be automatically detected once the row and column position has been provided. It accepts the input value in “String” datatype. You can also hardcode the values either in “String” format variable or provide the values in “String” datatype.

MISC

DisplayName: Displays the name of the activity. The activity name can be customized, which aids in troubleshooting.

SkipOnError: Specify the “Boolean” value as “True” or “False.”
True: Continue executing the workflow regardless of any errors thrown.
False:
 Halt the workflow if it encounters any errors.
None:
 If the option is left blank, the activity will, by default, behave as if “False” were chosen.

Version: It indicates the version of the feature being used.

OUTPUT

Result: It provides the ability to view the execution status of the activity. It returns values in “Boolean.”

True: Indicates that the activity has been executed successfully without any errors.
False: Indicates that the activity has been unsuccessful due to an unexpected error being thrown.

Text: It helps to view the output of the activity as the value that has been extracted from the terminal system. It returns values in “String” datatype.

* Represents mandatory fields to execute the workflow.

Example 

In the example below, I am connecting to the terminal and retrieve the username from the system using the GetField activity.

Note: The emulator has already been configured, and the session has been launched to perform automation.

1. Drag and drop the “TerminalSession” activity into the workflow.
2. Double click on the activity and select the “Configure Session” option.
a. Click here to view how to configure the session. 
3. Now, add the “Get Field” activity into the “Do” sequence of the terminal session activity. 
4. In the “Row/Column” position, I am providing the value as “07/17” which indicates the row and column position. 
a. To get the row and column position, you can place the cursor against the text which you are extracting, and the row and column value will be displayed in the bottom of the screen. 
b. Once the Row/Column value has been provided, the activity will automatically fill the “Label Before and Label After” field. 
5. Move to the “Text” in the output section of the properties to declare a variable to view the output of the activity.   
a. There are two methods to declare a variable –
b. Method 1: Double-click on the variable parameter in the “Output” section and enter a name that helps you easily identify it in the flow. Here, I’m using the name “Result” and using the shortcut key “Ctrl+Q” to create the variable.
c. Method 2: Click on the variable pane, enter your preferred name (here, I’m using “Result”), and choose the data type as “String” since the output value accepts the string data type.
6. Now, add a “Writelog” activity to print the output of the activity. 
a. In the “InputString”, provide the value as “Result”. 
b. Choose the log level as “Info”.
7. Now, execute the activity and view the result. 

5.8.5 GetFieldAtPosition

This activity helps the user to extract the value from the specified row/ column. Ensure to use this activity within the “Terminal Session”.

Properties

INPUT

DelayAfterIt assists the user to add a delay after initiating subsequent activities. The delay duration here is in milliseconds. When the option is left blank, the delay will not be considered.

DelayBeforeIt assists the user in adding a delay before starting the execution of the activities. The delay duration here is in milliseconds. When the option is left blank, the delay will not be considered.

Row/Column: *This parameter indicates the row and column position of the field from where the text needs to be retrieved. It accepts the input value in “String” datatype. You can either hardcode the values in “String” format variable or provide the values in “String” datatype.

The “Row/Column” position will be available in the “Terminal” screen at the bottom. Based on the cursor point, the row and column value can be retrieved.

MISC

DisplayName: Displays the name of the activity. The activity name can be customized, which aids in troubleshooting.

SkipOnError: Specify the “Boolean” value as “True” or “False.”
True: Continue executing the workflow regardless of any errors thrown.
False:
 Halt the workflow if it encounters any errors.
None:
 If the option is left blank, the activity will, by default, behave as if “False” were chosen.

Version: It indicates the version of the feature being used.

OUTPUT

Result: It provides the ability to view the execution status of the activity. It returns values in “Boolean.”

True: Indicates that the activity has been executed successfully without any errors.
False: Indicates that the activity has been unsuccessful due to an unexpected error being thrown.

Text: *It helps to view the output of the activity as the value that has been extracted from the specified Row/Column position. It returns values in “String” datatype.

* Represents mandatory fields to execute the workflow.

5.8.6 GetScreenArea

This activity helps the user to retrieve the text from the specified range of row and column position. 

Properties

INPUT

DelayAfterIt assists the user to add a delay after initiating subsequent activities. The delay duration here is in milliseconds. When the option is left blank, the delay will not be considered.

DelayBeforeIt assists the user in adding a delay before starting the execution of the activities. The delay duration here is in milliseconds. When the option is left blank, the delay will not be considered.

End Row/Column: This parameter indicates to provide the end position of the row and column until where the text needs to be retrieved. It accepts the input value in “String” datatype. You can either hardcode the values in “String” format variable or provide the values in “String” datatype.

Start Row/Column: This parameter indicates to provide the start position of the row and column from where the text needs to be retrieved. It accepts the input value in “String” datatype. You can either hardcode the values in “String” format variable or provide the values in “String” datatype. 

MISC

DisplayName: Displays the name of the activity. The activity name can be customized, which aids in troubleshooting.

SkipOnError: Specify the “Boolean” value as “True” or “False.”
True: Continue executing the workflow regardless of any errors thrown.
False:
 Halt the workflow if it encounters any errors.
None:
 If the option is left blank, the activity will, by default, behave as if “False” were chosen.

Version: It indicates the version of the feature being used.

OUTPUT

Output Text: *It helps to view the output of the activity as the value of the text from the specified row and column position that has been extracted from the terminal system. It returns values in “String” datatype.

Result: It provides the ability to view the execution status of the activity. It returns values in “Boolean.”

True: Indicates that the activity has been executed successfully without any errors.
False: Indicates that the activity has been unsuccessful due to an unexpected error being thrown.

Represents mandatory fields to execute the workflow.

5.8.7 GetTextAtPosition

This activity helps the users to extract the text from the specified Row/Column position on the connected terminal screen.

Properties

INPUT

DelayAfter: It assists the user to add a delay after initiating subsequent activities. The delay duration here is in milliseconds. When the option is left blank, the delay will not be considered.

DelayBefore: It assists the user in adding a delay before starting the execution of the activities. The delay duration here is in milliseconds. When the option is left blank, the delay will not be considered.

Length: This parameter indicates to provide the number of characters to be extracted from the specified position. It accepts values in the “Integer” datatype, allowing you to either hardcode an integer value or provide it dynamically.

Example: If the length is set to “3,” the first three characters from the specified starting position will be retrieved. 

Position: * This parameter indicates to provide the row and column position of the text to be retrieved. It accepts values in the “String” datatype, which can either be hardcoded or provided dynamically in “String” format.

MISC

DisplayName: Displays the name of the activity. The activity name can be customized, which aids in troubleshooting.

SkipOnError: Specify the “Boolean” value as “True” or “False.”
True: Continue executing the workflow regardless of any errors thrown.
False:
 Halt the workflow if it encounters any errors.
None:
 If the option is left blank, the activity will, by default, behave as if “False” were chosen.

Version: It indicates the version of the feature being used.

OUTPUT

Result: It provides the ability to view the execution status of the activity. It returns values in “Boolean.”

True: Indicates that the activity has been executed successfully without any errors.
False: Indicates that the activity has been unsuccessful due to an unexpected error being thrown.

Text: *It helps to view the output of the activity as the value that has been extracted from the specified Row/Column position. It returns values in “String” datatype.

* Represents mandatory fields to execute the workflow.

5.8.8 Move Cursor To Text

This activity allows the user to move the cursor to the specified text on the terminal screen.

Properties

INPUT

DelayAfterIt assists the user to add a delay after initiating subsequent activities. The delay duration here is in milliseconds. When the option is left blank, the delay will not be considered.

DelayBeforeIt assists the user in adding a delay before starting the execution of the activities. The delay duration here is in milliseconds. When the option is left blank, the delay will not be considered.

IgnoreCase: Using this option allows the user to disregard the case of letters (uppercase or lowercase) when searching for a matching text. It finds the text regardless of capitalization.

Start Row/Column: This parameter indicates the starting row and column position from where the text needs to be retrieved. It accepts the input value in “String” datatype. You can either hardcode the values in “String” format variable or provide the values in “String” datatype.

The “Row/Column” position will be available in the “Terminal” screen at the bottom. Based on the cursor point, the row and column value can be retrieved.

Text: *This parameter prompts the user to enter the input text where the cursor needs to be placed. It accepts the input value in “String” datatype. You can either hardcode the values in “String” format variable or provide the values in “String” datatype.

Timeout: This parameter specifies the maximum time allowed for searching and retrieving the text from the screen. If the text is not found within this time frame, an exception will be thrown.

MISC

DisplayName: Displays the name of the activity. The activity name can be customized, which aids in troubleshooting.

SkipOnError: Specify the “Boolean” value as “True” or “False.”
True: Continue executing the workflow regardless of any errors thrown.
False:
 Halt the workflow if it encounters any errors.
None:
 If the option is left blank, the activity will, by default, behave as if “False” were chosen.

Version: It indicates the version of the feature being used.

OUTPUT

Move Cursor Position: *It helps to view the output of the activity as the position of the cursor where it has been placed. It returns values in “String” datatype.

Result: It provides the ability to view the execution status of the activity. It returns values in “Boolean.”

True: Indicates that the activity has been executed successfully without any errors.
False: Indicates that the activity has been unsuccessful due to an unexpected error being thrown.

Represents mandatory fields to execute the workflow.

5.8.9 SendControlKey

This activity allows you to send keyboard shortcuts or control keys to the connected terminal session.

Properties

INPUT

Control Key: This parameter indicates to choose the control key to be triggered at the current cursor position. You can select the desired control key from the available options in the drop-down menu. 

DelayAfter: It assists the user to add a delay after initiating subsequent activities. The delay duration here is in milliseconds. When the option is left blank, the delay will not be considered.

DelayBefore: It assists the user in adding a delay before starting the execution of the activities. The delay duration here is in milliseconds. When the option is left blank, the delay will not be considered.

MISC

DisplayName: Displays the name of the activity. The activity name can be customized, which aids in troubleshooting.

SkipOnError: Specify the “Boolean” value as “True” or “False.”
True: Continue executing the workflow regardless of any errors thrown.
False:
 Halt the workflow if it encounters any errors.
None:
 If the option is left blank, the activity will, by default, behave as if “False” were chosen.

Version: It indicates the version of the feature being used.

OUTPUT

Result: It provides the ability to view the execution status of the activity. It returns values in “Boolean.”

True: Indicates that the activity has been executed successfully without any errors.
False: Indicates that the activity has been unsuccessful due to an unexpected error being thrown.

* Represents mandatory fields to execute the workflow.

Function Keys

When using the Direct Connection type in terminal automation, certain function keys (like F1, F2, etc.) cannot be used directly by themselves. They require a default function key (such as PA1 or PA2) to be pressed first, in order to activate or perform specific actions.

The following table list the required default function keys along with the corresponding actions or functions they trigger when used in combination with other function keys. Ensure to use the default keys before the respective function keys. 

Function Key Default keys
Field Exit
Erase EOF
F1 to F12
Use PA1
F13 TO F24
Use PA2
Attention
USE PA1

5.8.10 SendKeys

This activity helps the user to provide any text value to the position based on the cursor point.

Properties

INPUT

InputText: *This parameter indicates to provide the text value that needs to be provided in the terminal application. It accepts the input value in “String” datatype. You can either hardcode the values in “String” format variable or provide the values in “String” datatype.

MISC

DisplayNameDisplays the name of the activity. The activity name can be customized, which aids in troubleshooting.

SkipOnError: Specify the “Boolean” value as “True” or “False.”
True: Continue executing the workflow regardless of any errors thrown.
False:
 Halt the workflow if it encounters any errors.
None:
 If the option is left blank, the activity will, by default, behave as if “False” were chosen.

Version: It indicates the version of the feature being used.

OUTPUT

Result: It provides the ability to view the execution status of the activity. It returns values in “Boolean.”

True: Indicates that the activity has been executed successfully without any errors.
False: Indicates that the activity has been unsuccessful due to an unexpected error being thrown.

* Represents mandatory fields to execute the workflow.

Example 

In the example below, I am connecting to the terminal and setting the value to enter the password from the system using the SendKeys activity.

Note: The emulator has already been configured, and the session has been launched to perform automation.

1. Drag and drop the “TerminalSession” activity into the workflow.
2. Double click on the activity and select the “Configure Session” option. 
a. Click here to view how to configure the session. 
3. Now, add the “Send Keys” activity into the “Do” sequence of the terminal session activity. 
4. In the “Input” position, I am providing the value as “Pass123”.   
a. Here, i have manually placed the cursor point where the text needs to be provided. 
5. Now, execute the activity and view the result. 

5.8.11 Send keys Secure

This activity is used to securely set a text during the automation process. It is used in scenarios where a password has to be entered, to give sensitive data input, in encrypted communication, in meeting compliance with security standards and in secure authentication.

Properties

INPUT

DelayAfterIt assists the user to add a delay after initiating subsequent activities. The delay duration here is in milliseconds. When the option is left blank, the delay will not be considered.

DelayBeforeIt assists the user in adding a delay before starting the execution of the activities. The delay duration here is in milliseconds. When the option is left blank, the delay will not be considered.

SecureText: *Specify the input variable here. (The input will be the get credential activity output.) This field accepts only the variables in secured string format.

MISC

DisplayName: Displays the name of the activity. The activity name can be customized, which aids in troubleshooting.

SkipOnError: Specify the “Boolean” value as “True” or “False.”
True: Continue executing the workflow regardless of any errors thrown.
False:
 Halt the workflow if it encounters any errors.
None:
 If the option is left blank, the activity will, by default, behave as if “False” were chosen.

Version: It indicates the version of the feature being used.

OUTPUT

Result: It provides the ability to view the execution status of the activity. It returns values in “Boolean.”

True: Indicates that the activity has been executed successfully without any errors.
False: Indicates that the activity has been unsuccessful due to an unexpected error being thrown.

Represents mandatory fields to execute the workflow.

5.8.12 SetCursor

This activity helps the users to set the cursor position at the specified Row/Column on the connected terminal screen.

Properties

INPUT

Row/Column: *This parameter indicates to provide the row and column position where the cursor position needs to be set. It accepts values in the “String” datatype, which can either be hardcoded or provided dynamically in “String” format. 

The format of Row/Column should be “01/001”.

MISC

DisplayName: Displays the name of the activity. The activity name can be customized, which aids in troubleshooting.

SkipOnError: Specify the “Boolean” value as “True” or “False.”
True: Continue executing the workflow regardless of any errors thrown.
False:
 Halt the workflow if it encounters any errors.
None:
 If the option is left blank, the activity will, by default, behave as if “False” were chosen.

Version: It indicates the version of the feature being used.

OUTPUT

Result: It provides the ability to view the execution status of the activity. It returns values in “Boolean.”

True: Indicates that the activity has been executed successfully without any errors.
False: Indicates that the activity has been unsuccessful due to an unexpected error being thrown.

* Represents mandatory fields to execute the workflow.

5.8.13 SetField

This activity allows users to send text data to a specified row and column position on the terminal screen, with the option to include labels before and after the text.

Properties 

INPUT

DelayAfterIt assists the user to add a delay after initiating subsequent activities. The delay duration here is in milliseconds. When the option is left blank, the delay will not be considered.

DelayBeforeIt assists the user in adding a delay before starting the execution of the activities. The delay duration here is in milliseconds. When the option is left blank, the delay will not be considered.

Label After: This parameter indicates the value following to the specified row and column’s position. This field will be automatically detected once the row and column position has been provided. It accepts the input value in “String” datatype. You can also hardcode the values either in “String” format variable or provide the values in “String” datatype.

Label Before: This parameter indicates the value prior to the specified row and column’s position. This field will be automatically detected once the row and column position has been provided. It accepts the input value in “String” datatype. You can also hardcode the values either in “String” format variable or provide the values in “String” datatype. 

Row/Column: *This parameter indicates the row and column position of the field from where the text needs to be retrieved. It accepts the input value in “String” datatype. You can either hardcode the values in “String” format variable or provide the values in “String” datatype.

The “Row/Column” position will be available in the “Terminal” screen at the bottom. Based on the cursor point, the row and column value can be retrieved. 

Text: *This parameter indicates to provide the input value that needs to be provided at the specified position. It accepts values in the “String” datatype, which can either be hardcoded or provided dynamically in “String” format.

MISC

DisplayName: Displays the name of the activity. The activity name can be customized, which aids in troubleshooting.

SkipOnError: Specify the “Boolean” value as “True” or “False.”
True: Continue executing the workflow regardless of any errors thrown.
False:
 Halt the workflow if it encounters any errors.
None:
 If the option is left blank, the activity will, by default, behave as if “False” were chosen.

Version: It indicates the version of the feature being used.

OUTPUT

Result: It provides the ability to view the execution status of the activity. It returns values in “Boolean.”

True: Indicates that the activity has been executed successfully without any errors.
False: Indicates that the activity has been unsuccessful due to an unexpected error being thrown.

SetFieldStatus: It helps to view the output of the activity as the status of the value has been sent to the position. It returns values in “Boolean” datatype.

* Represents mandatory fields to execute the workflow.

5.8.14 SetText

This activity helps the users to provide the input to the specified Row/Column position on the connected terminal screen.

Properties

INPUT

DelayAfter: It assists the user to add a delay after initiating subsequent activities. The delay duration here is in milliseconds. When the option is left blank, the delay will not be considered.

DelayBefore: It assists the user in adding a delay before starting the execution of the activities. The delay duration here is in milliseconds. When the option is left blank, the delay will not be considered.

Position: *This parameter indicates to provide the row and column position of the text to be retrieved. It accepts values in the “String” datatype, which can either be hardcoded or provided dynamically in “String” format.

Text: *This parameter indicates to provide the input value that needs to be provided at the specified position. It accepts values in the “String” datatype, which can either be hardcoded or provided dynamically in “String” format.

MISC

DisplayName: Displays the name of the activity. The activity name can be customized, which aids in troubleshooting.

SkipOnError: Specify the “Boolean” value as “True” or “False.”
True: Continue executing the workflow regardless of any errors thrown.
False:
 Halt the workflow if it encounters any errors.
None:
 If the option is left blank, the activity will, by default, behave as if “False” were chosen.

Version: It indicates the version of the feature being used.

OUTPUT

Result: It provides the ability to view the execution status of the activity. It returns values in “Boolean.”

True: Indicates that the activity has been executed successfully without any errors.
False: Indicates that the activity has been unsuccessful due to an unexpected error being thrown.

* Represents mandatory fields to execute the workflow.

5.8.15 TerminalSession

This activity serves as a scope for the terminal activities, allowing the user to connect and configure the session with AS 400 and automate actions.

Limitations

Currently, only single session is supported, so multiple sessions with the connected terminal are not possible. By default, the session is set as “A.”

Properties

CONNECTIONS

Close Direct Connection: This parameter allows you to choose whether to close the terminal connection after executing the activities within the scope. This option is available only when the Direct Connection type is selected.
Connection Type: Indicates the connection type that has been configured.

Existing Connection: This parameter allows the user to reuse the same connection settings for the terminal in the next scope. This option is available only when the Direct Connection type is selected.

INPUT

Refer the below documentation based on the provider type chosen. 

MISC

DisplayName: Displays the name of the activity. The activity name can be customized, which aids in troubleshooting.

SkipOnError: Specify the “Boolean” value as “True” or “False.”
True: Continue executing the workflow regardless of any errors thrown.
False:
 Halt the workflow if it encounters any errors.
None:
 If the option is left blank, the activity will, by default, behave as if “False” were chosen.

Version: It indicates the version of the feature being used.

OUTPUT

Result: It provides the ability to view the execution status of the activity. It returns values in “Boolean.”

True: Indicates that the activity has been executed successfully without any errors.
False: Indicates that the activity has been unsuccessful due to an unexpected error being thrown.

SessionStatus: It provides the result of the status of the session that has been connected. It returns values in “Boolean”.

True: Indicates that the session has been executed successfully without any errors.
False: Indicates that the session has been unsuccessful due to an unexpected error being thrown.

Configure Session

The Configure Connection window offers various configuration options that differ based on the selected provider for connecting to the terminal environment. 

Provider: This option allows you to select the connection type to be configured. It offers two types of connections:

1. IBMEHLLAPI
2. Direct Connection

IBMEHLLAPI Connection 

This connection type uses IBM’s HLLAPI to establish a session with a mainframe emulator, allowing the terminal activities to communicate with the IBM system and perform tasks like sending commands or retrieving data. This connection type supports any 3rd party terminal emulator software that implements the EHLL API

Utilize this provider connection when there is any 3rd party terminal emulator software that supports the EHLL API software. 

Emulator Exe path: This indicates to provide the path of the terminal exe file. It accepts only “.ws” extension file type. Click on the “Browse” option and manually choose the path where it has been situated. You can also provide the file path in “String” datatype. 

Session: This parameter indicates the session where the bot needs to perform the action. Currently this field will be disabled, and the default value will be provided as “A”.
Note: “A” represents the first session that has been launched against the connected terminal system.

Note: The terminal emulation software needs to be started and connected before attempting to automate with it. Utilize “Desktop Automation” activities to launch and configure the connection. 

Direct Connection 

The Direct Connection type provides a streamlined way to interact with a terminal emulator window by directly mirroring the screen without relying on external APIs such as HLLAPI. This approach eliminates the need for any third-party terminal emulator software to be installed on the machine, making it simpler and more efficient to automate terminal-based tasks.
 
Host: Indicates to provide the IP Address or the host name of the terminal environment system. 
 
Port: Indicates to provide the specific network port on the host machine through which the terminal emulator communicates with the mainframe or server.
 
Note: The Direct Connection provider requires the latest Microsoft Visual C++ Redistributable version installed on the machine.
 

5.8.16 Wait Field Text

This activity helps the user to wait for a specified period of time for the provided text to be appeared on the terminal screen. 

Properties 

INPUT

DelayAfterIt assists the user to add a delay after initiating subsequent activities. The delay duration here is in milliseconds. When the option is left blank, the delay will not be considered.

DelayBeforeIt assists the user in adding a delay before starting the execution of the activities. The delay duration here is in milliseconds. When the option is left blank, the delay will not be considered.

IgnoreCase: Using this option allows the user to disregard the case of letters (uppercase or lowercase) while waiting for the text to appear. It finds the text regardless of capitalization. 

Label After: This parameter indicates the value following to the specified row and column’s position. This field will be automatically detected once the row and column position has been provided. It accepts the input value in “String” datatype. You can also hardcode the values either in “String” format variable or provide the values in “String” datatype.

Label Before: This parameter indicates the value prior to the specified row and column’s position. This field will be automatically detected once the row and column position has been provided. It accepts the input value in “String” datatype. You can also hardcode the values either in “String” format variable or provide the values in “String” datatype. 

Text: *This parameter prompts the user to wait for the input text to be appeared. It accepts the input value in “String” datatype. You can either hardcode the values in “String” format variable or provide the values in “String” datatype.

Timeout: This parameter specifies the maximum time allowed for searching and retrieving the text from the screen. If the text is not found within this time frame, an exception will be thrown. 

MISC

DisplayName: Displays the name of the activity. The activity name can be customized, which aids in troubleshooting.

SkipOnError: Specify the “Boolean” value as “True” or “False.”
True: Continue executing the workflow regardless of any errors thrown.
False:
 Halt the workflow if it encounters any errors.
None:
 If the option is left blank, the activity will, by default, behave as if “False” were chosen.

Version: It indicates the version of the feature being used.

OUTPUT

Result: It provides the ability to view the execution status of the activity. It returns values in “Boolean.”

True: Indicates that the activity has been executed successfully without any errors.
False: Indicates that the activity has been unsuccessful due to an unexpected error being thrown.

AppearStatus: It helps to view the output of the activity as the status of the value that has been appeared on the screen. It returns values in “Boolean” datatype.

True: Indicates that the value has been appeared successfully without any errors.
False: Indicates that the value has been unsuccessful due to an unexpected error being thrown.

* Represents mandatory fields to execute the workflow.

5.8.17 Wait Screen Text

This activity helps the user to wait for a specified period of time for the provided text to be appeared anywhere on the terminal screen. 

Properties 

INPUT

DelayAfterIt assists the user to add a delay after initiating subsequent activities. The delay duration here is in milliseconds. When the option is left blank, the delay will not be considered.

DelayBeforeIt assists the user in adding a delay before starting the execution of the activities. The delay duration here is in milliseconds. When the option is left blank, the delay will not be considered.

IgnoreCase: Using this option allows the user to disregard the case of letters (uppercase or lowercase) while waiting for the text to appear. It finds the text regardless of capitalization. 

Text: *This parameter prompts the user to wait for the input text to be appeared. It accepts the input value in “String” datatype. You can either hardcode the values in “String” format variable or provide the values in “String” datatype.

Timeout: This parameter specifies the maximum time allowed for searching and retrieving the text from the screen. If the text is not found within this time frame, an exception will be thrown. 

MISC

DisplayName: Displays the name of the activity. The activity name can be customized, which aids in troubleshooting.

SkipOnError: Specify the “Boolean” value as “True” or “False.”
True: Continue executing the workflow regardless of any errors thrown.
False:
 Halt the workflow if it encounters any errors.
None:
 If the option is left blank, the activity will, by default, behave as if “False” were chosen.

Version: It indicates the version of the feature being used.

OUTPUT

Result: It provides the ability to view the execution status of the activity. It returns values in “Boolean.”

True: Indicates that the activity has been executed successfully without any errors.
False: Indicates that the activity has been unsuccessful due to an unexpected error being thrown.

AppearStatus: It helps to view the output of the activity as the status of the value that has been appeared on the screen. It returns values in “Boolean” datatype.

True: Indicates that the value has been appeared successfully without any errors.
False: Indicates that the value has been unsuccessful due to an unexpected error being thrown.

* Represents mandatory fields to execute the workflow.

5.9 UI Vision

The UI Vision feature enables robots to visually analyze, identify, and interact with on-screen elements using AI and machine learning, similar to how a human would perceive and engage with a user interface. Instead of relying on traditional selectors or extensions, which can break when UI elements change, UI Vision recognizes elements based on visual cues like text, icons, buttons, and layouts.

Robility UI Vision utilizes the power of AI and machine learning to accurately detect, classify, and interact with UI elements. It employs AI-driven object detection to identify various components on the screen, OCR (Optical Character Recognition) to extract and interpret text, fuzzy text matching to handle variations in text, and layout detection to recognize structures within tables. Additionally, ML models are utilized for image matching and object classification, distinguishing elements such as icons, buttons, and input fields.

By integrating both AI and ML models, Robility UI Vision goes beyond traditional selector-based approaches, enabling comprehensive element recognition and text detection. This holistic approach allows the system to gain a full contextual understanding of the UI, making automation more resilient, adaptable, and efficient, even when UI layouts or designs change.

Key benefits of UI Vision

  1. High-Precision Automation – Analyzes visual data to accurately identify patterns, objects, and text, ensuring precise task execution.
  2. Versatile Interaction – Enables robots to detect and interact with UI elements across PDFs, images, documents, forms, and web applications.
  3. Adaptive to Multiple Use Cases – Supports object recognition, image analysis, document processing across various environments.
  4. Enhanced Stability in Virtual Environments – Overcomes challenges and seamlessly integrates with Citrix, VMware, and Microsoft Remote Desktop by eliminating reliance on unreliable image-based automation and selector targeting.
  5. Selector-Free and Extension-Free – Eliminates dependency on rigid selectors and browser extensions, providing greater flexibility, adaptability, and reliability in automation.
  6. Automates Dynamic Elements – Detects and interacts with changing UI elements like tables, checkboxes, dropdowns, and buttons without relying on fixed selectors.
  7. Resilient to UI Changes – Adapts to evolving UI structures, reducing bot failures and maintenance efforts.

5.9.1 Release Notes

v.1.1.2

This release includes enhancements to dependent DLLs.

Enhancement

All dependent DLLs have been upgraded to the latest stable versions, enhancing security, performance, and workflow reliability. This update ensures smoother execution and maintains compatibility with both existing and new workflows.

Released Date: 09/03/2026

5.9.2 UI Vision Scope

This activity serves as the scope for all UI Vision activities which establishes connection to Robility’s UI Vision server. It allows you to analyze the UI of the applications you wish to automate, identifying and examining all UI elements that will be used in subsequent automation activities.

Properties 

INPUT

Delay After: It helps the user to add a delay to start the execution of the further activity. The format of the delay here is milliseconds. By default, it will be set to 100. When the option is left blank, no delay is considered.

Delay Before: It helps the user to add a delay to before the execution of the activities. The format of the delay here is milliseconds. By default, it will be set to 100. When the option is left blank, no delay is considered. 

SeletedParams: This parameter allows you to choose the model for extracting values from the application. The available options are:

Text: Captures and retrieves only text values from the selected application.
Table: Captures and retrieves only table values, if available in the application.
All: Captures and retrieves both text and table values from the application.

MISC

DisplayName: Displays the name of the activity. The activity name can be customized, which aids in troubleshooting.

SkipOnError: Specify the “Boolean” value as “True” or “False.”
True: Continue executing the workflow regardless of any errors thrown.
False: Halt the workflow if it encounters any errors.
None: If the option is left blank, the activity will, by default, behave as if “False” were chosen.

Version: It indicates the version of the feature being used. 

OUTPUT

Result: This parameter allows you to view the execution status of the activity and returns a value in “Boolean.”
True: Indicates that the activity has been executed successfully without any errors.
False: Indicates that the activity has been unsuccessful due to an unexpected error being thrown.

Reindicating the Elements

This option allows you to re-indicate the current application or capture a different one. Follow these steps:

1. Double-click the “UI Vision Scope” activity.
2. Click the three lines to open the context menu.
3. Select “Reindicate” and capture the desired application.

You can follow the same steps to reset and configure new application. 

5.9.3 UI Vision Help Window

The UI Vision help window is available for all activities. By clicking the “Indicate on Scope” hyperlink, the user can launch the UI Vision help window.

These options within the UI Vision help window enhance the user’s ability to efficiently and accurately interact with the elements of an application, especially in dynamic or changing environments. They ensure that the robot selects the correct elements and adapts to UI changes as needed during the automation process. These options include:

Show Elements

This option allows the user to view all available UI elements on the screen. Once displayed, the user can interact with these elements and select the required one. It helps to visualize all clickable or interactive UI components in the application.

Refresh Elements

This option refreshes the UI elements on the screen, ensuring that any changes or updates to the application’s interface are captured. After refreshing, if there are any changes appeared on the existing indicated application, the new image will be sent to UI Vision server to analyze the elements. 

Delayed Refresh

This option provides a timed delay (5 seconds) before the user can select an element.

Relative Elements

This option allows the user to interact with UI elements in relation to other elements. Instead of specifying exact coordinates or static elements, the user can define a native element based on its relative position to another element. This is useful in situations where the layout of the interface changes dynamically, but the relative positions of certain elements remain consistent.

5.9.4 Click

This activity helps the user to perform the click actions on the specified element within the indicated application.

Properties 

INPUT

ClickType: Specifies the type of mouse click that needs to be used when simulating the click event. By default, single click is selected.
Single – Performs a single click action on the element. 

Double – Performs double click on the element. 
Up – This action helps you to hold the selected element.
Down – This action helps to release the element which is on hold.

Delay After: It helps the user to add a delay to start the execution of the further activity. The format of the delay here is milliseconds. By default, it will be set to 100. When the option is left blank, no delay is considered.

Delay Before: It helps the user to add a delay to before the execution of the activities. The format of the delay here is milliseconds. By default, it will be set to 100. When the option is left blank, no delay is considered. 

MouseButton: Specifies the click from the mouse to be performed. 

1. Left
2. Right
3. Middle

By default, the mouse uses the left click. 

MISC

DisplayName: Displays the name of the activity. The activity name can be customized, which aids in troubleshooting.

SkipOnError: Specify the “Boolean” value as “True” or “False.”
True: Continue executing the workflow regardless of any errors thrown.
False: Halt the workflow if it encounters any errors.
None: If the option is left blank, the activity will, by default, behave as if “False” were chosen.

Version: It indicates the version of the feature being used. 

OUTPUT

Result: This parameter allows you to view the execution status of the activity and returns a value in “Boolean.”
True: Indicates that the activity has been executed successfully without any errors.
False: Indicates that the activity has been unsuccessful due to an unexpected error being thrown. 

How to indicate the elements?

1. Drag and drop the “Click” activity into the scope.
2. Click on the “Indicate on Scope” hyperlink.
3. You will be navigated to the indicated screen, hover over the desired element, and click on it.
4. The selected element will now be stored in the activity.

5.9.5 Highlight

This activity allows the user to highlight a specified element within the indicated application.

Properties

INPUT

Delay After: It helps the user to add a delay to start the execution of the further activity. The format of the delay here is milliseconds. By default, it will be set to 100. When the option is left blank, no delay is considered.

Delay Before: It helps the user to add a delay to before the execution of the activities. The format of the delay here is milliseconds. By default, it will be set to 100. When the option is left blank, no delay is considered. 

Highlight Color: This parameter specifies to choose the color from the drop-down to highlight the element.

Highlight Duration: This parameter specifies to provide the duration in milliseconds to highlight the specified element. When the option is left blank, it will be considered as zero.

Timeout: This parameter specifies to provide the duration for the activity to execute and highlight the specified element before it throws any exception. 

MISC

DisplayName: Displays the name of the activity. The activity name can be customized, which aids in troubleshooting.

SkipOnError: Specify the “Boolean” value as “True” or “False.”
True: Continue executing the workflow regardless of any errors thrown.
False: Halt the workflow if it encounters any errors.
None: If the option is left blank, the activity will, by default, behave as if “False” were chosen.

Version: It indicates the version of the feature being used. 

Scroll

Delay Screenshot After Scroll: Specifies the delay (in milliseconds) while capturing the screen after each scroll. If left blank, the delay defaults to zero.

Number of Scrolls: Defines the number of scrolls the bot will perform during execution to highlight the specified element.

Scroll Direction: This parameter specifies to choose the scroll direction, which can be either “UP” or “DOWN.”

OUTPUT

Result: This parameter allows you to view the execution status of the activity and returns a value in “Boolean.”
True: Indicates that the activity has been executed successfully without any errors.
False: Indicates that the activity has been unsuccessful due to an unexpected error being thrown. 

5.9.6 Hover

This activity allows the user to hover the mouse over a specified element within the application.

Properties

INPUT

Delay After: It helps the user to add a delay to start the execution of the further activity. The format of the delay here is milliseconds. By default, it will be set to 100. When the option is left blank, no delay is considered.

Delay Before: It helps the user to add a delay to before the execution of the activities. The format of the delay here is milliseconds. By default, it will be set to 100. When the option is left blank, no delay is considered. 

MISC

DisplayName: Displays the name of the activity. The activity name can be customized, which aids in troubleshooting.

SkipOnError: Specify the “Boolean” value as “True” or “False.”
True: Continue executing the workflow regardless of any errors thrown.
False: Halt the workflow if it encounters any errors.
None: If the option is left blank, the activity will, by default, behave as if “False” were chosen.

Version: It indicates the version of the feature being used.  

OUTPUT

Result: This parameter allows you to view the execution status of the activity and returns a value in “Boolean.”
True: Indicates that the activity has been executed successfully without any errors.
False: Indicates that the activity has been unsuccessful due to an unexpected error being thrown. 

5.9.7 Get Text

This activity enables the user to extract data from a specified element on the screen.

Properties

INPUT

Get Text Method Type: This parameter allows you to select the method for extracting text from the screen. The available options are:

OCR: Extracts the specified text using Optical Character Recognition (OCR).
Select All Text: Functions like a Copy/Paste operation, extracting all selectable text on the screen via the clipboard.
Select Text Row: Extracts the text from the entire row of the specified element on the screen. 

Delay After: It helps the user to add a delay to start the execution of the further activity. The format of the delay here is milliseconds. By default, it will be set to 100. When the option is left blank, no delay is considered.

Delay Before: It helps the user to add a delay to before the execution of the activities. The format of the delay here is milliseconds. By default, it will be set to 100. When the option is left blank, no delay is considered. 

MISC

DisplayName: Displays the name of the activity. The activity name can be customized, which aids in troubleshooting.

SkipOnError: Specify the “Boolean” value as “True” or “False.”
True: Continue executing the workflow regardless of any errors thrown.
False: Halt the workflow if it encounters any errors.
None: If the option is left blank, the activity will, by default, behave as if “False” were chosen.

Version: It indicates the version of the feature being used.  

OUTPUT

Result: This parameter allows you to view the execution status of the activity and returns a value in “Boolean.”
True: Indicates that the activity has been executed successfully without any errors.
False: Indicates that the activity has been unsuccessful due to an unexpected error being thrown. 

Extracted Text: *It allows the user to return the extracted text as output of the activity in “String” datatype. 

* Represents mandatory fields to execute the workflow.

5.9.8 Type Into

This activity enables the user to input text values into a specified element within the application.

Properties

INPUT

Delay After: It helps the user to add a delay to start the execution of the further activity. The format of the delay here is milliseconds. By default, it will be set to 300. When the option is left blank, no delay is considered.

Delay Before: It helps the user to add a delay to before the execution of the activities. The format of the delay here is milliseconds. By default, it will be set to 200. When the option is left blank, no delay is considered. 

InputString: *This parameter specifies the input string to be entered into the element. It accepts values in the “String” data type.

MISC

DisplayName: Displays the name of the activity. The activity name can be customized, which aids in troubleshooting.

SkipOnError: Specify the “Boolean” value as “True” or “False.”
True: Continue executing the workflow regardless of any errors thrown.
False: Halt the workflow if it encounters any errors.
None: If the option is left blank, the activity will, by default, behave as if “False” were chosen.

Version: It indicates the version of the feature being used.  

Option

Empty Field: Use this option to clear all existing values in the specified element before entering new input values. 

OUTPUT

Result: This parameter allows you to view the execution status of the activity and returns a value in “Boolean.”
True: Indicates that the activity has been executed successfully without any errors.
False: Indicates that the activity has been unsuccessful due to an unexpected error being thrown. 

* Represents mandatory fields to execute the workflow. 

5.9.9 Wait Text At Position

This activity helps the user to wait for a specified period of time for the provided text to be appeared anywhere on the terminal screen. 

Properties 

INPUT

DelayAfterIt assists the user to add a delay after initiating subsequent activities. The delay duration here is in milliseconds. When the option is left blank, the delay will not be considered.

DelayBeforeIt assists the user in adding a delay before starting the execution of the activities. The delay duration here is in milliseconds. When the option is left blank, the delay will not be considered.

IgnoreCase: Using this option allows the user to disregard the case of letters (uppercase or lowercase) while waiting for the text to appear. It finds the text regardless of capitalization. 

Row/Column: This parameter indicates the starting row and column position from where the text needs to be retrieved. It accepts the input value in “String” datatype. You can either hardcode the values in “String” format variable or provide the values in “String” datatype.

The “Row/Column” position will be available in the “Terminal” screen at the bottom. Based on the cursor point, the row and column value can be retrieved.

Text: *This parameter prompts the user to wait for the input text to be appeared. It accepts the input value in “String” datatype. You can either hardcode the values in “String” format variable or provide the values in “String” datatype.

Timeout: This parameter specifies the maximum time allowed for searching and retrieving the text from the screen. If the text is not found within this time frame, an exception will be thrown. 

MISC

DisplayName: Displays the name of the activity. The activity name can be customized, which aids in troubleshooting.

SkipOnError: Specify the “Boolean” value as “True” or “False.”
True: Continue executing the workflow regardless of any errors thrown.
False:
 Halt the workflow if it encounters any errors.
None:
 If the option is left blank, the activity will, by default, behave as if “False” were chosen.

Version: It indicates the version of the feature being used.

OUTPUT

Result: It provides the ability to view the execution status of the activity. It returns values in “Boolean.”

True: Indicates that the activity has been executed successfully without any errors.
False: Indicates that the activity has been unsuccessful due to an unexpected error being thrown.

AppearStatus: It helps to view the output of the activity as the status of the value that has been appeared on the screen. It returns values in “Boolean” datatype.

True: Indicates that the value has been appeared successfully without any errors.
False: Indicates that the value has been unsuccessful due to an unexpected error being thrown.

* Represents mandatory fields to execute the workflow.

5.10 Computer Interaction

The Computer Interaction feature enables robots to understand natural language instructions and interact with desktop and web applications using AI. Instead of relying on predefined scripts or hardcoded selectors, it interprets user intent, identifies relevant UI elements, and performs the required actions.

Computer Interaction uses AI reasoning together with a Retrieval-Augmented Generation (RAG) knowledge base to retrieve contextual information and inform decisions during task execution. It can adapt to changes in application interfaces, handle unexpected scenarios, and recover from execution issues, supporting more flexible automation across different applications.

Key Benefits

1. Natural Language Automation – Provide automation instructions in natural language without defining every interaction step.
2. Dynamic UI Interaction – Identifies and interacts with relevant UI elements across desktop and web applications based on task context.
3. RAG-Powered Decision Making – Retrieves contextual knowledge from the RAG knowledge base to support task understanding and execution.
4. Adaptive Automation – Adjusts to changes in application interfaces and determines alternative interaction approaches when needed.
5. Self-Healing Execution – Detects unexpected UI states and uses contextual knowledge to recover and continue automation with reduced manual intervention.
6. Reduced Dependency on Selectors – Lowers reliance on predefined scripts and hardcoded selectors, reducing maintenance effort when applications change.
7. Cross-Application Consistency – Supports automation across a range of desktop and web applications, including interfaces that change over time.

Use Cases

1. Web Application Navigation – Use natural language instructions to navigate web applications, locate required options, and perform actions such as clicking, typing, and selecting.
2. Desktop Application Automation – Automate tasks across desktop applications by identifying relevant UI elements and performing actions without relying on predefined selectors.
3. Visual UI Interaction – Identify buttons, fields, menus, icons, and other visual elements on application screens and interact with them based on task context.
4. Dynamic Form Filling – Interpret instructions to locate and populate the appropriate fields in web or desktop forms.
5. Application-Based Data Entry – Retrieve information from one application and enter it into another by identifying the required UI elements and interaction points.
6. Cross-Application Data Synchronization – Move data between different applications by mapping source fields to destination fields based on task context.
7. Self-Healing Automation – Detect changes in application interfaces or unexpected UI states and determine alternative ways to complete the requested task.
8. Multi-Step Business Process Automation – Execute processes that span multiple applications by interpreting instructions, applying contextual reasoning, and performing the required interactions in sequence.
9. Legacy Application Automation – Automate applications where conventional selectors or standard UI automation methods are difficult to apply, using visual identification of UI elements instead.
10. Recovery from Unexpected UI States – Handle pop-ups, dialogs, or layout changes encountered during a task without requiring manual intervention to resume execution.


5.10.1 Release Notes

v.1.0.2

This release introduces new activities to the Computer Interaction suite, enabling vision-based, self-healing workflow automation.

New Activities

1. Robility Interaction Scope
Acts as the parent container for AI-driven visual sessions. It manages environment boundaries, target application connections, and global self-healing settings across web and desktop environments, without relying on rigid selectors.

2. Robility Screen Play Task
Executes dynamic UI workflows within an Interaction Scope based on natural language instructions. Powered by real-time visual perception, it interprets intent to automatically identify screen elements, perform actions, and adapt to unexpected layout changes, without requiring sub-activity mapping.

Limitation and Workaround

When masking is enabled for a field as True, its original value is hidden and cannot be accessed by subsequent automation steps.

To ensure that values required by subsequent automation steps remain accessible, enable masking only for fields that require data protection.
a. Set Masking = True for fields whose values must be hidden.
b. Set Masking = False for fields whose original values must remain accessible to subsequent automation steps.

Released Date: 29/08/2026

5.10.2 Robility Interaction Scope

Robility Interaction Scope is a container activity that identifies and manages the target desktop or web application, allowing you to perform multiple UI interactions within the same application scope. It uses AI-powered application detection and UI Explorer to identify the target application and its UI elements. 

Note: Double-click the Robility Interaction Scope activity to open and configure its settings.

Menu Icon (Three line)

1. Change Informative Screenshot: Change the existing screenshot by selecting a new screenshot from your local system.
2. Remove Informative Screenshot: Remove the existing informative screenshot.
3. Indicate Target Application: The Indicate Target Application feature allows you to identify and select UI elements from desktop or web applications using UI Explorer.

UI Explorer

a. Click Spy to start identifying an application or UI element.
b. Select the required application or UI element from the desktop or web application.
c. After selecting the application, you are redirected to the Selection Helper tab.
d. To return to UI Explorer from the Selection Helper, click Indicate Application via UI Explorer.
e. The Window Selector is displayed automatically when the application is indicated.

 i. To use the Window Selector as a variable, select Use Variable.
 ii. Enter a variable name and click Bind.
 iii. The variable name is then displayed in the Window Selector field.
 iv. You can delete the Window Selector if it is not required.

f. You can create a new Variable or Argument to store and reuse the selected application or UI element information.
g. If the current indication is incorrect or the application has changed, click Re-indicate to select the application again.
h. After completing the required configuration, click Confirm to save the selected application and its UI elements.

UI Explorer displays all currently open applications and web pages that can be selected for UI element identification.

 i. Select an application from the list of open applications.
 ii. The compatible selectors for the selected application are displayed.
 iii. Select the required selector to identify and interact with the corresponding UI element.
 iv. Once done, click Set as Application to confirm the selection.

4. Open Application Instance: If the target application is already open, you can either select Focus Current Instance to bring the existing application instance to the foreground or select Open New Instance to launch a new instance.

Activity in the Canvas

Indicated Application: Displays the image of the application selected using Indicate Target Application.

File Path: Automatically displays the file path of the indicated application.

Sequence: Displays the sequence used to organize and execute the activities.

Robility ScreenPlay Task: Allows you to add multiple activities within the scope to perform the required UI interactions.

Properties

AI Connection

API Key: Enter a valid API key to authenticate the AI connection.

Default Model: Enter the model name. Gemini 3.5 Flash is recommended.

MISC

Display Name: Displays the name of the activity. You can customize the activity name to help troubleshoot issues more easily. The specified name is also used for logging purposes.

Version: Displays the version number of the activity.

Options

Delay After (ms): Specifies the delay after the activity is executed. The default value is 5000 ms.

Open Mode: Specifies how the target application should be opened. The available options are:
If Not Open: Opens the application only if it is not already open.
Always: Opens a new instance of the application.
Never: Does not open the application.

Target Application

Application Arguments: Specifies the arguments required to launch the target application. You can enter the arguments directly or provide a variable containing the argument values.

Application Path: Displays the path of the application automatically based on the indicated target application.

Target Selector: Displays the selector automatically based on the indicated target application.

URL: Displays the URL automatically based on the indicated target application.

Working Directory: Displays the working directory automatically based on the indicated target application.

Note: For Application Path, Target Selector, URL, and Working Directory, you can either use the value displayed automatically or provide a variable containing the required value.

How to Use the Robility Interaction Scope

1. Drag and drop the Robility Interaction Scope into the workflow, then double-click it to open the configuration panel.
2. Once the configuration window opens, you will see the Indicate Target Application option.
3. You can select the target application in one of the following ways:
a. Choose an application from the list of applications currently open on your machine.
b. Use the Spy option to identify and select the target application directly.

If you select an application from the list:

i. Click Set as Application.
ii. You will automatically be redirected to the Selection Helper tab.
iii. Click Confirm to complete the selection.

If you use the Spy option:

i. You will automatically be redirected to the Selection Helper tab.
ii. Click Confirm to complete the selection.

4. By default, a Robility Screenplay Task activity is added within the scope.
a. You can add additional Screenplay Task activities to the sequence if required.
b. In the activity, provide the appropriate prompt and configure the necessary properties.

5. Once the target application has been indicated and the prompt has been configured, run the workflow by clicking Run.
a. The workflow will be executed based on the selected application and the provided prompt.

5.10.3 Robility Screen Play Task

The Robility Screen Play Task is an AI-powered automation tool that performs computer tasks based on simple, natural language instructions. Unlike traditional automation that follows rigid rules, this activity intelligently navigates and interacts with applications just like a human would, making it ideal for handling dynamic interfaces and changing layouts.

a. Perceive: The AI constantly scans the application screen to understand the current visual layout and elements.
b. Reason: It analyzes the information to decide the most efficient next step required to reach your goal.
c. Act: It performs the necessary interaction, such as clicking a button or typing text, to move the task forward.

Key Features

1. Agentic Loop: Define limits for steps, wait times, and timeouts for precise execution control.
2. Behavior Control: Manage automated planning, visual highlighting, and recovery from stagnant states.
3. Data Security: Protect sensitive information with customizable PII masking rules.
4. Adaptive Interaction: Seamlessly handles layout changes without the need for predefined navigation paths.
5. Outcome Tracking: Review detailed execution logs and receive a clear confirmation of task success.

Activity Details in Canvas

Prompt: Enter a natural language instruction that describes the action you want the AI to perform. You can enter a value directly or provide a String variable.

Success Condition: Enter the condition that determines whether the requested action was completed successfully. You can enter a value directly or provide a String variable.

Properties

Agentic Loop

Context / Constraints: Specify additional context, instructions, or constraints that the AI should consider while performing the task.

Max Steps: Specifies the maximum number of steps the AI can perform to complete the task. The default value is 20.

Note: Increasing the Max Steps value may increase AI-generated token usage and overall resource consumption. Set this value based on the complexity of the task.

Steps Wait (ms): Specifies the wait time between each AI step. The default value is 300 ms.

Success Condition: Enter the condition that determines whether the requested action was completed successfully.

Timeout (sec): Specifies the maximum time allowed for the AI to complete the task. The default value is 120 seconds.

Behavior

Enable Planning: Specifies whether the AI creates a plan before executing the task. It is a Boolean, Set to True or False.

Highlight Actions: Specifies whether actions performed by the AI are highlighted during execution. It is a Boolean, Set to True or False.

Max Verification Retries: Specifies the maximum number of times the AI can retry verifying an action. The default value is 2.

Stagnation Recovery: Specifies the recovery action performed when the AI is unable to make progress. The default value is BringWindowToFront.

Stagnation Threshold (Steps): Specifies the number of consecutive steps without progress before the stagnation recovery action is triggered. The default value is 3.

Masking

Enable Masking: Specifies whether masking is enabled for the activity. Set this property to True or False.
False: PII values are not masked.
True: PII values are masked based on the configured PII rule pack.

PII Rule Pack File Path: Specifies the file path of the PII rule pack used to identify and mask sensitive information.

a. When Enable Masking is set to True, the default PII rule pack is used if no customized rule pack path is provided.
b. To use a customized PII rule pack, specify its file path in this field.

Limitation and Workaround

When masking is enabled for a field, its original value is hidden and cannot be accessed by subsequent automation steps.

To ensure that values required by subsequent automation steps remain accessible, enable masking only for fields that require data protection.
a. Set Masking = True for fields whose values must be hidden.
b. Set Masking = False for fields whose original values must remain accessible to subsequent automation steps.

Customize the Rule Pack

If the default PII rules do not meet your requirements, you can create a customized rule pack for an activity.

To customize the rule pack:

1. Right-click Robility Designer and select Open file location.
2. Navigate to the following path:
SupportFiles\Packages\Features\(choose the project)\Robility.CoreActivities\2.5.7\PiiRulePack.default.json

3. Copy PiiRulePack.default.json to a location of your choice.
4. Modify the copied PiiRulePack.default.json file according to your requirements.
5. Specify the path of the customized rule pack in the PII Rule Pack File Path

For example:
“C:\Users\” + Environment.UserName + “\Documents\PiiRulePack.default.json”

Note: Always customize the copied PiiRulePack.default.json file. Do not modify the original file in the Robility Designer installation folder, as it may be overwritten during installation or updates.

MISC

Display Name: Specifies the display name of the activity. You can customize this value to improve workflow readability and simplify troubleshooting.

Skip On Error: Specifies whether the workflow should continue execution when the activity encounters an error.
True: Continues workflow execution when the activity encounters an error.
False: Stops workflow execution when the activity encounters an error.
Default: The default value is set to False.

Version: Displays the current version of the activity.

Output

Execution Log: Displays the execution details and status of the activity.

Result: Returns a Boolean value indicating the execution status of the activity.
True: The activity executed successfully.
False: The activity failed due to an unexpected error.

Task

Prompt: Displays the prompt specified in the activity canvas. You can use the value directly or provide a String variable or argument.

Prompt Design

For better AI execution, structure the prompt using the following format:

Action → Target → Details → Constraints → Expected Outcome

For example: Open the customer portal → search for customer ID 10245 → open the matching customer record → do not modify existing information → verify that the customer details page is displayed.

This structure provides the AI with the context required to identify the action, target, constraints, and expected result.

Viewing Activity Execution Reports

After the activity is completed, an HTML execution report is automatically generated.

Report Location

The generated HTML report is saved in a folder created at the activity’s configured file path.

To quickly access the execution folder, press Win + R, paste %LOCALAPPDATA%\Temp\RobilityScreenPlay (or C:\Users\<Username>\AppData\Local\Temp\RobilityScreenPlay), and press Enter.

Report Summary

The report provides the following execution details:

a. Result: Displays the overall execution status.
b. Steps: Displays the number of steps completed.
c. Actions: Displays the number of actions performed.
d. Duration: Displays the total execution time.
e. Model: Displays the AI model used for execution.
f. Tokens: Displays token usage, including input and output tokens.

Step Details

Each step can be expanded to view detailed execution information:

a. Action Performed: Displays the action performed during the step.
b. Observation: Displays the result or information captured after the action.
c. Raw JSON Data: Displays the underlying technical data for the step for debugging and troubleshooting.

Execution Configuration Log

Displays the execution configuration and activity details, including the original goal, AI model, execution start time, actions performed, and task completion verification.

6. Integration Activities

6.1 Overview

Introduction

Integration activities in Robility are designed to connect your automation workflows with a wide range of external systems, services, and APIs. These activities play a critical role in enabling seamless data exchange, service orchestration, and intelligent interaction across cloud platforms, enterprise tools, custom scripts, and AI services. Whether it’s accessing cloud storage, sending API calls, triggering AI models, or working with customer platforms like Salesforce and Zendesk, Robility’s integration capabilities are built to ensure flexibility, scalability, and secure automation.

List of Integrations

Cloud Platform Integration:

Enables automation with cloud services like Azure, Google Cloud, and AWS for managing resources, executing functions, and accessing cloud-based data.

App Integration Activities

Supports integration with third-party platforms such as Salesforce, Zendesk, and others to automate tasks like record updates, ticket management, and data retrieval.

WebClient Activities

Facilitates communication with web APIs by sending requests, handling responses, and automating web-based data operations.

Scripting Activities

Allows execution of Python or PowerShell scripts within workflows to handle custom logic, data transformation, or system-level tasks.

Invoke Activities

Enables calling of external code, reusable components, or workflows, making it easy to modularize and extend automation functionality.

Credential Manager

Secures sensitive information by storing and retrieving credentials safely within workflows, ensuring data protection during execution.

Interact Activities

Connects automation workflows with Robility Manager to add, retrieve, or update transactions via secure API calls.

AI Integration

Integrates AI services like Harmony AI to bring intelligence into automation through analysis, classification, and recognition.

Project Compatibility

6.2 Azure

Introduction

The Azure package in Robility encompasses a set of activities designed to interact with Microsoft Azure cloud services. Azure is a comprehensive cloud platform that offers a wide range of services for computing, storage, networking, databases, machine learning, AI, and more. The Azure package activities in Robility facilitate automation of tasks and workflows involving Azure resources. 

These activities leverage Azure APIs and functionalities to perform tasks such as provisioning resources, managing storage, deploying applications, monitoring Azure services, and executing actions based on Azure triggers or events.

Azure activities package

The Azure package in Robility incorporates advanced AI capabilities through services like Azure AI Form Recognizer and Microsoft Computer Vision. These services enable intelligent automation by leveraging machine learning algorithms and computer vision technology.

1. Azure AI Form Recognizer: This service allows users to automate data extraction from structured and unstructured documents such as invoices, receipts, forms, and reports. The Azure AI Form Recognizer activities in Robility facilitate the extraction of key information such as text, numbers, dates, and tables from documents, making it easier to process and analyze large volumes of data.

2. Microsoft Computer Vision: The integration of Microsoft Computer Vision services within the Azure package enables automation of image analysis tasks. Users can automate the detection, recognition, and classification of objects, text, and scenes in images and videos. This is particularly useful for applications involving image processing, content moderation, and visual data analysis.

6.2.1 AzureAIFormRecogniser

Introduction

Azure Form Recognizer, a cloud-based Azure Applied AI Service looks at your forms and documents, extracts text and data from them, maps field relationships as key-value pairs, and gives you a structured output. This structured output can be used to create data pipelines and automate processes. It can also be used to quickly access data and create reports, which can be used to make better decisions.

Benefits

1. Efficient Data Extraction: Azure Form Recognizer streamlines the extraction of text and data from diverse forms and documents, reducing manual data entry efforts and improving accuracy.

2. Structured Output: The service provides structured outputs in the form of key-value pairs, making it easier to integrate extracted data into existing systems and workflows.

3. Data Pipeline Automation: Azure Form Recognizer facilitates the creation of data pipelines, automating the processing and extraction of information from documents, leading to faster and more efficient workflows.

4. Process Automation: By leveraging the structured output from Azure Form Recognizer, businesses can automate processes such as invoice processing, document categorization, and data validation, enhancing operational efficiency.

5. Data Accessibility: The structured data output enables quick access to relevant information, empowering users to make data-driven decisions and respond promptly to business needs.

Use Cases

1. Invoice Processing: Automate the extraction of invoice details such as vendor information, invoice numbers, and line-item data from scanned invoices, streamlining accounts payable processes.

2. Expense Reporting: Automatically extract expense details from receipts and expense reports, speeding up reimbursement processes and ensuring accurate record-keeping.

3. Document Classification: Classify documents based on their content and extract key information for categorization and routing within document management systems.

3. Survey Analysis: Analyze survey forms to extract responses, sentiment analysis, and trends, facilitating insights for decision-making and improving customer satisfaction.

4. Healthcare Forms Processing: Automate the extraction of patient information, medical records, and insurance details from healthcare forms, improving patient care coordination and administrative efficiency.

6.2.2 MicrosoftComputerVision

Introduction

Microsoft Computer Vision is a cloud-based service that utilizes advanced machine learning algorithms to analyze and extract information from images and videos. In the realm of Robility, Computer Vision plays a vital role in automating tasks that involve visual recognition, interpretation, and decision-making based on visual inputs.

Benefits

1. Automated Image Processing: Computer Vision enables bots to process and analyze images automatically, reducing manual intervention and improving processing speed.
2. Enhanced Accuracy: The advanced algorithms of Computer Vision enhance accuracy in image recognition and interpretation, leading to more reliable automation outcomes.
3. Versatile Application: It can be applied across various industries and use cases, from invoice processing to document classification, quality control, and object identification.
4. Integration: Microsoft Computer Vision seamlessly integrates with Robility, enhancing their capabilities in handling visual data and enabling more sophisticated automation workflows.
5. Scalability: The cloud-based nature of Computer Vision allows for scalable image processing, accommodating large volumes of visual data in automation processes.

Use Cases

1. Visual Verification: Incorporate Computer Vision for visual verification tasks, such as confirming the presence of specific elements in graphical user interfaces (GUI) or web pages during automation.
2. Object Detection: Identify and locate objects within images or screenshots, enabling bots to interact with applications based on visual cues.
3. Receipt Processing: Automate the extraction of details like date, merchant, and total amount from scanned receipts using Computer Vision, streamlining expense reporting and reimbursement processes.
4. Signature Verification: Use Computer Vision to verify signatures on documents, contracts, or forms, ensuring authenticity and compliance with verification requirements.

6.3 Google

Introduction

The Google package in Robility encompasses a set of activities designed to interact with Google workspace. Google Workspace is a cloud-based platform developed by Google, which includes popular applications like Google Sheets, Google Docs, Google Drive, and Gmail. 

These activities leverage Google Cloud APIs and functionalities to seamlessly integrate with Google’s services, enabling users to streamline document processing, automate email communication, and enhance productivity within their automation workflows. 

About activities package

1. Google Document AI: Activities related to Google Document AI empower users to automate document processing and analysis tasks using Google’s AI and machine learning capabilities. This includes activities for extracting text, entities, and structured data from documents, performing document classification and entity recognition, and leveraging Google’s pre-trained models for document understanding tasks.

2. Gmail Integration: The Gmail activities in the Google package facilitate automation of email-related tasks within Gmail accounts. Users can automate actions such as sending emails, receiving and reading emails, searching for specific emails based on criteria, managing email threads and labels, and extracting email content for further processing.

3. Google Sheets Automation:

Robility offers out-of-the-box automation activities for Google Sheets, such as reading/writing cell values, manipulating ranges, and generating reports. Automation workflows in Robility can pull data from various business applications, process it, and export it directly to Google Sheets for real-time reporting and decision-making.

4. Seamless Integration with Gmail:

Robility integrates with Gmail to send automated emails based on predefined triggers or data conditions, making customer support or follow-up communication faster and more efficient. RPA bots can also manage email content dynamically, ensuring accurate information distribution.

5. File Handling with Google Drive:

Robility bots can automate the upload, download, and organization of files in Google Drive, reducing manual intervention in document management tasks. With the integration of Google Drive, bots can archive, retrieve, and share documents securely, enhancing collaboration and compliance.

Pre – requisites

To integrate Google services (such as Google Sheets, Google Drive, Gmail, etc.) into Robility for automation, there are certain prerequisites that need to be met. These ensure that Robility can securely connect to and access the Google Workspace services required for automation tasks. 

1. Google Cloud Project: You need to create a Google Cloud Project to access Google APIs (such as Google Sheets, Gmail, and Drive) for integration.
2. Enable Required APIs: Depending on the automation process, enable the relevant Google APIs within the Google Cloud project.
a. Google Sheets API: For automating Google Sheets.
b. Google Drive API: For file handling and folder management.
c. Gmail API: For automating email-related workflows.
3. OAuth 2.0 Credentials: Create OAuth 2.0 credentials to authenticate and authorize Robility to access the Google services on behalf of the user.
Steps:
a. In the APIs & Services section of the Google Cloud Console, go to Credentials.
b. Click on Create Credentials and select OAuth 2.0 Client IDs.
c. Configure the consent screen and specify the scopes (permissions) needed for your project.
d. Download the OAuth Client ID JSON file, which contains the credentials (client ID and client secret).

4. Google Account with Required Permissions: Ensure that you have a Google Workspace or Google Account with the required permissions for accessing the specific services.

a. For Google Sheets, you need read and write access to the sheets you want to automate.
b. For Google Drive, ensure you have the necessary permissions to read/write files.
c. For Gmail, permissions to send or manage emails.

Scopes for Permissions

When setting up the Google integration, you need to define the OAuth Scopes for your automation. These are permissions granted by the Google user to the Robility bot for accessing their data.

6.3.1 GoogleDocumentAI

Introduction

Google Document AI is a suite of AI-powered tools and APIs designed to automate document processing tasks. It leverages advanced machine learning algorithms to extract structured data, analyze content, and automate workflows within documents, enabling organizations to streamline document-based processes.

Benefits

  1. Automated Data Extraction: Document AI automates the extraction of structured data from documents, such as invoices, receipts, contracts, and forms, reducing manual data entry efforts.
  2. Semantic Understanding: It understands the context and semantics of content within documents, enabling intelligent analysis, categorization, and extraction of information.
  3. Integration with Google Services: Document AI seamlessly integrates with Google Workspace (formerly G Suite) and other Google services, enhancing collaboration and productivity in document-centric workflows.
  4. Customizable Workflows: Organizations can customize Document AI workflows to suit their specific document processing needs, improving efficiency and accuracy.
  5. Scalability: The cloud-based nature of Document AI allows for scalable document processing, accommodating large volumes of documents with ease.

Use Cases

1. Invoice Processing: Automatically extract invoice details such as vendor information, line items, and totals from scanned invoices using Document AI, speeding up accounts payable processes.

2. Document Classification: Classify documents based on content, types, or categories using Document AI, facilitating document management, retrieval, and organization.

3. Form Recognition: Recognize and extract data from forms, surveys, and questionnaires, enabling automated data capture and analysis.

4. Content Analysis: Analyze document content for sentiment analysis, key insights, trends, and patterns, supporting decision-making and business intelligence.

5. Text Extraction: Extract text from images, PDFs, and scanned documents, enabling text searchability, indexing, and information retrieval.

6.3.2 Gmail Automation

Introduction

Gmail automation in Robility involves bots to perform various tasks within Gmail accounts automatically. These tasks can include managing incoming and outgoing emails, organizing emails into folders, sending automated responses, monitoring for specific keywords or attachments, and generating reports based on email activity.

Benefits

1. Efficiency: Gmail automation streamlines repetitive tasks, such as sorting emails, sending responses, and generating reports, leading to increased efficiency and time savings.
2. Accuracy: Automation reduces the risk of human errors in email management, ensuring that emails are processed accurately and consistently.
3. Productivity: By automating routine email tasks, employees can focus on higher-value activities, leading to improved productivity and better use of resources.
4. Scalability: Automation allows organizations to handle large volumes of emails efficiently, scaling operations without significant increases in manpower.
5. Timeliness: Automated processes can ensure that emails are processed and responded to promptly, improving customer satisfaction and communication effectiveness.

UseCase

1. Email Filtering and Organization: Automatically categorize incoming emails into folders based on sender, subject, or keywords to streamline inbox management.
2. Automated Responses: Generate and send automated responses to common inquiries or requests, such as order confirmations or support ticket acknowledgments.
3. Email Monitoring and Escalation: Monitor urgent emails or specific keywords and escalate them to the appropriate team members for immediate attention.
4. Data Extraction: Extract data from incoming emails, such as contact information or order details, and input this data into CRM systems or databases.
5. Reporting and Analytics: Generate reports on email activity, including metrics like response times, email volume, and customer feedback trends, for analysis and decision-making.

6.3.3 GoogleSheet

Robility® integrates with Google Sheet to automate tasks such as reading/writing cell values, manipulating ranges, and generating reports.

Use cases

1. Data Migration Between Systems: Robots can use Google Sheets as an intermediate storage location when transferring data between incompatible systems, ensuring smooth migration with data.
2. Automated Billing Reconciliation: Bots can check payment statuses or transaction records in Google Sheets against a system to ensure consistency and accuracy in billing data.
3. Employee Onboarding/Offboarding: Google Sheets can be used to track onboarding tasks or checklist completion for new hires. Bots can update HR systems with onboarding details automatically.
4. Expense Tracking: Bots can extract expense data from receipts, emails, or expense reports and record it in Google Sheets, where it can be categorized and summed up for financial reports.

Pre – requisites

Building an automation workflow with Google Sheet requires a connection in the “App Integration” menu in Robility Manager. There are two types of authentication that brings Google Sheet into Robility,

1. OAuth 2.0 Authorization code – Enables you to provide the Gmail account address and password that has been authenticated with defined scopes.
2. OAuth 2.0 Client credentials – Enables you to provide your own Client ID, Client Secret and Scopes manually.

Once the connection has been enabled, you are all set to build your automation workflow.

Scopes

Scopes define what kind of data it accesses, and level of access needs to be provided. For detailed information, please check out the Google documentation. Below are the scopes that are mandatory to automate with Google Sheet API.

Refresh Token

Google has refresh token limitation for every individual Oauth 2.0 authorization that expires every one hour. If the token has been expired, Robility’s App Integration service will refresh the authentication without any warning or disruptions during your automation execution. Even though Robility refreshes the token, at some certain circumstances, it requires re-connection with Google Sheet.

1. When you have revoked your access.
2. If the Google Sheet connection has not been utilized for six months after configuration.
3. If you have changed your Google account password and if the scopes for user have been changed.
4. If the user account has exceeded a maximum number of granted (100 live) refresh tokens.

Note: The limit is currently set to 100 refresh tokens per Google account per OAuth 2.0 client ID. This number can be subject to change. For the latest information, always check the Google documentation.

6.3.4 GoogleDrive

Robility® provides seamless integration with Google Drive, allowing users to automate a variety of document management tasks. With this feature, bots can interact with Google Drive to handle tasks like file uploads, downloads, organizing folders. It allows the robots to store any data and access the files easily and securely.

Key Features of Google Drive

1. File Operations: The API allows automated file management tasks, including uploading, downloading, updating, and deleting files within Google Drive.
2. Access Control: Automates the sharing of files and folders with specific users or groups by setting permissions (e.g., view, edit, or comment).
3. Real-Time Synchronization: Automatically syncs data between Google Drive and other platforms or local storage, ensuring up-to-date access to files.
4. File Search and Metadata: Provides automated search functionality to locate files based on name, type, or metadata, helping users retrieve documents faster.
5. Version Management: Bots can track and manage document versions, ensuring the latest versions are accessible and older versions are archived.

Use cases

1. Automated File Upload and Organization: Automatically upload documents to specific folders based on predefined rules.
2. Scheduled Backups: Bots can regularly back up critical documents from local storage to Google Drive.
3. Folder Management: Automates the creation, organization, and deletion of folders, keeping the file structure organized. 
4. Bots can download the specific file from Google Drive to extract and process data from the file, updating systems (e.g., CRM, ERP) and generating reports.

Pre – requisites

Building an automation workflow with Google Drive requires a connection in the “App Integration” menu in Robility Manager. There are two types of authentication that brings Google Drive into Robility,

  1. OAuth 2.0 Authorization code – Enables you to provide the Gmail account address and password that has been authenticated with defined scopes.
  2. OAuth 2.0 Client credentials – Enables you to provide your own Client ID, Client Secret and Scopes manually.

Once the connection has been enabled, you are all set to build your automation workflow.

Scopes

Scopes define what kind of data it accesses, and level of access needs to be provided. For detailed information, please check out the Google documentation. Below are the scopes that are mandatory to automate with Google Drive API.

Refresh Token

Google has refresh token limitation for every individual Oauth 2.0 authorization that expires every one hour. If the token has been expired, Robility’s App Integration service will refresh the authentication without any warning or disruptions during your automation execution. Even though Robility refreshes the token, at some certain circumstances, it requires re-connection with Google Drive.

1. When you have revoked your access.
2. If the Google Drive connection has not been utilized for six months after configuration.
3. If you have changed your Google account password and if the scopes for user have been changed.
4. If the user account has exceeded a maximum number of granted (100 live) refresh tokens.

Note: The limit is currently set to 100 refresh tokens per Google account per OAuth 2.0 client ID. This number can be subject to change. For the latest information, always check the Google documentation

6.4 AWS

6.4.1 AmazonRekognition

Introduction

Amazon Rekognition is a powerful cloud-based service that provides pre-trained and customizable computer vision capabilities. It enables businesses to extract information, detect objects, analyze images and videos, and gain valuable insights using advanced machine learning algorithms.

Benefits

1. Facial Recognition: Rekognition allows comparing faces in source and target images, enabling applications such as identity verification, access control, and personalized experiences.

2. Facial Analysis: Detect key facial features like emotions, age, gender, and facial expressions in input images, providing valuable insights for market research, customer analysis, and sentiment analysis.

3. Object Detection: Identify and detect objects present in images, supporting inventory management, security monitoring, and visual search applications.

4. Content Moderation: Detect evocative and provocative content in images, enabling content moderation and compliance with community guidelines and regulations.

5. Text Extraction: Recognize and extract text within images, including graffiti, license plates, clothing labels, product packaging, and more, enhancing data extraction and processing capabilities.

Use Cases

1. Retail and E-Commerce: Enhance product search and recommendation systems, detect counterfeit products, and monitor brand presence and compliance.

2. Media and Entertainment: Enable personalized content delivery, automate metadata tagging, and analyze audience engagement and sentiment.

3. Security and Surveillance: Monitor public spaces, detect unauthorized access, and identify suspicious activities for enhanced security and safety.

4. Healthcare: Analyze medical images for diagnostics, patient monitoring, and healthcare analytics, improving patient care and treatment outcomes.

5. Automotive: Enable autonomous driving capabilities, detect road signs, pedestrians, and obstacles for enhanced safety and navigation.

6. Document Analysis: Extract and process data from documents, invoices, forms, and receipts for automation, compliance, and data validation.

6.5 Common

6.5.1 WebClient Automation

Robility provides a range of activities integrated with the WebClient feature, designed to streamline communication with web servers and APIs. This feature empowers users to interact with web-based systems efficiently and perform various operations through HTTP-based requests.

The REST activity supports multiple request formats, including JSON, XML, Plain Text, and URL Encoded, allowing users to send and receive data using standard HTTP methods such as GET, POST, PUT, and DELETE. This versatility makes it ideal for interacting with modern RESTful APIs, enabling seamless integration with external systems for data exchange, automation, and process orchestration.

The SOAP activity is specifically tailored for environments using SOAP-based web services. It allows users to communicate with web services that rely on XML-based protocols, enabling them to send structured requests and receive responses. By facilitating interaction across different programming languages and systems, this activity ensures compatibility with a wide range of legacy and enterprise-grade applications.

Together, these features enable Robility users to integrate diverse web services into their workflows, bridging the gap between automated processes and external systems, enhancing flexibility, and streamlining operations. Whether working with modern REST APIs or traditional SOAP-based systems, Robility’s WebClient activities provide robust tools to handle web service interactions efficiently.

6.5.2 Python Automation

Introduction

The Python automation package allows you to invoke and execute a Python script wherever necessary within the automation process flow. This functionality is provided by the RunPythonScript component in the Robility , which is part of the Python Automation package.

Moreover, it simplifies the management of Python scripts by centralizing them within RobilityDesigner. As a result, users can efficiently harness the power of Python automation to optimize their tasks and achieve greater productivity.

Pre-requisites

1. Ensure that your Python script is indented correctly to avoid indentation during runtime. When passing a variable name as the value for an argument, the names must match. For example, if the argument name is ‘Sample,’ the variable name should also be ‘Sample.’ Failure to match the names will result in a mismatch error being thrown. 
2. The Python functionality in Robility requires the “Python.exe” file to execute the process, and this file will be automatically installed when you install the feature. Refer the attached sample Python file to view how to parse arguments in the script.

Benefits

1.  Customization: You can create custom Python scripts to handle specific tasks or scenarios that might be challenging with native Robility activities, giving you more control and flexibility.
2.  Integration: Python can easily integrate with external APIs, databases, and web services, enabling you to connect your workflows to a broader array of systems and data sources.
3.  Machine Learning: You can incorporate machine learning models and algorithms to make data-driven decisions and predictions within your workflow.
4.  Performance: Python is known for its performance, making it suitable for handling large datasets and computationally intensive tasks.

Use Cases

1. Data Manipulation and Analysis: Python can be used to clean, transform, and analyze data before or after processing it. This is particularly useful for tasks involving Excel spreadsheets, CSV files, or databases.
2. Image and Video Processing: You can employ Python libraries such as OpenCV to work with images and videos within the workflows. This is valuable for tasks like image recognition, object detection, or video processing.
3. Machine Learning Integration: Integrate machine learning models trained in Python into your automation bot to automate decision making processes, such as fraud detection or recommendation systems.
4. Database Interaction: Python can connect to various databases (SQL, NoSQL) to perform data extraction, transformation, and loading tasks as part of your workflows.
5. Automating Script Execution: Execute Python scripts at specific points in your automation to perform specialized calculations or tasks

6.5.3 PowerShell

Introduction

PowerShell is a cross-platform framework that enables the execution of scripts and commands to automate various tasks, manage system configurations, and interact with different applications and services. It is highly versatile, providing powerful scripting capabilities, access to system administration tools, and seamless integration with the Windows operating system.

Pre-Requisites

1. Microsoft Windows system (Windows 7, 8 ,10) with the ability to open either PowerShell or PowerShell Integrated Scripting Environment (ISE)
2. Ability to set the execution policy (set-executionpolicy) either to unrestricted or bypass. This will require administrative rights.

Benefits

1. Automation of Repetitive Tasks: Enables the automation of repetitive and time-consuming tasks, reducing manual intervention and increasing efficiency in system administration and automation processes.
2. Scripting Capabilities: With a robust scripting language, PowerShell allows users to create complex automation scripts for managing and configuring systems, applications, and services.
3. Versatility and Integration: PowerShell is highly versatile and integrates seamlessly with other Microsoft technologies and services. It can interact with various applications, databases, and APIs, making it a powerful tool.
4. Remote Management: It supports remote management, allowing administrators to execute commands and scripts on remote computers. This is valuable for managing distributed systems and environments.

Use Cases

1. File and Folder Operations: Automate file and folder management tasks using PowerShell script such as Move, copy, rename, or delete files and folders based on certain conditions.
2. System Administration: Perform administrative tasks on Windows systems such as Create, modify, or delete user accounts; manage services and processes; configure network settings.
3. Application Installation and Updates: Automate the installation and updating of applications. Script the silent installation of software packages or updates.
4. Data Extraction and Transformation: Extract data from different sources and transform it for further processing such as Parse log files, extract relevant information, and format it for reporting.
5. Task Automation: Schedule PowerShell scripts using Task Scheduler to run at specific times for routine maintenance or data collection.

6.5.4 Invoke

Introduction

The ‘Invoke’ feature in Robility refers to the capability of calling or executing external workflows, DLLs, templates, or activities within a main workflow. This powerful feature enables you to modularize your automation projects and create a more organized and efficient automation process. 

Uses of Invoke feature

1. Modularization: The “Invoke” feature breaks complex automation processes into manageable modules, improving organization and maintenance.

2. Reusability: “Invoke” creates reusable components for multiple projects, such as login workflows shared across automation projects.

3. Dynamic Decision Making: “Invoke” calls workflows based on dynamic conditions, enabling runtime adaptability.

4. Library Management: Robility supports invoking libraries, containing reusable workflows and DLLs, saving development time.

5. Integration: Use “Invoke” for external processes like running scripts, enhancing system interactions beyond native Robility support.

6.5.5 InvokeCode

This activity helps users to extend the functionality of their automation processes by integrating custom C# and VB.Net code. By integrating custom scripts, users can elevate their workflows with advanced functionalities crafted to their precise requirements.

Key Features

1. Code Execution: Run C# and VB.Net code snippets within the workflow without the need for external applications.
2. Error Handling: Built-in mechanisms to handle exceptions and errors that may occur during code execution.
3. Parameter Support: Pass variables and arguments to and from the code, enabling dynamic interactions and data exchange.

Limitations

1. The main method must be static in C# and shared in VB.NET.
2. Arguments passed to the main method are not supported.
a. The main method is the entry point of a program where execution begins. However, in this activity, passing arguments to the main method is not be supported.
3. Using “InvokeArguments” as the class name is not recommended because it should be reserved for identifying arguments that are either passed as input or output values within the code.
4. The argument name should not be a reserved keywords used in the code to avoid compilation errors.
5. When importing or copying the activity from one solution to another, the code text file available in the source solution path will not be copied to the destination solution path. You need to manually copy and paste the code text file to the destination path. 

Properties

INPUT

Language: This parameter specifies the language of the code being written in the “InputCode” field. Choose from the following options in the drop-down menu:
CSharp: Allows the user to input code in C# language.
VBNet: Allows the user to input code in VB.NET language. By default, the option will be “CSharp”. 

MISC

DisplayName: Displays the name of the activity. The activity name can be customized, which aids in troubleshooting.

SkipOnError: Specify the “Boolean” value as “True” or “False.”
True: Continue executing the workflow regardless of any errors thrown.
False: Halt the workflow if it encounters any errors.
None: If the option is left blank, the activity will, by default, behave as if “False” were chosen.

Version: It indicates the version of the feature being used.

OUTPUT

Result: It provides the ability to view the execution status of the activity. It returns values in “Boolean.”
True: Indicates that the activity has been executed successfully without any errors.
False: Indicates that the activity has been unsuccessful due to an unexpected error being thrown.

How to provide the code into the activity?

1. Drag and drop the “InvokeCode” activity and set it as the start node.
2. Double-click on the activity.
3. Click on the three lines in the activity and select the “Edit Code” option.
a. This option allows you to provide, modify, or change the code.
b. Another window labeled “Invoke Code” will be launched.
c. Enter your code here and click on the “Save” button.
4. The code will be displayed in the “InputCode” display area and will be non-editable.
5. To edit the code, you can follow the same steps. 

6.6 FacePlusPlus

Introduction

FacePlusPlus is an advanced facial recognition and analysis platform that offers precise detection and location of human faces within images. It provides high-precision face bounding boxes, making it easy to identify and analyze faces accurately. 

With FacePlusPlus, users can perform a range of automation tasks, including creating and deleting face tokens and face sets. This flexibility in managing facial data supports various applications such as identity verification, access control, and authentication processes.

Benefits

1. Face Detection: FacePlusPlus offers high-precision face detection capabilities, accurately locating human faces within images and providing bounding boxes for easy identification.

2. Metadata Storage: The ability to store metadata of detected faces enables future use and reference, enhancing data management and analysis capabilities.

3. Face Token Management: FacePlusPlus allows the creation and deletion of face tokens and face sets, providing flexibility in managing and organizing facial data.

4. Face Comparison: Perform face comparison tasks to verify identity, authenticate users, or detect duplicate entries, ensuring security and accuracy in identity verification processes.

5. Face Detection and Analysis: Detect and analyze faces within images for various attributes such as age, gender, emotions, facial expressions, and demographics, providing valuable insights for marketing, customer analysis, and personalized experiences.

Use Cases

1. Identity Verification: Use FacePlusPlus for identity verification in applications such as access control systems, secure login procedures, and identity authentication processes.

2. Security and Surveillance: Employ FacePlusPlus for security and surveillance applications, detecting and tracking faces in real-time for threat detection, visitor management, and perimeter security.

3. Automated Attendance Tracking: Integrate FacePlusPlus with RPA to automate attendance tracking in schools, workplaces, or events. RPA bots can use facial recognition to identify and record attendance, streamlining administrative processes.

4. Customer Verification in Banking: Use FacePlusPlus within RPA solutions in the banking sector for customer verification during account opening, loan processing, or transaction authorization. RPA bots can automate the verification process using facial recognition.

5. Fraud Detection and Prevention: Use FacePlusPlus with RPA to detect and prevent fraud in various industries such as finance, insurance, and e-commerce. RPA bots can analyze facial data to identify suspicious activities or transactions, triggering automated fraud prevention measures.

6.6.1 FPPScope

The FPP scope is the activity where we add the API key, API secret and end point for us to continue with any other activities under the FacePlusPlus feature.
Click on the link below to get your API key and API Secret Face⁺⁺ – Doc Center (faceplusplus.com)

Properties

AUTHENTICATION

ApiKey:* Specify the API key displayed at the time of registration.

ApiSecret:* Specify the ApiSecret displayed at the time of registration.

RegionEndPoint: Choose from the drop down as displayed at the time of registration

MISC

Body: This part remains empty and auto populates when a FPP activity is dragges and dropped into it.

Display Name: Displays the name of the activity. You can also customize the activity name to help troubleshoot issues faster. This name will be used for logging purposes.

SkipOnError: It specifies whether to continue executing the workflow even if it throws an error. This supports only Boolean value “True or False”. By default, it is set to “False”
True: Continues the workflow to the next step
False: Stops the workflow and throws an error.

Version: It specifies the version of the FacePlusPlus feature in use

* Represents mandatory fields to execute the workflow.

6.6.2 AddFacetoFaceset

This activity is used to add the generated face tokens from face detection activity to the generated face token set from the create face set activity.

Properties

INPUT

FaceSetToken:* Enter the faceset token generated from the create face set activity.

Face Tokens: * Enter the variable declared for the face tokens.

Parameter1: Specify whether you are going to add the faceset token or Outer ID.

MISC

Display Name: Displays the name of the activity. You can also customize the activity name to help troubleshoot issues faster. This name will be used for logging purposes.

SkipOnError: It specifies whether to continue executing the workflow even if it throws an error. This supports only Boolean value “True or False”. By default, it is set to “False.”
True: Continues the workflow to the next step
False: Stops the workflow and throws an error.

Version: It specifies the version of the FacePlusPlus feature in use.

OUTPUT

Output: This is not a mandatory field. However, to view the output a variable must be declared here.

ResultDeclare a variable here to validate the activity. It accepts only Boolean value. This is not a mandatory field.

* Represents mandatory fields to execute the workflow.

6.6.3 CreateFaceset

This activity is used to create a face set (which acts like a folder) into which a number of face tokens can be added (Which acts like a file).

Properties

INPUT

FaceSetDisplayName Specify the name of the face set. No more than 256 characters must be given, and it must not contain special characters ^@, &=*’”.

FaceSetID: Specify the custom unique ID of faceset under your account which is the Outer ID of the faceset.

FaceTokens:  Specify the face tokens required to be added to the created face set. No more than 5 tokens can be added, and it can be separated using a comma.

Tags: Specify the face custom tag, used for categorizing Faceset, comma separated. only 255 characters can be used and must not contain special characters ^@,&=*’”

UserData: Specify the customer user information.

MISC 

Display Name: Displays the name of the activity. You can also customize the activity name to help troubleshoot issues faster. This name will be used for logging purposes.

SkipOnError:It specifies whether to continue executing the workflow even if it throws an error. This supports only Boolean value “True or False”. By default, it is set to “False”
True: Continues the workflow to the next step
False: Stops the workflow and throws an error.

Version: It specifies the version of the FacePlusPlus feature in use.

OUTPUT

Output:* Declare a variable here to see the result in an output box.

Result: Declare a variable here to validate the activity. It accepts only Boolean value. This is not a mandatory field.

* Represent mandatory fields to execute the workflow.

6.6.4 DeleteFaceset

This activity is used to delete a faceset using the faceset token.

Properties

INPUT

FaceSetID: Specify the face set token that has to be deleted.

Parameter1: Specify if the above-mentioned detail is a faceset token or an outer ID.

MISC 

Display Name: Displays the name of the activity. You can also customize the activity name to help troubleshoot issues faster. This name will be used for logging purposes.

SkipOnError: It specifies whether to continue executing the workflow even if it throws an error. This supports only Boolean value “True or False”. By default, it is set to “False.”
True: Continues the workflow to the next step
False: Stops the workflow and throws an error.

Version: It specifies the version of the FacePlusPlus feature in use

OUTPUT

Output:* This is not a mandatory field. However, to see if the faceset has been deleted declare a variable here to see the result in an output b

Result: Declare a variable here to validate the activity. It accepts only Boolean value. This is not a mandatory field.

* Mandatory fields to execute the workflow.

6.6.5 FaceAnalyze

This activity is used to analyze the face and get the face attributes by passing its face token which is generated from the face detection activity. Face analyze can process up to 5 face tokens at a time.

Properties

INPUT

FaceTokenList: Specify the variable declared in the variable box as list<String> to analyze the face.

MISC 

Display Name: Displays the name of the activity. You can also customize the activity name to help troubleshoot issues faster. This name will be used for logging purposes.

SkipOnError: It specifies whether to continue executing the workflow even if it throws an error. This supports only Boolean value “True or False”. By default, it is set to “False.”

True: Continues the workflow to the next step
False: Stops the workflow and throws an error

Version: It specifies the version of the FacePlusPlus feature in use.

OUTPUT

Output: * This is not a mandatory field. However, to view the result of the analyzed face, declare a variable here.

Result: Declare a Boolean value here to validate the success state of the activity. This is not a mandatory field.

* Mandatory fields to execute the workflow.

6.6.6 FaceCompare

This activity is used when we want to check the likelihood that two faces belong to the same person. You will get a confidence score and thresholds to evaluate the similarity. With Face Compare, you can easily verify a user against a reference photo.

Properties

INPUT

ImagePath1: * Specify the path of the first image.

ImagePath2: * Specify the path of the second image.

Parameter1: Specify the type of file 1.

Parameter2: Specify the type of file 2.

MISC 

Display Name: Displays the name of the activity. You can also customize the activity name to help troubleshoot issues faster. This name will be used for logging purposes.

SkipOnError: It specifies whether to continue executing the workflow even if it throws an error. This supports only Boolean value “True or False”. By default, it is set to “False.”
True: Continues the workflow to the next step
False: Stops the workflow and throws an error.

Version:It specifies the version of the FacePlusPlus feature in use

OUTPUT

Output: This is not a mandatory field. However, to see the result of the activity, a variable must be declared here.

Result: Declare a variable here to validate the activity. It accepts only Boolean value. This is not a mandatory field.

* Represents mandatory fields to execute the workflow.

6.6.7 FaceDetection

This activity is used to create a face token for a specified image which needs to be added to the face set token.

Properties

INPUT

ImagePath:* Specify the path of the image for which the face token is required.

Parameter: Choose the parameter from the drop down.

MISC 

Display Name: Displays the name of the activity. You can also customize the activity name to help troubleshoot issues faster. This name will be used for logging purposes.

SkipOnError: It specifies whether to continue executing the workflow even if it throws an error. This supports only Boolean value “True or False”. By default, it is set to “False”
True: Continues the workflow to the next step
False: Stops the workflow and throws an error.

Version: It specifies the version of the FacePlusPlus feature in use.

OUTPUT

Output: This is not a mandatory field. However, to view the created face token, declare a variable here

Result: Declare a Boolean value here to validate the success state of the activity. This is not a mandatory field.

* Mandatory fields to execute the workflow.

6.6.8 FaceGetDetails

This activity is used to get the face details of a given face. We can derive the image ID and the face token to which it belongs.

Properties

INPUT

FaceToken:* Specify the face token for which the details are required.

MISC 

Display Name: Displays the name of the activity. You can also customize the activity name to help troubleshoot issues faster. This name will be used for logging purposes.

SkipOnError: It specifies whether to continue executing the workflow even if it throws an error. This supports only Boolean value “True or False”. By default, it is set to “False.”
True: Continues the workflow to the next step
False: Stops the workflow and throws an error.

Version: It specifies the version of the FacePlusPlus feature in use.

OUTPUT

Output: This is not a mandatory field. However, to see the result of the activity, a variable must be declared here.

Result: Declare a variable here to validate the activity. It accepts only Boolean value. This is not a mandatory field.

* Represents mandatory fields to execute the workflow.

6.6.9 FacesetUserID

This activity is used to set a user ID for a face token in a face set token. The face set user ID is used for the convenience of the user.

Properties

INPUT

FaceToken:* Specify the face token of the detected face.

User ID:* Enter any user ID for the face token.

MISC 

Display Name: Displays the name of the activity. You can also customize the activity name to help troubleshoot issues faster. This name will be used for logging purposes.

SkipOnError:It specifies whether to continue executing the workflow even if it throws an error. This supports only Boolean value “True or False”. By default, it is set to “False.”
True: Continues the workflow to the next step
False: Stops the workflow and throws an error.

Version: It specifies the version of the FacePlusPlus feature in use.

OUTPUT

Output: This is not a mandatory field. However, to see the result of the activity, a variable must be declared here.

Result: Declare a variable here to validate the activity. It accepts only Boolean value. This is not a mandatory field.

* Represents mandatory fields to execute the workflow.

6.6.10 GetFacesetDetails

This activity is used to get the face set details of the given face set token. It helps us get the information about outer Display name, Number of faces in the face set token, Face token for each face, etc.

Properties

INPUT

FaceSetToken:* Specify the face token for which the details are required.

Parameter1: Specify if the above given value is a face set or an outer ID.

MISC 

Display Name: Displays the name of the activity. You can also customize the activity name to help troubleshoot issues faster. This name will be used for logging purposes.

SkipOnError: It specifies whether to continue executing the workflow even if it throws an error. This supports only Boolean value “True or False”. By default, it is set to “False.”
True: Continues the workflow to the next step
False: Stops the workflow and throws an error.

Version: It specifies the version of the FacePlusPlus feature in use.

OUTPUT

Output: This is not a mandatory field. However, to view the result of the activity, declare a variable here.

Result: Declare a Boolean value here to validate the success state of the activity. This is not a mandatory field.

* Represents mandatory fields to execute the workflow.

6.6.11 GetFacesets

This activity is used to get the face set details of the given face set token. It helps us get the information about outer Display name,Number of faces in the face set token, Face token for
each face, etc.

Properties

INPUT

FaceSetToken: Specify the face token for which the details are required.

Parameter1: Specify if the above given value is a face set or an outer ID

MISC 

Display Name: Displays the name of the activity. You can also customize the activity name to help troubleshoot issues faster. This name will be used for logging purposes.

SkipOnError:It specifies whether to continue executing the workflow even if it throws an error. This supports only Boolean value “True or False”. By default, it is set to “False.”
True: Continues the workflow to the next step
False: Stops the workflow and throws an error.

Version: It specifies the version of the FacePlusPlus feature in use.

OUTPUT

Output:* This is not a mandatory field. However, to view the result of the activity, declare a variable here.

Result: Declare a Boolean value here to validate the success state of the activity. This is not a mandatory field.

* Represents mandatory fields to execute the workflow.

6.6.12 RemoveFacefromFaceset

This activity is used to remove a face token from a face set token.

Properties

INPUT

FaceSetToken:*  Specify the face set token from which the face token must be removed.

FaceTokens:*  Enter the variable declared for the face tokens in the variable box.

Parameter1: Specify whether you are going to add the faceset token or Outer ID.

MISC 

Display Name: Displays the name of the activity. You can also customize the activity name to help troubleshoot issues faster. This name will be used for logging purposes.

SkipOnError: It specifies whether to continue executing the workflow even if it throws an error. This supports only Boolean value “True or False”. By default, it is set to “False.”
True: Continues the workflow to the next step
False: Stops the workflow and throws an error.

Version: It specifies the version of the FacePlusPlus feature in use.

OUTPUT

Output: This is not a mandatory field. However, to view if the face token has been from the face set token, declare a variable here.

Result: Declare a Boolean value here to validate the success state of the activity. This is not a mandatory field.

* Represents mandatory fields to execute the workflow.

6.6.13 UpdateFaceset

This activity is used to update the name of a face set ID (Outer ID).

Properties

INPUT

FaceSetID:* Existing Outer ID of the faceset.

NewFaceSetId:* New outer ID of the faceset.

Parameter1Specify if the face set IF given is an outer ID or face set token.

Parameter2Specify if the new ID is an outer ID, display name or User data.

MISC 

Display Name: Displays the name of the activity. You can also customize the activity name to help troubleshoot issues faster. This name will be used for logging purposes.

SkipOnError:It specifies whether to continue executing the workflow even if it throws an error. This supports only Boolean value “True or False”. By default, it is set to “False.”
True: Continues the workflow to the next step
False: Stops the workflow and throws an error.

Version: It specifies the version of the FacePlusPlus feature in use.

OUTPUT

Output: This is not a mandatory field. However, to view the updated faceset, declare a variable here.

Result: Declare a Boolean value here to validate the success state of the activity. This is not a mandatory field.

* Represents mandatory fields to execute the workflow.

6.7 Interact

RobilityInteract’ s advanced features make it a powerful tool for businesses seeking to enhance their automation processes. Its seamless collaboration between humans and robots ensures uninterrupted workflow. With its robust and flexible module, RobilityInteract can effortlessly capture and process bulk data, streamlining complex tasks. Moreover, its responsive webform allows users to interact with robots effortlessly, making automation more accessible and efficient. Whether it’s data management or task execution, RobilityInteract is your solution for a smoother and more productive automation journey.

Benefits of Interact

1. RobilityInteract goes beyond facilitating human-robot collaboration; it also provides real-time tracking and progress monitoring for automation processes.
2.
This feature allows users to stay informed about the status of ongoing tasks and make necessary adjustments on the fly.
3. With the ability to track and analyze the automation process in real time, businesses can optimize their operations, identify bottlenecks, and ensure a seamless workflow.
4. RobilityInteract is the comprehensive solution for achieving efficiency, transparency, and control in your automated processes.
5. RobilityInteract deploys Web Service APIs to send \ receive transactional information securely over networks.

Do’s & Don’ts

There are a few requirements that apply for a valid JSON format to be input.

1. The input values supports only “Json” string values or “String” variables.
2. The parameters and values need to be in “Single quotes”.
3. The values within JSON are presented as “JsonObject,” and “Variable,” all of which should commence and conclude with double quotes.
4. It starts and ends with a square bracket.
5. To provide a variable inside the “Json” format, add the variable as represented here – ‘Field Name’: ‘”+Variable+” ‘.
6. The path of the “String” file that contains the Json values cannot be provided as input.
7. Array values can also be provided in the string as represented here – “[{‘Documents’: [{‘Pdf’:”,’Word’:”,’Image’:”}]}]”
8. The “Json” format cannot be provided in multiple lines in the “Input String” property box. Refer the below image.

Sample

Below is the sample valid format of the “Json” format that has been hardcoded as input string here,

“[{ ‘Field Name’ : ‘ Field value ‘, ‘Field Name 2’ : ‘” +Variable+” ‘,
‘Field Name 3’ : ‘Field Value’, Photo’:” ,’Documents’:[{‘Pdf’:”,’Word’:”,’Image’:”}]}]”

BatchID vs URN

Let’s say that when transactions are uploaded as “Bulk” on the “Interact” page using the “Multiple Transactions” option, the “ID” for these transactions will be generated as “BatchID” to represent them.

1. BatchID consists of 16 serial numbers that represent the transaction.
2. Using this BatchID, users will be able to retrieve the fields and their values associated with the transaction.
3. The “BatchID” will also be generated when the transactions are uploaded individually through “Single Transaction” option.
4. It will be same number when the transactions are uploaded through “Bulk” option and will be different when the transactions are uploaded through individually. 

Now, each transaction will also be assigned a unique number.

1. This unique number will differ for each transaction when uploaded either individually (“Single”) or in bulk (“Multiple” transactions).
2. The unique number will be represented as “URN” (Unique Reference Number) on the “Review page” in the “Interact”.
3. It will be represented with a “Hyperlink” option which helps the user to navigate to view the “details” uploaded against each transaction.

6.7.1 Release Notes

v1.5.5

This release includes stability improvements to Interact activities.

Bug Fix:

Resolved an issue where the AddTransaction activity could intermittently fail during bot execution in the Runner, resulting in a “One or more errors occurred” exception. The activity has been stabilized to improve execution reliability.

Released Date: 06/07/2026

6.7.2 BulkUploadTransaction

This feature allows users to add multiple transaction records at once to a target queue in Interact by uploading a .csv or .xlsx file containing the records.

Prerequisites

1. The target queue in Robility Manager must have the required fields enabled with the Edit option to allow transaction uploads.
2. You can download a sample Excel file from the target queue in Robility Manager, which contains all the required fields for that queue.
3. Use this file to enter the required details before uploading transactions.
4. Each queue has its own sample Excel file reflecting the specific fields configured for that queue.

Limitations

DataTable and Attachment field types are not supported when uploading Queue transactions through Bulk Upload.

Properties

INPUT

Attachments*: Specify the file path of the record file as a string. The file must be in .csv or .xlsx format and the file size must not exceed 2 MB.

Queue Name*: Provide the exact queue name as a string where the uploaded transactions will be routed.

MISC

DisplayName: Displays the name of the activity. This name can be customized for better readability and troubleshooting.

SkipOnError: Specify a Boolean value (True or False).
True – Continue executing the workflow regardless of any errors encountered.
False – Halt the workflow if any errors occur.
None – If left blank, the activity defaults to False.

Version: Displays the version of the activity being used. This field is auto-populated and read-only.

OUTPUT

Result: Indicates the execution status of the activity. Returns Boolean values.
True – The activity executed successfully without any errors.
False – The activity failed due to an unexpected error.

Upload Message Content: Returns the system response message as a string, providing details about the upload result or any errors.

Upload Status: Returns the status of the uploaded file as a string.
Success – The file was uploaded successfully without any errors.
Failed – The file upload failed due to an unexpected error.
* Represents mandatory fields required to execute the workflow.

Troubleshooting

Field Mismatch or Changes in Robility Manager

Uploading errors may occur if the fields in the target queue in Robility Manager are modified (renamed, removed, or new fields are added).

Resolution

1. If the fields in the target queue are changed, download a new sample Excel file from the queue before performing the upload.
2. Ensure that the sample Excel file used for uploads matches the current fields of the target queue in Robility Manager.
3. Re-prepare the data using the latest sample file and proceed with the upload.

6.7.3 CheckDuplicateTransaction

This activity helps the user check for duplicate transactions among those that have already been indexed.

Properties

INPUT

InputParameters:* This parameter helps you to provide the “inputs” that are required to check against the fields in the transactions during the execution. This parameter accepts collection of argument types.

MISC

DisplayName: Displays the name of the activity. The activity name can be customized, which aids in troubleshooting.

SkipOnError: Specify the “Boolean” value as “True” or “False.”
True: Continue executing the workflow regardless of any errors thrown.
False: Halt the workflow if it encounters any errors.
None: If the option is left blank, the activity will, by default, behave as if “False” were chosen.

Version: It indicates the version of the feature being used.

RESULT

JsonData:It helps to view the response as  “status” from the service for created transaction. It returns in the values in “String” datatype.

Result: It provides the ability to view the execution status of the activity. It returns values in “Boolean.”
True: Indicates that the activity has been executed successfully without any errors.
False: Indicates that the activity has been unsuccessful due to an unexpected error being thrown.

Represents mandatory fields to execute the workflow

6.7.4 GetMasterData

This activity helps the user extract the “Master Data” uploaded in the “Interact” module during project configuration.

Limitation:

1. Supports only Excel file formats (.xlsx and .xls).

Properties

INPUT

DownloadFilePath:* Indicates to provide the “FilePath” to download the “MasterData” available in the “Interact”. You can either hardcode the values in “String” datatype or can enter the values in “String”. This parameter accepts values in “String” datatype.

FileName:* Indicates the name of the “Masterdata” created during the configuration of the “Project” in “Interact.” The value can be hardcoded or provided dynamically using the String datatype. Ensure the file name includes a valid Excel extension, such as .xlsx or .xls, as only these formats are supported.

FileOverWrite: Indicates to overwrite the “Files” that are being downloaded from the “Interact” in the specified path. By default, the box will be “checked”

MISC

DisplayName: Displays the name of the activity. The activity name can be customized, which aids in troubleshooting.

SkipOnError: Specify the “Boolean” value as “True” or “False.”
True: Continue executing the workflow regardless of any errors thrown.
False: Halt the workflow if it encounters any errors.
None: If the option is left blank, the activity will, by default, behave as if “False” were chosen.

Version: It indicates the version of the feature being used.

RESULT

Result: It provides the ability to view the execution status of the activity. It returns values in “Boolean.”
True: Indicates that the activity has been executed successfully without any errors.
False: Indicates that the activity has been unsuccessful due to an unexpected error being thrown.

Represents mandatory fields to execute the workflow

6.7.5 AddTransaction

This activity assists users in adding a new transaction to the specified queue name in their project during runtime. The added transaction will be visible on the “SmartInteract” page in the “Robility Manager”.

When to use?

After configuring the project, we require transactions to initiate and complete the intended automation process. You can add transactions either manually or through an activity. To learn how to add transactions to the Interact project, please refer the documentation example for guidance. The transactions are nothing, but a field and it values against for which each BatchID and URN will be created.

Properties

INPUT

AttachmentsFieldName: This parameter indicates to provide the “FieldName” of the Attachment if any created in the Interact. This field name can be extracted from “SmartInteract” in Manager. Refer the below document. You can either hardcode the values in “String” datatype or can enter the values in “String”. When left blank, it will not be considered. This parameter accepts values in “String” datatype.

InputParameters:* This parameter helps you to provide the “inputs” that are required to pass against the fields in the Project during the execution. This parameter accepts collection of argument types.
Refer the below documentation to pass the values.

Json: *To create transactions, you should provide the “Json” string to the Project. The sample “JsonString” can be extracted from “SmartInteract” in Manager. It will incorporate with the values passed in the “InputParameters” field and creates a transaction. This parameter accepts values in “String” datatype. You can either hardcode the values in “String” datatype or can enter the values in “String”. The “InputString” must be in “Json” format. (Refer the tips below)

QueueName:* Indicates to provide the “Queue” name from the “Project” against which the “transaction” needs to be added. This parameter accepts values “String” datatype.

MISC

DisplayName: Displays the name of the activity. The activity name can be customized, which aids in troubleshooting.

SkipOnError: Specify the “Boolean” value as “True” or “False.”
True: Continue executing the workflow regardless of any errors thrown.
False: Halt the workflow if it encounters any errors.
None: If the option is left blank, the activity will, by default, behave as if “False” were chosen.

Version: It indicates the version of the feature being used.

OUTPUT

BatchID:* It helps to extract the “BatchId” of the created transaction as output. It returns in the values in “String” datatype.

ResponseValue:* It helps to view the response as “status” from the service for created transaction. It returns in the values in “String” datatype.

Result: It provides the ability to view the execution status of the activity. It returns values in “Boolean.”
True: Indicates that the activity has been executed successfully without any errors.
False: Indicates that the activity has been unsuccessful due to an unexpected error being thrown.

URN:* It helps to extract the “URN” of the created transaction as output. It returns in the values in “String” datatype.

Represents mandatory fields to execute the workflow. 

Configuring Interact key

After configuring the project details on the “RobilityManager” for the transactions, the “Interact key” for the respective project will be configured.

Follow the below steps to find the “Interact key” in the Designer.

1. Launch the Designer and create a solution named as “Interact Automation”.
2. To access the “Interact Key,” select the corresponding project from the “Publish” section located at the bottom of the Designer. This selection should align with the project for which the “Interact” has been configured. The default setting for the publish option is “This PC” (as demonstrated in the GIF below).
3. Upon selecting the project, the “key” will be integrated into the solution explorer.
4. The “Interact” key is the essential part here for the automation, which eliminates the need of the “Project name, Process and Username” to configure the details into the “queues”.

Json Format

The input string can either be hardcoded or you can input the “String” variable that contains the “Json” format. The sample Json format will be available in the “Interact” page under “Project configuration” menu. You will find the json string in “Queues” step against the queue name.

Where to find?

The Sample Json string customized according to your field names can be extracted from the “Interact page”. Follow the below steps to know:

1. Login to the “Robility Manager” and navigate to your project that configured Interact.
2. Click on the “SmartInteract” option.
3. Navigate to the “Project Configuration” menu and go the “Queues” step.
4. On the right-hand side, you can see the “Queues” name configured.
5. You can find the “JsonString” copy against the queue names.
6. Copy it and save it to your local or you can input as value to a variable.

Uploading Attachments

To upload the attachments such as image, word, excel, pdf etc., to your project in “Interact”, you need to configure a field with either “File Upload” or “Picture box” field type to add the attachments to the transaction. Ensure that these fields are accessible against the queues that the transactions are being added. Follow the below steps,

1. Login to the “Smart Interact” page.
2. Create a field to upload the attachments.
3. Now, navigate to the “Queues” step and create the queues to process your transactions.
4. Once configured, provide the field access to the “queue” against which you need to upload the attachment.
5. Now, on the right-hand side, you can find the “Attachments” column enabled against the queue name.
6. Copy it and save the field name to pass it in the activity.
7. Click here to know how the “Attachments” is passed in the activity

6.7.6 GetTransaction

This activity assists the user in extracting details from the created transactions associated with the specified ‘Batch ID and URN’ found in the queue on the ‘Interact’ page.

Properties

INPUT

AttachmentsFieldName: This parameter indicates to provide the “FieldName” of the Attachment if any created in the Interact. This field name can be extracted from “SmartInteract” in Manager. Refer the below document. You can either hardcode the values in “String” datatype or can enter the values in “String”. When left blank, it will not be considered. This parameter accepts values in “String” datatype.

DataTableFieldName: This parameter indicates to provide the “FieldName” of the “Table” or “Group” if any created in the Interact. This field name can be extracted from “SmartInteract” in Manager. Refer the below document. You can either hardcode the values in “String” datatype or can enter the values in “String”. When left blank, it will not be considered. This parameter accepts values in “String” datatype.

DownloadFilePath: Indicates to provide the “FilePath” to download the attachments against the field, if any available in the “Interact”. You can either hardcode the values in “String” datatype or can enter the values in “String”. When left blank, it will not be considered. This parameter accepts values in “String” datatype.

FileOverWrite: Indicates to overwrite the “Files” that are being downloaded from the “Interact” in the specified path. By default, the box will be “checked”.

InputParameters:* This parameter helps you to provide the “inputs” that are required to pass against the fields in the Project during the execution. This parameter accepts collection of argument types.
Refer the below documentation to pass the values.

QueueName:* Indicates to provide the “Queue” name from the “Project” against which the “transaction” needs to be added. This parameter accepts values “String” datatype.

MISC

DisplayName: Displays the name of the activity. The activity name can be customized, which aids in troubleshooting.

SkipOnError: Specify the “Boolean” value as “True” or “False.”
True: Continue executing the workflow regardless of any errors thrown.
False: Halt the workflow if it encounters any errors.
None: If the option is left blank, the activity will, by default, behave as if “False” were chosen.

Version: It indicates the version of the feature being used.

OUTPUT

JsonData:* It helps to view the output of the activity as “Json String” for the extracted transactions. It returns in the values in “String” datatype.

OutputDataset:* It helps to view the output of the activity as “Dataset” if there are any tables or group available in the extracted transactions. It returns in the values in “Dataset” datatype.

Result: It provides the ability to view the execution status of the activity. It returns values in “Boolean.”
True: Indicates that the activity has been executed successfully without any errors.
False: Indicates that the activity has been unsuccessful due to an unexpected error being thrown.

URN:It helps to extract the “URN” of the created transaction as output. It returns in the values in “String” datatype.

Represents mandatory fields to execute the workflow

6.7.7 GetTransactionCount

This activity allows the user to fetch the transaction count for “New” and “locked” status from the connected project in Interact.

Properties

INPUT

FromDate: Specifies the starting date from which transaction count needs to be retrieved, based on the provided Status. Accepts values in String datatype. 

Tips

You can use DateTime.Now.ToString(“yyyy/MM/dd”) to enter the current date and retrieve the transaction count.

QueueName: *Specify the “Queue Name” to retrieve the transaction count for the specified queue Accepts values in String datatype.

QueueType: Specify the “QueueType to retrieve the transaction count for the specified queue. Accepts values in String datatype.

a. Processing
b. Business exception
c. System exception
d. Rejected
e. Completed
f. Harmony AI queues.

Status: *Specifies the Status of the transactions in Interact to fetch the count against it. Supported statuses are:

New: Fetches the count of transactions in the New state.
Locked: Fetches the count of transactions in the Locked state.
To fetch the count of transactions from both status at one time, you can use the following,
a. NewLocked
b. Both

You can either hardcode the values or provide them as input in String datatype.

ToDate: Specifies the end date until which transaction count should be retrieved, based on the provided Status. Accepts values in String datatype.

Tips

You can use DateTime.Now.ToString(“yyyy/MM/dd”) to enter the current date and retrieve the transaction count.

MISC

DisplayName: Displays the name of the activity. The activity name can be customized, which aids in troubleshooting.

SkipOnError: Specify the “Boolean” value as “True” or “False.”
True: Continue executing the workflow regardless of any errors thrown.
False: Halt the workflow if it encounters any errors.
None: If the option is left blank, the activity will, by default, behave as if “False” were chosen.

Version: It indicates the version of the feature being used.

OUTPUT

ResponseDatatable: * Displays the transaction count for the specified QueueName and QueueType in a tabular format.

Result: This parameter allows you to view the execution status of the activity and returns a value in “Boolean.”

True: Indicates that the activity has been executed successfully without any errors.
False: Indicates that the activity has been unsuccessful due to an unexpected error being thrown

* Represents mandatory fields to execute the workflow.

6.7.8 GetTransaction Details

This activity enables users to retrieve transactions from a specified queue for a selected date range within the connected project.

Properties

Input

Queue Name*: Specifies the name of the queue from which transactions need to be retrieved. This field accepts values of the String data type.

From Date*: Select or enter the start date from which transactions should be fetched.

End Date*: Select or enter the end date from which transactions should be fetched.

MISC

DisplayName: Displays the name of the activity. The activity name can be customized, which aids in troubleshooting.

SkipOnError: Specify the “Boolean” value as “True” or “False.”
True: Continue executing the workflow regardless of any errors thrown.
False: Halt the workflow if it encounters any errors.
None: If the option is left blank, the activity will, by default, behave as if “False” were chosen.

Version: It indicates the version of the feature being used.

OUTPUT

Response Datatable: Returns the transaction details from the queue in a structure table format.  

Result: This parameter allows you to view the execution status of the activity and returns a value in “Boolean.”
True: Indicates that the activity has been executed successfully without any errors.
False: Indicates that the activity has been unsuccessful due to an unexpected error being thrown.

* Represents mandatory fields to execute the workflow

6.7.9 UpdateTransaction

This activity helps the user to update the existing transactions to update the fields. It can also be used to move the transactions from one to another queue.  It accepts the input values of the “Json” format extracted as output in the “Get Transaction” activity as it requires the “Batch ID, URN and Queue” of the existing transaction to be updated.

Pre-Requisites

1. The Input “Json” provided here should contain the “BatchID, URN” of the existing transaction.
2. It accepts only the output extracted from the “Get Transaction” activity as input in the “JsonData” field here.
3. You can update the existing field values by either hardcoding the values or providing the variables. (Refer below in the document to get a detailed understanding.)

Properties

INPUT

AttachmentFieldName: This parameter indicates to provide the “FieldName” of the Attachment if any created in the Interact. This field name can be extracted from “SmartInteract” in Manager. Refer the below document. You can either hardcode the values in “String” datatype or can enter the values in “String”. When left blank, it will not be considered. This parameter accepts values in “String” datatype.

InputParameters: This parameter helps you to provide the “inputs” that are required to filter and extract specific values against the transactions in the Project during the execution. This parameter accepts collection of argument types.
Refer the below documentation to pass the values.

Json: To update transactions, you should provide the “Json” string to the Project. The sample “JsonString” can be extracted from “SmartInteract” in Manager. It will incorporate with the values passed in the “InputParameters” field and creates a transaction.
This parameter accepts values in “String” datatype. You can either hardcode the values in “String” datatype or can enter the values in “String”. The “InputString” must be in “Json” format. (Refer the tips below).

JsonData: This parameter indicates to provide the “JsonData” resulted as output in “GetTransaction” activity as input here. It accepts values in only “String” datatype, or you can input the “String” variable that contains the “Json” values. The “InputString” must contain the “Json” format. (Refer the tips below).

MISC

DisplayName: Displays the name of the activity. The activity name can be customized, which aids in troubleshooting.

SkipOnError: Specify the “Boolean” value as “True” or “False.”
True: Continue executing the workflow regardless of any errors thrown.
False: Halt the workflow if it encounters any errors.
None: If the option is left blank, the activity will, by default, behave as if “False” were chosen.

Version: It indicates the version of the feature being used.

OUTPUT

ResponseBatchID:* It helps to extract the “BatchId” of the updated transaction as output. It returns in the values in “String” datatype.

ResponseURN: It helps to extract the “URN” of the updated transaction as output. It returns in the values in “String” datatype.

ResponseValue: It helps to view the response as  “status” from the service for updated transaction. It returns in the values in “String” datatype.

Result: It provides the ability to view the execution status of the activity. It returns values in “Boolean.”
True: Indicates that the activity has been executed successfully without any errors.
False: Indicates that the activity has been unsuccessful due to an unexpected error being thrown.

Represents mandatory fields to execute the workflow

6.7.10 Upload Master Data

This activity allows users to upload master data to Interact for the connected project.

Properties

Input

File Name*: Specifies the name of the file, including the extension, to be uploaded and it accepts values of the String data type.

Attachment*: Specifies the file path of the file to be uploaded to Interact. It accepts values of the String data type.

Overwrite: When enabled, this option overwrites the existing file during upload if a file with the same name already exists.

MISC

DisplayName: Displays the name of the activity. The activity name can be customized, which aids in troubleshooting.

SkipOnError: Specify the “Boolean” value as “True” or “False.”
True: Continue executing the workflow regardless of any errors thrown.
False: Halt the workflow if it encounters any errors.
None: If the option is left blank, the activity will, by default, behave as if “False” were chosen.

Version: It indicates the version of the feature being used.

OUTPUT

Upload Status: Returns the status of the file uploaded to the Interact in Boolean value.  

True: Indicates that the file has been uploaded successfully without any errors.
False: Indicates that the file has been unsuccessful due to an unexpected error being thrown.

Result: This parameter allows you to view the execution status of the activity and returns a value in “Boolean.”
True: Indicates that the activity has been executed successfully without any errors.
False: Indicates that the activity has been unsuccessful due to an unexpected error being thrown.

* Represents mandatory fields to execute the workflow

6.8 Manager

Introduction

The Credential Manager securely stores sensitive information such as usernames, passwords, tokens, pins, keys, and other configuration assets in encrypted form. This ensures that critical data is protected and inaccessible to unauthorized users.

The Credential Vault acts as a centralized and secure location for managing these items. It provides administrative access to view, update, or rotate credentials and other stored data as needed.

All stored information is encrypted and maintained in a secure database to uphold strict security standards. For example, when a robot needs to access a webpage, tool, application, or external system, the required credentials and tokens can be securely retrieved from the vault—eliminating the need to hardcode sensitive data within workflows. Click here to learn more about where the configured credentials are stored. 

By integrating the Credential Manager within each project, it significantly reduces the risk of credential exposure and enhances the overall security of automation processes.

Use cases

1. Web and Desktop Applications: In automation scenarios involving websites or desktop applications, bots often need to log in repeatedly using credentials.
2. Cloud Platforms (e.g., Azure, AWS, GCP): Accessing cloud services typically requires API keys, access tokens, client secrets, or service principal credentials.
3. Database Access: Bots that interact with databases for data extraction, reporting, or updating records require authentication credentials like database usernames and passwords.
4. Third-Party API Integrations: Many automation workflows involve integration with third-party APIs such as payment gateways, CRM systems, or messaging platforms (e.g., Twilio, Salesforce).
5. Internal Tools and Systems: Organizations often use custom tools and internal systems that require secured access.
6. Shared Assets and Configuration: Beyond login credentials, the Credential Manager can also store non-sensitive but critical data such as configuration values, environment-specific tokens, or encryption keys needed during execution.

To learn more about credential vault, refer the credential vault documentation.  

Choosing the vault key in Designer

After adding the credential details for the application in Robility Manager, the vault key for the corresponding project will be configured.

Click here to learn how to create credentials for the application.

Follow the steps below to locate the vault key in the Designer:

1. Launch the Designer and open an existing solution or create a new one.
a. To access the Vault Key, select the relevant project from the Publish section located at the bottom of the Designer. This project should correspond to the one for which the credential vault has been configured in Manager.
b. Once the project is selected, the vault key will appear in the Solution Explorer under the Resource category as Credential Vault.

2. The Credential Vault will only appear in the Designer interface if the Credential Manager has been configured for that specific project.
3. Click Solution Explorer to view the Credential Vault listed under the Resource section.

6.8.1 Release Notes

v.1.4.9

In this release, we have addressed bug fixes.

Bug Fix

In the previous version of Manager, the Get Pin & Key activity threw an exception stating that the “Key” value was not supplied, even though the “Key” property was not available within the activity. This issue has now been resolved.

Important

To use the key values provided in Robility Manager, it is recommended to use the API Request activity.

Release Date: 18/03/2026

6.8.2 API Request

The API Request activity enables seamless integration with AI models to automate intelligent tasks such as content generation, text summarization, data classification, sentiment analysis, language translation, decision support, and other AI-driven insights.

It securely retrieves the API key from a configured vault at runtime, ensuring that sensitive credentials are never exposed during design or execution.

Limitation

The API key must be configured only through the Vault in Robility Manager using the Pin & Key configuration.
Currently, this activity supports integration only with Azure and its supported AI models.

Security Behavior

1. The API key is securely retrieved from the configured vault only during workflow execution
2. The API key is not visible in: Activity Designer UI, Workflow variables & Logs or trace outputs
3. The API key exists only in memory during execution and is cleared immediately after use.
4. The API key is never logged, displayed, or persisted in any form.

Parameters

INPUT

Tenant Name: Automatically populated when the project is connected using the Publish
Connector*: Connector options become available only after the project is connected and can be selected from the drop-down menu.
Vault Key*: Vault key options become available only after the project is connected and can be selected from the drop-down menu.
API Version*: Specifies the version of the API used for processing requests.
Deployment Name*: Specifies the name of the deployed model used to generate responses.
Endpoint*: Specifies the base URL of the API service used for processing requests.
System Prompt*: Provides content to guide the AI in a specific role, behavior, or tone, and defines how responses should be generated (e.g., technically, creatively).
       • Example: Acts as a content creator and generates content in a user-friendly way to explain a software product to new users in 5 simple lines.
User Prompt*: Provides input for the AI to generate a response based on the System Prompt.

Note: All input values can be hardcoded, assigned using a String variable, or passed as a String datatype.

MISC

DisplayName : Displays the name of the activity.
SkipOnError: Specifies how the workflow behaves when an error occurs
True – Continues workflow execution even if an error occurs.
False – Stops workflow execution when an error occurs.
None (Default) – Behaves the same as False.
Version: Indicates the version of the activity.

OUTPUT

Response: Specifies the response returned after processing the request.
ResponseContent: Specifies the actual response content in JSON format, to be viewed in detail.
Note: Response and ResponseContent are available only as String variables.
Result: Returns the execution status of the activity as a Boolean value:
True – Activity executed successfully.
False – Activity failed due to an error.

* Represents mandatory fields required to execute the workflow.

How to Do?

Step 1: Connect with the Project
• You need to select the project to connect.
• Once connected, you can choose the Connector and the Vault Key (a secure key to access sensitive information).

Step 2: Configure the Activity and Execute the Workflow
• After connecting, provide all the required information the activity needs to work in each parameter.
• Then, run the workflow so the AI will response with your input and give the output as instructed, system can perform the task automatically to give the response from the AI.

Use Cases

1. Automated content creation (emails, reports, descriptions) 
2. Text summarization of large documents
3. Question answering based on given input
4. Automatic data classification and tagging
5. End-to-end workflow automation using AI

6.8.3 GetAsset

The Get Asset activity enables you to retrieve assets from the Robility Manager vault for a specified project.

Properties

INPUT

Tenant Name: Indicates the name of the tenant to which the project is currently connected.

Asset Name: * The dropdown will display the list of assets available for the project.
Note: It includes all assets, including expired ones.

MISC

Display Name: Displays the name of the activity. The activity name can be customized, which aids in troubleshooting.

SkipOnError: Specify the “Boolean” value as “True” or “False.”

True: Continue executing the workflow regardless of any errors thrown.
False: Halt the workflow if it encounters any errors.
None: If the option is left blank, the activity will, by default, behave as if “False” were chosen.

Timeout: Specifies the maximum duration (in milliseconds) to wait while retrieving the asset from the vault. By default, the value is set to 30000 milliseconds.

Version: It indicates the version of the feature being used.

OUTPUT

Result: This parameter allows you to view the execution status of the activity and returns a value in “Boolean.”

True: Indicates that the activity has been executed successfully without any errors.
False: Indicates that the activity has been unsuccessful due to an unexpected error being thrown.

Value: Returns the value of the asset retrieved from the vault as output in Object data type.

* Represents mandatory fields to execute the workflow. 

6.8.4 GetCredential

This activity is used to retrieve the credentials which are configured in the vault at Robility Manager. It is useful for activation/login to applications involved in this process.

Properties

INPUT

ApplicationName: *Choose the “Application name” from the drop-down to extract the credentials from 

Lock: Specifies whether the selected application should be locked during execution in Boolean value.

True
: Locks the credential during execution, preventing other machines from using the same credential.

False: Allows multiple machines to use the same credential simultaneously.
None: If left blank, the activity defaults to the False state.

Note: To unlock the credential, you can either select the “Unlock” button in Robility Manager for the respective credential or use the “UnlockCredential” activity within the automation.

TenantName: *Displays the “Tenant” name which will be automatically filled once the vault key is configured against the solution. Click here to learn more.

Context Menu Options

Create variables option: It is used to generate variables for output properties – Application Details, Application Title, Domain, Username, and Password. It securely stores encrypted credentials that can be used as inputs in other activities.

Refresh credentials: To reset or switch to a different credential already configured in the activity, use the “Refresh” option. This action clears all existing values in the activity, allowing you to select a new or updated credential.

MISC

DisplayName: Displays the name of the activity. The activity name can be customized, which aids in troubleshooting.

SkipOnError: Specify the “Boolean” value as “True” or “False.”
True: Continue executing the workflow regardless of any errors thrown.
False: Halt the workflow if it encounters any errors.
None: If the option is left blank, the activity will, by default, behave as if “False” were chosen.

Version: It indicates the version of the feature being used.

OUTPUT

Application Detail: Returns the “Application details” extracted from the selected application in “String” datatype.

Application Title: Returns the “Application title” extracted from the selected application in “String” datatype.

Domain: Returns the “Domain” provided against the selected application in “String” datatype.

Password: Returns the “Password” provided against the selected application in “String” datatype.

Result: This parameter allows you to view the execution status of the activity and returns a value in “Boolean.”

True: Indicates that the activity has been executed successfully without any errors.
False: Indicates that the activity has been unsuccessful due to an unexpected error being thrown

Username: Returns the “Username” provided against the selected application in “String” datatype.

* Represents mandatory fields to execute the workflow. 

6.8.5 Get JwtToken

The Get Jwt Token activity enables you to retrieve tokens configured from the Robility Manager vault for a specified project. 

What is a JWT Token?

When interacting with APIs or web applications through REST services, a JWT (JSON Web Token) is commonly used for authentication and authorization between the automation activity and the target application. By using JWT, the need to log in with credentials for every request is eliminated, enabling secure and seamless access to protected resources.
 
In Robility, this token is primarily leveraged within the “WebClient – REST” activity. Unlike a regular token, a JWT is self-contained and includes all the necessary claims within the token itself. This makes it more secure and efficient, as it does not require database verification for each request—the token’s integrity can be validated directly using its digital signature. 

To learn more about its role in automation, click here.

Properties

INPUT

Tenant Name: Indicates the name of the tenant to which the project is currently connected.

Application Name: * The dropdown will display the list of applications available for the project.
Note: It includes all assets, including expired ones.

MISC

Display Name: Displays the name of the activity. The activity name can be customized, which aids in troubleshooting.

SkipOnError: Specify the “Boolean” value as “True” or “False.”

True: Continue executing the workflow regardless of any errors thrown.
False: Halt the workflow if it encounters any errors.
None: If the option is left blank, the activity will, by default, behave as if “False” were chosen.

Timeout: Specifies the maximum duration (in milliseconds) to wait while retrieving the asset from the vault. By default, the value is set to 30000 milliseconds.

Version: It indicates the version of the feature being used.

OUTPUT

Result: This parameter allows you to view the execution status of the activity and returns a value in “Boolean.”

True: Indicates that the activity has been executed successfully without any errors.
False: Indicates that the activity has been unsuccessful due to an unexpected error being thrown.

JwtToken: Returns the token of the application retrieved from the vault as output in String data type.

* Represents mandatory fields to execute the workflow. 

6.8.6 Get Pin & Key

The Get Pin & Key activity enables you to retrieve pin configured from the Robility Manager vault for a specified project.

Properties

INPUT

Tenant Name: Indicates the name of the tenant to which the project is currently connected.

Application Name: * The dropdown will display the list of applications available for the project.
Note: It includes all assets, including expired ones.

MISC

Display Name: Displays the name of the activity. The activity name can be customized, which aids in troubleshooting.

SkipOnError: Specify the “Boolean” value as “True” or “False.”

True: Continue executing the workflow regardless of any errors thrown.
False: Halt the workflow if it encounters any errors.
None: If the option is left blank, the activity will, by default, behave as if “False” were chosen.

Timeout: Specifies the maximum duration (in milliseconds) to wait while retrieving the asset from the vault. By default, the value is set to 30000 milliseconds.

Version: It indicates the version of the feature being used.

OUTPUT

Result: This parameter allows you to view the execution status of the activity and returns a value in “Boolean.”

True: Indicates that the activity has been executed successfully without any errors.
False: Indicates that the activity has been unsuccessful due to an unexpected error being thrown.

Pin: Returns the pin of the application retrieved from the vault as output in SecureString data type.

* Represents mandatory fields to execute the workflow. 

6.8.7 Get Token

The Get Token activity enables you to retrieve tokens configured from the Robility Manager vault for a specified project.

Properties

INPUT

Tenant Name: Indicates the name of the tenant to which the project is currently connected.

Application Name: * The dropdown will display the list of applications available for the project.
Note: It includes all assets, including expired ones.

MISC

Display Name: Displays the name of the activity. The activity name can be customized, which aids in troubleshooting.

SkipOnError: Specify the “Boolean” value as “True” or “False.”

True: Continue executing the workflow regardless of any errors thrown.
False: Halt the workflow if it encounters any errors.
None: If the option is left blank, the activity will, by default, behave as if “False” were chosen.

Timeout: Specifies the maximum duration (in milliseconds) to wait while retrieving the asset from the vault. By default, the value is set to 30000 milliseconds.

Version: It indicates the version of the feature being used.

OUTPUT

Result: This parameter allows you to view the execution status of the activity and returns a value in “Boolean.”

True: Indicates that the activity has been executed successfully without any errors.
False: Indicates that the activity has been unsuccessful due to an unexpected error being thrown.

Token: Returns the token of the application retrieved from the vault as output in String data type.

* Represents mandatory fields to execute the workflow. 

6.8.8 GetStopStatus

The Get stop status activity can be employed in the workflow to terminate the process. It can be used in several preferred points in the workflow where we wish to halt the execution of the robot.

The “Stop” will be initiated only if the “GetStopStatus” activity is utilized in the workflow.

Properties

MISC

DisplayName: Displays the name of the activity. You can also customize the activity name to help in troubleshooting.

SkipOnError: It specifies whether to continue executing the workflow even if it throws an error. This supports only Boolean value “True or False.”
True: Continues to execute the workflow irrespective of any error thrown.
False: The workflow aborts if it throws any error.
None: If the option is specified as blank, by default the activity will perform as “False” action.
Version: It specifies the version of the Robility Manager feature in use.

OUTPUT

Output: It helps to view the output of the activity in a “Boolean” datatype.
True: Indicates that the workflow has been successfully stopped by the activity.
False: Indicates that the workflow has not been stopped by the activity and specifies the exception thrown.

Example

The following use case illustrates how we can utilize the “GetStopStatus” activity in a workflow, which facilitates to stop a workflow when it’s executed in the runner.

This Automation use case helps to read the mails and extract the report from the mailbox in a loop. Within the workflow, we are utilizing the “GetStopStatus” activity to “Terminate” the execution of the bot utilizing the “Stop” button in the “Manager.”

The output of the activity will terminate the workflow and moves the robot to “Idle” state in the “Manager.”

Steps to execute the bot 

1. Add a “GetStopStatus” activity and place it before the “ForEach” activity in the workflow.
a. Navigate to the “Status” in the properties of the activity and declare a variable to view the status of the activity.
b. There are two ways to create a variable-
     i. Method 1 – Click on the “Status” property within the “GetStopStatus” activity and enter the variable name. In this case, we are using ” Stop_bot.”  Then, press “Ctrl+Q,” which is a shortcut key to create a variable.
    ii. Method 2 – Click on the Variables pane and enter the name ” Stop_bot.” Then, in the “Variable Types” column, select “Boolean” from the dropdown menu.
2. Now, save the workflow and publish the workflow.
3. Once the workflow has been published, navigate to the “RobilityManager
”.
a. Login with your credentials to access the platform.
b. Select the “Tenant” name under which the project has been published.
c. Navigate to the “Projects” menu and click on “Go” button against the respective automation project.
d. Next navigate to the “Robot” menu and connect the “Machine” to execute  the Automation.
e. Once the robot has been connected, copy the “License key” available in  the Manager.
4. Lauch the “Runner” in your machine and paste the “License key” in the Runner.
5. Then, navigate to the “Robot” in RobilityManager and click on “Run” button to initiate the Automation.
6. When the Runner receives the “Request”, it will initiate to execute the workflow and the status in the “Manager” will be changed to “Run initiated”.
7. Now, the “Stop” button will be enabled to terminate the workflow through Manager.
a. Click on the “Stop” button on the “Manager”.
b. A request will be sent to the “RobilityRunner” to terminate the workflow.
c. The workflow will be aborted, and the robot moves to “ToCheck” status and gets back to “Idle” state.

6.8.9 UnlockCredential

This activity unlocks the credential that was locked in Robility Manager during workflow execution.

Properties

INPUT

ApplicationDetails: *Specifies the application details required to unlock the credential in JSON format in String data type. You can provide the application details obtained as output from the Get Credentials activity. 

UserName:* Specify the “Username” or provide the variable in which the input username has been stored in “String” datatype.

MISC

DisplayName: Displays the name of the activity. It can also be customized to help in troubleshooting.

SkipOnError: It specifies whether to continue executing the workflow even if it throws an error. This supports only Boolean value “True or False”. By default, it is set to “False.”
True: Continues the workflow to the next step
False: The workflow aborts if it throws any error.
None: If the option is specified as blank, by default the activity will perform as “False” action.
Version: It specifies the version of the Robility Manager feature in use.

OUTPUT

Message: Returns the output of the activity in a “String” datatype in case an error occurs during the process of unlocking the credential.

Result: It helps to view the execution state of the activity. It returns the values in Boolean format.
True: It indicates the activity has been executed successfully without any error.
False: It indicates that the activity has been faulted due to some unexceptional error thrown.

Status: This facilitates to provide the output of the “Unlock” status in a “Boolean” datatype.
Success: It indicates that the “Credential” has been unlocked successfully.
Failure: It indicates that the “Credential” has not unlocked due to some unexceptional error thrown. The error message can be viewed in the “Message” field in the output if a variable has been declared.

* Represents mandatory fields to execute the workflow.

6.9 Zendesk

Introduction

Zendesk is a cloud-based customer service platform designed to help businesses manage customer interactions across various products and services. Its core feature is a ticketing system that organizes customer inquiries from multiple channels.

Within the Robility® platform, Zendesk enables the creation of automated workflows to streamline repetitive tasks, prioritize and manage tickets and records. It simplifies ticket management and customer interaction using standardized and highly secure authentication methods.

Pre-requisites

Before using Zendesk with the Robility platform, users must first enable outbound connections with the Zendesk platform to create and retrieve the API required for authentication. Depending on the authentication type you select, you will need the following credentials:

OAuth Authorization: Requires sending the Client ID, client secret, username, password, scope, and token URL with every API request. 

Scope: The scope should be set to “Read and write.” These permissions must be enabled when creating and configuring Zendesk for automation through the API. This ensures that users can read and update tickets.

For more detailed information, click here to check out the provider’s documentation.

Connecting with Zendesk

Acquire Credentials: Ensure that you have obtained the necessary credentials required for connecting with Zendesk. This may include the Client ID, client secret, username, password, scope, and token URL.

Integration: Integrate Zendesk within the Robility platform. The automation workflow development can only proceed once Zendesk is successfully integrated.

Login to the Robility Manager platform.

1. Navigate to your tenant and choose the desired project.
2. Click on the “App Integrations”.
3. Search and navigate to “Zendesk” from the list of pre-built connections available.
4. Click on it and enter the required credentials, then click on “Connect”.
5. Once your credentials have been provided, the list will be added in the “Connections”.

Now, you will be able to automate the activities.

Adding connection through Activity

1. Drag and drop the activity into the workflow. 
2. Click on the “Add New Connection” hyperlink in the activity. 
3. Once you click on the hyperlink, you will be navigated to the Manager.
4. Login and navigate to the project.
5. Choose “Zendesk” in the App Integrations menu.
6. Provide the required credentials and click on “Connect”.

7. Now, refresh and you will be able to automate with the Zendesk activities. 

How to view the output? 

 Each Zendesk activity generates a specific datatype, often containing data like ticket details, comments, or user information. To ensure we can access this data, we need to properly view and retrieve its parameter. To view the output from Zendesk activities, follow these steps:

1. In your workflow, drag and drop the Write Log activity from the Activities panel.
2. In the Write Log activity’s “Input” property, enter the variable name that holds the activity’s output. For example, if the output is stored in a variable named “TicketDetails”, you would enter TicketDetails.

3. Press “CTRL + Spacebar ” to open the IntelliSense menu, which displays a list of available parameters and properties for the specified variable.
4. Choose the desired parameter from the list to include it in your output. For instance, to view the ticket ID, you might select ticketDetails.TicketID.
5. Execute your workflow. The specified parameters will be printed to the Output panel, allowing you to verify the details of the created ticket.

6.9.1 Release Notes

v.1.5.3

This release includes stability and performance improvements across connector activities.

Bug Fix

Resolved an issue that could cause intermittent execution failures and increased processing time during connector operations. Authentication handling has been optimized to improve connection reliability, reduce unnecessary authentication requests, and enhance overall workflow performance.

Released Date: 02/06/2026

6.9.2 AddComment

This activity helps the user to add a new comment to the specific ticket ID.

Properties

Configuration

Once you select the respective project name where Zendesk has been authenticated, the activity will automatically retrieve the available connections for that project.

If you have not added the connection, click here to learn more. 

Below are the properties available after the project has been integrated:

Zendesk: *This parameter indicates the account name associated with the integration.

INPUT

CommentBody: *This parameter indicates to provide the body of the comment against the specific ticket ID.

It accepts the input value in “String” datatype. You can either hardcode the values in “String” format variable or provide the values in “String” datatype.

CommentType: It indicates to choose the comment type as “Public” or “Private”. 

Public: It allows the user to add a comment publicly which will be visible for every user. 
Private: It allows the user to add a comment privately which will be visible only to specific group agents. 

TicketID: *This parameter indicates to provide the “TicketID” against where the comment needs to be added. 

It accepts the input value in “String” datatype. You can either hardcode the values in “String” format variable or provide the values in “String” datatype.

Uploads: This parameter indicates to upload any attachments in the comments against ticket ID. Use the “TokenID” retrieved from “Upload Attachments” activity. 

It accepts the input value in “List of String” datatype. You can either hardcode the values in “String” format variable or provide the values in “String” datatype.
Note: If you are uploading only single attachment to the comments, the value must be provided as “New list (Of string for {“Token ID”}) or (New list (Of string for {variable})”.
If you are uploading multiple attachments to the comments, the value must be provided as “{“TokenID1”, “TokenID2″}”.

MISC

DisplayName: Displays the name of the activity. The activity name can be customized, which aids in troubleshooting.

SkipOnError: Specify the “Boolean” value as “True” or “False.”
True: Continue executing the workflow regardless of any errors thrown.
False: Halt the workflow if it encounters any errors.
None: If the option is left blank, the activity will, by default, behave as if “False” were chosen.

Version: It indicates the version of the feature being used.

OUTPUT

CommentDetails: It helps to view the details of the comment added in the specific ticket ID. It returns the following data,

Comment ID: The unique identifier for the comment.
Ticket ID: The ID of the ticket to which the comment was added.
Author ID: The ID of the user or agent who authored the comment.
Comment Body: The text content of the comment.
Public/Private: Indicates whether the comment is visible to the end user (public) or only to internal agents (private).
Created At: The timestamp when the comment was created.
Updated At: The timestamp of the most recent update to the comment.

CommentID: It helps to view the comment ID as the result of the activity. It returns the values in String datatype.

Result: It provides the ability to view the execution status of the activity. It returns values in “Boolean.”
True: Indicates that the activity has been executed successfully without any errors.
False: Indicates that the activity has been unsuccessful due to an unexpected error being thrown.

* Represents mandatory fields to execute the workflow.

6.9.3 CreateGroup

This activity allows the user to create a new group in the Zendesk application for reporting incidents. It represents a collection of agents to whom tickets can be assigned.

Properties

Configuration

Once you select the respective project name where Zendesk has been authenticated, the activity will automatically retrieve the available connections for that project.

If you have not added the connection, click here to learn more. 

Below are the properties available after the project has been integrated:

Zendesk: *This parameter indicates the account name associated with the integration.

INPUT

Description: This parameter indicates to description of the group to describe the purpose of it. 

It accepts the input value in “String” datatype. You can either hardcode the values in “String” format variable or provide the values in “String” datatype.

IsPublic: Use this option to make the created group accessible to everyone in the Zendesk application. If left unchecked, the group will only be available to specific members.  

Name: *This parameter indicates to provide the name for the group to be created. 

It accepts the input value in “String” datatype. You can either hardcode the values in “String” format variable or provide the values in “String” datatype.

MISC

DisplayName: Displays the name of the activity. The activity name can be customized, which aids in troubleshooting.

SkipOnError: Specify the “Boolean” value as “True” or “False.”
True: Continue executing the workflow regardless of any errors thrown.
False: Halt the workflow if it encounters any errors.
None: If the option is left blank, the activity will, by default, behave as if “False” were chosen.

Version: It indicates the version of the feature being used.

OUTPUT

GroupDetails: It helps the user to view the information about the newly created group in Zendesk. This output includes the following data:

URL: Provides the URL to created group. 
Group ID: The unique identifier for the group.
Group Name: The name assigned to the group.
IsPublic: Indicates whether the group is public or restricted to specific members.
Created At: The timestamp when the group was created.
Updated At: The timestamp of the most recent update to the group.

GroupID: *It helps to view the unique Group ID for the newly created group as output. It returns the result in String datatype. 

Result: It provides the ability to view the execution status of the activity. It returns values in “Boolean.”
True: Indicates that the activity has been executed successfully without any errors.
False: Indicates that the activity has been unsuccessful due to an unexpected error being thrown.

* Represents mandatory fields to execute the workflow.

6.9.4 CreateTicket

This activity helps the user to create a ticket on the Zendesk application for the user to report any incidents.

Properties

Configuration

Once you select the respective project name where Zendesk has been authenticated, the activity will automatically retrieve the available connections for that project.

If you have not added the connection, click here to learn more. 

Below are the properties available after the project has been integrated:

Zendesk: *This parameter indicates the account name associated with the integration.

INPUT

AssigneeID: This parameter indicates to provide the “Assignee ID” to whom the ticket needs to be assigned from the specific ID. It will directly route the ticket to the specified person.

It accepts the input value in “String” datatype. You can either hardcode the values in “String” format variable or provide the values in “String” datatype.

When left empty, it will not be considered, and the ticket will be assigned randomly to the persons in the group name.

BrandID: This parameter indicates to provide the “BrandID” of the specific brand. It represents the unique identifier of the brand/ product within the specific organization.

It accepts the input value in “String” datatype. You can either hardcode the values in “String” format variable or provide the values in “String” datatype.

When left empty, it will not be considered.

Description: *This parameter indicates to provide the description to explain the purpose for which the ticket is created.

It accepts the input value in “String” datatype. You can either hardcode the values in “String” format variable or provide the values in “String” datatype.

DueAt: This parameter indicates to provide the timeframe at which the ticket needs to be resolved within. It is basically known as SLA value upon which the ticket should be resolved.

DataType: It accepts the input value in “String” datatype.
Format: YYYY/MM/DD
You can either hardcode the values in “String” format variable or provide the values in “String” datatype.

When left empty, it will not be considered.

GroupID: This parameter indicates to specify the “GroupID” against which the ticket needs to be created and assigned specifically. It specifically helps the user to route the ticket to the specified GroupID.
It accepts the input value in “String” datatype. You can either hardcode the values in “String” format variable or provide the values in “String” datatype.

OrganizationID: This parameter indicates to specify the “OrganizationID” against which the ticket needs to be created.
It accepts the input value in “String” datatype. You can either hardcode the values in “String” format variable or provide the values in “String” datatype.

Priority: This parameter indicates you to set the priority based on importance and urgency of the incident to be resolved.

Urgent: Allows you to create a ticket with an urgent priority based on its impact.
High: Allows you to create a ticket with high priority based on its impact.
Normal: Allows you to create a ticket with normal priority based on its impact.
Low: Allows you to create a ticket with low priority based on its impact.

RequesterID: This parameter indicates the end user who has initiated the request to create the ticket.
It accepts the input value in “String” datatype. You can either hardcode the values in “String” format variable or provide the values in “String” datatype.

Subject: This parameter indicates to mention the subject of the ticket.
It accepts the input value in “String” datatype. You can either hardcode the values in “String” format variable or provide the values in “String” datatype.

Type: This parameter indicates the choose the type of ticket from the below,

Problem: It indicates to create a ticket if there is a bug in the software.
Incident: To group multiple tickets that represent the same issue / interruption in the software, use this.
Question: It indicates the query or any inquiry about the software.
Task: It indicates to create a task to complete a set of actions with clear steps.

MISC

DisplayName: Displays the name of the activity. The activity name can be customized, which aids in troubleshooting.

SkipOnError: Specify the “Boolean” value as “True” or “False.”
True: Continue executing the workflow regardless of any errors thrown.
False: Halt the workflow if it encounters any errors.
None: If the option is left blank, the activity will, by default, behave as if “False” were chosen.

Version: It indicates the version of the feature being used.

OUTPUT

Result: It provides the ability to view the execution status of the activity. It returns values in “Boolean.”
True: Indicates that the activity has been executed successfully without any errors.
False: Indicates that the activity has been unsuccessful due to an unexpected error being thrown.

TicketDetails: It helps to view the details of the created ticket. It returns value in class type.

TicketID: *It helps to view the ticket ID as the result of String datatype. Declare a variable here to view the output.

* Represents mandatory fields to execute the workflow.

6.9.5 DeleteRecord

This activity allows the user to permanently delete the specific record from the Zendesk application.

Properties 

Configuration

Once you select the respective project name where Zendesk has been authenticated, the activity will automatically retrieve the available connections for that project.

If you have not added the connection, click here to learn more. 

Below are the properties available after the project has been integrated:

Zendesk: *This parameter indicates the account name associated with the integration.

INPUT

FileToken: This parameter indicates the unique identifier that is used as reference for the file that has been uploaded to Zendesk ticket. When you want to delete a specific file that has been attached to a ticket, you need to provide the File Token.

It accepts the input value in “String” datatype. You can either hardcode the values in “String” format variable or provide the values in “String” datatype.

ObjectID: *This parameter indicates the unique identifier associated with the specific record that you want to retrieve. Depending on the Object Type selected (such as Ticket, User, Organization, etc.), the Object ID refers to the distinct ID that helps to identify the particular entity in the Zendesk application.

It accepts the input value in “String” datatype. You can either hardcode the values in “String” format variable or provide the values in “String” datatype.

ObjectType: This parameter indicates the specific type of data entity you want to retrieve from Zendesk application. You can choose the option from the dropdown in the activity interface. There are totally 17 object type from which you can retrieve the specific data. 

MISC

DisplayName: Displays the name of the activity. The activity name can be customized, which aids in troubleshooting.

SkipOnError: Specify the “Boolean” value as “True” or “False.”
True: Continue executing the workflow regardless of any errors thrown.
False: Halt the workflow if it encounters any errors.
None: If the option is left blank, the activity will, by default, behave as if “False” were chosen.

Version: It indicates the version of the feature being used.

OUTPUT

DeletedStatus: It provides the ability to view the status of the deleted record from the Zendesk system. It returns values in “Boolean.”
True: Indicates that the record has been deleted successfully.
False: Indicates that the record has not been deleted due to an unexpected error being thrown.

Result: It provides the ability to view the execution status of the activity. It returns values in “Boolean.”
True: Indicates that the activity has been executed successfully without any errors.
False: Indicates that the activity has been unsuccessful due to an unexpected error being thrown.

* Represents mandatory fields to execute the workflow.

6.9.6 DeleteTicket

This activity helps the user to delete the specified ticket ID from the Zendesk application.

Properties

Configuration

Once you select the respective project name where Zendesk has been authenticated, the activity will automatically retrieve the available connections for that project.

If you have not added the connection, click here to learn more. 

Below are the properties available after the project has been integrated:

Zendesk: *This parameter indicates the account name associated with the integration.

INPUT

TicketID: *This parameter indicates to provide the ticket ID, which requires to be deleted from the application.

It accepts the input value in “String” datatype. You can either hardcode the values in “String” format variable or provide the values in “String” datatype.

MISC

DisplayName: Displays the name of the activity. The activity name can be customized, which aids in troubleshooting.

SkipOnError: Specify the “Boolean” value as “True” or “False.”
True: Continue executing the workflow regardless of any errors thrown.
False: Halt the workflow if it encounters any errors.
None: If the option is left blank, the activity will, by default, behave as if “False” were chosen.

Version: It indicates the version of the feature being used.

OUTPUT

DeletedStatus: It provides the ability to view the status of the deleted ticket. It returns values in “Boolean”.

True: Indicates that the activity has been executed successfully without any errors.
False: Indicates that the activity has been unsuccessful due to an unexpected error being thrown.

Result: It provides the ability to view the execution status of the activity. It returns values in “Boolean.”
True: Indicates that the activity has been executed successfully without any errors.
False: Indicates that the activity has been unsuccessful due to an unexpected error being thrown.

* Represents mandatory fields to execute the workflow.

6.9.7 DownloadAttachments

This activity helps the user to download both inline and explicit attachments from a Zendesk ticket. It enables the user to download multiple attachments in a loop and saves them to the specified folder path.

Properties

Configuration

Once you select the respective project name where Zendesk has been authenticated, the activity will automatically retrieve the available connections for that project.

If you have not added the connection, click here to learn more. 

Below are the properties available after the project has been integrated:

Zendesk: *This parameter indicates the account name associated with the integration.

INPUT

TicketID: *This parameter indicates to provide the ticket ID from which the attachments need to be downloaded from the application.

It accepts the input value in “String” datatype. You can either hardcode the values in “String” format variable or provide the values in “String” datatype.

Overwrite: Indicates to overwrite the “Files” that are being downloaded from the “ticket ID” in the specified path. By default, the box will be “unchecked”.
Check: Overwrites any existing files with the same name in the specified directory.
Uncheck: Throws an error if a file with the same name already exists.

FolderPath: *Indicates to provide the “FilePath” to download the attachments against the specified ticket ID. You can either hardcode the values in “String” datatype or can enter the values in “String”. When left blank, it will not be considered. This parameter accepts values in “String” datatype.

MISC

DisplayName: Displays the name of the activity. The activity name can be customized, which aids in troubleshooting.

SkipOnError: Specify the “Boolean” value as “True” or “False.”
True: Continue executing the workflow regardless of any errors thrown.
False: Halt the workflow if it encounters any errors.
None: If the option is left blank, the activity will, by default, behave as if “False” were chosen.

Version: It indicates the version of the feature being used.

OUTPUT

DownloadStatus: It provides the ability to view the status of the attachments downloaded from the ticket. It returns values in “Boolean”.

True: Indicates that the attachment has been downloaded successfully without any errors.
False: Indicates that the attachment has been not downloaded due to an unexpected error being thrown.

Result: It provides the ability to view the execution status of the activity. It returns values in “Boolean.”
True: Indicates that the activity has been executed successfully without any errors.
False: Indicates that the activity has been unsuccessful due to an unexpected error being thrown.

* Represents mandatory fields to execute the workflow.

6.9.8 GetRecord

This activity allows the user to retrieve specific record’s detailed information from the Zendesk application. It can be used to fetch details of any tickets, ticket metrics, requests, users etc which can be further utilized in the process.  

Properties

Configuration

Once you select the respective project name where Zendesk has been authenticated, the activity will automatically retrieve the available connections for that project.

If you have not added the connection, click here to learn more. 

Below are the properties available after the project has been integrated:

Zendesk: *This parameter indicates the account name associated with the integration.

INPUT

AuditID: This parameter indicates the unique identifier assigned to an audit trail entry for a specific ticket. Each time a ticket is updated—whether it’s a status change, assignment update, or field modification—an audit record is generated. The Audit ID allows you to retrieve detailed historical information about changes made to the ticket, such as:

  • Who made the update
  • What specific changes were made (e.g., status changed from “open” to “closed”)
  • When the change occurred (timestamp)
  • Any associated comments or notes

It accepts the input value in “String” datatype. You can either hardcode the values in “String” format variable or provide the values in “String” datatype.

ObjectID: *This parameter indicates the unique identifier associated with the specific record that you want to retrieve. Depending on the Object Type selected (such as Ticket, User, Organization, etc.), the Object ID refers to the distinct ID that helps to identify the particular entity in the Zendesk application.

It accepts the input value in “String” datatype. You can either hardcode the values in “String” format variable or provide the values in “String” datatype.

ObjectType: This parameter indicates the specific type of data entity you want to retrieve from Zendesk application. You can choose the option from the dropdown in the activity interface. There are totally 17 object type from which you can retrieve the specific data. 

MISC

DisplayName: Displays the name of the activity. The activity name can be customized, which aids in troubleshooting.

SkipOnError: Specify the “Boolean” value as “True” or “False.”
True: Continue executing the workflow regardless of any errors thrown.
False: Halt the workflow if it encounters any errors.
None: If the option is left blank, the activity will, by default, behave as if “False” were chosen.

Version: It indicates the version of the feature being used.

OUTPUT

Output: It helps the user to view the information about the retrieved object’s details in a list format.

OutputTypeClass: It helps to view the class of the object type that has been selected. This field will be auto populated when the object type is chosen. 

Result: It provides the ability to view the execution status of the activity. It returns values in “Boolean.”
True: Indicates that the activity has been executed successfully without any errors.
False: Indicates that the activity has been unsuccessful due to an unexpected error being thrown.

* Represents mandatory fields to execute the workflow.

6.9.9 GetTicket

This activity allows the user to retrieve the details of a ticket using a specified ticket ID.

Properties

Configuration

Once you select the respective project name where Zendesk has been authenticated, the activity will automatically retrieve the available connections for that project.

If you have not added the connection, click here to learn more. 

Below are the properties available after the project has been integrated:

Zendesk: *This parameter indicates the account name associated with the integration.

INPUT

TicketID: *This parameter indicates to provide the “TICKET ID” against the details needs to be retrieved.

It accepts the input value in “String” datatype. You can either hardcode the values in “String” format variable or provide the values in “String” datatype.

MISC

DisplayName: Displays the name of the activity. The activity name can be customized, which aids in troubleshooting.

SkipOnError: Specify the “Boolean” value as “True” or “False.”
True: Continue executing the workflow regardless of any errors thrown.
False: Halt the workflow if it encounters any errors.
None: If the option is left blank, the activity will, by default, behave as if “False” were chosen.

Version: It indicates the version of the feature being used.

OUTPUT

TicketDetails: It provides the ability to view the result of the activity as the ticket details retrieve from the provided ticket ID.

Result: It provides the ability to view the execution status of the activity. It returns values in “Boolean.”
True: Indicates that the activity has been executed successfully without any errors.
False: Indicates that the activity has been unsuccessful due to an unexpected error being thrown.

* Represents mandatory fields to execute the workflow.

6.9.10 GetTicketMetrics

This activity retrieves detailed metrics and performance data for a specific ticket. It provides insights into various aspects such as response times, resolution times, and ticket statuses.

Properties

Configuration

Once you select the respective project name where Zendesk has been authenticated, the activity will automatically retrieve the available connections for that project.

If you have not added the connection, click here to learn more. 

Below are the properties available after the project has been integrated:

Zendesk: *This parameter indicates the account name associated with the integration.

INPUT

TicketID: *This parameter indicates to provide the “TICKET ID” against which the metrics needs to be retrieved.

It accepts the input value in “String” datatype. You can either hardcode the values in “String” format variable or provide the values in “String” datatype.

MISC

DisplayName: Displays the name of the activity. The activity name can be customized, which aids in troubleshooting.

SkipOnError: Specify the “Boolean” value as “True” or “False.”
True: Continue executing the workflow regardless of any errors thrown.
False: Halt the workflow if it encounters any errors.
None: If the option is left blank, the activity will, by default, behave as if “False” were chosen.

Version: It indicates the version of the feature being used.

OUTPUT

Result: It provides the ability to view the execution status of the activity. It returns values in “Boolean.”
True: Indicates that the activity has been executed successfully without any errors.
False: Indicates that the activity has been unsuccessful due to an unexpected error being thrown.

TicketMetrics: It provides the ability to view the result of the activity as the ticket metrics from the provided ticket ID.

* Represents mandatory fields to execute the workflow.

6.9.11 Insert Record

This activity helps the user to insert any records such as user, ticket, groups, organizations, categories etc., to the connected Zendesk account. 

Properties

Configuration

Once you select the respective project name where Zendesk has been authenticated, the activity will automatically retrieve the available connections for that project.

If you have not added the connection, click here to learn more. 

Below are the properties available after the project has been integrated:

Zendesk: *This parameter indicates the account name associated with the integration.

Input

Object Type: *Specifies the record to be selected from the drop-down list to insert into the connected account. It accepts values of the ‘String’ data type.

Manage Properties

Use this wizard to configure the standard fields for the selected records. You can select the fields, assign a default value or a corresponding variable, and save the configurations. 

MISC

DisplayName: Displays the name of the activity. The activity name can be customized, which aids in troubleshooting.

SkipOnError: Specify the “Boolean” value as “True” or “False.”
True: Continue executing the workflow regardless of any errors thrown.
False: Halt the workflow if it encounters any errors.
None: If the option is left blank, the activity will, by default, behave as if “False” were chosen.

Version: It indicates the version of the feature being used.

OUTPUT

Record ID: Returns the unique ID generated for the inserted record. The output is in the ‘Int64’ data type.

Result: It provides the ability to view the execution status of the activity. It returns values in “Boolean.”
True: Indicates that the activity has been executed successfully without any errors.
False: Indicates that the activity has been unsuccessful due to an unexpected error being thrown.

* Represents mandatory fields to execute the workflow.

6.9.12 List All Records

This activity helps the user to fetch the list of specific record. 

Properties

Configuration

Once you select the respective project name where Zendesk has been authenticated, the activity will automatically retrieve the available connections for that project.

If you have not added the connection, click here to learn more. 

Below are the properties available after the project has been integrated:

Zendesk: *This parameter indicates the account name associated with the integration.

Input

Object Type: Specifies the object type to be selected from the drop-down list, such as ticket, group, user, etc. It also accepts values in the String data type. 

Manage Properties

Use this wizard to configure the standard fields for the selected records. You can select the fields, assign a default value or a corresponding variable, and save the configurations. 

MISC

DisplayName: Displays the name of the activity. The activity name can be customized, which aids in troubleshooting.

SkipOnError: Specify the “Boolean” value as “True” or “False.”
True: Continue executing the workflow regardless of any errors thrown.
False: Halt the workflow if it encounters any errors.
None: If the option is left blank, the activity will, by default, behave as if “False” were chosen.

Version: It indicates the version of the feature being used.

OUTPUT

Result: It provides the ability to view the execution status of the activity. It returns values in “Boolean.”
True: Indicates that the activity has been executed successfully without any errors.
False: Indicates that the activity has been unsuccessful due to an unexpected error being thrown.

* Represents mandatory fields to execute the workflow.

How to View the Output of the Activity?

To view the output of this activity, configure its output properties using the Manage Properties wizard. Follow the steps below:

1. Select the activity and open the Manage Properties wizard.
2. You will see four properties: MaxRecord, PageSize, FirstOfRecord, and ListOfRecords.
3. Set the maximum number of records to retrieve in the MaxRecord property.
4. To store and access the list of retrieved records, assign a variable to the “ListOfRecords” property.
5. Use a For Each activity to iterate through the list and view each record.

6.9.13 ListAllRecentTickets

This activity retrieves a comprehensive list of recent tickets from the system for the past 7 days.

Properties

Configuration

Once you select the respective project name where Zendesk has been authenticated, the activity will automatically retrieve the available connections for that project.

If you have not added the connection, click here to learn more. 

Below are the properties available after the project has been integrated:

Zendesk: *This parameter indicates the account name associated with the integration.

INPUT

TimeoutThis parameter indicates the timeout value for establishing a connection to the Zendesk application.
If the connection cannot be established within this specified time, it will throw an exception.

MISC

DisplayName: Displays the name of the activity. The activity name can be customized, which aids in troubleshooting.

SkipOnError: Specify the “Boolean” value as “True” or “False.”
True: Continue executing the workflow regardless of any errors thrown.
False: Halt the workflow if it encounters any errors.
None: If the option is left blank, the activity will, by default, behave as if “False” were chosen.

Version: It indicates the version of the feature being used.

OUTPUT

RecentTickets: It helps to view the output of the activity as the recent tickets retrieved from past 7 days.

Result: It provides the ability to view the execution status of the activity. It returns values in “Boolean.”
True: Indicates that the activity has been executed successfully without any errors.
False: Indicates that the activity has been unsuccessful due to an unexpected error being thrown.

* Represents mandatory fields to execute the workflow.

6.9.14 ListAllTicketComments

This activity helps the user to retrieve and display all comments associated with a specific ticket or a group of tickets. It provides a detailed list of comments, including their content, authors, and timestamps.

Properties

Configuration

Once you select the respective project name where Zendesk has been authenticated, the activity will automatically retrieve the available connections for that project.

If you have not added the connection, click here to learn more. 

Below are the properties available after the project has been integrated:

Zendesk: *This parameter indicates the account name associated with the integration.

INPUT

Fields: This parameter specifies any fields o the comment section to filter and retrieve the comments from the specified Ticket ID.

It accepts the input value in “Array of String” datatype. You can either hardcode the values in “Array of String” format variable or provide the values in “Array of String” datatype.
When left empty, it will not be considered.

Include: This parameter specifies the list of users to whom the CC emails will be sent.

It accepts input values in the “String” datatype. You can either hardcode the values in “String” format variable or provide the values in “Array of String” datatype.

When left empty, it will not be considered.

SortOrder: This parameter indicates to sort and retrieve the comments based on the below,

Ascending: It helps to retrieve the comments in ascending order.
Descending: It helps to retrieve the comments in ascending order.

By default, the order will be fetched and retrieved in “Ascending order”.

TicketID: *This parameter indicates to provide the “TICKET ID” against which the comments needs to be retrieved.

It accepts the input value in “String” datatype. You can either hardcode the values in “String” format variable or provide the values in “String” datatype.

Timeout: This parameter indicates the timeout value for establishing a connection to the Zendesk application.

If the connection cannot be established within this specified time, it will throw an exception.

MISC

DisplayName: Displays the name of the activity. The activity name can be customized, which aids in troubleshooting.

SkipOnError: Specify the “Boolean” value as “True” or “False.”
True: Continue executing the workflow regardless of any errors thrown.
False: Halt the workflow if it encounters any errors.
None: If the option is left blank, the activity will, by default, behave as if “False” were chosen.

Version: It indicates the version of the feature being used.

OUTPUT

Result: It provides the ability to view the execution status of the activity. It returns values in “Boolean.”
True: Indicates that the activity has been executed successfully without any errors.
False: Indicates that the activity has been unsuccessful due to an unexpected error being thrown.

TicketComments: It helps to view the output of the activity as the comments retrieved from the provided Ticket ID.

* Represents mandatory fields to execute the workflow.

6.9.15 ListAllTickets

This activity retrieves a comprehensive list of all tickets from the system for the past 30 days. 

Properties

Configuration

Once you select the respective project name where Zendesk has been authenticated, the activity will automatically retrieve the available connections for that project.

If you have not added the connection, click here to learn more. 

Below are the properties available after the project has been integrated:

Zendesk: *This parameter indicates the account name associated with the integration.

INPUT

MaxRecords: This parameter indicates to provide the maximum number of records to be retrieved.

It accepts input values in “Integer”. You can either hardcode the values in “Integer” format variable or provide the values in “Integer” datatype.

When left empty, it will not be considered, and it will retrieve all the tickets numbers from the past 30 days.

PageSize: This parameter specifies the maximum number of records to display per page.

It accepts input values in “Integer” format. You can either hardcode the values as an “Integer” or provide them through an “Integer” datatype variable.

When left empty, it will not be considered.

Timeout: This parameter indicates the timeout value for establishing a connection to the Zendesk application.

If the connection cannot be established within this specified time, it will throw an exception.

MISC

DisplayName: Displays the name of the activity. The activity name can be customized, which aids in troubleshooting.

SkipOnError: Specify the “Boolean” value as “True” or “False.”
True: Continue executing the workflow regardless of any errors thrown.
False: Halt the workflow if it encounters any errors.
None: If the option is left blank, the activity will, by default, behave as if “False” were chosen.

Version: It indicates the version of the feature being used.

OUTPUT

Result: It provides the ability to view the execution status of the activity. It returns values in “Boolean.”
True: Indicates that the activity has been executed successfully without any errors.
False: Indicates that the activity has been unsuccessful due to an unexpected error being thrown.

TicketList: *It helps the user to view the output of the activity as the list of the tickets retrieved from the Zendesk application. Declare a variable to view the output.

* Represents mandatory fields to execute the workflow.

6.9.16 ReplaceTicket

This activity allows the user to replace or update an existing ticket with a new set of details. It involves specifying the ticket ID and providing updated information or data that will override the current ticket details.

Properties

Configuration

Once you select the respective project name where Zendesk has been authenticated, the activity will automatically retrieve the available connections for that project.

If you have not added the connection, click here to learn more. 

Below are the properties available after the project has been integrated:

Zendesk: *This parameter indicates the account name associated with the integration.

INPUT

AssigneeID: This parameter indicates to provide the “Assignee ID” to whom the ticket needs to be assigned from the specific ID. It will directly route the ticket to the specified person.

It accepts the input value in “String” datatype. You can either hardcode the values in “String” format variable or provide the values in “String” datatype.

When left empty, it will not be considered, and the ticket will be assigned randomly to the persons in the group name.

BrandID: This parameter indicates to provide the “BrandID” of the specific brand. It represents the unique identifier of the brand/ product within the specific organization.

It accepts the input value in “String” datatype. You can either hardcode the values in “String” format variable or provide the values in “String” datatype.

When left empty, it will not be considered.

Description*This parameter indicates to provide the description to explain the purpose for which the ticket is created.

It accepts the input value in “String” datatype. You can either hardcode the values in “String” format variable or provide the values in “String” datatype.

DueAt: This parameter indicates to provide the timeframe at which the ticket needs to be resolved within. It is basically known as SLA value upon which the ticket should be resolved.

DataType: It accepts the input value in “String” datatype.
Format: YYYY/MM/DD
You can either hardcode the values in “String” format variable or provide the values in “String” datatype.

When left empty, it will not be considered.

GroupID: This parameter indicates to specify the “GroupID” against which the ticket needs to be created and assigned specifically. It specifically helps the user to route the ticket to the specified GroupID.

It accepts the input value in “String” datatype. You can either hardcode the values in “String” format variable or provide the values in “String” datatype.

OrganizationID: This parameter indicates to specify the “OrganizationID” against which the ticket needs to be created.

It accepts the input value in “String” datatype. You can either hardcode the values in “String” format variable or provide the values in “String” datatype.

Priority: This parameter indicates you to set the priority based on importance and urgency of the incident to be resolved.

• Urgent: Allows you to create a ticket with an urgent priority based on its impact.
• High: Allows you to create a ticket with high priority based on its impact.
• Normal: Allows you to create a ticket with normal priority based on its impact.
• Low: Allows you to create a ticket with low priority based on its impact.

RequesterID: This parameter indicates the end user who has initiated the request to create the ticket.
It accepts the input value in “String” datatype. You can either hardcode the values in “String” format variable or provide the values in “String” datatype.

Status: It indicates to retrieve the list of tickets from the specified status.
• New
• Open
• Pending
• Hold
• Solved
• Closed

Subject: This parameter indicates to mention the subject of the ticket.

It accepts the input value in “String” datatype. You can either hardcode the values in “String” format variable or provide the values in “String” datatype.

TicketID: *This parameter indicates to provide the “TICKET ID” against which the details needs to be updated.

It accepts the input value in “String” datatype. You can either hardcode the values in “String” format variable or provide the values in “String” datatype.

Type: This parameter indicates the choose the type of ticket from the below,

Problem: It indicates to create a ticket if there is a bug in the software.
Incident: To group multiple tickets that represent the same issue / interruption in the software, use this.
Question: It indicates the query or any inquiry about the software.
Task: It indicates to create a task to complete a set of actions with clear steps.

MISC

DisplayName: Displays the name of the activity. The activity name can be customized, which aids in troubleshooting.

SkipOnError: Specify the “Boolean” value as “True” or “False.”
True: Continue executing the workflow regardless of any errors thrown.
False: Halt the workflow if it encounters any errors.
None: If the option is left blank, the activity will, by default, behave as if “False” were chosen.

Version: It indicates the version of the feature being used.

OUTPUT

Result: It provides the ability to view the execution status of the activity. It returns values in “Boolean.”
True: Indicates that the activity has been executed successfully without any errors.
False: Indicates that the activity has been unsuccessful due to an unexpected error being thrown.

* Represents mandatory fields to execute the workflow.

6.9.18 SearchTicket

This activity helps the user to search and retrieve the list of tickets from the specified status if provided any.

Properties

Configuration

Once you select the respective project name where Zendesk has been authenticated, the activity will automatically retrieve the available connections for that project.

If you have not added the connection, click here to learn more. 

Below are the properties available after the project has been integrated:

Zendesk: *This parameter indicates the account name associated with the integration.

INPUT

Assignee: This parameter specifies the “Assignee” ID of the person whose list of tickets needs to be retrieved.

It accepts the input value in “String” datatype. You can either hardcode the values in “String” format variable or provide the values in “String” datatype.

DueDate: This parameter specifies the “Date” against which the list of tickets needs to be searched and retrieved.

DataType: It accepts the input value in “String” datatype.
Format: YYYY/MM/DD

You can either hardcode the values in “String” format variable or provide the values in “String” datatype.

When left empty, it will not be considered.

Organization: This parameter specifies the “Organization” ID/ name of whose list of tickets needs to be retrieved.

It accepts the input value in “String” datatype. You can either hardcode the values in “String” format variable or provide the values in “String” datatype.

Priority: This parameter allows you to retrieve a list of tickets based on the specified priority.

Urgent: Allows you to retrieve tickets with an urgent priority based on its impact.
High: Allows you to retrieve tickets with high priority based on its impact.
Normal: Allows you to retrieve tickets with normal priority based on its impact.
Low: Allows you to retrieve tickets with low priority based on its impact.

Requester: This parameter specifies the “Requester” of the person whose list of tickets needs to be retrieved.

It accepts the input value in “String” datatype. You can either hardcode the values in “String” format variable or provide the values in “String” datatype.

Status: It indicates to retrieve the list of tickets from the specified status.
• New
• Open
• Pending
• Hold
• Solved
• Closed

Subject: This parameter specifies the “Subject” of the ticket that needs to be retrieved.

It accepts the input value in “String” datatype. You can either hardcode the values in “String” format variable or provide the values in “String” datatype.

Tags: This parameter specifies the “tags” from which the ticket needs to be retrieved.

It accepts the input value in “String” datatype. You can either hardcode the values in “String” format variable or provide the values in “String” datatype.

Timeout: This parameter indicates the timeout value for establishing a connection to the Zendesk application.

If the connection cannot be established within this specified time, it will throw an exception

Type: This parameter allows you to select the type of ticket from which the list needs to be retrieved.

Problem: Tickets related to the root cause of one or more incidents.
Incident: Tickets related to unplanned interruptions or reductions in service quality.
Question: Tickets that involve inquiries or requests for information.
Task: Tickets that require specific actions to be completed.

MISC

DisplayName: Displays the name of the activity. The activity name can be customized, which aids in troubleshooting.

SkipOnError: Specify the “Boolean” value as “True” or “False.”
True: Continue executing the workflow regardless of any errors thrown.
False: Halt the workflow if it encounters any errors.
None: If the option is left blank, the activity will, by default, behave as if “False” were chosen.

Version: It indicates the version of the feature being used.

OUTPUT

Result: It provides the ability to view the execution status of the activity. It returns values in “Boolean.”
True: Indicates that the activity has been executed successfully without any errors.
False: Indicates that the activity has been unsuccessful due to an unexpected error being thrown.

Tickets: It helps to return the list of tickets from the specified parameters as the result of the activity. It returns the “List” datatype.

* Represents mandatory fields to execute the workflow.

6.9.19 Search Users

This activity allows the user to retrieve a list of users from the connected Zendesk account. It also supports fetching users based on specific criteria such as name, email address, organization, and more.

Properties

Configuration

Once you select the respective project name where Zendesk has been authenticated, the activity will automatically retrieve the available connections for that project.

If you have not added the connection, click here to learn more. 

Below are the properties available after the project has been integrated:

Zendesk: *This parameter indicates the account name associated with the integration.

Input

Manage Properties

Use this wizard to configure additional fields for fetching the user list. You can select the required fields, assign default values or map them to variables, and save the configuration.

Note: In this activity, the list of users can be retrieved based on the fields configured in the Manage Properties wizard. By default, all available parameters are selected.

 MISC

DisplayName: Displays the name of the activity. The activity name can be customized, which aids in troubleshooting.

SkipOnError: Specify the “Boolean” value as “True” or “False.”
True: Continue executing the workflow regardless of any errors thrown.
False: Halt the workflow if it encounters any errors.
None: If the option is left blank, the activity will, by default, behave as if “False” were chosen.

Version: It indicates the version of the feature being used.

OUTPUT

Users: Returns the user details in a list of custom class as variable type. Use ForEach activity to iterate and retrieve the list of users. 

Result: It provides the ability to view the execution status of the activity. It returns values in “Boolean.”
True: Indicates that the activity has been executed successfully without any errors.
False: Indicates that the activity has been unsuccessful due to an unexpected error being thrown.

* Represents mandatory fields to execute the workflow.

6.9.20 UpdateGroup

This activity helps the user to modify and update the details of an existing group of agents for the specific GroupID. 

Properties

Configuration

Once you select the respective project name where Zendesk has been authenticated, the activity will automatically retrieve the available connections for that project.

If you have not added the connection, click here to learn more. 

Below are the properties available after the project has been integrated:

Zendesk: *This parameter indicates the account name associated with the integration.

INPUT

Description: This parameter indicates to provide the description of the group that needs to be modified against the GroupID.  

It accepts the input value in “String” datatype. You can either hardcode the values in “String” format variable or provide the values in “String” datatype.

GroupID: *This parameter indicates to provide the unique “GroupID” against which the details need to be modified. 

It accepts the input value in “String” datatype. You can either hardcode the values in “String” format variable or provide the values in “String” datatype.

IsPublic: Use this option to make the created group accessible to everyone in the Zendesk application. If left unchecked, the group will only be available to specific members.  

Name: This parameter indicates to provide the name for the group to be created. 

It accepts the input value in “String” datatype. You can either hardcode the values in “String” format variable or provide the values in “String” datatype

MISC

DisplayName: Displays the name of the activity. The activity name can be customized, which aids in troubleshooting.

SkipOnError: Specify the “Boolean” value as “True” or “False.”
True: Continue executing the workflow regardless of any errors thrown.
False: Halt the workflow if it encounters any errors.
None: If the option is left blank, the activity will, by default, behave as if “False” were chosen.

Version: It indicates the version of the feature being used.

OUTPUT

GroupDetails: It helps the user to view the information about the newly created group in Zendesk. This output includes the following data:

URL: Provides the URL to created group. 
Group ID: The unique identifier for the group.
Group Name: The name assigned to the group.
IsPublic: Indicates whether the group is public or restricted to specific members.
Created At: The timestamp when the group was created.
Updated At: The timestamp of the most recent update to the group.

Result: It provides the ability to view the execution status of the activity. It returns values in “Boolean.”
True: Indicates that the activity has been executed successfully without any errors.
False: Indicates that the activity has been unsuccessful due to an unexpected error being thrown.

* Represents mandatory fields to execute the workflow.

6.9.21 Update Record

This activity allows users to update records such as users, tickets, groups, organizations, categories, and more in the connected Zendesk account.

Properties

Configuration

Once you select the respective project name where Zendesk has been authenticated, the activity will automatically retrieve the available connections for that project.

If you have not added the connection, click here to learn more. 

Below are the properties available after the project has been integrated:

Zendesk: *This parameter indicates the account name associated with the integration.

Input

Object Type: *Specifies the record to be selected from the drop-down list to update into the connected account. It accepts values of the ‘String’ data type.

Object ID: *Specifies the provide the selected Object’s ID to update and it accepts values of the ‘String’ data type.

Manage Properties

Use this wizard to configure the standard fields for the selected records. You can select the fields, assign a default value or a corresponding variable, and save the configurations. 

MISC

DisplayName: Displays the name of the activity. The activity name can be customized, which aids in troubleshooting.

SkipOnError: Specify the “Boolean” value as “True” or “False.”
True: Continue executing the workflow regardless of any errors thrown.
False: Halt the workflow if it encounters any errors.
None: If the option is left blank, the activity will, by default, behave as if “False” were chosen.

Version: It indicates the version of the feature being used.

OUTPUT

Record ID: Returns the unique ID generated for the updated record. The output is in the ‘Int64’ data type.

Result: It provides the ability to view the execution status of the activity. It returns values in “Boolean.”
True: Indicates that the activity has been executed successfully without any errors.
False: Indicates that the activity has been unsuccessful due to an unexpected error being thrown.

* Represents mandatory fields to execute the workflow.

6.9.22 UploadAttachments

This activity helps the user to upload files or documents to a specific ticket. These attachments can include images, documents, or other relevant files that assist in resolving tickets or providing additional information. 

Limitation

This activity allows the upload of files up to a maximum size of 50 MB.

Properties

Configuration

Once you select the respective project name where Zendesk has been authenticated, the activity will automatically retrieve the available connections for that project.

If you have not added the connection, click here to learn more. 

Below are the properties available after the project has been integrated:

Zendesk: *This parameter indicates the account name associated with the integration.

INPUT

Attachment: *This parameter indicates to provide the attachment path of the file that needs to be uploaded. You can also choose file path using the browse option.   

It accepts the input value in “String” datatype. You can either hardcode the values in “String” format variable or provide the values in “String” datatype.

Filename: *This parameter indicates to provide the name of the file that needs to be uploaded for the attachment. 

It accepts the input value in “String” datatype. You can either hardcode the values in “String” format variable or provide the values in “String” datatype.

MISC

DisplayName: Displays the name of the activity. The activity name can be customized, which aids in troubleshooting.

SkipOnError: Specify the “Boolean” value as “True” or “False.”
True: Continue executing the workflow regardless of any errors thrown.
False: Halt the workflow if it encounters any errors.
None: If the option is left blank, the activity will, by default, behave as if “False” were chosen.

Version: It indicates the version of the feature being used.

OUTPUT

AttachmentDetails: It helps the user to view the information about the attachment details uploaded. This output includes the following data:

Attachment ID: A unique identifier for the uploaded file.
File Name: The name of the file that was uploaded.
File Size: The size of the uploaded file in bytes.
Content Type: The type of the uploaded file (e.g., PDF, JPEG).
Content URL: A link to access or download the uploaded attachment within Zendesk.
Created At: The timestamp when the file was uploaded.

FileToken*It refers to the unique ID of the attachment that has been uploaded. It returns the values in “String” datatype. 

Result: It provides the ability to view the execution status of the activity. It returns values in “Boolean.”
True: Indicates that the activity has been executed successfully without any errors.
False: Indicates that the activity has been unsuccessful due to an unexpected error being thrown.

Represents mandatory fields to execute the workflow.

6.9.23 Zendesk HTTP Request

The Zendesk HTTP Request activity allows you to perform bulk operations through API requests, such as updating tickets, managing users, organizations, and groups, adding comments, and uploading or downloading attachments.

Why use HTTP Request instead of other Zendesk activities?

1. Work with multiple resources: Update or retrieve information for several tickets, users, or other objects in a single request.
2. Combine actions: Reduce the need to chain multiple activities by performing several operations in one step.
3. Access advanced API operations: Perform advanced actions not available in other Zendesk activities, such as:

a. Filtering results with query parameters (e.g., retrieve tickets from a specific organization with a defined tag).
b. Sending structured JSON payloads with nested fields, attachments, or conditional data.

4. Customize requests: Define the method type (GET, POST, PUT, DELETE), set headers, add query parameters, and configure the request body to match your requirements.

Properties

Configuration

Once you select the respective project where Zendesk has been authenticated, the activity will automatically retrieve the available connections for that project.

If no connection is added, click here to learn more.

The following properties are available after the project is integrated:

Zendesk: Indicates the account name associated with the integration.

Input

Request URL: *Specifies to provide the API endpoint (action-specific path) and it accepts values in “String” datatype. Refer the below documentation to learn more about Request URL.

Method: *Specifies to provide the HTTP method to be used when calling the API. Supported methods are:

GET – Retrieves or fetches records from categories such as tickets, users, organizations, etc.
POST – Creates a new resource such as a ticket or user.
PUT – Updates existing resources such as tickets, users, or comments.
DELETE – Removes existing resources such as tickets, users, or comments.
PATCH – Updates only specific fields in existing resources such as tickets or users.

Base URL: Automatically populated with the base URL from the activity.

Request Headers: Allows you to provide custom headers required by the API, such as authentication details or content type.

Query Parameters: Specifies to provide key and value pairs used as input parameters in the request URL. This field is required only with the GET method to filter, sort, or paginate results.

Body: Specifies the request payload. Accepts input in string format with JSON content.

MISC

Display Name: Displays the name of the activity. The activity name can be customized, which aids in troubleshooting.

SkipOnError: Specify the “Boolean” value as “True” or “False.”

True: Continue executing the workflow regardless of any errors thrown.
False: Halt the workflow if it encounters any errors.
None: If the option is left blank, the activity will, by default, behave as if “False” were chosen.

Version: It indicates the version of the feature being used.

OUTPUT

Response Body: Returns the response body from the API call as a String data type.

Response Headers: Returns the response headers as a Dictionary data type.

Response Status Code: Returns the execution status code of the API as an Integer data type. Each status code represents a different execution result.

Result: This parameter allows you to view the execution status of the activity and returns a value in “Boolean.”

True: Indicates that the activity has been executed successfully without any errors.
False: Indicates that the activity has been unsuccessful due to an unexpected error being thrown.

* Represents mandatory fields to execute the workflow.

Common Status Codes

1. 200 – Success (request completed successfully)
2. 201 – Created (a new resource has been created, e.g., ticket or user)
3. 202 – Request accepted but processing is not yet complete.
4. 204 – No Content (request succeeded but no content returned, common with DELETE)
5. 400 – Bad Request (invalid input or request format)
6. 401 – Unauthorized (missing or invalid authentication)
7. 403 – Forbidden (insufficient permissions)
8. 404 – Not Found (resource doesn’t exist)
9. 500 – Internal Server Error (server-side issue).
10. 504 – Gateway Timeout – The server didn’t respond in time.
11. 503 Service Unavailable → API service is down or overloaded.

Request URL

This activity provides the base URL. Along with it, you need to specify the request URL, which varies depending on the resource (such as tickets, users, comments, etc.).

Examples:

POST – Create a new organization:

RequestURL: “/organizations.json”

Body: “{“”organization””:{“”name””:””sl org 200″”,””created_at””:””0001-01-01T00:00:00″”,””domain_names””:[],””organization_fields””:{},””shared_comments””:false,””shared_tickets””:false,””tags””:[],””updated_at””:””0001-01-01T00:00:00″”}}”

PUT / PATCH – Update an existing ticket:

RequestURL   : “/tickets/ID.json”

Body: “{“”ticket””:{“”comment””:{“”body””:””tstein””,””uploads””:null,””public””:true,””author_id””:null}}}”

GET – Search for a user by email

RequestURL: “users/search.json?

query=email:user123@testng.com

Click here to refer detailed information on the official Zendesk API documentation.

Example using Zendesk HTTP request activity

In this example, we will demonstrate how to use the Zendesk HTTP Request activity to first create a new support ticket and then update the ticket with a follow-up comment. This is a common workflow where:

a. A user raises an issue (ticket creation).
b. Later, more details or updates need to be added to the same ticket (ticket update with comments).

Steps:

1. Drag and drop the Create Ticket activity into the workflow.
2. Enter the description “The user reports that they are unable to login with valid credentials.”
3. Provide the subject “ Unable to login to the website”.
4. In the output section, declare a variable in the Ticket ID parameter to capture the ticket ID returned from Zendesk.
5. Add a Write Log activity to print the ticket ID for reference.

Update the Ticket with Comments

6. Drag and drop the Zendesk HTTP Request activity after the Write Log activity.
7. Set the Method to PUT.
8. In the Request URL, enter: “tickets/” + TICKET_NUMBER + “.json”

(Here, TICKET_NUMBER refers to the variable holding the ticket ID from Step 1.)

9. In the Body parameter, provide the comment details:

“{“”ticket””:{“”comment””:{“”body””:””Totally 400 users were affected but right now the issue is resolved. Please provide the RCA.””,””uploads””:null,””public””:true,””author_id””:null}}}”

10. In the output section of the HTTP Request activity, declare a variable in the Response Status Code parameter to capture the execution result.
11. Add a Write Log activity to print the status code and verify whether the update was successful (200 indicates success).

Result:

a. A ticket is created in Zendesk with the given subject and description.
b. A follow-up comment is added to the same ticket with status code confirmation.

6.10 Salesforce

Salesforce in Robility is a cloud-based CRM connector that enhances automation workflows by integrating key Salesforce functionalities. It streamlines the automation of CRM processes, including creating and managing accounts, contacts, leads, opportunities, tracking sales, and generating reports.

Scopes

To integrate Robility with Salesforce, specific scopes must be enabled when setting up an application. These scopes grant Robility with the required permissions to access Salesforce data, read records, create entries, and utilize various features.

Without integration, Robility cannot retrieve data from Salesforce, preventing users from automating tasks or executing workflows within the Salesforce platform. For detailed information on integrating external client applications with Salesforce, refer these links.

1. External Client Apps
2. Configure a Connected App for the OAuth 2.0 Client Credentials Flow

Below are the required scopes to ensure proper functionality and integration. 

OAuth Scopes

Below are the required OAuth scopes to ensure proper functionality and integration:

1. Manage user data via APIs (api): This scope allows Robility to read, create, update, and delete records in the Salesforce account through API interactions.

2. Full access (Full): This scope grants the application complete access to Salesforce, with no restrictions on the data or functionality it can access.

3. Perform requests at any time (refresh_token, offline_access): This scope enables the application to request and maintain a refresh token, allowing it to refresh the user’s access token without needing the user to authenticate again.

Callback URL

The Callback URL is a critical part of the OAuth flow. When integrating Robility with Salesforce, this URL ensures that once the user grants permission to the application, Salesforce will send an authorization code (for OAuth 2.0) or an access token to this URL. This allows Robility to complete the authentication process and gain access to Salesforce data.

The Callback URL can be found on the “Salesforce” Connection page in Robility. Follow the below steps:

1. Log in to Robility Manager.
2. Navigate to Projects → App Integrations → Salesforce.
3. You will be redirected to the Salesforce connector page.
4. Click the Settings icon on that page.
5. Select the Bring your own OAuth 2.0 app option.
6. The callback URL for the OAuth application will be displayed.
7. Copy this URL and add it during the application configuration in Salesforce. 
    a. Add it in the salesforce application during external client application configuration at the below path:
    b. OAuth Settings –>App Settings –>Callback URL 

Note: This URL must be provided for both authentication types.

Flow Enablement and Security

Flow Enablement and Security are essential for ensuring the smooth and secure operation of Robility’s integration with Salesforce.

1. Flow Enablement: Automates workflows to collect data, update records, and execute predefined actions seamlessly within Salesforce.
2. Security: Ensures that all users accessing Salesforce are properly authenticated and authorized to safeguard data integrity.

Refer to the below image to ensure that the necessary options are enabled when configuring the application with Salesforce. 

Refresh Token Policy

Salesforce enables applications to automatically refresh tokens upon expiration, which occurs every hour, until the access has been manually revoked. This option can be enabled when creating the application in Salesforce to keep the refresh token valid. Refer the below image. 

Additionally, it enforces a refresh token policy limiting token creation to a maximum of five users per Salesforce integration connector.

How It Works?

1. Each Salesforce account integrated with the Robility connector can maintain up to five active refresh tokens.
2. If a sixth user integrates with the Salesforce connector with the existing salesforce account, the system will override the token associated with the most recent user’s connection. Click here to learn more. 

Note: If a token expires during the process-building phase, the user will receive a notification prompting them to regenerate the token with a navigation URL directing them to Robility Manager. Click here to learn more how to integrate connections. 

Authentication 

After creating an application within Salesforce using the required scopes provided above to automate with Robility, you can establish a connection through App Integrations in Robility Manager. Click here to learn more. 

Salesforce integration supports two authentication methods:

1. OAuth 2.0 Authorization Code – Use this option to connect via Sutherland’s authenticated Salesforce account with predefined scopes.
2. Bring Your Own OAuth 2.0 App – This method allows you to manually provide your own Client ID, Client Secret, and Domain for authentication. 

This authentication is required to start building an automation workflow using Salesforce activities. Users need the Salesforce Authenticator app for authentication upon each connection. 

Connection from Designer 

1. Drag and drop the activity into the workflow.
2. Click on the “Add New Connection” hyperlink within the activity.
3. You will be redirected to Robility Manager. Click on “Connect”.
4. You will then be taken to the Salesforce login page. Enter the required credentials.
5. Return to the activity, click the “Settings” icon, and select the “Refresh” button to sync with the newly created connection in Robility Manager.
6. The activity is now connected, and you can begin automating with Salesforce.

6.10.1 Release Notes

v.1.7.0

This release includes stability and performance improvements across connector activities.

Bug Fix

Resolved an issue that could cause intermittent execution failures and increased processing time during connector operations. Authentication handling has been optimized to improve connection reliability, reduce unnecessary authentication requests, and enhance overall workflow performance.

Released Date: 02/06/2026

6.10.2 Output Preview

How to view the output? 

 Each Salesforce activity generates a specific datatype, often containing data like account, contact, file or lead details. To ensure we can access this data, we need to properly view and retrieve its parameter. To view the output from Salesforce activities, follow these steps:

1. In your workflow, drag and drop the Write Log activity from the Activities panel.
2. In the Write Log activity’s “Input” property, enter the variable name that holds the activity’s output. For example, if the output is stored in a variable named “Test”, you would enter “Test”.

3. Press “CTRL + Spacebar” to open the IntelliSense menu, which displays a list of available parameters and properties for the specified variable.
4. Choose the desired parameter from the list to include it in your output. For instance, to view the Account ID, you might select Test.ID.
5. Execute your workflow.

The specified parameters will be printed to the Output panel, allowing you to verify the details of the created account.

6.10.3 Add File to Record

This activity helps the users to attach an uploaded file to a specified Salesforce record, such as an Account, Contact, or Opportunity.

Properties

Configuration

Once the integration is connected from the Manager, the property panel will automatically display the connected integration.
If you see the message “Add new connection”click here to learn how to set up a new connection.

Below are the properties available after the project has been integrated:

Salesforce: *This parameter indicates the account name associated with the integration.

INPUT

Content Document ID: *Specify the File ID of the attachment uploaded to the Salesforce account. It accepts values in the “String” datatype. You can retrieve the “File ID” from the output of the “Upload File” activity.

Record ID: *Specify the Account ID, Contact ID, Lead ID or Opportunity ID to link the file to. It accepts values in the “String” datatype.

Share Type: *Defines the sharing permissions for the uploaded file. Choose the option from the drop-down or you can directly provide the values in “String” datatype. 

Viewer Permission: Grants permission for all users to view the file.
Collaborator Permission: Grants permission for collaborators only to view the file.
Inferred Permission: Makes the file invisible and prevents sharing.

Visibility: Specifies whether the file should be visible to all users, internal users, or shared users. You can select an option from the drop-down menu or directly enter the values in the “String” datatype.

MISC

SkipOnError: Specify the “Boolean” value as “True” or “False.”
True: Continue executing the workflow regardless of any errors thrown.
False: Halt the workflow if it encounters any errors.
None: If the option is left blank, the activity will, by default, behave as if “False” were chosen.

Version: It indicates the version of the feature being used.

OUTPUT

File Record Link: It helps to view the details of the file uploaded, curated by custom class of Salesforce API. Click here to know how to view the output.

Result: This parameter allows you to view the execution status of the activity and returns a value in “Boolean.”
True: Indicates that the activity has been executed successfully without any errors.
False: Indicates that the activity has been unsuccessful due to an unexpected error being thrown.

* Represents mandatory fields to execute the workflow.

6.10.4 Create Account

This activity helps the user to add new customer or business accounts to their Salesforce.

Properties

Configuration

Once the integration is connected from the Manager, the property panel will automatically display the connected integration.
If you see the message “Add new connection”click here to learn how to set up a new connection.

Below are the properties available after the project has been integrated:

Salesforce: *This parameter indicates the account name associated with the integration.

INPUT

Account Name: *This parameter specifies to provide a unique name for the account to be created. It accepts values in “String” datatype. 

Account Number: Specifies the user defined external number to create the account. It accepts values in “String” datatype. 

Account Type: Specifies to select the type of account such as “Customer, prospect or partner” to be created. It accepts values in “String” datatype. 

a. Customer
b. Prospect
c. Partner

Phone: This parameter specifies to provide the phone number for the account being created. It accepts values in “String” datatype.

Website: Specifies to provide the website belonging to the account being created. It accepts values in “String” datatype. 

MISC

DisplayName: Displays the name of the activity. The activity name can be customized, which aids in troubleshooting.

SkipOnError: Specify the “Boolean” value as “True” or “False.”
True: Continue executing the workflow regardless of any errors thrown.
False: Halt the workflow if it encounters any errors.
None: If the option is left blank, the activity will, by default, behave as if “False” were chosen.

Version: It indicates the version of the feature being used.

Manage Properties

Use this option to select and customize the standard fields for account creation. The configured properties will appear in the activity’s properties panel, allowing you to provide the necessary input. 

OPTIONS

Account source: Specifies to choose the referral source from which the account/company was received, such as Web, Phone, Twitter etc. It accepts values in “String” datatype.

Billing City: Specifies to provide the city to which account would be billed. It accepts values in “String” datatype. 

Billing Country: Specifies to provide the country to which account would be billed. It accepts values in “String” datatype. 

Billing postal code: Specifies to provide the postal code of the city to which the account would be billed. It accepts values in “String” datatype.

Description: Specifies to provide additional information of the account being created. It accepts values in “String” datatype.

Employees: Specifies to provide the number of employees for the account being created. It accepts values in “Int64” datatype.

Shipping city: Specifies to provide the city associated with the account’s shipping address. It accepts values in “String” datatype. 

Shipping Country: Specifies to provide the country associated with the account’s shipping address. It accepts values in “String” datatype.

Shipping Postal Code: Specifies to provide the postal code associated with the account’s shipping address. It accepts values in “String” datatype.

OUTPUT

Account: It helps to view the details of the account curated by custom class of Salesforce API. Click here to know how to view the output.

ID: It helps to return the unique identifier of the account created in salesforce in “String” datatype.

Result: This parameter allows you to view the execution status of the activity and returns a value in “Boolean.”
True: Indicates that the activity has been executed successfully without any errors.
False: Indicates that the activity has been unsuccessful due to an unexpected error being thrown.

* Represents mandatory fields to execute the workflow.

6.10.5 Create Bulk Upload Job

This activity allows the user to create a bulk upload job in Salesforce, enabling the insertion, updating, or deleting of large volumes of records.

Properties

Configuration

Once the integration is connected from the Manager, the property panel will automatically display the connected integration.
If you see the message “Add new connection”click here to learn how to set up a new connection.

Below are the properties available after the project has been integrated:

Salesforce: *This parameter indicates the account name associated with the integration.

INPUT

Select Object: Specifies the Salesforce object on which the operation will be performed. You can either select an option from the drop-down menu or enter the value manually using the available options below,

1. Clear Values: Clears the existing value and prompts to enter new value.
2. Use Variable: Clears the assigned variable and enables selection from the drop-down.

CSV File: *Specifies the file path of the CSV containing the data. It accepts values in the String datatype.

1. Open in Expression Editor: Enter the CSV file path manually in “string” format or use a variable which contains the path. 
2. Clear Values: Clears the existing value and prompts to enter new value.
3. Browse: Allows to browse and select the file path from the system folder manually. 

CRUD Operation: Specifies to select the type of operation to be performed on the Salesforce object. Below are the options, 

Insert: Adds new records to the specified Salesforce object.
Update: Modifies existing records based on the provided identifiers.
Upsert: Inserts new records or updates existing ones if a matching identifier is found.
Delete: Removes specified records from the Salesforce object.

Column Delimiter: Specifies which delimiter option should be used from the provided csv file during the execution. Below are the options, 

Comma
Backquote
Caret
Pipe
Semicolon

Line Ending: Specifies the type of line break used in the CSV file to separate records during the execution. Below are the options,

LF (Line Feed): Uses \n as the line break.
CRLF (Carriage Return + Line Feed): Uses \r\n as the line break. 

MISC

Display Name: Displays the name of the activity. The activity name can be customized, which aids in troubleshooting.

SkipOnError: Specify the “Boolean” value as “True” or “False.”

True: Continue executing the workflow regardless of any errors thrown.
False: Halt the workflow if it encounters any errors.
None: If the option is left blank, the activity will, by default, behave as if “False” were chosen.

Version: It indicates the version of the feature being used.

OUTPUT

JOB ID: *It helps to return the JOB ID as the result of the execution in “String” datatype.

Result: This parameter allows you to view the execution status of the activity and returns a value in “Boolean.”

True: Indicates that the activity has been executed successfully without any errors.
False: Indicates that the activity has been unsuccessful due to an unexpected error being thrown.

* Represents mandatory fields to execute the workflow.

6.10.6 Create Bulk Download Job Using SOQL

This activity helps the user to create a Job ID for downloading bulk data in Salesforce using a custom SOQL query to retrieve large volumes of data efficiently by querying specific objects and fields. 

Properties

Configuration

Once the integration is connected from the Manager, the property panel will automatically display the connected integration.
If you see the message “Add new connection”click here to learn how to set up a new connection.

Below are the properties available after the project has been integrated:

Salesforce: *This parameter indicates the account name associated with the integration.

INPUT

Query: *Specifies the SOQL query to be executed for the bulk download job. This query defines which object and fields to retrieve, along with any conditions or filters. The value must be provided as a String and should follow proper SOQL syntax.

OUTPUT

JOB ID: *It helps to return the JOB ID as the result of the execution in “String” datatype.

Result: This parameter allows you to view the execution status of the activity and returns a value in “Boolean.”

True: Indicates that the activity has been executed successfully without any errors.
False: Indicates that the activity has been unsuccessful due to an unexpected error being thrown.

* Represents mandatory fields to execute the workflow.

6.10.7 Create Contact

This activity helps the user to create a new contact for the salesforce account. It represents the individuals who are associated with the account. 

Properties

Configuration

Once the integration is connected from the Manager, the property panel will automatically display the connected integration.
If you see the message “Add new connection”click here to learn how to set up a new connection.

Below are the properties available after the project has been integrated:

Salesforce: *This parameter indicates the account name associated with the integration.

INPUT

Account ID: *Specify account ID against where the contact of the individual needs to be associated. It offers multiple ways to choose the account ID:
a. Clear Values: It will clear the account ID chosen and allows you to choose another account. 
b. Use Variable: Allows you to provide the “Account ID” as a variable in “String” format. You can either hardcode the values as a string or use a variable of the “String” datatype.

Description: Specifies to provide description for the contact being created. It accepts values in “String” datatype.

Email: Specify the email account of the contact being created. It accepts values in “String” datatype.

First name: Specify the first name of the contact being created. It accepts values in “String” datatype.

Last Name: Specify the last name of the contact being created. It accepts values in “String” datatype.

Phone: Specify the phone number of the contact being created. It accepts values in “String” datatype. 

Salutation: Specifies to select the salutation to address the contact being created. It accepts values in “String” datatype. 

Title: Specify the designation of the contact being created. It accepts values in “String” datatype.

MISC

SkipOnError: Specify the “Boolean” value as “True” or “False.”
True: Continue executing the workflow regardless of any errors thrown.
False: Halt the workflow if it encounters any errors.
None: If the option is left blank, the activity will, by default, behave as if “False” were chosen.

Version: It indicates the version of the feature being used. 

Manage Properties

This wizard displays if the activity includes any additional configurable properties to include while execution. 

OPTIONS

Creation Source: This option will create the contact with the inputs provided in the activity without any additional inputs. Select the option as “Auto create” to automatically create the contacts with only the provided inputs. 

OUTPUT

Contact: It helps to view the details of the contact created, curated by custom class of Salesforce API. Click here to know how to view the output.

ID: It helps to return the unique identifier of the contact created in salesforce in “String” datatype.

Result: This parameter allows you to view the execution status of the activity and returns a value in “Boolean.”
True: Indicates that the activity has been executed successfully without any errors.
False: Indicates that the activity has been unsuccessful due to an unexpected error being thrown.

* Represents mandatory fields to execute the workflow.

6.10.8 Create Lead

This activity allows the user to create a lead in a Salesforce account. A lead is a sales contact or prospect person who has shown interest in a company’s products or services.

Properties

Configuration

Each activity requires a connection with Salesforce authentication. Once you select the respective project name where Salesforce has been authenticated, the activity will automatically retrieve the available connections for that project.

Below are the properties available after the project has been integrated:

Salesforce: *This parameter indicates the account name associated with the integration. 

INPUT

Company: Specify the name of the company to which the lead belongs to. It accepts values in the “String” data type.

Email: Specify the email address of the lead and it accepts values in the “String” data type.

First name: Specify the first name of the lead being created. It accepts values in “String” datatype.

Last Name: Specify the last name of the lead being created. It accepts values in “String” datatype. 

Lead Status: Specifies the current stage of the lead in the sales process which includes New, Contacted, Qualified, Disqualified, and Converted. It accepts values in the String data type.

Phone: Specify the phone number of the lead being created. It accepts values in “String” datatype. 

Salutation: Specifies to select the salutation to address the lead being created. It offers multiple ways to choose the salutation:
1. Browse Option: When selecting the dropdown option, it will automatically list the salutations.
2. Three-Line Menu: Clicking on the “Three lines” icon will open a context menu with the following two options.
a. Force Refresh: Refreshes the selected salutation.
b. Clear Values: It will clear the value chosen and allows you to choose another value. 
c. Use Variable: Allows you to provide the “Salutation” as a variable in “String” format. You can either hardcode the values as a string or use a variable of the “String” datatype.

MISC

DisplayName: Displays the name of the activity. The activity name can be customized, which aids in troubleshooting.

SkipOnError: Specify the “Boolean” value as “True” or “False.”
True: Continue executing the workflow regardless of any errors thrown.
False: Halt the workflow if it encounters any errors.
None: If the option is left blank, the activity will, by default, behave as if “False” were chosen.

Version: It indicates the version of the feature being used.

Manage Properties

Use this option to select and customize the standard fields for lead creation. The configured properties will appear in the activity’s properties panel, allowing you to provide the necessary input. 

OPTIONS

Lead Source: Specifies the origin of the lead, indicating how the prospect discovered the company. Common sources include Web, Email, Social Media, Advertisement, Referral, Trade Show, and Cold Call. It accepts values in the String data type.

City: Specifies to provide the city to which account lead belongs to. It accepts values in “String” datatype. 

Country: Specifies to provide the country to which lead belongs to. It accepts values in “String” datatype. 

Postal code: Specifies to provide the postal code of the city to which the lead belongs to. It accepts values in “String” datatype.

Description: Specifies to provide additional information of the lead belongs to. It accepts values in “String” datatype. 

Rating: Specifies the rating of the lead based on predefined criteria. Common rating values include Hot, Warm, and Cold, indicating the likelihood of conversion. It accepts values in the String data type. 

Street: Specifies to provide the street address to which lead belongs to. It accepts values in “String” datatype. 

OUTPUT

Lead: It helps to view the details of the lead created, curated by custom class of Salesforce API. Click here to know how to view the output.

ID: It helps to return the unique identifier of the lead created in salesforce in “String” datatype.

Result: This parameter allows you to view the execution status of the activity and returns a value in “Boolean.”
True: Indicates that the activity has been executed successfully without any errors.
False: Indicates that the activity has been unsuccessful due to an unexpected error being thrown.

Represents mandatory fields to execute the workflow.

6.10.9 Create Opportunity

This activity helps the user to create an opportunity in the salesforce account to track sales progress.

Properties

Configuration

Each activity requires a connection with Salesforce authentication. Once you select the respective project name where Salesforce has been authenticated, the activity will automatically retrieve the available connections for that project.

Below are the properties available after the project has been integrated:

Salesforce: *This parameter indicates the account name associated with the integration. 

INPUT

Opportunity Name: Specifies to provide the name of the opportunity to be created and it accepts values in “String” datatype.

Stage: Select the stage for the opportunity to be created. The options are,

1. Qualification – Checking if the customer has a need, budget, and authority to make a purchase.
2. Need Analysis – Understanding the customer’s specific requirements
3. Proposal– Sending a formal offer with pricing details.
4. Negotiation – Discussing and finalizing deal terms with the customer.
5. Closed Won – The customer agrees to buy, and the deal is completed.
6. Closed Lost – The deal is not successful, either due to customer disinterest or choosing another solution.

Close Date: Specifies the date when the opportunity is expected to close. It accepts the value in String format.

1. Open in Expression Editor: Enter the date manually in “YYYY-MM-DD” format or use a variable.
2. Clear Values: Removes the selected date, allowing you to enter a new value.
3. Deactivate Use Variable: Clears the assigned variable and enables selection from the Datepicker.

Account ID: Specify account ID against where the opportunity needs to be associated. It offers multiple ways to choose the account ID:

1. Open in Expression Editor: Enter the account ID manually in “string” format or use a variable which contains the account ID.
2. Force Refresh: Refreshes the selected account.
3. Clear Values: Clears the existing value and prompts to enter new value.
4. Deactivate Use Variable: Clears the assigned variable and enables selection from the drop-down

Amount: Specifies to provide the total estimated value or cost associated with the property involved in the opportunity. It accepts values  “String” datatype. It offers multiple ways to provide the amount:

1. Open in Expression Editor: Enter the amount value manually in “string” format or use a variable.
2. Clear Values: Clears the existing value and prompts to enter new value.

Contact ID: Specify the Contact ID against where the opportunity needs to be associated. It offers multiple ways to provide the contact ID:

1. Open in Expression Editor: Enter the contact ID manually in “string” format or use a variable which contains the contact ID.
2. Force Refresh: Refreshes the selected account.
3. Clear Values: Clears the existing value and prompts to enter new value.
4. Deactivate Use Variable: Clears the assigned variable and enables selection from the drop-down

Forecast Category: Specifies to select the forecast sales stage or probability classification that needs to be assigned to the opportunity. It accepts values in “String” datatype.

Pipeline – Early-stage opportunity, yet to be fully qualified.
Best Case – A promising deal with a moderate chance of closing.
Commit – A high-confidence deal expected to close.
Closed – Successfully won opportunity.
Omitted – Excluded from forecasting, such as lost deals.

Lead Source: Specifies to provide the origin of the opportunity from which it has been created. Select the options from the drop-down. It accepts values in “String” datatype.

Loss Reason: Specifies to select the primary reason for the opportunity that was not successfully closed. It accepts values in “String” datatype.

Description: Specifies to provide the description of the opportunity to be created. It accepts values in “String” datatype.

Next Step: Specifies to provide the details of the next step/ action to be taken with the created opportunity. It accepts values in “String” datatype.

Opportunity Type: Specifies to provide the type of opportunity to be created and it accepts values in “String” datatype. Below are the types of opportunities,

New Business – A new customer or account that has not purchased before.
Existing Business – Additional sales from an existing customer.
Renewal – A repeat contract or subscription renewal.
Upsell – Selling additional features, upgrades, or a higher-tier product.
Cross-Sell – Selling a different product/service to the same customer.
Partner-Sourced – A deal brought in by a channel or business partner.
Referral – An opportunity generated through customer or third-party referrals.
Expansion – A deal where an existing customer increases their usage or scope

Primary campaign ID: Specifies to provide the existing marketing ID to link the created opportunity with it and it accepts values in “String” datatype.

Probability: Specifies to provide the probability of the closure of the opportunity to be created and it accepts values in “Double” datatype.

Manage Properties

Use this option to select and customize the standard fields for opportunity creation. The configured properties will appear in the activity’s properties panel, allowing you to provide the necessary input. 

 MISC

Display Name: Displays the name of the activity. The activity name can be customized, which aids in troubleshooting.

SkipOnErrorSpecify the “Boolean” value as “True” or “False.”
True: Continue executing the workflow regardless of any errors thrown.
False: Halt the workflow if it encounters any errors.
None: If the option is left blank, the activity will, by default, behave as if “False” were chosen.

Version: It indicates the version of the feature being used.

OUTPUT

ID: It helps to return the unique identifier of the opportunity created in salesforce in “String” datatype.

Opportunity: It helps to view the details of the opportunity created, curated by custom class of Salesforce API. Click here to know how to view the output.

Result: This parameter allows you to view the execution status of the activity and returns a value in “Boolean.”
True: Indicates that the activity has been executed successfully without any errors.
False: Indicates that the activity has been unsuccessful due to an unexpected error being thrown.

Represents mandatory fields to execute the workflow.

6.10.10 Delete Record

This activity allows the user to delete specific records, such as accounts, leads, or opportunities, from a Salesforce account.

Properties

Configuration

Each activity requires a connection with Salesforce authentication. Once you select the respective project name where Salesforce has been authenticated, the activity will automatically retrieve the available connections for that project.

Below are the properties available after the project has been integrated:

Salesforce: *This parameter indicates the account name associated with the integration.

Input

Select Object: *Specifies to select the object from the dropdown to delete the record. It accepts the values in “String” datatype.

1. Force Refresh: Refreshes the selected object.

Id: *Specifies to provide the specific ID of the object that needs to be deleted. It accepts the values in “String” datatype. It offers multiple ways to choose the ID:

1. Open in Expression Editor: Enter the account ID manually in “string” format or use a variable which contains the ID. 
2. Clear Values: Removes existing values and allows you to enter a new one.

MISC

Display Name: Displays the name of the activity. The activity name can be customized, which aids in troubleshooting.

SkipOnError: Specify the “Boolean” value as “True” or “False.”

True: Continue executing the workflow regardless of any errors thrown.
False: Halt the workflow if it encounters any errors.
None: If the option is left blank, the activity will, by default, behave as if “False” were chosen.

Version: It indicates the version of the feature being used.

Output

DeleteStatus: Returns the API response status for the deleted object as a Boolean value.

Result: This parameter allows you to view the execution status of the activity and returns a value in “Boolean.”

True: Indicates that the activity has been executed successfully without any errors.
False: Indicates that the activity has been unsuccessful due to an unexpected error being thrown.

* Represents mandatory fields to execute the workflow.

6.10.11 Download File

This activity allows the user to download a specific file from a Salesforce account.

Properties

Configuration

Each activity requires a connection with Salesforce authentication. Once you select the respective project name where Salesforce has been authenticated, the activity will automatically retrieve the available connections for that project.

Below are the properties available after the project has been integrated:

Salesforce: *This parameter indicates the account name associated with the integration. 

INPUT

File Version ID: *Specify File ID against which needs to be downloaded. It offers multiple ways to choose the File ID:
1. Browse Option: When selecting the dropdown option, it will automatically list the accounts available for the connected salesforce account. The user must manually select the account each time when using this option.
2. Three-Line Menu: Clicking on the “Three lines” icon will open a context menu with the following two options.
a. Force Refresh: Refreshes the selected account.
b. Clear Values: It will clear the File ID chosen and allows you to choose another account. 
c. Use Variable: Allows you to provide the “contact ID” as a variable in “String” format. You can either hardcode the values as a string or use a variable of the “String” datatype.

Download Location: Specify the “Path” where the file should be downloaded on the local system. It accepts values in the “String” data type.

MISC

DisplayName: Displays the name of the activity. The activity name can be customized, which aids in troubleshooting.

SkipOnError: Specify the “Boolean” value as “True” or “False.”
True: Continue executing the workflow regardless of any errors thrown.
False: Halt the workflow if it encounters any errors.
None: If the option is left blank, the activity will, by default, behave as if “False” were chosen.

Version: It indicates the version of the feature being used.

OUTPUT

Download Status: It helps to view the status of the file downloaded in “Boolean” value. 

Result: This parameter allows you to view the execution status of the activity and returns a value in “Boolean.”
True: Indicates that the activity has been executed successfully without any errors.
False: Indicates that the activity has been unsuccessful due to an unexpected error being thrown.

* Represents mandatory fields to execute the workflow.

6.10.12 Download SOQL Bulk Job Results

This activity helps the user to download the results of a SOQL bulk job from a Salesforce account, retrieving the queried data in CSV format.

Properties

Configuration

Each activity requires a connection with Salesforce authentication. Once you select the respective project name where Salesforce has been authenticated, the activity will automatically retrieve the available connections for that project.

Below are the properties available after the project has been integrated:

Salesforce: * This parameter indicates the account name associated with the integration.

Input

Job Id: *Specifies to provide the unique Job ID from which details need to be retrieved. It accepts values in the “String” datatype and provides multiple options for selecting the ID:

1. Open in Expression Editor: Enter the Job ID manually in “string” format or use a variable which contains the ID. 
2. Clear Values: Removes existing values and allows you to enter a new one.

Download Location: Specifies the system path where the results should be downloaded, and it accepts values in “String” datatype.

File Name: Specify the name of the file to be downloaded and it accepts values in “String” datatype.

Overwrite: Enables overwriting of existing files with the same name in the specified location. By default, this option is not selected.

MISC

Display Name: Displays the name of the activity. The activity name can be customized, which aids in troubleshooting.

SkipOnError: Specify the “Boolean” value as “True” or “False.”

True: Continue executing the workflow regardless of any errors thrown.
False: Halt the workflow if it encounters any errors.
None: If the option is left blank, the activity will, by default, behave as if “False” were chosen.

Version: It indicates the version of the feature being used.

OUTPUT

Download Status: *It helps to return the status of the file that has been downloaded with the results from the job execution in “Boolean” datatype.

Result: This parameter allows you to view the execution status of the activity and returns a value in “Boolean.”

True: Indicates that the activity has been executed successfully without any errors.
False: Indicates that the activity has been unsuccessful due to an unexpected error being thrown.

* Represents mandatory fields to execute the workflow.

6.10.13 Download UnProcessed Records of Bulk Upload

This activity allows the user to download records that were not processed successfully during a bulk upload job in Salesforce.

Properties

Configuration

Each activity requires a connection with Salesforce authentication. Once you select the respective project name where Salesforce has been authenticated, the activity will automatically retrieve the available connections for that project.

Below are the properties available after the project has been integrated:

Salesforce: * This parameter indicates the account name associated with the integration.

Input

Job Id: *Specifies to provide the unique Job ID from which details need to be retrieved. It accepts values in the “String” datatype and provides multiple options for selecting the ID:

1. Open in Expression Editor: Enter the Job ID manually in “string” format or use a variable which contains the ID. 
2. Clear Values: Removes existing values and allows you to enter a new one.

Download Location: Specifies the system path where the results should be downloaded, and it accepts values in “String” datatype.

File Name: Specify the name of the file to be downloaded and it accepts values in “String” datatype.

Overwrite: Enables overwriting of existing files with the same name in the specified location. By default, this option is not selected.

MISC

Display Name: Displays the name of the activity. The activity name can be customized, which aids in troubleshooting.

SkipOnError: Specify the “Boolean” value as “True” or “False.”

True: Continue executing the workflow regardless of any errors thrown.
False: Halt the workflow if it encounters any errors.
None: If the option is left blank, the activity will, by default, behave as if “False” were chosen.

Version: It indicates the version of the feature being used.

OUTPUT

Download Status: *It helps to return the status of the file that has been downloaded with the results from the job execution in “Boolean” datatype.

Result: This parameter allows you to view the execution status of the activity and returns a value in “Boolean.”

True: Indicates that the activity has been executed successfully without any errors.
False: Indicates that the activity has been unsuccessful due to an unexpected error being thrown.

* Represents mandatory fields to execute the workflow.

6.10.14 Get Contact

This activity allows the user to retrieve specific contact information from a Salesforce account.

Properties

Configuration

Each activity requires a connection with Salesforce authentication. Once you select the respective project name where Salesforce has been authenticated, the activity will automatically retrieve the available connections for that project.

Below are the properties available after the project has been integrated:

Salesforce: *This parameter indicates the account name associated with the integration.

INPUT

Contact ID: *Specify contact ID against where the details need to be retrieved. It offers multiple ways to choose the contact ID:
1. Browse Option: When selecting the dropdown option, it will automatically list the accounts available for the connected salesforce account. The user must manually select the account each time when using this option.
2. Three-Line Menu: Clicking on the “Three lines” icon will open a context menu with the following two options.
a. Force Refresh: Refreshes the selected account.
b. Clear Values: It will clear the contact ID chosen and allows you to choose another account. 
c. Use Variable: Allows you to provide the “contact ID” as a variable in “String” format. You can either hardcode the values as a string or use a variable of the “String” datatype.

MISC

DisplayName: Displays the name of the activity. The activity name can be customized, which aids in troubleshooting.

SkipOnError: Specify the “Boolean” value as “True” or “False.”
True: Continue executing the workflow regardless of any errors thrown.
False: Halt the workflow if it encounters any errors.
None: If the option is left blank, the activity will, by default, behave as if “False” were chosen.

Version: It indicates the version of the feature being used.

OUTPUT

Contact: It helps to view the details of the contact retrieved, curated by custom class of Salesforce API. Click here to know how to view the output.

Result: This parameter allows you to view the execution status of the activity and returns a value in “Boolean.”
True: Indicates that the activity has been executed successfully without any errors.
False: Indicates that the activity has been unsuccessful due to an unexpected error being thrown.

* Represents mandatory fields to execute the workflow.

6.10.15 Get Account

This activity helps the user to retrieve specific account details from the salesforce. 

Properties

Configuration

Each activity requires a connection with Salesforce authentication. Once you select the respective project name where Salesforce has been authenticated, the activity will automatically retrieve the available connections for that project.

Below are the properties available after the project has been integrated:

Salesforce: *This parameter indicates the account name associated with the integration.

INPUT

Account ID: *Specify account ID against where the account details need to be retrieved. It offers multiple ways to choose the account ID:
1. Browse Option: When selecting the dropdown option, it will automatically list the accounts available for the connected salesforce account. The user must manually select the account each time when using this option.
2. Three-Line Menu: Clicking on the “Three lines” icon will open a context menu with the following two options.
a. Force Refresh: Refreshes the selected account.
b. Clear Values: It will clear the account ID chosen and allows you to choose another account. 
c. Use Variable: Allows you to provide the “Account ID” as a variable in “String” format. You can either hardcode the values as a string or use a variable of the “String” datatype.

MISC

DisplayName: Displays the name of the activity. The activity name can be customized, which aids in troubleshooting.

SkipOnError: Specify the “Boolean” value as “True” or “False.”
True: Continue executing the workflow regardless of any errors thrown.
False: Halt the workflow if it encounters any errors.
None: If the option is left blank, the activity will, by default, behave as if “False” were chosen.

Version: It indicates the version of the feature being used.

OUTPUT

Account: It helps to view the details of the account curated by custom class of Salesforce API. Click here to know how to view the output.

Result: This parameter allows you to view the execution status of the activity and returns a value in “Boolean.”
True: Indicates that the activity has been executed successfully without any errors.
False: Indicates that the activity has been unsuccessful due to an unexpected error being thrown.

* Represents mandatory fields to execute the workflow.

6.10.16 Get Bulk Job Info

This activity retrieves the status and details of a bulk job from the Salesforce account, including job ID, state, processed records, failed records, and completion status.

Properties

Configuration

Each activity requires a connection with Salesforce authentication. Once you select the respective project name where Salesforce has been authenticated, the activity will automatically retrieve the available connections for that project.

Below are the properties available after the project has been integrated:

Salesforce: *This parameter indicates the account name associated with the integration.

Input

Job Id: *Specifies the unique Job ID from which details need to be retrieved. It accepts values in the “String” datatype and provides multiple options for selecting the ID:

1. Open in Expression Editor: Enter the Job ID manually in “string” format or use a variable which contains the ID. 
2. Clear Values: Removes existing values and allows you to enter a new one.

Job Type: Specifies to select the type of job that needs to be executed against the specific ID. The options are, 

1. Bulk Upload: Used for inserting, updating, or deleting large volumes of records in Salesforce.
2. Bulk Download: Retrieves large datasets from Salesforce for processing or analysis.

MISC 

Display Name: Displays the name of the activity. The activity name can be customized, which aids in troubleshooting.

SkipOnError: Specify the “Boolean” value as “True” or “False.”

True: Continue executing the workflow regardless of any errors thrown.
False: Halt the workflow if it encounters any errors.
None: If the option is left blank, the activity will, by default, behave as if “False” were chosen.

Version: It indicates the version of the feature being used.

Output

BulkJobInfo:It helps to result of the job executed against the provided ID curated by custom class of Salesforce API. Click here to know how to view the output.

Result: This parameter allows you to view the execution status of the activity and returns a value in “Boolean.”

True: Indicates that the activity has been executed successfully without any errors.
False: Indicates that the activity has been unsuccessful due to an unexpected error being thrown.

* Represents mandatory fields to execute the workflow.

6.10.17 Get Opportunity

This activity helps the user to retrieve the specific opportunity information from a Salesforce account.

Properties

Configuration

Each activity requires a connection with Salesforce authentication. Once you select the respective project name where Salesforce has been authenticated, the activity will automatically retrieve the available connections for that project.

Below are the properties available after the project has been integrated:

Salesforce: * This parameter indicates the account name associated with the integration.

INPUT

Opportunity ID: *Specify opportunity ID against where the details need to be retrieved. It offers multiple ways to choose the opportunity ID:

1. Open in Expression Editor: Enter the account ID manually in “string” format or use a variable which contains the opportunity ID. 
2. Force Refresh: Refreshes the selected account. 
3. Clear Values: Clears the existing value and prompts to enter new value. 
4. Deactivate Use Variable: Clears the assigned variable and enables selection from the drop-down option.

MISC

Display Name: Displays the name of the activity. The activity name can be customized, which aids in troubleshooting.

SkipOnError: Specify the “Boolean” value as “True” or “False.”

True: Continue executing the workflow regardless of any errors thrown.
False: Halt the workflow if it encounters any errors.
None: If the option is left blank, the activity will, by default, behave as if “False” were chosen.

Version: It indicates the version of the feature being used.

OUTPUT

Opportunity: * It helps to return the details of the opportunity, curated by custom class of Salesforce API. Click here to know how to view the output.

Result: This parameter allows you to view the execution status of the activity and returns a value in “Boolean.”

True: Indicates that the activity has been executed successfully without any errors.
False: Indicates that the activity has been unsuccessful due to an unexpected error being thrown.

* Represents mandatory fields to execute the workflow.

6.10.18 Get Object Fields

This activity helps the user to retrieve the list of fields for a specified Salesforce object, such as Account, Contact, or Opportunity. 

Properties

Configuration

Once the integration is connected from the Manager, the property panel will automatically display the connected integration.
If you see the message “Add new connection”click here to learn how to set up a new connection.

Below are the properties available after the project has been integrated:

Salesforce: *This parameter indicates the account name associated with the integration.

INPUT

Select Object: *Specifies to provide/ select the object to retrieve the list. It offers multiple ways to choose the object: 
a. Clear Values: It will clear the object chosen and allows you to choose another account. 
b. Use Variable: Allows you to provide the “Object” as a variable in “String” format. You can either hardcode the values as a string or use a variable of the “String” datatype.

MISC

DisplayName: Displays the name of the activity. The activity name can be customized, which aids in troubleshooting.

SkipOnError: Specify the “Boolean” value as “True” or “False.”
True: Continue executing the workflow regardless of any errors thrown.
False: Halt the workflow if it encounters any errors.
None: If the option is left blank, the activity will, by default, behave as if “False” were chosen.

Version: It indicates the version of the feature being used. 

OUTPUT

Field Names: It helps to return the list of fields available against the specified object in “String” datatype. 

Result: This parameter allows you to view the execution status of the activity and returns a value in “Boolean.”
True: Indicates that the activity has been executed successfully without any errors.
False: Indicates that the activity has been unsuccessful due to an unexpected error being thrown.

* Represents mandatory fields to execute the workflow.

6.10.19 Get Record

This activity allows users to retrieve specific record details—such as accounts, leads, opportunities, and more—from their Salesforce account.

Properties

Configuration

Each activity requires a connection with Salesforce authentication. Once you select the respective project name where Salesforce has been authenticated, the activity will automatically retrieve the available connections for that project.

Below are the properties available after the project has been integrated:

Salesforce: *This parameter indicates the account name associated with the integration.

Input

Select Object: *Specifies to select the object from the dropdown to insert the record. It accepts the values in “String” datatype.

  1. Force Refresh: Refreshes the selected object.
  2. Use Variable: Allows the user to enter the object from a variable. 
    a. Open in Expression Editor: Enter the object manually in “string” format or use a variable which stores the object. 
    b. Deactivate variable: Removes the values and allows you to choose the object from the dropdown. 

Get ID: *Specifies the unique ID of the record to retrieve its details. It accepts values in “String” datatype. It offers multiple ways to choose the ID:

1. Open in Expression Editor: Enter the record ID manually in “string” format or use a variable which contains the ID. 
2. Clear Values: Removes existing values and allows you to enter a new one.

Manage Properties

Use this option to select and customize the standard fields for opportunity creation. The configured properties will appear in the activity’s properties panel, allowing you to provide the necessary input. 

MISC

Display Name: Displays the name of the activity. The activity name can be customized, which aids in troubleshooting.

SkipOnError: Specify the “Boolean” value as “True” or “False.”

True: Continue executing the workflow regardless of any errors thrown.
False: Halt the workflow if it encounters any errors.
None: If the option is left blank, the activity will, by default, behave as if “False” were chosen.

Version: It indicates the version of the feature being used.

Output

Result: This parameter allows you to view the execution status of the activity and returns a value in “Boolean.”

True: Indicates that the activity has been executed successfully without any errors.
False: Indicates that the activity has been unsuccessful due to an unexpected error being thrown.

Output: The output is generated based on the selected object. To access the retrieved details, you must declare a variable in the Manage Properties window.

* Represents mandatory fields to execute the workflow.

6.10.20 Insert Record

This activity allows the user to insert a new record, such as accounts, leads, or opportunities, to the Salesforce account.

Properties

Configuration

Each activity requires a connection with Salesforce authentication. Once you select the respective project name where Salesforce has been authenticated, the activity will automatically retrieve the available connections for that project.

Below are the properties available after the project has been integrated:

Salesforce: *This parameter indicates the account name associated with the integration.

Input

Select Object: *Specifies to select the object from the dropdown to insert the record. It accepts the values in “String” datatype.

  1. Force Refresh: Refreshes the selected object.
  2. Use Variable: Allows the user to enter the object from a variable. 
    a. Open in Expression Editor: Enter the object manually in “string” format or use a variable which stores the object. 
    b. Deactivate variable: Removes the values and allows you to choose the object from the dropdown. 

Manage Properties

Use this option to select and customize the standard fields for opportunity creation. The configured properties will appear in the activity’s properties panel, allowing you to provide the necessary input. 

MISC

Display Name: Displays the name of the activity. The activity name can be customized, which aids in troubleshooting.

SkipOnError: Specify the “Boolean” value as “True” or “False.”

True: Continue executing the workflow regardless of any errors thrown.
False: Halt the workflow if it encounters any errors.
None: If the option is left blank, the activity will, by default, behave as if “False” were chosen.

Version: It indicates the version of the feature being used.

Output

Result: This parameter allows you to view the execution status of the activity and returns a value in “Boolean.”

True: Indicates that the activity has been executed successfully without any errors.
False: Indicates that the activity has been unsuccessful due to an unexpected error being thrown.

* Represents mandatory fields to execute the workflow.

6.10.21 Search Records

This activity allows users to retrieve one or multiple records from specific Salesforce objects, such as Accounts, Leads, Assets, and more. It also helps in retrieving matching records by applying keywords or field-based filters on the selected object. 

Properties

Configuration

Once the integration is connected from the Manager, the property panel will automatically display the connected integration.
If you see the message “Add new connection”click here to learn how to set up a new connection.

Below are the properties available after the project has been integrated:

Salesforce: *This parameter indicates the account name associated with the integration.

Input

Select Object: *Specifies to select the list of objects from the drop-down. 

Add filter: Specifies the provide the condition to filter and retrieve records from the selected object. Use this parameter to narrow down the results based on specific field values or criteria.

Fields: Specifies to provide the field’s name to retrieve the records from the specified object in a comma separated value. You can also fetch the specified object’s field from “Get Object Fields” activity. It accepts values in “String” datatype. 
E.g., “Id, Name, Industry, CreatedDate”. 

Include Deleted: This parameter determines whether records that have been deleted (but not permanently removed) should be included in the search results. It accepts values in “Boolean” datatype. 

MaxRecords: Specifies to provide the maximum number of records to be fetched and it accepts values “Int32” datatype. 

Nulls Last: This parameter controls the positioning of null values when sorting search results.

True – Places records with null values at the end of the sorted result set.
False (default or unspecified) – Null values may appear at the beginning, depending on the sort order and Salesforce default behavior. 

Order By: Specifies to provide the field name with the order to sort the records returned by the search. It accepts values in “String” datatype. 
E.g., “Name ASC”
“BillingCountry DESC”.  

Manage Properties

This wizard displays if the activity includes any additional configurable properties to include while execution. 

Note: In this activity, the property to view the output of the activity is configured in the Manage Properties option. So, declare a variable here against the property “Output” to view the result

MISC

Display Name: Displays the name of the activity. The activity name can be customized, which aids in troubleshooting.

SkipOnError: Specify the “Boolean” value as “True” or “False.”

True: Continue executing the workflow regardless of any errors thrown.
False: Halt the workflow if it encounters any errors.
None: If the option is left blank, the activity will, by default, behave as if “False” were chosen.

Version: It indicates the version of the feature being used.

Output

Result: This parameter allows you to view the execution status of the activity and returns a value in “Boolean.”

True: Indicates that the activity has been executed successfully without any errors.
False: Indicates that the activity has been unsuccessful due to an unexpected error being thrown.

* Represents mandatory fields to execute the workflow. 

Filter Window 

This wizard allows you to define specific conditions to filter and retrieve records from the selected object.

1. AND: Returns TRUE only if all the conditions separated by AND are true.
2. OR: Returns TRUE only if any of the conditions separated by OR are true.
3. Name: Displays a dropdown of available field names for the selected object.
4. Operator: Specifies the comparison operator to apply on the field, such as:

a. Equals
b. Contains
c. In

5. Value: Provide the value against which the records should be filtered.

6.10.22 Start or Abort Bulk Job

This activity helps the user to initiate or abort the bulk job in the salesforce account. 

Properties

Configuration

Each activity requires a connection with Salesforce authentication. Once you select the respective project name where Salesforce has been authenticated, the activity will automatically retrieve the available connections for that project.

Below are the properties available after the project has been integrated:

Salesforce: *This parameter indicates the account name associated with the integration.

Input

Job Id: *Specifies the unique Job ID to perform the action and it accepts values in the “String” datatype and provides multiple options for selecting the ID:

1. Open in Expression Editor: Enter the Job ID manually in “string” format or use a variable which contains the ID. 
2. Clear Values: Removes existing values and allows you to enter a new one.

Action: Specifies to select the action to be executed in the provided Job ID. The options are, 

1. Start – Initiates the job.
2. Abort – Stops the execution of existing bulk job. 

Job Type: Specifies to select the type of job that needs to be executed against the specific ID. The options are, 

1. Bulk Upload: Used for inserting, updating, or deleting large volumes of records in Salesforce.
2. Bulk Download: Retrieves large datasets from Salesforce for processing or analysis.

MISC 

Display Name: Displays the name of the activity. The activity name can be customized, which aids in troubleshooting.

SkipOnError: Specify the “Boolean” value as “True” or “False.”

True: Continue executing the workflow regardless of any errors thrown.
False: Halt the workflow if it encounters any errors.
None: If the option is left blank, the activity will, by default, behave as if “False” were chosen.

Version: It indicates the version of the feature being used.

Output

JobStatus: Returns the execution status of the job in a Boolean format. 

Result: This parameter allows you to view the execution status of the activity and returns a value in “Boolean.”

True: Indicates that the activity has been executed successfully without any errors.
False: Indicates that the activity has been unsuccessful due to an unexpected error being thrown.

* Represents mandatory fields to execute the workflow.

6.10.23 Update Account

This activity helps the user to update the specified account ID in the salesforce. 

Properties

Configuration

Each activity requires a connection with Salesforce authentication. Once you select the respective project name where Salesforce has been authenticated, the activity will automatically retrieve the available connections for that project.

Below are the properties available after the project has been integrated:

Salesforce: *This parameter indicates the account name associated with the integration.

INPUT

Account ID: *Specify account ID against where the account details need to be retrieved. It offers multiple ways to choose the account ID:
1. Browse Option: When selecting the dropdown option, it will automatically list the accounts available for the connected salesforce account. The user must manually select the account each time when using this option.
2. Three-Line Menu: Clicking on the “Three lines” icon will open a context menu with the following two options.
a. Force Refresh: Refreshes the selected account.
b. Clear Values: It will clear the account ID chosen and allows you to choose another account. 
c. Use Variable: Allows you to provide the “Account ID” as a variable in “String” format. You can either hardcode the values as a string or use a variable of the “String” datatype.

Account Name: This parameter specifies to provide a unique name for the account to be updated. It accepts values in “String” datatype. 

Account Number: Specifies the custom and user defined external number to update the account. It accepts values in “String” datatype. 

Account Type: Specifies to select the type of account such as “Customer, prospect or partner” to be updated. It accepts values in “String” datatype. 

a. Customer
b. Prospect
c. Partner

Phone: This parameter specifies to provide the phone number for the account being updated. It accepts values in “String” datatype.

Website: Specifies to provide the website belonging to the account being updated. It accepts values in “String” datatype. 

MISC

DisplayName: Displays the name of the activity. The activity name can be customized, which aids in troubleshooting.

SkipOnError: Specify the “Boolean” value as “True” or “False.”
True: Continue executing the workflow regardless of any errors thrown.
False: Halt the workflow if it encounters any errors.
None: If the option is left blank, the activity will, by default, behave as if “False” were chosen.

Version: It indicates the version of the feature being used.

Manage Properties

Use this option to select and customize the standard fields to update the account. The configured properties will appear in the activity’s properties panel, allowing you to provide the necessary input.  

OPTIONS

Account Owner ID: Specifies to provide the account owner ID to update the account. It accepts values in “String” datatype. 

Account source: Specifies to choose the referral source from which the account/company was received, such as Web, Phone, Twitter etc. It accepts values in “String” datatype.

Billing City: Specifies to provide the city to which account would be billed. It accepts values in “String” datatype. 

Billing Country: Specifies to provide the country to which account would be billed. It accepts values in “String” datatype. 

Billing postal code: Specifies to provide the postal code of the city to which the account would be billed. It accepts values in “String” datatype.

Description: Specifies to provide additional information of the account being updated. It accepts values in “String” datatype.

Employees: Specifies to provide the number of employees for the account being updated. It accepts values in “Int64” datatype.

Shipping city: Specifies to provide the city associated with the account’s shipping address. It accepts values in “String” datatype. 

Shipping Country: Specifies to provide the country associated with the account’s shipping address. It accepts values in “String” datatype.

Shipping Postal Code: Specifies to provide the postal code associated with the account’s shipping address. It accepts values in “String” datatype.

OUTPUT

Account: It helps to view the details of the account updated, curated by custom class of Salesforce API. Click here to know how to view the output.

ID: It helps to return the unique identifier of the account created in salesforce in “String” datatype.

Result: This parameter allows you to view the execution status of the activity and returns a value in “Boolean.”
True: Indicates that the activity has been executed successfully without any errors.
False: Indicates that the activity has been unsuccessful due to an unexpected error being thrown.

* Represents mandatory fields to execute the workflow.

6.10.24 Update Contact

This activity helps the user to update the specific contact ID in the salesforce account. 

Properties

Configuration

Each activity requires a connection with Salesforce authentication. Once you select the respective project name where Salesforce has been authenticated, the activity will automatically retrieve the available connections for that project.

Below are the properties available after the project has been integrated:

Salesforce: *This parameter indicates the account name associated with the integration. 

INPUT

Account ID: *Specify account ID against where the contact of the individual needs to be associated. It offers multiple ways to choose the account ID:
1. Browse Option: When selecting the dropdown option, it will automatically list the accounts available for the connected salesforce account. The user must manually select the account each time when using this option.
2. Three-Line Menu: Clicking on the “Three lines” icon will open a context menu with the following two options.
a. Force Refresh: Refreshes the selected account.
b. Clear Values: It will clear the account ID chosen and allows you to choose another account. 
c. Use Variable: Allows you to provide the “Account ID” as a variable in “String” format. You can either hardcode the values as a string or use a variable of the “String” datatype.

Contact Owner ID: Specify the contact owner ID to which the contact needs to be reassigned. It offers multiple ways to choose the Contact Owner ID. Refer the above properties to view the option. 

Contact ID: *Specify the contact ID against where the contact of the individual needs to be updated. It offers multiple ways to choose the Contact ID. Refer the above properties to view the option.

Description: Specifies to provide description for the contact to be updated. It accepts values in “String” datatype.

Email: Specify the email account of the contact to be updated. It accepts values in “String” datatype.

First name: Specify the first name of the contact to be updated. It accepts values in “String” datatype.

Last Name: Specify the last name of the contact to be updated. It accepts values in “String” datatype.

Mailing City: Specifies to provide the city to which contact needs to be mailed. It accepts values in “String” datatype. 

Mailing Country: Specifies to provide the country to which contact needs to be mailed. It accepts values in “String” datatype. 

Mailing Postal codeSpecifies to provide the postal code of the city to which the contact needs to be mailed. It accepts values in “String” datatype. 

Mailing Street: Specifies to provide the street address of the contact needs to be mailed. It accepts values in “String” datatype.

Phone: Specify the phone number of the contact being updated. It accepts values in “String” datatype. 

Salutation: Specifies to select the salutation to address the contact being updated. It offers multiple ways to choose the Salutations. 

Title: Specify the designation of the contact to be updated. It accepts values in “String” datatype. 

MISC

DisplayName: Displays the name of the activity. The activity name can be customized, which aids in troubleshooting.

SkipOnError: Specify the “Boolean” value as “True” or “False.”
True: Continue executing the workflow regardless of any errors thrown.
False: Halt the workflow if it encounters any errors.
None: If the option is left blank, the activity will, by default, behave as if “False” were chosen.

Version: It indicates the version of the feature being used.

Manage Properties

Use this option to select and customize the standard fields for account update. The configured properties will appear in the activity’s properties panel, allowing you to provide the necessary input. 

OPTIONS

Creation Source: This option will update the contact with the inputs provided in the activity without any additional inputs. Select the option as “Auto create” to automatically create the contacts with only the provided inputs. 

OUTPUT

Contact: It helps to view the details of the contact updated, curated by custom class of Salesforce API. Click here to know how to view the output.

Result: This parameter allows you to view the execution status of the activity and returns a value in “Boolean.”
True: Indicates that the activity has been executed successfully without any errors.
False: Indicates that the activity has been unsuccessful due to an unexpected error being thrown.

Represents mandatory fields to execute the workflow.

6.10.25 Upload File

This activity allows users to upload attachments to the associated Salesforce account.

Properties

Configuration

Each activity requires a connection with Salesforce authentication. Once you select the respective project name where Salesforce has been authenticated, the activity will automatically retrieve the available connections for that project.

Below are the properties available after the project has been integrated:

Salesforce: *This parameter indicates the account name associated with the integration.

INPUT

Attachment: *Specifies to provide the attachment to upload. It accepts values in “String” datatype, and you can also browse and select the files from the local. 

Description: Specifies to provide the description for the attachment being uploaded. 

MISC

SkipOnError: Specify the “Boolean” value as “True” or “False.”
True: Continue executing the workflow regardless of any errors thrown.
False: Halt the workflow if it encounters any errors.
None: If the option is left blank, the activity will, by default, behave as if “False” were chosen.

Version: It indicates the version of the feature being used.

OUTPUT

File ID: It helps to return the unique identifier of the file being uploaded to the salesforce account in “String” datatype.

Result: This parameter allows you to view the execution status of the activity and returns a value in “Boolean.”
True: Indicates that the activity has been executed successfully without any errors.
False: Indicates that the activity has been unsuccessful due to an unexpected error being thrown.

Upload a file: It helps to view the details of the file uploaded, curated by custom class of Salesforce API. Click here to know how to view the output.

* Represents mandatory fields to execute the workflow.

6.10.26 Update Lead

This activity updates a specific lead in the Salesforce account using its Lead ID.

Properties

Configuration

Each activity requires a connection with Salesforce authentication. Once you select the respective project name where Salesforce has been authenticated, the activity will automatically retrieve the available connections for that project.

Below are the properties available after the project has been integrated:

Salesforce: *This parameter indicates the account name associated with the integration. 

INPUT

Company: Specify the name of the company to which the lead account needs to be updated. It accepts values in the “String” data type.

Email: Specify the email address of the lead to be updated. It accepts values in the “String” data type.

First name: Specify the first name of the lead to update. It accepts values in “String” datatype.

Last Name: Specify the last name of the lead to update. It accepts values in “String” datatype. 

Lead ID: Specify lead ID against where the details need to be retrieved. It offers multiple ways to choose the lead ID:
1. Browse Option: When selecting the dropdown option, it will automatically list the accounts available for the connected salesforce account. The user must manually select the account each time when using this option.
2. Three-Line Menu: Clicking on the “Three lines” icon will open a context menu with the following two options.
a. Force Refresh: Refreshes the selected account.
b. Clear Values: It will clear the lead ID chosen and allows you to choose another account. 
c. Use Variable: Allows you to provide the “Lead ID” as a variable in “String” format. You can either hardcode the values as a string or use a variable of the “String” datatype.

Lead Owner ID: Specifies the unique identifier of the lead to be reassigned with the different owner. It offers multiple ways to choose the lead Owner ID:
1. Browse Option: When selecting the dropdown option, it will automatically list the accounts available for the connected salesforce account. The user must manually select the account each time when using this option.
2. Three-Line Menu: Clicking on the “Three lines” icon will open a context menu with the following two options.
a. Force Refresh: Refreshes the selected account.
b. Clear Values: It will clear the lead ID chosen and allows you to choose another account. 
c. Use Variable: Allows you to provide the “Lead Owner ID” as a variable in “String” format. You can either hardcode the values as a string or use a variable of the “String” datatype.

Lead Status: Specifies the current stage of the lead in the sales process which includes New, Contacted, Qualified, Disqualified, and Converted. It accepts values in the String data type.

Phone: Specify the phone number of the lead to be updated. It accepts values in “String” datatype. 

Salutation: Specifies to select the salutation to address the lead to update. It offers multiple ways to choose the salutation:
1. Browse Option: When selecting the dropdown option, it will automatically list the salutations.
2. Three-Line Menu: Clicking on the “Three lines” icon will open a context menu with the following two options.
a. Force Refresh: Refreshes the selected salutation.
b. Clear Values: It will clear the value chosen and allows you to choose another value. 
c. Use Variable: Allows you to provide the “Salutation” as a variable in “String” format. You can either hardcode the values as a string or use a variable of the “String” datatype. 

MISC

DisplayName: Displays the name of the activity. The activity name can be customized, which aids in troubleshooting.

SkipOnError: Specify the “Boolean” value as “True” or “False.”
True: Continue executing the workflow regardless of any errors thrown.
False: Halt the workflow if it encounters any errors.
None: If the option is left blank, the activity will, by default, behave as if “False” were chosen.

Version: It indicates the version of the feature being used.

Manage Properties

Use this option to select and customize the standard fields for lead creation. The configured properties will appear in the activity’s properties panel, allowing you to provide the necessary input. 

OPTIONS

Lead Source: Specifies the origin of the lead, indicating how the prospect discovered the company. Common sources include Web, Email, Social Media, Advertisement, Referral, Trade Show, and Cold Call. It accepts values in the String data type.

City: Specifies to provide the city to which account lead belongs to. It accepts values in “String” datatype. 

Country: Specifies to provide the country to which lead belongs to. It accepts values in “String” datatype. 

Postal code: Specifies to provide the postal code of the city to which the lead belongs to. It accepts values in “String” datatype.

Description: Specifies to provide additional information of the lead belongs to. It accepts values in “String” datatype. 

Rating: Specifies the rating of the lead based on predefined criteria. Common rating values include Hot, Warm, and Cold, indicating the likelihood of conversion. It accepts values in the String data type. 

Street: Specifies to provide the street address to which lead belongs to. It accepts values in “String” datatype. 

OUTPUT

Lead: It helps to view the details of the lead updated, curated by custom class of Salesforce API. Click here to know how to view the output.

Result: This parameter allows you to view the execution status of the activity and returns a value in “Boolean.”
True: Indicates that the activity has been executed successfully without any errors.
False: Indicates that the activity has been unsuccessful due to an unexpected error being thrown.

Represents mandatory fields to execute the workflow.

6.10.27 Update Record

This activity allows users to update the specific record details—such as accounts, leads, opportunities, and more—from their Salesforce account.

Properties

Configuration

Each activity requires a connection with Salesforce authentication. Once you select the respective project name where Salesforce has been authenticated, the activity will automatically retrieve the available connections for that project.

Below are the properties available after the project has been integrated:

Salesforce: *This parameter indicates the account name associated with the integration.

Input

Select Object: *Specifies to select the object from the dropdown to update the record. It accepts the values in “String” datatype.

  1. Force Refresh: Refreshes the selected object.
  2. Use Variable: Allows the user to enter the object from a variable. 
    a. Open in Expression Editor: Enter the object manually in “string” format or use a variable which stores the object. 
    b. Deactivate variable: Removes the values and allows you to choose the object from the dropdown. 

Get ID: *Specifies the unique ID of the record to update the details. It accepts values in “String” datatype. It offers multiple ways to choose the ID:

1. Open in Expression Editor: Enter the record ID manually in “string” format or use a variable which contains the ID. 
2. Clear Values: Removes existing values and allows you to enter a new one.

Manage Properties

Use this option to select and customize the standard fields for opportunity creation. The configured properties will appear in the activity’s properties panel, allowing you to provide the necessary input. 

To update specific details, open this window and modify the record by either entering the value as a string or using a variable.

MISC

Display Name: Displays the name of the activity. The activity name can be customized, which aids in troubleshooting.

SkipOnError: Specify the “Boolean” value as “True” or “False.”

True: Continue executing the workflow regardless of any errors thrown.
False: Halt the workflow if it encounters any errors.
None: If the option is left blank, the activity will, by default, behave as if “False” were chosen.

Version: It indicates the version of the feature being used.

Output

Result: This parameter allows you to view the execution status of the activity and returns a value in “Boolean.”

True: Indicates that the activity has been executed successfully without any errors.
False: Indicates that the activity has been unsuccessful due to an unexpected error being thrown.

Output: The output is generated based on the selected object. To access the updated details, you must declare a variable in the Manage Properties window.

* Represents mandatory fields to execute the workflow.

6.11 GenAI

Robility Designer now offers a powerful Generative AI (GenAI) capability, allowing users to seamlessly integrate intelligent language processing into their automation workflows. These GenAI activities are built to understand, generate, summarize, translate, and classify inputs —enabling robots to work more efficiently with unstructured content such as emails, documents, and chat conversations.

With this feature, users can incorporate a range of AI-driven text processing activities that go beyond traditional automation logic. These GenAI activities are designed to:

1. Understand the context and intent behind language input,

2. Extract key entities such as names, dates, and organizations using Named Entity Recognition (NER). 

3. Detect and redact personally identifiable information to ensure data privacy and compliance.

4. Condense long texts into concise summaries for quicker understanding and decision-making.

5. Instantly create dynamic, human-like responses tailored to your use case.

How to connect GenAI from Designer? 

1. Drag and drop the activity into the workflow. 
2. Click on the “Add New Connection” hyperlink in the activity. 
3. Ensure to acquire HarmonyAI license to connect and utilize the GenAI feature. 
4. Once you click on the hyperlink, you will be navigated to the Manager, click on “Connect”.
5. Now, refresh and you will be able to automate with the GenAI activities. 

Click here to learn how to connect GenAI to the project from Robility Manager.

6.11.1 Release Notes

v.1.3.6

This release includes enhancements to dependent DLLs.

Enhancement

All dependent DLLs have been upgraded to the latest stable versions, enhancing security, performance, and workflow reliability. This update ensures smoother execution and maintains compatibility with both existing and new workflows.

Released Date: 09/03/2026

6.11.2 Content Generation

This activity allows users to generate content based on the provided input and system prompt. Use it to create dynamic and context-aware outputs.

Technical Reference

Configuration

Once the integration is connected from the Manager, the property panel will automatically display the connected integration.
If you see the message “Add new connection”, click here to learn how to set up a new connection.

Below are the properties available after the project has been integrated:

Provider: *This parameter indicates the account name associated with integration.

Model Name: *Specifies to choose the list of models available for Gen AI integration. 

Input

DelayAfter: It assists the user to add a delay before initiating subsequent activities. The delay duration here is in milliseconds. By default, it is set to “500” milliseconds. When the option is left blank, the delay will not be considered.

DelayBefore: It assists the user in adding a delay before starting the execution of the activities. The delay duration here is in milliseconds. By default, it is set to “500” milliseconds. When the option is left blank, the delay will not be considered.

User Input: *Specifies the input to generate the desired content. It accepts values either as a string enclosed in double quotes or as a string variable.

System Prompt: *Specifies the role, tone, and behavior the AI should follow while generating responses. It acts as the guiding instruction to set the context for how the output should be framed. It accepts the values either as a string enclosed in double quotes or a string variable. Refer the example below. 

Maximum Token: Specifies the maximum length of the generated content. Accepts either an Int32 value or an Int32 variable.

Timeout: Specifies the maximum time allowed for the activity to execute. If the connection is not established within this period, an exception will be thrown. By default, it is set to “30000” milliseconds. 

Test: Selecting this option opens the Co-Pilot assistant, allowing you test the provided input and view the output simultaneously.

MISC

DisplayName: Displays the name of the activity. The activity name can be customized, which aids in troubleshooting.

SkipOnError: Specify the “Boolean” value as “True” or “False.”
True: Continue executing the workflow regardless of any errors thrown.
False: Halt the workflow if it encounters any errors.
None: If the option is left blank, the activity will, by default, behave as if “False” were chosen.

Version: It indicates the version of the feature being used. 

Manage Properties

Use this wizard to configure the standard fields for the selected records. You can select the fields, assign a default value or a corresponding variable, and save the configurations. 

Output

Content Generation: Returns the generated content of the provided input as a string variable. 

Result: It provides the ability to view the execution status of the activity. It returns values in “Boolean.”
True: Indicates that the activity has been executed successfully without any errors.
False: Indicates that the activity has been unsuccessful due to an unexpected error being thrown.

* Represents mandatory fields to execute the workflow.

How this activity works? 

This example demonstrates how the activity uses both the Prompt and System Prompt inputs to generate a personalized, professional email for an HR scenario.

User Input

Sample Input Email from Employee (Leave Request)
Subject: Leave Request from June 24 to June 28

Hi,

I would like to request leave from June 24 to June 28 as I need to attend a family function out of town.

Please let me know if it’s approved.

Regards,
Priya
Employee ID: 0342

System Prompt

You are an HR assistant at ABC Infotech company, responsible for writing concise, professional internal emails that align with company communication standards.

When approving or responding to a leave request email:

1. Verify the completeness of the request: leave dates, type of leave, reason, employee ID.
2. Check leave balance availability.
3. Confirm compliance with notice period policy.
4. Assess if any handover or task delegation has been arranged.
5. Identify if there are overlapping team leaves or business impact.
6. Ensure alignment with company leave policies (medical proof, if required, etc.).
7. Add empathy and professionalism in your tone while informing the approval or rejection.

Use this context to generate a reply.

Generated Output

Subject: Re: Leave Request from June 24 to June 28

Hi Priya,

Thank you for your leave request. I have reviewed the details provided:

– **Leave Dates**: June 24 to June 28
– **Type of Leave**: Personal (Family Function)
– **Employee ID**: 0342

I have checked your leave balance, and you have sufficient days available. Additionally, your request complies with our notice period policy.

Please ensure that any ongoing tasks are delegated appropriately to your team members to maintain workflow continuity. Kindly confirm if you have arranged for a handover or if you need assistance in coordinating this.

Currently, there are no overlapping leaves within your team that would impact business operations during your requested leave period.

Your leave request is approved. Enjoy your time with your family, and safe travels!

Best regards,
HR Department
ABC Infotech Company

6.11.3 Detect Language

This activity analyzes the provided input text and determines its primary language and returns the detected language as output.

Technical Reference

Configuration

Once the integration is connected from the Manager, the property panel will automatically display the connected integration.
If you see the message “Add new connection”, click here to learn how to set up a new connection.

Below are the properties available after the project has been integrated:

Provider: This parameter indicates the account name associated with integration.

Model Type: Specifies to choose the list of models available for GEN AI integration.

Input

DelayAfter: It assists the user to add a delay before initiating subsequent activities. The delay duration here is in milliseconds. By default, it is set to “500” milliseconds. When the option is left blank, the delay will not be considered.

DelayBefore: It assists the user in adding a delay before starting the execution of the activities. The delay duration here is in milliseconds. By default, it is set to “500” milliseconds. When the option is left blank, the delay will not be considered.

Text: *Specifies the input text for language detection. It accepts values either as a string enclosed in double quotes or as a string variable.

Test: Selecting this option opens the Co-Pilot assistant, allowing you test the provided input and view the output simultaneously.

Timeout: Specifies the maximum time allowed for the activity to execute. If the connection is not established within this period, an exception will be thrown. By default, it is set to “30000” milliseconds. 

MISC

DisplayName: Displays the name of the activity. The activity name can be customized, which aids in troubleshooting.

SkipOnError: Specify the “Boolean” value as “True” or “False.”
True: Continue executing the workflow regardless of any errors thrown.
False: Halt the workflow if it encounters any errors.
None: If the option is left blank, the activity will, by default, behave as if “False” were chosen.

Version: It indicates the version of the feature being used. 

Output

Detected Language: Returns the detected language as a string variable.The output is returned as a JSON object, formatted as a string. It includes the original input along with the translated results categorized by language.

Result: This parameter allows you to view the execution status of the activity and returns a value in “Boolean”.
True: Indicates that the activity has been executed successfully without any errors.
False: Indicates that the activity has been unsuccessful due to an unexpected error being thrown. 

* Represents mandatory fields to execute the workflow. 

How It Works

The activity analyzes the input text and determines the language based on linguistic patterns and vocabulary usage.

Example:

Input:

“Address of the employee is No.12, rue de la Mémoire, Venise, Italie.
La dirección del empleado es No.12, rue de la Mémoire, Venecia, Italia.
Die Adresse des Mitarbeiters ist Nr.12, rue de la Mémoire, Venedig, Italien.
L’indirizzo del dipendente è n.12, rue de la Mémoire, Venezia, Italia.”

Processing:

The text includes different languages and detects all the language and returns the output as below, 
{
“Input”: “Adresse de l’employé : No.12, rue de la Mémoire, Venise, Italie. \nLa dirección del empleado es No.12, rue de la Mémoire, Venecia, Italia.\nDie Adresse des Mitarbeiters ist Nr.12, rue de la Mémoire, Venedig, Italien.\nL’indirizzo del dipendente è n.12, rue de la Mémoire, Venezia, Italia.”,
“Output”: {
“French”: “Adresse de l’employé : No.12, rue de la Mémoire, Venise, Italie.”,
“Spanish”: “La dirección del empleado es No.12, rue de la Mémoire, Venecia, Italia.”,
“German”: “Die Adresse des Mitarbeiters ist Nr.12, rue de la Mémoire, Venedig, Italien.”,
“Italian”: “L’indirizzo del dipendente è n.12, rue de la Mémoire, Venezia, Italia.”
}
}

6.11.4 Named Entity Recognition

This activity is used to analyze the input text to identify and classify the specified named entities into categories such as person names, organizations, locations, dates, percentages, and more.

Technical Reference

Configuration

Once the integration is connected from the Manager, the property panel will automatically display the connected integration.
If you see the message “Add new connection”, click here to learn how to set up a new connection.

Below are the properties available after the project has been integrated:

Provider: This parameter indicates the account name associated with integration.

Model Type: Specifies to choose the list of models available for GEN AI integration. 

Input

DelayAfter: It assists the user to add a delay before initiating subsequent activities. The delay duration here is in milliseconds. By default, it is set to “500” milliseconds. When the option is left blank, the delay will not be considered.

DelayBefore: It assists the user in adding a delay before starting the execution of the activities. The delay duration here is in milliseconds. By default, it is set to “500” milliseconds. When the option is left blank, the delay will not be considered.

Text: *Specifies the input text to analyze the entities. It accepts values either as a string enclosed in double quotes or as a string variable.

Entities: This option allows you to provide specific entity names such as name, location, date, sentiment etc., that should be identified and extracted from the input text. 

Test: Selecting this option opens the Co-Pilot assistant, allowing you test the provided input and view the output simultaneously. 

Timeout: Specifies the maximum time allowed for the activity to execute. If the connection is not established within this period, an exception will be thrown. By default, it is set to “30000” milliseconds. 

MISC

DisplayName: Displays the name of the activity. The activity name can be customized, which aids in troubleshooting.

SkipOnError: Specify the “Boolean” value as “True” or “False.”
True: Continue executing the workflow regardless of any errors thrown.
False: Halt the workflow if it encounters any errors.
None: If the option is left blank, the activity will, by default, behave as if “False” were chosen.

Version: It indicates the version of the feature being used. 

Output

Entities: Returns the output as the entities that has been identified from the provided string. The output is returned as a JSON object, formatted as a string. It includes the original input along with the results categorized by specified entities.

Result: This parameter allows you to view the execution status of the activity and returns a value in “Boolean”.
True: Indicates that the activity has been executed successfully without any errors.
False: Indicates that the activity has been unsuccessful due to an unexpected error being thrown. 

* Represents mandatory fields to execute the workflow.

6.11.5 PII Filtering

This activity helps to identify and redact PII from the provided input text to ensure compliance with data protection regulations.

Technical Reference

Configuration

Once the integration is connected from the Manager, the property panel will automatically display the connected integration.
If you see the message “Add new connection”, click here to learn how to set up a new connection.

Below are the properties available after the project has been integrated:

Provider: This parameter indicates the account name associated with integration.

Model Type: Specifies to choose the list of models available for GEN AI integration. 

Input

DelayAfter: It assists the user to add a delay before initiating subsequent activities. The delay duration here is in milliseconds. By default, it is set to “500” milliseconds. When the option is left blank, the delay will not be considered.

DelayBefore: It assists the user in adding a delay before starting the execution of the activities. The delay duration here is in milliseconds. By default, it is set to “500” milliseconds. When the option is left blank, the delay will not be considered.

Input Text: *Specifies the input text in which PII needs to be identified and redacted and it accepts values in String datatype.

PII/PHI Category: *Specifies the PII/PHI categories to be identified and redacted from the input text. Multiple categories can be selected from the drop-down.

Timeout: Specifies the maximum time allowed for the activity to execute. If the connection is not established within this period, an exception will be thrown. By default, it is set to “30000” milliseconds. 

Test: Selecting this option opens the Co-Pilot assistant, allowing you test the provided input and view the output simultaneously.

MISC

DisplayName: Displays the name of the activity. The activity name can be customized, which aids in troubleshooting.

SkipOnError: Specify the “Boolean” value as “True” or “False.”
True: Continue executing the workflow regardless of any errors thrown.
False: Halt the workflow if it encounters any errors.
None: If the option is left blank, the activity will, by default, behave as if “False” were chosen.

Version: It indicates the version of the feature being used. 

Option

Minimum Confidence Score: Specifies the minimum confidence score required for the activity to identify and redact PII data from the input text. The score should be a value between 0 and 1 (e.g., 0.85).

Text Language: Specifies the language of the input text. Select the appropriate language from the drop-down to enable accurate detection and redaction of PII data.

OUTPUT

Redacted Text: Returns the redacted version of the input text based on the selected PII category and the output is returned in a “String” datatype.

Result: It provides the ability to view the execution status of the activity. It returns values in “Boolean.”
True: Indicates that the activity has been executed successfully without any errors.
False: Indicates that the activity has been unsuccessful due to an unexpected error being thrown.

* Represents mandatory fields to execute the workflow.

Understanding Confidence Score

The confidence score sets the minimum certainty the activity needs to identify and redact PII from your text. It helps avoid unnecessary redactions by filtering out low-confidence results.

You can adjust how sensitive the redaction should be:

a. High score (e.g., 0.9 to 1): Redacts only when the AI is very sure and ensures accurate redactions.
b. Low score (e.g., 0.6 to 0.9): Redacts more, but may include some incorrect redactions.

6.11.6 Summarize Text

This activity generates a concise summary of the input text, limited to the defined maximum number of words.

Technical Reference

Configuration

Once the integration is connected from the Manager, the property panel will automatically display the connected integration.
If you see the message “Add new connection”, click here to learn how to set up a new connection.

Below are the properties available after the project has been integrated:

Provider: *This parameter indicates the account name associated with integration.

Model Type: *Specifies to choose the list of models available for GEN AI integration. 

Input

DelayAfter: It assists the user to add a delay before initiating subsequent activities. The delay duration here is in milliseconds. By default, it is set to “500” milliseconds. When the option is left blank, the delay will not be considered.

DelayBefore: It assists the user in adding a delay before starting the execution of the activities. The delay duration here is in milliseconds. By default, it is set to “500” milliseconds. When the option is left blank, the delay will not be considered.

Text to summarize: *Specifies the input text for summarization. It accepts values either as a string enclosed in double quotes or as a string variable.

Number of summary words: Specifies the maximum length of the generated summary. Accepts either an Int32 value or an Int32 variable.

Summary format: Specifies to choose the summary of the text as paragraph, numbered list or bullet points from the drop-down.

Change Output language: Specifies whether the output should be provided in a different language. The default value is False. 

Timeout: Specifies the maximum time allowed for the activity to execute. If the connection is not established within this period, an exception will be thrown. By default, it is set to “30000” milliseconds. 

Test: Selecting this option opens the Co-Pilot assistant, allowing you test the provided input and view the output simultaneously.

MISC

DisplayName: Displays the name of the activity. The activity name can be customized, which aids in troubleshooting.

SkipOnError: Specify the “Boolean” value as “True” or “False.”
True: Continue executing the workflow regardless of any errors thrown.
False: Halt the workflow if it encounters any errors.
None: If the option is left blank, the activity will, by default, behave as if “False” were chosen.

Version: It indicates the version of the feature being used. 

Option 

Output Language: Specifies to choose the preferred language for the summary from the drop-down when the output needs to be in a different language. This option is available only if ‘Change Output Language’ is set to True. 

Output

Summary: Returns the summary of the provided input as a string variable. 

Result: It provides the ability to view the execution status of the activity. It returns values in “Boolean.”
True: Indicates that the activity has been executed successfully without any errors.
False: Indicates that the activity has been unsuccessful due to an unexpected error being thrown.

* Represents mandatory fields to execute the workflow.

6.12 Twilio

Introduction

Twilio is a cloud-based communication platform that enables developers to programmatically make and receive phone calls, send and receive text messages, and perform other communication functions using its web service APIs.

Within the Robility® platform, Twilio integration allows users to automate communication workflows such as sending SMS, making calls, and handling messages directly within their automation processes. It provides seamless, secure, and scalable integration with the Twilio API through standardized authentication methods.

Pre-requisites

Before using Twilio with the Robility platform, users must first enable outbound connections between Robility Manager and Twilio. This allows you to authenticate securely and use Twilio APIs for automation.

Depending on your setup, you will need the following credentials from Twilio:

• Account SID – Your Twilio account’s unique identifier.

• Auth Token – Used for authentication along with the Account SID.

Phone Number – A verified Twilio number to send messages or make calls.

Ensure that your Twilio account has the appropriate permissions and that your phone number is verified for sending messages or calls.

Note: Before using any Twilio activity, you must configure the Twilio App Integration in Robility Manager for the corresponding project.

For detailed information, refer to the link – Auth Tokens and How to Change Them – Twilio Help Center.

Connecting with Twilio

Acquire Credentials

Ensure that you have obtained the following credentials from your Twilio Console:

• Account SID

• Auth Token

• Twilio Phone Number

Integration Steps

Integrate Twilio within the Robility platform. Automation workflows can only be created after successful integration.

1. Login to the Robility Manager platform.

2. Navigate to your tenant and select the desired project.

3. Click on App Integrations.

4. Search for Twilio from the list of available pre-built connections.

5. Click on it, enter the required credentials, and select Connect.

6. Once the connection is successful, Twilio will appear under the Connections list.

You can now start automating communication tasks using Twilio activities.

Adding Connection through Activity

1. Drag and drop the desired Twilio activity (e.g., Send Message, Make Call) into your workflow.

2. Click on the “Add New Connection” hyperlink within the activity properties panel.

3. You’ll be redirected to the Robility Manager portal.

4. Login and navigate to your project.

5. Go to App Integrations → Twilio.

6. Provide the required credentials (Account SID, Auth Token) and click on Connect.

Return to your workflow and refresh the connections list. The newly created connection will now be available for use.

6.12.1 Release Notes

 v.2.0.3

This release includes stability and performance improvements across connector activities.

Bug Fix

Resolved an issue that could cause intermittent execution failures and increased processing time during connector operations. Authentication handling has been optimized to improve connection reliability, reduce unnecessary authentication requests, and enhance overall workflow performance.

Released Date: 02/06/2026

6.12.2 Make a Call

This activity enables you to initiate an outbound voice call. It can be used to perform automated voice notifications, deliver pre-recorded or dynamic messages, and handle call status callbacks for further processing.

Properties

INPUT

To:* Specifies the recipient’s phone number to which the voice call will be made. The number must include the country code (e.g., +1XXXXXXXXXX).

From: * Specifies the Twilio-registered caller phone number from which the call will be initiated.

Say: Specifies the text that should be read out during the call. If this property is provided, Twilio will convert the text into voice.

Url: Specifies the complete URL of the TwiML instructions to be executed when the call is answered. Use this if you want to control the call flow using a TwiML document hosted externally (e.g., play audio, gather input, redirect, etc.).

CallbackURL: Specifies the URL endpoint to receive the call status callback once the call is completed.
It can be used for logging call outcomes or triggering follow-up actions in your system.

EnableAMD: Enables Answering Machine Detection (AMD). When set to True, Twilio will analyze the call to determine whether it was answered by a human or a voicemail system.

AsyncAMDstatuscallback: Specifies whether to enable Asynchronous AMD status callback.

MISC

SkipOnError: Specify the “Boolean” value as “True” or “False.”

True: Continue executing the workflow regardless of any errors thrown.
False: Halt the workflow if it encounters any errors.
None: If the option is left blank, the activity will, by default, behave as if “False” were chosen.

Version: Displays the version of the activity being used. This field is auto-populated and read-only.

DisplayName: Displays the name of the activity. The name can be customized for better readability and troubleshooting.

OUTPUT

Calls: Returns the JSON response from Twilio containing details of the initiated call such as SID, status, start time, duration, and price. (String Datatype)

CallDetails: Returns the Calls JSON details in a deserialized format and stores them in object.

AMDResult: Returns the Answering Machine Detection (AMD) JSON response if AMD is enabled. This output helps determine whether the call was answered by a person or voicemail. (String Datatype)

ResultIt provides the ability to view the execution status of the activity. It returns values in “Boolean.”
True: 
Indicates that the activity has been executed successfully without any errors.
False: 
Indicates that the activity has been unsuccessful due to an unexpected error being thrown.

* Represents mandatory fields to execute the workflow.

6.12.3 GetRecord

The GetRecord activity is used to retrieve details of a specific Twilio record—such as a Call, Message, or Message Media—by using its ID. This activity is helpful when you already have a Twilio SID and need to fetch record information for validation, logging, monitoring, or further workflow processing.

How to Use the GetRecord Activity

1. In Manager, open your project and select the app integration connected with Twilio.
2. Connect the Twilio account using the required credentials.
3. In Designer, go to the Publish section and select the project where the Twilio integration is connected.
4. Drag and drop the GetRecord activity into the workflow.
5. Configure the activity fields as described below.
a. Twilio: Automatically populated with the integrated Twilio email ID.
b. Object Type: Select the required Twilio object type: Call, Message or Message Media
c. SID: Enter the unique SID of the selected Twilio object.
            A SID is a unique identifier assigned to every Twilio resource and is required to retrieve that specific record (See Step by Step Instruction).

Parameters

INPUT

Media ID: Required for Message Media. Specify the Media ID as a string. Retrieve it from the Send Message activity log output (See Step by Step Instruction)
Object Type: Automatically populated based on the selected object type.
SID*: The unique SID of the Twilio record to retrieve. You can either hardcode the values in the “String” variable or pass the values as “String” datatype. This parameter accepts values in “String” datatype.

MISC

DisplayName: Name of the activity. Can be customized for easier identification.
SkipOnError: Determines workflow behavior on error:
• True – Continue workflow even if error occurs
• False – Stop workflow on error
• None – Defaults to False
Version: Version of the activity being used.

OUTPUT

Output: Create a variable to store the retrieved record details. The output type is Array.
OutputTypeClass: Automatically populated based on selected object type.
Result: This parameter allows you to view the execution status of the activity and returns a value in “Boolean.”
 • True: Indicates that the activity has been executed successfully without any errors.
 • False: Indicates that the activity has been unsuccessful due to an unexpected error being thrown.

How to Get Media ID and SID Using Send Message Activity

You can retrieve the required Media ID and SID using the Send Message activity.

Step 1: Configure the Send Message Activity 
• Refer to the Send Message Activity documentation for configuration details.
• Fill in all required fields based on your workflow needs.

Step 2: Capture Media ID and SID
1. Add a Write Log activity after the Send Message activity.
2. In the Input String, enter the variable created in the Send Message activity.
3. Type a dot (.) after the variable to view all available properties.
4. Select the Twilio URI property after the dot to get the complete endpoint and run the workflow.
5. Review the log output to identify the Media ID and SID.

Step 3: Sample Output
Example values:
Media ID: ME878a486bdfcb3e51b126cff371c87d6
SID: MM09beba6d02b39e261927b2acb81826eb
Tip: Use these retrieved values directly in the GetRecord activity configuration.

How to Retrieve the Output of GetRecord Activity

Steps to View Data Returned by the GetRecord Activity
1. Add a Write Log activity after the GetRecord activity.
2. In the Input String, enter the output variable created in the GetRecord activity.
    • Example: If your output variable is recordOutput, enter recordOutput.
3. Type a dot (.) after the variable to view all available output properties.
    • Example: recordOutput. → shows properties like Status, DateCreated, RecordID, etc.
4. Select the required properties.
   • Example: recordOutput.Status
5. Run the workflow and review the log output after execution is completed.

6.12.4 Send Message

This activity allows you to send SMS or MMS messages using the Twilio integration. It enables automated message delivery to recipients, which can be used for notifications, alerts, or communication purposes

Properties

INPUT

To:* Specifies the recipient’s phone number to which the message will be sent. Ensure that the number includes the country code (e.g., +1XXXXXXXXXX).

From:* Specifies the sender’s phone number that is registered with Twilio. Messages can only be sent from Twilio-verified numbers.

Body:* Specifies the text content of the message to be sent. String data type.

MediaUrl: Specifies a list of media URLs to send MMS messages. If not provided, the message will be sent as a regular SMS. (eg., New List(Of String) From {“https://example.com/image1.jpg”, “https://example.com/image2.png”})

Note: The URL should be publicly accessible. And also, should have proper format. Refer the link for more information –21620: Invalid media URL(s) | Twilio.

MISC

SkipOnError: Specify the “Boolean” value as “True” or “False.”

True: Continue executing the workflow regardless of any errors thrown.
False: Halt the workflow if it encounters any errors.
None: If the option is left blank, the activity will, by default, behave as if “False” were chosen.

Version: Displays the version of the activity being used. This field is auto-populated and read-only.

DisplayName: Displays the name of the activity. The name can be customized for better readability and troubleshooting.

OUTPUT

Response: Returns the JSON response received from Twilio after sending the message. The response contains details such as message SID, status, and timestamps. (String Datatype)

MessageDetails: Returns the sent message JSON details in a deserialized format and stores them in a Messages object.

Result: It provides the ability to view the execution status of the activity. It returns values in “Boolean.”
True: 
Indicates that the activity has been executed successfully without any errors.
False: 
Indicates that the activity has been unsuccessful due to an unexpected error being thrown.

* Represents mandatory fields to execute the workflow.

6.13 MicrosoftOutlook365

The Microsoft 365 connector in Robility is a secure, cloud-based integration that brings Outlook 365, calendars, user profiles, and Microsoft Graph APIs into your automation workflows. It uses OAuth 2.0 authentication for streamlined email sending, calendar management, and more.

Prerequisites

Before using Microsoft 365 with the Robility platform, users must first establish a secure connection between Robility Manager and your organization’s Microsoft Entra ID (formerly Azure AD) environment. This allows you to authenticate securely and leverage Microsoft Graph APIs for your automation workflows.

Depending on your chosen authentication flow, you will need the following credentials from your Microsoft Entra ID App Registration:

1. Client Credentials: You will need the Client ID, Tenant ID, and Client Secret.
2. Authorization Code: You will need the Service Email Address and Password associated with your Microsoft 365 account.

Ensure that your App Registration has the necessary Microsoft Graph API permissions configured to match your workflow requirements.
Note: Before using any Microsoft 365 activity, you must configure the Microsoft 365 App Integration in Robility Manager for the corresponding project.

For detailed information on managing your credentials, refer to the official guide: Microsoft Entra ID App Registrations.

OAuth Callback URL

The Callback URL is critical for the OAuth flow. After user permission, Microsoft 365 sends the authorization code or access token here, allowing Robility to complete authentication. Find it on the “Microsoft 365” Connection page in Robility and add as Redirect URL in your App Registration:
https://robilitydev.sutherlandglobal.com/Robility/AppIntegration/microsoft365Callback
(Copy directly from the Robility connector page.)

Integration Steps

1. Log in to Robility Manager.
2. Go to ProjectsApp IntegrationsMicrosoft 365.
3. Click the Settings icon.
4. Choose your authentication type and connect:
    OAuth 2.0 Client Credentials:
      a.Enter Client ID, Tenant ID, Client Secret.
      b.Click Connect.
    OAuth 2.0 Authorization Code:
      a.Click Connect (redirects to Microsoft login).
      b.Enter service email and password.
      c.Verify under Connections

Adding Connections via Activities

1. Drag and drop the desired Microsoft 365 activity into your workflow.
2. Click the Add New Connection hyperlink within the activity properties.
3. You will be redirected to the Robility Manager.
4. Log in and navigate your project.
5. Select Microsoft 365 from the App Integrations menu.
6. Provide the required credentials (OAuth 2.0 Client Credentials or Authorization Code) and click Connect.
7. Return to the workflow, refresh the connection list, and proceed with your automation.

Expiration and Troubleshooting

Robility auto-refreshes OAuth 2.0 tokens if credentials stay valid.

1. Client Credentials: No auto-expiration; fails only if Client Secret or App Registration is revoked/changed.
2. Authorization Code: Refresh token lasts long-term; may revoke on password change, user consent removal, or organization policies.

If an authentication or token expiry error occurs in Robility, reconnect the integration from the Microsoft 365 connector’s Settings page without re-adding it.

Security Best Practices

Robility prioritizes the security of your Microsoft 365 environment by utilizing industry-standard authentication and data protection protocols.

1. Secure Authentication: OAuth 2.0 ensures that your Microsoft credentials are never stored directly by the Robility platform.
2. Principle of Least Privilege: Access is strictly governed by the specific permissions granted in your Azure App Registration; we recommend limiting these to the minimum required for your workflows.
3. Data Encryption: All communication between Robility and Microsoft services is encrypted via secure HTTPS/TLS channels.
4. Credential Maintenance: Client Secrets should be rotated periodically according to your organization’s security policy and updated immediately in the connector settings.

6.14 Microsoft Outlook365 Calendar

The Microsoft Outlook 365 Calendar integration enables users to access and manage the Outlook calendar of the configured service account directly within the application. Users can create, retrieve, update, and delete calendar events, schedule meetings, invite participants, and track calendar activities through automated workflows.

In Outlook, an event is a calendar item such as a meeting, appointment, reminder, or all-day event. Events help users manage scheduled activities and important dates.

Prerequisite: Configure the Microsoft Outlook 365 connection before using Calendar activities.

Purpose: Automate the creation, retrieval, updating, deletion, and management of Outlook calendar events for the configured service account.

Benefits

a. Reduces manual calendar administration.
b. Automates scheduling and event management tasks.
c. Simplifies meeting creation and updates.
d. Ensures consistent and accurate calendar data.

Microsoft 365 Calendar Connection Scopes

The following Microsoft Graph API scopes are mandatory for using and automating Microsoft 365 Calendar activities. These permissions enable the activities to securely access and manage Outlook calendar resources.

Scope Description
Calendars.ReadWrite Allows the application to create, read, update, and delete Outlook calendar events. Required for managing calendar activities.
Calendars.Read Allows the application to read calendars and retrieve calendar events.
offline_access Allows the application to obtain refresh tokens and maintain access without requiring repeated user sign-in.
User.Read Allows access to the authenticated user's basic profile information.
openid Enables user authentication through the Microsoft Identity Platform.
profile Provides basic user profile information during authentication.

Activities

The following Calendar activities are available in the Microsoft 365 activity package:

Activity Description
Create Event Creates a new event in the specified Outlook calendar.
Delete Event Deletes or cancels an Outlook calendar event and sends a cancellation notification to all attendees.
For Each Event Iterates through calendar events that match the specified filter criteria.
Forward Event Forwards an existing calendar event to one or more recipients.
Get Event List Retrieves a list of calendar events that match the specified filter criteria.
Update Event Updates an existing calendar event, including properties such as the subject, date and time, attendees, or location.

6.14.1 Release Notes

v.1.1.2

This release introduces a new activity to simplify meeting invitation management directly from Microsoft 365 Calendar.

New Activity

Respond to a Meeting Invitation

Allows users to Accept, Tentatively Accept, or Decline invitations using a configured Microsoft 365 account. Supports attaching a custom response message when replying to the organizer.

Release Date: 29/08/2026

6.14.2 Create Event

The Create Event activity creates an event in a Microsoft 365 calendar of the configured service account. It allows you to configure event details such as the title, start and end date/time, attendees, location, online meeting information, reminders, categories, and calendar availability settings.

Prerequisites

1. A valid Project Key is required in the Publish Console to access and publish workflows successfully.
2. If Is Online Meeting is enabled, a valid meeting URL must be provided in the Online Meeting property.

Limitations

1. Recurring events are not supported.
2. Events can only be created as a single occurrence.

Activity Details in Canvas

Microsoft 365: Select a Microsoft 365 account from the available connections. The selected account is used to authenticate and access the mailbox.

Calendar: Specifies the calendar folder where the event will be created. You can either select a calendar folder from the drop-down list, enter the calendar folder name directly as text, or provide a String variable containing the calendar folder name.

Event Title: Specifies the title of the event. You can enter the title directly as text or provide a String variable containing the event title.

Start Date & Time: Specifies the date and time when the event begins. You can select the date using the date picker, provide the value through a variable, and enter the time manually.

End Date & Time: Specifies the date and time when the event ends. You can select the date using the date picker, provide the value through a variable, and enter the time manually.

Note: The Start Date & Time and End Date & Time fields can be configured using either of the following options:

  • Use Variable: Select a variable that stores the required date and time value.
  • Deactivate Variable: Remove the variable and enter the date and time directly.

Supported DateTime Format: YYYY-MM-DD HH:mm:ss

Example: 2023-01-10 13:00:00

Time Zone: Specifies the time zone for the event. For example, Coordinated Universal Time (UTC). If no value is provided, Indian Standard Time (IST) is used by default.

Required Attendees: Specifies the email addresses of attendees who are required to attend the event. You can enter the email addresses directly or provide a String variable containing the required attendee email addresses.
Single Attendee: {“demo@gmail.com”}
Multiple Attendees: {“abc@gmail.com”,”def@gmail.com”}

All Day Event: When enabled, the event is scheduled as an all-day event.

Important: Values configured in the Canvas are automatically populated in the corresponding properties in the Properties panel and can be modified there if required.

Properties

INPUT

AttachmentPaths: Specifies the file path(s) of the attachment(s) to be added to the event. You can enter the file paths directly or provide a String variable containing the attachment paths. Multiple file paths must be separated by a semicolon (;).
Example: {“C:\Files\Agenda.pdf”,”C:\Files\Notes.docx”}

Body: Specifies the description of the event. You can enter the content directly as text or provide a String variable containing the event description. The content can be provided in either HTML or plain text format.

Categories: Specifies the categories associated with the event. You can enter the categories directly or provide a String variable containing the category values. Multiple categories must be separated by a semicolon (;).

Supported categories include Red, Blue, Yellow, Purple, Orange, Green, and any custom categories configured in Microsoft 365.

End Date: Specifies the event end date and time.

Event Title: Specifies the title of the event. You can enter the title directly as text or provide a String variable containing the event title.

Importance: Specifies the importance level of the event. Available options are Normal, High, and Low.

Is All Day: Specifies whether the event should be scheduled as an all-day event.

Is Online Meeting: Specifies whether the event should be created as an online meeting. When enabled, the Online Meeting property becomes mandatory, and a valid meeting URL must be provided.

Location: Specifies the location where the event will take place. You can enter the location directly as text or provide a String variable containing the location details.

Online Meeting: Specifies the URL of the online meeting. You can enter the meeting URL directly or provide a String variable containing the meeting URL.

Supported meeting platforms include Zoom, Webex, and other valid meeting services.

Optional Attendees: Specifies the email addresses of attendees whose participation in the event is optional. You can enter the email addresses directly or provide a String variable containing the optional attendee email addresses.

ReminderMinutesBeforeStart: Specifies the number of minutes before the event start time when the reminder notification should be triggered.

Required Attendees: Specifies the email addresses of attendees who are required to attend the event. You can enter the email addresses directly or provide a String variable containing the required attendee email addresses.

Resource Attendees: Specifies the email addresses of resource attendees associated with the event, such as meeting rooms or equipment. You can enter the values directly or provide a String variable containing the resource attendee details.

Sensitivity: Specifies the privacy level of the event. Available options are Normal, Private, Confidential, and Personal.

ShowAs: Specifies how the event appears in the calendar availability view. Available options are Busy, Free, Tentative, OOF (Out of Office), Unknown, and Working Elsewhere.

Start Date: Specifies the event start date and time.

Timezone: Specifies the time zone of the event.

MISC

DisplayName: Specifies the display name of the activity. This value can be customized to improve workflow readability and troubleshooting.

SkipOnError: Specifies whether the workflow execution should continue when the activity encounters an error.
True: The workflow continues execution even if an error occurs.
False: The workflow stops execution when an error occurs.
None: The default value is set to False.

Version: Displays the current version of the activity.

OUTPUT

Created Event (O365EventItem): Specify a variable to store the details of the newly created calendar event. The variable is populated after the activity executes successfully and can be used to access in later workflow steps.

Result: Returns a Boolean value indicating the execution status of the activity.
True: The activity executed successfully.
False: The activity failed due to an unexpected error.

After the event is created successfully, invitation emails are automatically sent to all specified attendees.

6.14.3 Update Event

The Update Event activity updates an existing event in a Microsoft 365 calendar of the configured service account. It allows you to modify event details such as the title, start and end date/time, attendees, location, online meeting information, reminders, categories, and calendar availability settings.

Prerequisites

1. A valid Project Key is required in the Publish Console to access and publish workflows successfully.
2. If Is Online Meeting is enabled, a valid meeting URL must be provided in the Online Meeting property.

Limitations

1. Recurring events are not supported.
2. Events can only be updated as a single occurrence.
3. This activity must be used within the For Each Event activity .

Activity Details in Canvas

Microsoft 365: Select a Microsoft 365 account from the available connections. The selected account is used to authenticate and access the mailbox.

Calendar: Specifies the calendar folder containing the event to be updated. You can either select a calendar folder from the drop-down list, enter the calendar folder name directly as text, or provide a String variable containing the calendar folder name.

Event To Modify: Specifies the event to be updated. Use the CurrentEvent variable, which is generated by default as the Item Name field in the For Each Event activity , to select the event to be updated.

Event Title: Specifies the title of the event. You can enter the title directly as text or provide a String variable containing the event title.

Start Date & Time: Specifies the date and time when the event begins. You can select the date using the date picker, provide the value through a variable, and enter the time manually.

End Date & Time: Specifies the date and time when the event ends. You can select the date using the date picker, provide the value through a variable, and enter the time manually.

Note: The Start Date & Time and End Date & Time fields can be configured using either of the following options:

 Use Variable: Select a variable that stores the required date and time value.
 Deactivate Variable: Remove the variable and enter the date and time directly.
 Supported DateTime Format:
 YYYY-MM-DD HH:mm:ss Example: 2023-01-10 13:00:00

Time Zone: Specifies the time zone for the event update. For example, Coordinated Universal Time (UTC). If no value is provided, Indian Standard Time (IST) is used by default.

Required Attendees: Specifies the email addresses of attendees who are required to attend the event. You can enter the email addresses directly or provide a String variable containing the required attendee email addresses.

Single Attendee: {"demo@gmail.com"}

Multiple Attendees: {"abc@gmail.com","def@gmail.com"}

All Day Event: When enabled, the event is updated as an all-day event.

Important: Values configured in the Canvas are automatically populated in the corresponding properties in the Properties panel and can be modified there if required.

Properties

INPUT

AttachmentPaths: Specifies the file path(s) of the attachment(s) to be added to the event. You can enter the file paths directly or provide a String variable containing the attachment paths. Multiple file paths must be separated by a semicolon (;).
Example: {"C:\Files\Agenda.pdf","C:\Files\Notes.docx"}

Body: Specifies the description of the event. You can enter the content directly as text or provide a String variable containing the event description. The content can be provided in either HTML or plain text format.

Categories: Specifies the categories associated with the event. You can enter the categories directly or provide a String variable containing the category values. Multiple categories must be separated by a semicolon (;).
Supported categories include Red, Blue, Yellow, Purple, Orange, Green, and any custom categories configured in Microsoft 365.

End Date: Specifies the event end date and time.

Event Title: Specifies the title of the event. You can enter the title directly as text or provide a String variable containing the event title.

Importance: Specifies the importance level of the event. Available options are Normal, High, and Low.

Is All Day: Specifies whether the event should be updated as an all-day event.

Is Online Meeting: Specifies whether the event should be updated as an online meeting. When enabled, the Online Meeting property becomes mandatory, and a valid meeting URL must be provided.

Location: Specifies the location where the event will take place. You can enter the location directly as text or provide a String variable containing the location details.

Online Meeting: Specifies the URL of the online meeting. You can enter the meeting URL directly or provide a String variable containing the meeting URL.
Supported meeting platforms include Zoom, Webex, and other valid meeting services.

Optional Attendees: Specifies the email addresses of attendees whose participation in the event is optional. You can enter the email addresses directly or provide a String variable containing the optional attendee email addresses.

ReminderMinutesBeforeStart: Specifies the number of minutes before the event start time when the reminder notification should be triggered.

Required Attendees: Specifies the email addresses of attendees who are required to attend the event. You can enter the email addresses directly or provide a String variable containing the required attendee email addresses.

Resource Attendees: Specifies the email addresses of resource attendees associated with the event, such as meeting rooms or equipment. You can enter the values directly or provide a String variable containing the resource attendee details.

Sensitivity: Specifies the privacy level of the event. Available options are Normal, Private, Confidential, and Personal.

ShowAs: Specifies how the event appears in the calendar availability view. Available options are Busy, Free, Tentative, OOF (Out of Office), Unknown, and Working Elsewhere.

Start Date: Specifies the event start date and time.

Timezone: Specifies the time zone of the event.

MISC

DisplayName: Specifies the display name of the activity. This value can be customized to improve workflow readability and troubleshooting.

SkipOnError: Specifies whether the workflow execution should continue when the activity encounters an error.
True: The workflow continues execution even if an error occurs.
False: The workflow stops execution when an error occurs.
None: The default value is set to False.

Version: Displays the current version of the activity.

OUTPUT

Updated Event: Specify a variable of type O365EventItem to store the details of the updated calendar event. The variable is populated after the activity executes successfully and can be used to access the event details in subsequent workflow steps.

Result: Returns a Boolean value indicating the execution status of the activity.
True: The activity executed successfully.
False: The activity failed due to an unexpected error.

After the event is updated successfully, update notification emails are automatically sent to all specified attendees regarding the modified event.

6.14.4 GetEvent List

The Get Event List activity retrieves events from a Microsoft 365 calendar of the configured service account. It allows you to retrieve events within a specified date and time range, apply additional filters, and store the retrieved events in a variable for further processing within the workflow.

Prerequisites

A valid Project Key is required in the Publish Console to access and publish workflows successfully.

Activity Details in Canvas

Microsoft 365: Select a Microsoft 365 account from the available connections. The selected account is used to authenticate and access the mailbox.

Calendar: Specifies the calendar folder from which events will be retrieved. You can either select a calendar folder from the drop-down list, enter the calendar folder name directly as text, or provide a String variable containing the calendar folder name.

Start Date & Time: Specifies the date and time from which events will be retrieved. You can select the date using the date picker, provide the value through a variable, and enter the time manually.

End Date & Time: Specifies the date and time until which events will be retrieved. You can select the date using the date picker, provide the value through a variable, and enter the time manually.

Note: The Start Date & Time and End Date & Time fields can be configured using either of the following options:

Use Variable: Select a variable that stores the required date and time value.
Deactivate Variable: Remove the variable and enter the date and time directly.
Supported DateTime Format: YYYY-MM-DD HH:mm:ssExample: 2023-01-10 13:00:00

Additional Filters: Allows you to define additional filtering conditions using the Filter Builder to retrieve specific calendar events based on event properties.

Important: Values configured in the Canvas are automatically populated in the corresponding properties in the Properties panel and can be modified there if required.

Properties

MISC

DisplayName: Specifies the display name of the activity. This value can be customized to improve workflow readability and troubleshooting.

SkipOnError: Specifies whether the workflow execution should continue when the activity encounters an error.
True: The workflow continues execution even if an error occurs.
False: The workflow stops execution when an error occurs.
None: The default value is set to False.

Version: Displays the current version of the activity.

OPTIONS

Limit: Specifies the maximum number of events to retrieve. The default value is 50.

Timezone: Specifies the time zone used while retrieving events. You can enter the time zone directly as text or provide a String variable containing the required time zone value.
For example, Indian Standard Time (IST). If no value is provided, the default configured time zone is used.

OUTPUT

Events: Stores the collection of calendar events retrieved by the activity in a variable. This variable can be used in subsequent activities to process the retrieved events.

Result: Returns a Boolean value indicating the execution status of the activity.
True: The activity executed successfully.
False: The activity failed due to an unexpected error.

After the activity is successfully completed, the retrieved events are available through the Events output variable and can be used in subsequent activities.

6.14.5 ForEach Event

The For Each Event activity retrieves and iterates through events available in a Microsoft 365 calendar of the configured service account. It allows you to search for events within a specified date and time range, apply additional filters, and perform actions on each event individually.

Prerequisites

A valid Project Key is required in the Publish Console to access and publish workflows successfully.

Activity Details in Canvas

Microsoft 365: Select a Microsoft 365 account from the available connections. The selected account is used to authenticate and access the mailbox.

Calendar: Specifies the calendar folder from which events will be retrieved. You can either select a calendar folder from the drop-down list, enter the calendar folder name directly as text, or provide a String variable containing the calendar folder name.

Start Date & Time: Specifies the date and time from which events will be retrieved. You can select the date using the date picker, provide the value through a variable, and enter the time manually.

End Date & Time: Specifies the date and time until which events will be retrieved. You can select the date using the date picker, provide the value through a variable, and enter the time manually.

Note: The Start Date & Time and End Date & Time fields can be configured using either of the following options:

Use Variable: Select a variable that stores the required date and time value.
Deactivate Variable: Remove the variable and enter the date and time directly.
Supported DateTime Format: MM/DD/YYYY HH:mm:ssExample: 01/10/2023 13:00:00

Add Filters using Filter Builder: Allows you to define additional filtering conditions to retrieve specific events based on event properties. For more information, refer to the Filter Builder.

Important: Values configured in the Canvas are automatically populated in the corresponding properties in the Properties panel and can be modified there if required.

Properties

MISC

DisplayName: Specifies the display name of the activity. This value can be customized to improve workflow readability and troubleshooting.

SkipOnError: Specifies whether the workflow execution should continue when the activity encounters an error.
True: The workflow continues execution even if an error occurs.
False: The workflow stops execution when an error occurs.
None: The default value is set to False.

Version: Displays the current version of the activity.

OPTIONS

ItemName: Specifies the name of the variable that stores the current event being processed during each iteration. This variable is generated by default and can be used in activities placed inside the Do section to access the details of the current event.

Limit: Specifies the maximum number of events to retrieve and process. The default value is 50.

Preferred Timezone: Specifies the preferred time zone used while retrieving events. You can enter the time zone directly as text or provide a String variable containing the required time zone value.
The recommended format is Indian Standard Time (IST).

OUTPUT

NumberOfEventProcessed: Stores the number of events processed by the activity in a variable.

Result: Returns a Boolean value indicating the execution status of the activity.
True: The activity executed successfully.
False: The activity failed due to an unexpected error.

6.14.6 Forward Event

The Forward Event activity forwards an existing event from a Microsoft 365 calendar of the configured service account to one or more recipients. It allows you to specify recipients and include additional comments in the forwarded event invitation.

Prerequisites

A valid Project Key is required in the Publish Console to access and publish workflows successfully.

Limitations

1. This activity is not standalone and must be used within the For Each Event activity.
2. The event to be forwarded must be provided through the Event property.

Activity Details in Canvas

Microsoft 365: Select a Microsoft 365 account from the available connections. The selected account is used to authenticate and access the mailbox.

Event: Specifies the event to be forwarded. Use the CurrentEvent variable, which is generated by default as the Item Name field in the For Each Event activity, to select the event to be forwarded.

Attendee(s): Specifies the email addresses of the recipients to whom the event will be forwarded. You can enter the email addresses directly or provide a String variable containing the recipient email addresses.

Comment: Specifies additional comments to be included with the forwarded event invitation. You can enter the comments directly as text or provide a String variable containing the comment content.

The comment editor supports rich text formatting options such as Bold, Italic, Underline, Lists, Hyperlinks, and HTML formatting.

Important: Values configured in the Canvas are automatically populated in the corresponding properties in the Properties panel and can be modified there if required.

Properties

EMAIL

Body: Specifies the content of the comment included while forwarding the event. You can enter the content directly as text or provide a String variable containing the comment content. The content can be provided in either HTML or plain text format.

INPUT

ApplyOnSeries: Specifies whether the forwarding action should be applied to all occurrences of a recurring event series.

Available options:
Yes: Applies the forwarding action to all occurrences of the recurring event series.
No: Applies the forwarding action only to the selected event occurrence.

MISC

DisplayName: Specifies the display name of the activity. This value can be customized to improve workflow readability and troubleshooting.

SkipOnError: Specifies whether the workflow execution should continue when the activity encounters an error.
True: The workflow continues execution even if an error occurs.
False: The workflow stops execution when an error occurs.
None: The default value is set to False.

Version: Displays the current version of the activity.

OUTPUT

Result: Returns a Boolean value indicating the execution status of the activity.
True: The activity executed successfully.
False: The activity failed due to an unexpected error

After the activity is successfully completed, the specified recipients receive a forwarded invitation for the selected calendar event along with the provided comments.

6.14.7 Respond to Event Invitation

The Respond to Event Invitation activity enables the configured Microsoft 365 account to respond to a meeting invitation by sending an Accept, Tentative, or Decline response. An optional message can also be included with the response. This activity can be used only when the configured account is an attendee of the meeting invitation.

Prerequisites

A valid Project Key is required in the Publish Console to successfully access and publish workflows.

Limitations

1. This activity is not standalone and must be used within the For Each Event Activity.
2. The event to respond to must be provided through the Event.
3. The configured Microsoft 365 account must be an attendee of the meeting invitation. The activity cannot be used by the meeting organizer to accept, decline, or tentatively accept their own meeting invitation.

Activity Details in Canvas

Microsoft 365: Select a Microsoft 365 account from the available connections. The selected account is used to authenticate and access the mailbox.

Event to Reply: Specifies the meeting invitation to which the response is sent. You can provide the event directly or use a String variable containing the required event value.

Response: Specifies the response status sent to the event organizer. The available options are: Accept, Tentatively Accept or Decline

Input

Apply on All Occurrences: Specifies whether the response should be applied to all occurrences of a recurring event in Yes or No.
Accept: When Accept is selected, no additional fields are displayed.
Tentatively Accept / Decline: When Tentatively Accept or Decline is selected, additional fields are displayed.

NEW

Start Date & Time: Specifies the date and time from which events are retrieved. You can select the date using the date picker, provide the value through a variable, and enter the time manually.

End Date & Time: Specifies the date and time until which events are retrieved. You can select the date using the date picker, provide the value through a variable, and enter the time manually.

Note: The Start Date & Time and End Date & Time fields can be configured using either of the following options:
Use Variable: Select a variable that stores the required date and time value.
Deactivate Variable: Remove the variable and enter the date and time directly.
Supported DateTime Format:
 YYYY-MM-DD HH:mm:ss Example: 2023-01-10 13:00:00

Timezone: Specifies the time zone used while retrieving events. You can enter the time zone directly as text or provide a String variable containing the required time zone value.
For example: Indian Standard Time (IST). If no value is provided, the default configured time zone is used.

Send Response Notification: Specifies whether a response notification should be sent. Yes or No

Comment: The Comment field is displayed when Send Response Notification is set to Yes. It allows you to enter a message that is sent to the event organizer along with the response status. This property supports String variables and string-formatted values.

Properties

EMAIL

Body: Displays the response message or content associated with the event invitation response.

INPUT

Response Option: Displays the response option selected for the event invitation.
Time Zone: Specifies the time zone associated with the event response.

MISC

DisplayName: Specifies the display name of the activity. This value can be customized to improve workflow readability and troubleshooting.

SkipOnError: Specifies whether workflow execution should continue when the activity encounters an error.
True: The workflow continues execution even if an error occurs.
False: The workflow stops execution when an error occurs.
None: The default value is False.

Version: Displays the current version of the activity.

OUTPUT

Result: Returns a Boolean value indicating the execution status of the activity.
True: The activity executed successfully.
False: The activity failed due to an unexpected error.

Note: Once the activity executes successfully, the selected response is sent to the meeting invitation organizer.

Common Error

Meeting Organizer Cannot Respond

Error Message:

Cannot respond to this event: the current user is the meeting organizer, not an attendee. Only attendees can accept/decline/tentatively accept a meeting invitation.

This error occurs when the Microsoft 365 account configured in the activity is the meeting organizer rather than an attendee. In Microsoft Outlook/Office 365, only attendees can Accept, Decline, or Tentatively Accept a meeting invitation. Since the configured account created and owns the meeting, the Respond to Event Invitation activity is not applicable and the operation fails.

Resolution

Verify whether the meeting was created by the same Microsoft 365 account configured in the automation.

1. If the configured account is the meeting organizer, skip the Respond to Event Invitation. 
2. If the configured account is an attendee, the response can be sent using this activity.
3. Ensure that the configured account is listed as an attendee of the meeting invitation before executing the activity.

6.14.8 Delete Event

The Delete Event activity deletes an existing event from a Microsoft 365 calendar of the configured service account. It allows you to remove a specific event and specify whether the deletion should apply only to the selected event or to occurrences within a recurring event series.

Prerequisites

A valid Project Key is required in the Publish Console to access and publish workflows successfully.

Limitations

1. This activity is not standalone and must be used within the For Each Event activity.
2. The event to be deleted must be provided through the Event To Delete property.

Activity Details in Canvas

Microsoft 365: Select a Microsoft 365 account from the available connections. The selected account is used to authenticate and access the mailbox.

Event To Delete: Specifies the event to be deleted. Use the CurrentEvent variable, which is generated by default as the Item Name field in the For Each Event activity, to select the event to be deleted.

Delete Option: Specifies how the event should be removed from the calendar.

Available options:
Single Event Only: Deletes only the selected event.
Future Occurrences Only: Deletes the selected occurrence and all future occurrences in the recurring event series.
Past and Future Occurrences: Deletes all occurrences in the recurring event series.

Comment: Specifies additional comments to be included in the cancellation notification sent to attendees. You can enter the comments directly as text or provide a String variable containing the cancellation message.
The comment editor supports rich text formatting options such as Bold, Italic, Underline, Lists, Hyperlinks, and HTML formatting.

Important: Values configured in the Canvas are automatically populated in the corresponding properties in the Properties panel and can be modified there if required.

Properties

EMAIL

Body: Specifies the content of the cancellation message. You can enter the content directly as text or provide a String variable containing the cancellation message. The content can be provided in either HTML or plain text format.

MISC

DisplayName: Specifies the display name of the activity. This value can be customized to improve workflow readability and troubleshooting.

SkipOnError: Specifies whether the workflow execution should continue when the activity encounters an error.
True: The workflow continues execution even if an error occurs.
False: The workflow stops execution when an error occurs.
None: The default value is set to False.

Version: Displays the current version of the activity.

OUTPUT

Result: Returns a Boolean value indicating the execution status of the activity.
True: The activity executed successfully.
False: The activity failed due to an unexpected error.

After the activity is successfully completed, the selected event or occurrence is removed from the calendar, and a cancellation notification is automatically sent to the attendees along with the provided comments.

6.15 Microsoft SharePoint

Microsoft SharePoint integration enables Robility to securely connect with Microsoft SharePoint Online. This integration allows users to access and manage files and folders stored in SharePoint document libraries directly from Robility.

The integration uses Microsoft OAuth 2.0 authentication to establish a secure connection between Robility and SharePoint. Users can connect using the standard Microsoft authentication process or configure their own Microsoft Entra ID (Azure AD) OAuth application.

Prerequisites

Before creating a Microsoft SharePoint connection, ensure the following requirements are met:

1. You have an active Microsoft SharePoint Online account.
2. You have the required permissions to access the SharePoint sites and document libraries that will be used in your workflows.
3. If you are using the Bring Your Own OAuth 2.0 App authentication method:
     a. A Microsoft Entra ID (Azure AD) application must be registered.
     b. The application must have the required Microsoft Graph API permissions.
     c. The required Client ID, Client Secret, Tenant ID, and Redirect URI must be available.

Authentication Methods                                                                                                                   

Microsoft SharePoint supports the following authentication methods:

Authentication Method Description
OAuth 2.0 Authorization Code Connects Robility using your Microsoft account through the standard Microsoft sign-in and authorization process.
Bring Your Own OAuth 2.0 App Connects Robility using a custom Microsoft Entra ID (Azure AD) application created and managed by your organization.

Choosing an Authentication Method

OAuth 2.0 Authorization Code

Use this method when you want to connect using an existing Microsoft account without creating a custom application.

Advantages:

a. Simple configuration.
b. Uses the standard Microsoft login process.
c. Supports automatic token refresh.

Bring Your Own OAuth 2.0 App

Use this method when your organization requires control over application registration, permissions, and security policies.

Advantages:

a. Organization-managed authentication.
b. Custom permission configuration.
c. Better control over application access.

Connection Configuration

When using Bring Your Own OAuth 2.0 App, configure the following fields:

Field Description
Client ID The Application (Client) ID generated when registering the Microsoft Entra ID application.
Client Secret The secret key generated for the Microsoft Entra ID application.
Scope Defines the Microsoft Graph API permissions required for SharePoint access.
Tenant ID The unique identifier of your Microsoft Entra ID organization tenant.

Microsoft Graph API Scopes

The Scope field defines the permissions that Robility requests from Microsoft Graph API.

The supported scopes are:

Scope Purpose
offline_access Allows access tokens to be refreshed without requiring repeated user sign-in.
openid Enables OpenID Connect authentication.
profile Provides access to basic user profile information.
email Provides access to the user's email address.
Files.Read Allows reading files that the signed-in user can access.
Files.Read.All Allows reading all files that the signed-in user has permission to access.
Files.ReadWrite Allows reading and modifying files that the signed-in user can access.
Files.ReadWrite.All Allows reading and modifying all files that the signed-in user has permission to access.
Sites.Read.All Allows reading SharePoint site content.
Sites.ReadWrite.All Allows reading and modifying SharePoint site content.
Group.Read.All Allows reading Microsoft 365 group information.
Group.ReadWrite.All Allows reading and modifying Microsoft 365 group information.
User.Read.All Allows reading user profile information across the organization.

Callback URL / Redirect URI Configuration

When registering a custom Microsoft Entra ID application, configure the callback URL displayed on the Robility connection page as the application’s Redirect URI.

The Redirect URI allows Microsoft to securely return the authentication response to Robility after successful login.

URL – https://robilitydev.sutherlandglobal.com/Robility/AppIntegration/Callback

Ensure that:

a. The Redirect URI exactly matches the URL provided by Robility.
b. The correct application type is selected during Microsoft Entra ID registration.
c. The application has the required API permissions.

Connecting Through Bring Your Own OAuth 2.0 App

To create a connection using your organization’s Microsoft Entra ID application:

1. Enter the Client ID.
2. Enter the Client Secret.
3. Configure the required Scopes.
4. Enter the Tenant ID.
5. Select Connect.
6. Sign in using your Microsoft account.
7. Review and approve the requested permissions.
 8. After successful authentication, the connection is created and available for SharePoint activities.

Connecting Through OAuth 2.0 Authorization Code

To create a connection using standard Microsoft authentication:

1. Select Connect.
2. Enter your Microsoft account email address.
3. Enter your password.
4. Select Sign in.
5. Complete any additional Microsoft authentication steps if required.
6. After successful authentication, you will be redirected back to the Connections page.
7. The newly created connection will be displayed and available for use.

Adding a SharePoint Connection Through Activities

Microsoft SharePoint activities require a valid connection before they can access SharePoint resources.

IMPORTANT: This feature is currently available only in Integration. The associated activities have not yet been released to the Live environment

Creating a New Connection

1. Open the required Microsoft SharePoint activity.
2. Open the Connection dropdown.
3. Select Add New Connection.
4. Complete the authentication process.
5. After successful authentication, the connection becomes available for use.

Using an Existing Connection

If a connection already exists:

1. Open the Connection dropdown.
2. Select the required SharePoint connection.
3. The selected connection will be used by the activity.

The default connection is automatically selected when available.

Managing Invalid Connections

If the selected connection is invalid:

1. Open the Connection dropdown.
2. Select Connections.
3. Remove the connection of the Microsoft account.
4. Add the connection again.

Once created, the connection can be reused across all Microsoft SharePoint activities within the project.

Troubleshooting

Issue Possible Cause Solution
Unable to create a connection Incorrect authentication details. Verify the Client ID, Client Secret, Tenant ID, and login credentials.
Access denied error Missing SharePoint permissions. Ensure the user or application has the required SharePoint permissions.
Authentication fails Incorrect Redirect URI. Verify that the Redirect URI matches the URL configured in Microsoft Entra ID.
Workflow cannot access files Insufficient file or site permissions. Confirm that the account has access to the SharePoint site and document library.
Connection expires Authentication token is invalid or has expired. Reconnect the account from Manage Connections to generate a new authentication token.

Notes

1. Microsoft SharePoint integration supports SharePoint Online only.
2. Authentication is performed using Microsoft OAuth 2.0.
3. Access to SharePoint resources depends on the permissions granted to the authenticated Microsoft account or Microsoft Entra ID application.
4. Configure Microsoft Graph API permissions according to your organization’s security requirements.
5. OAuth 2.0 Authorization Code authentication supports automatic token refresh.
6. Bring Your Own OAuth 2.0 App authentication requires administrators to manage application credentials and permissions.
7. Always follow your organization’s security policies when granting SharePoint permissions.

6.15.1 Release Notes

v.1.0.8

This release introduces new Microsoft SharePoint activities that enable you to automate file and folder management within the configured SharePoint site or document library. These activities simplify document management by allowing you to create, check, retrieve, move, rename, copy, delete, and upload files and folders as part of your workflows.

New Activities

1. Create Folder – Creates a new folder at the specified location within the configured document library.

2. File or Folder Exists – Checks whether a specified file or folder exists at the given location and returns the result for use in subsequent workflow activities.

3. Get Files and Folders – Retrieves files and folders from the specified location. The retrieved information can be used as input for subsequent activities in the workflow.

4. Move File or Folder – Moves an existing file or folder from one location to another within the configured document library.

5. Rename File or Folder – Renames an existing file or folder at the specified location.

6. Copy File or Folder – Copies an existing file or folder to the specified destination within the configured document library.

7. Delete File or Folder – Deletes an existing file or folder from the specified location.

8. Upload Files – Uploads one or more files from a local or specified source to the configured document library.

Release Date: 29.08.2026

6.15.2 Create Folder

The Create Folder activity creates a new folder in a specified SharePoint document library.

Prerequisites

A valid Project Key is required in the Publish Console to access and publish workflows successfully.

Activity Details in Canvas

Microsoft 365*: Select a Microsoft 365 account from the available connections. The selected account is used to authenticate and access SharePoint.

Parent Folder: Select the SharePoint document library or parent folder where the new folder will be created.

Folder Name: Enter the name of the new folder. You can enter the folder name directly as text or provide a String variable containing the folder name.

If Folder Already Exists: Specify how the activity should handle an existing folder with the same name:
Don’t Replace: Keeps the existing folder and does not create a new folder.
Auto Rename: Creates the new folder with an automatically generated name to avoid a naming conflict

Important: Values configured in the Canvas are automatically populated in the corresponding properties in the Properties panel and can be modified there if required.

Properties

INPUT

Folder Name: Enter the name of the new folder to be created.

Parent Folder Name: Select the parent folder from the document library where the new folder will be created.

MISC

DisplayName: Specifies the display name of the activity. This value can be customized to improve workflow readability and troubleshooting.

SkipOnError: Specifies whether the workflow execution should continue when the activity encounters an error.
True: The workflow continues execution even if an error occurs.
False: The workflow stops execution when an error occurs.
None: The default value is set to False.

Version: Displays the current version of the activity.

OUTPUT

Folder Detail(o365DriveRemoteItem): Specify a variable to store the details of the newly created folder. The variable is populated after the activity executes successfully and can be used to access the folder’s information in later workflow steps.

Result: Returns a Boolean value indicating the execution status of the activity.
True: The activity executed successfully.
False: The activity failed due to an unexpected error.

6.15.3 Files or Folder Exists

The File or Folder Exists activity checks whether a specified file or folder exists at a designated location within SharePoint.

Prerequisites

A valid Project Key is required in the Publish Console to access and publish workflows successfully.

Activity Details in Canvas

Microsoft 365*: Select a Microsoft 365 account from the available connections. The selected account is used to authenticate and access SharePoint.

File or Folder to rename: Select the file or folder to rename from the SharePoint document library. You can browse the document library and choose the required file or folder from the available list.

Properties

INPUT

File or Folder to rename: Select the file or folder to rename from the document library. You can choose an item from the available list.

Is Folder: Specify whether the selected item is a folder.
True: Treat the selected item as a folder.
False: Treat the selected item as a file.

MISC

DisplayName: Specifies the display name of the activity. This value can be customized to improve workflow readability and troubleshooting.

SkipOnError: Specifies whether the workflow execution should continue when the activity encounters an error.
True: The workflow continues execution even if an error occurs.
False: The workflow stops execution when an error occurs.
None: The default value is set to False.

Version: Displays the current version of the activity.

OUTPUT

Result: Returns a Boolean value indicating the execution status of the activity.
True: The activity executed successfully.
False: The activity failed due to an unexpected error.

6.15.4 Get Files and Folders

The Get Files and Folders activity retrieves the files and folders from a specified location within SharePoint.

Prerequisites

A valid Project Key is required in the Publish Console to access and publish workflows successfully.

Activity Details in Canvas

Microsoft 365*: Select a Microsoft 365 account from the available connections. The selected account is used to authenticate and access SharePoint.

Files or Folders: Select the file or folder to retrieve from the document library. You can choose an item from the available list using the folder picker, or use a variable for the folder destination.

Properties

MISC

DisplayName: Specifies the display name of the activity. This value can be customized to improve workflow readability and troubleshooting.

SkipOnError: Specifies whether the workflow execution should continue when the activity encounters an error.
 True: The workflow continues execution even if an error occurs.
 False: The workflow stops execution when an error occurs.
 None: The default value is set to False.

Version: Displays the current version of the activity.

OUTPUT

Item (o365DriveRemoteItem): Specifies a variable to store the details of the retrieved file or folder. The variable is populated after the activity executes successfully and can be used to access the item’s information in subsequent workflow steps

Result: Returns a Boolean value indicating the execution status of the activity.
 True: The activity executed successfully.
 False: The activity failed due to an unexpected error.

6.15.5 Move File or Folder

The Move File or Folder activity moves a specified file or folder to a destination folder within a SharePoint document library. You can also specify a new name for the moved item.

Prerequisites

A valid Project Key is required in the Publish Console to access and publish workflows successfully.

Activity Details in Canvas

Microsoft 365*: Select a Microsoft 365 account from the available connections. The selected account is used to authenticate and access SharePoint.

File or Folder to Move: Select the file or folder to move from the document library. You can select an item using the folder picker or provide a variable containing the file or folder path.

Destination Folder: Select the destination folder in the document library where the file or folder will be moved.

New Name: Enter a new name for the moved file or folder. You can enter the name directly as text or provide a String variable containing the new name.

Properties

INPUT

If file already exists: Select how to handle a file with the same name in the destination folder:
Replace: Overwrite the existing file.
Don’t Replace: Skip the operation and keep the existing file unchanged.
Auto Rename: Automatically rename the new file to avoid a naming conflict.

MISC

DisplayName: Specifies the display name of the activity. This value can be customized to improve workflow readability and troubleshooting.

SkipOnError: Specifies whether the workflow execution should continue when the activity encounters an error.
True: The workflow continues execution even if an error occurs.
False: The workflow stops execution when an error occurs.
None: The default value is False.

Version: Displays the current version of the activity.

OUTPUT

Folder Detail (o365DriveRemoteItem): Specifies a variable to store the details of the destination folder. The variable is populated after the activity executes successfully and can be used to access the folder information in subsequent workflow steps.

Result: Returns a Boolean value indicating the execution status of the activity.
True: The activity executed successfully.
False: The activity failed due to an unexpected error.

6.15.6 Rename File or Folder

The Rename File or Folder activity updates the name of an existing file or folder at its specified location within SharePoint.

Prerequisites

A valid Project Key is required in the Publish Console to access and publish workflows successfully.

Activity Details in Canvas

Microsoft 365*: Select a Microsoft 365 account from the available connections. The selected account is used to authenticate and access SharePoint.

File or Folder to rename: Select the file or folder to rename from the SharePoint document library. You can browse the document library and choose the required file or folder from the available list.

New Name: Enter the name of the new folder or file. You can enter the folder name directly as text or provide a String variable containing the folder name.

Properties

INPUT

File or Folder to rename: Select the file or folder to rename from the document library. You can choose an item from the available list.

Is Folder: Specify whether the selected item is a folder.
True: Treat the selected item as a folder.
False: Treat the selected item as a file.

New Name: Enter the name of the new folder or file.

MISC

DisplayName: Specifies the display name of the activity. This value can be customized to improve workflow readability and troubleshooting.

SkipOnError: Specifies whether the workflow execution should continue when the activity encounters an error.
True: The workflow continues execution even if an error occurs.
False: The workflow stops execution when an error occurs.
None: The default value is set to False.

Version: Displays the current version of the activity.

OUTPUT

Result: Returns a Boolean value indicating the execution status of the activity.
True: The activity executed successfully.
False: The activity failed due to an unexpected error.

6.15.7 Copy File or Folder

The Copy File or Folder activity creates a duplicate copy of a specified file or folder at a destination location within SharePoint.

Prerequisites

A valid Project Key is required in the Publish Console to access and publish workflows successfully.

Activity Details in Canvas

Microsoft 365*: Select a Microsoft 365 account from the available connections. The selected account is used to authenticate and access SharePoint.

File Or Folder To Copy: Select the file or folder to copy from the document library. You can choose an item from the available list.

Destination Folder: Select the destination folder in the document library where the file or folder will be copied.

New Name: Enter the name of the new folder. You can enter the folder name directly as text or provide a String variable containing the folder name.

Properties

INPUT

If file already exists: Select how to handle a file with the same name in the destination folder:
Replace: Overwrite the existing file.
Don’t Replace: Skip the operation and keep the existing file unchanged.
Auto Rename: Automatically rename the new file to avoid a naming conflict.

MISC

DisplayName: Specifies the display name of the activity. This value can be customized to improve workflow readability and troubleshooting.

SkipOnError: Specifies whether the workflow execution should continue when the activity encounters an error.
True: The workflow continues execution even if an error occurs.
False: The workflow stops execution when an error occurs.
None: The default value is set to False.

Version: Displays the current version of the activity.

OUTPUT

First Or Folder (o365DriveRemoteItem): Specify a variable to store the details of the copied or moved file/folder. The variable is populated after the activity executes successfully and can be used to access the item’s information in later workflow steps.

Result: Returns a Boolean value indicating the execution status of the activity.
True: The activity executed successfully.
False: The activity failed due to an unexpected error.

6.15.8 Delete File or Folder

The Delete File or Folder activity deletes a specified file or folder from a SharePoint document library. You can choose to permanently delete the item or move it to the recycle bin.

Prerequisites

A valid Project Key is required in the Publish Console to access and publish workflows successfully.

Activity Details in Canvas

Microsoft 365*: Select a Microsoft 365 account from the available connections. The selected account is used to authenticate and access SharePoint.

File or Folder to Delete: Select the file or folder to delete from the document library. You can select an item using the folder picker or provide a variable containing the file or folder path.

Permanently Delete: Specifies whether the selected file or folder should be permanently deleted.
Yes: Permanently deletes the file or folder.
No: Moves the file or folder to the recycle bin.

Properties

MISC

DisplayName: Specifies the display name of the activity. This value can be customized to improve workflow readability and troubleshooting.

SkipOnError: Specifies whether the workflow execution should continue when the activity encounters an error.
True: The workflow continues execution even if an error occurs.
False: The workflow stops execution when an error occurs.
None: The default value is set to False.

Version: Displays the current version of the activity.

OUTPUT

Result: Returns a Boolean value indicating the execution status of the activity.
True: The activity executed successfully.
False: The activity failed due to an unexpected error.

6.15.9 Upload Files

The Upload Files activity uploads one or more files to a designated location within a SharePoint document library.

Prerequisites

A valid Project Key is required in the Publish Console to access and publish workflows successfully.

Activity Details in Canvas

Microsoft 365*: Select a Microsoft 365 account from the available connections. The selected account is used to authenticate and access SharePoint.

File(s): Select the file(s) to upload. You can browse and choose one or more files from your local system.
Example: {“C:\\Users\\DemoUser\\Documents\\ProjectProposal.pdf”, “C:\\Users\\DemoUser\\Documents\\Requirements.xlsx”}

Destination Folder: Select the destination folder in the SharePoint document library where the file or folder will be uploaded. You can browse the document library and choose the required folder from the available list.

Properties

INPUT

If file already exists: Select how to handle a file with the same name in the destination folder:
Replace: Overwrite the existing file.
Don’t Replace: Skip the operation and keep the existing file unchanged.
Auto Rename: Automatically rename the new file to avoid a naming conflict.

Metadata for uploaded files: Specifies the metadata to associate with the uploaded files. This property applies only to files stored in a SharePoint document library and supports DataTable variables.

To provide metadata, create a Data Table using the Build Data Table activity with the following columns:
FieldName (String) – Specifies the name of an existing SharePoint column.
FieldValue (Object) – Specifies the value to be assigned to the corresponding SharePoint column.

Assign the DataTable output to a variable and provide the variable in the Metadata property.

Ensure that each FieldName matches an existing column in the SharePoint document library. For custom metadata, create the custom column in SharePoint first, then specify its name in FieldName and provide the value to be inserted in FieldValue.

Example: If the SharePoint library contains a custom column named Department, specify Department as the FieldName and provide a value such as Finance in FieldValue.

MISC

DisplayName: Specifies the display name of the activity. This value can be customized to improve workflow readability and troubleshooting.

SkipOnError: Specifies whether the workflow execution should continue when the activity encounters an error.
True: The workflow continues execution even if an error occurs.
False: The workflow stops execution when an error occurs.
None: The default value is set to False.

Version: Displays the current version of the activity.

OUTPUT

File List (List<o365DriveRemoteItem>): Specify a variable to store the details of all uploaded files. The variable is populated after the activity executes successfully and can be used to access the uploaded files’ information in later workflow steps.

First File (o365DriveRemoteItem): Specify a variable to store the details of the uploaded file. The variable is populated after the activity executes successfully and can be used to access the file’s information in later workflow steps.

Result: Returns a Boolean value indicating the execution status of the activity.
True: The activity executed successfully.
False: The activity failed due to an unexpected error.

7. IT Automation

7.1 Overview

Introduction

The IT Automation activities package in Robility includes a range of functionalities designed to automate IT-related tasks efficiently including cloud management, data extraction, and storage operations, leveraging the capabilities of platforms like Microsoft Azure and Amazon Web Services (AWS) within Robility’s automation workflows. These activities streamline IT operations, improve efficiency, and enable seamless integration of cloud services and data processing functionalities.

About the package

Azure Activities: These activities automate tasks related to Microsoft Azure, enabling efficient resource management, deployment automation, service monitoring, and seamless integration of Azure functionalities into your workflows. Key features included are:

1. Azure Blob Storage: Automates the management of unstructured data, including file uploads, downloads, and data manipulation in Azure Blob Storage.

2. Azure Key Vault: Provides secure storage and management of sensitive data such as API keys, passwords, and certificates, ensuring data security within automation processes.

3. Azure Virtual Machines (VM): Enables the automation of VM provisioning, configuration, and management, optimizing cloud computing resources and streamlining virtual machine operations within workflows.

Amazon S3 Activities: Activities related to Amazon S3 (Simple Storage Service) facilitate automation of tasks involving cloud storage on Amazon Web Services (AWS). They enable uploading, downloading, managing, and manipulating files stored in Amazon S3 buckets, integrating cloud storage capabilities into automation processes.

Cognitive Services: These services enable developers to integrate AI functionalities into their applications, facilitating tasks such as text extraction from images, address validation, and image quality enhancement without requiring extensive AI expertise.

Integration of API

In Robility, IT Automation packages are integrated using APIs to interact with specific features and leverage their capabilities.

Azure Blob Storage: To use these activities, you must provide the necessary Azure credentials (such as Azure Storage Account name and key or connection string) and specify the target container and blob details as required by each activity.

Amazon S3 Storage: To use these activities effectively, you must provide your AWS credentials (such as Access Key ID and Secret Access Key), specify the target bucket and object keys, and configure any additional settings required for each activity.

In both cases, the APIs provided by Robility through these activities abstract the underlying communication and authentication mechanisms required to interact with Azure Blob Storage and Amazon S3 storage. Users need to configure the activities with the appropriate API credentials and parameters to perform file operations and data management tasks seamlessly within their automation processes.

It’s important to ensure that the API credentials used in Robility activities for Azure Blob Storage and Amazon S3 storage have the necessary permissions and access rights to perform the desired operations on the respective storage services. This includes permissions for reading, writing, deleting, listing, and managing storage resources based on the requirements of your automation workflows.

Project Compatibility

7.2 Azure

Robility’s integration with Microsoft Azure automates a wide range of tasks, enhancing resource management, deployment automation, service monitoring, and seamless integration of Azure services into your workflows. By leveraging these powerful capabilities, organizations can streamline their IT operations, ensuring scalability, security, and efficiency in cloud-based processes. The key features include:

Azure Blob Storage: Robility automates the management of unstructured data in Azure Blob Storage, facilitating tasks like file uploads, downloads, and data manipulation within automation workflows. This integration ensures efficient data management across systems and enhances cloud storage, enabling businesses to manage large volumes of data seamlessly.

Azure Key Vault: The Azure Key Vault integration in Robility allows for the secure storage and management of sensitive data such as API keys, passwords, and certificates. By automating the retrieval and management of secrets, this feature reduces the risk of exposure and ensures compliance with security standards. Robility centralizes secret management, helping businesses maintain high security in their automation processes and prevent unauthorized access to critical information.

Azure Virtual Machines (VM): With Robility’s Azure VM integration, businesses can automate the provisioning, configuration, and management of virtual machines. This feature supports resource optimization and cost efficiency by automating the entire VM lifecycle, including creation, start/stop operations, and monitoring. Through this integration, Robility helps businesses optimize virtual machine management within their automation workflows, ensuring efficient use of cloud resources and improving operational flexibility.

7.2.1 AzureBlob

Introduction

Azure Blob storage is a cloud-based storage solution optimized for storing massive amounts of unstructured data, such as text and binary data. Within Robility, Azure Blob storage provides activities that work seamlessly under the Azure Scope, allowing bots to interact with Azure Blob containers and manage data efficiently.

Benefits

1. Scalable Storage: Azure Blob storage offers scalable storage solutions, allowing organizations to store and manage large volumes of unstructured data without worrying about storage limitations.

2. Cost-Effective: It provides cost-effective storage options, enabling organizations to pay only for the storage capacity they use, reducing overall storage costs.

3. Secure and Reliable: Azure Blob storage offers built-in security features such as encryption, access controls, and data redundancy, ensuring data security and reliability.

4. Integration with Azure Services: It seamlessly integrates with other Azure services, enabling automated data management workflows and seamless data exchange between systems.

5. Data Management: Azure Blob storage facilitates efficient data management, including storage, retrieval, deletion, and archival of data, enhancing data governance and compliance.

Use Cases

1. Data Archival: Use Azure Blob storage activities in Robility to archive data from automation processes, ensuring data integrity and compliance with data retention policies.

2. Document Storage: Store and manage documents, images, and files generated during automation processes in Azure Blob containers, providing a centralized repository for document management.

3. Data Backup and Recovery: Automate backup and recovery processes using Azure Blob storage, ensuring data resilience and disaster recovery capabilities for automation workflows.

4. Data Transfer: Use Azure Blob storage activities to transfer data between Robility and Azure Blob containers, enabling seamless data exchange and integration between systems.

5. Project-Based Data Management: Create Azure Blob containers for specific automation projects, store project-related data, and delete containers once projects are completed, ensuring efficient data organization and management.

7.2.2 AzureKeyVault

Introduction

Azure Key Vault Integration in Robility is a feature that enhances the security and compliance of automation workflows. By incorporating Azure Key Vault, ensures the secure storage and management of sensitive information, such as credentials and secrets, within a centralized and protected environment. This integration allows Robility users to securely access and manage these secrets, supporting robust security practices and compliance with industry standards in their automation tasks

Limitations

Robility’s integration with Azure Key Vault is limited to creating, retrieving, and deleting “Secrets.” Operations involving “Keys and Certificates” are not currently supported.

Pre-requisites

1. Create a resource to configure the Key vault in Azure before starting the automation with Robility. Click here to view the details.
2. Ensure the Key Vault is configured in Azure before you begin automation with Robility. Users accessing the Azure Key Vault requires specific roles:
a. Key Vault Reader: Allows reading secrets in the Key Vault.
b. Key Vault Contributor: Enables managing the Key Vault and its contents, such as adding and removing secrets.
c. Key Vault Administrator: Grants complete access, including the ability to set access policies and manage all contents.
3. To access the Azure Key Vault through software applications, your application must be registered with Azure. This registration enables secure interaction between your application and the Key Vault.

Secrets

It refers to the storage and management of sensitive data such as passwords, API keys, and connection strings, which are accessed only by authorized users.
Below is the sensitive information that can be stored and managed inside Azure Key Vault services:

1. Passwords: Secure storage of passwords for applications, databases, or services.
2. Connection Strings: Storage of connection strings for databases, APIs, or other services.
3. API Keys: Management of API keys used for accessing various services or resources.
4. Tokens: Storage of tokens used for authentication and authorization.
5. Configuration Settings: Management of sensitive configuration settings for applications.

Benefits

1. Secure Storage of Credentials: Azure Key Vault keeps your credentials like passwords and API keys in a safe, central place. This reduces the risk of them being exposed or accessed by unauthorized people.
2. Encrypted Configuration Settings: With Azure Key Vault, you can store sensitive settings securely, making sure that only authorized bots or users can access this important information.
3. Key Management for Encryption: The service simplifies managing encryption keys, helping ensure that your data stays safe and encrypted when it’s sent or stored, boosting both security and compliance.
4. Integration with Platforms: Azure Key Vault makes it easier for bot developers to access and manage the credentials and keys needed for their projects. This streamlines their workflows and cuts down on the complexity of handling sensitive information.
5. Secure Parameter Passing: When automating tasks, Azure Key Vault helps safely transmit and retrieve parameters, ensuring that your sensitive data is protected throughout the process.

7.2.3 AzureVM

Introduction

These activities enable IT Departments to easily automate important Azure operations in their workflows like managing Resource Groups, Storage Accounts, and Virtual Machines.
Microsoft Azure Virtual Machines (VMs) provide scalable compute capacity in the cloud. VMs are on-demand, scalable, and customizable, and can be used for a variety of purposes such as hosting applications, running enterprise workloads, or developing and testing software.

Pre-requisites

Before using Azurevm with the Robility platform, users must first enable outbound connections with the AzureVm platform to create and retrieve the API required for authentication. Depending on the authentication type you select, you will need one of the following credentials:

1.  Client ID
2. Client Secret
3. Tenant ID
4. Subscription ID

 And token URL with every API request.

How to establish a connection?

1. Login to the Robility Manager platform.
2. Navigate to your tenant and choose the desired project.
3. Click on the “App Integrations”.
4. Search and navigate to “AzureVM” from the list of pre-built connections available.
5. Click on it and choose the authentication type.
6. Enter the required credentials and click on “Connect”.

7. Once your credentials have been provided, the list will be added in the “Connections”.

Now, you will be able to automate the activities.

7.3 AmazonS3

Amazon S3 (Simple Storage Service) is a scalable, secure, and durable cloud storage service provided by Amazon Web Services (AWS). It is designed to store and retrieve large amounts of data, making it an ideal choice for organizations seeking scalable and cost-effective cloud storage solutions. In Robility, Amazon S3 offers activities and integrations that allow automation bots to interact with S3 buckets and manage data seamlessly.

Benefits

1. Scalable Storage: Amazon S3 offers virtually unlimited storage capacity, allowing organizations to scale storage resources based on their needs without worrying about infrastructure limitations.

2. Cost-Effective: It provides cost-effective storage solutions with pay-as-you-go pricing, enabling organizations to pay only for the storage they use, reducing overall storage costs.

3. High Durability: Amazon S3 ensures high durability and data availability with multiple redundant copies of data stored across different availability zones, minimizing the risk of data loss.

4. Security Features: S3 offers robust security features such as encryption, access controls, and data lifecycle policies, ensuring data security and compliance with regulatory requirements.

5. Integration with AWS Services: It seamlessly integrates with other AWS services, enabling automated data management workflows, data processing, and analytics.

6. Data Management: Amazon S3 facilitates efficient data management, including storage, retrieval, versioning, replication, and data archival, enhancing data governance and data lifecycle management practices.

Use Cases

1. Data Backup and Recovery: Use Amazon S3 in automation workflows for automated data backup and recovery processes, ensuring data resilience and disaster recovery capabilities.

2. Document Storage and Management: Store and manage documents, files, and media assets generated or used in automation processes in Amazon S3 buckets, providing a centralized repository for document management.

3. Data Transfer and Integration: Transfer data between Robility and Amazon S3 buckets, enabling seamless data exchange and integration between systems.

4. Data Archival: Archive historical data and logs from automation processes in Amazon S3 for compliance, auditing, and long-term storage purposes, ensuring data retention and regulatory compliance.

5. Data Analytics and Reporting: Use Amazon S3 to store data for analytics and reporting purposes, enabling automation bots to analyze and derive insights from large datasets stored in S3 buckets.

6. Automated Data Processing: Utilize Amazon S3 for automated data processing tasks, such as data transformation, cleansing, and enrichment, supporting data-driven decision-making in automation processes.

7.3.1 Release Notes

v.1.0.3

This release includes enhancements to the NLog package.

Enhancement

The NLog package has been upgraded to version 6.0.7, delivering improved logging reliability, performance, and compatibility. The update supports both existing and new workflows.

Released Date: 09/02/2026

7.3.2 AmazonS3Scope

This activity is the main authentication activity to be used before using any AmazonS3 activities. It acts as a package into which the activities are dropped for further execution.

Properties

INPUT

AccessKeyID:* Specify the access Key ID which was provided at the time of registration.

RegionEndpoint:* Specify the region end point provided at the time of registration.

SecretAccessKey:* Specify the secret access key provided at the time of registration.

MISC

Body: This remains empty and auto populates when an activity is dropped into the AmazonS3 scope.

Display Name: Displays the name of the activity. You can also customize the activity name to help troubleshoot issues faster. This name will be used for logging purposes.

SkipOnError: It specifies whether to continue executing the workflow even if it throws an error. This supports only Boolean value “True or False.”
True: Continues to execute the workflow irrespective of any error thrown.
False: Stops the workflow if it throws any error

Version: It specifies the version of amazonS3 automation feature in use.

* Mandatory fields to execute the workflow.

Once the Access key ID, End point and Secret access key is entered, drag, and drop any of the activities from the Amazon S3 feature to be executed.

7.3.3 CreateBucket

This activity is used to create a bucket in Amazon S3. Every object that we store in Amazon S3 must be stored in a bucket for which we need to create one.

Properties

INPUT

BucketName:*  Enter a name for the bucket to be created within double quotes.

MISC

Display Name: Displays the name of the activity. You can also customize the activity name to help troubleshoot issues faster. This name will be used for logging purposes.

SkipOnError: It specifies whether to continue executing the workflow even if it throws an error. This supports only Boolean value “True or False”.
True: Continues to execute the workflow irrespective of any error thrown.
False: Stops the workflow if it throws any error.

Version: t specifies the version of amazonS3 automation feature in use.

OUTPUT

Output: Declare a variable here to view the result in the output box. This is not a mandatory field. However, to confirm if the bucket has been created, a variable must be declared here to see the result in an output box.

Result: It provides the ability to view the execution status of the activity. It returns values in “Boolean.”

True: Indicates that the activity has been executed successfully without any errors.
False: Indicates that the activity has been unsuccessful due to an unexpected error being thrown.

Represents mandatory fields to execute the workflow.

7.3.4 DeleteBucket

This activity is used to delete a bucket from Amazon S3.

Properties

INPUT

BucketName:* Specify the name of the bucket which has to be deleted.

MISC

Display Name: Displays the name of the activity. You can also customize the activity name to help troubleshoot issues faster. This name will be used for logging purposes.

SkipOnError:It specifies whether to continue executing the workflow even if it throws an error. This supports only Boolean value “True or False”
True: Continues to execute the workflow irrespective of any error thrown.
False: Stops the workflow if it throws any error

Version: It specifies the version of amazonS3 automation feature in use

OUTPUT

Output: Declare a variable here to view the result in the output box. This is not a mandatory field. However, to confirm if the bucket has been deleted, a variable must be created here, to view the result in an output box.

Result: It provides the ability to view the execution status of the activity. It returns values in “Boolean.”

True: Indicates that the activity has been executed successfully without any errors.
False: Indicates that the activity has been unsuccessful due to an unexpected error being thrown.

Represents mandatory fields to execute the workflow.

7.3.5 DeleteFile

This activity is used to delete a specific file from a specific bucket.

Properties

INPUT

BucketName:* Specify the bucket name from which the file has to be deleted.

KeyName:* Specify the key name of the file which has to be deleted.

MISC

Display Name: Displays the name of the activity. You can also customize the activity name to help troubleshoot issues faster. This name will be used for logging purposes.

SkipOnError: It specifies whether to continue executing the workflow even if it throws an error. This supports only Boolean value “True or False.”
True: Continues to execute the workflow irrespective of any error thrown.
False: Stops the workflow if it throws any error

Version: It specifies the version of amazonS3 automation feature in use

OUTPUT

Output: Declare a variable here to view the result in the output box This is not a mandatory field. However, to confirm if the file has been deleted, a variable must be created here, to view the result in an output box.

Result: It provides the ability to view the execution status of the activity. It returns values in “Boolean.”

True: Indicates that the activity has been executed successfully without any errors.
False: Indicates that the activity has been unsuccessful due to an unexpected error being thrown.

Represents mandatory fields to execute the workflow.

7.3.6 DownloadFile

This activity is used to download a specific file from a specific bucket.

Properties

INPUT

BucketName:* Specify the name of the bucket from which the file has to be downloaded.

FilePath:* Specify the location in which the downloaded file has to be saved.

KeyName:* Specify the key name of the file which has to be downloaded.

MISC

Display Name: Displays the name of the activity. You can also customize the activity name to help troubleshoot issues faster. This name will be used for logging purposes.

SkipOnError: It specifies whether to continue executing the workflow even if it throws an error. This supports only Boolean value “True or False”
True: Continues to execute the workflow irrespective of any error thrown.
False: Stops the workflow if it throws any error

Version: It specifies the version of the Regex Automation feature in use.

OUTPUT

Output: This is not a mandatory field. However, to confirm if the file has been deleted, a variable must be created here, to view the result in an output box.

Result: It provides the ability to view the execution status of the activity. It returns values in “Boolean.”

True: Indicates that the activity has been executed successfully without any errors.
False: Indicates that the activity has been unsuccessful due to an unexpected error being thrown.

Represents mandatory fields to execute the workflow.

7.3.7 GetFileDetails

This activity is used to get the file details of a specific file uploaded to amazon S3 bucket.

Properties

INPUT

BucketName:* Specify the name of the bucket from which the file details are required.

KeyName:* Specify the key name of the file given when uploaded.

MISC

Display Name: Displays the name of the activity. You can also customize the activity name to help troubleshoot issues faster. This name will be used for logging purposes.

SkipOnError: It specifies whether to continue executing the workflow even if it throws an error. This supports only Boolean value “True or False”
True: Continues to execute the workflow irrespective of any error thrown.
False: Stops the workflow if it throws any error.

Version: It specifies the version of amazonS3 automation feature in use.

OUTPUT

Output: Declare a variable here to view the result in the output box. This is not a mandatory field. However, to get the output of the file details in an output box, a variable must be created here.

Result: It provides the ability to view the execution status of the activity. It returns values in “Boolean.”

True: Indicates that the activity has been executed successfully without any errors.
False: Indicates that the activity has been unsuccessful due to an unexpected error being thrown.

Represents mandatory fields to execute the workflow.

7.3.8 ListAllFiles

This activity is used to get the list of all files present in a specific bucket.

Properties

INPUT

BucketName:* Specify the name of the bucket from which the list of all file details is required.

MISC

Display Name: Displays the name of the activity. You can also customize the activity name to help troubleshoot issues faster. This name will be used for logging purposes.

SkipOnError: It specifies whether to continue executing the workflow even if it throws an error. This supports only Boolean value “True or False.”
True: Continues to execute the workflow irrespective of any error thrown.
False: Stops the workflow if it throws any error

Version: It specifies the version of amazonS3 automation feature in use

OUTPUT

Output: Declare a variable here to view the result in the output box. This is not a mandatory field. However, to view the list of files, a variable must be created here, to view the result in an output box.

Result: It provides the ability to view the execution status of the activity. It returns values in “Boolean.”

True: Indicates that the activity has been executed successfully without any errors.
False: Indicates that the activity has been unsuccessful due to an unexpected error being thrown.

Represents mandatory fields to execute the workflow.

7.3.9 UploadFile

This activity is used to upload a file into a bucket available in Amazon S3.

Properties

INPUT

BucketName:* Specify the name of the bucket into which the file has to be uploaded.

FilePath:* Specify the path of the file which has to be uploaded into the bucket.

KeyName:* Specify any key name for the file that is uploaded.

ReplaceFile:*Specify true if the file has to replace an existing file and false if it need not be replaced.

MISC

Display Name: Displays the name of the activity. You can also customize the activity name to help troubleshoot issues faster. This name will be used for logging purposes.

SkipOnError: It specifies whether to continue executing the workflow even if it throws an error. This supports only Boolean value “True or False”. By default, it is set to “False.”
True: Continues the workflow to the next step.
False: Stops the workflow and throws an error.

Version: It specifies the version of the Amazon S3 feature in use.

OUTPUT

Output: Declare a variable here to see the result in an output box. This is not a mandatory field. However, to confirm if the file has been uploaded, a variable must be created here, to view the result in an output box.

Result: It provides the ability to view the execution status of the activity. It returns values in “Boolean.”

True: Indicates that the activity has been executed successfully without any errors.
False: Indicates that the activity has been unsuccessful due to an unexpected error being thrown.

Represents mandatory fields to execute the workflow.

7.4 CognitiveServices

Introduction

Cognitive services encompass advanced capabilities such as Optical Character Recognition (OCR), Address Matching, and Image Enhancement. These services enable developers to integrate AI functionalities into their applications, facilitating tasks such as text extraction from images, address validation, and image quality enhancement without requiring extensive AI expertise.

UseCase

1. Receipt Processing: OCR can extract information from receipts, invoices, and bills, enabling automated expense tracking and financial management.
2. Text Recognition in Images: OCR services help in extracting text from images, such as signs, labels, and captions, for applications like augmented reality and image-based search.
3. Address Validation: Address matching services validate and standardize addresses entered by users, reducing errors in shipping and logistics applications.
4. Photo Editing: Image enhancement services enhance photos by adjusting brightness, contrast, and color balance, improving the visual quality of images for social media and digital marketing.

Benefits

1. Efficiency: Cognitive services like OCR automate tasks like text extraction, address validation, and image enhancement, saving time and effort.
2. Accuracy: These services ensure data accuracy by reducing errors in data entry, address validation, and image quality.
3. Enhanced User Experience: Users benefit from searchable text, accurate addresses, and visually appealing images, improving overall satisfaction.
4. Cost Savings and Innovation: By streamlining processes and improving quality, cognitive services lead to cost savings and enable the development of innovative applications.

7.4.1 Release Notes

v.1.0.4

This release includes enhancement to dependent DLLs and Bug fixes in the following areas:

Enhancement

All dependent DLLs have been upgraded to the latest stable versions, enhancing security, performance, and workflow reliability. This update ensures smoother execution and maintains compatibility with both existing and new workflows.

Bug Fix

Image Enhancement Activity:
Previously, users encountered the error: “Error on Image Snipping – Dynamic Image Capturing Activity Error on deleting file: Could not find a part of the path.”
This issue has now been resolved through a fix in the file path handling logic.

Released Date: 09/03/2026

7.4.2 AddressMatch

This activity enables users to compare two different addresses as input and provides the percentage of similarity.

Properties

INPUT

Address1: *This parameter indicates to provide the first address that needs to be compared. It accepts values in “String” datatype. You can either hardcode the values in “String” format or enter the variable in “String” datatype.

Address2: *This parameter indicates to provide the second address that needs to be compared. It accepts values in “String” datatype. You can either hardcode the values in “String” format or enter the variable in “String” datatype.

MISC

DisplayName: Displays the name of the activity. The activity name can be customized, which aids in troubleshooting.

SkipOnError: Specify the “Boolean” value as “True” or “False.”
True: Continue executing the workflow regardless of any errors thrown.
False:
 Halt the workflow if it encounters any errors.
None:
 If the option is left blank, the activity will, by default, behave as if “False” were chosen.

Version: It indicates the version of the feature being used.

OUTPUT

MatchPercentage: This parameter helps to view the output of the activity, displaying the “percentage” of the match. It returns the values in a “Double” data type.

* Represents mandatory fields to execute the workflow.

Here’s an example of how the “AddressMatch” activity is used in the workflow.
In the following example, I have two different sample addresses and by using this activity, I am going to compare and retrieve the percentage of similarity.

Example

1. Create a new solution or open an existing solution.
2. Install the latest version of “CognitiveServices” feature from the “ManageFeature”.
3. Now, I am adding the “AddressMatch” activity from the “CognitiveServices” feature and setting it as start node.

a. Navigating to the “Address1” in the properties to provide the first address. Here I am entering the value as “Cecilia Chapman, 711-2880 Nulla St., Mankato Mississippi 96522”.
b. Now, moving to the “Address2” in the properties to provide the second address. Here I am providing the value as “Aaron Hawkins, 5587 Nunc. Avenue, Erie Rhode Island 24975.” 
4. Next, moving to the “MatchPercentage” in the output of the properties to declare a variable to view the output. 
5. Then, adding the “writelog” activity to view the output.
a. Enter the input string as “Output.ToString”.
b. The “.ToString” is advised to use along with any other data types other than string format. It converts any data type into string.
c. Choosing the log level as “Info”. 
6. Now, Execute the activity.

The bot executes the activity and gives the percentage of address match in the output box. Here the match percentage is 0 % as they were two different addresses.

7.4.3 OCR

The OCR (Optical Character Recognition) activity helps the user to recognize and extract the text from images.

Properties

EXISTING IMAGE

InputImage: *This parameter indicates the “input image” that has been provided either as a path or as bytes.
It accepts the values in “String” datatype. You can either hardcode the values in the “String” format or can enter the values in “String” datatype.

InputType: *Indicates the “type” of the input image that has been passed in the “InputImage” property. Select the option from the drop-down:
Path: Use this option to refer the location of the input image.
Bytes: Use this option to pass the input image in (binary data) “Bytes” format.
By default, the option will be set to “Path.

TakeExistingImage: Indicates to process the existing image that has been passed as input. Specify the “Boolean” value as “True” or “False.”
True: It continues to take the existing image.
False: This option will not be considered.
None: If the option is left blank, the activity will, by default, behave as if “False” were chosen.

INPUT

LimitCharacters: Indicates the characters that needs to be limited while extracting text from the image. Select the value from the drop-down:
None: If the option is left blank, the activity will, by default, will not consider any option to limit.
Number: Specifies that only numeric characters (0-9) should be extracted.
Alpha: Indicates that only alphabetic characters (A-Z, a-z) should be extracted, excluding numeric and special characters.
AlphaNumeric: Specifies that both alphabetic and numeric characters should be extracted, while excluding special characters.
SpecialCharacters: Indicates that only special characters (e.g., @, #, $, %) should be extracted, excluding alphabetic and numeric characters.
Small Letters: Specifies that only lowercase alphabetic characters (a-z) should be extracted, excluding uppercase letters, numeric, and special characters.
Capital Letters: Indicates that only uppercase alphabetic characters (A-Z) should be extracted, excluding lowercase letters, numeric, and special characters.
NumberSpecialCharacter: Specifies that both numeric characters and special characters should be extracted, excluding alphabetic characters.

UseWindowTitle: Check this box if you want to use the window title option.

WindowTitle: *This parameter specifies to choose the applications from the list of active applications to where the text needs to be inputted. It accepts values in “String” datatype. You have the option to either hardcode the values in the “String” variable or pass the values as “String” datatype.

MISC

DisplayName: Displays the name of the activity. The activity name can be customized, which aids in troubleshooting.

SkipOnError: Specify the “Boolean” value as “True” or “False.”
True: Continue executing the workflow regardless of any errors thrown.
False:
 Halt the workflow if it encounters any errors.
None:
 If the option is left blank, the activity will, by default, behave as if “False” were chosen.

Version: It indicates the version of the feature being used.

OUTPUT
Text: *This parameter helps to view the output of the activity as the text extracted from the provided image input. It returns the values in “String” datatype.

PROCESSED IMAGE

ProcessedImage: Indicates to provide the “Path” along with the name of the image to save the processed image. This parameter accepts values in “String” datatype. You have the option to either hardcode the values in the “String” variable or pass the values as “String” datatype

REFINEMENT*

BgColour: Indicates the “Background” color of the image to process. Choose the option from drop-down:
White: It provides the processed image background as “White”.
Black: It provides the processed image background as “Black”.
By default, it will be chosen as “White”. This field gets auto filled from the RobilityOCR wizard.

ConsoleImage: Indicates to provide the processed image in a console or command-line during the execution. Specify the “Boolean” value as “True” or “False.”
True: Continue executing the workflow regardless of any errors thrown.
False: Halt the workflow if it encounters any errors.
None: If the option is left blank, the activity will, by default, behave as if “False” were chosen.
This field gets auto filled from the RobilityOCR wizard.

Language: Indicates to recognize and translate the text to opted language. Choose the option from drop-down:
English: Use this option to translate other language option to English.
Arabic: Use this option to translate other language options to Arabic.
By default, it will be chosen as “English”. This field gets auto filled from the RobilityOCR wizard.

ScaleImage: This parameter allows to adjust the size or dimensions of the input image. You can adjust the size in the “Image Property” option in the RobilityOCR wizard.
By default, it will be chosen as “small”. This field gets auto filled from the RobilityOCR wizard.
REGION*

Height: Indicates the height of the processed image. This field gets auto filled from the RobilityOCR wizard.

Width: Indicates the width of the processed image. This field gets auto filled from the RobilityOCR wizard.

X: Indicates the “X” position of the processed image. This field gets auto filled from the RobilityOCR wizard.

Y: Indicates the “Y” position of the processed image. This field gets auto filled from the RobilityOCR wizard.

* Represents mandatory fields to execute the workflow.


How to use Robility OCR Wizard

The RobilityOCR wizard appears only when we drag and drop the activity into the workflow. Follow the below steps to snip the image.
1. Drag and drop the activity into the workflow.
2. Another pop-up will appear on the screen indicating to choose the options as “Single OCR image” or “Browse an image”.
a. The “Single Text OCR” feature enables you to capture the entire image at once and configure its properties. You can choose this option when you want to use the image statically.
b. “Browsing an image” allows you to select an image from a specified path. You can choose this option when you need to dynamically change the image during execution.

3. Once you have chosen the option, the “RobilityOCR wizard” window will appear on the screen.
4. Customize the properties to refine the image, limit the characters and adjust the image size.
5. If you want to view the output of the modified image, choose “RUN OCR” option and the preview will be available in the “Preview” area.
6. Click on “Save” option when you have finished configuring the properties.

7.4.4 ImageEnhancement

This activity assists the user in enhancing the quality of an image used for processing.

Properties

IMAGE ATTRIBUTES

BackgroundCleanAndBold: This parameter enables to clean up the background and bold characters in the image. Specify the “Boolean” value as “True” or “False.”
True: Continue to clean and bold the background of the image.
False: The option will not be considered.
None: If the option is left blank, the activity will, by default, behave as if “False” were chosen.

EdgeEnhancement: This parameter enables to enhance the edge of the input image and characters. Specify the “Boolean” value as “True” or “False.”
True: Continue to enhance the image.
False: The option will not be considered to enhance the image.
None: If the option is left blank, the activity will, by default, behave as if “False” were chosen.

ResizeScale: Indicates to provide the “re-size” value of the image if needed. This parameter accepts value in “Double” datatype.
You can either hardcode the value in “Double” format or can enter the values in “Double” datatype.

Sharpening: This parameter enables to sharpen the quality of the provided input image. Specify the “Boolean” value as “True” or “False.”
True: Continue to sharpen the quality of the image.
False: The option will not be considered.
None: If the option is left blank, the activity will, by default, behave as if “False” were chosen.

INPUT

ImageInput: *This parameter indicates to provide the “Path” of the input image that needs to be processed. It accepts values in “String” datatype.
You can either hardcode the values in “String” format or can enter the values in “string” datatype.
InputType: *Indicates the “type” of the input image that has been passed in the “InputImage” property. Select the option from the drop-down:
Path: Use this option to refer the location of the input image.
Bytes: Use this option to pass the input image in (binary data) “Bytes” format.
By default, the option will be set to “Path”.

MISC

DisplayName: Displays the name of the activity. The activity name can be customized, which aids in troubleshooting.

SkipOnError: Specify the “Boolean” value as “True” or “False.”
True: Continue executing the workflow regardless of any errors thrown.
False:
 Halt the workflow if it encounters any errors.
None:
 If the option is left blank, the activity will, by default, behave as if “False” were chosen.
Version: 
It indicates the version of the feature being used.

OUTPUT

ImageOutput: *It helps to view the output of the activity as the processed image in the specified path. This parameter returns the value in “String” datatype. (Refer the tips below).

OutputType: Indicates to provide the “type” of the output image that has been passed in the “InputImage” property. Select the option from the drop-down:
Path: Use this option to refer the location of the output image.
Bytes: Use this option to pass the output image in (binary data) “Bytes” format. By default, the option will be set to “Path”.

SNIPPED IMAGE INPUTS

Height: Indicates the height of the snipped image. This field gets auto filled from the RobilityOCR wizard.

OnScreen: This parameter allows to view and interact with the image directly on the screen. Specify the “Boolean” value as “True” or “False.”
True: Allows to view the image on the screen.
False: The option will not be considered.
None: If the option is left blank, the activity will, by default, behave as if “False” were chosen.

UseWindowTitle: Check this box to use the window title.

Width: Indicates the width of the snipped image. This field gets auto filled from the RobilityOCR wizard.

WindowTitle: This parameter specifies to choose the applications from the list of active applications to where the text needs to be inputted. This parameter accepts values in “String” datatype. You have the option to either hardcode the values in the “String” variable or pass the values as “String” datatype.
X: Indicates the “X” position of the snipped image. This field gets auto filled from the RobilityOCR wizard.
Y: Indicates the “Y” position of the snipped image. This field gets auto filled from the RobilityOCR wizard.

* Represents mandatory fields to execute the workflow.

Here’s an example of how the activity is used in the workflow –

In the following example, I am going to use a sample image to enhance the quality.

Example

1. Create a new solution or open an existing workflow.
2. Drag and drop the image enhancement activity into the workflow and set it as start node.
3. Here I am navigating to the “ImageInput” in the properties section, to provide the path of the image.
4. Then, moving to the “Sharpening” in the properties section to enhance the image quality.
    a. Here I am specifying the value as “True”.
5. Now, moving to the “ImageOutput” property to provide the path of the image to store the output.
6. Next, moving to the “On-screen image” property specifying the value as true.
7. Now, Execute the workflow.

8. Applications

8.1 Overview

Introduction

The Application Activities package in Robility encompasses a range of activities designed to interact with various applications and file formats, enhancing automation capabilities across different tasks. These activities streamline automation workflows by enabling efficient data handling, document management, and communication tasks within Robility.

About the package

CSV Activities: Robility’s CSV Activities automate tasks related to working with CSV files, which are commonly used for storing structured data in a simple, readable format. The CSV Scope activity is the central feature for managing CSV files within an automation workflow. It allows users to easily read, write, and process CSV files, providing a structured way to handle data without the need for manual intervention.

Excel Activities: These activities enable automation of tasks related to Microsoft Excel, such as reading data from Excel files, writing data to Excel sheets, formatting cells, performing calculations, and manipulating Excel data for analysis or reporting purposes.

Outlook Activities: Activities in this category facilitate automation of email-related tasks using Microsoft Outlook. This includes sending emails, receiving emails, reading email contents, managing attachments, and interacting with Outlook’s email management features.

Word Activities: Word activities enable automation of tasks involving Microsoft Word documents. This includes tasks like reading text from Word documents, modifying document content, formatting text, and generating documents dynamically.

PDF Activities: These activities are used for automating tasks related to PDF files, such as reading text from PDFs, extracting data, merging, or splitting PDF documents, and performing OCR (Optical Character Recognition) for scanned PDFs.

Text Activities: Text activities facilitate automation of text-related tasks, including text manipulation, parsing, searching, and formatting. They enable automation of tasks involving text data, such as data extraction, text processing, and generating text-based reports or documents.

Project Compatibility

Supported versions

Excel Application:

The following are the list of versions of Excel application that are supported in Windows legacy,

  • Excel 2010
  • Excel 2007

It’s important to ensure that you have the necessary updates, service packs, and compatibility patches installed for these Office versions to work smoothly on Windows Legacy systems.

Additionally, for optimal security and performance, it’s recommended to consider upgrading to newer Office versions and compatible Windows operating systems when feasible and supported by your organization’s IT policies.

Word:

The Microsoft Word application is not supported on Windows Legacy versions because Robility only supports a limited number of Word application versions. To know more information, click here to refer the Word documentation.

Scope Integration

The Scope Integration in Robility includes a unique scope activity within the Applications Activities package. This activity is utilized to establish an authenticated connection to the specified application.

By establishing an authenticated connection within the scope activity, Robility maintains data integrity and security, enabling seamless automation of tasks across various applications while adhering to authentication protocols and access controls.

The following activities require “Scope” integration for the execution of other activities:

1. CSV Automation: The “CSV Scope” activity serves as a scope in this feature, enabling seamless automation for managing CSV files within workflows. This activity encapsulates actions related to reading, writing, and processing CSV data, allowing users to automate tasks such as importing data into the system, exporting results, and performing calculations or transformations on the data.

2. Email Automation: The “Read” activity serves as a scope in this feature, facilitating integration and connection with other activities for execution. Most activities must be used within scope, while a few activities do not require scope integration. For detailed information, refer to the Email Automation documentation.

3. Excel Automation: The “Excel Scope” activity in Excel Automation enables integration and connection with other activities for execution. The execution occurs in the background, meaning there will be no active application opened during the process.

4. Outlook Automation: The “Outlook Scope” activity acts as a scope in Outlook Automation, providing a centralized environment for automating email-related tasks within Microsoft Outlook. This activity encapsulates all actions related to managing emails, appointments, contacts, and tasks, enabling users to streamline their email workflows.

5. Word: The “Word Scope” activity acts as a scope in Word Automation, facilitating integration with the Word application document. The execution occurs in the background, meaning there will be no active application opened during the process.

Why do we need scope integration for the applications?

Scope integration is necessary for activities in Robility for several reasons:

1. Modularity and Reusability: Scopes promote modularity and reusability of activities’ parameters. By encapsulating related activities within a scope, they can be easily reused multiple times in the flow without the need for extensive modifications.

2. Authentication and Security: Scope activities help establish authenticated connections to specific applications or services, ensuring that automation processes can securely interact with them. This authentication ensures that only authorized users or processes can access and manipulate data within the application.

8.2 CSV Automation

CSV Automation in Robility refers to the automation processes to handle tasks involving CSV files. This can include tasks such as reading, writing, transforming, and processing data contained in CSV files. This automation is primarily built to work exclusively with CSV (Comma-Separated Values) files, which can be,

Reading Data: Extracting data from CSV files for use in other processes or systems. This involves parsing the CSV file to convert its content into a structured format that can be manipulated within Robility.
Writing Data: Saving data into CSV files from various sources. This includes exporting data from databases, application outputs, or processed data into a CSV file format, ensuring that the data is organized and accessible.

What is a CSV File?

CSV (Comma-Separated Values) is a simple file format used to store tabular data, such as spreadsheets or databases. Each line in a CSV file corresponds to a row in the table, and each value within that line is separated by a comma, pipe, caret, semicolon and tab. The CSV format is widely used because of its simplicity and ease of integration with various data processing tools.

Benefits

  1. Increased Efficiency: Automates repetitive tasks such as data extraction and reporting, reducing the time and effort required.
  2. Error Reduction: Minimizes manual data entry errors by automating data handling processes, leading to more accurate results.
  3. Consistency: Ensures uniform data processing and output, as automation follows predefined rules and workflows.
  4. Scalability: Handles large volumes of data efficiently, making it easier to process and manage extensive datasets.
  5. Integration: Facilitates easy integration with other systems and tools, allowing for seamless data exchange and processing.

Use Cases

  1. Data Migration: Automating the transfer of data between different systems or databases using CSV files as intermediaries.
  2. Reporting: Generating reports from data stored in CSV files and formatting them for presentation or analysis.
  3. Data Validation and Cleansing: Automating the process of checking and cleaning data in CSV files to ensure quality and accuracy.
  4. Inventory Management: Updating inventory records by automating the import and export of CSV files containing stock data.
  5. Customer Data Integration: Synchronizing customer information between CRM systems and other applications using CSV files for data exchange.
  6. Financial Reconciliation: Automating the reconciliation of financial records by processing CSV files containing transaction data.

8.2.1 Release Notes

v.1.0.5

This release includes enhancements to dependent DLLs.

Enhancement

All dependent DLLs have been upgraded to the latest stable versions, enhancing security, performance, and workflow reliability. This update ensures smoother execution and maintains compatibility with both existing and new workflows.

Released Date: 09/03/2026

8.2.2 Append

This activity allows the user to append the input datatable to the specified CSV file. It allows you to write the input data after the last line of the current data in the file.

Properties

INPUT

AppendData:* This parameter indicates you to specify the input datatable that is required to append in the existing specified CSV file.
It accepts input in “Datatable” datatype. 

You can either hardcode the values in “Datatable” format or provide the values in “Datatable” format variable.  

Delimiter: This parameter refers to a character used to separate values in a CSV file. Select the delimiter from the drop-down menu:

Comma (,): Use this when the data in the input sheet is separated by commas.
Tab: Use this when the data in the input sheet is separated by tabs.
Semicolon (;): Use this when the data in the input sheet is separated by semicolons.
Pipe (|): Use this when the data in the input sheet is separated by pipes.
Caret (^): Use this when the data in the input sheet is separated by carets.

Filepath:* This parameter requires you to provide the path of the CSV file to execute the activities.

Datatype: This parameter accepts input values in the “String” datatype.
Browse Option: You can browse and select the file using the “Browse” option in the activity.
Manual Entry: Alternatively, you can either hardcode the input value in “String” format or manually provide the values in “String” datatype.

Hasheader: If this option is enabled, the first row in the specified CSV file will be treated as the header. If it is not enabled, the first row will not be considered a header.

Ignorequotes: If this option is enabled, the quotes in the data will be ignored during the reading process.

MISC

DisplayName: Displays the name of the activity. The activity name can be customized, which aids in troubleshooting.

SkipOnError: Specify the “Boolean” value as “True” or “False.”

True: Continue executing the workflow regardless of any errors thrown.
False: Halt the workflow if it encounters any errors.
None: If the option is left blank, the activity will, by default, behave as if “False” were chosen.

Version: It indicates the version of the feature being used.

OUTPUT

AppendStatus: It helps the user to view the status of the data appended in the provided CSV file. It returns values in “Boolean”.

True: Indicates that the data has been appended successfully without any errors.
False: Indicates that the data has not been appended successfully due to an unexpected error being thrown.

Result: It provides the ability to view the execution status of the activity. It returns values in “Boolean.”

True: Indicates that the activity has been executed successfully without any errors.
False: Indicates that the activity has been unsuccessful due to an unexpected error being thrown.

*Represents mandatory fields to execute the workflow.

8.2.3 ReadCSV

This activity helps the user to read and extract data from the specified CSV file. It is helpful when you want to extract the data in tabular format for further processing with Excel automation feature. 

Properties

INPUT

Delimiter: This parameter refers to a character used to separate values in a CSV file. Select the delimiter from the drop-down menu:

Comma (,): Use this when the data in the input sheet is separated by commas.
Tab: Use this when the data in the input sheet is separated by tabs.
Semicolon (;): Use this when the data in the input sheet is separated by semicolons.
Pipe (|): Use this when the data in the input sheet is separated by pipes.
Caret (^): Use this when the data in the input sheet is separated by carets.

Filepath:* This parameter requires you to provide the path of the CSV file to execute the activities.

Datatype: This parameter accepts input values in the “String” datatype.
Browse Option: You can browse and select the file using the “Browse” option in the activity.
Manual Entry: Alternatively, you can either hardcode the input value in “String” format or manually provide the values in “String” datatype.

Hasheader: If this option is enabled, the first row in the specified CSV file will be treated as the header. If it is not enabled, the first row will not be considered a header.

MISC

DisplayName: Displays the name of the activity. The activity name can be customized, which aids in troubleshooting.

SkipOnError: Specify the “Boolean” value as “True” or “False.”

True: Continue executing the workflow regardless of any errors thrown.
False: Halt the workflow if it encounters any errors.
None: If the option is left blank, the activity will, by default, behave as if “False” were chosen.

Version: It indicates the version of the feature being used.

OUTPUT

ReadData:* This parameter retrieves the output of the activity as extracted data in “DataTable” format. It returns the values in the “DataTable” datatype.

Result: It provides the ability to view the execution status of the activity. It returns values in “Boolean.”

True: Indicates that the activity has been executed successfully without any errors.
False: Indicates that the activity has been unsuccessful due to an unexpected error being thrown.

*Represents mandatory fields to execute the workflow

Here’s an example of how the activity is used in the workflow –

In the following steps, I have utilized a sample CSV file which contains a list of customer details extracted from the organization’s website. Using this activity, we are going to read the value from the CSV file and extract them in a tabular format.

1. Create a new solution.
2. Install the feature “CSV Automation” from the manage features option.
3. Now, add the “ReadCSV” activity into the workflow.
a. This activity helps the user to read and extract the data in the CSV file in tabular format.
b. Navigating to the “Datatable” in the properties to declare a variable to view the output.
   i. There are two ways to create a variable –
   ii. Method 1 – Click on the “Datatable” property within the “ReadRanges” activity and enter the variable name. In this case, we are using “Table.” Then, press “Ctrl+Q,” which is a shortcut key to create a variable.
   iii. Method 2 – Click on the Variables pane and enter the name ” Table.” Then, in the “Variable Types” column, select “Browse for Types” from the dropdown menu.
   iv. The .Net window for data types will appear on the screen, enter the type of datatype as “System.Data.Datatable” and then click “OK” button.
5. Next, add the “Table viewer” activity to view the extracted output.
a. Add the input table value as “TABLE”.
b. Provide a title for the table.
6. Save and execute the workflow.

8.2.4 WriteCSV

This activity allows the user to write an input DataTable value to the specified CSV file. It is widely used to export the tabular data into CSV format for data storage and interchange.

Properties

INPUT

Delimiter: This parameter refers to a character used to separate values in a CSV file. Select the delimiter from the drop-down menu:

Comma (,): Use this when the data in the input sheet is separated by commas.
Tab: Use this when the data in the input sheet is separated by tabs.
Semicolon (;): Use this when the data in the input sheet is separated by semicolons.
Pipe (|): Use this when the data in the input sheet is separated by pipes.
Caret (^): Use this when the data in the input sheet is separated by carets.

Filepath:* This parameter requires you to provide the path of the CSV file to execute the activities.

Datatype: This parameter accepts input values in the “String” datatype.
Browse Option: You can browse and select the file using the “Browse” option in the activity.
Manual Entry: Alternatively, you can either hardcode the input value in “String” format or manually provide the values in “String” datatype.

Hasheader: If this option is enabled, the first row in the specified CSV file will be treated as the header. If it is not enabled, the first row will not be considered a header. 

IgnoreQuotes: If this option is enabled, the quotes in the data will be ignored during the reading process. 

WriteData:* This parameter specifies the input DataTable value that needs to be written to the CSV file. It accepts the values in the “Datatable” datatype.

MISC

DisplayName: Displays the name of the activity. The activity name can be customized, which aids in troubleshooting.

SkipOnError: Specify the “Boolean” value as “True” or “False.”

True: Continue executing the workflow regardless of any errors thrown.
False: Halt the workflow if it encounters any errors.
None: If the option is left blank, the activity will, by default, behave as if “False” were chosen.

Version: It indicates the version of the feature being used.

OUTPUT

Result: It provides the ability to view the execution status of the activity. It returns values in “Boolean.”

True: Indicates that the activity has been executed successfully without any errors.
False: Indicates that the activity has been unsuccessful due to an unexpected error being thrown.

WriteStatus: It provides the ability to view the status of the data written in the CSV file. It returns values in “Boolean.”

True: Indicates that the activity has been executed successfully without any errors.

False: Indicates that the activity has been unsuccessful due to an unexpected error being thrown.

*Represents mandatory fields to execute the workflow

Click here to view how the activity is used in the workflow. 

8.2.5 Use Case

The user receives a CSV file to which they need to append data. The data will be extracted from the website using the “HTMLTableToDataTable” activity. Once the data has been appended, we will read the CSV file using the “ReadCSV” activity to verify that the data has been successfully appended.

Here’s how we can achieve the task,

1. Drag and drop the “OpenWebBrowser” activity into the workflow and set it as start node.
a. Here we are using this activity to open the website to extract the datatable.
b. In this case, let’s use a sample website “https://datatables.net/examples/styling/bootstrap4”. 
c. Double click on the activity and provide the above URL in the “URL” property. 

2. Now, Add the “HtmlTabletoDatatable” activity next to the “OpenWebBrowser”.
a. Here we are using this activity to extract the data in a tabular format from the website and return the output in “Datatable” datatype.   
b. Double click on the activity and choose the “Select Element” option to spy the table value from the website. Click here to refer
c. Next move to the “Datatable” in the properties to view the output of the activity.
d. Refer the steps here to learn how to declare a variable in Datatable format.

3. Add the “AppendCSV” activity next to the “ExceltoDatatable” activity.
a. Here we are using this activity to append the converted excel data into the CSV file.
b. I have already created a CSV file to write the input data.
c. Double click on the activity and click on the “Browse file” option to choose the CSV file.
d. Navigate to the “AppendData” to provide the input datatable that has been extracted from the website.
e. Here the variable is “DT”. 

4. Now, add the “Read” activity from the CSV Automation and place it next to the “Append” activity
a. Here we are using this activity to read the CSV data from the existing file.
b. Double click on the activity and provide the “FilePath”. 
c. In this case, we are using the CSV file where we have appended the data.
d. Navigate to the “ReadData” in the output properties panel to declare a variable to view the output in tabular format.
e. Here we are declaring the variable as “RD_CSV”. 

5. Now, you can add the “Tableviewer” activity to view the output for the read data from CSV file.

8.3 Email Automation

Introduction

Email Automation in Robility helps automate bots to perform tasks such as sending emails, processing information, and interacting with email platforms. It streamlines email-based processes, reduces human intervention, and enhances efficiency.

Prerequisites

The application must be installed on the host machine, and a valid email account must be actively logged in. Without both conditions met, the automation will not function correctly.

Limitations

Admin vs. non-admin access
The Email automation behaves differently depending on user permissions.
1. Admin users can run the automation whether the application is open or closed.
2. Non-admin users must keep the application open (minimized or active) for the automation to execute; it will not run if the application is fully closed.

Benefits of Email Automation

The following are the benefits of automating with Email Automation.

  1. Minimizes the manual effort and reduces the errors in email-based processes.
  2. Improves response times and customer satisfaction.
  3. Enables 24/7 automated email interactions.
  4. Enhances accuracy in data processing and reporting.
  5. Integrates seamlessly with other applications and systems.

Use cases

The following are the use cases of the scenarios that helps the user to perform automation with the Email Automation package.

  1. Invoice Processing and Notifications – Enables to extract invoice details from emails, update to the systems/applications and sending payment notifications as email.
  2. Data extraction – Automate to extract daily reports from the emails and send back the notifications.
  3. Customer support and query resolutions – Categorize and route customer inquiries, automate responses, and escalate complex issues to human agents.
  4. Order Processing and Tracking – Automate order confirmation emails, update order status, and send shipment tracking information to customers.
  5. Employee Onboarding and Training – Automate the process of sending welcome emails, distribute training materials, and track employee progress.

8.3.1 Release Notes

v.3.2.8

This release includes the following enhancement:

Enhancement

Set Email CategoriesIntroduced a new Single Mail Item property that allows you to apply a specified category to an individual email.

Released Date: 20/04/2026

8.3.2 AddNewFolder

This activity assists the user to create a “New Folder” or a “New Sub Folder” within the specified outlook account. Ensure this activity is included within a designated parent activity.

Properties

INPUT

FolderName: This parameter enables you to specify the “Folder name” where you wish to create a new “subfolder.”  This parameter accepts values in “String” datatype. You can either hardcode the values in “String” datatype or can enter the values in “String”. When left blank, it will not be considered.

NewFolderName:* This parameter allows you to specify the “Name” in which the folder has to be created.
This parameter accepts values in “String” datatype. You can either hardcode the values in “String” datatype or can enter the values in “String”.

MISC

DisplayName: Displays the name of the activity. The activity name can be customized, which aids in troubleshooting.

SkipOnError: Specify the “Boolean” value as “True” or “False.”
True: Continue executing the workflow regardless of any errors thrown.
False:
 Halt the workflow if it encounters any errors.
None:
 If the option is left blank, the activity will, by default, behave as if “False” were chosen.

Version: It indicates the version of the feature being used.

OUTPUT

Result: It provides the ability to view the execution status of the activity. It returns values in “Boolean.”
True: Indicates that the activity has been executed successfully without any errors.
False: Indicates that the activity has been unsuccessful due to an unexpected error being thrown.

* Represents mandatory fields to execute the workflow.

8.3.3 CopyFolder

This feature enables users to effortlessly copy or move a “Folder” from one location to another within their specified Outlook account. To utilize this feature effectively, ensure it is integrated into a designated parent activity.

Properties

INPUT

Action: This section specifies the action that needs to be executed. By default, the “Copy” option will be selected. Choose the desired action from the dropdown list:
Copy: This action carries out the “Copy/Paste” functionality by duplicating the “Folder” from the original destination and pasting it in a different destination.
Move: This action performs the “Move” functionality by transferring the folder from one destination to another.
DestinationFolderName:* This specifies the name of the “Destination Folder” to which the folder from the specified “Source Destination” should be moved or copied.
This parameter accepts values in “String” datatype. You can either hardcode the values in “String” datatype or can enter the values in “String”.
SourceFolderName: * This specifies the name of the “Source Folder” from which the folder needs to be selected to carry out the action.
This parameter accepts values in “String” datatype. You can either hardcode the values in “String” datatype or can enter the values in “String”.

MISC

DisplayName: Displays the name of the activity. The activity name can be customized, which aids in troubleshooting.
SkipOnError: 
Specify the “Boolean” value as “True” or “False.”
True: Continue executing the workflow regardless of any errors thrown.
False:
 Halt the workflow if it encounters any errors.
None:
 If the option is left blank, the activity will, by default, behave as if “False” were chosen.
Version: 
It indicates the version of the feature being used.

OUTPUT

Result: It provides the ability to view the execution status of the activity. It returns values in “Boolean.”
True: Indicates that the activity has been executed successfully without any errors.
False: Indicates that the activity has been unsuccessful due to an unexpected error being thrown.

* Represents mandatory fields to execute the workflow.

8.3.4 Delete

This activity assists the user in deleting a specified number of emails within the specified Outlook account. To utilize this feature effectively, ensure it is integrated into a designated parent activity.

Properties

INPUT

List: * It specifies that the “MailItem” variable (which is declared in the “Read mail” activity) should be provided as an input value to delete the emails from the list.

MISC

DisplayName: Displays the name of the activity. The activity name can be customized, which aids in troubleshooting.
SkipOnError: 
Specify the “Boolean” value as “True” or “False.”
True: Continue executing the workflow regardless of any errors thrown.
False:
 Halt the workflow if it encounters any errors.
None:
 If the option is left blank, the activity will, by default, behave as if “False” were chosen.
Version: 
It indicates the version of the feature being used.

OUTPUT

Result: It provides the ability to view the execution status of the activity. It returns values in “Boolean.”
True: Indicates that the activity has been executed successfully without any errors.
False: Indicates that the activity has been unsuccessful due to an unexpected error being thrown.
* Represents mandatory fields to execute the workflow.

8.3.5 DeleteFolder

This activity helps the user to delete the specified “Folder” from the preferred Outlook account. To utilize this feature effectively, ensure it is integrated into a designated parent activity.

Properties

INPUT

FolderName: This parameter enables you to specify the “Folder name” where you wish to create a new “subfolder.” 
This parameter accepts values in “String” datatype. You can either hardcode the values in “String” datatype or can enter the values in “String”.
When left blank, it will not be considered.

MISC

DisplayName: Displays the name of the activity. The activity name can be customized, which aids in troubleshooting.
SkipOnError: 
Specify the “Boolean” value as “True” or “False.”
True: Continue executing the workflow regardless of any errors thrown.
False:
 Halt the workflow if it encounters any errors.
None:
 If the option is left blank, the activity will, by default, behave as if “False” were chosen.
Version: 
It indicates the version of the feature being used.

OUTPUT

Result: It provides the ability to view the execution status of the activity. It returns values in “Boolean.”
True: Indicates that the activity has been executed successfully without any errors.
False: Indicates that the activity has been unsuccessful due to an unexpected error being thrown.
* Represents mandatory fields to execute the workflow.

8.3.6 EmailTrigger

This activity allows users to trigger a workflow when an email is received, based on the specified conditions.When an email that meets the specified criteria—such as sender, subject, keywords, or attachments—is received, this activity automatically triggers a designated workflow.

Properties

INPUT

EmailAccount:* This parameter provides the Outlook account that has been integrated into the user’s system. Choose the option from the drop-down to select the required account. This field accepts the value in “String” format. You can either hardcode the values in “String” datatype or can enter the values in “String”.

WatchEmailsFromFolder: It specifies the “Folder” where the mails are required to watch and trigger the workflow. This parameter accepts values in “String” datatype. You can either hardcode the values in “String” datatype or can enter the values in “String”.

MISC

DisplayName: Displays the name of the activity. The activity name can be customized, which aids in troubleshooting.

SkipOnError: Specify the “Boolean” value as “True” or “False.”
True: Continue executing the workflow regardless of any errors thrown.
False:
 Halt the workflow if it encounters any errors.
None:
 If the option is left blank, the activity will, by default, behave as if “False” were chosen.
Version: 
It indicates the version of the feature being used.

OPTIONAL

From: It indicates the filters that are required to watch and trigger the workflow.

Select Filters: Use this option to configure an advanced filter to specify any conditions for the emails to be read. Click on this to open the “Advanced Filter” wizard.

a. And / OR condition: The “AND” function returns results that meet all specified conditions, while the “OR” function returns results that meet any of the specified conditions.
b. The first dropdown lists the email fields to filter by: Bcc, Body, Cc, Date, From, To, Subject, or Categories.
c. The second dropdown lists the operators to evaluate the chosen fields. The available operators are:

     i. For the fields “Bcc, Body, Cc, From, To, Subject, and Categories,” the operators are contains, does not contain, ends with, starts with, equals, is empty, or is not empty.
    ii. For the “Date” field, the operators are older than, newer than, or equals, indicating the time period of the emails.
d. To include additional conditions, click the “Add” button.

OUTPUT

Result: It provides the ability to view the execution status of the activity. It returns values in “Boolean.”
True: Indicates that the activity has been executed successfully without any errors.
False: Indicates that the activity has been unsuccessful due to an unexpected error being thrown.

* Represents mandatory fields to execute the workflow.

8.3.7 ExtractMailMessage

This activity enables the extraction of details using the “Mail message” or the “MailItem” from the specified account name in Outlook.

Properties

INPUT

AttachmentPath:* This parameter specifies the “Path” to save the attachments extracted from the “MailMessage” or “MailItem.”
This parameter accepts values in “String” datatype. You can either hardcode the values in “String” datatype or can enter the values in “String”.

InputPath: It specifies the “Input path” where the mail message is stored in the system. Use this option when the “InputType” is selected as “MSG_File.”
This parameter accepts values in “String” datatype. You can either hardcode the values in “String” datatype or can enter the values in “String”.

InputType:* Select the input type from the dropdown:
MailItem: This option refers to the “MailItem” variable declared as an output in the “ReadMail” activity. Use this type to extract details and attachments from the “MailItem” variable.
MSG_File: This option pertains to the “MailMessage” file. Utilize this type to extract details and attachments from the “MailMessage.”By default, the type is set to “MSG_File.”

MailItem:* 
Specify the “MailItem” variable (which will be declared in the “Read Mail” activity) to extract the emails from the provided “list.”

MISC

DisplayName: Displays the name of the activity. The activity name can be customized, which aids in troubleshooting.

SkipOnError: Specify the “Boolean” value as “True” or “False.”
True: Continue executing the workflow regardless of any errors thrown.
False:
 Halt the workflow if it encounters any errors.
None:
 If the option is left blank, the activity will, by default, behave as if “False” were chosen.
Version: 
It indicates the version of the feature being used.

OUTPUT

AttachmentList: This feature aids in storing and viewing the extracted attachments as an “Output” of the activity in a “list” datatype from the email.

CCList: This functionality allows you to view the “CC List” as an output of the activity in a “list” datatype, extracted from the email.

FromMailID: This feature enables you to view the “FromMailID” as an output of the activity in the “String” datatype, extracted from the email.

IsHadAttachment: This parameter helps to return the output of the activity to validate whether the mails have attachment. This field returns the value in “Boolean” datatype.
Yes – The provided “MailMessage” or “Mailitem” contains attachment.
No – The provided “MailMessage” or “Mailitem” does not contain any attachments.

MailBody: This feature enables you to view the “MailBody” as an output of the activity in the “String” datatype, extracted from the email.

MailSenderName:This feature enables you to view the “MailSenderName” as an output of the activity in the “String” datatype, extracted from the email.

MailSubject: It helps to view the output of the activity as “MailSubject” extracted from the mails. This field returns the values in the “String” datatype.

ReceivedDateTime: This feature enables you to view the “ReceivedDateTime” as an output of the activity in the “DateTime” datatype, extracted from the email.

ToList: It helps to view the output of the activity as “ToList” extracted from the mails. This field returns the values in the “List of String” datatype.
* Represents mandatory fields to execute the workflow.

8.3.8 Forward

This activity allows you to forward emails from Outlook to the designated email address.

Properties

INPUT

AttachmentList:* Indicate the “AttachmentList” (Declared as an output in the “ExtractMailMessage” activity) to include attachments along with the “NewMail.” It accepts values in the form of a “list” datatype. When left blank, it will not be considered.

BCCAddress: This parameter specifies to provide the “BCC address” of the recipients for sending the email. It ensures that the “MailID” mentioned is not disclosed to the other users listed in the “To” and “CC” addresses.
This parameter accepts values in “String” datatype. You can either hardcode the values in “String” datatype or can enter the values in “String”.When left blank, it will not be considered.Body: This parameter specifies the “Mail Body” that should be sent as an email. his parameter accepts values in “String” datatype. You can either hardcode the values in “String” datatype or can enter the values in “String”. When left blank, it will not be considered.

CCAddress: This parameter provides the “CC address” of the recipients to whom the email should be sent. It enables sending the email to additional recipients for informational purposes. 
This parameter accepts values in “String” datatype. You can either hardcode the values in “String” datatype or can enter the values in “String”.
When left blank, it will not be considered.

FromAddress: Specify the “From address,” which is the sender’s email address used to send the email. This parameter accepts values in “String” datatype. You can either hardcode the values in “String” datatype or can enter the values in “String”. When left blank, it will not be considered.

MailItem:* Specify the “MailItem” variable (which will be declared in the “Read Mail” activity) to reply to the emails from the provided “list.”

MailSubject: Specify the “Subject” of the email to be sent along with the mails. This parameter accepts values in “String” datatype. You can either hardcode the values in “String” datatype or can enter the values in “String”. When left blank, it will not be considered.

SendAs: It specifies the type to be send as the mail. Choose the send as type from the drop-down,
Forward – It enables to forward the mails to the mentioned mail address as “Forward” functionality.
ForwardAsNew – It enables to forward the mail as “New” mail to the mentioned mail address.
By default, the “Forward” types will be set.

ToAddress: It specifies the “To address” of the recipient to send the mail. This parameter accepts values in “String” datatype. You can either hardcode the values in “String” datatype or can enter the values in “String”. When left blank, it will not be considered.

MISC

DisplayName: Displays the name of the activity. The activity name can be customized, which aids in troubleshooting.

SkipOnError: Specify the “Boolean” value as “True” or “False.”
True: Continue executing the workflow regardless of any errors thrown.
False:
 Halt the workflow if it encounters any errors.
None:
 If the option is left blank, the activity will, by default, behave as if “False” were chosen.
Version: 
It indicates the version of the feature being used.

OUTPUT

Result: It provides the ability to view the execution status of the activity. It returns values in “Boolean.”
True: Indicates that the activity has been executed successfully without any errors.
False: Indicates that the activity has been unsuccessful due to an unexpected error being thrown.

* Represents mandatory fields to execute the workflow.

Attachment list

The attachments list should be declared as a list of strings from the variables section and enter the value as new List(of string)(new string(){“value1”,“value2”}).
Enter the location path of the attachments.

8.3.9 ForEachMail

This activity refers to a loop activity designed to perform actions on a collection of emails, such as reading, processing, or moving each email message individually within the loop based on specific conditions. It is integral to automating email-related tasks and streamlining processes involving bulk email handling. 

Properties

INPUT 

Limit: This parameter indicates the maximum number of emails to be looped through to perform a set of actions. This parameter accepts the value in “String” datatype. You can either hardcode the value in “String” datatype or provide the variables in “String” format.

MailsFrom: * This parameter specifies the “Folder” from which the set of actions will be performed. To choose the folder, click the “+” icon next to the box and select the required folder from the dropdown menu.

Alternatively, you can provide a variable of the “List of MailItem” datatype. Refer to the documentation below for more information.

MISC

DisplayName: Displays the name of the activity. The activity name can be customized, which aids in troubleshooting.

SkipOnError: Specify the “Boolean” value as “True” or “False.”
True: Continue executing the workflow regardless of any errors thrown.
False:
 Halt the workflow if it encounters any errors.
None:
 If the option is left blank, the activity will, by default, behave as if “False” were chosen.
Version: 
It indicates the version of the feature being used.

OUTPUT

List: This parameter allows you to view the output of the activity as a “MailItem” variable, which can be used as input in subsequent activities within the “For Each Mail” body. It returns values in the “MailItem” datatype.

Result: It provides the ability to view the execution status of the activity. It returns values in “Boolean.”

True: Indicates that the activity has been executed successfully without any errors.
False: Indicates that the activity has been unsuccessful due to an unexpected error being thrown.

Represents mandatory fields to execute the workflow.

Setting up the activity

Let’s see how to set up and configure the fields in the activity.

1. For Each (Current MailItem): This represents the name used to reference each email within the body of the “For Each Mail” activity. By default, the value is “Current Mail.” You can customize this name as needed.

2. EmailsFrom: It indicates the folder from which emails should be read and processed in a loop for the specified actions. To choose the folder, click the “+” icon next to the box and select the required folder from the dropdown menu.

Alternatively, you can provide a variable of the “List of MailItem” datatype. This variable will be the output of the “Read Mail” activity.

3. Limit emails to first: This parameter sets the maximum number of emails to be looped through for performing a set of actions. You can select the number of emails from the provided dropdown.

4. Unread mails: Check this option to process only unread emails from the chosen folder and execute them in the loop.

5. Retrieve Attachments: Check this option to extract attachments along with the emails from the chosen folder.

6. With Attachments Only: Check this option to read and process only emails that contain attachments in the chosen folder.

7. Include subfolders: Check this option to include subfolders when reading and processing emails from within the chosen folder.

8. More Filters: Use this option to configure an advanced filter to specify any conditions for the emails to be read. Click on this to open the “Advanced Filter” wizard.
a. And / OR condition: The “AND” function returns results that meet all specified conditions, while the “OR” function returns results that meet any of the specified conditions.
b. The first dropdown lists the email fields to filter by: Bcc, Body, Cc, Date, From, To, Subject, or Categories.
c. The second dropdown lists the operators to evaluate the chosen fields. The available operators are:
     i. For the fields “Bcc, Body, Cc, From, To, Subject, and Categories,” the operators are contains, does not contain, ends with, starts with, equals, is empty, or is not empty.
     ii. For the “Date” field, the operators are older than, newer than, or equals, indicating the time period of the emails.
d. To include additional conditions, click the “Add” button.

8.3.10 GetAccountList

This activity enables to retrieve the outlook account list that are actively available in the local machine.

Properties

MISC

DisplayName: Displays the name of the activity. The activity name can be customized, which aids in troubleshooting.

SkipOnError: Specify the “Boolean” value as “True” or “False.”
True: Continue executing the workflow regardless of any errors thrown.
False:
 Halt the workflow if it encounters any errors.
None:
 If the option is left blank, the activity will, by default, behave as if “False” were chosen.
Version: 
It indicates the version of the feature being used.

OUTPUT

Result:* It provides the ability to view the execution status of the activity. It returns values in “Boolean.”
True: Indicates that the activity has been executed successfully without any errors.
False: Indicates that the activity has been unsuccessful due to an unexpected error being thrown.
* Represents mandatory fields to execute the workflow.

8.3.11 Move

This activity assists in relocating “emails” from one folder to another within the specified Outlook account. To utilize this feature effectively, ensure it is integrated into a designated parent activity.

Properties

INPUT

MailItem: * Specify the “MailItem” variable (which will be declared in the “Read Mail” or “For Each Mail” activity) to reply to the emails from the provided “list.”

MailSubject: Specify the “Subject” of the email to be sent along with the mails. This parameter accepts values in “String” datatype. You can either hardcode the values in “String” datatype or can enter the values in “String”. When left blank, it will not be considered.

SubFolderName: Specify the “FolderName” to which the emails should be moved. You can also indicate the “Subfolder” name here. (Refer the tips below).
This parameter accepts values in “String” datatype. You can either hardcode the values in “String” datatype or can enter the values in “String”.

MISC

DisplayName: Displays the name of the activity. The activity name can be customized, which aids in troubleshooting.

SkipOnError: Specify the “Boolean” value as “True” or “False.”
True: Continue executing the workflow regardless of any errors thrown.
False:
 Halt the workflow if it encounters any errors.
None:
 If the option is left blank, the activity will, by default, behave as if “False” were chosen.
Version: 
It indicates the version of the feature being used.

OUTPUT

Result: It provides the ability to view the execution status of the activity. It returns values in “Boolean.”
True: Indicates that the activity has been executed successfully without any errors.
False: Indicates that the activity has been unsuccessful due to an unexpected error being thrown.

* Represents mandatory fields to execute the workflow.

8.3.12 NewMail

This activity facilitates sending a “New mail” to the specified address using Outlook.

Properties

INPUT

AttachmentList:* Indicate the “AttachmentList” (Declared as an output in the “ExtractMailMessage” activity) to include attachments along with the “NewMail.” It accepts values in the form of a “list” datatype. When left blank, it will not be considered.

BCCAddress: This parameter specifies to provide the “BCC address” of the recipients for sending the email. It ensures that the “MailID” mentioned is not disclosed to the other users listed in the “To” and “CC” addresses. This parameter accepts values in “String” datatype. You can either hardcode the values in “String” datatype or can enter the values in “String”.
When left blank, it will not be considered.

Body: This parameter specifies the “Mail Body” that should be sent as an email. This parameter accepts values in “String” datatype. You can either hardcode the values in “String” datatype or can enter the values in “String”. When left blank, it will not be considered.

CCAddress: This parameter provides the “CC address” of the recipients to whom the email should be sent. It enables sending the email to additional recipients for informational purposes. 
This parameter accepts values in “String” datatype. You can either hardcode the values in “String” datatype or can enter the values in “String”. When left blank, it will not be considered.

FromAddress: Specify the “From address,” which is the sender’s email address used to send the email. This parameter accepts values in “String” datatype. You can either hardcode the values in “String” datatype or can enter the values in “String”. When left blank, it will not be considered.

MailSubject: Specify the “Subject” of the email to be sent along with the mails. This parameter accepts values in “String” datatype. You can either hardcode the values in “String” datatype or can enter the values in “String”. When left blank, it will not be considered.

ToAddress: It specifies the “To address” of the recipient to send the mail. This parameter accepts values in “String” datatype. You can either hardcode the values in “String” datatype or can enter the values in “String”.
When left blank, it will not be considered.

MISC

DisplayName: Displays the name of the activity. The activity name can be customized, which aids in troubleshooting.

SkipOnError: Specify the “Boolean” value as “True” or “False.”
True: Continue executing the workflow regardless of any errors thrown.
False:
 Halt the workflow if it encounters any errors.
None:
 If the option is left blank, the activity will, by default, behave as if “False” were chosen.
Version: 
It indicates the version of the feature being used.

OUTPUT

Result: It provides the ability to view the execution status of the activity. It returns values in “Boolean.”
True: Indicates that the activity has been executed successfully without any errors.
False: Indicates that the activity has been unsuccessful due to an unexpected error being thrown.

Represents mandatory fields to execute the workflow.

Attachment list

The attachments list should be declared as a list of strings from the variables section and enter the value as new List(of string)(new string(){“value1”,“value2”}). Enter the location path of the attachments.

8.3.13 OpenMail

This activity is used to open mail from the specified mail account. A separate window appears while opening the mail. To utilize this feature effectively, ensure it is integrated into a designated parent activity.

Properties

INPUT

MailItem:* Specify the “MailItem” variable (which will be declared in the “Read Mail” activity) to extract the emails from the provided “list.”

MISC

DisplayName: Displays the name of the activity. The activity name can be customized, which aids in troubleshooting.
SkipOnError: 
Specify the “Boolean” value as “True” or “False.”

True: Continue executing the workflow regardless of any errors thrown.
False:
 Halt the workflow if it encounters any errors.
None:
 If the option is left blank, the activity will, by default, behave as if “False” were chosen.
Version: 
It indicates the version of the feature being used.

OUTPUT

Result: It provides the ability to view the execution status of the activity. It returns values in “Boolean.”
True: Indicates that the activity has been executed successfully without any errors.
False: Indicates that the activity has been unsuccessful due to an unexpected error being thrown.
* Represents mandatory fields to execute the workflow.

8.3.14 Read

This activity helps users to access and read emails directly from the specified Outlook account. To utilize this feature effectively, ensure it is integrated into a designated parent activity.

Properties

INPUT 

Filter: Specify the filter values that need to be applied while reading emails from the account name. This parameter accepts values in “String” datatype. You can either hardcode the values in “String” datatype or can enter the values in “String”. It is an optional field and reads all emails if no value is provided.

MarkAsUnread: This property indicates whether read emails should be marked as unread after the automation is completed. Specify “True” or “False” to enable or disable the marking of emails as unread during the mail reading process.
True: Enables marking emails as unread after they are read.
False: Disables marking emails as unread after they are read.
None: If this option is left blank, the property will not take effect, and by default, emails will be read without marking as unread.

NoOfMails: * Enter the number of emails that need to be read within the specified account name. This parameter accepts values in “Integer” datatype. You can either hardcode the values in “Integer” datatype or can enter the values in “Integer”.  The maximum number of emails to be read is 1000. 

SortBy: This property sorts the emails either in ascending or descending order for reading within the specified account name. By default, it functions with the ‘Ascending’ order option. Choose the option from the drop-down.
Ascending – Sorts the emails in ascending order.
Descending – Sorts the emails in descending order.

SortbyFieldName: This property specifies the field options such as “From,” “To,” “Subject,” and “Received Time” for sorting and reading emails. Provide the value to sort against the “FilterValue” property. This drop-down contains field names as follows:
From – Sorts using the “From Address” provided in the “FilterValue” option.
To – Sorts using the “To Address” provided in the “FilterValue” option.
Subject – Sorts using the “Subject” provided in the “FilterValue” option.
Received time – Sorts using the “Received time” provided in the “FilterValue” option.

SubFolderName: * Specify the folder name from which the emails need to be accessed and read. You can also provide the “SubFolderName” if you need to read emails from a subfolder. (Refer to Tips).

Unread: Specify whether to read emails that have not been read yet in the mailbox. Specify either “True” or “False” in the field:
True – Enables reading only the “Unread” mails from the mailbox.
False – Disables the condition and reads emails according to the sorting order provided, irrespective of whether they are “Read” or “Unread” mails.
None – When left out blank, the activity will perform with “False” action.

MISC

DisplayName: Displays the name of the activity. The activity name can be customized, which aids in troubleshooting.

SkipOnError: Specify the “Boolean” value as “True” or “False.”
True: Continue executing the workflow regardless of any errors thrown.
False:
 Halt the workflow if it encounters any errors.
None:
 If the option is left blank, the activity will, by default, behave as if “False” were chosen.
Version: 
It indicates the version of the feature being used.

OUTPUT

List: * It helps to store the mails in the list format that has been read from the mailbox. (Refer to the steps in creating a workflow.)

* Represents mandatory fields to execute the workflow.

8.3.15 SetCategory

The SetCategory activity is used to assign categories to one or more email messages, such as blue, green, yellow, etc. It allows users to organize and classify emails within a mailbox by applying predefined or custom categories.

This activity accepts a collection of email items (for example, those retrieved from the Read Mail activity) and applies the specified category name to each email in the collection. It helps improve email management by enabling better filtering and grouping of messages based on their assigned categories.

Properties

INPUT

Category Name*: Specifies the predefined or custom category name to be assigned to the email, such as blue, green, yellow, etc.

MailItems*: Accepts a collection of email messages retrieved from the Read Mail activity, on which the specified category will be applied.

SingleMailItem – Accepts a single Outlook mail item (MailItem) as input, to which the specified category will be applied.

MISC

DisplayName: Displays the name of the activity. This can be customized for better readability and easier troubleshooting.

SkipOnError: Specifies a Boolean value (True or False).
True: Continues executing the workflow even if an error occurs.
False: Stops the workflow if an error is encountered.
None: If left blank, the default behavior is False.

Version: Displays the version of the activity being used. This field is auto populated and read-only.

OUTPUT

Result: Indicates the execution status of the activity. Returns a Boolean value:
True: The activity executed successfully without errors.
False: The activity failed due to an error.

UpdatedCount: Indicates the total number of email messages that were successfully processed and updated with the specified category. The output is returned as an Integer.

UpdatedMailItems  : Returns a collection of email messages that were successfully updated with the specified category. The output is of type List of mailitem.

*Represents mandatory fields to execute the workflow.

8.3.16 Reply

This activity assists in “Replying” to emails from the designated Outlook account.

Properties

INPUT

AttachmentList: Indicate the “AttachmentList” (Declared as an output in the “ExtractMailMessage” activity) to include attachments along with the “NewMail.” It accepts values in the form of a “list” datatype. When left blank, it will not be considered.

BCCAddress: This parameter specifies to provide the “BCC address” of the recipients for sending the email. It ensures that the “MailID” mentioned is not disclosed to the other users listed in the “To” and “CC” addresses.
This parameter accepts values in “String” datatype. You can either hardcode the values in “String” datatype or can enter the values in “String”.When left blank, it will not be considered.

CCAddress: This parameter provides the “CC address” of the recipients to whom the email should be sent. It enables sending the email to additional recipients for informational purposes. 
This parameter accepts values in “String” datatype. You can either hardcode the values in “String” datatype or can enter the values in “String”. When left blank, it will not be considered.

MailBody: * This parameter specifies the “Mail Body” that should be sent as an email.
This parameter accepts values in “String” datatype. You can either hardcode the values in “String” datatype or can enter the values in “String”. When left blank, it will not be considered.

MailItem:* Specify the “MailItem” variable (which will be declared in the “Read Mail” activity) to reply to the emails from the provided “list.”

MailSubject: Specify the “Subject” of the email to be sent along with the mails. This parameter accepts values in “String” datatype. You can either hardcode the values in “String” datatype or can enter the values in “String”.
When left blank, it will not be considered.

MoreRecipients: This specifies the addition of more recipients by including the email addresses of the recipients. This parameter accepts values in “String” datatype. You can either hardcode the values in “String” datatype or can enter the values in “String”.
When left blank, it will not be considered.

RemoveRecipients: Specify the removal of recipients by providing their “Email addresses.” This parameter accepts values in “String” datatype. You can either hardcode the values in “String” datatype or can enter the values in “String”.
When left blank, it will not be considered.

ReplyAll: Specify either “True” or “False” to enable or disable the “Reply all” condition for the list of emails.
True: Enables the “Reply All” functionality to send a reply to all the users mentioned in the email.
False: Disables the “Reply All” functionality, allowing a reply to be sent only to the original sender.
None: Indicates that when left blank, the functionality will be default to “False”.

MISC

DisplayName: Displays the name of the activity. The activity name can be customized, which aids in troubleshooting.

SkipOnError: Specify the “Boolean” value as “True” or “False.”
True: Continue executing the workflow regardless of any errors thrown.
False:
 Halt the workflow if it encounters any errors.
None:
 If the option is left blank, the activity will, by default, behave as if “False” were chosen.
Version: 
It indicates the version of the feature being used.

OUTPUT

Result: It provides the ability to view the execution status of the activity. It returns values in “Boolean.”
True: Indicates that the activity has been executed successfully without any errors.
False: Indicates that the activity has been unsuccessful due to an unexpected error being thrown.

Represents mandatory fields to execute the workflow.

8.3.17 Send

This activity enables sending emails using the “SMTP Client” from Outlook to the specified address.

Properties

INPUT

AttachmentList: Indicate the “AttachmentList” (Declared as an output in the “ExtractMailMessage” activity) to include attachments along with the “NewMail.” It accepts values in the form of a “list” datatype. When left blank, it will not be considered.

BCCMailID: Provide the “BCC MailID” of the recipients for sending the email. This ensures that the “MailID” mentioned is not disclosed to the other users listed in the “To” and “CC” addresses. This parameter accepts values in “String” datatype. You can either hardcode the values in “String” datatype or can enter the values in “String”. When left blank, it will not be considered.

Body: This parameter specifies the “Mail Body” that should be sent as an email. It accepts values in “String” datatype. You can either hardcode the values in “String” datatype or can enter the values in “String”. When left blank, it will not be considered.

CCMailID: Provide the “CC address” of the recipients to send the email. This allows sending email to additional recipients for informational purposes. This parameter accepts values in “String” datatype. You can either hardcode the values in “String” datatype or can enter the values in “String”. When left blank, it will not be considered. 

CredDomain: Specify the “DomainName” for the “SMTP client” mentioned, to send the email. This parameter accepts values in “String” datatype. You can either hardcode the values in “String” datatype or can enter the values in “String”.
When left blank, it will not be considered.

CredPassword: Specify the “Password” credentials for the mentioned “SMTP client” to send the email. This parameter accepts values in “String” datatype. You can either hardcode the values in “String” datatype or can enter the values in “String”.
When left blank, it will not be considered.

CredUsername: Specify the “Username” credentials for the mentioned “SMTP client” to send the email. This parameter accepts values in “String” datatype. You can either hardcode the values in “String” datatype or can enter the values in “String”.
When left blank, it will not be considered.

MailAddress: Specify the “From address,” which is the sender’s email address used to send the email. This parameter accepts values in “String” datatype. You can either hardcode the values in “String” datatype or can enter the values in “String”.
When left blank, it will not be considered.

SmtpClient: Specify the “SMTP server” name that is required to send the mail.This parameter accepts values in “String” datatype. You can either hardcode the values in “String” datatype or can enter the values in “String”.
When left blank, it will not be considered.

Subject: Specify the “Subject” of the email to be sent along with the mails. This parameter accepts values in “String” datatype. You can either hardcode the values in “String” datatype or can enter the values in “String”.
When left blank, it will not be considered.

ToMailID: * It specifies the “To address” of the recipient to send the mail. This parameter accepts values in “String” datatype. You can either hardcode the values in “String” datatype or can enter the values in “String”. When left blank, it will not be considered.

MISC

DisplayName: Displays the name of the activity. The activity name can be customized, which aids in troubleshooting.

SkipOnError: Specify the “Boolean” value as “True” or “False.”
True: Continue executing the workflow regardless of any errors thrown.
False:
 Halt the workflow if it encounters any errors.
None:
 If the option is left blank, the activity will, by default, behave as if “False” were chosen.
Version: 
It indicates the version of the feature being used.

OUTPUT

Result: It provides the ability to view the execution status of the activity. It returns values in “Boolean.”
True: Indicates that the activity has been executed successfully without any errors.
False: Indicates that the activity has been unsuccessful due to an unexpected error being thrown.
Represents mandatory fields to execute the workflow.

8.3.18 Save

This activity assists in saving the “Mail” in the “MailMessage” format to the specified local path.

Properties

INPUT

FileName: Specify the “Name” in which the mails are required to save in the specified local path as “MailMessage.” This parameter accepts values in “String” datatype. You can either hardcode the values in “String” datatype or can enter the values in “String”.  When left blank, it will not be considered.

FolderPath: Specify the “Folder path” to where the “Mails” are required to be saved from the list. This parameter accepts values in “String” datatype. You can either hardcode the values in “String” datatype or can enter the values in “String”. When left blank, it will not be considered.

MailItem:* Specify the “MailItem” variable (which will be declared in the “Read Mail” activity) to reply to the emails from the provided “list.”

MISC

DisplayName: Displays the name of the activity. The activity name can be customized, which aids in troubleshooting.

SkipOnError: Specify the “Boolean” value as “True” or “False.”
True: Continue executing the workflow regardless of any errors thrown.
False:
 Halt the workflow if it encounters any errors.
None:
 If the option is left blank, the activity will, by default, behave as if “False” were chosen.
Version: 
It indicates the version of the feature being used.

OUTPUT

Result: It provides the ability to view the execution status of the activity. It returns values in “Boolean.”
True: Indicates that the activity has been executed successfully without any errors.
False: Indicates that the activity has been unsuccessful due to an unexpected error being thrown.
Represents mandatory fields to execute the workflow.

8.4 Excel Automation

Introduction

Robility’s Excel automation streamlines tasks in Microsoft Excel, such as data processing, extraction, manipulation, and report generation, providing seamless integration with workbooks and worksheets.

Compatible versions:

1. This feature supports only “.xlsx”, “.xlsb”, “.xlsm” and .xls” excel sheets. CSV sheets will not be supported by this feature.
2. Microsoft Office (versions 2007, 2010, 2013, 2016, 2019, or 365 desktop editions) these versions are supported for automating tasks in Excel.

Use Cases

1. Report Generation: With excel automation, bots can leverage the “Macros and VBA scripts” to pull data from various sources and generate comprehensive reports automatically.  
2. Data validation: Bots can be used to automate the excel data to clean, validate, and standardize, ensuring data quality and consistency.
3. Invoice Processing: Bots can automate the extraction of data from invoices, such as invoice numbers, amounts, and due dates, and populate this information into Excel for further processing.
4. Data Analysis: Banks and financial organizations manage several types of data in excel sheet to perform calculations, generate financial reports, and analyze financial data. 

8.4.1 Release Notes

v.1.7.6

In this release, we have fixed the bug:

Bug Fix
InsertAndDeleteColumn activity tooltip contained a spelling error. This issue has now been fixed.

Released Date: 25/03/2026

8.4.2 AppendRange

This activity allows the user to append the specified data table to an existing workbook in Excel. It functions within the Excel Scope activity.

Properties

INPUT

Datatable: * This parameter specifies the input datatable to append to the chosen sheet and accepts values in the “Datatable” datatype. 

SheetName: * Specify the “SheetName” where the data will be appended. This parameter accepts values in the “String” datatype.

MISC

DisplayName: Displays the name of the activity. The activity name can be customized, which aids in troubleshooting.

SkipOnError: Specify the “Boolean” value as “True” or “False.”
True: Continue executing the workflow regardless of any errors thrown.
False: Halt the workflow if it encounters any errors.
None: If the option is left blank, the activity will, by default, behave as if “False” were chosen.

Version: It indicates the version of the feature being used.

OUTPUT

Result: This parameter allows you to view the execution status of the activity and returns a value in “Boolean”.
True: Indicates that the activity has been executed successfully without any errors.
False: Indicates that the activity has been unsuccessful due to an unexpected error being thrown.

* Represents mandatory fields to execute the workflow.

8.4.3 AutoFillRange

This activity allows users to automatically fill specified ranges in an Excel sheet, including predefined formulas. It operates within the Excel Scope activity.

Properties

INPUT

Destination Range: *Specify the “range” where the data should be auto filled in the designated sheet. This parameter accepts values in the “String” data type. 

Sheet Name: *Specify the “SheetName” where the data needs to be processed. This parameter accepts values in the “String” datatype.”

Source Range: *Specify the source range from which the values will be copied. The input for this range must be provided in the “String” data type.

MISC

DisplayName: Displays the name of the activity. The activity name can be customized, which aids in troubleshooting.

SkipOnError: Specify the “Boolean” value as “True” or “False.”
True: Continue executing the workflow regardless of any errors thrown.
False: Halt the workflow if it encounters any errors.
None: If the option is left blank, the activity will, by default, behave as if “False” were chosen.

Version: It indicates the version of the feature being used.

OUTPUT

Result: This parameter allows you to view the execution status of the activity and returns a value in “Boolean.”
True: Indicates that the activity has been executed successfully without any errors.
False: Indicates that the activity has been unsuccessful due to an unexpected error being thrown.

* Represents mandatory fields to execute the workflow.

Utilization of AutoFillRange

Download the sample excel sheet. 

1. To fill a range with a single cell value:

For example, let’s say we have a column titled “Remarks,” and we want to auto-fill it with the value “20.”

Steps:
a. Add the “AutoFill Range” activity, ensuring it is used within the “Excel Scope.”
b. Specify the “Source Range” as C3.
c. Specify the “Destination Range” as C3:C10.
d. Provide the sheet name and execute the activity.

Result: The range C3:C10 will be auto filled with the value 20.

2. To auto-fill a range with a predefined formula for incrementing values:

For example, let’s say we have a column titled “Remarks,” and we want to increment values across the range. (Refer to the attached sheet.)

Steps:
a. Add the “AutoFill Range” activity, ensuring it is used within the “Excel Scope.”
b. Specify the “Source Range” as C2:C10.
c. Specify the “Destination Range” as C2:C10.
d. Provide the sheet name and execute the activity.

Result: The range C2:C10 will be auto filled with incremented values based on the predefined formula.

8.4.4 Change Pivot Data Source

This activity allows users to update or modify the data source of an existing Pivot Table. It is used when the underlying data range, worksheet, or datatable has changed and the Pivot Table needs to reflect the updated source data. It must be used within the Excel Scope activity.

Properties

Input

Source Sheet Name: * Specifies the name of the worksheet where the existing Pivot Table is located. It accepts values of the String data type.

Pivot Table Name: * Specifies the name of the Pivot Table which needs to be updated. It accepts values of the String data type.

New Source Sheet Name: * Specifies the name of the worksheet from which the new data should be fetched to update the existing Pivot Table. It accepts values of the String data type.

Range: * Specifies the data range from the new source sheet to be used for updating the existing Pivot Table. It accepts values of the String data type.

MISC

DisplayName: Displays the name of the activity. The activity name can be customized, which aids in troubleshooting.

SkipOnError: Specify the “Boolean” value as “True” or “False.”
True: Continue executing the workflow regardless of any errors thrown.
False: Halt the workflow if it encounters any errors.
None: If the option is left blank, the activity will, by default, behave as if “False” were chosen.

Version: It indicates the version of the feature being used.

OUTPUT

Result: This parameter allows you to view the execution status of the activity and returns a value in “Boolean.”
True: Indicates that the activity has been executed successfully without any errors.
False: Indicates that the activity has been unsuccessful due to an unexpected error being thrown.

* Represents mandatory fields to execute the workflow.

8.4.5 Change Data Range

This activity can be used only within the Update Chart scope. It helps the user to update the data range for the existing chart created in the excel sheet.

Properties

INPUT

Range: *Specify the “Range” to read the data in the specified excel sheet, and it accepts values in the “String” datatype.

MISC

DisplayName: Displays the name of the activity. The activity name can be customized, which aids in troubleshooting.

SkipOnError: Specify the “Boolean” value as “True” or “False.”
True: Continue executing the workflow regardless of any errors thrown.
False: Halt the workflow if it encounters any errors.
None: If the option is left blank, the activity will, by default, behave as if “False” were chosen.

Version: It indicates the version of the feature being used.

OUTPUT

Result: This parameter allows you to view the execution status of the activity and returns a value in “Boolean.”
True: Indicates that the activity has been executed successfully without any errors.
False: Indicates that the activity has been unsuccessful due to an unexpected error being thrown.

* Represents mandatory fields to execute the workflow. 

8.4.6 ClearWorksheet

This activity enables the user to clear data from a specific worksheet. It operates within the Excel Scope activity.

Properties

INPUT

SheetName: *Specify the “SheetName” to clear the data from the worksheet, and it accepts values in the “String” datatype.”

MISC

DisplayName: Displays the name of the activity. The activity name can be customized, which aids in troubleshooting.

SkipOnError: Specify the “Boolean” value as “True” or “False.”
True: Continue executing the workflow regardless of any errors thrown.
False: Halt the workflow if it encounters any errors.
None: If the option is left blank, the activity will, by default, behave as if “False” were chosen.

Version: It indicates the version of the feature being used.

OUTPUT

Result: This parameter allows you to view the execution status of the activity and returns a value in “Boolean”.
True: Indicates that the activity has been executed successfully without any errors.
False: Indicates that the activity has been unsuccessful due to an unexpected error being thrown.

* Represents mandatory fields to execute the workflow.

8.4.7 CreateWorksheet

This activity helps the user to create a new worksheet. It functions within the Excel Scope activity.

Properties

INPUT

SheetName:  *Specify the “SheetName” to create the worksheet and it accepts values in the “String” datatype.”

MISC

DisplayName: Displays the name of the activity. The activity name can be customized, which aids in troubleshooting.

SkipOnError: Specify the “Boolean” value as “True” or “False.”
True: Continue executing the workflow regardless of any errors thrown.
False: Halt the workflow if it encounters any errors.
None: If the option is left blank, the activity will, by default, behave as if “False” were chosen.

Version: It indicates the version of the feature being used.

OUTPUT

Result: This parameter allows you to view the execution status of the activity and returns a value in “Boolean”.
True: Indicates that the activity has been executed successfully without any errors.
False: Indicates that the activity has been unsuccessful due to an unexpected error being thrown.

* Represents mandatory fields to execute the workflow.

8.4.8 Create Pivot Table

This activity enables users to create a pivot table from a designated table in a specified Excel sheet. It must be used within the ‘Excel Scope’ activity.

Properties

INPUT 

Destination Cell: Specify the exact cell location in the destination sheet where the pivot table should be placed. This parameter accepts input in the String data type (for example, “A1” or “B5”).

Destination Sheet Name: Specify the “Sheet name” where the pivot table should be created from the source table. This parameter accepts input in the String data type.

Layout: Specify the display format of the pivot table by selecting a layout option from the dropdown.
a. Compact Layout: Shows multiple row fields in a single column with indentation to represent hierarchy and save space.
b. Tabular Layout: Displays each row field in its own column, creating a clear table format for analysis.
c. Outline Layout: Displays row fields in separate columns and groups related data together, with subtotals shown for each group.

Overwrite Table Name: Select this checkbox to overwrite an existing pivot table with the same name in the destination sheet. When selected, the existing pivot table is replaced; when cleared, the existing pivot table is retained.

Pivot Table Name: Specify a name for the pivot table to be created. This parameter accepts input in the String data type.

Source Range: Provide the data “Range” from the source sheet to create the pivot table. This parameter accepts values in the String data type (for example, “A1:D100”).

Source Sheet Name: Specify the sheet name from which the pivot table should be created. This parameter accepts input in the String data type.

Values Added As: Specify how the values should be displayed in the pivot table by selecting an option from the dropdown (Columns or Rows).

MISC

DisplayName: Displays the name of the activity. The activity name can be customized, which aids in troubleshooting.

SkipOnError: Specify the “Boolean” value as “True” or “False.”
True: Continue executing the workflow regardless of any errors thrown.
False: Halt the workflow if it encounters any errors.
None: If the option is left blank, the activity will, by default, behave as if “False” were chosen.

Version: It indicates the version of the feature being used.

OUTPUT

Result: This parameter allows you to view the execution status of the activity and returns a value in “Boolean.”
True: Indicates that the activity has been executed successfully without any errors.
False: Indicates that the activity has been unsuccessful due to an unexpected error being thrown.

* Represents mandatory fields to execute the workflow

8.4.9 Create Table

This activity allows users to create a table from the specified range in the Excel sheet. It should be used within the “Excel Scope” activity.

Properties

INPUT

Range: *Provide the “Range” from which the table should be created in the specified sheet. This parameter accepts values in the “String” data type.
Note: If the specified range does not contain any values, a blank table will be created in the sheet.

SheetName: *Specify the “SheetName” where the table needs to be created, and it accepts values in the “String” datatype.

TableName: This parameter indicates to provide a name for the table to be created in “String” datatype. 

MISC

DisplayName: Displays the name of the activity. The activity name can be customized, which aids in troubleshooting.

SkipOnError: Specify the “Boolean” value as “True” or “False.”
True: Continue executing the workflow regardless of any errors thrown.
False: Halt the workflow if it encounters any errors.
None: If the option is left blank, the activity will, by default, behave as if “False” were chosen.

Version: It indicates the version of the feature being used.

OUTPUT

Result: This parameter allows you to view the execution status of the activity and returns a value in “Boolean.”
True: Indicates that the activity has been executed successfully without any errors.
False: Indicates that the activity has been unsuccessful due to an unexpected error being thrown.

* Represents mandatory fields to execute the workflow

8.4.10 Copy Paste Range

This activity enables the user to copy a specified range, including values, tables, cell formats, and formulas, and paste it into a designated sheet. It must be used within the “Excel Scope” activity.

Properties

INPUT

Source SheetName: *Specify the “SheetName” from which the range of values needs to be copied, and it accepts value in “String” datatype.

Source Range:  *Specify the range of cells from the source sheet to be copied and it accepts values in “String” datatype.

Destination Sheet:  *Specify the destination sheet name where the range of values to be pasted and it accepts values in “String” datatype.

Destination Cell:  *Specify the “cell” number from the destination sheet to paste the values and it accepts values in “String” datatype.

Options: This parameter allows you to choose what to be read and copied from the range of values. Select the values from the drop-down, 

Value: Allows to copy and paste only the values from the specified range. 
Formula: Allows to copy and paste values along with their formulas from the specified range.
Number Format: Allows to copy and paste the numeric values along with their number formatting, such as currency, percentage, or decimal places.
Cell Format: Allows to copy and paste the cell formatting, including font styles, background colors, borders, and alignment, without copying the actual cell values or formulas.
All: Allows you to copy and paste everything from the specified range, including values, formulas, number formatting, and cell formatting to the destination sheet.

MISC

DisplayName: Displays the name of the activity. The activity name can be customized, which aids in troubleshooting.

SkipOnError: Specify the “Boolean” value as “True” or “False.”
True: Continue executing the workflow regardless of any errors thrown.
False: Halt the workflow if it encounters any errors.
None: If the option is left blank, the activity will, by default, behave as if “False” were chosen.

Version: It indicates the version of the feature being used.

OUTPUT

Result: This parameter allows you to view the execution status of the activity and returns a value in “Boolean.”
True: Indicates that the activity has been executed successfully without any errors.
False: Indicates that the activity has been unsuccessful due to an unexpected error being thrown.

* Represents mandatory fields to execute the workflow.

8.4.11 DeleteWorksheet

This activity enables the user to delete a specific sheet from an Excel workbook. It operates within the ‘Excel Scope’ activity.

Properties

INPUT

Sheetname: *Specify the “SheetName” where the worksheet to be deleted, and it accepts values in the “String” datatype.”

MISC

Displayname: Displays the name of the activity. The activity name can be customized, which aids in troubleshooting.

SkipOnError: Specify the “Boolean” value as “True” or “False.”
True: Continue executing the workflow regardless of any errors thrown.
False: Halt the workflow if it encounters any errors.
None: If the option is left blank, the activity will, by default, behave as if “False” were chosen.

Version: It indicates the version of the feature being used.

OUTPUT

Result: This parameter allows you to view the execution status of the activity and returns a value in “Boolean.”
True: Indicates that the activity has been executed successfully without any errors.
False: Indicates that the activity has been unsuccessful due to an unexpected error being thrown.

* Represents mandatory fields to execute the workflow.

8.4.12 DeleteRange

This activity deletes a specific range of cells from a specified Excel sheet and operates within the “Excel Scope” activity.

Properties

INPUT

Range: *Provide the “Range” from the Excel sheet to be deleted. This parameter accepts values in the “String” data type.

SheetName: *Provide the “SheetName” to delete the range. This parameter accepts values in the “String” data type.

MISC

DisplayName: Displays the name of the activity. The activity name can be customized, which aids in troubleshooting.

SkipOnError: Specify the “Boolean” value as “True” or “False.”
True: Continue executing the workflow regardless of any errors thrown.
False: Halt the workflow if it encounters any errors.
None: If the option is left blank, the activity will, by default, behave as if “False” were chosen.

Version: It indicates the version of the feature being used.

OUTPUT

Result: This parameter allows you to view the execution status of the activity and returns a value in “Boolean.”
True: Indicates that the activity has been executed successfully without any errors.
False: Indicates that the activity has been unsuccessful due to an unexpected error being thrown.

* Represents mandatory fields to execute the workflow

8.4.13 Delete Table Column

This activity helps the user to delete the column from the specified table in the excel sheet. It must be utilized within the “Excel Scope” activity. 

Properties

INPUT

ColumnName: *Specify the name of the column to be deleted from the table and it accepts the values in “String” datatype. 

SheetName: *Specify the “SheetName” where the column to be deleted from the table, and it accepts values in the “String” datatype. 

TableName: *Specify the name of the table where the column to be deleted, and it accepts values in the “String” datatype. 

MISC

DisplayName: Displays the name of the activity. The activity name can be customized, which aids in troubleshooting.

SkipOnError: Specify the “Boolean” value as “True” or “False.”
True: Continue executing the workflow regardless of any errors thrown.
False: Halt the workflow if it encounters any errors.
None: If the option is left blank, the activity will, by default, behave as if “False” were chosen.

Version: It indicates the version of the feature being used.

OUTPUT

Result: This parameter allows you to view the execution status of the activity and returns a value in “Boolean.”
True: Indicates that the activity has been executed successfully without any errors.
False: Indicates that the activity has been unsuccessful due to an unexpected error being thrown.

* Represents mandatory fields to execute the workflow.

8.4.14 Duplicate Sheet

This activity allows users to create a duplicate of an existing sheet within an Excel workbook. It operates within the ‘Excel Scope’ activity.

Properties

Input

Sheet to Duplicate: *Specifies the name of the sheet to be duplicated from the existing workbook. Accepts values in String datatype.

Rename To: *Specifies the new name for the duplicated sheet. Accepts values in String datatype.

MISC

Display Name: Displays the name of the activity. The activity name can be customized, which aids in troubleshooting.

SkipOnError: Specify the “Boolean” value as “True” or “False.”

True: Continue executing the workflow regardless of any errors thrown.
False: Halt the workflow if it encounters any errors.
None: If the option is left blank, the activity will, by default, behave as if “False” were chosen.

Version: It indicates the version of the feature being used.

Output

Result: This parameter allows you to view the execution status of the activity and returns a value in “Boolean.”

True: Indicates that the activity has been executed successfully without any errors.
False: Indicates that the activity has been unsuccessful due to an unexpected error being thrown.

* Represents mandatory fields to execute the workflow.

8.4.15 ExcelToDatatable

This activity helps the user to convert the “Excel” sheet into “Datatable” format. It functions within the Excel scope activity.

Properties

INPUT

IncludeColumnHeader:Include the “Column Headers” from the Excel sheet when converting the data to the “DataTable” data type. If left blank, column headers will not be included in the conversion.

Sheet Name: *Provide the “SheetName” from which the data is to be converted. This parameter accepts values in the “String” data type.

MISC

DisplayName: Displays the name of the activity. The activity name can be customized, which aids in troubleshooting.

SkipOnError: Specify the “Boolean” value as “True” or “False.”
True: Continue executing the workflow regardless of any errors thrown.
False: Halt the workflow if it encounters any errors.
None: If the option is left blank, the activity will, by default, behave as if “False” were chosen.

Version: It indicates the version of the feature being used.

OUTPUT

Datatable: *It helps to view the output as converted sheet in “Datatable” format and returns the values in “Datatable” datatype.

Result: This parameter allows you to view the execution status of the activity and returns a value in “Boolean.”
True: Indicates that the activity has been executed successfully without any errors.
False: Indicates that the activity has been unsuccessful due to an unexpected error being thrown.

* Represents mandatory fields to execute the workflow.

8.4.16 ExecuteMacro

This activity allows the user to execute a pre-existing “Macro” method in the specified Excel file. It operates within the “Excel Scope” activity and requires the file format to be “.xlsm”.

Properties

INPUT

MethodName: *Provide the “Macro” method name from the Excel sheet. This parameter accepts values in the “String” data type.

MISC

DisplayName: Displays the name of the activity. The activity name can be customized, which aids in troubleshooting.

SkipOnError: Specify the “Boolean” value as “True” or “False.”
True: Continue executing the workflow regardless of any errors thrown.
False: Halt the workflow if it encounters any errors.
None: If the option is left blank, the activity will, by default, behave as if “False” were chosen.

Version: It indicates the version of the feature being used.

OUTPUT

Result: This parameter allows you to view the execution status of the activity and returns a value in “Boolean.”
True: Indicates that the activity has been executed successfully without any errors.
False: Indicates that the activity has been unsuccessful due to an unexpected error being thrown.

* Represents mandatory fields to execute the workflow. 

What is “Macro” method and why is it needed?

In Excel, the term “macro” refers to a recorded sequence of actions or a set of Visual Basic for Applications (VBA) code that automates tasks.

Benefits:

1. Macros can automate repetitive tasks in Excel, such as data formatting, calculations, or data import/export. 
2. It is useful for performing complex calculations or data manipulations that may be impractical or error-prone to do manually.
3. It can create user interfaces (forms or dialog boxes) to interact with Excel users, making it easier for non-technical users to perform specific tasks.

How to create “Macro” in Excel sheet?

1. Open or create a blank excel sheet.
2. Now, select the “View” menu on the top of the sheet.
a. Here, you will find the “Macro’s” as the last option on the Menu.
3. Select the “Macro’s” drop-down menu, it will display a context menu.
a. Here we are going to choose the “View Macros” from the drop-down.
b. You can also record the steps that needs to be automated using the “Record Macro” option and provide the name in the “ExecuteMacro” activity.
4. Once you click on the “View Macros” option, a dialog box will appear on the screen.
a. Here, provide a name for the “Macro” in the box as “Welcome Message”.
b. Now, the “Create” option will be enabled, click on it to write the code.
c. The VBA code window appears on the screen.
d. Here I am providing a sample VBA code as “MsgBox “Hello Everyone! Welcome to Robility !””.
e. Now, save “Excel with macro enabled workbook extension” and close it.
5. That’s it, a simple Macro code has been created. 

8.4.17 ExcelScope

The “ExcelScope” activity serves as the scope for all other activities within this feature. All the functionalities which include creating new data, inserting content, deleting entries, extracting the data, writing data, and executing macro functions will be performed within this scope.

The Excel application should be closed during the runtime. 

Properties

INPUT

CreateNewWorkbook: Indicates whether to create a new workbook at runtime. You can check this box if required. If left unchecked, it will not be applied.

ExcelPath: *Specifies the “Path” of the Excel file for automation. To select the file, click the three dots next to “FilePath” in the activity. Alternatively, you can hardcode the path in a “String” variable or manually enter it as a “String” value. 

Password: Provide the “Password” to securely access the specified Excel sheet at runtime. This field accepts values in the “String” data type.

MISC

Body: Gets auto filled once the “Activity” is dropped into the body.

DisplayName: Displays the name of the activity. The activity name can be customized, which aids in troubleshooting.

SkipOnError: Specify the “Boolean” value as “True” or “False.”
True: Continue executing the workflow regardless of any errors thrown.
False: Halt the workflow if it encounters any errors.
None: If the option is left blank, the activity will, by default, behave as if “False” were chosen.

Version: It indicates the version of the feature being used.

*Represents Mandatory field to execute the workflow. 

8.4.18 Filter Pivot Table

This activity allows users to apply filters to a specified Pivot Table by selecting one column (field) names. It is used to refine and display only the required data within the Pivot Table. It must be used within the “Excel Scope” activity.

Properties

Input

Sheet Name: *Specifies the name of the worksheet where the Pivot Table is located. It accepts values of the String data type.

Pivot Table Name: *Specifies the name of the Pivot Table within the selected sheet that needs to be filtered. It accepts values of the String data type.

Column Name: *Specifies the name of the Pivot Table column to apply the filter, along with the condition defined in the configuration.

MISC

DisplayName: Displays the name of the activity. The activity name can be customized, which aids in troubleshooting.

SkipOnError: Specify the “Boolean” value as “True” or “False.”
True: Continue executing the workflow regardless of any errors thrown.
False: Halt the workflow if it encounters any errors.
None: If the option is left blank, the activity will, by default, behave as if “False” were chosen.

Version: It indicates the version of the feature being used.

Options

Configure Filter: Enables configuring a filter condition where the selected column value is matched against the specified value.

Disable filter: Removes the applied filter from the selected column.

OUTPUT

Result: This parameter allows you to view the execution status of the activity and returns a value in “Boolean.”
True: Indicates that the activity has been executed successfully without any errors.
False: Indicates that the activity has been unsuccessful due to an unexpected error being thrown.

* Represents mandatory fields to execute the workflow.

8.4.19 Filter Table

This activity allows users to filter table values based on a specified column in an Excel sheet. It must be used within the “Excel Scope” activity. 

Properties

INPUT

Sheet Name: *Specify the sheet name where the filter options will be applied to the specified table. This field accepts values in the “String” data type, which can either be hardcoded or assigned to a “String” variable.

Table Name: *Specify the name of the table where the filter options will be applied. This field accepts values in the “String” data type, which can be either hardcoded or assigned to a “String” variable.

Column Name: *Specify the name of the column to apply the filter options. This field accepts values in the “String” data type, which can be either hardcoded or assigned to a “String” variable.

FilterOptions: *Provide the filter options to be applied to the specified column. This parameter accepts values in the “Array of String” data type, which can be either hardcoded or assigned to an array of “String” variables.
Note: You can specify a single filter value or multiple values, e.g., {“100”, “150”}.
 

MISC

DisplayName: Displays the name of the activity. The activity name can be customized, which aids in troubleshooting.

SkipOnError: Specify the “Boolean” value as “True” or “False.”
True: Continue executing the workflow regardless of any errors thrown.
False: Halt the workflow if it encounters any errors.
None: If the option is left blank, the activity will, by default, behave as if “False” were chosen.

Version: It indicates the version of the feature being used.

OUTPUT

Result: This parameter allows you to view the execution status of the activity and returns a value in “Boolean.”
True: Indicates that the activity has been executed successfully without any errors.
False: Indicates that the activity has been unsuccessful due to an unexpected error being thrown.

* Represents mandatory fields to execute the workflow

8.4.20 Find Or Replace Value

This activity allows users to search for a specified value in an Excel sheet and replace it with another value. It must be used within the Excel Scope activity.

Properties

INPUT

Look In: Specifies the option to search within the provided range in the sheet.
Available options:

1. Values
2. Formulas

Match Case: Ensures that the search matches the case (uppercase or lowercase) of the provided value exactly.

Match Entire Cell Contents: Enables matching the entire cell content instead of partial matches.

Operation: Specifies the operation to be performed in the Excel sheet.
Available options:

a. Find: Finds and returns the first matching cell value.
b. Find All: Finds and returns all matching cell values.
c. Replace: Finds and replaces the first matching cell value.
d. Replace All: Finds and replaces all matching cell values.

Range: *Specifies the range in the Excel sheet where the operation should be performed. Accepts values in String datatype.

Replace With: *Specifies the value to replace the found text with. This parameter is applicable only when Replace or Replace All is selected. Accepts values in String datatype.

Sheet Name: *Specifies the sheet name where the operation is to be performed. Accepts values in String datatype.

Value to Find: *Specifies the input value to be searched within the Excel sheet. Accepts values in String datatype.

MISC

Display Name: Displays the name of the activity. The activity name can be customized, which aids in troubleshooting.

SkipOnError: Specify the “Boolean” value as “True” or “False.”

True: Continue executing the workflow regardless of any errors thrown.
False: Halt the workflow if it encounters any errors.
None: If the option is left blank, the activity will, by default, behave as if “False” were chosen.

Version: It indicates the version of the feature being used.

Output

Found At: Returns the output as the cell value where the operation has been performed in String datatype.

Result: This parameter allows you to view the execution status of the activity and returns a value in “Boolean.”

True: Indicates that the activity has been executed successfully without any errors.
False: Indicates that the activity has been unsuccessful due to an unexpected error being thrown.

* Represents mandatory fields to execute the workflow.

8.4.21 Get Chart

This activity allows users to retrieve an existing chart from a specified worksheet in an Excel file and either save it as an image or copy it to the clipboard. It must be used within the Excel Scope activity.

Properties

Input

Action: Specifies the action to be performed when retrieving the chart.

a. Save as picture
b. Copy to clipboard

Chart Name: *Specifies the name of the chart to be retrieved from the worksheet. It accepts values of the String data type.

Sheet Name: *Specifies the name of the worksheet where the chart is located. It accepts values of the String data type.

File name: Specifies the full file path and name (including extension) where the chart image should be saved. This option is enabled only when Save as picture is selected.

Replace existing file: When enabled, the existing file with the same name will be replaced.

MISC

DisplayName: Displays the name of the activity. The activity name can be customized, which aids in troubleshooting.

SkipOnError: Specify the “Boolean” value as “True” or “False.”
True: Continue executing the workflow regardless of any errors thrown.
False: Halt the workflow if it encounters any errors.
None: If the option is left blank, the activity will, by default, behave as if “False” were chosen.

Version: It indicates the version of the feature being used.

OUTPUT

Result: This parameter allows you to view the execution status of the activity and returns a value in “Boolean.”
True: Indicates that the activity has been executed successfully without any errors.
False: Indicates that the activity has been unsuccessful due to an unexpected error being thrown.

* Represents mandatory fields to execute the workflow.

8.4.22 Get Table Range

This activity allows the user to retrieve the range of a table or pivot table from a specified Excel sheet. It must be used within the “Excel Scope” activity.

Properties

INPUT

Sheet Name: *Specify the sheet name from which the table range should be retrieved, and it accepts values in String datatype, either hardcode the value or assign it to a variable of the String datatype.

Table Name: *Specify the name of the table to extract the range and it accepts values in String datatype, either hardcode the value or assign it to a variable of the String datatype.

OPTIONS 

IsPivot: This parameter lets you specify if the table is a pivot table. By default, this option is not selected.

MISC

DisplayName: Displays the name of the activity. The activity name can be customized, which aids in troubleshooting.

SkipOnError: Specify the “Boolean” value as “True” or “False.”
True: Continue executing the workflow regardless of any errors thrown.
False: Halt the workflow if it encounters any errors.
None: If the option is left blank, the activity will, by default, behave as if “False” were chosen.

Version: It indicates the version of the feature being used.

OUTPUT

Range: It provides the result of the range retrieved from the specified sheet and returns values in “String” datatype. 

Result: This parameter allows you to view the execution status of the activity and returns a value in “Boolean.”
True: Indicates that the activity has been executed successfully without any errors.
False: Indicates that the activity has been unsuccessful due to an unexpected error being thrown.

* Represents mandatory fields to execute the workflow

8.4.23 Get Selected Range

This activity helps the user to retrieve the range from the selected range of cells. It must be utilized within the “Excel Scope” activity.

Properties

MISC

DisplayName: Displays the name of the activity. The activity name can be customized, which aids in troubleshooting.

SkipOnError: Specify the “Boolean” value as “True” or “False.”
True: Continue executing the workflow regardless of any errors thrown.
False: Halt the workflow if it encounters any errors.
None: If the option is left blank, the activity will, by default, behave as if “False” were chosen.

Version: It indicates the version of the feature being used.

OUTPUT

Result: This parameter allows you to view the execution status of the activity and returns a value in “Boolean.”
True: Indicates that the activity has been executed successfully without any errors.
False: Indicates that the activity has been unsuccessful due to an unexpected error being thrown.

Range: It allows you to view the range extracted from the excel sheet and returns the value in “String” datatype. 

8.4.24 InvokeVBA

This activity enables the user to execute custom VBA code directly within an Excel sheet. It must be used within the “Excel Scope” activity and supports execution in both “.xls” and “.xlsx” file formats.

Pre-requisites

This activity allows the execution of VB script only if access is enabled in the Excel sheet. Follow the steps below to enable it:
1. Open Excel and navigate to File → Options → Trust Center → Trust Center Settings.
2. Under Macro Settings, select the checkbox for Trust Access to the VBA project object model.
Ensure this setting is enabled before using the activity.

Properties

Input

VBScriptPath: *Indicates to provide the VB script path and it accepts values in “String” datatype. You can either hardcode the values or use a variable of the “String” datatype. 

MethodName: *Specify the “Method name” from the script to be called and execute the functionality. It accepts values in “String” datatype, either hardcode the values or use a variable of the “String” datatype. 

MethodParameters: This parameter specifies the input arguments to be provided for the specified method name.

MISC

DisplayName: Displays the name of the activity. The activity name can be customized, which aids in troubleshooting.

SkipOnError: Specify the “Boolean” value as “True” or “False.”
True: Continue executing the workflow regardless of any errors thrown.
False: Halt the workflow if it encounters any errors.
None: If the option is left blank, the activity will, by default, behave as if “False” were chosen.

Version: It indicates the version of the feature being used.

OUTPUT

Result: This parameter allows you to view the execution status of the activity and returns a value in “Boolean”.
True: Indicates that the activity has been executed successfully without any errors.
False: Indicates that the activity has been unsuccessful due to an unexpected error being thrown.

Output: This parameter allows you to view the output of the script execution and result from the script. 

* Represents mandatory fields to execute the workflow.

Example 

In the following example, the “Invoke VBA” activity is utilized to highlight the text based on the length in the provided sheet. Here we are highlighting the text value that exceeds more than 10 characters in red in the sheet. Refer the attached sample VBS code. 

HighlightText VB script

Note: Download the above VBS code and save it as “.vbs” extension type. 

1. Drag and drop the “Excel Scope” activity into the workflow and choose the downloaded excel sheet path to automate. 
2. Add the “InvokeVBA” activity within the body of the excel scope.
a. Now, choose the downloaded “VB script path”. 
b. Enter the method name as “HighlightLongTextWithParams”. Refer the attached code. 
3. Before moving to the “Method parameters”, create 2 variables as below. 
a. SheetName with “String” as datatype to provide the sheet name. 
b.  TextLength as “Integer” as dataype to provide the length as “10”.
c. Now, add these values to the “MethodParameters” property. 
4. Save and execute the workflow. 

8.4.25 InsertandDeleteColumn

This activity allows the user to add or delete the number of specified columns from the specified excel sheet. It must be used within the “Excel Scope” activity.

Properties

INPUT

Action: Indicates to choose the action from the drop-down.
Insert: Helps to insert number of specified columns in the specified sheet.
Delete: Helps to delete the number of specified columns from the sheet.

By default, it will be configured to “Insert” option.

NumberOfColumns: *Specify the number of columns to be added or deleted in the provided sheet. This parameter accepts values in the “Integer” data type, which can be either hardcoded in an “Integer” variable or directly entered as an “Integer” value

SheetName: *Specify the “SheetName” to insert/delete the column, and it accepts values in the “String” datatype.”

StartingColumn: *Specify the “Position” of the column to insert/ delete from the provided sheet. The index position of the column begins from “0” and it accepts values in “Integer” datatype. 

MISC

DisplayName: Displays the name of the activity. The activity name can be customized, which aids in troubleshooting.

SkipOnError: Specify the “Boolean” value as “True” or “False.”
True: Continue executing the workflow regardless of any errors thrown.
False: Halt the workflow if it encounters any errors.
None: If the option is left blank, the activity will, by default, behave as if “False” were chosen.

Version: It indicates the version of the feature being used.

OUTPUT

Result: This parameter allows you to view the execution status of the activity and returns a value in “Boolean.”
True: Indicates that the activity has been executed successfully without any errors.
False: Indicates that the activity has been unsuccessful due to an unexpected error being thrown.

* Represents mandatory fields to execute the workflow.

8.4.26 InsertandDeleteRow

This activity allows the user to add or delete the number of specified rows from the sheet. It must be used within the “Excel Scope” activity.

Properties

INPUT

Action: Indicates to choose the action from the drop-down.
Insert: Helps to insert number of specified rows in the specified sheet.
Delete: Helps to delete the number of specified rows from the specified sheet.  

By default, it will be configured to “Insert” option.

NumberOfRows: *Specify the number of rows to be added or deleted in the provided sheet. This parameter accepts values in the “Integer” data type, which can be either hardcoded in an “Integer” variable or directly entered as an “Integer” value. 

SheetName: *Specify the “SheetName” to insert/delete the rows. This parameter accepts values in the “String” datatype.”

Starting Of Row: *Specify the “Position” of the row to insert/ delete from the provided sheet. The index position of the row begins from “0” and it accepts values in “Integer” datatype. 

MISC

DisplayName: Displays the name of the activity. The activity name can be customized, which aids in troubleshooting.

SkipOnError: Specify the “Boolean” value as “True” or “False.”
True: Continue executing the workflow regardless of any errors thrown.
False: Halt the workflow if it encounters any errors.
None: If the option is left blank, the activity will, by default, behave as if “False” were chosen.

Version: It indicates the version of the feature being used.

OUTPUT

Result: This parameter allows you to view the execution status of the activity and returns a value in “Boolean.”
True: Indicates that the activity has been executed successfully without any errors.
False: Indicates that the activity has been unsuccessful due to an unexpected error being thrown.

Represents mandatory fields to execute the workflow.

8.4.27 Insert Table Column

This activity helps the user to add a new column to the specified table in the excel sheet. It must be utilized within “Excel Scope” activity. 

Properties

INPUT

ColumnName: *Specify the name of the column to be created in the table and it accepts the values in “String” datatype. 

Position: Specify the position where the column needs to be inserted in the table. It accepts ‘Integer’ values, which can be hardcoded or provided from an “Integer” variable.
If left blank, the column will be inserted at the end of the table. 

SheetName: *Specify the “SheetName” where the column needs to be inserted in the table, and it accepts values in the “String” datatype. 

TableName: *Specify the name of the table where the column needs to be created, and it accepts values in the “String” datatype. 

MISC

DisplayName: Displays the name of the activity. The activity name can be customized, which aids in troubleshooting.

SkipOnError: Specify the “Boolean” value as “True” or “False.”
True: Continue executing the workflow regardless of any errors thrown.
False: Halt the workflow if it encounters any errors.
None: If the option is left blank, the activity will, by default, behave as if “False” were chosen.

Version: It indicates the version of the feature being used.

OUTPUT

Result: This parameter allows you to view the execution status of the activity and returns a value in “Boolean.”
True: Indicates that the activity has been executed successfully without any errors.
False: Indicates that the activity has been unsuccessful due to an unexpected error being thrown.

* Represents mandatory fields to execute the workflow.

8.4.28 Insert Chart

This activity allows users to generate a chart in an Excel sheet based on the selected data range. It must be used within the “Excel Scope” activity.

Properties

INPUT

Chart Category*: Specifies the chart category to be generated. Available options include:

• Area

• Bar

• Column

• Line

• Pie

• Scatter

Chart Type*: Specifies the chart type within the selected category. Examples include:

• Stacked Bar

• Clustered Bar

• 100% Stacked Bar

Sheet Name*: Indicates the name of the sheet containing the data and accepts input value of String datatype.

Data Range*: Specifies the data range from the sheet that will be used to create the chart and accepts the input value of String datatype.

Insert Into Sheet*: Specifies the sheet where the generated chart should be inserted and accepts the input value of String datatype.

Chart Name: Specifies to provide the name for the chart being created and accepts the input value of String datatype.

Height: Specifies the height of the chart and accepts an Int32 value.

Width: Specifies the width of the chart and accepts an Int32 value.

Left: Indicates the starting column position in the sheet where the chart will be placed and it accepts values in Int32 datatype. Position starts from 0.

Right: Specifies the starting row position in the sheet where the chart will be placed and accepts values in Int32 datatype. Position starts from 0.

MISC

DisplayName: Displays the name of the activity. The activity name can be customized, which aids in troubleshooting.

SkipOnError: Specify the “Boolean” value as “True” or “False.”
True: Continue executing the workflow regardless of any errors thrown.
False: Halt the workflow if it encounters any errors.
None: If the option is left blank, the activity will, by default, behave as if “False” were chosen.

Version: It indicates the version of the feature being used.

OUTPUT

Inserted Chart Name: Returns the name of the chart created in String datatype.

Result: This parameter allows you to view the execution status of the activity and returns a value in “Boolean.”
True: Indicates that the activity has been executed successfully without any errors.
False: Indicates that the activity has been unsuccessful due to an unexpected error being thrown.

* Represents mandatory fields to execute the workflow

8.4.29 Lookup Range

This activity searches for a specific value within a range in the specified sheet and returns the corresponding cell value. It functions within the “Excel Scope” activity.

Properties

INPUT

SheetName: *Specify the “SheetName” from where the value needs to be found, and it accepts values in the “String” datatype. 

Range:  *Specify the range of values to be read from the specified sheet and it accepts values in the “String” datatype. 

Value: *Specify the input “value” to be found within the defined range, and it accepts values in “String” datatype. 

MISC

DisplayName: Displays the name of the activity. The activity name can be customized, which aids in troubleshooting.

SkipOnError: Specify the “Boolean” value as “True” or “False.”
True: Continue executing the workflow regardless of any errors thrown.
False: Halt the workflow if it encounters any errors.
None: If the option is left blank, the activity will, by default, behave as if “False” were chosen.

Version: It indicates the version of the feature being used.

OUTPUT

Result: This parameter allows you to view the execution status of the activity and returns a value in “Boolean.”
True: Indicates that the activity has been executed successfully without any errors.
False: Indicates that the activity has been unsuccessful due to an unexpected error being thrown.

CellValue: This parameter allows you to view the cell reference value where the specified text is found and returns the value in “String” datatype. 

* Represents mandatory fields to execute the workflow.

8.4.30 ListToExcel

This activity helps the user to provide the values in list format to insert in the specified sheet. It must be used within the “Excel Scope” activity.

Properties

INPUT

Cell: *Indicates to provide the “Cell” reference to write the data and it accepts values in the “String” datatype.

ListData: *Indicates to provide the “List of data” to be inserted in the specified sheet and it accepts values in the “List Of String” datatype. 

SheetName: *Indicates to provide the “SheetName” to insert the data, and it accepts values in the “String” datatype.”

MISC

DisplayName: Displays the name of the activity. The activity name can be customized, which aids in troubleshooting.

SkipOnError: Specify the “Boolean” value as “True” or “False.”
True: Continue executing the workflow regardless of any errors thrown.
False: Halt the workflow if it encounters any errors.
None: If the option is left blank, the activity will, by default, behave as if “False” were chosen.

Version: It indicates the version of the feature being used.

OUTPUT

Result: This parameter allows you to view the execution status of the activity and returns a value in “Boolean.”
True: Indicates that the activity has been executed successfully without any errors.
False: Indicates that the activity has been unsuccessful due to an unexpected error being thrown.

* Represents mandatory fields to execute the workflow

8.4.31 ReadCell

This activity reads and extracts data from a specified cell in the specified sheet. It functions within the “Excel Scope” activity. 

Properties

INPUT

Cell: *Specify the “Cell” reference value to read the data from it, and it accepts values in the “String” datatype.

Sheet Name: *Specify the “Sheet Name” to read the data, and it accepts values in the “String” datatype.”

MISC

DisplayName: Displays the name of the activity. The activity name can be customized, which aids in troubleshooting.

SkipOnError: Specify the “Boolean” value as “True” or “False.”
True: Continue executing the workflow regardless of any errors thrown.
False: Halt the workflow if it encounters any errors.
None: If the option is left blank, the activity will, by default, behave as if “False” were chosen.

Version: It indicates the version of the feature being used.

OUTPUT

Result: This parameter allows you to view the execution status of the activity and returns a value in “Boolean.”
True: Indicates that the activity has been executed successfully without any errors.
False: Indicates that the activity has been unsuccessful due to an unexpected error being thrown.

Text: It helps to view the output as the extracted value from the specified cell in “String” datatype. 

* Represents mandatory fields to execute the workflow.

8.4.32 ReadCellFormula

This activity helps the user to read and extract the formula from the specified cell. It functions within the “Excel Scope” activity.

Properties

INPUT

Cell: *Specify the “Cell” reference value to read the formula from it, and it accepts values in the “String” datatype.

Sheet Name: *Specify the “SheetName” to read the formula, and it accepts values in the “String” datatype.”

MISC

DisplayName: Displays the name of the activity. The activity name can be customized, which aids in troubleshooting.

SkipOnError: Specify the “Boolean” value as “True” or “False.”
True: Continue executing the workflow regardless of any errors thrown.
False: Halt the workflow if it encounters any errors.
None: If the option is left blank, the activity will, by default, behave as if “False” were chosen.

Version: It indicates the version of the feature being used.

OUTPUT

Formula: It helps to view the output as the extracted formula from the specified cell in “String” datatype. 

Result: This parameter allows you to view the execution status of the activity and returns a value in “Boolean.”
True: Indicates that the activity has been executed successfully without any errors.
False: Indicates that the activity has been unsuccessful due to an unexpected error being thrown.

* Represents mandatory fields to execute the workflow.

8.4.33 ReadRange

This activity helps the user to read and extract the range of values from the specified sheet. It functions within the “Excel Scope” activity.

Properties

INPUT

Range: *Specify the “Range” to read the data in the specified excel sheet, and it accepts values in the “String” datatype.

Sheet Name: *Specify the “SheetName” to read the data, and it accepts values in the “String” datatype.”

MISC

AutomaticCalculations: This parameter helps you to perform “Automatic calculations” if any formulas are available in the excel sheet. If left unchecked, it will not be considered.

DisplayName: Displays the name of the activity. The activity name can be customized, which aids in troubleshooting.

IncludeColumnHeader: Include the “Column Headers” from the Excel sheet when extracting the data. If left blank, column headers will not be included.

SkipOnError: Specify the “Boolean” value as “True” or “False.”
True: Continue executing the workflow regardless of any errors thrown.
False: Halt the workflow if it encounters any errors.
None: If the option is left blank, the activity will, by default, behave as if “False” were chosen.

Version: It indicates the version of the feature being used.

OUTPUT

Datatable: *It helps to view the output as extracted range in “Datatable” datatype. 

Result: This parameter allows you to view the execution status of the activity and returns a value in “Boolean.”
True: Indicates that the activity has been executed successfully without any errors.
False: Indicates that the activity has been unsuccessful due to an unexpected error being thrown.

 * Represents mandatory fields to execute the workflow.

8.4.34 ReadColumn

This activity reads and extracts the specified column value from the specified sheet. It functions within the “Excel Scope” activity.

Properties

INPUT

Include Column Headers: *Include the “Column Headers” from the Excel sheet when extracting the data. If left blank, column headers will not be included. 

Sheet Name: *Specify the “Sheet Name” to read the data and it accepts values in the “String” datatype.”

Start Column: *Specify the “Position” of the column to read the data from the provided sheet. The index position of the column begins from “0” and it accepts values in “Integer” datatype. 

MISC

DisplayName: Displays the name of the activity. The activity name can be customized, which aids in troubleshooting.

SkipOnError: Specify the “Boolean” value as “True” or “False.”
True: Continue executing the workflow regardless of any errors thrown.
False: Halt the workflow if it encounters any errors.
None: If the option is left blank, the activity will, by default, behave as if “False” were chosen.

Version: It indicates the version of the feature being used.

OUTPUT

Datatable: *It helps to view the output as extracted range in “Datatable” datatype. 

Result: This parameter allows you to view the execution status of the activity and returns a value in “Boolean.”
True: Indicates that the activity has been executed successfully without any errors.
False: Indicates that the activity has been unsuccessful due to an unexpected error being thrown.

* Represents mandatory fields to execute the workflow.

8.4.35 ReadRow

This activity helps the user to read and extract the specified row from the specified sheet. It functions within the “Excel Scope” activity.

Properties

INPUT

Sheet Name: *Specify the “Sheet Name” to read and extract the row and it accepts values in the “String” datatype.”

Start Row: *Specify the “Position” of the column to insert/ delete from the provided sheet. The index position of the column begins from “0” and it accepts values in “Integer” datatype. 

MISC

DisaplayName: Displays the name of the activity. The activity name can be customized, which aids in troubleshooting.

SkipOnError: Specify the “Boolean” value as “True” or “False.”
True: Continue executing the workflow regardless of any errors thrown.
False: Halt the workflow if it encounters any errors.
None: If the option is left blank, the activity will, by default, behave as if “False” were chosen.

Version: It indicates the version of the feature being used.

OUTPUT

DataTable: * It helps to view the output of the activity as extracted row in “Datatable” datatype. 

Result: This parameter allows you to view the execution status of the activity and returns a value in “Boolean.”
True: Indicates that the activity has been executed successfully without any errors.
False: Indicates that the activity has been unsuccessful due to an unexpected error being thrown.

* Represents mandatory fields to execute the workflow.

8.4.36 ReadWorkbook

This activity helps the user to read all the sheets from the specified excel. It functions within the “Excel Scope” activity.

Properties

INPUT

Include Column Header: Include the “Column Headers” from the Excel sheet when extracting the data. If left blank, column headers will not be included.

MISC

DisplayName: Displays the name of the activity. The activity name can be customized, which aids in troubleshooting.

SkipOnError: Specify the “Boolean” value as “True” or “False.”
True: Continue executing the workflow regardless of any errors thrown.
False: Halt the workflow if it encounters any errors.
None: If the option is left blank, the activity will, by default, behave as if “False” were chosen.

Version: It indicates the version of the feature being used.

OUTPUT

DataSet: *It helps to view the output as extracted data from all the sheets in “Dataset” value.

Result: This parameter allows you to view the execution status of the activity and returns a value in “Boolean.”
True: Indicates that the activity has been executed successfully without any errors.
False: Indicates that the activity has been unsuccessful due to an unexpected error being thrown.

SheetNames: It helps to view the output as the list of sheets extracted from the specified excel workbook and it returns values in “list of string” datatype. 

* Represents mandatory fields to execute the workflow.

8.4.37 Refresh Pivot Table

This activity allows the user to refresh an existing pivot table in the specified sheet. It functions within the “Excel Scope” activity

Properties

INPUT

Pivot Table Name: *Specify the name of the pivot table to be refreshed, and it accepts values in the String datatype. 

Sheet Name: *Specify the sheet name where the pivot table needs to be refreshed, and it accepts values in String datatype. 

MISC

DisplayName: Displays the name of the activity. The activity name can be customized, which aids in troubleshooting.

SkipOnError: Specify the “Boolean” value as “True” or “False.”
True: Continue executing the workflow regardless of any errors thrown.
False: Halt the workflow if it encounters any errors.
None: If the option is left blank, the activity will, by default, behave as if “False” were chosen.

Version: It indicates the version of the feature being used.

OUTPUT

Result: This parameter allows you to view the execution status of the activity and returns a value in “Boolean.”
True: Indicates that the activity has been executed successfully without any errors.
False: Indicates that the activity has been unsuccessful due to an unexpected error being thrown.

* Represents mandatory fields to execute the workflow.

8.4.38 Remove Duplicates Range

This activity allows the user to remove duplicate rows from the specified range of cells in the sheet. It functions within the “Excel Scope” activity.

Properties

INPUT

SheetName: *Specify the “SheetName” where the duplicate rows to be removed, and it accepts values in “String” datatype. 

Range: *Specify the “Range” from the specified sheet, and it accepts values in the “String” datatype. 

MISC

DisplayName: Displays the name of the activity. The activity name can be customized, which aids in troubleshooting.

SkipOnError: Specify the “Boolean” value as “True” or “False.”
True: Continue executing the workflow regardless of any errors thrown.
False: Halt the workflow if it encounters any errors.
None: If the option is left blank, the activity will, by default, behave as if “False” were chosen.

Version: It indicates the version of the feature being used.

OUTPUT

Result: This parameter allows you to view the execution status of the activity and returns a value in “Boolean.”
True: Indicates that the activity has been executed successfully without any errors.
False: Indicates that the activity has been unsuccessful due to an unexpected error being thrown.

* Represents mandatory fields to execute the workflow.

8.4.39 Show / Hide Data Labels

This activity can be used only within the Update Chart scope. It allows users to show or hide the data labels in an existing chart created in the Excel sheet.

Properties

Input

Show Legend: When this option is enabled, the data labels are displayed on the chart. When disabled, the data labels are hidden.

MISC

DisplayName: Displays the name of the activity. The activity name can be customized, which aids in troubleshooting.

SkipOnError: Specify the “Boolean” value as “True” or “False.”
True: Continue executing the workflow regardless of any errors thrown.
False: Halt the workflow if it encounters any errors.
None: If the option is left blank, the activity will, by default, behave as if “False” were chosen.

Version: It indicates the version of the feature being used.

OUTPUT

Result: This parameter allows you to view the execution status of the activity and returns a value in “Boolean.”
True: Indicates that the activity has been executed successfully without any errors.
False: Indicates that the activity has been unsuccessful due to an unexpected error being thrown

8.4.40 Show/ Hide Legends

This activity can be used only within the Update Chart scope. It allows users to show or hide the legend in an existing chart created in the Excel sheet.

Properties

Input

Show Legend: When this option is enabled, the legend is displayed on the chart. When disabled, the legend is hidden.

MISC

DisplayName: Displays the name of the activity. The activity name can be customized, which aids in troubleshooting.

SkipOnError: Specify the “Boolean” value as “True” or “False.”
True: Continue executing the workflow regardless of any errors thrown.
False: Halt the workflow if it encounters any errors.
None: If the option is left blank, the activity will, by default, behave as if “False” were chosen.

Version: It indicates the version of the feature being used.

OUTPUT

Result: This parameter allows you to view the execution status of the activity and returns a value in “Boolean.”
True: Indicates that the activity has been executed successfully without any errors.
False: Indicates that the activity has been unsuccessful due to an unexpected error being thrown.

8.4.41 SecureWorkbook

This activity lets the user protect or unprotect the excel workbook with a password. It functions within the Excel Scope activity.

Properties

INPUT

Password: *This parameter helps you to set passwords for the workbook and it accepts values in the “String” datatype.

Type: Indicates to choose the type from the drop-down.
Protect: Helps to lock the workbook. 
Unprotect: Helps to unlock the workbook.

By default, it will be configured to “Protect”.

MISC

DisplayName: Displays the name of the activity. The activity name can be customized, which aids in troubleshooting.

SkipOnError: Specify the “Boolean” value as “True” or “False.”
True: Continue executing the workflow regardless of any errors thrown.
False: Halt the workflow if it encounters any errors.
None: If the option is left blank, the activity will, by default, behave as if “False” were chosen.

Version: It indicates the version of the feature being used.

OUTPUT

Result: This parameter allows you to view the execution status of the activity and returns a value in “Boolean.”
True: Indicates that the activity has been executed successfully without any errors.
False: Indicates that the activity has been unsuccessful due to an unexpected error being thrown.

Represents mandatory fields to execute the workflow

8.4.42 SetCellColor

This activity helps the user to set “color” either to the “Text” or to the specified “Cell” in the specified sheet. It functions within the Excel scope activity.

Properties

INPUT

Cell:  *Specify the “Cell” reference value to set the color, and it accepts values in the “String” datatype.

CellColor: *This parameter helps you to choose a wide range of colors to be applied in the font. You can choose the colors from the drop-down.

FormatStyle: Choose whether the “Style” should be applied to the text or the cell. Select the desired option from the drop-down menu.
Font: Allows applying color to the text within a cell.
Background: Enables applying color to the entire cell, including its background.

By default, it will be configured to “Font”.

SheetName: *Specify the “SheetName” to set the color against the cell, and it accepts values in the “String” datatype.”

MISC

DisplayName: Displays the name of the activity. The activity name can be customized, which aids in troubleshooting.

SkipOnError: Specify the “Boolean” value as “True” or “False.”
True: Continue executing the workflow regardless of any errors thrown.
False: Halt the workflow if it encounters any errors.
None: If the option is left blank, the activity will, by default, behave as if “False” were chosen.

Version: It indicates the version of the feature being used.

OUTPUT

Result: This parameter allows you to view the execution status of the activity and returns a value in “Boolean.”
True: Indicates that the activity has been executed successfully without any errors.
False: Indicates that the activity has been unsuccessful due to an unexpected error being thrown.

* Represents mandatory fields to execute the workflow. 

8.4.43 Sort Table

This activity helps the user to sort the specified table values in Ascending or descending order in the specified sheet. It functions within the “Excel Scope” activity and only table values can be sorted. 

Properties

INPUT

Column Name: *Specify the column name where the data needs to be sorted, and it accepts values of the String datatype. 

Order: *This parameter indicates to choose the order in which the values need to be sorted. Select the values from the drop-down, 
Ascending: Sorts the values from smallest to biggest order (A to Z). 
Descending: Sorts the values from biggest to smallest order (Z to A). 

Sheet Name: *Specify the sheet name where the table is available, and it accepts values of the String datatype. 

Table Name: *Specify the table name where the column needs to be sorted, and it accepts values of the String datatype.  

MISC

DisplayName: Displays the name of the activity. The activity name can be customized, which aids in troubleshooting.

SkipOnError: Specify the “Boolean” value as “True” or “False.”
True: Continue executing the workflow regardless of any errors thrown.
False: Halt the workflow if it encounters any errors.
None: If the option is left blank, the activity will, by default, behave as if “False” were chosen.

Version: It indicates the version of the feature being used.

OUTPUT

Result: This parameter allows you to view the execution status of the activity and returns a value in “Boolean.”
True: Indicates that the activity has been executed successfully without any errors.
False: Indicates that the activity has been unsuccessful due to an unexpected error being thrown.

* Represents mandatory fields to execute the workflow.

8.4.44 Text to Columns

This activity helps the user to insert columns with the text specified from the chosen data range in the excel sheet. It must be used within the “Excel Scope” activity.

Properties

Input

Sheet Name*: Indicates to provide the “SheetName” to insert the data, and it accepts values in the “String” datatype.”

Source Range*: Specifies to provide the source range from where the text needs to be retrieved and it accepts values in “String” datatype.

Destination*: Specifies to provide the destination column range where the text needs to be inserted and it accepts values in “String” datatype.

MISC

DisplayName: Displays the name of the activity. The activity name can be customized, which aids in troubleshooting.

SkipOnError: Specify the “Boolean” value as “True” or “False.”
True: Continue executing the workflow regardless of any errors thrown.
False: Halt the workflow if it encounters any errors.
None: If the option is left blank, the activity will, by default, behave as if “False” were chosen.

Version: It indicates the version of the feature being used.

Options

Delimiter Options

Comma: Splits the text into columns wherever a comma ( , ) is found.

Semi Colon: Splits the text into columns wherever a semicolon ( ; ) is found.

Space: Splits the text into columns wherever a space character occurs.

Tab: Splits the text into columns wherever a tab character is present.

Line Break: Splits the text into columns at each line break (new line) in the text.

Other: Allows users to specify a custom delimiter character not listed in the default options.

Other Delimiter: Specifies the custom character to be used as the delimiter when the Other option is selected.

Consecutive Operator as One: When enabled, treat multiple consecutive delimiters as a single delimiter during the split operation.
Note: You can use this option when your data has inconsistent spacing, empty columns or extra delimiters.

Data Type: Specifies to choose the option on how the text should be split into columns.

• Delimited: Splits text based on the selected delimiter(s).

• Fixed Width: Splits text based on a fixed number of characters per column.

Number of Characters per Column: Specifies the number of characters to be used for each column when Fixed Width is selected. This option is applicable only for the Fixed Width data type.

Text Qualifier: Specifies a character that encloses text values. Text within the qualifier is treated as a single value even if it contains delimiters.

• None: No text qualifier is applied.

• Double Quote ( ” ): Treats text enclosed in double quotes as a single value.

• Single Quote ( ‘ ): Treats text enclosed in single quotes as a single value.

OUTPUT

Result: This parameter allows you to view the execution status of the activity and returns a value in “Boolean.”
True: Indicates that the activity has been executed successfully without any errors.
False: Indicates that the activity has been unsuccessful due to an unexpected error being thrown.

* Represents mandatory fields to execute the workflow

8.4.45 Update Axis Bounds

This activity can be used only within the Update Chart scope. It allows users to update the range of the chart axes (X-axis or Y-axis) to improve data visibility and readability.

Properties

Input

Axis: *Specifies the axis to be updated in the selected chart. Choose one of the following options from the dropdown:

a. Horizontal (X-axis)
b. Vertical (Y-axis)

Min bound: *Specifies the starting value of the selected axis range and it accepts values of the Int32 data type.

Maximum Bound: *Specifies to provide the maximum value to end with the chart axis range. It accepts values in “Int32” datatype.  

MISC

DisplayName: Displays the name of the activity. The activity name can be customized, which aids in troubleshooting.

SkipOnError: Specify the “Boolean” value as “True” or “False.”
True: Continue executing the workflow regardless of any errors thrown.
False: Halt the workflow if it encounters any errors.
None: If the option is left blank, the activity will, by default, behave as if “False” were chosen.

Version: It indicates the version of the feature being used.

OUTPUT

Result: This parameter allows you to view the execution status of the activity and returns a value in “Boolean.”
True: Indicates that the activity has been executed successfully without any errors.
False: Indicates that the activity has been unsuccessful due to an unexpected error being thrown.

* Represents mandatory fields to execute the workflow.

8.4.46 Update Axis Title

This activity can be used only within the Update Chart scope. It helps the user to update the axis title for the existing chart created in the excel sheet.

Properties

Input

Axis: *Specifies the user to choose where the axis title needs to be added.

Horizontal: Adds the specified title horizontally
Vertical: Adds the specified title vertically.

Show Axis Title: *Enables or removes the axis title from horizontal or vertical. The user can choose “Yes” to display the title or “No” to hide it.

Title: Specifies to provide the name of the title to be changed/added and it accepts values in String datatype. This option will be enabled only when the “Show title” is enabled.

MISC

DisplayName: Displays the name of the activity. The activity name can be customized, which aids in troubleshooting.

SkipOnError: Specify the “Boolean” value as “True” or “False.”
True: Continue executing the workflow regardless of any errors thrown.
False: Halt the workflow if it encounters any errors.
None: If the option is left blank, the activity will, by default, behave as if “False” were chosen.

Version: It indicates the version of the feature being used.

OUTPUT

Result: This parameter allows you to view the execution status of the activity and returns a value in “Boolean.”
True: Indicates that the activity has been executed successfully without any errors.
False: Indicates that the activity has been unsuccessful due to an unexpected error being thrown.

* Represents mandatory fields to execute the workflow.

8.4.47 Update Chart

This activity allows users to modify an existing chart by performing actions such as updating the data range, axis titles, axis bounds, chart title, and showing or hiding legends and data labels.

It functions as a scope activity for all chart-related modifications, and this activity must be placed inside the Excel Scope.

Properties

Input

Sheet Name: *Indicates to provide the “SheetName” to insert the data, and it accepts values in the “String” datatype.”

Chart Name: *Specifies to provide the “Chart name” generated and it accepts values in “String” datatype.

Add the modification from the below button:  Allows users to choose and add the modification action to be performed. Selecting the action will automatically include the child activity into the scope.

Modification Options

a. Update Chart Title: Updates the main title of the chart.
b. Update Axis Title: Modifies the title of the X-axis or Y-axis.
c. Update Axis Bounds: Adjusts the minimum and maximum values displayed on the chart axes.
d. Change Data Range: Updates the existing data range with a new one for the chart.
e. Show/Hide Legend: Displays or removes the chart legend.
f. Show/Hide Data Labels: Shows or hides data labels on the chart for better visualization.

MISC

DisplayName: Displays the name of the activity. The activity name can be customized, which aids in troubleshooting.

SkipOnError: Specify the “Boolean” value as “True” or “False.”
True: Continue executing the workflow regardless of any errors thrown.
False: Halt the workflow if it encounters any errors.
None: If the option is left blank, the activity will, by default, behave as if “False” were chosen.

Version: It indicates the version of the feature being used.

OUTPUT

Result: This parameter allows you to view the execution status of the activity and returns a value in “Boolean.”
True: Indicates that the activity has been executed successfully without any errors.
False: Indicates that the activity has been unsuccessful due to an unexpected error being thrown.

Represents mandatory fields to execute the workflow.

8.4.48 Update Chart Title

This activity can be used only within the Update Chart scope. It allows the user to update the title of an existing chart in the Excel sheet.

Properties

INPUT

Show title: * Enables or removes the chart title. The user can choose “Yes” to display the title or “No” to hide it.

Title: Specifies to provide the name of the title to be changed and it accepts values in String datatype. This option will be enabled only when the “Show title” is enabled.

MISC

DisplayName: Displays the name of the activity. The activity name can be customized, which aids in troubleshooting.

SkipOnError: Specify the “Boolean” value as “True” or “False.”
True: Continue executing the workflow regardless of any errors thrown.
False: Halt the workflow if it encounters any errors.
None: If the option is left blank, the activity will, by default, behave as if “False” were chosen.

Version: It indicates the version of the feature being used.

OUTPUT

Result: This parameter allows you to view the execution status of the activity and returns a value in “Boolean.”
True: Indicates that the activity has been executed successfully without any errors.
False: Indicates that the activity has been unsuccessful due to an unexpected error being thrown.

* Represents mandatory fields to execute the workflow.

8.4.49 WriteCell

This activity helps the user to provide the “Input” text to the specified cell in the sheet. It functions within the Excel scope activity.

Properties

INPUT

Cell: *Specify the “Cell” reference value to write the data in it, and it accepts values in the “String” datatype.

InputString: *Specify the “Input” data to enter it in the specified cell value. It accepts input values in the “String” datatype.

SheetName: *Specify the “SheetName” to write the data, and it accepts input values in the “String” datatype.”

MISC

DisplayName: Displays the name of the activity. The activity name can be customized, which aids in troubleshooting.

SkipOnError: Specify the “Boolean” value as “True” or “False.”
True: Continue executing the workflow regardless of any errors thrown.
False: Halt the workflow if it encounters any errors.
None: If the option is left blank, the activity will, by default, behave as if “False” were chosen.

Version: It indicates the version of the feature being used.

OUTPUT

Result: This parameter allows you to view the execution status of the activity and returns a value in “Boolean.”
True: Indicates that the activity has been executed successfully without any errors.
False: Indicates that the activity has been unsuccessful due to an unexpected error being thrown.

* Represents mandatory fields to execute the workflow.

8.4.50 WriteCellFormula

This activity enables the user to write any formula to a specified cell in the sheet. It functions within the “Excel Scope” activity.

Properties

INPUT

Cell: *Specify the “Cell” reference value to insert the formula, and it accepts input values in the “String” datatype.

Formula: * Specify the “Formula” that needs to be inserted in the specified cell. This parameter accepts input values in the “String” datatype.

Sheet Name: *Specify the “SheetName” to enter the data, and it accepts values in the “String” datatype.”

MISC

DisplayName: Displays the name of the activity. The activity name can be customized, which aids in troubleshooting.

SkipOnError: Specify the “Boolean” value as “True” or “False.”
True: Continue executing the workflow regardless of any errors thrown.
False: Halt the workflow if it encounters any errors.
None: If the option is left blank, the activity will, by default, behave as if “False” were chosen.

Version: It indicates the version of the feature being used.

OUTPUT

Result: This parameter allows you to view the execution status of the activity and returns a value in “Boolean.”
True: Indicates that the activity has been executed successfully without any errors.
False: Indicates that the activity has been unsuccessful due to an unexpected error being thrown.

* Represents mandatory fields to execute the workflow.

8.4.51 WriteRange

This activity helps the user to provide the text to the specified range of cells in the sheet. It functions within the “Excel Scope” activity.

Properties

INPUT

Datatable: *Specify the “Datatable” value/ variable that stores the input value to be written in the specified sheet. This parameter accepts input values in “Datatable” datatype.

Include Column Headers: Include the “Column Headers” from the Excel sheet when writing the data in the sheet. If left blank, column headers will not be included.

Range: *Specify the “Range” to write the data in the specified sheet, and it accepts values in the “String” datatype.

Sheet Name: *Specify the “Sheet Name” to write the data, and it accepts values in the “String” datatype.”

MISC

DisplayName: Displays the name of the activity. The activity name can be customized, which aids in troubleshooting.

SkipOnError: Specify the “Boolean” value as “True” or “False.”
True: Continue executing the workflow regardless of any errors thrown.
False: Halt the workflow if it encounters any errors.
None: If the option is left blank, the activity will, by default, behave as if “False” were chosen.

Version: It indicates the version of the feature being used.

OUTPUT

Result: This parameter allows you to view the execution status of the activity and returns a value in “Boolean.”
True: Indicates that the activity has been executed successfully without any errors.
False: Indicates that the activity has been unsuccessful due to an unexpected error being thrown.

* Represents mandatory fields to execute the workflow.

8.4.52 GetWorkbookSheet

This activity helps the user to retrieve the sheet name from the specified excel workbook. It functions within the “Excel Scope” activity. 

Properties

INPUT

Index: *Specify the “Position” of the sheet from the Excel workbook. The index position of the column begins from “0” and it accepts values in “Integer” datatype. 

MISC

DisplayName: Displays the name of the activity. The activity name can be customized, which aids in troubleshooting.

SkipOnErrorSpecify the “Boolean” value as “True” or “False.”
True: Continue executing the workflow regardless of any errors thrown.
False: Halt the workflow if it encounters any errors.
None: If the option is left blank, the activity will, by default, behave as if “False” were chosen.

Version: It indicates the version of the feature being used.

Output

Result: This parameter allows you to view the execution status of the activity and returns a value in “Boolean.”
True: Indicates that the activity has been executed successfully without any errors.
False: Indicates that the activity has been unsuccessful due to an unexpected error being thrown.

Sheet: This parameter retrieves the sheet name from the specified position in the workbook and returns the value in “String” data type.

* Represents mandatory fields to execute the workflow.

8.4.53 GetWorkbookSheets

This activity helps the user to retrieve all the list of sheets available in the Excel workbook. It functions within the “Excel Scope” activity. 

Properties 

MISC

DisplayName: Displays the name of the activity. The activity name can be customized, which aids in troubleshooting.

SkipOnErrorSpecify the “Boolean” value as “True” or “False.”
True: Continue executing the workflow regardless of any errors thrown.
False: Halt the workflow if it encounters any errors.
None: If the option is left blank, the activity will, by default, behave as if “False” were chosen.

Version: It indicates the version of the feature being used.

Output

Result: This parameter allows you to view the execution status of the activity and returns a value in “Boolean.”
True: Indicates that the activity has been executed successfully without any errors.
False: Indicates that the activity has been unsuccessful due to an unexpected error being thrown.

Sheets: This parameter retrieves the list of sheets from the specified workbook and returns the values in “List of String” data type.

Example

In the following example, I am using a sample excel sheet to retrieve the list of sheets. 

Click here to get the sample excel file. 

Steps to execute the bot:

1. Open an existing solution. 
2. Drag and drop the “ExcelScope” activity into the workflow. 
3. Double click on the activity and choose the input excel file attached. 
4. Now, place the “GetWorkbookSheets” activity inside the body of excel scope activity. 
a. Navigate to the “Sheets” in the output section of the “GetWorkbookSheets” to create a variable. 
b. Here, the variable is created as “List_Sheets” by pressing “CTRL +Q”.  
5. Next, place the “ForEach” next to the “GetWorkbookSheets”. 
a. Choose the “TypeArgument” as “String” since we are iterating and retrieving the list of string values. 
b. Provide the values as “List_ Sheets”. 
c. Add a “Writelog” activity into the body of “ForEach” activity and provide the input as “item”. 
6. Now, save and execute the workflow. 

8.5 Outlook Automation

About

Outlook Automation in Robility helps to interact with Microsoft Outlook to perform tasks such as sending, receiving, extract attachment details and managing email-based tasks. This automation can streamline workflows, reduce manual effort, and enhance productivity.

Prerequisites

The application must be installed on the host machine, and a valid email account must be actively logged in. Without both conditions met, the automation will not function correctly.

Limitations

Admin vs. non-admin access
The Email automation behaves differently depending on user permissions.
1. Admin users can run the automation whether the application is open or closed.
2. Non-admin users must keep the application open (minimized or active) for the automation to execute; it will not run if the application is fully closed.

Benefits of Outlook Automation

The following are the benefits of automating with Email Automation.

  1. Minimizes the manual effort and reduces the errors in email-based processes.
  2. Improves response times and customer satisfaction.
  3. Enables 24/7 automated email interactions.
  4. Enhances accuracy in data processing and reporting.
  5. Integrates seamlessly with other applications and systems.

Use cases

The following are the use cases of the scenarios that helps the user to perform automation with the Email Automation package.

  1. Invoice Processing and Notifications – Enables to extract invoice details from emails, update to the systems/applications and sending payment notifications as email.
  2. Data extraction – Automate to extract daily reports from the emails and send back the notifications.
  3. Customer support and query resolutions – Categorize and route customer inquiries, automate responses, and escalate complex issues to human agents.
  4. Order Processing and Tracking – Automate order confirmation emails, update order status, and send shipment tracking information to customers.
  5. Employee Onboarding and Training – Automate the process of sending welcome emails, distribute training materials, and track employee progress.

8.5.1 Release Notes

v.1.0.8

This release includes enhancements to the NLog package.

Enhancement

The NLog package has been upgraded to version 6.0.7, delivering improved logging reliability, performance, and compatibility. The update supports both existing and new workflows.

Released Date: 09/02/2026

8.5.2 AddNewFolder

This activity assists the user to create a “New Folder” or a “New Sub Folder” within the specified outlook account. Ensure this activity is included within a designated parent activity, “Outlook Scope”.

Properties

INPUT

FolderName: This parameter indicates to provide the parent folder name where a new subfolder will be created. It accepts values in the “String” datatype. You can either hardcode the values as a “String” datatype or can provide the values in “String”.

If left blank, the parent folder will not be considered, and a separate folder will be created within the specified account without a parent folder.

NewFolderName:* This parameter allows you to specify the “Name” in which the folder has to be created.
It accepts values in “String” datatype. You can either hardcode the values in “String” datatype or can enter the values in “String”.

MISC

DisplayName: Displays the name of the activity. The activity name can be customized, which aids in troubleshooting.

SkipOnError: Specify the “Boolean” value as “True” or “False.”
True: Continue executing the workflow regardless of any errors thrown.
False:
 Halt the workflow if it encounters any errors.
None:
 If the option is left blank, the activity will, by default, behave as if “False” were chosen.

Version: It indicates the version of the feature being used.

OUTPUT

Result: It provides the ability to view the execution status of the activity. It returns values in “Boolean.”
True: Indicates that the activity has been executed successfully without any errors.
False: Indicates that the activity has been unsuccessful due to an unexpected error being thrown.

* Represents mandatory fields to execute the workflow.

Note: If you want to create a folder within a subfolder, specify the parent folder path as “Inbox\Robility\Test.” This will create the folder within the specified subfolder.

8.5.3 CopyFolder

This activity helps the users to effortlessly copy or move a “Folder” from one location to another within their specified Outlook account. Ensure this activity is included within a designated parent activity, “Outlook Scope”.

Properties

INPUT

Action: It indicates to specify the action that needs to be executed. Choose the desired action from the dropdown list:

Copy: It carries out the “Copy/Paste” functionality by duplicating the “Folder” from the original path and pasting it in destination path.
Move: It performs the “Move” functionality by transferring the folder from one destination to another.

By default, the “Copy” option will be selected.

DestinationFolderName:* This parameter indicates to provide the name of the “Destination Folder” where the folder from the specified “Source Destination” should be moved or copied.

It accepts values in “String” datatype. You can either hardcode the values in “String” datatype or can enter the values in “String”.

SourceFolderName: * This parameter indicates to provide the name of the “Source Folder” from where the folder needs to be selected to carry out the action.

It accepts values in “String” datatype. You can either hardcode the values in “String” datatype or can enter the values in “String”.

MISC

DisplayName: Displays the name of the activity. The activity name can be customized, which aids in troubleshooting.

SkipOnError: Specify the “Boolean” value as “True” or “False.”
True: Continue executing the workflow regardless of any errors thrown.
False:
 Halt the workflow if it encounters any errors.
None:
 If the option is left blank, the activity will, by default, behave as if “False” were chosen.

Version: It indicates the version of the feature being used.

OUTPUT

Result: It provides the ability to view the execution status of the activity. It returns values in “Boolean.”
True: Indicates that the activity has been executed successfully without any errors.
False: Indicates that the activity has been unsuccessful due to an unexpected error being thrown.

* Represents mandatory fields to execute the workflow.

Note: If you want to create a folder within a subfolder, specify the parent folder path as “Inbox\Robility\Test.” This will create the folder within the specified subfolder.

8.5.4 Delete

This activity helps the user in deleting a specified number of emails within the specified Outlook account. Ensure this activity is included within a designated parent activity, “Outlook Scope” and “ForEachMail” activity.

Properties

INPUT

MailItem: * This parameter indicates to provide the MailItem variable that needs to be deleted from the specified outlook account.

The MailItem variable is essentially the email message, and it can be obtained using the “For Each Mail” activity, which retrieves emails from your specified folder in Outlook.

MISC

DisplayName: Displays the name of the activity. The activity name can be customized, which aids in troubleshooting.

SkipOnError: Specify the “Boolean” value as “True” or “False.”
True: Continue executing the workflow regardless of any errors thrown.
False:
 Halt the workflow if it encounters any errors.
None:
 If the option is left blank, the activity will, by default, behave as if “False” were chosen.

Version: It indicates the version of the feature being used.

OUTPUT

Result: It provides the ability to view the execution status of the activity. It returns values in “Boolean.”
True: Indicates that the activity has been executed successfully without any errors.
False: Indicates that the activity has been unsuccessful due to an unexpected error being thrown.
* Represents mandatory fields to execute the workflow.

8.5.5 DeleteFolder

This activity helps the user to delete the specified “Folder” from the preferred Outlook account. Ensure this activity is included within a designated parent activity, “Outlook Scope”.

Properties

INPUT

FolderName: This parameter indicates to provide the folder name that needs to be deleted from the Outlook account. It accepts values in “String” datatype. You can either hardcode the values in “String” datatype or can enter the values in “String”.

MISC

DisplayName: Displays the name of the activity. The activity name can be customized, which aids in troubleshooting.

SkipOnError: Specify the “Boolean” value as “True” or “False.”
True: Continue executing the workflow regardless of any errors thrown.
False:
 Halt the workflow if it encounters any errors.
None:
 If the option is left blank, the activity will, by default, behave as if “False” were chosen.

Version: It indicates the version of the feature being used.

OUTPUT

Result: It provides the ability to view the execution status of the activity. It returns values in “Boolean.”
True: Indicates that the activity has been executed successfully without any errors.
False: Indicates that the activity has been unsuccessful due to an unexpected error being thrown.

* Represents mandatory fields to execute the workflow.

Note: If you want to create a folder within a subfolder, specify the parent folder path as “Inbox\Robility\Test.” This will create the folder within the specified subfolder.

8.5.6 EmailTrigger

This activity helps the users to trigger a workflow when an email is received, based on the specified conditions. When an email that meets the specified criteria—such as sender, subject, keywords, or attachments—is received, this activity automatically triggers a designated workflow.

Properties

INPUT

EmailAccount:* This parameter provides the Outlook account that has been integrated into the user’s system. Choose the option from the drop-down to select the required account. This field accepts the value in “String” format. You can either hardcode the values in “String” datatype or can enter the values in “String”.

WatchEmailsFromFolder: It specifies the “Folder” where the mails are required to watch and trigger the workflow. This parameter accepts values in “String” datatype. You can either hardcode the values in “String” datatype or can enter the values in “String”.

MISC

DisplayName: Displays the name of the activity. The activity name can be customized, which aids in troubleshooting.

SkipOnError: Specify the “Boolean” value as “True” or “False.”
True: Continue executing the workflow regardless of any errors thrown.
False:
 Halt the workflow if it encounters any errors.
None:
 If the option is left blank, the activity will, by default, behave as if “False” were chosen.

Version: It indicates the version of the feature being used.

OPTIONAL

From: It indicates the filters that are required to watch and trigger the workflow.

Select Filters: Use this option to configure an advanced filter to specify any conditions for the emails to be read. Click on this to open the “Advanced Filter” wizard.

1. And / OR condition: The “AND” function returns results that meet all specified conditions, while the “OR” function returns results that meet any of the specified conditions.
    b. The first dropdown lists the email fields to filter by: Bcc, Body, Cc, Date, From, To, Subject, or Categories.
    c. The second dropdown lists the operators to evaluate the chosen fields. The available operators are:
        i. For the fields “Bcc, Body, Cc, From, To, Subject, and Categories,” the operators are contains, does not contain, ends with, starts with, equals, is empty, or is not empty.
       ii. For the “Date” field, the operators are older than, newer than, or equals, indicating the time period of the emails.
   d. To include additional conditions, click the “Add” button.

OUTPUT

Result: It provides the ability to view the execution status of the activity. It returns values in “Boolean.”
True: Indicates that the activity has been executed successfully without any errors.
False: Indicates that the activity has been unsuccessful due to an unexpected error being thrown.

* Represents mandatory fields to execute the workflow.

Tips

1. Trigger Activation: If there are already emails in the specified folder at the time the workflow starts, the email trigger will not activate. This means it won’t respond to those existing emails.2
2. Post-Execution Triggering: After the workflow has been executed, if a new email arrives in the specified folder, that will trigger the flowchart to start.
3. Continuous Monitoring: The trigger will continue to monitor the folder in a loop, looking for the next incoming email. However, this continuous checking will stop if a “stop” condition is defined and executed within the workflow.

8.5.7 ExtractMailMessage

This activity enables the extraction of details using the “Mail message” format or the “MailItem” from the specified account name in Outlook.

Properties

INPUT

AttachmentPath:* This parameter indicates to provide the “Path” to save the attachments extracted from the “MailMessage” or “MailItem.”
It accepts values in “String” datatype. You can either hardcode the values in “String” datatype or can enter the values in “String”.

InputPath: It indicates to provide the “Input path” where the mail message is stored in the system. Use this option when the “InputType” is selected as “MSG_File.”
It accepts values in “String” datatype. You can either hardcode the values in “String” datatype or can enter the values in “String”.

InputType:* Select the input type from the dropdown:
MailItem: This option refers to the “MailItem” variable. Use this type to extract details and attachments from the “MailItem” variable.
MSG_File: This option pertains to the “MailMessage” file. Utilize this type to extract details and attachments from the “MailMessage.” By default, the type is set to “MSG_File.”

MailItem:* 
This parameter indicates to provide the MailItem variable that needs to extract the emails from the provided “list.”

MISC

DisplayName: Displays the name of the activity. The activity name can be customized, which aids in troubleshooting.

SkipOnError: Specify the “Boolean” value as “True” or “False.”
True: Continue executing the workflow regardless of any errors thrown.
False:
 Halt the workflow if it encounters any errors.
None:
 If the option is left blank, the activity will, by default, behave as if “False” were chosen.

Version: It indicates the version of the feature being used.

OUTPUT

AttachmentList: This parameter helps in storing and viewing the extracted attachments as an “Output” of the activity in a “list” datatype from the email.

CCList: This functionality allows you to view the “CC List” as an output of the activity in a “list” datatype, extracted from the email.

FromMailID: This feature enables you to view the “FromMailID” as an output of the activity in the “String” datatype, extracted from the email.

IsHadAttachment: This parameter helps to return the output of the activity to validate whether the mails have attachment. This field returns the value in “Boolean” datatype.
Yes – The provided “MailMessage” or “Mailitem” contains attachment.
No – The provided “MailMessage” or “Mailitem” does not contain any attachments.

MailBody: This feature enables you to view the “MailBody” as an output of the activity in the “String” datatype, extracted from the email.

MailSenderName: This feature enables you to view the “MailSenderName” as an output of the activity in the “String” datatype, extracted from the email.

MailSubject: It helps to view the output of the activity as “MailSubject” extracted from the mails. This field returns the values in the “String” datatype.

ReceivedDateTime: This feature enables you to view the “ReceivedDateTime” as an output of the activity in the “DateTime” datatype, extracted from the email.

ToList: It helps to view the output of the activity as “ToList” extracted from the mails. This field returns the values in the “List of String” datatype.

* Represents mandatory fields to execute the workflow.

8.5.8 ForEachMail

This activity refers to a loop activity designed to perform actions on a collection of emails, such as reading, processing, or moving each email message individually within the loop based on specific conditions. Ensure this activity is included within a designated parent activity, “Outlook Scope”.

Properties

INPUT

Limit: This parameter indicates the maximum number of emails to be looped through to perform a set of actions. This parameter accepts the value in “String” datatype. You can either hardcode the value in “String” datatype or provide the variables in “String” format. Else, you can choose the number of mails from the drop-down available in the activity.

MailsFrom: * This parameter specifies the “Folder” from which the set of actions will be performed. To choose the folder, click the “+” icon next to the box and select the required folder from the dropdown menu.

MISC

DisplayName: Displays the name of the activity. The activity name can be customized, which aids in troubleshooting.

SkipOnError: Specify the “Boolean” value as “True” or “False.”
True: Continue executing the workflow regardless of any errors thrown.
False: Halt the workflow if it encounters any errors.
None: If the option is left blank, the activity will, by default, behave as if “False” were chosen.

Version: It indicates the version of the feature being used.

OUTPUT

Result: It provides the ability to view the execution status of the activity. It returns values in “Boolean.”
True: Indicates that the activity has been executed successfully without any errors.
False: Indicates that the activity has been unsuccessful due to an unexpected error being thrown.

Represents mandatory fields to execute the workflow.

Setting up the activity

Let’s see how to set up and configure the fields in the activity.
1. For Each (Current MailItem): This represents the name used to reference each email within the body of the “For Each Mail” activity. By default, the value is “Current Mail.” You can customize this name as needed.
2. EmailsFrom: It indicates the folder from which emails should be read and processed in a loop for the specified actions. To choose the folder, click the “+” icon next to the box and select the required folder from the dropdown menu.
3. Limit emails to first: This parameter sets the maximum number of emails to be looped through for performing a set of actions. You can select the number of emails from the provided dropdown.
a. Unread mails: Check this option to process only unread emails from the chosen folder and execute them in the loop.
b. Retrieve Attachments: Check this option to extract attachments along with the emails from the chosen folder.
c. With Attachments Only: Check this option to read and process only emails that contain attachments in the chosen folder.
d. Include subfolders: Check this option to include subfolders when reading and processing emails from within the chosen folder.

4. More Filters: Use this option to configure an advanced filter to specify any conditions for the emails to be read. Click on this to open the “Advanced Filter” wizard.
a. And / OR condition: The “AND” function returns results that meet all specified conditions, while the “OR” function returns results that meet any of the specified conditions.
b. The first dropdown lists the email fields to filter by: Bcc, Body, Cc, Date, From, To, Subject, or Categories.
c. The second dropdown lists the operators to evaluate the chosen fields. The available operators are:

    i. For the fields “Bcc, Body, Cc, From, To, Subject, and Categories,” the operators are contains, does not contain, ends with, starts with, equals, is empty, or is not empty.
    ii. For the “Date” field, the operators are older than, newer than, or equals, indicating the time period of the emails.
d. To include additional conditions, click the “Add” button.

8.5.9 Forward

This activity helps the user to forward emails from Outlook to the designated email address. Ensure this activity is included within a designated parent activity, “Outlook Scope” and “ForEachMail” activity.

Properties

INPUT

AttachmentList:* Indicate the “AttachmentList” (Declared as an output in the “ExtractMailMessage” activity) to include attachments along with the “NewMail.” It accepts values in the form of a “list” datatype. When left blank, it will not be considered.

BCCAddress: This parameter specifies to provide the “BCC address” of the recipients for sending the email. It ensures that the “MailID” mentioned is not disclosed to the other users listed in the “To” and “CC” addresses.
This parameter accepts values in “String” datatype. You can either hardcode the values in “String” datatype or can enter the values in “String”. When left blank, it will not be considered.

Body: This parameter specifies the “Mail Body” that should be sent as an email. his parameter accepts values in “String” datatype. You can either hardcode the values in “String” datatype or can enter the values in “String”. When left blank, it will not be considered.

CCAddress: This parameter provides the “CC address” of the recipients to whom the email should be sent. It enables sending the email to additional recipients for informational purposes. 
This parameter accepts values in “String” datatype. You can either hardcode the values in “String” datatype or can enter the values in “String”.
When left blank, it will not be considered.

FromAddress: Specify the “From address,” which is the sender’s email address used to send the email. This parameter accepts values in “String” datatype. You can either hardcode the values in “String” datatype or can enter the values in “String”. When left blank, it will not be considered.

MailItem:* This parameter specifies the MailItem variable that needs to be forwarded.    

The MailItem variable is essentially the email message, and it can be obtained using the “For Each Mail” activity, which retrieves emails from your specified folder in Outlook.

MailSubject: Specify the “Subject” of the email to be sent along with the mails. This parameter accepts values in “String” datatype. You can either hardcode the values in “String” datatype or can enter the values in “String”. When left blank, it will not be considered.

SendAs: It specifies the type to be send as the mail. Choose the send as type from the drop-down,
Forward – It enables to forward the mails to the mentioned mail address as “Forward” functionality.
ForwardAsNew – It enables to forward the mail as “New” mail to the mentioned mail address.
By default, the “Forward” types will be set.

ToAddress:*  It specifies the “To address” of the recipient to send the mail. This parameter accepts values in “String” datatype. You can either hardcode the values in “String” datatype or can enter the values in “String”. When left blank, it will not be considered.

MISC

DisplayName: Displays the name of the activity. The activity name can be customized, which aids in troubleshooting.

SkipOnError: Specify the “Boolean” value as “True” or “False.”
True: Continue executing the workflow regardless of any errors thrown.
False:
 Halt the workflow if it encounters any errors.
None:
 If the option is left blank, the activity will, by default, behave as if “False” were chosen.

Version: It indicates the version of the feature being used.

OUTPUT

Result: It provides the ability to view the execution status of the activity. It returns values in “Boolean.”
True: Indicates that the activity has been executed successfully without any errors.
False: Indicates that the activity has been unsuccessful due to an unexpected error being thrown.

* Represents mandatory fields to execute the workflow.

Notes

The attachments list should be declared as a list of strings from the variables section and enter the value as new List(of string)(new string(){“value1”,“value2”}). Enter the location path of the attachments in the “Value1 and 2”.

8.5.10 MarkAsReadUnread

This activity allows the user to mark the specified email as either read or unread in the Outlook account. Ensure this activity is included within a designated parent activity, “Outlook Scope” and “ForEachMail” activity.

Properties

INPUT

MailItem: This parameter indicates to provide the MailItem variable against which the action needs to be performed.  

The MailItem variable is essentially the email message, and it can be obtained using the “For Each Mail” activity, which retrieves emails from your specified folder in Outlook.

MarkAs: It specifies to choose the action from the dropdown list:

Read: It will mark as read for the specified mailitem.
Unread: It mark as unread for the specified mailitem.

MISC

DisplayName: Displays the name of the activity. The activity name can be customized, which aids in troubleshooting.

SkipOnError: Specify the “Boolean” value as “True” or “False.”
True: Continue executing the workflow regardless of any errors thrown.
False:
 Halt the workflow if it encounters any errors.
None:
 If the option is left blank, the activity will, by default, behave as if “False” were chosen.

Version: It indicates the version of the feature being used.

OUTPUT

Output: It provides the result of the activity as the updated mailitem. It returns values in “MailItem” datatype.

Result: It provides the ability to view the execution status of the activity. It returns values in “Boolean.”
True: Indicates that the activity has been executed successfully without any errors.
False: Indicates that the activity has been unsuccessful due to an unexpected error being thrown.

* Represents mandatory fields to execute the workflow.

8.5.11 Move

This activity helps the user in relocating “emails” from one folder to another within the specified Outlook account. Ensure this activity is included within a designated parent activity, “Outlook Scope” and “ForEachMail” activity.

Properties

INPUT

MailItem: *This parameter specifies the MailItem variable that needs to be moved from one folder to another folder within the outlook account.    

The MailItem variable is essentially the email message, and it can be obtained using the “For Each Mail” activity, which retrieves emails from your specified folder in Outlook.

SubFolderName: This parameter indicates to provide the “FolderName” to which the emails should be moved. You can also indicate the “Subfolder” name here.
It accepts values in “String” datatype. You can either hardcode the values in “String” datatype or can enter the values in “String”.

MISC

DisplayName: Displays the name of the activity. The activity name can be customized, which aids in troubleshooting.

SkipOnError: Specify the “Boolean” value as “True” or “False.”
True: Continue executing the workflow regardless of any errors thrown.
False:
 Halt the workflow if it encounters any errors.
None:
 If the option is left blank, the activity will, by default, behave as if “False” were chosen.

Version: It indicates the version of the feature being used.

OUTPUT

Result: It provides the ability to view the execution status of the activity. It returns values in “Boolean.”
True: Indicates that the activity has been executed successfully without any errors.
False: Indicates that the activity has been unsuccessful due to an unexpected error being thrown.

* Represents mandatory fields to execute the workflow.

Note: If you want to move the emails from folder within a subfolder, specify the folder path as “Inbox\Robility\Test.”

8.5.12 NewMail

This activity helps the user to send a “New mail” to the specified address in the Outlook.

Properties

INPUT

AttachmentList: Indicate the “AttachmentList” (Declared as an output in the “ExtractMailMessage” activity) to include attachments along with the “NewMail.” It accepts values in the form of a “list” datatype. When left blank, it will not be considered.

BCCAddress: This parameter specifies to provide the “BCC address” of the recipients for sending the email. It ensures that the “MailID” mentioned is not disclosed to the other users listed in the “To” and “CC” addresses. This parameter accepts values in “String” datatype. You can either hardcode the values in “String” datatype or can enter the values in “String”.
When left blank, it will not be considered.

Body: This parameter specifies the “Mail Body” that should be sent as an email. This parameter accepts values in “String” datatype. You can either hardcode the values in “String” datatype or can enter the values in “String”. When left blank, it will not be considered.

CCAddress: This parameter provides the “CC address” of the recipients to whom the email should be sent. It enables sending the email to additional recipients for informational purposes. 
This parameter accepts values in “String” datatype. You can either hardcode the values in “String” datatype or can enter the values in “String”. When left blank, it will not be considered.

FromAddress: Specify the “From address,” which is the sender’s email address used to send the email. This parameter accepts values in “String” datatype. You can either hardcode the values in “String” datatype or can enter the values in “String”. When left blank, it will not be considered.

MailSubject: Specify the “Subject” of the email to be sent along with the mails. This parameter accepts values in “String” datatype. You can either hardcode the values in “String” datatype or can enter the values in “String”. When left blank, it will not be considered.

ToAddress: *It specifies the “To address” of the recipient to send the mail. This parameter accepts values in “String” datatype. You can either hardcode the values in “String” datatype or can enter the values in “String”. When left blank, it will not be considered.

MISC

DisplayName: Displays the name of the activity. The activity name can be customized, which aids in troubleshooting.

SkipOnError: Specify the “Boolean” value as “True” or “False.”
True: Continue executing the workflow regardless of any errors thrown.
False:
 Halt the workflow if it encounters any errors.
None:
 If the option is left blank, the activity will, by default, behave as if “False” were chosen.

Version: It indicates the version of the feature being used.

OUTPUT

Result: It provides the ability to view the execution status of the activity. It returns values in “Boolean.”
True: Indicates that the activity has been executed successfully without any errors.
False: Indicates that the activity has been unsuccessful due to an unexpected error being thrown.

Represents mandatory fields to execute the workflow.

Notes

The attachments list should be declared as a list of strings from the variables section and enter the value as new List(of string)(new string(){“value1”,“value2”}). Enter the location path of the attachments in the “Value1 and 2”.

8.5.13 OpenMail

This activity is used to open mail from the specified outlook account. A separate window appears while opening the mail. Ensure this activity is included within a designated parent activity, “Outlook Scope”.

Properties

INPUT

MailItem:* This parameter specifies the MailItem variable that needs to be opened in a separate window.   

The MailItem variable is essentially the email message, and it can be obtained using the “For Each Mail” activity, which retrieves emails from your specified folder in Outlook.

MISC

DisplayName: Displays the name of the activity. The activity name can be customized, which aids in troubleshooting.

SkipOnError: Specify the “Boolean” value as “True” or “False.”
True: Continue executing the workflow regardless of any errors thrown.
False:
 Halt the workflow if it encounters any errors.
None:
 If the option is left blank, the activity will, by default, behave as if “False” were chosen.

Version: It indicates the version of the feature being used.

OUTPUT

Result: It provides the ability to view the execution status of the activity. It returns values in “Boolean.”
True: Indicates that the activity has been executed successfully without any errors.
False: Indicates that the activity has been unsuccessful due to an unexpected error being thrown.

* Represents mandatory fields to execute the workflow.

8.5.14 OutlookScope

The “Outlook Scope” activity acts as centralized authentication for an Outlook account. It defines the boundaries within which specific activities, such as reading, writing, sending, or managing emails and folders, can be executed. Users need to select the required “Outlook” account within this scope for authentication and access, eliminating the need for separate authentication steps for each interaction involving Outlook activities.

Properties

INPUT 

Account: * This parameter lists the number of Outlook accounts integrated into the user’s system. Choose the option from the drop-down to select the required account. This field accepts the value in “String” format.

MISC

DisplayName: Displays the name of the activity. The activity name can be customized, which aids in troubleshooting.

SkipOnError: Specify the “Boolean” value as “True” or “False.”
True: Continue executing the workflow regardless of any errors thrown.
False:
 Halt the workflow if it encounters any errors.
None:
 If the option is left blank, the activity will, by default, behave as if “False” were chosen.

Version: It indicates the version of the feature being used.

Represents mandatory fields to execute the workflow.

How to integrate your outlook account?

1. Create a new solution.
2. Install the “Outlook Automation” feature from the “Manage Features” option.
3. Drag and drop the “Outlook scope” activity into the workflow and set it as start node.
4. Double click on the activity.
5. In the “Account” field, click on the dropdown menu within the activity.
a. The dropdown menu lists the number of accounts integrated into the user’s system.
b. If there are multiple accounts, you can choose the desired option from the dropdown menu.
6. Now, you can add other email automation activities into the “Do” sequence within the scope activity.

8.5.15 Reply

This activity helps the user in “Replying” to emails from the designated Outlook account. Ensure this activity is included within a designated parent activity, “Outlook Scope” and “ForEachMail” activity.

Properties

INPUT

AttachmentList: Indicate the “AttachmentList” (Declared as an output in the “ExtractMailMessage” activity) to include attachments along with the “NewMail.” It accepts values in the form of a “list” datatype. When left blank, it will not be considered.

BCCAddress: This parameter specifies to provide the “BCC address” of the recipients for sending the email. It ensures that the “MailID” mentioned is not disclosed to the other users listed in the “To” and “CC” addresses.
This parameter accepts values in “String” datatype. You can either hardcode the values in “String” datatype or can enter the values in “String”.When left blank, it will not be considered.

CCAddress: This parameter provides the “CC address” of the recipients to whom the email should be sent. It enables sending the email to additional recipients for informational purposes. 
This parameter accepts values in “String” datatype. You can either hardcode the values in “String” datatype or can enter the values in “String”. When left blank, it will not be considered.

MailBody: * This parameter specifies the “Mail Body” that should be sent as an email.
This parameter accepts values in “String” datatype. You can either hardcode the values in “String” datatype or can enter the values in “String”. When left blank, it will not be considered.

MailItem:* This parameter indicates to provide the MailItem variable that needs to be replied.  

The MailItem variable is essentially the email message, and it can be obtained using the “For Each Mail” activity, which retrieves emails from your specified folder in Outlook.

MailSubject: Specify the “Subject” of the email to be sent along with the mails. This parameter accepts values in “String” datatype. You can either hardcode the values in “String” datatype or can enter the values in “String”.
When left blank, it will not be considered.

MoreRecipients: This specifies the addition of more recipients by including the email addresses of the recipients. This parameter accepts values in “String” datatype. You can either hardcode the values in “String” datatype or can enter the values in “String”.
When left blank, it will not be considered.

RemoveRecipients: Specify the removal of recipients by providing their “Email addresses.” This parameter accepts values in “String” datatype. You can either hardcode the values in “String” datatype or can enter the values in “String”.
When left blank, it will not be considered.

ReplyAll: Specify either “True” or “False” to enable or disable the “Reply all” condition for the list of emails.
True: Enables the “Reply All” functionality to send a reply to all the users mentioned in the email.
False: Disables the “Reply All” functionality, allowing a reply to be sent only to the original sender.
None: Indicates that when left blank, the functionality will be default to “False”.

MISC

DisplayName: Displays the name of the activity. The activity name can be customized, which aids in troubleshooting.

SkipOnError: Specify the “Boolean” value as “True” or “False.”
True: Continue executing the workflow regardless of any errors thrown.
False:
 Halt the workflow if it encounters any errors.
None:
 If the option is left blank, the activity will, by default, behave as if “False” were chosen.

Version: It indicates the version of the feature being used.

OUTPUT

Result: It provides the ability to view the execution status of the activity. It returns values in “Boolean.”
True: Indicates that the activity has been executed successfully without any errors.
False: Indicates that the activity has been unsuccessful due to an unexpected error being thrown.

Represents mandatory fields to execute the workflow.

 Notes

The attachments list should be declared as a list of strings from the variables section and enter the value as new List(of string)(new string(){“value1”,“value2”}). Enter the location path of the attachments in the “Value1 and 2”.

8.5.16 Save

This activity assists in saving the “Mail” in the “MailMessage” format to the specified local path. Ensure this activity is included within a designated parent activity, “Outlook Scope” and “ForEachMail” activity.

Properties

INPUT

FileName: This parameter indicates to provide the “Name” in which the mails are required to save in the specified local path as “MailMessage.” It accepts values in “String” datatype. You can either hardcode the values in “String” datatype or can enter the values in “String”. 

When left blank, it will not be considered.

FolderPath: This parameter indicates to provide the “Folder path” to where the “Mails” are required to be saved from the outlook account. It accepts values in “String” datatype. You can either hardcode the values in “String” datatype or can enter the values in “String”.

MailItem:* This parameter indicates to provide the MailItem variable that needs to be saved from the specified outlook account.

The MailItem variable is essentially the email message, and it can be obtained using the “For Each Mail” activity, which retrieves emails from your specified folder in Outlook.

MISC

DisplayName: Displays the name of the activity. The activity name can be customized, which aids in troubleshooting.

SkipOnError: Specify the “Boolean” value as “True” or “False.”
True: Continue executing the workflow regardless of any errors thrown.
False:
 Halt the workflow if it encounters any errors.
None:
 If the option is left blank, the activity will, by default, behave as if “False” were chosen.

Version: It indicates the version of the feature being used.

OUTPUT

Result: It provides the ability to view the execution status of the activity. It returns values in “Boolean.”
True: Indicates that the activity has been executed successfully without any errors.
False: Indicates that the activity has been unsuccessful due to an unexpected error being thrown.

Represents mandatory fields to execute the workflow.

8.6 Word

In Robility, the “Word” feature refers to a set of activities designed to interact with Microsoft Word documents.

These activities enable the automation of various tasks within Word, such as data extraction, text replacement, content appending, and more.

This feature will be compatible with following Microsoft Word versions:
    1. 2016
    2. 2019
    3. Office 365 

Benefits of Word Activities

1. Efficiency: Automation of repetitive tasks like generating reports, extracting specific data, or formatting documents saves time and reduces human error.
2. Accuracy: Ensures precise document handling, formatting, and content extraction by following defined workflows.
3. Integration: Seamlessly interacts with Microsoft Word to perform various operations within the automation workflow.

4. Scalability: Can be integrated into larger automation processes, increasing the scalability of document-related tasks.

UseCase

1. Data Extraction and Entry: Automate the extraction of specific data from Word documents and use it in other processes or systems.
2. Content Appending and Modification: Append or modify text, images, or tables within existing documents based on the predefined conditions or requirements.

8.6.1 Release Notes

v.1.0.9

This release includes enhancements to dependent DLLs.

Enhancement

All dependent DLLs have been upgraded to the latest stable versions, enhancing security, performance, and workflow reliability. This update ensures smoother execution and maintains compatibility with both existing and new workflows.

Released Date: 09/03/2026

8.6.2 AppendText

This activity assists the user to append the additional input text to a specified word document, either at the top or at the bottom of the page.

Properties

INPUT

AtTop: This parameter enables to append the text at the top of the page in the specified word document. Specify the “Boolean” value as “True” or “False.”
True: Enables to append the text at the top of the page.
False: Does not add text at the top of the page.
None: If the option is left blank, the activity will, by default, behave as if “False” were chosen.

DelayAfter: It assists the user to add a delay before initiating subsequent activities. The delay duration here is in milliseconds. By default, it is set to “1000” milliseconds. When the option is left blank, the delay will not be considered.

DelayBefore: It assists the user in adding a delay before starting the execution of the activities. The delay duration here is in milliseconds. By default, it is set to “1000” milliseconds. When the option is left blank, the delay will not be considered.

FilePath:* This parameter specifies to provide the “Path” of the input word file where the text needs to be appended. You can either hardcode the values in the “String” variable or pass the values as “String” datatype. This parameter accepts values in “String” datatype. You can either hardcode the values in the “String” variable or pass the values as “String” datatype. This parameter accepts values in “String” datatype.

NewLine: This parameter enables to append the input text in a new line after the existing text in the specified word document. Specify the “Boolean” value as “True” or “False.”
True: Enables to append the input text in a new line.
False: Proceeds to write the input text in the same line next to the existing text in the word document.
None: If the option is left blank, the activity will, by default, behave as if “False” were chosen.

NewPage: This parameter enables to append the input text in a new page after the existing text in the specified word document. Specify the “Boolean” value as “True” or “False.”
True: Enables to append the input text in a new page.
False: Proceeds to write the input text in the same page next to the existing text in the word document.
None: If the option is left blank, the activity will, by default, behave as if “False” were chosen.

MISC

DisplayName: Displays the name of the activity. The activity name can be customized, which aids in troubleshooting.

SkipOnError: Specify the “Boolean” value as “True” or “False.”
True: Continue executing the workflow regardless of any errors thrown.
False: Halt the workflow if it encounters any errors.
None: If the option is left blank, the activity will, by default, behave as if “False” were chosen.

Version: It indicates the version of the feature being used.

OUTPUT

Result: It provides the ability to view the execution status of the activity. It returns values in “Boolean.”
True: Indicates that the activity has been executed successfully without any errors.
False: Indicates that the activity has been unsuccessful due to an unexpected error being thrown.

* Represents mandatory fields to execute the workflow.

8.6.3 ReadText

This activity assists the user to read the entire text from the specified word document and stores in a “String” variable. 

Properties

INPUT

DelayAfter: It assists the user to add a delay before initiating subsequent activities. The delay duration here is in milliseconds. By default, it is set to “1000” milliseconds. When the option is left blank, the delay will not be considered.

DelayBefore: It assists the user in adding a delay before starting the execution of the activities. The delay duration here is in milliseconds. By default, it is set to “1000” milliseconds. When the option is left blank, the delay will not be considered.

Filepath:* This parameter specifies to provide the “Path” of the input word file where the text needs to be read. You can either hardcode the values in the “String” variable or pass the values as “String” datatype. This parameter accepts values in “String” datatype.

MISC

DisplayName: Displays the name of the activity. The activity name can be customized, which aids in troubleshooting.

SkipOnError: Specify the “Boolean” value as “True” or “False.”
True: Continue executing the workflow regardless of any errors thrown.
False: Halt the workflow if it encounters any errors.
None: If the option is left blank, the activity will, by default, behave as if “False” were chosen.
Version: It indicates the version of the feature being used.

OUTPUT

Read Text: It returns the output of the activity as the text extracted from the specified word document. It returns the output in “String” datatype.

Result: It provides the ability to view the execution status of the activity. It returns values in “Boolean.”
True: Indicates that the activity has been executed successfully without any errors.
False: Indicates that the activity has been unsuccessful due to an unexpected error being thrown.

* Represents mandatory fields to execute the workflow.

8.6.4 ReplaceText

This activity helps the user to replace an existing text with a new text in the specified input word document. It functions the same as the “Replace” functionality in the Microsoft “Word” document.

Properties

INPUT

DelayAfter: It assists the user to add a delay before initiating subsequent activities. The delay duration here is in milliseconds. By default, it is set to “1000” milliseconds. When the option is left blank, the delay will not be considered.

DelayBefore: It assists the user in adding a delay before starting the execution of the activities. The delay duration here is in milliseconds. By default, it is set to “1000” milliseconds. When the option is left blank, the delay will not be considered.

ExistingText:* This parameter specifies to provide the existing “input” text which needs to be found in the specified input word document. You can either hardcode the values in the “String” variable or pass the values as “String” datatype. This parameter accepts values in “String” datatype.

IsReplaceAll:* This parameter enables to replace all the found existing text with the new text in the specified word document. Specify the “Boolean” value as “True” or “False.”
True: Enables to replace all the text.
False: It replaces only the first found text.

ReplaceText:* This parameter specifies to provide the new “input” text which needs to be replaced in the specified input word document. You can either hardcode the values in the “String” variable or pass the values as “String” datatype. This parameter accepts values in “String” datatype.

MISC

DisplayNameDisplays the name of the activity. The activity name can be customized, which aids in troubleshooting.

SkipOnError: Specify the “Boolean” value as “True” or “False.”
True: Continue executing the workflow regardless of any errors thrown.
False: Halt the workflow if it encounters any errors.
None: If the option is left blank, the activity will, by default, behave as if “False” were chosen.
Version: It indicates the version of the feature being used.

OUTPUT

Result: It provides the ability to view the execution status of the activity. It returns values in “Boolean.”
True: Indicates that the activity has been executed successfully without any errors.
False: Indicates that the activity has been unsuccessful due to an unexpected error being thrown.

* Represents mandatory fields to execute the workflow.

8.6.5 SaveWordAsPdf

This activity enables users to save a Word document as a PDF file.

Parameters

INPUT

File Path: *Specifies the file path with the .pdf extension where the Word document will be saved as a PDF. The value can be hardcoded in a String variable or passed as a String datatype.

Replace Existing: Determines whether an existing file at the specified location should be replaced.

MISC

DisplayName: Displays the name of the activity.

SkipOnError: Specifies a Boolean value: True or False.
True: Continues executing the workflow regardless of any errors encountered.
False: Halts the workflow if any error occurs.
None: If left blank, the activity behaves as False by default.

Version: Indicates the version of the feature being used.

OUTPUT

Result: Returns the execution status of the activity as a Boolean value.   
True: The activity executed successfully without any errors.
False: The activity failed due to an unexpected error.

* Represents mandatory fields required to execute the workflow.

How to Do?

To perform this activity, it must be used within the WordScope activity.

1. Drag and drop the SaveWordAsPDF activity inside the WordScope
2. In the WordScope activity, select the file path of the input Word document.
3. In the SaveWordAsPDF activity, provide the same file path with the file extension of .pdf. The path can be hardcoded or passed as a variable.

Example:
WordScope File Path: “C:\Users\Document1.docx”
SaveWordAsPDF File Path: “C:\Users\Document1.pdf”

8.6.6 WordScope

The “WordScope” activity serves as the primary container for various activities within the Word automation feature. It acts as the encompassing scope for tasks such as creating new content, inserting information, removing entries, reading, and writing data, all within the context of a Word document.

Within the scope, users input the necessary Word document, input strings, or variables required for the designated tasks.

Properties

INPUT

CreateIfNotExists: Indicates to enable this checkbox if there is no “word” document in the mentioned file path. By default, it will be unchecked. When left empty, the property will not be considered.

FilePath:* This parameter specifies to provide the “Path” of the input word file where the text needs to be read. You can either hardcode the values in the “String” variable or pass the values as “String” datatype. This parameter accepts values in “String” datatype.

Password: This parameter indicates to provide the “Password” of the input word file if it’s been protected. You can either hardcode the values in the “String” variable or pass the values as “String” datatype. This parameter accepts values in “String” datatype.

MISC

Body: Gets auto filled once the “Activity” is dropped into the body.

DisplayName: Displays the name of the activity. The activity name can be customized, which aids in troubleshooting.

SkipOnError: Specify the “Boolean” value as “True” or “False.”
True: Continue executing the workflow regardless of any errors thrown.
False: Halt the workflow if it encounters any errors.
None: If the option is left blank, the activity will, by default, behave as if “False” were chosen.
Version: It indicates the version of the feature being used.

* Represents mandatory fields to execute the workflow.

8.7 PDF Automation

Introduction

PDF automation in Robility involves the capabilities to automate bots to handle tasks related to PDF files. This can include extracting, processing, and generating PDF documents.

Benefits

  1. Efficiency &Accuracy : Automating PDF-related tasks reduces manual effort, improving efficiency and accuracy.
  2. Time Savings: It can quickly navigate, extract, or input data in PDFs, saving considerable time.
  3. Cost Savings: By automating repetitive PDF tasks, organizations can cut operational costs.

Use Cases

  1. Data Extraction: To extract specific data from PDF documents, such as invoices or forms.
  2. Data Entry: Populating webforms or databases with information from PDFs.
  3. Text Search and Analysis: To search and analyze text within PDFs for specific information.

8.7.1 Release Notes

v.1.2.8

This release includes the following bug fixes:

Bug Fix:

Fixed an issue in the PDF Merge activity that caused merges to fail when PDF files were located in multiple folders. The core functionality has been updated, and PDF activities now work correctly.

Limitation

1. In the ExtractImagesFromPdf activity, if both the Extract All Pages checkbox is selected and a page range is specified, the activity prioritizes extracting images from all pages, ignoring the specified range.
2. If neither option is selected, the activity prompts at least one option to be provided either enable Extract All Pages or specify a page range.
3. Except for the PDF Create activity, all other PDF activities support readable PDFs only; image-based PDFs are not supported.

Released Date: 05/05/2026

8.7.2 Convert to PDF

The Convert to PDF activity is used to convert various file types (.doc, .docx, .xls, .xlsx, .jpg, .jpeg, .png, .bmp) into a PDF file.

Properties

INPUT

InputFilePath: *Specifies to provide the full path of the file to be converted into PDF. Accepts values in String datatype.

OutputFileName: *Specifies to provide the full path along with the file name and .pdf extension. where the converted PDF will be saved and accepts values in String datatype.

Overwrite: Indicates whether to overwrite the output PDF file if it already exists at the specified path. By default, the box will be unchecked.
Check: Overwrites the existing PDF file with the new one.
Uncheck:
Throws an error if a PDF file with the same name already exists.

Password: Specifies to provide the password if the provided file is protected with password and accepts values in String datatype.

MISC

Display Name: Displays the name of the activity. The activity name can be customized, which aids in troubleshooting.

SkipOnError: Specify the “Boolean” value as “True” or “False.”

True: Continue executing the workflow regardless of any errors thrown.
False: Halt the workflow if it encounters any errors.
None: If the option is left blank, the activity will, by default, behave as if “False” were chosen.

Version: It indicates the version of the feature being used.

OUTPUT

Result: This parameter allows you to view the execution status of the activity and returns a value in “Boolean.”

True: Indicates that the activity has been executed successfully without any errors.
False: Indicates that the activity has been unsuccessful due to an unexpected error being thrown.

* Represents mandatory fields to execute the workflow.

8.7.3 Extract Images from PDF

This activity allows users to extract and save images from the specified PDF file to a local directory.

Properties

INPUT

Extract from all pages: *Enables the extraction of images from all pages in the PDF. This option is enabled by default.

Image Format: Specifies the image format in which the extracted images will be saved. Available options include:

a. PNG
b. JPG
c. JPEG
d. TIFF
e. GIF
f. BMP

Output Folder Path: Specifies the local directory path where the extracted images will be saved. Accepts values in String datatype.

Password: Specifies the password for the input PDF if it is password-protected. Accepts values in String datatype.

PDF File Path: *Specifies the file path of the input PDF from which images are to be extracted. Accepts values in String datatype.

Range: Indicates the page numbers from which images should be extracted. Accepts values in String datatype. The accepted formats are:

a. 1 (single page)
b. 1,3 (specific pages)
c. 3-5 (page range)
d. ALL (entire document)

MISC

Display Name: Displays the name of the activity. The activity name can be customized, which aids in troubleshooting.

SkipOnError: Specify the “Boolean” value as “True” or “False.”

True: Continue executing the workflow regardless of any errors thrown.
False: Halt the workflow if it encounters any errors.
None: If the option is left blank, the activity will, by default, behave as if “False” were chosen.

Version: It indicates the version of the feature being used.

Output

Extracted Images Path: Returns a list containing the file paths of all extracted images. The output is in List of String datatype.

Result: This parameter allows you to view the execution status of the activity and returns a value in “Boolean.”

True: Indicates that the activity has been executed successfully without any errors.
False: Indicates that the activity has been unsuccessful due to an unexpected error being thrown.

Total Images Extracted: Returns the total number of images extracted from the PDF. The output is in Int32 datatype.

* Represents mandatory fields to execute the workflow.

8.7.4 PDFCreate

This activity helps the user to convert images into a PDF file. Only (.jpg & .png) images are acceptable.

Properties

INPUT

FileList:* This parameter specifies to provide the list of images “Path” to convert them into a PDF. You have the option to either hardcode the values in the “Array of String” variable or pass the values as “Array of String” datatype. This parameter accepts values in “Array of String” datatype.
(Refer in the below document to know how to declare array of string datatype).

OutputFileName:* This parameter indicates the “Path” along with the name of the PDF to specify where the output should be stored. You have the option to either hardcode the values in the “String” variable or pass the values as “String” datatype. This parameter accepts values in “String” datatype.
(Refer the tips to get detailed information).

OverWriteFile: Indicates to overwrite the “PDF Files” that are being stored with the same name available in the system. By default, the box will be “un-checked”.

MISC

DisplayName: Displays the name of the activity. The activity name can be customized, which aids in troubleshooting.

SkipOnError: Specify the “Boolean” value as “True” or “False.”
True: Continue executing the workflow regardless of any errors thrown.
False: Halt the workflow if it encounters any errors.
None: If the option is left blank, the activity will, by default, behave as if “False” were chosen.

Version: It indicates the version of the feature being used.

OUTPUT

Result: It provides the ability to view the execution status of the activity. It returns values in “Boolean.”
True: Indicates that the activity has been executed successfully without any errors.
False: Indicates that the activity has been unsuccessful due to an unexpected error being thrown.

Represents mandatory fields to execute the workflow

Example

Here’s an example of how the “PDFCreate” activity works in the workflow –

The following is a simple example that demonstrates converting two different images into single PDF document as output.

1. Create a solution for building a workflow.
2. Drag and drop the “PDFCreate ” activity onto the designer pane and set it as the “Start Node.”
3. Double-click the activity to provide the essential details.
4. In the “FileList” field, providing the list of image files to be converted to PDF.
a. It accepts only “Array of String” and there are two ways to provide the input of the file list.
b. Method 1: The list of PDF files can be hardcoded directly in the property “FileList”. Click on the variables section and here I am providing the name as “Input” and choose the type argument as “Array [String]”.
     i. Here provide the default value as multiple files in the format as {“Image1.jpg”, “Image2.png”}
    ii. Then, enter the variable name in the “FileList” property.
c. Method 2: You can provide the values in the “FileList” property by entering the format as {“Image1.jpg”, “Image2.png”}
5. Next, moving to the “OutputFileName” and providing the name and path of my PDF document to store the converted output into PDF.
6. Now, execute the workflow.

The bot will execute the workflow and converts the image files to create a new PDF and stores it in the specified Output path.

8.7.5 MergeFiles

This activity facilitates the user in merging multiple PDF documents into a single PDF document at a specified path

Properties

INPUT

FileList:* This parameter specifies to provide the list of images “Path” to convert them into a PDF. You have the option to either hardcode the values in the “Array of String” variable or pass the values as “Array of String” datatype. This parameter accepts values in “Array of String” datatype.
(Refer in the below document to know how to declare array of string datatype).

OutputFileName:* This parameter indicates the “Path” along with the name of the PDF to specify where the output should be stored. You have the option to either hardcode the values in the “String” variable or pass the values as “String” datatype. This parameter accepts values in “String” datatype.
(Refer the tips to get detailed information).

MISC

DisplayName: Displays the name of the activity. The activity name can be customized, which aids in troubleshooting.

SkipOnError: Specify the “Boolean” value as “True” or “False.”
True: Continue executing the workflow regardless of any errors thrown.
False: Halt the workflow if it encounters any errors.
None: If the option is left blank, the activity will, by default, behave as if “False” were chosen.

Version: It indicates the version of the feature being used.

OUTPUT

Result: It provides the ability to view the execution status of the activity. It returns values in “Boolean.”
True: Indicates that the activity has been executed successfully without any errors.
False: Indicates that the activity has been unsuccessful due to an unexpected error being thrown.

Represents mandatory fields to execute the workflow

Example

Here’s an example of how the “MergeFiles” activity works in the workflow –

The following is a simple example that demonstrates how to merge two different PDF files the content from the specified pages of the provided input PDF document.

1. Create a solution for building a workflow.
2. Drag and drop the “MergeFiles” activity onto the designer pane and set it as the “Start Node.”
3. Double-click the activity to provide the essential details.
a. Here, I am providing the “OutputFileName” as the name and path of my PDF document to store the merged PDFs.
4. Navigating to the “FileList” in the properties section to provide the list of PDF files to be merged.
a. It accepts only “Array of String” and there are two ways to provide the input of the file list.
b. Method 1: The list of PDF files can be hardcoded directly in the property “FileList”. Click on the variables section and here I am providing the name as “Input” and choose the type argument as “Array[String]” .
     i. Here provide the default value as multiple files in the format as {“Path1.pdf”, “Path2.pdf”}.
     ii. Then, enter the variable name in the “FileList” property.
c. Method 2: You can provide the values in the “FileList” property by entering the format as {“Path1.pdf”, “Path2.pdf”}.
5. Now, execute the workflow.

The bot will execute the workflow and merges the list of specified files into a single PDF document in the specified Output path.

8.7.6 PDFPagecount

This activity helps the user to get the count of the pages from the specified PDF file.

Properties

INPUT

Password: This parameter is used to specify the password if the pdf is protected. You have the option to either hardcode the values in the “String” variable or pass the values as “String” datatype. When the option is left blank, the password will not be considered.
This parameter accepts values in “String” datatype.

PDFFilePath:* This parameter specifies to provide the “Path” of the input pdf against which the count needs to extracted. You can either hardcode the values in the “String” variable or pass the values as “String” datatype. This parameter accepts values in “String” datatype.

MISC

DisplayName: Displays the name of the activity. The activity name can be customized, which aids in troubleshooting.

SkipOnError: Specify the “Boolean” value as “True” or “False.”
True: Continue executing the workflow regardless of any errors thrown.
False: Halt the workflow if it encounters any errors.
None: If the option is left blank, the activity will, by default, behave as if “False” were chosen.

Version: It indicates the version of the feature being used.

OUTPUT

PageCountsIt returns the output of the activity as the count extracted from the specified pdf document. It returns the output in “Integer” datatype.

Result: It provides the ability to view the execution status of the activity. It returns values in “Boolean.”
True: Indicates that the activity has been executed successfully without any errors.
False: Indicates that the activity has been unsuccessful due to an unexpected error being thrown.

Represents mandatory fields to execute the workflow

8.7.7 PDFPageToImage

This activity helps the user to convert the specified PDF pages into an image format file.

Properties

INPUT

InputFilePath:* This parameter specifies to provide the “Path” of the input pdf from where the text needs to be extracted. You can either hardcode the values in the “String” variable or pass the values as “String” datatype. This parameter accepts values in “String” datatype.

OutputFileName:* This parameter indicates the “Path” along with the name of the PDF to specify where output should be stored. You have the option to either hardcode the values in the “String” variable or pass the values as “String” datatype.cThis parameter accepts values in “String” datatype.
(Refer the tips to get detailed information).

PageNumber:*  It indicates to specify the “page” range to convert them into an image. You have the option to either hardcode the values in the “Integer” variable or pass the values as “Integer” datatype.

Password: This parameter is used to specify the password if the pdf is protected. You have the option to either hardcode the values in the “String” variable or pass the values as “String” datatype. When the option is left blank, the password will not be considered. This parameter accepts values in “String” datatype.

MISC

DisplayName: Displays the name of the activity. The activity name can be customized, which aids in troubleshooting.

SkipOnError: Specify the “Boolean” value as “True” or “False.”
True: Continue executing the workflow regardless of any errors thrown.
False: Halt the workflow if it encounters any errors.
None: If the option is left blank, the activity will, by default, behave as if “False” were chosen.

Version: It indicates the version of the feature being used.

OUTPUT

Result: It provides the ability to view the execution status of the activity. It returns values in “Boolean.”
True: Indicates that the activity has been executed successfully without any errors.
False: Indicates that the activity has been unsuccessful due to an unexpected error being thrown.

Represents mandatory fields to execute the workflow

8.7.8 Split

This activity helps the user to split the pdfs into multiple PDFs. It efficiently divides the specified PDFs into distinct files, providing users with a convenient way to manage and organize their documents.

Properties

INPUT

InputFilePath:* This parameter specifies to provide the “Path” of the input pdf from where the text needs to be extracted. You can either hardcode the values in the “String” variable or pass the values as “String” datatype. This parameter accepts values in “String” datatype.

OutputFileName:* This parameter indicates the “Path” along with the name of the PDF to specify where output should be stored. You have the option to either hardcode the values in the “String” variable or pass the values as “String” datatype.cThis parameter accepts values in “String” datatype.
(Refer the tips to get detailed information).

Password: This parameter is used to specify the password if the pdf is protected. You have the option to either hardcode the values in the “String” variable or pass the values as “String” datatype. When the option is left blank, the password will not be considered. This parameter accepts values in “String” datatype.

SplitBy:* It indicates to specify the “page” range to split the PDF. (Refer the tips below in the document to get more information)
You have the option to either hardcode the values in the “String” variable or pass the values as “String” datatype. This parameter accepts values in “String” datatype.

SplitType: This parameter specifies the type to split the input PDF,
 SplitByPages: It splits the PDF document page by page with the number of pages specified in the “SplitBy” field.
 DividePDF: It divides the PDF document with the number of pages specified in the “SplitBy” field.
 TwoPartPDF: It divides the PDF document into two parts with the number of pages specified in the “SplitBy” field.
 PageRanges: It splits only the specified number of pages range from the PDF document with the number of pages specified in the “SplitBy” field.

MISC

DisplayName: Displays the name of the activity. The activity name can be customized, which aids in troubleshooting.

SkipOnError: Specify the “Boolean” value as “True” or “False.”
True: Continue executing the workflow regardless of any errors thrown.
False: Halt the workflow if it encounters any errors.
None: If the option is left blank, the activity will, by default, behave as if “False” were chosen.

Version: It indicates the version of the feature being used.

OUTPUT

Result: It provides the ability to view the execution status of the activity. It returns values in “Boolean.”
True: Indicates that the activity has been executed successfully without any errors.
False: Indicates that the activity has been unsuccessful due to an unexpected error being thrown.

Represents mandatory fields to execute the workflow

8.7.9 TextExtractor

This activity assists the user in extracting the content from the specified pages of a PDF and storing it as a variable.

Properties

INPUT

InputFilePath:* This parameter specifies to provide the “Path” of the input pdf from where the text needs to be extracted. You can either hardcode the values in the “String” variable or pass the values as “String” datatype. This parameter accepts values in “String” datatype.

Password: This parameter is used to specify the password if the pdf is protected. You have the option to either hardcode the values in the “String” variable or pass the values as “String” datatype. When the option is left blank, the password will not be considered. This parameter accepts values in “String” datatype.

Range:* It indicates to specify the “page” range to read and extract the text from the specified pages only. You have the option to either hardcode the values in the “String” variable or pass the values as “String” datatype. By default, it will be specified as “ALL”. This parameter accepts values in “String” datatype.

MISC

DisplayName: Displays the name of the activity. The activity name can be customized, which aids in troubleshooting.

SkipOnError: Specify the “Boolean” value as “True” or “False.”
True: Continue executing the workflow regardless of any errors thrown.
False: Halt the workflow if it encounters any errors.
None: If the option is left blank, the activity will, by default, behave as if “False” were chosen.

Version: It indicates the version of the feature being used.

OUTPUT

Result: It provides the ability to view the execution status of the activity. It returns values in “Boolean.”
True: Indicates that the activity has been executed successfully without any errors.
False: Indicates that the activity has been unsuccessful due to an unexpected error being thrown.

Text: It returns the output of the activity as the text extracted from the specified pdf document. It returns the output in “String” datatype

Represents mandatory fields to execute the workflow

8.8 TextAutomation

Introduction

Text automation in Robility streamlines the handling of textual information, enabling bots to efficiently perform tasks such as data extraction, document analysis, and content manipulation. These operations can be carried out within applications like Notepad, MS Word, or on tabular data in CSV files.

Limitation

This feature supports only the Notepad application for the following activities:

1. Append Text
2. Read Text
3. Overwrite Text

Supported File Systems

Text automation supports the following file systems:

1. Local Files: Files stored within local folders on the system.
2. Shared Network Paths: Files located on shared network paths, provided appropriate access permissions have been granted.

Use Case

1. Invoice Processing: Automate the extraction of key details (invoice number, date, amount, vendor) from invoices.

Activities that can be used: Read Text, Regex Match, Text Parsing, Text Splitting.

2. Document Review: Review contracts or agreements for specific information or keywords and send alerts for approvals.

Activities that can be used: Read Text, Regex Match, WordTextExtractor.

3. Report Generation: Automate the preparation of daily, weekly, or monthly performance reports by consolidating data from various sources.

Activities that can be used: Append Text, Overwrite Text, Table Parser (CSV), WordTextExtractor.

8.8.1 Release Notes

v.1.1.0

This release includes enhancements to dependent DLLs.

Enhancement

All dependent DLLs have been upgraded to the latest stable versions, enhancing security, performance, and workflow reliability. This update ensures smoother execution and maintains compatibility with both existing and new workflows.

Released Date: 09/03/2026

8.8.2 AppendText

This activity helps the user to append the additional input text to a specified text file, either at the top or at the bottom of the page.

Properties

INPUT

AppendType: This parameter determines the place where the input text needs to be added in the file.

AppendNext: Adds the input text to the end of the document.
AppendBefore: Adds the input text to the beginning of the document. By default, it is chosen as “AppendNext” option.

ContinueOnSameLine: This parameter enables to append the input text in the same line after the existing text in the specified document.
By default, it will be un-checked. When left blank, this option will not be considered.

FilePath: *This parameter specifies to provide the “Path” of the input file where the text needs to be appended. It accepts values in the “String” variable.  

InputString: * This parameter specifies to provide the “input” text that needs to be written in the input document. It accepts the values in the “String” variable.

MISC

DisplayName: Displays the name of the activity. The activity name can be customized, which aids in troubleshooting.

SkipOnError: Specify the “Boolean” value as “True” or “False.”
True: Continue executing the workflow regardless of any errors thrown.
False: Halt the workflow if it encounters any errors.
None: If the option is left blank, the activity will, by default, behave as if “False” were chosen.

Version: It indicates the version of the feature being used.

OUTPUT

Result: This parameter allows you to view the execution status of the activity and returns a value in “Boolean.”
True: Indicates that the activity has been executed successfully without any errors.
False: Indicates that the activity has been unsuccessful due to an unexpected error being thrown
.

* Represents mandatory fields to execute the workflow. 

8.8.3 ClearClipboard

This activity helps the user to clear all the text available in the “Clipboard” data. 

Properties

MISC

DisplayName: Displays the name of the activity. The activity name can be customized which will help in troubleshooting.

SkipOnError: Specify the Boolean value as “True or False.”
True: Continues to execute the workflow irrespective of any error thrown.
False: Stops the workflow if it throws any error.
None: If the option is specified as blank, by default the activity will perform the “False” action.

Version: It indicates the version of the feature that is being in use.

OUTPUT

Result: This parameter allows you to view the execution status of the activity and returns a value in “Boolean.”
True: Indicates that the activity has been executed successfully without any errors.
False: Indicates that the activity has been unsuccessful due to an unexpected error being thrown.

8.8.4 GetClipboardValue

This activity helps the user to retrieve the data from the “Clipboard”.

Properties

MISC

DisplayName: Displays the name of the activity. The activity name can be customized which will help in troubleshooting.

SkipOnError: Specify the Boolean value as “True or False.”
True: Continues to execute the workflow irrespective of any error thrown.
False: Stops the workflow if it throws any error.
None: If the option is specified as blank, by default the activity will perform the “False” action.

Version: It specifies the version of the FS automation feature in use.

OUTPUT

ClipboardValue: *It helps to view the output of the activity as the data retrieved from the clipboard in “String” format. This field returns the output in “String” datatype.

Result: This parameter allows you to view the execution status of the activity and returns a value in “Boolean.”
True: Indicates that the activity has been executed successfully without any errors.
False: Indicates that the activity has been unsuccessful due to an unexpected error being thrown
.

* Represents mandatory Fields to execute the workflow.

8.8.5 ReadText

This activity reads the entire text from a specified file and stores it in a string variable.

Properties

INPUT

FilePath: *This parameter specifies the file path of the input text file. You can provide it as a string or a string variable.

MISC

DisplayName: Displays the name of the activity. The activity name can be customized, which aids in troubleshooting.

SkipOnError: Specify the “Boolean” value as “True” or “False.”
True: Continue executing the workflow regardless of any errors thrown.
False: Halt the workflow if it encounters any errors.
None: If the option is left blank, the activity will, by default, behave as if “False” were chosen.

Version: It indicates the version of the feature being used.

OUTPUT

ReadText:It returns the text extracted from the specified text file in “String” datatype.

Result: This parameter allows you to view the execution status of the activity and returns a value in “Boolean.”
True: Indicates that the activity has been executed successfully without any errors.
False: Indicates that the activity has been unsuccessful due to an unexpected error being thrown

* Represents mandatory fields to execute the workflow. 

8.8.6 RegexMatch

 This activity helps the user to find matches in a given input string using a specified regular expression (regex) pattern. 

Properties

INPUT

Compiled: This parameter specifies to enable pre-compiling the regex for faster execution. Check this box if performance optimization is required for repeated matches.

CultureInvariant: This parameter specifies to check this box that ensures to ignore cultural differences in string comparison. 

EcmaScript: This parameter specifies to check this box if your pattern relies on ECMAScript standards for the regex. 

ExplicitCapture: This parameter specifies to enable this option that limits the capture to explicitly named groups. 

IgnoreCase: This parameter specifies to check this box to match text without considering case differences.

IgnorePatternWhitespace: Check this parameter to ignore pattern whitespace and allows comments in the regex pattern for better readability. 

InputString: *This parameter specifies to provide the input text to be matched using the regex. It accepts values in “String” datatype.

Multiline: Check this parameter if the specified input is multi-line text and this option allows ^ and $ to match the start and end of each line. 

RegexPattern: *This parameter specifies to provide the regex pattern for matching the values from the input string. It accepts the values in “String” datatype. 

RightToLeft: Check this parameter to search for the matches from right to left order.

Singleline: Check this parameter when the input needs to be treated as a single line, where it matches every character including newline. 

MISC

DisplayName: Displays the name of the activity. The activity name can be customized, which aids in troubleshooting.

SkipOnError: Specify the “Boolean” value as “True” or “False.”
True: Continue executing the workflow regardless of any errors thrown.
False: Halt the workflow if it encounters any errors.
None: If the option is left blank, the activity will, by default, behave as if “False” were chosen.

Version: It indicates the version of the feature being used.

OUTPUT

Matches: *It helps to return the list of matches retrieved from the provided input string.  

Result: This parameter allows you to view the execution status of the activity and returns a value in “Boolean.”
True: Indicates that the activity has been executed successfully without any errors.
False: Indicates that the activity has been unsuccessful due to an unexpected error being thrown.

* Represents mandatory fields to execute the workflow.

8.8.7 TableParserCSV

This activity assists the user in parsing tabular data available in Notepad into CSV format.

Properties

INPUT

Content: *This parameter specifies to provide the “Input” data that needs to be parsed into a CSV format. It accepts values in “String” datatype, either hardcoded or provided as a “String” values. 

EndLineNo: *Specifies to provide the “LineNumber” up to which the input data needs to be retrieved to parse them into CSV. It accepts values in “Integer” datatype. 

FilePath: *This parameter specifies to provide the “File path” of the CSV to where the parsed needs to be created. It accepts values in “String” datatype, either hardcoded or provided as a “String” values.

StartLineNo: *Specifies to provide the “LineNumber” from which the input data needs to be retrieved to parse them into CSV. It accepts values in “Integer” datatype. 

MISC

DisplayName: Displays the name of the activity. The activity name can be customized which will help in troubleshooting.

SkipOnError: Specify the Boolean value as “True or False.”
True: Continues to execute the workflow irrespective of any error thrown.
False: Stops the workflow if it throws any error.
None: If the option is specified as blank, by default the activity will perform the “False” action.

Version: It specifies the version of the Text Automation feature in use.

OUTPUT

DataTable: * It helps to view the output of the activity as the parsed output in “Datatable” format. This field returns the output in “Datatable” datatype.

Result: This parameter allows you to view the execution status of the activity and returns a value in “Boolean.”
True: Indicates that the activity has been executed successfully without any errors.
False: Indicates that the activity has been unsuccessful due to an unexpected error being thrown.

* Represents mandatory Fields to execute the workflow.

8.8.8 Text Parsing

This activity helps the user to extract a substring from the input text based on the specified length, line number, and starting position.

Properties

INPUT

ContentLength: *This parameter specifies the length of data to be extracted from the input string. It accepts values in the ‘Integer’ datatype.

 InputString: *This parameter specifies to provide the input from text where the text needs to be extracted. It accepts values in “String” datatype, you can either hardcode the values or provide the values in String variable. 

LineNo: *This parameter specifies to provide the line number from where the text needs to be extracted. It accepts values in “Integer” datatype. 

StartsAt: *Specifies to provide the position of the text that needs to be extracted. It accepts values in “Integer” datatype. 

MISC

DisplayName: Displays the name of the activity. The activity name can be customized, which aids in troubleshooting.

SkipOnError: Specify the “Boolean” value as “True” or “False.”
True: Continue executing the workflow regardless of any errors thrown.
False: Halt the workflow if it encounters any errors.
None: If the option is left blank, the activity will, by default, behave as if “False” were chosen.

Version: It indicates the version of the feature being used.

OUTPUT

Text: *It helps to return the text from the provided input string as the output of the activity in “String” datatype.  

Result: This parameter allows you to view the execution status of the activity and returns a value in “Boolean.”
True: Indicates that the activity has been executed successfully without any errors.
False: Indicates that the activity has been unsuccessful due to an unexpected error being thrown.

Represents mandatory fields to execute the workflow.

8.8.9 TextSplitting

This activity helps the user to split and extract the characters from the provided input string.

Properties

INPUT

InputString: *This parameter specifies to provide the “Input” data that needs to be split and extracted. It accepts values in “String” datatype, you can either hardcode the values or provide the values in String variable.

SplitType: * Specifies to choose the split type of option from the drop-down,
LTRIM: Trims characters from the left side.
RTRIM: Trims characters from the right side.
MIDTRIM: Trims characters from the middle.

StringLength: *Specify the “Length” of the input string characters that the bot must trim. It accepts values in “Integer” datatype. 

MISC

DisplayName: Displays the name of the activity. The activity name can be customized, which aids in troubleshooting.

SkipOnError: Specify the “Boolean” value as “True” or “False.”
True: Continue executing the workflow regardless of any errors thrown.
False: Halt the workflow if it encounters any errors.
None: If the option is left blank, the activity will, by default, behave as if “False” were chosen.

Version: It indicates the version of the feature being used.

OUTPUT

Text: *It returns the output of the activity as the text extracted from the specified text file in “String” datatype.

Result: This parameter allows you to view the execution status of the activity and returns a value in “Boolean.”
True: Indicates that the activity has been executed successfully without any errors.
False: Indicates that the activity has been unsuccessful due to an unexpected error being thrown.

* Represents mandatory fields to execute the workflow.

8.8.10 SetClipBoardValue

This activity helps the user set specific data to the clipboard.

Properties

INPUT

InputString: *This parameter specifies to provide the “Input” data that needs to be added in the “ClipBoard”. It accepts values in “String” datatype, you can either hardcode the values or provide the values in String variable.

MISC

DisplayName: Displays the name of the activity. The activity name can be customized, which aids in troubleshooting.

SkipOnError: Specify the “Boolean” value as “True” or “False.”
True: Continue executing the workflow regardless of any errors thrown.
False: Halt the workflow if it encounters any errors.
None: If the option is left blank, the activity will, by default, behave as if “False” were chosen.

Version: It indicates the version of the feature being used.

OUTPUT

Result: This parameter allows you to view the execution status of the activity and returns a value in “Boolean.”
True: Indicates that the activity has been executed successfully without any errors.
False: Indicates that the activity has been unsuccessful due to an unexpected error being thrown.

* Represents mandatory fields to execute the workflow.

8.8.11 WordTextExtractor

This activity helps the user to extract text from the Microsoft word document.

Properties

INPUT

FilePath: *Specify the path of the word file from which the text has to be extracted. It accepts values in “String” datatype, you can either hardcode the values or provide the values in String variable.

MISC

DisplayName: Displays the name of the activity. You can also customize the activity name to help troubleshoot issues faster. This name will be used for logging purposes.

SkipOnError: It specifies whether to continue executing the workflow even if it throws an error. This supports only Boolean value “True or False.”
True: Continues to execute the workflow irrespective of any error thrown.
False: Stops the workflow if it throws any error.

Version: It specifies the version of the Text automation feature in use.

OUTPUT

Result: This parameter allows you to view the execution status of the activity and returns a value in “Boolean.”
True: Indicates that the activity has been executed successfully without any errors.
False: Indicates that the activity has been unsuccessful due to an unexpected error being thrown.

Text: * It helps to view the output of the activity as the text extracted from the word document in “String” datatype.

* Represents mandatory fields to execute the workflow.

8.8.12 OverWriteText

This activity helps the user to overwrite the input text in the specified text file.

Properties

INPUT

FilePath: *Specify the path of the file in which the text must be overwritten. It accepts values in “String” datatype. 
Inputstring: *Specify the input text to overwrite, it accepts values in “String” datatype. 

MISC

DisplayName: Displays the name of the activity. You can also customize the activity name to help troubleshoot issues faster. This name will be used for logging purposes.

SkipOnError: It specifies whether to continue executing the workflow even if it throws an error. This supports only Boolean value “True or False”
True: Continues to execute the workflow irrespective of any error thrown.
False: Stops the workflow if it throws any error.

Version: It specifies the version of the Text automation feature in use.

OUTPUT

Result: This parameter allows you to view the execution status of the activity and returns a value in “Boolean.”
True: Indicates that the activity has been executed successfully without any errors.
False: Indicates that the activity has been unsuccessful due to an unexpected error being thrown.

* Represents mandatory fields to execute the workflow.

9. MarketPlace

9.1 Overview

Introduction

MarketPlace is designed to be the go-to centralized hub for a meticulously curated collection of automation scripts and connectors, meticulously crafted to elevate and expedite your automation projects. Whether you are a seasoned automation professional or a newcomer looking to streamline your processes, MarketPlace offers a diverse array of tools and resources to meet your specific needs.

Our platform brings together a vibrant community of developers, engineers, and automation enthusiasts who contribute their expertise to create a dynamic ecosystem. Each script and connector undergoes a rigorous vetting process to ensure quality, reliability, and security. This commitment to excellence ensures that users can confidently integrate these resources into their projects without compromising
performance or stability.

Discover an extensive range of automation solutions, spanning various industries and applications. From IT and finance to healthcare and manufacturing, MarketPlace hosts a rich assortment of scripts tailored to address the unique challenges of different sectors. This diversity empowers users to find the perfect automation tools that align with their industry requirements.

The user-friendly interface of MarketPlace facilitates easy navigation, allowing users to quickly search, preview, and download scripts and connectors that suit their project objectives.

In addition to individual scripts and connectors, MarketPlace also features curated collections and bundles that address specific automation needs. These collections streamline the process of finding complementary resources, saving users time and effort in building comprehensive automation solutions.

As automation continues to play a pivotal role in transforming industries, MarketPlace stands as a beacon of innovation and collaboration.

Benefits of MarketPlace

1. Rich Repository of Automation Resources: The Marketplace is a comprehensive repository that offers a wide array of automation scripts and connectors, providing users with a rich selection of resources to meet their automation needs.
2. Time Efficiency: Users, whether experienced professionals or beginners, can save time by accessing pre-built automation solutions available on the Marketplace. This accelerates the development and implementation of automation projects.
3. Community Collaboration: The platform fosters a vibrant community of developers, engineers, and automation enthusiasts. This collaborative environment encourages the sharing of expertise and knowledge, contributing to the growth and enhancement of the automation ecosystem.
4. Quality Assurance:  Each script and connector undergoes a rigorous vetting process, ensuring high quality, reliability, and security. Users can trust that the resources available on the Marketplace meet industry standards and best practices.
5. Ease of Use: The user-friendly interface of the Marketplace simplifies navigation, allowing users to easily search, preview, and download scripts and connectors. This simplicity enhances the overall user experience.
6. Thorough Security Check: Scripts and connectors available on the Marketplace undergo thorough security vetting to ensure they adhere to best practices and do not pose security risks. This helps in maintaining the integrity and security of automation projects.
7. Licensing Compliance: Marketplace resources often come with clear licensing information, outlining the terms and conditions for usage. Users can understand the licensing requirements before integrating any script or connector into their automation processes, ensuring compliance and legal usage.

Listing types

Re-usable components: It could be a script, module, or activity that is made available for users to discover, download, and incorporate into their automation designs. These components are designed to serve specific functions or tasks and can be conveniently reused across different workflows, saving time and effort in development.

Library: It facilitates the upload of DLLs; a library refers to a curated collection of dynamic link libraries (DLLs) or compiled code modules that users can access and integrate into their projects. DLLs are binary files containing code and data that multiple programs can use simultaneously. This library serves as a repository for DLLs that are either created by the community, third-party developers, or the platform itself to be beneficial for others.

Integration: It helps to facilitate interoperability between the automation environment and a variety of external tools, APIs, or software solutions. This interoperability is crucial for creating comprehensive automation workflows. Integration listings typically come with configurable options, allowing users to tailor the integration to their specific needs and customize how the automation platform interacts with external services.

Custom activity:It refers to a task-specific module or script created by users. These activities, developed by either the user or third-party contributors, can be added to automation workflows for personalized functionality, enhancing the capabilities of the platform.

License Types

In Robility’s Marketplace the users need to upload the license along with their listings in the marketplace for transparency, legal clarity, and to establish the terms under which others can use, modify, and distribute their software or content. The following are the type of license that are supported by the Marketplace:

1. Custom License: A custom license is a user-defined set of terms and conditions governing the use, distribution, and modification of software or content. Unlike standard, widely adopted licenses, a custom license is crafted by the creator to suit specific requirements, providing a flexible approach to sharing intellectual property while retaining control over its use.
2. MIT License: The MIT License is an open-source license known for its simplicity and permissiveness. It allows users to freely use, modify, distribute, and sublicense the software, often with minimal restrictions. Users are typically required to include the original copyright notice and disclaimer in any substantial portions of the software.
3. Apache License 2.0: The Apache License 2.0 is an open-source license that provides more comprehensive terms than the MIT License. It permits users to use, modify, distribute, and sublicense the software,both for commercial and non-commercial purposes. The license includes an express grant of patent rights from contributors to users and requires modifications to be clearly marked.
4. 3-Clause BSD License: The 3-Clause BSD License, also known as the New BSD License or Modified BSD License, is an open-source license that allows users to freely use, modify, and distribute the software for both commercial and non-commercial purposes. It requires users to include the original copyright notice, a disclaimer, and the license text in any substantial portions of the software or documentation.

9.2 LoadEnvironment

This activity helps the helps the user in setting up and configuring the runtime environment required for the execution of scripts, applications, or automation tasks. It encompass tasks such as loading necessary libraries, initializing variables, configuring connections to databases or external services, and preparing the environment for the successful execution of subsequent actions.

Properties

INPUT

EnvironmentNameThe “Name” mentioned in this parameter refers to the name of the downloaded “Python Script” used for automation.
By default, the name will be auto filled and disable to make any changes.

EnvironmentVersion: It indicates the version of the script that is being used.

PythonPath:* It indicates to provide the “Path” of the Python application. You can either hardcode the values in “String” datatype or can provide the values in the “String” format. This field accepts “String” datatype.

MISC

Body: Gets auto filled once the “Activity” is dropped into the body

DisplayName: Displays the name of the activity. The activity name can be customized, which aids in troubleshooting.

SkipOnError: Specify the “Boolean” value as “True” or “False.”
True: Continue executing the workflow regardless of any errors thrown.
False: Halt the workflow if it encounters any errors.
None: If the option is left blank, the activity will, by default, behave as if “False” were chosen.

Version: It indicates the version of the feature being used.

OUTPUT

Result: It provides the ability to view the execution status of the activity. It returns values in “Boolean.”
True: Indicates that the activity has been executed successfully without any errors.
False: Indicates that the activity has been unsuccessful due to an unexpected error being thrown.

Represents mandatory fields to execute the workflow.

Pre-Requisites

Before executing the activity, verify the following prerequisites:

  • The system must have Python application version 3.11.6 with 64 bits installed. Versions below 3.11.6 or higher versions will not be supported for this activity. During the application installation, please choose the “Customize” installation mode and ensure to check the “Add Python to environment variables” option before proceeding.

Click here to know how the activity is used in the workflow.

9.3 PythonScriptLoader

This activity helps the user in loading and executing Python scripts. It might encompass functionalities like specifying the script location, managing dependencies, handling script execution, and capturing the output or results.

Properties

INPUT

FileName: Indicates the name of the “Python file” that is being used. By default, it will be auto filled and will be disabled to edit the name.

MethodName:* Select the “MethodName” from the drop-down. This parameter indicates the name of the method in the script to be automated. You can either hardcode the values in the “String” format or can enter the values in the “String” datatype.

Parameters: * This parameter helps you to provide the “inputs” that are required to pass during the execution of the “Python script”. This field accepts collection of argument types.

MISC

DisplayName: Displays the name of the activity. The activity name can be customized, which aids in troubleshooting.

SkipOnError: Specify the “Boolean” value as “True” or “False.”
True: Continue executing the workflow regardless of any errors thrown.
False: Halt the workflow if it encounters any errors.
None: If the option is left blank, the activity will, by default, behave as if “False” were chosen.

Version: It indicates the version of the feature being used.

OUTPUT

Result: It provides the ability to view the execution status of the activity. It returns values in “Boolean.”
True: Indicates that the activity has been executed successfully without any errors.
False: Idicates that the activity has been unsuccessful due to an unexpected error being thrown.

Text: It returns the output of the activity as the text extracted from the Python Script. It returns the output in “String” datatype.

Represents mandatory fields to execute the workflow.

Let’s see how to download and use the reusable component from the MarketPlace:

How to download?

How to download listings in MarketPlace at Designer?

All the scripts and solutions added in the Marketplace will be available in the Designer, empowering users with a rich library of pre-built components. This library includes integrations that facilitate seamless connections to external services, as well as custom activities, allowing users to incorporate specialized functionalities into their automation workflows.

Follow the below steps to download and integrate the scripts:

1. Launch the designer.
2. Navigate to the “MarketPlace”.
3. Here chooses the specified template that is suitable for your solutions.
4. Click on it and a pop-up window will appear on the screen. Here I am choosing the “PDF” specified as “Reusable component”.
5. It displays the description of the chosen listing along with the versions available, listing type, created by, license file and URL.
6. Review the “Terms & Conditions” and then proceed to check the box.
7. Select the “Download” option to download it in your local system.
8. Now, easily integrate the script in your automations.

You can view the downloaded MarketPlace file in the following path “C:\Users\Username\Documents\Robility\Marketplace”.

Steps to integrate the listing in the solutions/templates:

Example

In the following example, I have downloaded the “PDF” listed as “Reusable component” to integrate into the solutions.

1. Open an existing template or create a new template.
2. Navigate to the toolbox section and scroll to the end of the features.
3. Here, you will find the scripts downloaded under the feature as “Reusable Component”.
4. Now, I have dragged and dropped the “PDF” which acts as the “Load Environment” activity. It also acts as scope for the list of scripts available in it.
5. Now, navigating to the “PythonPath” in the properties to provide the path of the “Python” application. Here I am providing the value in the variable as “Path”.
a. There are two steps to provide the variable in the property.
b. Step 1: Click on the variable pane, enter your preferred name (here, I’m using “Path”), and choose the data type as “String” since the output value accepts the string data type. And provide the path of the python application as default value.
c. Step 2: Double-click on the variable parameter in the “PythonPath” section and enter a name as “Path”.
6. Now, I am adding the “Image conversion” script into “LoadEnvironment – PDF” activity to automate in the solutions.
7. Here I am choosing the file name from the drop-down as “Image_Conversion.py”.
8. Now, the “MethodName” option will be available and here I am choosing the method from the drop-down as “convert_pdf_to_images”.
9. Navigating to the “Parameters” in the properties section to provide the required inputs for the script.
a. Click on the Three dots and the “Parameters” dialog box will appear on the screen with the required inputs.
b. Here are two inputs required to automate the script. You can either enter the input values here in the specified datatype in the “Value” field or can hardcode the values in the specified datatype.
c. I have directly provided the values in the “Values” field for both the inputs, now click on “OK” button.
10. The parameter which indicates “OUT” as direction is indicated as the output of the activity. Here the “result” is indicated as “OUT”, so declaring a variable there to view the output.
a. Now, I am declaring a variable in the “Variables” section with the similar name “result” along with the specified datatype as “Jobject”.
11. Now, to view the output, add the “Writelog” activity and pass the required inputs.
12. Save and execute the bot.

Now, the script will be loaded and starts to create a virtual environment, which might get delayed on the first execution. Then the bot proceeds to execute the script. 


The bot will write the output in the “Output” section using the “writelog” activity.

9.4 Release Notes

v.1.0.9

This release includes enhancements to dependent DLLs.

Enhancement

All dependent DLLs have been upgraded to the latest stable versions, enhancing security, performance, and workflow reliability. This update ensures smoother execution and maintains compatibility with both existing and new workflows.

Released Date: 09/03/2026

9.4.1 v.1.0.6

This release includes enhancements to the NLog package.

Enhancement

The NLog package has been upgraded to version 6.0.7, delivering improved logging reliability, performance, and compatibility. The update supports both existing and new workflows.

Released Date: 09/02/2026

10. Other Activities

10.1 Overview

Introduction

In Robility, the other activities packages activities have been built by Windows Workflow Foundation and are installed together with Designer. They provide functionality for control flow, conditions, event handling, state management, and communicating with applications and services.

About the package

This package consists of the following feature,

Control Flow: Provides activities like If Else, Switch, While, For Each, and Flow Decision, enabling developers to create flexible control structures, branching, looping, and decision-making within workflows.

Collections: Includes activities for managing collections of data, such as adding, removing, iterating through items, and performing operations on collections.

Dictionary: Offers functionalities for working with key-value pairs, allowing developers to store, retrieve, and manipulate data using keys and values.

Flowchart: Enables the design and implementation of flowchart-based workflows, defining sequential steps, decision points, and branching logic for process automation.

Primitives: Provides basic building blocks and activities for workflow development, including variables, assignments, calculations, and basic operations.

Error Handling: Includes activities like Try Catch, Throw, and Exception Handling for managing errors, exceptions, and implementing robust error handling strategies within workflows.

Please note that in this guide we have only documented the essential Workflow Foundation activities. For more information, please visit Microsoft’s official documentation.

10.2 ControlFlow

Introduction

Control flow in the Robility refers to the sequencing and arrangement of actions and decisions within an automation process. It is a fundamental feature that allows developers to define the order of execution and decision-making logic within an automation process, enabling the robot to perform tasks systematically and respond to different scenarios.

Usecase

1. Sequential Execution: It is used to create a step-by-step sequence of actions and ensures that tasks are completed in a specific order.

2. Conditional Logic: Use the “If” activity to introduce conditional branching. For example, you can check if a specific condition is met before executing a particular set of actions, allowing your robot to adapt to different scenarios.

3. Looping: Robility provides various loop activities, such as “For Each,” “While,” and “Do While,” to iterate through collections or repeat actions until a specific condition is satisfied. This is useful for processing lists of items or handling repetitive tasks.

4. Switch Case: The “Switch” activity is helpful when you need to select a specific path based on the value of a variable. It simplifies decision-making and routing within your workflow.

5. Parallel Processing: Robility enables parallel execution of activities using the “Parallel” activity. This is useful for scenarios where you want to perform multiple tasks concurrently, improving automation efficiency.

6. PickBranch: It is useful in scenarios where you want to monitor multiple conditions or events simultaneously and react to the first one that occurs.

10.2.1 DoWhile

This activity allows the user to execute a sequence of actions to be repeatedly executed as long as a specified condition meets true. In other words, it creates a loop where the associated activities are executed repeatedly until the condition specified within the activity becomes false.

Properties

MISC

Condition:* This indicates the condition to be met while the sequence of actions is executed. You can either provide the values hardcoded in “Boolean” format or enter the values in “Boolean” datatype. This field accepts the values in “Boolean” datatype.

DisplayName: Displays the name of the activity. The activity name can be customized which will help in troubleshooting.

Represents mandatory fields to execute the workflow.

Example

Here’s an example of how the activity works –

In the following example, I am about to perform the counter variable condition where the bot meets the value “10”, the execution will be completed. Here I have already created a variable “Counter” in “Integer” datatype and assigned default value as “1”.

Steps to execute the bot

1. Open an existing solution or create a new solution as “ControlFlow”.
2. The ControlFlow feature will be available in the toolbox on the installation of the Designer.
3. Drag and drop the “DoWhile” activity to the workflow and set it as start node.
4. Here I am using this activity to execute the sequence of actions in loop until the specified condition is met.
5. Double click on the activity.
6. Here, I am adding the “Assign” activity into the “Body” of “DoWhile” activity.
a. Providing the “Counter” variable created already in the “TO” field.
b. Now, providing the value as “Counter + 1”.
7. Now, I am adding the “WriteLine” activity inside the body of the “DoWhile” activity.
a. Here I am providing the value as “Counter.ToString” in the “Text” field of the activity to write the number.
b. The “.ToString” is advised to use along with any other data types other than string format. It converts any data type into string.
8. Now, Here I am specifying the condition as “Counter =10” in the box.
9. Save and execute the workflow.

The bot executes the workflow and when it reaches the condition, since it gets the value of 1=10 according to the condition, which is false, it aborts the workflow and gives, and output of the counter is 1.

10.2.2 ForEach

This activity helps the user to enable the iteration over elements in a collection, such as an array or a list. It executes a specified set of actions for each value in the collection variable/argument, allowing for efficient processing of multiple items without the need for manual iteration.

Properties

Display Name: Displays the name of the activity. The activity name can be customized which will help in troubleshooting.

TypeArgument:* It indicates the “datatype” of each value in the collection of variable / argument. Choose only specific datatype of variable from the drop-down menu, avoiding selections of lists, collections, or arrays of types.

Values:* Indicates to provide the “variable” or “argument” name with a collection of values. This should match the datatype selected.

*  Represents mandatory fields to execute the workflow.

10.2.3 If

This activity helps the user to make decisions based on a specified condition. It provides a way to create branching logic, enabling the robot to adapt dynamically based on the outcome of the condition evaluation.

Key characteristics

The If-Else activity evaluates a specified condition. If the condition is true, the activities within the “Then” section are executed. If the condition is false, the activities within the “Else” section (if provided) are executed.

The “Then” section represents the set of activities to be executed if the condition is true. The “Else” section (optional) represents the set of activities to be executed if the condition is false.

If needed, If-Else activities can be nested, allowing for more complex decision-making structures within the workflow. This is achieved by placing an additional If-Else activity within the “Then” or “Else” section of another.

Properties

MISC

Condition: This indicates the condition to be met while the sequence of actions is executed. You can either provide the values hardcoded in “Boolean” format or enter the values in “Boolean” datatype. This field accepts the values in “Boolean” datatype.

DisplayName: *Displays the name of the activity. The activity name can be customized which will help in troubleshooting.

Represents mandatory fields to execute the workflow

Example

Here’s an example of how the activity is used in the workflow –

In the following example, I am going to automate a simple use case with “WebAutomation” to find out whether the element exists on the page and proceed further with “IfElse” activity.  Here I am using the “ https://www.sutherlandglobal.com/ link to detect the “ContactUs” button.

Steps to execute the bot

1. Open an existing solution or create a new workflow.
2. Install the “WebAutomation” feature from the “Manage” features.

3. Drag and drop the “ElementExist” activity to the workflow and set it as start node.
4. Here I have already launched to the website.
5. Double click on the activity to detect the element.
a. Here, choose the “Select Element” option.
b. Detecting over the “ContactUs” button.
c. Once you have chosen the button, the element’s value will be stored in the “Spy” window, along with an “image” of the application.
d. If you wish to add or remove any attributes, you can edit the “Attributes Editor.”   In this case, we are not making any changes in the “Editor.”
e. Once you click on the “Save” button, the element’s values will be stored in the activity window.
6. Now, navigating to the “ExistStatus” in the properties to declare a variable to view the output of the activity.
a. There are two methods to store the spied value in the variable.
b. Method 1: Double-click on the variable parameter “ExistStatus” in the “Output” section and enter a name that helps you easily identify it in the flow. Here, I’m using the name “Exists” and using the shortcut key “Ctrl+Q” to create the variable.
c.  Method 2: Click on the variable pane, enter your preferred name (here, I’m using “Exists”), and choose the data type as “Boolean” since the output value accepts the boolean data type.
7. Then, adding the “If” activity from the “ControlFlow” feature.
a. Here I am using this activity to check whether the value exists when the website is launched, based on the output, the bot will make decisions.
b. Double click on the activity and here I am providing the “Condition” as “Exists”.
8. Now, In the “Then” branch, I am adding a write log to write the success message if the element exists on the website.
9. In the “Else” branch, I am adding the “BrowserControl” activity from the “WebAutomation” feature.
a. Here I am providing the “URL” as the website URL –https://www.sutherlandglobal.com/.
b. Choosing the “ActionType” as “Refresh” from the drop-down as here I am trying to refresh the browser if the element is not found.
10. Now, save and execute the workflow.

10.2.4 Parallel

This feature enables users to execute workflows in an asynchronous mode. These actions facilitate concurrent task execution, eliminating the need to wait for one task to finish before starting another. Typically, tasks are executed synchronously, meaning they only progress to the next step when the current execution process is finished.

The parallel activity aids in executing tasks in scenarios where automation requires waiting for external resources or services, such as web requests or file operations. It enables your workflow to continue processing other activities while waiting for these operations to be completed.

Properties

MISC

CompleteCondition: This parameter enables you to execute tasks based on a Boolean value condition. Specify either ‘True’ or ‘False’ here.
True: Executes the first-found activity and cancels the execution of other activities.
False: Executes all the sequence of activities one by one without delays. If ‘True/False’ is not provided, it will default to the ‘False’ functionality.

Display Name: Displays the name of the activity. The activity name can be customized which will help in troubleshooting.

10.2.5 Pick

This activity helps the user to efficiently handle multiple asynchronous events and execute the corresponding actions based on the first trigger that occurs. Unlike the Parallel activity, it doesn’t allow different sets of activities to run concurrently rather it responds to first trigger that occurs among multiple triggers.

Properties

MISC

Display Name: Displays the name of the activity. The activity name can be customized, which aids in troubleshooting.

10.2.6 PickBranch

This activity refers to a specific set of activities executed within the “Pick” activity. Each trigger in the Pick activity is linked to a Pick Branch, defining a series of actions to be performed when the trigger condition is met. It can be used only inside the “Pick” activity.

Properties

MISC

Display Name: Displays the name of the activity. The activity name can be customized, which aids in troubleshooting.

Triggers:

A trigger is a specified condition that, when evaluated as true, initiates the execution of a particular Pick Branch within the Pick activity.

Triggers in the Pick activity are designed to monitor and respond to changes in conditions, events, or variables. Each trigger is associated with a specific Pick Branch, and the first trigger that becomes true will activate its corresponding branch.

Action:

An action refers to a set of sequential activities or steps defined within a Pick Branch These activities outline the specific actions or operations to be performed when the associated trigger condition is met.

Actions inside a Pick Branch define the workflow logic that should be executed in response to the triggering event. They can include tasks such as data processing, user interface interactions, logging, or any other operation required to handle the specific scenario associated with the trigger.

10.2.7 PickWithTwoBranchesFactory

This activity is similar to the “PickBranch” activity but here it provides two branches by default. Each trigger in the Pick activity is linked to a Pick Branch, defining a series of actions to be performed when the trigger condition is met.

Properties

MISC

Display Name: Displays the name of the activity. The activity name can be customized, which aids in troubleshooting.

10.2.8 Sequence

This activity is used to represent a linear set of actions executed in a specific order. It is a container for a series of activities that are executed sequentially, one after the other.

Properties

MISC

Display Name: Displays the name of the activity. The activity name can be customized, which aids in troubleshooting.

10.3 Collections

Introduction

Collections in Robility refer to data structures or objects that allow bot developers to store, organize, and manipulate data efficiently during automation processes. Collections play a crucial role in managing data elements such as variables, arrays, lists, dictionaries, and other complex data types.

1. Variables: Collections can store individual data elements or variables, such as numbers, text strings, dates, and Boolean values. Variables are used to hold temporary or permanent data values that are used and modified throughout the automation workflow.
2. Arrays: Arrays are collections of variables or data elements of the same data type that are stored under a single name. They allow bot developers to store and access multiple related values using index-based referencing. Arrays are particularly useful for handling lists of items or data sets.
3. Lists: Lists are dynamic collections that can store a sequence of data elements of varying data types. Unlike arrays, lists can grow or shrink in size dynamically as data is added or removed. Lists are commonly used for processing and iterating through sets of data during automation tasks.
4. Dictionaries: Dictionaries, also known as associative arrays or maps, are collections that store key-value pairs. Each element in a dictionary consists of a unique key associated with a corresponding value. Dictionaries are ideal for storing structured data where quick access to values based on keys is required.
5. Collections Operations: RPA platforms and programming languages provide built-in functions and methods to perform various operations on collections. These operations include adding or removing elements, searching for specific values, sorting data, iterating through collection items, and merging or splitting collections as needed.
6. Data Management: Collections help bot developers efficiently manage and manipulate data during automation tasks. They enable data organization, retrieval, processing, and transformation, enhancing the automation workflow’s effectiveness and accuracy.

Benefits

1. Efficient Data Management: Collections allow for organized storage and retrieval of data elements, enabling efficient data management during automation processes.
2. Flexibility: Collections support various data types and structures, such as arrays, lists, dictionaries, and variables, providing flexibility in handling different types of data within the workflows.
3. Enhanced Data Processing: Collections facilitate data processing operations, including sorting, filtering, searching, and iterating through data elements, enhancing the automation workflow’s capabilities.
4. Improved Reusability: By storing data in collections, bot developers can create reusable components and modules that can be easily integrated into multiple automation tasks, reducing development time and effort.
5. Dynamic Data Handling: Collections like lists and dictionaries support dynamic resizing and modification of data, allowing for dynamic data handling based on changing requirements or input data sets.

Use Cases

1. Data Extraction and Processing: Collections are used to extract data from documents, emails, web pages, and other sources, process the extracted data, and store it in structured formats for further analysis or automation tasks.
2. Workflow Automation: Collections facilitate workflow automation by managing data inputs, intermediate results, and outputs, enabling seamless execution of complex automation processes.
3. Data Validation and Verification: Collections help in validating and verifying data against predefined criteria, performing data quality checks, and identifying discrepancies or errors during automation tasks.
4. Dynamic Data Handling: Collections like lists and dictionaries are used for dynamic data handling, such as managing customer records, processing transactional data, handling inventory information, and more.

10.3.1 Release Notes

v.1.3.4

In this release, we have introduced a new activity:

New Activity

Append Item to Collection

Enables adding one or more items to an existing collection. Supports multiple data types through the built-in Collection Builder and helps in organizing and storing data efficiently within automation workflows

Released Date: 20/04/2026

10.3.2 AddToCollection

The collection package in the designer acts as a container to store information/data during the run time. We can use the add to collection activity to dynamically store the data from an excel file or a web service in a table format.

Properties

Misc

Collection: *This indicates the name of the collection variable to which the item has to be added.

Display Name: *Displays the name of the activity. You can also customize the activity name to help troubleshoot issues faster. This name will be used for logging purposes.

Item: This indicates the name of the variable which has to be added to the collection

TypeArgument: *This indicates the type of the argument which is going to be added. There are number of options from which we can choose.

* Represents mandatory fields to execute the workflow.

10.3.3 Compare collection

This activity helps the user to compare between two collections and provides the updated, modified or findings as result.

Properties

Input

Compare Mode: Specifies how the rows in the collection are compared during matching or lookup operations.

• Key comparison: Compares only the keys.

• Value comparison: Compares only the values.

• Key-Value pair comparison: Compares both the key and its corresponding value together.

Ignore Case*: When enabled, it ignores letter casing while searching. Uppercase and lowercase letters are treated the same when matching values.

First collection*: Specifies the source collection that contains the values to be matched.

Second collection*: Specifies the target collection where the matching values will be searched.

MISC

Display Name: Displays the name of the activity. The activity name can be customized, which aids in troubleshooting.

SkipOnError: Specify the “Boolean” value as “True” or “False.”

True: Continue executing the workflow regardless of any errors thrown.

False: Halt the workflow if it encounters any errors.

None: If the option is left blank, the activity will, by default, behave as if “False” were chosen.

Version: It indicates the version of the feature being used.

Output

Only In Second: Returns the rows that exist in the second collection but not in the first collection in a structured collection format.

Only in First: Returns the rows that were present in the first collection but are missing in the second collection in a structured collection format

Common items: Returns the rows that are identical in both the first and second collections in a structured collection format.

Result: This parameter allows you to view the execution status of the activity and returns a value in “Boolean.”

True: Indicates that the activity has been executed successfully without any errors.

False: Indicates that the activity has been unsuccessful due to an unexpected error being thrown.

* Represents mandatory fields to execute the workflow.

10.3.4 ClearCollection

The Clear collection activity helps to clear the items that were added to the collection. This activity can be used with Add to collection only.

Properties

Collection: *This indicates the name of the collection variable to which the item has to be added

Display Name: Displays the name of the activity. You can also customize the activity name to help troubleshoot issues faster. This name will be used for logging purposes.

TypeArgument:* This indicates the type of the argument which is going to be added. There are number of options from which we can choose.

* Represents mandatory fields to execute the workflow

Use Case

Here we are going to automate and demonstrate the utilization of Collections feature. The following activity illustrates on how we are going to clear the name which we added to the collection of lists. Here we are continuing from the Add to collection activity, so, we are going to clear the name in the following example.

Steps to execute the bot

Let’s continue building,

1. Now, Drag and drop Clear collection activity and connect it below Write line activity.
2. From the properties panel, add the variable “Name_Col” in the collections tab.
3. Select the Type argument as “String” from the drop-down list.
4. Drag and drop another write line activity below to the Clear collections activity to ensure whether the item has been removed from the collection.
5. Enter VB expression as “Final Value” + Name_Col.Count.ToString in the box.
6. Now, execute the workflow.

The bot will execute and return the output in the output window. The initial value will be zero before adding the item and after adding the item to the collection, it displays as 1. Once it clears, it displays as zero again.

10.3.5 BuildCollection

The Build Collection activity is used to create and initialize a collection within a workflow. It generates a collection in which all items share the same data type as the first specified element, ensuring consistency across values. It allows users to define the collection type and populate it with values at design time, enabling structured data handling. It helps organize data efficiently and makes it easier to pass and reuse collections across different activities in the workflow.

On the activity screen, provide the initial value (for example, an integer or a string). Additional items can then be added to the collection. Click the field to open the Collection Builder, within the Collection Builder, add the desired values to the collection. All items must be of the same data type as the first item.

For example, if the first item is an integer, all subsequent items must also be integers. Adding a different data type (such as a string) is restricted and will result in a runtime validation error.

Properties

INPUT

First Item*: Specifies the initial value of the collection. This determines the data type for all subsequent items.

MISC

DisplayName: Displays the name of the activity. This can be customized for better readability and easier troubleshooting.

SkipOnError: Specifies a Boolean value (True or False).
True: Continues executing the workflow even if an error occurs.
False: Stops the workflow if an error is encountered.
None: If left blank, the default behavior is False.

Version: Displays the version of the activity being used. This field is auto-populated and read-only.

OUTPUT

New Collection: Stores the created collection for use in other activities. The output type is Collection.

Result: Indicates the execution status of the activity. Returns a Boolean value:
True: The activity executed successfully without errors.
False: The activity failed due to an error.

*Represents mandatory fields to execute the workflow.

10.3.6 Collection to Datatable

This activity allows users to convert collection values into a structured DataTable format, which cannot be achieved directly through syntax.

Properties

INPUT

Collection: * Specifies the existing collection variable to convert, using the ICollection<Object> data type. Refer to the documentation below for instructions on converting to an ICollection<Object> type.

MISC

DisplayName: Displays the name of the activity. The activity name can be customized, which aids in troubleshooting.

SkipOnError: Specify the “Boolean” value as “True” or “False.”
True: Continue executing the workflow regardless of any errors thrown.
False: Halt the workflow if it encounters any errors.
None: If the option is left blank, the activity will, by default, behave as if “False” were chosen.

Version: It indicates the version of the feature being used.

OUTPUT

Datatable: *Returns the output of the activity as a table format in datatable variable.   

Result: This parameter allows you to view the execution status of the activity and returns a value in “Boolean.”

True: Indicates that the activity has been executed successfully without any errors.
False: Indicates that the activity has been unsuccessful due to an unexpected error being thrown

* Represents mandatory fields to execute the workflow.

Limitations

1. Only a single collection can be converted to a DataTable.
2. If the collection contains nested collections (e.g., a list of lists), the Collection to DataTable activity cannot convert it directly into a DataTable.

Steps to Convert to ICollection<Object> Data Type

This activity accepts input collections only in the ICollection<Object> data type. To convert an existing collection, you can either provide the conversion syntax directly in the “Collection” properties or use an Assign activity.

Option 1: Using syntax in the property field

“collectionVariable.Cast(Of Object)().ToList()”

Option 2: Using Assign activity

Using Assign activity: 

1. Drag and drop an Assign.
2. Create a variable with the ICollection<Object> data type.
3. In the To field, enter the created variable.
4. In the Value field, use the syntax “collectionVariable.Cast(Of Object)().ToList()”.
a. Here, collectionVariable refers to your existing collection variable.

10.3.7 AppendItemToCollection

This activity helps to adds one or more items to the end of a specific collection, supporting multiple data types via the Collection Builder.

Properties

INPUT

Collection*: Specifies the collection variable to which the new items will be appended. This field accepts an ICollection<Object> type.

MISC

DisplayName: Displays the name of the activity. The name can be customized for better readability and troubleshooting.

SkipOnError: Specifies the Boolean value as True or False.

True: Continue executing the workflow regardless of any errors thrown.
False: Halt the workflow if it encounters any errors.
None: If this field is left blank, the activity will behave as if False were chosen by default.

Version: Displays the version of the activity being used. This field is auto-populated and read-only.

OUTPUT

New Collection: Stores the resulting collection of type List<Object> after the new items have been appended.

Result: Indicates the execution status of the activity. Returns a Boolean value.
True: Indicates that the activity has been executed successfully without any errors.
False: Indicates that the activity has been unsuccessful due to an unexpected error being thrown.

How to Add a Collection Builder?

The Append Item to Collection activity appears on the canvas with the following options:

1. Collection – Enter the collection item directly or a hardcoded variable.
2. Collection Builder – Click the button to open the Collection Builder window, which allows you to add multiple items to the collection at once.

Collection Builder Window

The Collection Builder dialog provides a structured way to manage multiple collection values. Once opened, you can:

1. Add multiple InArgument<Object> values at once, with each row accepting any object type as an input argument.
2. Click (+) to add a new row for an additional value.
3. Click (X) to remove an existing row.
4. Click (≡) to open the Expression Editor, where you can write expressions for a specific InArgument<Object> value.
5. Click Save to apply all entered values or Cancel to discard changes.

10.3.8 ExistsInCollection

This activity is used to find out if an item already exists in the collection.

Properties

MIsc

Collection:* This indicates the name of the collection variable to which the item has been added.

Display Name:* Displays the name of the activity. You can also customize the activity name to help troubleshoot issues faster. This name will be used for logging purposes.

Item:* This indicates the name of the variable which is already added to the collection.

Result: Declare and assign a variable to return the output. This is a Boolean value. This is not a mandatory field.

TypeArgument:* This indicates the type of the argument which is going to be added. There are number of options from which we can choose.

* Represents mandatory fields to execute the workflow

10.3.9 Find and Replace

This activity allows users to search for a specified value in the input collection and replace it with another value.

Properties

INPUT

Input collection: Specifies to provide the input collection to search within the provided range.

Case Sensitive: Ensures that the search matches the case (uppercase or lowercase) of the provided value exactly.

Operation: Specifies the operation to be performed in the collection.

Available options:

1. Find: Finds and returns the first matching value.

2. Find All: Finds and returns all matching values.

3. Replace: Finds and replaces the first matching value.

4. Replace All: Finds and replaces all matching values.

Find Value*: Specifies the input value to be searched within the collection. Accepts values in String datatype.

Replace Value*: Specifies the value to replace the found text with. This parameter is applicable only when Replace or Replace All is selected. Accepts values in String datatype.

MISC

Argument Type*: Select the type of elements contained in the collection from the drop-down.
For example, if the collection is a list of strings, choose “String” as the argument type.

Display Name: Displays the name of the activity. The activity name can be customized, which aids in troubleshooting.

SkipOnError: Specify the “Boolean” value as “True” or “False.”

True: Continue executing the workflow regardless of any errors thrown.

False: Halt the workflow if it encounters any errors.

None: If the option is left blank, the activity will, by default, behave as if “False” were chosen.

Version: It indicates the version of the feature being used.

Output

Found At: Returns the index where the matched value is found in String format.

Updated collection: Returns the output with the updated values in a chosen format in Argument Type.

Result: This parameter allows you to view the execution status of the activity and returns a value in “Boolean.”

True: Indicates that the activity has been executed successfully without any errors.

False: Indicates that the activity has been unsuccessful due to an unexpected error being thrown.

* Represents mandatory fields to execute the workflow.

10.3.10 Filter Collection

This activity allows users to filter values from a collection based on specified conditions, either retaining or removing the matching items alone.

Limitation

This activity supports collections of primitive data types—such as “Int, float, double and string” since filtering conditions can only be applied to these types.

Properties

Input

Collection: *Specifies the collection variable that contains the data to be filtered.

Filter Action: *Select the desired filter action from the dropdown:

Keep matching items: Retains only the items that meet the specified condition.
Remove matching items: Removes the items that meet the specified conditions from the collection.

Misc

Argument Type: *Select the type of elements contained in the collection from the drop-down.
For example, if the collection is a list of strings, choose “String” as the argument type.

Display Name: Displays the name of the activity. The activity name can be customized, which aids in troubleshooting.

SkipOnError: Specify the “Boolean” value as “True” or “False.”

True: Continue executing the workflow regardless of any errors thrown.
False: Halt the workflow if it encounters any errors.
None: If the option is left blank, the activity will, by default, behave as if “False” were chosen.

Version: It indicates the version of the feature being used.

Output

CollectionOutput: *Returns a list of objects containing the filtered data from the collection.

Result: This parameter allows you to view the execution status of the activity and returns a value in “Boolean.”

True: Indicates that the activity has been executed successfully without any errors.
False: Indicates that the activity has been unsuccessful due to an unexpected error being thrown.

* Represents mandatory fields to execute the workflow.

Filter Window

This wizard allows you to define specific conditions to filter and retrieve data from the provided collection.

1. AND: Returns TRUE only if allthe conditions separated by AND are true.

2. OR: Returns TRUE only if anyof the conditions separated by OR are true.

3. Name: Displays a datatype of the collection variable.

4. Operator: Specifies the comparison operator to apply on the field, such as:
a. Equals
b. Contains
c. In

5. Value: Provide the value against which the records should be filtered.

6. Add: Click on the Add button to add multiple conditions to filter. 

Click here to download and view the sample workflow using filter collection activity.

10.3.11 Merge Collections

This activity allows the user to merge two existing collections into a single collection variable.

Properties

INPUT

Collection: *Specifies to provide the first existing collection variable in “Icollection<Object>” datatype. Refer to the documentation below for instructions on converting to an ICollection<Object> type.

Second collection: *Specifies to provide the second existing collection variable. “Icollection<Object>” datatype. Refer to the documentation below for instructions on converting to an ICollection<Object> type.

MISC

DisplayName: Displays the name of the activity. The activity name can be customized, which aids in troubleshooting.

SkipOnError: Specify the “Boolean” value as “True” or “False.”
True: Continue executing the workflow regardless of any errors thrown.
False: Halt the workflow if it encounters any errors.
None: If the option is left blank, the activity will, by default, behave as if “False” were chosen.

Version: It indicates the version of the feature being used.

OUTPUT

Merged Collection: *Returns the output of the activity as the merged collections into one variable.  

Result: This parameter allows you to view the execution status of the activity and returns a value in “Boolean.”

True: Indicates that the activity has been executed successfully without any errors.
False: Indicates that the activity has been unsuccessful due to an unexpected error being thrown

* Represents mandatory fields to execute the workflow.

Limitations

1. Both input variables must be of the same data type. Throws exception if the two collections are of different data types.
a. Eg: Only String to String datatypes can be converted.

2. The activity merges all elements by default. If duplicate entries are not required, additional filtering logic should be applied after the merge.
a. After merge, if you need to filter any values, use filter collections

Steps to Convert to ICollection<Object> Data Type

This activity accepts input collections only in the ICollection<Object> data type. To convert an existing collection, you can either provide the conversion syntax directly in the “Collection” and “Second Collection” properties or use an Assign activity.

Option 1: Using syntax in the property field

“collectionVariable.Cast(Of Object)().ToList()”

Option 2: Using Assign activity

Using Assign activity: 

1. Drag and drop an Assign
2. Create a variable with the ICollection<Object> data type.
3. In the To field, enter the created variable.
4. In the Value field, use the syntax “collectionVariable.Cast(Of Object)().ToList()”.
a. Here, collectionVariable refers to your existing collection variable.

10.3.12 RemoveFromCollection

This activity is used to remove a particular item from the collection.

Properties

Collection:* This indicates the name of the collection variable to which the item has to be added.

Display Name:* Displays the name of the activity. You can also customize the activity name to help troubleshoot issues faster. This name will be used for logging purposes.

Item: This indicates the name of the variable which has to be added to the collection

TypeArgument:* This indicates the type of the argument which is going to be added. There are number of options from which we can choose.

  Represents Mandatory fields to execute the workflow

10.4 Dictionary

Introduction

In Robility, a dictionary refers to a data structure that stores key-value pairs. Each key in the dictionary maps to a corresponding value, allowing for efficient retrieval and manipulation of data elements. Dictionaries are commonly used in workflows scripting and automation to store and manage dynamic data sets, configuration settings, and temporary variables during process execution.

Benefits

1. Efficient Data Organization: Dictionaries allow for efficient organization of data elements using key-value pairs, enabling quick access and retrieval of specific data based on keys.

2. Dynamic Data Storage: Dictionaries can store dynamic data sets, allowing workflows to manage changing data values, configurations, or variables during automation tasks.

3. Fast Lookup and Retrieval: With dictionaries, the bots can retrieve data elements by directly accessing their corresponding keys, resulting in fast lookup and retrieval operations.

4. Flexible Data Manipulation: Dictionaries support flexible data manipulation operations such as adding, updating, or removing key-value pairs, making them versatile for data management tasks.

5. Reduced Code Complexity: Using dictionaries in RPA scripts can reduce code complexity by providing a structured and organized way to handle data, configurations, and temporary variables.

6. Enhanced Reusability: Dictionaries promote code reusability by allowing bot developers to define and reuse common data structures across multiple automation processes.

Use Cases

1. Configuration Settings: Use dictionaries to store and manage configuration settings such as API endpoints, credentials, timeouts, and application parameters. This enables easy configuration management and flexibility in automation scripts.

2. Data Mapping: Implement dictionaries for data mapping tasks in workflows. Map input data fields to output data fields using key-value pairs, facilitating data transformation and integration processes.

3. Dynamic Variable Storage: Store dynamic variables and temporary data elements in dictionaries during execution. This allows bots to manage and manipulate data based on runtime conditions and inputs.

4. Error Handling: Use dictionaries to store error messages, codes, and status flags during error handling processes. This helps in tracking and managing errors efficiently within automation workflows.

5.Localization and Globalization: Utilize dictionaries for managing localized or globalized data elements in workflows. Store language-specific strings, messages, or labels in dictionaries for multi-language support.

6. Data Validation Rules: Define data validation rules and conditions in dictionaries for data validation tasks. Store validation criteria as key-value pairs and validate input data against predefined rules during automation execution.

10.4.1 AddToDictionary

The Dictionary is a collection of Keys and Values, where key is like a word and value is like a definition.Thus, The Dictionary is a general collection of keys and values pair of data. This is used to store and retrieve data temporarily when the project is running. The Dictionary class implements the IDictionary<TKey,TObject> Interface. User can store the values in any defined data type in value.

Properties

INPUT

Dictionary:* Declare the name of the dictionary here as a variable.

Key:* This indicates the content in the dictionary. E.g., Name

Value:* This indicates the value that represents the key. E.g., Age

MISC

ArgumentType1:* This indicates the type of the key we will be using. Choose from the drop down.

ArgumentType2:* This indicates the type of the value that represents the key value. Choose from the drop down

Display Name: Displays the name of the activity. You can also customize the activity name to help troubleshoot issues faster. This name will be used for logging purposes.

SkipOnError: It specifies whether to continue executing the workflow even if it throws an error. This supports only Boolean value “True or False”

True: Continues to execute the workflow irrespective of any error thrown.

False: Stops the workflow if it throws any error

Version: It specifies the version of the Dictionary feature in use

OUTPUT

ResultProvides the success status of the operation. This field indicates whether the VM was successfully stopped or if there were any issues during the operation. It provides the ability to view the execution status of the activity. It returns values in “Boolean.”
True: Indicates that the activity has been executed successfully without any errors.
False: Indicates that the activity has been unsuccessful due to an unexpected error being thrown.

Represents mandatory fields to execute the workflow.

10.4.2 Delete

This activity is used to delete specific keys from the dictionary.

Properties

INPUT

Dictionary: *Declare the name of the dictionary here as a variable.

Key: *This indicates the content in the dictionary which has to removed.

MISC

ArgumentType1: * This indicates the type of the key we have used in the dictionary. Choose from the drop down.

ArgumentType2: * This indicates the type of the value that represents the key value which we have used in the dictionary. Choose from the drop down.

Display Name: Displays the name of the activity. You can also customize the activity name to help troubleshoot issues faster. This name will be used for logging purposes.

SkipOnError: It specifies whether to continue executing the workflow even if it throws an error. This supports only Boolean value “True or False.”
True: Continues to execute the workflow irrespective of any error thrown.
False: Stops the workflow if it throws any error

Version: It specifies the version of the Dictionary feature in use

OUTPUT

ResultProvides the success status of the operation. This field indicates whether the VM was successfully stopped or if there were any issues during the operation. It provides the ability to view the execution status of the activity. It returns values in “Boolean.”
True: Indicates that the activity has been executed successfully without any errors.
False: Indicates that the activity has been unsuccessful due to an unexpected error being thrown.

Represents mandatory fields to execute the workflow

10.4.3 GetValue

This activity is used to get the value of a specified key from the dictionary.

Properties

INPUT

Dictionary:* Specify the name of the dictionary from which we need to get the value.

Key:* Specify the name of the key for which the value is required

MISC

ArgumentType1: This indicates the type of the key which was used in the dictionary. Choose it the drop from down.

ArgumentType2: This indicates the type of the value that was used to represent the key value. Choose from the drop down.

Display Name: Displays the name of the activity. You can also customize the activity name to help troubleshoot issues faster. This name will be used for logging purposes.

SkipOnError: It specifies whether to continue executing the workflow even if it throws an error. This supports only Boolean value “True or False.”

True: Continues to execute the workflow irrespective of any error thrown.

False: Stops the workflow if it throws any error

Version: It specifies the version of the Dictionary feature in use

OUTPUT

Result: Define a Boolean to validate if the activity has been completed successfully. This is not a mandatory field.

Value:* Declare a variable here to view the value of a specified key.

* Represents mandatory fields to execute the workflow.

10.4.4 SetValue

This activity is used to update an existing value of a respective key. It overwrites the value of the existing ones.

Properties

INPUT

Dictionary:*Specify the name of the dictionary in which the value has to be updated

Key:*Specify the key whose value has to be edited

Value:* Specify the new value that has to be updated in respect to the specified key.

MISC

ArgumentType1:* This indicates the type of the argument that we have used for the key. Choose from the drop down.

ArgumentType2:* This indicates the type of the value that represents the key value. Choose from the drop down.

Display Name: Displays the name of the activity. You can also customize the activity name to help troubleshoot issues faster. This name will be used for logging purposes.

SkipOnError: It specifies whether to continue executing the workflow even if it throws an error. This supports only Boolean value “True or False.”

True: Continues to execute the workflow irrespective of any error thrown.

False: Stops the workflow if it throws any error

Version: It specifies the version of the Dictionary feature in use

OUTPUT

ResultProvides the success status of the operation. This field indicates whether the VM was successfully stopped or if there were any issues during the operation. It provides the ability to view the execution status of the activity. It returns values in “Boolean.”
True: Indicates that the activity has been executed successfully without any errors.
False: Indicates that the activity has been unsuccessful due to an unexpected error being thrown.

Represents mandatory fields to execute the workflow

10.4.5 View

This activity is used to view the details that are entered in the dictionary. This can be used along with other dictionary activities to view the content in the dictionary. The details in the dictionary are seen as a pop up.

Properties

INPUT

Dictionary:*The name of the dictionary for which we want to view the content.

ExpirySecs: ExpirySecs: Number of seconds the view page must be displayed on screen.

MessageTitle:* The title of the window in which the content has to be displayed.

MISC

ArgumentType1:* This indicates the type of the key we have used in the dictionary. Choose from the drop down.

ArgumentType2:* This indicates the type of the value that has been used to represent the key value. Choose from the drop down.

Display Name: Displays the name of the activity. You can also customize the activity name to help troubleshoot issues faster. This name will be used for logging purposes.

SkipOnError: It specifies whether to continue executing the workflow even if it throws an error. This supports only Boolean value “True or False”
True: Continues to execute the workflow irrespective of any error thrown.
False: Stops the workflow if it throws any error

Version: It specifies the version of the Dictionary feature in use.

Represents mandatory fields to execute the workflow.

10.5 ErrorHandling

Introduction

Error handling deals with handling errors with respect to various activities in a workflow. If the workflow throws exceptions or any errors, you can handle them through these activities.

Benefits

1. Improved Reliability: Error handling ensures that bots can detect and address exceptions or unexpected situations during process execution. This leads to more reliable automation as bots can handle errors gracefully without causing disruptions to the entire process.
2. Enhanced Data Accuracy: By implementing error handling mechanisms, systems can verify and validate data inputs and outputs. This helps in maintaining data accuracy by identifying and rectifying errors or inconsistencies in real-time.
3. Efficient Troubleshooting: Error handling provides detailed logs and error messages that assist in identifying the root cause of failures or issues. This facilitates efficient troubleshooting and enables developers to make necessary adjustments to prevent similar errors in the future.

Use Case

1. Application Errors: Implement error handling routines to capture and handle application errors gracefully. This includes logging error details, displaying user-friendly error messages, retrying failed actions, and escalating critical errors for manual intervention.

2. Data Validation Errors: Use error handling to validate input data against predefined rules and criteria. Identify and flag data validation errors, log error details, and trigger corrective actions such as notifying users, retrying data validation, or marking records for manual review.

3. Timeouts and Delays: Implement timeout handling mechanisms to handle delays and timeouts gracefully. Set appropriate timeout thresholds, implement retry strategies, log timeout occurrences, and escalate long-running processes for investigation or manual intervention.

4. Resource Unavailability: Implement resource availability checks and error handling routines to handle resource unavailability scenarios. Retry failed resource accesses, implement fallback mechanisms, log resource availability status, and notify administrators for resolution.

5. Integration Errors: Implement integration error handling to manage integration failures effectively. Handle communication errors, parse and validate API responses, retry failed integrations with backoff strategies, log integration errors, and alert support teams for resolution.

6. Business Rule Violations: Define and enforce business rule validations within workflows. Implement error handling for business rule violations, log rule violation details, trigger corrective actions, and notify stakeholders or administrators for remediation.

10.5.1 Release Notes

v.2.3.4

In this release, the Retry Scope activity has been enhanced:

Enhancement

Retry Scope – The Retry Scope activity now includes explicit Action and Condition sections. The Action section specifies the activity or sequence to be retried, and the Condition section defines the logic that determines when to stop retrying. This enhancement provides improved control and reliability for workflows.

Released Date: 20/04/2026

10.5.2 Throw

This activity is used to notify the exception message and terminate the process. It explicitly throws an exception that is defined by the user. Once the bot reaches the throw activity, it throws the exception message and ends the workflow.

Properties

MISC

Display name: Displays the name of the activity. You can also customize the activity name to help troubleshoot issues faster. This name will be used for logging purposes.

Exception: * Define the exception rule to display during the runtime. It gets displayed in the Output window.

* Represents mandatory field to execute the workflow

10.5.3 Rethrow

When you are required to retry the execution of the sequence before an exception occurs, The Rethrow activity can be used Rethrowactivity throws a previously thrown exception from within a TryCatch activity while retaining the original source of the exception.

Example

1. Let’s continue from Try Catch activity,
2. Add Rethrow activity to the catch block below the sequence.
3. Add another Try Catch and place the before TryCatch activity inside the Try block.
4. Now, execute the workflow if there is an exception it rethrows and handles the exception.

10.5.4 TryCatch

The Try-Catch activity is an error handler, where you can handle the possible exceptions in a workflow with a different set of activities accommodating the Catch and block activity, ensuring that the process is not interrupted. The Try Catch activity has three segments within it, Try, Catch and Finally.

Try: is the segment of the activity that holds the executional sequence. This comprises a series of tasks which are likely to throw up errors.

Catch: is the segment of the activity that is used to handle the exception. This segment requires the exception type that the bot is required to handle. We also need to provide a sequence of activities that the bot must perform in the catch segment.

Finally, has a set of activities to be performed after the Try and Catches blocks are executed. This section is executed only when no exceptions are thrown or when an error. occurs and is caught in the Catches section.

The following activity explains how we are going to use the try catch activity in a simple workflow.
1. Drag and drop a try catch activity from the error handling feature.
2.Double click on the activity and drop a sequence activity from the control flow feature.
3. Design the above workflow inside the sequence activity by dragging and dropping the required activities. 
4. The next segment in the try catch activity is the catches. Here we need to choose the exception that the bot must handle. In this case we are going to choose System.exception. We can choose this exception by seeing the exception message that we get in our output window when the workflow is not executed.

10.5.5 RetryScope

The Retry Scope activity is used to repeatedly execute an action until a defined condition is met or the maximum number of retries is reached. It is commonly used to handle temporary failures such as slow web page loading, delayed UI elements, or intermittent system responses, ensuring that the automation workflow continues reliably without manual intervention.

Properties

INPUT

NumberOfRetries*: Specifies how many times the activity should be retried if the condition is not met. Accepts an Integer value. The value can be hardcoded or passed dynamically through a variable.

RetryIntervalSeconds*: Specifies the wait time between each retry. Accepts an Integer value in seconds. The value can be hardcoded or passed dynamically through a variable. The default value is 0, meaning no delay between retries.

MISC

Body: Auto-populated when an activity is added to the Action.
Displays Sequence if multiple activities are used.
Displays the activity name if only a single activity is used.

Condition: Auto-populated when an activity is added to the Condition.
Displays Sequence if multiple activities are used.
Displays the activity name if only a single activity is used.

DisplayName: Specifies the name of the activity. This can be customized to aid in troubleshooting.

SkipOnError: Specifies a Boolean value (True or False):
True: Continues executing the workflow regardless of errors.
False: Stops the workflow if an error occurs.
If left blank, it behaves as False by default.

Version: Indicates the version of the feature being used.

OUTPUT

Condition: Returns a Boolean value that indicates whether the condition was satisfied after execution:
True: The condition is met (Retry Scope stops successfully).
False: The condition is not met (Retry Scope continues retrying until limit is reached).

How Retry Scope Works

On the screen canvas, the Retry Scope is divided into two sections: Action and Condition.

Process Table
Component What it Means How it Works
Action The step where the system performs a task such as clicking a button, opening a page, or entering data. These tasks may fail temporarily due to delays or unavailable elements. Runs at least once. If it fails or does not meet the required condition, it is retried after a short delay. This continues until it succeeds or the retry limit is reached.
Condition A True/False check that confirms whether the Action was completed successfully. After each attempt, the condition is evaluated. If True, the process stops successfully. If False, the Action is retried after the defined delay until success or maximum retries are reached.

Example: Retry Scope Usage

This example shows how Retry Scope can automatically retry by clicking a button on a web page until a success message appears, ensuring the process works even if the page is slow or unresponsive.

1. Add the Retry Scope activity to a new workflow and set NumberOfRetries = 3 and RetryIntervalSeconds = 10 (wait 10 seconds between retries).

2. In the Action section, add a Click activity and select the target button using Indicate on Screen.

3. In the Condition section, add an Element Exists activity and select the message element. It returns True when the element is found (success) and False when it is not (retry required).

4. The workflow clicks the button, checks the condition after each attempt, retries if the result is False, and continues once the condition becomes True or stops after reaching the maximum retries.

10.6 Flowchart

Introduction

Flowcharts are graphical representations of workflows, processes, or automation sequences. They use symbols and connectors to illustrate the sequence of steps, decision points, actions, and transitions within an automated process. Flowcharts serve as visual aids for planning, designing, documenting, and understanding workflows, making them essential tools for development and implementation.

Benefits

1. Visual Representation: It provides a visual representation of automation workflows, making it easier for bot developers, stakeholders, and team members to understand and communicate complex automation logic.

2. Process Documentation: It serves as documentation tools for capturing and documenting the sequence of steps, decision points, conditions, and actions involved in an RPA process, enhancing process transparency and clarity.

3. Workflow Planning: Flowcharts help in planning and designing workflows by visualizing the logical flow of activities, identifying dependencies, defining decision paths, and optimizing process sequences.

4. Error Identification: It aids in identifying potential errors, bottlenecks, and inefficiencies within automation processes by visualizing the flow of data, decisions, and actions, allowing for process optimization and improvement.

5. Collaborative Development: Flowcharts support collaborative development in automation projects by providing a common visual language for developers, designers, analysts, and stakeholders to collaborate, review, and refine automation workflows.

Use Cases

1. Process Design: Use flowcharts to design and plan automation processes, including defining automation sequences, task dependencies, decision points, error handling, and data flows. Visualize the end-to-end process flow before implementation.

2. Workflow Documentation: Document workflows using flowcharts to capture and communicate process logic, steps, conditions, and actions. Create process maps for reference, analysis, and auditing purposes.

3. Process Optimization: Analyze flowcharts to identify inefficiencies, bottlenecks, or redundant steps within the processes. Optimize process flows, streamline automation sequences, and improve overall process efficiency.

4. Error Handling: Use flowcharts to design error handling and exception management workflows. Define error paths, recovery actions, notifications, and escalation procedures for handling exceptions during automation execution.

5. Decision Trees: Create decision trees within flowcharts to model decision-making logic in automation processes. Define conditions, branches, outcomes, and decision criteria for automating complex decision-making tasks.

6. Integration Mapping: Use flowcharts to map integration points, data exchanges, and communication flows between systems, applications, and external services. Design data mapping, transformation, and synchronization processes within flowchart diagrams.

7. Process Validation: Validate automation processes using flowcharts by comparing the visualized process flow with documented requirements, business rules, and expected outcomes. Ensure alignment between designed processes and intended automation logic.

10.6.1 Flowchart

The Flowchart activity is used to create workflows that define and manage complex flow controls. The Flowchart activity specifies a unique StartNode that is executed when the workflow starts and uses a network of linked activities.

Properties

MISC 

Display Name: Displays the name of the activity. You can also customize the activity name to help troubleshoot issues faster. This name will be used for logging purposes.

ValidateUnconnectedNodes: If the check box is enabled, it connects all the activities/nodes which are not linked to the flow chart and validates them.

10.6.2 FlowSwitch

The Flowswitch activity is a conditional node that provides branching for the flow of control based on match criterion when more than two alternative branches are required. This activity can be used in combination with other activities like assign, flowdecision.

Properties.

MISC 

Display Name: Displays the name of the activity. You can also customize the activity name to help troubleshoot issues faster. This name will be used for logging purposes.

Expression:* This indicates the name of the variable given in the variable box of the Flow Switch property. This is a mandatory field to execute the workflow.

* Represents mandatory fields to execute the workflow.

Example

The following activity illustrates how we are going to use the FlowSwitch activity along with an assign activity. It shows if the given number goes through the FlowSwitch and declares the right value.

Steps to execute a bot

1. Drag and drop an assign activity from Primitives. Select the assign activity and choose the variables option. Choose the variable option, assign the variable“int” and select “int32” as the variable type. 
2. Enter any number against the Int in the assign activity box. (Here we will use 10 and 4) to see the difference in output.
3. Drag and drop the Flow Switch box and connect below the assign activity, which is used to handle multiple scenarios based on a single input. Enter the variable as “Int” in the expression box.
4. Connect 4 writeline activity boxes as required to the switch box.
5. One of the writeline box should always be set as default for the action to execute. In this activity we choose one box as default and enter the VB expression as “Given Value is not Found”.
6. Select the other boxes and enter the VB expression as required. For e.g., Value is 9, Value is 10, Value is 19 etc.

7. Each arrow that connects the write line activity and Switch box has a number in circle that is placed on the arrow by the system itself. This is just a box for reference. Select the default circle and go to the property box and check the InDefaultCase box.
8. Execute the workflow.

When the number entered on the assign tab is 10, The bot gives a message in the output box that the “Value is 10”.
When the number entered on the assign tab is 4, The Bot gives a message in the output box that the “Given Value is not Found”

10.6.3 FlowDecision

This activity is used when the flow can be branched into two paths. The node will have a condition and a flownode associated with each of the two possible outcomes: True or False. The condition is evaluated, and the value of this evaluation determines the next step of execution in the workflow.

The FlowDecision activity can be used in combination with any activity that has a possibility of two outcomes.

Properties

MISC 

Condition:* The path that determines which path the flow control takes.

Display Name: Displays the name of the activity. You can also customize the activity name to help troubleshoot issues faster. This name will be used for logging purposes.

FalseLabel:* The path taken by the flow control when the condition is not satisfied.

Truelabel:* The path taken by the flow control when the condition is satisfied.

* Represents mandatory fields to execute the workflow.

10.7 Primitives

Introduction

Primitives refer to the design components that are responsible for visually representing and configuring basic or fundamental activities within a workflow. These designers are focused on the visual aspects and user interface elements associated with simple activities, providing a way for developers to interact with and customize the behavior of these foundational workflow elements.

Benefits

1. Modularity and Clarity: State machines provide a modular and clear representation of complex workflows by breaking them into distinct states. This enhances readability and makes it easier to understand the logic.
2. Scalability: State machines are well-suited for scenarios with multiple paths or stages, allowing for scalability and the addition of new states without significant redesign.
3. Error Handling: The “Terminate Workflow” activity is crucial for handling critical errors. It helps prevent the execution of subsequent activities when an error occurs, enabling graceful error handling and logging.
4. Workflow Control: It provides explicit control over the flow of the workflow, allowing developers to stop execution based on specific conditions or exceptions.
5. Data Transformation: Assignments facilitate data transformation, enabling the manipulation and preparation of data for further processing.
6. Dynamic Values: Assignments allow the dynamic updating of variable values based on changing conditions, enhancing flexibility in workflow execution.
7. Parallel Processing: It is beneficial in scenarios involving parallel processing, providing the ability to handle cancellations in specific branches without affecting the entire workflow.

10.7.1 Release Notes

v.1.8.4

In this release, new activities have been introduced under the Primitives feature to simplify workflow creation and enhance flexibility.

New Activities

1. Repeat Number of Times – Unlike For Each, this activity allows repeating the same set of actions for a specified number of times without any specific condition or logic.

2. Custom Assign – Enables assigning values to variables with custom logic, providing greater flexibility in data manipulation within workflows.

10.7.2 Assign

This activity is utilized to assign values to variables or arguments, supporting various datatypes such as String, Boolean, Int32, object, array, and more. It also serves to increment variable values within a loop or to calculate the sum of multiple variables, assigning the result to another variable.

Properties

DisplayName: Displays the name of the activity. The activity name can also be customized to help in troubleshooting.

To:* This parameter indicates to provide the variable to which the value needs to be assigned.
You have the option to hardcode the values in any variable format. This accepts all variable datatype.

Value:* This parameter indicates to provide the value that needs to be assigned to the variable in the “To” field. You have the option to hardcode the values in any variable format. This accepts variable datatype depending on the datatype of the “TO” field.

 *Represents mandatory fields to execute the workflow.

Here’s an example of how the “Assign” activity works –

In the following example, I will calculate the total cost of items based on the quantity, utilizing the “Assign” activity. Here I have created three variables such as “ItemPrice, Quantity, and Total cost” with “Int32” as datatype for all three.

Example

1. Create a new solution or open an existing solution.
2. The “Primitives” features will be installed by default during the installation of the “Designer”.
3. Drag and drop the “Assign” activity to the workflow and set it as start node.
a. In the first assign, I am entering the “To” as “ItemPrice” and “Value” as “32”.
4. Now, I am adding another “Assign” activity below to the first one to assign values to the “Quantity” variable.
a. Providing the value as “4”.
5. Then, adding the final “Assign” activity to calculate the values and assign to “TotalCost” variable.
a. To perform the action, I am providing the value as “32*4” in the box.
6.You can add the “Writelog” activity to view the results.
7. Now, execute the workflow.

10.7.3 Custom Assign

This activity allows the user to assign a specified value to a variable.

Why this custom assign is required?

Unlike the standard Assign activity in Robility, the Custom Assign activity allows users to declare a variable directly within the activity and choose any data type for the value assignment.

In the standard Assign activity, you can only assign values to existing variables. To declare a new variable, you must create it separately in the Variables section.

This Custom Assign activity eliminates these manual steps, improving usability and simplifying workflow design.

Properties

INPUT

Value to Save: *Specifies the value that needs to be assigned to the variable.

MISC

Type Argument: Specifies to choose the type of variable being assigned such as String, Int32, Boolean, Double, or any other compatible data type.

DisplayName: Displays the name of the activity. The activity name can be customized, which aids in troubleshooting.

SkipOnError: Specify the “Boolean” value as “True” or “False.”
True: Continue executing the workflow regardless of any errors thrown.
False: Halt the workflow if it encounters any errors.
None: If the option is left blank, the activity will, by default, behave as if “False” were chosen.

Version: It indicates the version of the feature being used.

OUTPUT

Save To: *Specifies to provide the variable to which the value needs to be updated/ assigned. You can select an existing variable or create a new variable and define its type.

Result: This parameter allows you to view the execution status of the activity and returns a value in “Boolean.”

True: Indicates that the activity has been executed successfully without any errors.

False: Indicates that the activity has been unsuccessful due to an unexpected error being thrown.

* Represents mandatory fields to execute the workflow.

10.7.4 WriteLine

This activity designed to output information or messages in the output window or log files during the execution of a workflow. It is commonly used for debugging and logging purposes, allowing developers to inspect and monitor the flow of the automation process.

Properties

Display Name: Displays the name of the activity. The activity name can also be customized to help in troubleshooting.

Text: This parameter indicates to provide the “Input” value to write in the output window.
You have the option either to hardcode the values in “String” variable or you can input the values in “String” format.
This accepts only “String” datatype.

TextWriter: This parameter indicates to write the “Input string” variable that we are passing into other targeted areas or application.
You have the option either to hardcode the values in “String” variable or you can input the values in “String” format.
This accepts only “String” datatype.

Example

Here’s an example of how the “WriteLine” activity works –

In the following example, I am continuing from the “Assign” activity example to write the output in the output window.

1. Create a new solution or open an existing solution.
2. Drag and drop the “WriteLine” activity to the below to the last assign activity.
3. Here I am entering the value as “Amount:” +TotalCost.ToString in the “Text” field.
a. The “.ToString” is advised to use along with any other data types other than string format. It converts any data type into string.
4. Now, save and execute the workflow.

10.7.5 Break

This activity assists the user in exiting the loop during execution when utilized in For Each activity.  

Properties

MISC

DisplayName: Displays the name of the activity. The activity name can be customized, which aids in troubleshooting.

Version: It indicates the version of the feature being used.

Example

Here’s an example of how the “Break” activity is used in the workflow –

In the following example, I have a sample excel sheet of employee details, where it contains the employee’s name, mail id and login name. Here I am going to iterate the “EmployeeName” to check the duplicates by using break activity.

Steps to execute the bot:

1. Create a new solution or open an existing workflow.
2. Drag and drop the “ExcelScope” activity from the “ExcelAutomation”.
a. Here I am using this activity to read and extract the values from the Excel sheet.
b. Choose the specified “FilePath” where the excel has been stored.
3. Next, place the “ReadRanges” activity from the Excel Automation feature within the scope.
a. We are using this activity to read the ranges from the provided “Excel” file and extract the data to “Datatable” type as output.
b. Enter the “Range” as “A1” as we are reading the ranges from “A1” to the end of the data.
4. Provide the “SheetName” as it contains the data that needs to be read.
5. Navigate to the properties and create a variable in the “DataTable” field as “EmployeeName”. It will convert and extract the read data to store in the variable “EmployeeName”,
6. There are two ways to create a variable-
7. Now, placing the “ForEach” activity from the “Primitives” to iterate and loop the names from the variable.
a. Here I am providing the “In” variable as the “EmployeeName.Asenumerable()”.
b. Here Choosing the type argument as “system.Data.Datarow”.
8. Inside the ForEach activity, use an If activity to check for duplicate names.

In the Condition field, enter the logic DuplicateList.Contains(CurrentRow(“EmployeeName”).ToString.Trim) Where DuplicateList is a list created to track duplicate names.
9. Inside the If condition:
a. If the condition is True, drag and drop the Break activity. This will stop further iteration and exit the loop when a duplicate name is found.
b. If the condition is False, add the name to the DuplicateList variable to keep track of unique names.
Initialize and declare the DuplicateList variable as a new list of strings before the ForEach activity starts.

10. Use the Assign activity: DuplicateList = New List(Of String)
a. After the loop execution is complete, you can add a WriteLine activity or Log Message to display the result of the operation. For instance: Message: “Duplicate Found: ” + CurrentRow(“EmployeeName”).ToString.Trim
11. Finally, run the bot to test the workflow.

10.7.6 Continue

This activity helps the user to skip the remaining steps in the current iteration inside the “ForEach” activity.

Properties

MISC

DisplayName: Displays the name of the activity. The activity name can be customized, which aids in troubleshooting.

Version: It indicates the version of the feature being used.

10.7.7 Repeat Number of Times

This activity executes a set of activities repeatedly for a specified number of times. It helps workflows perform repetitive operations without duplicating logic, supporting scenarios such as retries, batch processing, or executing a task a fixed number of times.

How does this activity differ from Retry Scope and For Each?

Retry Scope: Retries an activity only if it throws an exception during execution.

For Each: Iterates only through the number of items available in a collection or list.

Repeat Number of Times: Executes a set of actions for a defined number of times or can be used to iterate with the next value for each repetition.

Why do you need this activity?

This activity is useful when you already know how many times some action(e.g., selecting a date, choosing the value from dropdown etc.) needs to be repeated. It doesn’t depend on conditions or lists just repeat the same action at fixed number of times.

Simple examples:

1. Press a Refresh button 5 times.
2. Move through a calendar (Datepicker) step by step to reach the right date.

Properties

Input

Repeat number of times: Specifies to provide the number of times the activities need to be repeated.

Start at: Specifies to enter the value from the which the “CurrentItem” parameter should start from.

For Each: Helps to iterate and repeat the set of activities in loop with the “CurrentItem” value. You can customize the name.

MISC

Display Name: Displays the name of the activity. The activity name can be customized, which aids in troubleshooting.

SkipOnError: Specify the “Boolean” value as “True” or “False.”

True: Continue executing the workflow regardless of any errors thrown.
False: Halt the workflow if it encounters any errors.
None: If the option is left blank, the activity will, by default, behave as if “False” were chosen.

Version: It indicates the version of the feature being used.

Example of Using This Activity

To select a date from the Datepicker control, let’s look at an example using a sample website.

Required Variables:

1. One String variable (InputDate) – to store the date to be selected from the Datepicker control.
2. One Int32 variable (DaysDiff) – to provide the number of times the action should be performed.

Prerequisite: Install Web Automation and Keyboard Automation packages.

Steps to Create the Bot:

1. Open the website, add a Click activity from Web Automation, and detect the Datepicker box to open the calendar.
2. Add an Assign activity with the following expression:

a. DaysDiff = (DateTime.Now.Date – DateTime.Parse(InputDate).Date).Days

3. Add another Assign activity:
a. DaysDiff = Math.Abs(DaysDiff)

4. Add a Write Log activity to check the calculated number.
5. Add an If activity with the condition: Now < DateTime.Parse(InputDate)
6. Then branch:
a. Add a Repeat Number of Times activity.
b. Set the Repeat Number of Times property to DaysDiff.

7. In the Do sequence:
a. Add a Shortcut Key activity (Keyboard Automation) and select the standard key Right.
b. Add another Shortcut Key activity and select Enter.

8. Else branch: Follow the same steps as above, but in the Shortcut Key activity, select Left instead of Right.

Explanation:
This bot checks the input date provided in the variable and calculates the difference between the current date and the input date. Based on this difference, it repeats the navigation action (Right/Left) the required number of times. If the input date is greater than the current date, it moves forward (Right). Otherwise, it moves backward (Left). Finally, it selects the date.

Example 2: Using the “For Each” Function

A simple example to print values repeatedly using the Message Box activity.

Steps to Create the Bot:

1. Add a Repeat Number of Times activity.
2. Set the Repeat Number of Times property to 12.
3. In the Start At property, enter the value 1.
4. This indicates that the current item will start from 1 as the initial number.
5. In the Do sequence:
a. Add a Message Box activity (Notification) and provide the input string as CurrentItem.
CurrentItem is the variable available in the For Each property, and it can be customized if needed.
b. Provide a title for the message box.
6. Execute the bot.

You will see that the count increases with each iteration of the loop.

10.7.8 TerminateWorkflow

This activity is used to abruptly stop the execution of the current workflow. It essentially acts as a mechanism to forcefully end the workflow at a specified point, terminating the execution of any activities that come after it in the workflow sequence. It is commonly employed to handle exceptional situations or to intentionally stop the workflow under specific conditions.

Properties

MISC

Display Name: Displays the name of the activity. The activity name can also be customized to help in troubleshooting.

Exception: This parameter indicates to provide the exception message to abort the workflow. You have the option either to hardcode the values or input values.

Reason: Indicates to specify the reason for the exception to abort. By default, it will be blank. This parameter accepts only “String” datatype.

Example

The following activity illustrates on how we will use the terminate workflow activity to terminate a workflow when an exception occurs.

In this example, we will design a simple workflow to demonstrate how to terminate it when a system exception occurs. The Terminate Workflow activity can be used to handle both business and system exceptions effectively.

Let’s create a workflow using the Element Exists activity within a Try-Catch activity to observe how the bot handles errors and terminates the workflow when an exception occurs.

Steps to Create the Workflow:

1. Drag and drop a Sequence activity from the Control Flow feature.
2. Inside the sequence, add a Try-Catch activity.
3. In the Try segment, place an Element Exists activity:
4. Double-click on the activity to configure it.
5. Spy for an element on a webpage to be found. For this example, let’s spy the “Google” element on the Google homepage.
6. In the Catches segment – Add a System.Exception type.
7. Specify the next action the bot should perform when an error occurs.
8. Add a Message Box activity in the Catches segment to display the error:
9. Set a title for the message box (e.g., “Error Occurred”).
10. In the input string field, use the exception.Message property to display the error details.
11. Below the message box, add a Terminate Workflow activity to stop the workflow execution.
a. In the Reason field of the activity, provide a message explaining the termination cause. For example: “The Google page was closed or not found.”
12. Workflow Execution:
If an exception occurs: The bot will throw an error message via the message box, display the specified termination reason, and terminate the workflow.
If no exception occurs: The bot will continue to the Finally segment and display a message indicating the successful execution of the workflow.

10.7.9 State

A state machine is a type of automation that uses number of states in its execution. We can get into the initial state when triggered by an activity and it exits this state when another activity is triggered.

There are two activities that are specific to state machines, namely State and Final state. The state machine acts like the main branch of a tree, within which we add the states and final state to execute the workflow. The state activity has three categories within itself- Entry, Exit and Transition.

Entry- Indicates the activity that the bot must execute while entering the state

Exit- Indicates the activity that the bot executes while exiting the state

The Entry and Exit sections enable you to add entry and exit triggers for the selected state, while the Transition(s) section displays all the transitions linked to the selected state.

Transition-Indicates the condition that the bot must perform to jump from one state to another

Transitions are expanded when you double-click them, just like the State activity. They contain three sections, TriggerCondition and Action, that enable you to add a trigger for the next state or add a condition under which an activity or sequence is to be executed.

The final state has only one activity within it which is just the Entry box. This box indicates the final state of the activity when the execution is complete.

10.7.10 StateMachine

10.7.11 FinalState

10.7.12 ForEach

This activity helps the user to enable the iteration over elements in a collection, such as an array or a list. It executes a specified set of actions for each value in the collection variable/argument, allowing for efficient processing of multiple items without the need for manual iteration.

Properties

Display Name: Displays the name of the activity. The activity name can be customized which will help in troubleshooting.

TypeArgument:* It indicates the “datatype” of each value in the collection of variable / argument. Choose only specific datatype of variable from the drop-down menu, avoiding selections of lists, collections, or arrays of types.

Values:* Indicates to provide the “variable” or “argument” name with a collection of values. This should match the datatype selected.

Represents mandatory fields to execute the workflow

10.7.13 MultipleAssign

This activity lets you assign values to multiple variables at once, avoiding the need for multiple Assign activities. This activity is commonly used for initialization purposes before extensive processes, eliminating the need to set up multiple Assign activities.

Properties

MISC

DisplayName: Displays the name of the activity. The activity name can be customized, which aids in troubleshooting.

Example

Here’s an example of how “MultipleAssign” activity is used –

In the following example, I am declaring three “Integer” variables and using the multiple assign activity, I am going to perform a simple calculation.

1. Open an existing workflow or create a new solution.
2. Create three variables from the “VariablePanel” with “Integer” as datatype.
3. Now, drag and drop the “Multiple Assign” activity into the workflow and set it as start node.
4. In the “TO” property, enter the value as “Variable1” and pass the value as “2000” in the “Value” property.
5. Now, selecting the “Add” option to add multiple variables
6. In the “TO” property, enter the value as “Variable2” and pass the value as “745” in the “Value” property
7. Again, I am choosing the “ADD” option to add the third variable.
8. In the “TO” property, enter the value as “SUM” and pass the value as “Variable1 + Variable2” in the “Value” property.
9. Now, adding a “writeline” activity to view the output of the “SUM” variable.
a. Here, I am providing the value as “SUM.Tostring”.
b. The “.ToString” is advised to use along with any other data types other than string format. It converts any data type into string.
10. Now, execute the workflow to view the output.

The bot will execute and sums up the variable1 and variable2 to provide the output in writeline activity.

10.8 List

List activities in Robility provide a simplified way to manage lists within workflows. A list is a dynamic data structure used to store and process multiple values of the same type (e.g., names, numbers, objects). These activities help streamline automation where you need to collect, modify, or loop through related data items.

Why Use List Activities?

1. No manual syntax – Easily create and manage lists using drag-and-drop.
2. Unified experience – Works consistently across data types.
3. Error reduction – Predefined activities reduce common mistakes.
4. Better visibility – List operations are clearer and more readable in the workflow.

Activities That Support List Operations

1. Create List – Initialize an empty list of a specified type.
2. Update List – Modify or replace values in an existing list.
3. Append to List – Add new items during automation runtime.
4. Read List – Retrieve list values for decisions or downstream use.

When to Use List Activities

a. To group related data like customer names, order IDs, or records.
b. To reduce variable clutter by using a single list instead of many variables.
c. When data grows dynamically during execution.
d. To iterate over values and perform repeated actions.

10.8.1 Release notes

v.1.1.6

This release includes enhancements to dependent DLLs.

Enhancement

All dependent DLLs have been upgraded to the latest stable versions, enhancing security, performance, and workflow reliability. This update ensures smoother execution and maintains compatibility with both existing and new workflows.

Released Date: 09/03/2026

10.8.2 Create List

The Create List activity is used to initialize a list variable of a specific type (e.g., Integer, String, Object). By default, the created list is empty until you assign or add values.

Properties

MISC

Display Name: Displays the name of the activity. The activity name can be customized, which aids in troubleshooting.

SkipOnError: Specify the “Boolean” value as “True” or “False.”

True: Continue executing the workflow regardless of any errors thrown.
False: Halt the workflow if it encounters any errors.
None: If the option is left blank, the activity will, by default, behave as if “False” were chosen.

Type Argument: Select the type of variable to be created from the drop-down.
For example, if it is a list of strings, choose “String” as the argument type.

By default, the argument type should be as “String”.

Version: It indicates the version of the feature being used.

OUTPUT

NewList: *Returns a new list based on the selected variable type as the output.

Result: This parameter allows you to view the execution status of the activity and returns a value in “Boolean.”

True: Indicates that the activity has been executed successfully without any errors.
False: Indicates that the activity has been unsuccessful due to an unexpected error being thrown.

* Represents mandatory fields to execute the workflow.

How to Use the Create List Activity?

The Create List activity generates an empty list variable with null values. To add values, you need to assign values to the list. Below are the three ways you can do this:

1. Add to Collection activity
2. Assign activity
3. Update / Append List activity

Step 1: Create the List

1. Drag and drop the Create List activity into your workflow.
2. Set the Type Argument (e.g., Integer).
3. Declare the variable in the NewList parameter.

At this point, a list of the selected types (for example, integers) has been created, but it’s still empty. Next, let’s assign values.

Step 2: Assigning Values Using the Assign Activity

You can populate the list with values using either the Assign activity or the Update List activity.

To use the Assign activity:

4. Drag and drop an Assign activity after the Create List activity.
5. In the To field, enter the variable name created in the Create List activity.
6. In the Value field, use this syntax:

New List(Of Int32) From {32, 16, 24, 12}

Example:
For a list of strings, the Assign activity should look like this:

STRLIST = New List(Of String) From {“Apple”, “Banana”, “Cherry”}

Click here to learn how to assign values using the Update List or Append List activities.

Step 3: Reading List Values

To read or print the values from the list, use the Read List activity. This will allow you to retrieve the stored items and print them in your workflow using Write log activity.

When to Use For Each?

Yes, you need to use For Each if you want to iterate through all items in the list and perform an action on each one.

a. Use Read List when you want to fetch the entire list as an output.
b. Use For Each when you want to process each value individually.

Iterating Through a List

To process or read items inside a list, use the For Each activity.

Steps:

1. Drag and drop a For Each activity.
2. In the Values field, provide the list variable (e.g., NumList).
3. Set the Type Argument (e.g., Int32 if the list is integers).
4. Inside the loop, use activities like Write Log to print the output.
5. In the Writelog activity, enter the input string as “item.Tostring”.

So, the Create List activity itself only initializes the list. To use the list effectively, you combine it with Assign / append / Update list (to add values to it) and Read list / For Each (to iterate through it).

10.8.3 Read List

The Read List activity is used to fetch a value from a list by specifying its position (index).

Properties

INPUT

Item index: *Specifies to provide the position of the item to be retrieved from the list. Accepts values in Int32 datatype.

List: Specifies to provide the list variable from which the value needs to be retrieved.

MISC

Display Name: Displays the name of the activity. The activity name can be customized, which aids in troubleshooting.

SkipOnError: Specify the “Boolean” value as “True” or “False.”

True: Continue executing the workflow regardless of any errors thrown.
False: Halt the workflow if it encounters any errors.
None: If the option is left blank, the activity will, by default, behave as if “False” were chosen.

Type Argument: Select the type of variable for the list provided from the drop-down.
For example, if it is a list of strings, choose “String” as the argument type.

By default, the argument type should be as “String”.

Version: It indicates the version of the feature being used.

OUTPUT

Result: This parameter allows you to view the execution status of the activity and returns a value in “Boolean.”

True: Indicates that the activity has been executed successfully without any errors.
False: Indicates that the activity has been unsuccessful due to an unexpected error being thrown.

SaveTo: * Returns the value from the specified index as the output in the selected TypeArgument datatype.

* Represents mandatory fields to execute the workflow.

10.8.4 Append List

This activity is used to add new values to an existing list variable. It updates the list by appending the specified items without overwriting the current contents.

Properties

Input

Item To Append: *Specifies to provide the value that needs to be added to the existing list.

List: *Specifies to provide the list variable from which the value needs to be retrieved.

MISC

Display Name: Displays the name of the activity. The activity name can be customized, which aids in troubleshooting.

SkipOnError: Specify the “Boolean” value as “True” or “False.”

True: Continue executing the workflow regardless of any errors thrown.
False: Halt the workflow if it encounters any errors.
None: If the option is left blank, the activity will, by default, behave as if “False” were chosen.

Type Argument: Select the type of variable for the list provided from the drop-down.
For example, if it is a list of strings, choose “String” as the argument type.

By default, the argument type should be as “String”.

Version: It indicates the version of the feature being used.

OUTPUT

Result: This parameter allows you to view the execution status of the activity and returns a value in “Boolean.”

True: Indicates that the activity has been executed successfully without any errors.
False: Indicates that the activity has been unsuccessful due to an unexpected error being thrown.

Item index: *Returns the position of the item that has been added to the list in Int32 datatype.

* Represents mandatory fields to execute the workflow.

Example

The following example demonstrates how to create a list and then append values to it:

Step 1: Create the list

1. Drag and drop the Create List activity and set the TypeArgument to Integer.
2. In the NewList parameter, declare a variable (e.g., newList).

a. At this stage, an empty list of integers is created.

Step 2: Append value to the list

3. Add the Append List activity after the Create List activity.
4. In the Item to append property, enter the value 145.
5. In the List property, provide the variable you created earlier (newList).
6. Ensure the TypeArgument is set to Integer.

Step 3: Read the appended value

7. In the output section of the Append List activity, declare a variable in the ItemIndex field to capture the index of the appended item.
8. Add a Read List activity and set the ItemIndex property to the variable from step 7.
9. Provide the same list variable (newList) in the List property.
10. In the output section of the Read List activity, declare a variable to store the retrieved value.

Step 4: Display the result

11. Add a Write Log activity and use the following expression to print the appended item:

“ReadList.ToString”.

Now, you can view the appended list to the existing list.

10.8.5 Update List

This activity is used to replace an existing value in a specified list variable with a new value.

Properties

Input

Item Index: *Specifies to provide the position of the value from the list variable that needs to be updated in “Integer” datatype. 

List: *Specifies to provide the list variable from which the value needs to be retrieved.

New Value: Specified to provide the new value which needs to be replaced.

MISC

Display Name: Displays the name of the activity. The activity name can be customized, which aids in troubleshooting.

SkipOnError: Specify the “Boolean” value as “True” or “False.”

True: Continue executing the workflow regardless of any errors thrown.
False: Halt the workflow if it encounters any errors.
None: If the option is left blank, the activity will, by default, behave as if “False” were chosen.

Type Argument: Select the type of variable for the list provided from the drop-down.
For example, if it is a list of strings, choose “String” as the argument type.

By default, the argument type will be as “String”.

Version: It indicates the version of the feature being used.

OUTPUT

Result: This parameter allows you to view the execution status of the activity and returns a value in “Boolean.”

True: Indicates that the activity has been executed successfully without any errors.
False: Indicates that the activity has been unsuccessful due to an unexpected error being thrown.

* Represents mandatory fields to execute the workflow.

11. Developer Activities

11.1 Overview

Developer activities in Robility are actions performed by developers using Robility Designer to create and deploy automation solutions. These activities involve building workflows, designing automation processes, and integrating various technologies to automate repetitive tasks.

These developer activities encompass a wide range of tasks used to build, develop, and deploy automation solutions. They include working with SQL commands, JSON, and XML, allowing developers to interact with databases, manage structured data, and seamlessly integrate with external systems. These activities consist of several packages available for developers, providing the tools needed to effectively create robust automation solutions.

The developer activities consist of the following packages available,

  1. Portable database
  2. Database Automation
  3. Json
  4. XML

About the package

Portable Database Package:

This package facilitates the integration and manipulation of data stored in lightweight, portable databases such as SQLite. It allows developers to create, read, update, and delete (CRUD) operations on database records within the workflows.

Developers can use activities from the portable database package to connect to an SQLite database file, execute SQL queries, retrieve query results, insert or update records, and manage database transactions. This package is valuable for automation processes that involve local data storage, offline operations, or lightweight database interactions.

Database Package:

This package enables developers to interact with traditional relational databases such as MySQL and SQL Server. It supports a wide range of database operations, including data retrieval, data manipulation, stored procedure execution, and transaction management.

Developers can utilize activities from the database package to establish connections to external databases, execute SQL commands or stored procedures, fetch data based on criteria, perform bulk operations, handle database transactions with rollback and commit options, and manage database connections efficiently. This package is crucial for projects that involve integration with enterprise databases and data-driven automation tasks.

JSON Package:

This package is designed to handle JSON (JavaScript Object Notation) data structures, allowing developers to parse, manipulate, and generate JSON data within workflows. It is commonly used for data exchange between systems, API integration, and handling structured data in modern applications.

Developers can employ activities from the JSON package to parse JSON strings into objects, extract specific data elements from JSON structures, transform JSON data formats, validate JSON schemas, and handle JSON serialization/deserialization. This package is essential for processes that involve working with web APIs, RESTful services, or systems that use JSON as a data interchange format.

XML Package:

This package facilitates the manipulation and processing of XML (Extensible Markup Language) documents, which are commonly used for data representation, configuration files, and communication protocols. It allows developers to parse, generate, validate, and transform XML data within the workflows.

Developers can utilize activities from the XML package to parse XML documents into structured data, extract information using XPath expressions, modify XML nodes and attributes, validate XML against schemas etc. This package is valuable for tasks that involve working with XML-based systems, data interchange formats, or configuration files in applications.

Project Compatibility

11.2 Activity Builder

Robility’s Custom Activity Builder is an exclusive feature that allows developers to create reusable activities using Microsoft Visual Studio. This enables users to create their own activities that can be integrated into automation workflows in Robility Designer. The integration with Visual Studio makes it easy for developers to build and deploy packages for their custom activities

Why do we need custom activities?

In Robility Designer, when you want to create specific functionalities using an activity, utilize the Robility Custom Activity Builder. It not only allows you to create specific functionalities within existing features in Robility Designer but also enables you to create new activities that perform specific tasks within the workflow.

Pre-requisites

To build and integrate the custom activity into the Robility Designer, below are the requirements.

1. Visual Studio Enterprise 2022
2. Familiar Knowledge with code development.
3. Robility Designer.

Extension

The Robility Activity extension for Visual Studio is a crucial tool for developers creating custom activities. It streamlines the development process and simplifies packaging and deployment. By leveraging this extension, developers can create robust, reusable, and maintainable custom activities that can be integrated with Robility Designer.

Installation steps:

1. Open a new or existing project in Visual Studio.
2. On the top of the menu, choose “extensions” and click on “Manage extension”.
3. From the “Manage extension” window, search for “Robility Activity Builder” and install it.
4. Once installed, the extension will be available in the “Extensions” menu as “Robility”.
5. Click on the “Robility” to add and define the activities. 

Setup in Visual Studio

To set up Robility Custom activity in the visual studio. Follow the below steps,

1. Create a new project.
2. Under the “Templates”, search for “Robility Custom activity” and choose the template.

Default code template

When you create a custom activity using Visual Studio, the default code template typically includes a few essential components to get you started. This default code template will be created only when you define the activities and properties for it. These components generally consist of the following:

1. Namespace Declarations: Includes the necessary namespaces for the activity.
2. Class Definition: A class that inherits from CodeActivity to make sure that the activity runs synchronously.
3. Execution Method: An overridden Execute method where you define the logic of your activity.
4. Activity Arguments: Definitions for input and output arguments that your activity will use.
    a. InArgument and OutArgument are used to define the input and output parameters of the activity.
    b. Execute method contains the core logic that will be executed when the activity runs.
    c. Category and Required Argument attributes are used to specify the metadata for the activity’s arguments.

11.2.1 Use Case

Creating an activity

Overview:

We are going to create an activity for the extraction of specific data from a JSON file within an automation solution. Previously, achieving this extraction required a workflow comprising 4 to 5 steps; however, with this custom activity, the process becomes more efficient and direct.

Use Case:

In this scenario, the activity reads a JSON file and extracts a specific value from it.

Steps to build the custom activity

1. Once you have created a project with “Robility Custom Activity” builder template, now navigate to the “Menu” bar.2
2. Click on the “Extensions” and choose the “Robility” from the drop-down menu.
3. Select the “Add Activity” to build and create a custom activity for our use case.
    a. A window labeled as “Add Activities” will appear on the screen.

4. Upon selecting the “Create” option, you will be navigated to define the activities name for the feature that we are about to create.
    a. In this case, we are creating only one activity and let’s name it as “Json Reader”.
    b. Click on the “Add” option and enter the name in the box.
    c. Let’s provide a description of the activity as “Helps to extract specific details from the provided JSON input.
    d. If you want to add multiple activities, click on “Add” button and define them.

Creating Properties

This is the most crucial step where we define the basic structure for the properties required for the activity. These properties determine how the input and output values should be provided.

A. Define Input Properties:

Input properties specify the data that the activity will receive. In this use case, we require the following input properties,

1. InputText – This is used to provide the input JSON text value in “String” format from which the specified extracted value needs to be retrieved.
2. ExtractionValue – This is used to provide the “Value” that needs to be extracted from the JSON input text.

Now, let’s see how to define these properties.

1. To launch the “Define Properties” window, select the “Edit” option under the property in the define activities window.
2. Now, click on the “Add” button to create the property.
    a. Enter the property name as “InputText”.
    b. In the description, you can provide the properties description. Here the value is, “Provide the input JSON value in String format”.
    c. Now, move to the next field, “Direction”. Since this property is used to retrieve the value as input. The direction needs to be set as “IN”.
    d. Next, in the “TYPE” field defines the datatype of the property that needs to be accepted when the user provides the input value. Here choose the value as “String”.
    e. Make this property as “Mandatory” by toggling the “required” option.

3. Now, let’s define the next property, “ExtractionValue”.
    a. Click on the “Add” button at the bottom of the window.
    b. Enter the property name as “ExtractionValue”.
    c. In the description, you can provide the properties description. Here the value is, “Provide the value that needs to be extracted from the JSON value in String format”.
    d. Now, move to the next field, “Direction”. Since this property is used to retrieve the value as input. The direction needs to be set as “IN”.
    e. Next, in the “TYPE” field defines the datatype of the property that needs to be accepted when the user provides the input value. Here choose the value as “String”.
    f. Make this property as “Mandatory” by toggling the “required” option.

B. Define Output Properties:

Output properties specify the data that the activity will provide as result. In this use case, we require the following output property,

1. JsonValue – This is used to return the value that is provided as input from the JSON text value in “String” format.

Now, let’s see how to define these properties.

1. In the “Define Properties” window, click on the “Add” button and in the “Category” list, choose the value as “Output”.
    a. Enter the property name as “OutText”.
    b. In the description, you can provide the properties description. Here the value is, “Declare a variable to view the output in String format”.
    c. Now, move to the next field, “Direction”. Since this property is used to retrieve the value as input, the direction needs to be set as “OUT”.
    d. Next, in the “TYPE” field defines the datatype of the property that needs to be accepted when the user provides the input value. Here choose the value as “String”.
    e. Make this property as “Mandatory” by toggling the “required” option.

C. Provide the custom code:

Once you select the “Finish” button, the activity’s code with all the properties will be created. In that code, you can add the custom logic that needs to be performed. Let’s see how to input your custom code:

1. In the “Code Editor,” you can view the default code template with all the activity arguments defined.
2. In the “Execution” section, you will see “Add your logic here.” In that area, provide your code. 
    a. Refer to the attached code.
    b. Now, you can save the code.

D. Create the nuget package:

1. Now, right click on the “Solution” name in the solution explorer.
2. Choose “Build” option to create the nuget package.
3. The path where the nuget package will be saved will be available in the below toolbox.

E. Utilizing the activity in Robility Designer:

Let’s use the created package in the Designer to view how the activity works.

1. Launch the designer and create a solution.
2. Click on the “ManageFeatures” option in the Designer to install our package.
3. Navigate to the “Browse” option.
    a. This option is used to install the nuget package that aren’t available in the Designer.
    b. Here we are using this option to install our nuget package.
    c. Now, browse and install the package, the feature will be available in the “Toolbox”.

5. Drag and drop the activity and pass the required input in the properties.

Below is the sample output of the execution of the activity,

11.3 Cryptography

Introduction

Cryptography in Robility uses algorithms and techniques to protect data, messages, and transactions from unauthorized access or tampering. This includes methods like encryption, decryption, and hashing to ensure security. Cryptography is essential for maintaining data confidentiality, integrity, and authenticity within RPA.

Key Concepts

1. Encryption: Transforms readable data (plaintext) into an unreadable format (ciphertext) using an algorithm and a secret key, ensuring that only someone with the decryption key can read it.
2. Decryption: Converts the unreadable ciphertext back into readable plaintext using the correct algorithm and decryption key.
3. Hashing: Creates a fixed-length value (hash) from input data using algorithms like MD5, SHA-1, or SHA-256. This ensures data integrity and securely stores passwords.

Benefits

1. Data Confidentiality: Encryption methods like AES (Advanced Encryption Standard) ensure sensitive data stays private and unreadable by unauthorized users, protecting personal information, financial data, and proprietary information.
2. Data Integrity: Hashing algorithms like SHA-256 or SHA-512 create unique hash values for data. These hashes verify data integrity by comparing values before and after transmission. If data changes, the hash will be different, indicating possible tampering.
3. Secure Communication: Cryptographic protocols like TLS or SSL secure communication between bots, servers, and external systems. They encrypt data during transmission, preventing unauthorized access and attacks.
4. Access Control: Cryptographic keys control access to sensitive data. Only those with the correct keys can decrypt and view the information, ensuring that only authorized users can access and modify encrypted data.
5. Compliance Requirements: Cryptography helps organizations comply with data protection laws and standards like GDPR, HIPAA, and PCI DSS, which often require encryption and hashing to protect sensitive information.

Secret Key

A secret key, also known as a symmetric key or private key, is used in symmetric encryption algorithms for both encryption and decryption. This key is crucial for maintaining data security and confidentiality in automation processes involving sensitive information. Different types of data that can be used as a key include:

1. Random Data: Randomly generated data of the required length, crucial for security as predictable keys are vulnerable to attacks.
2. Passphrases: A sequence of words or characters that can be used as a key. Passphrases are easier to remember than random strings but must be long and complex enough to resist attacks.
3. Derived Keys: Keys generated from other data, such as passwords, using Key Derivation Functions (KDFs). KDFs enhance security by adding features like salting and iteration.
4. Key Files: Keys stored in securely managed files accessed by the encryption software. These files may contain binary data or encoded key information.
5. Pre-shared Keys (PSKs): Symmetric keys shared in advance between communicating parties in protocols like TLS or VPNs, used to establish secure communication channels.

Limitations for the secret key for each algorithm:

AES GCM, AES, Rijndael: The key length must be 16 characters.
DES: The key length must be 8 characters.
RC2: The key length must be 5 characters.
TripleDES: The key length must be 24 characters.

Key Encoding

Key encoding involves representing cryptographic keys in a specific format that is suitable for encryption, decryption, and hashing algorithms. This ensures that keys are compatible with cryptographic operations and can be securely managed and transferred between systems.
Robility’s Cryptography feature supports 148 different encoding types. Here are some of the most commonly used key encoding methods:

1. Unicode
2. Unicode (Big-Endian)
3. Unicode (UTF-32)
4. Unicode (UTF-32 Big-Endian)
5. US-ASCII
6. Western European (ISO)
7. Unicode (UTF-8)

11.3.1 Release Notes

v.1.0.5

This release includes the following bug fix:

Bug Fixes

Encrypt File
Fixed an issue in the Encrypt File activity where incorrect error messages (“Input file not found” and “Encryption has failed. Please make sure you use the same algorithm and key for both encryption and decryption operations”) were displayed. The messages have now been updated to reflect the actual cause of the failure.

Released Date: 20/04/2026

11.3.2 EncryptFile

This activity allows users to easily encrypt files by selecting a key encoding and encryption algorithm.

Properties

INPUT

Algorithm: This parameter indicates to choose the algorithm type from the drop-down menu that is used to encrypt the file based on it.

1. AES(Deprecated)
2. AES GCM
3. DES (Deprecated)
4. RC2 (Non-FIPS) (Deprecated)
5. Rijndael (Non-FIPS) (Dperecated)
6. Triple DES.

Refer to the documentation below to view the types of algorithms.
By default, the activity recommends the most commonly used type, “AES GCM”.

DelayAfter: It assists the user to add a delay before initiating subsequent activities. The delay duration here is in milliseconds. By default, it is set to “1000” milliseconds.
When the option is left blank, the delay will not be considered.

DelayBefore: It assists the user in adding a delay before starting the execution of the activities. The delay duration here is in milliseconds. By default, it is set to “1000” milliseconds.
When the option is left blank, the delay will not be considered.

Input File path*: This parameter indicates to provide the input path of the file which needs to be encrypted.

This parameter accepts the values in “String” datatype. You can either hardcode the values in “String” format or can provide the variable in “String” datatype.

Key Encoding: It assists the user to choose the key encoding type from the drop-down menu that is used to perform the encryption algorithm.

Click here to refer the documentation to view the types of key encoding.

By default, the activity recommends the most commonly used type, “Unicode UTF-8”.

Overwrite: Check this box if you want to overwrite a file if the specified output file path is already in use.

By default, it is unchecked.

Secret Key*: This parameter indicates to provide the key which is used by algorithm chosen to encrypt as well as decrypt the file.

This field accepts values in “String” datatype. You can either hardcode the values in “String” format or can provide the variable in “String” datatype.

MISC

DisplayName: Displays the name of the activity. The activity name can be customized, which aids in troubleshooting.

SkipOnError: Specify the “Boolean” value as “True” or “False.”

True: Continue executing the workflow regardless of any errors thrown.
False: Halt the workflow if it encounters any errors.
None: If the option is left blank, the activity will, by default, behave as if “False” were chosen.

Version: It indicates the version of the feature being used.

OUTPUT

Output File Path*It assists the user to provide the file path where the encrypted file needs to be saved in the system. 

This field returns values in “String” datatype. You can either hardcode the values in “String” format or can provide the variable in “String” datatype.

Result: It provides the ability to view the execution status of the activity. It returns values in “Boolean.”

True: Indicates that the activity has been executed successfully without any errors.
False: Indicates that the activity has been unsuccessful due to an unexpected error being thrown.

Represents mandatory fields to execute the workflow.

Types of Algorithms

The following algorithms are used to encrypt your data (file or text). Each offers different capabilities and encryption methods. You can choose any of these options in the activity.

AES GCM (Advanced Encryption Standard Galois/Counter Mode):

1. Combines AES encryption with Galois/Counter Mode (GCM), providing both data confidentiality (encryption) and data integrity (authentication).
2. Known for its strong security and efficiency. The secret key length must be 16 characters.

DES (Deprecated) (Data Encryption Standard):

1. An older symmetric encryption algorithm that is no longer recommended due to its short key length, making it vulnerable to brute-force attacks.
2. Operates on blocks of data and has been largely replaced by more secure algorithms like AES. The secret key length must be 8 characters.

RC2 (Non-FIPS) (Deprecated):

1. A symmetric encryption algorithm that is not compliant with Federal Information Processing Standards (FIPS) and has been deprecated due to security concerns.
2. Uses variable key lengths and operates on blocks of data. Its use has declined in favor of more secure alternatives. The secret key length must be 5 characters.

Rijndael (Non-FIPS) (Deprecated):

1. This algorithm became AES (Advanced Encryption Standard) after winning a competition for a new encryption standard.
2. The non-FIPS version refers to variations of Rijndael that do not comply with Federal Information Processing Standards. Its use has decreased in favor of AES and other modern algorithms. The secret key length must be 16 characters.

TripleDES (Triple Data Encryption Standard):

1. Applies the DES encryption algorithm three times in succession to enhance security by increasing the key length.
2. While more secure than DES, it has been surpassed by modern algorithms like AES. The secret key length must be 24 characters.

Here’s an example of how to use the activity in a workflow:

In this example, I’ll automate a simple workflow using the “Encrypt File” activity to encrypt a sample image file.

Steps to build the bot:

1. Create a new solution.
2. Install the “CryptographyAutomation” from the Manage Features menu.
3. Add the “EncryptFile” activity to the workflow and set it as the starting node.
a. Double-click on the activity to enter the necessary details.
b. For this example, use the default algorithm type (AES GCM).
c. Navigate to the “Input File Path” in the properties section and provide the input file path.
d. Next, go to the “Secret Key” section and enter a random value to serve as the key for encrypting file. For example, use “ABC123456789FILE” as the key.
4. Keep all other settings at their default values.
5. Move to the “Output File Path” in the properties section to determine where your encrypted file will be saved.
a. Specify the directory path as
Environment.GetFolderPath(Environment.SpecialFolder.Desktop).
b. This command fetches the desktop path for the current user, providing a location to store the encrypted file.
6. Now, save the workflow and execute.

The encrypted file will be stored in the specified directory path. To learn more about decrypting the file in detail, click here.

11.3.3 EncryptText

This activity allows users to encrypt text using a selected key encoding and encryption algorithm.

Properties

INPUT

Algorithm: This parameter indicates to choose the algorithm type from the drop-down menu that is used to encrypt the text based on it.

1. AES(Deprecated)
2. AES GCM
3. DES (Deprecated)
4. RC2 (Non-FIPS) (Deprecated)
5. Rijndael (Non-FIPS) (Dperecated)
6. Triple DES.

Refer to the documentation below to view the types of algorithms.
By default, the activity recommends the most commonly used type, “AES GCM”.

DelayAfter: It assists the user to add a delay before initiating subsequent activities. The delay duration here is in milliseconds. By default, it is set to “1000” milliseconds.
When the option is left blank, the delay will not be considered.

DelayBefore: It assists the user in adding a delay before starting the execution of the activities. The delay duration here is in milliseconds. By default, it is set to “1000” milliseconds.
When the option is left blank, the delay will not be considered.

Input Text*: This parameter indicates to provide the input text which needs to be encrypted.

This parameter accepts the values in “String” datatype. You can either hardcode the values in “String” format or can provide the variable in “String” datatype.

Key Encoding: It assists the user to choose the key encoding type from the drop-down menu that is used to perform the encryption algorithm.

Click here to refer the documentation to view the types of key encoding.

By default, the activity recommends the most commonly used type, “Unicode UTF-8”.

Secret Key*: This parameter indicates to provide the key which is used by algorithm chosen to encrypt as well as decrypt the file.

This field accepts values in “String” datatype. You can either hardcode the values in “String” format or can provide the variable in “String” datatype.

MISC

DisplayName: Displays the name of the activity. The activity name can be customized, which aids in troubleshooting.

SkipOnError: Specify the “Boolean” value as “True” or “False.”

True: Continue executing the workflow regardless of any errors thrown.
False: Halt the workflow if it encounters any errors.
None: If the option is left blank, the activity will, by default, behave as if “False” were chosen.

Version: It indicates the version of the feature being used.

OUTPUT

Output TextIt assists the user to declare a variable here to view output as the encrypted text. 

This field returns values in “String” datatype. You can either hardcode the values in “String” format or can provide the variable in “String” datatype.

Result: It provides the ability to view the execution status of the activity. It returns values in “Boolean.”

True: Indicates that the activity has been executed successfully without any errors.
False: Indicates that the activity has been unsuccessful due to an unexpected error being thrown.

Represents mandatory fields to execute the workflow.

Here’s an example of how to use the activity in a workflow:

Steps to build the bot:

In this example, we will use the “Encrypt Text” activity to encrypt text extracted from a website.  The text will be taken from the Sutherland website for encryption.

1. Create a new workflow/ open an existing workflow.
2. Drag and drop the “OpenWebBrowser” activity from the “WebAutomation” feature into the workflow to launch the Sutherland website and set it as the start node.
a. Double click on the activity.
b. Enter the “URL” as https://www.sutherlandglobal.com/.
3. Next, add the “GetText” activity from the “WebAutomation” feature next to the “OpenWebBrowser” activity to extract text from the website.
4. Double-click on the activity.
a. Click on the “Select Element” option and navigate to the website to identify the text.
b. Once you have selected the element, the attributes will be displayed in the “RobilitySpy” window.
c. In the “RobilitySpy” window, the default attributes required for automation will be pre-selected. If you need additional attributes to locate the element, select them as needed.
d. For this example, use the default selected attributes.
e. Click the “Save” button. The attributes will be automatically filled in the properties.
f. Next, navigate to the “Text” field in the output section of the properties to declare a variable for the output. Here it is as “Out_text”.
5. Now, place the “EncryptText” activity into the workflow next to the “GetText” activity.
a. This activity is used to encrypt the text extracted from the website and double-click on the activity.
b. Proceed with the default algorithm type (AES GCM).
c. Navigate to the “Input Text” field in the properties section to provide the input.
d. Use “Out_Text” as the value, which is the extracted text from the website.
e. Next, go to the “Secret Key” field and provide a random value as the key for encryption. For example: Use “ABC123456789TEXT” as the key.
f. Now, go to the “Output Text” field in the output section of the properties to declare a variable for the encrypted text. Here it is as “Encrypted_Text”.
6. Now, place the “WriteLog” activity into the workflow to view the encrypted text.
a. Provide the input as “Encrypted_Text” and set the log level to “Info”.
7. Save and execute the workflow.

11.3.4 DecryptFile

This activity helps users decrypt encrypted files by using the exact key encoding and encryption algorithm that were used during the encryption process.

Properties

INPUT

Algorithm: This parameter indicates to choose the algorithm type from the drop-down menu that is used to decrypt the file text based on it.

1. AES(Deprecated)
2. AES GCM
3. DES (Deprecated)
4. RC2 (Non-FIPS) (Deprecated)
5. Rijndael (Non-FIPS) (Dperecated)
6. Triple DES.

Refer to the documentation below to view the types of algorithms.
By default, the activity recommends the most commonly used type, “AES GCM”.

DelayAfter: It assists the user to add a delay before initiating subsequent activities. The delay duration here is in milliseconds. By default, it is set to “1000” milliseconds.
When the option is left blank, the delay will not be considered.

DelayBefore: It assists the user in adding a delay before starting the execution of the activities. The delay duration here is in milliseconds. By default, it is set to “1000” milliseconds.
When the option is left blank, the delay will not be considered.

Input File Path*: This parameter indicates to provide the input path of the file which needs to be decrypted.

This parameter accepts the values in “String” datatype. You can either hardcode the values in “String” format or can provide the variable in “String” datatype.

Key Encoding: It assists the user to choose the key encoding type from the drop-down menu that is used to perform the encryption algorithm.

Click here to refer the documentation to view the types of key encoding.

By default, the activity recommends the most commonly used type, “Unicode UTF-8”.

Overwrite: Check this box if you want to overwrite a file if the specified output file path is already in use.

By default, it is unchecked.

Secret Key*: This parameter indicates to provide the key which is used by algorithm chosen to encrypt as well as decrypt the file.

This field accepts values in “String” datatype. You can either hardcode the values in “String” format or can provide the variable in “String” datatype.

MISC

DisplayName: Displays the name of the activity. The activity name can be customized, which aids in troubleshooting.

SkipOnError: Specify the “Boolean” value as “True” or “False.”

True: Continue executing the workflow regardless of any errors thrown.
False: Halt the workflow if it encounters any errors.
None: If the option is left blank, the activity will, by default, behave as if “False” were chosen.

Version: It indicates the version of the feature being used.

OUTPUT

Output File PathIt assists the user to provide the file path where the decrypted file needs to be saved in the system. 

This field returns values in “String” datatype. You can either hardcode the values in “String” format or can provide the variable in “String” datatype.

Result: It provides the ability to view the execution status of the activity. It returns values in “Boolean.”

True: Indicates that the activity has been executed successfully without any errors.
False: Indicates that the activity has been unsuccessful due to an unexpected error being thrown.

Represents mandatory fields to execute the workflow.

Let’s see how this activity operates:

In this example, we will decrypt a file using the “Decrypt File” activity. The input file for decryption is the same file that was previously encrypted using the “Encrypt File” activity. Click here to learn more about how encryption works.

1. Create a new workflow or open an existing workflow.
2. Drag and drop the “DecryptFile” activity into the workflow and set it as the start node.
a. Double-click on the activity to provide the details.
b. Proceed with the default algorithm type (AES GCM).
c. Navigate to the “Input File Path” in the properties section to provide the input file path. Use the file that has been previously encrypted as the input.
d. Next, go to the “Secret Key” field and provide the same key that was used in the “Encrypt File” activity as the input to decrypt the file. Use “ABC123456789FILE” as the key.
3. Keep the other options at their default values.
4. Now, navigate to the “Output File Path” in the output section of the properties to specify where to save the decrypted file.
a. Enter the directory path as
`Environment.GetFolderPath(Environment.SpecialFolder.Desktop)`.
b. This syntax fetches the username and desktop folder path to save the decrypted file.
5. Now, save the workflow and execute it.

11.3.5 DecryptText

This activity enables users to decrypt text by using the same key encoding and decryption algorithm that were employed during the encryption process. To successfully decrypt the text, it is crucial that the key and algorithm match those used for encryption.

Properties

INPUT

Algorithm: This parameter indicates to choose the algorithm type from the drop-down menu that is used to decrypt the text based on it.

1. AES(Deprecated)
2. AES GCM
3. DES (Deprecated)
4. RC2 (Non-FIPS) (Deprecated)
5. Rijndael (Non-FIPS) (Dperecated)
6. Triple DES.

Refer to the documentation below to view the types of algorithms.
By default, the activity recommends the most commonly used type, “AES GCM”.

DelayAfter: It assists the user to add a delay before initiating subsequent activities. The delay duration here is in milliseconds. By default, it is set to “1000” milliseconds.
When the option is left blank, the delay will not be considered.

DelayBefore: It assists the user in adding a delay before starting the execution of the activities. The delay duration here is in milliseconds. By default, it is set to “1000” milliseconds.
When the option is left blank, the delay will not be considered.

Input Text*: This parameter indicates to provide the encrypted input text which needs to be decrypted.

It accepts the values in “String” datatype. You can either hardcode the values in “String” format or can provide the variable in “String” datatype.

Key Encoding: It assists the user to choose the key encoding type from the drop-down menu that is used to perform the encryption algorithm.

Click here to refer the documentation to view the types of key encoding.

By default, the activity recommends the most commonly used type, “Unicode UTF-8”.

Secret Key*: This parameter indicates to provide the key which is used by algorithm chosen to encrypt as well as decrypt the file.

This field accepts values in “String” datatype. You can either hardcode the values in “String” format or can provide the variable in “String” datatype.

MISC

DisplayName: Displays the name of the activity. The activity name can be customized, which aids in troubleshooting.

SkipOnError: Specify the “Boolean” value as “True” or “False.”

True: Continue executing the workflow regardless of any errors thrown.
False: Halt the workflow if it encounters any errors.
None: If the option is left blank, the activity will, by default, behave as if “False” were chosen.

Version: It indicates the version of the feature being used.

OUTPUT

Output TextIt assists the user in declaring a variable here to view the decrypted text as output.

This field returns values in the “String” datatype. You can either hardcode the values in “String” format or provide a variable in the “String” datatype.

Result: It provides the ability to view the execution status of the activity. It returns values in “Boolean.”

True: Indicates that the activity has been executed successfully without any errors.
False: Indicates that the activity has been unsuccessful due to an unexpected error being thrown.

Represents mandatory fields to execute the workflow.

Here’s an example of how the activity is used in the workflow:

In this example, the “Decrypt Text” activity is used to decrypt text that was previously encrypted. Click here to learn how the “Encrypt Text” activity works.

Steps to build the bot:

1. Open a workflow.
2. Drag and drop the “DecryptText” activity into the workflow and place it next to the “WriteLog” activity.
a. Double-click on the activity to provide the details.
b. Proceed with the default algorithm type (AES GCM).
c. Navigate to the “Input Text” field in the properties section to provide the input. Use the text that was encrypted in the “EncryptText” activity as the input.
d. Next, go to the “Secret Key” field and provide the same key that was used in the “Encrypt Text” activity to decrypt the text. Use “ABC123456789TEXT” as the key.
e. Keep the other options at their default values.
f. Next, navigate to the “Output Text” field in the output section of the properties to declare a variable to store the decrypted text. Here it is as “DecryptText”.
2. Now, place the “WriteLog” activity to view the decrypted text.
a. Provide the input as “Text” and set the log level to “Info”.
3. Save and execute the workflow.

11.3.6 HashFile

This activity enables users to create a unique hash value for an input file. The hash value serves as a digital fingerprint, ensuring the file’s integrity and authenticity. Hashing is particularly useful for checking that a file hasn’t been modified, as even a tiny change in the file’s content will generate a completely different hash value.

Points to note

1. To generate a unique hash value for the provided file, a “Secret” key is required for the following algorithm types: 
a. HMAC using MD5 (Deprecated)
b. HMAC using SHA-1 (Deprecated)
c. HMAC using SHA-256
d. HMAC using SHA-384
e. HMAC using SHA-512
2. There is no minimum character requirement for the “Secret key” for the above algorithm types.
3. The “Secret key” parameter will not appear in the properties section when using any of the above algorithm types. Instead, you will find the option within the activity when you double-click on it.

Properties

INPUT

Algorithm: This parameter indicates to choose the algorithm type from the drop-down menu that is used to generate the hash for the file based on it.

1. HMAC using MD5 (Deprecated)
2. HMAC using SHA-1 (Deprecated)
3. HMAC using SHA-256
4. HMAC using SHA-384
5. HMAC using SHA-512
6. SHA-1
7. SHA-256
8. SHA-384
9. SHA-512

Refer to the documentation below to view the types of algorithms.

By default, the activity recommends the most commonly used type, ” HMAC using SHA-256”.

DelayAfter: It assists the user to add a delay before initiating subsequent activities. The delay duration here is in milliseconds. By default, it is set to “1000” milliseconds.
When the option is left blank, the delay will not be considered.

DelayBefore: It assists the user in adding a delay before starting the execution of the activities. The delay duration here is in milliseconds. By default, it is set to “1000” milliseconds.
When the option is left blank, the delay will not be considered.

Input File Path*:  This parameter indicates the input path of the file for which the hash value needs to be generated.

It accepts values in the “String” datatype. You can either hardcode the values in “String” format or provide a variable in “String” datatype.

Key Encoding: It assists the user to choose the key encoding type from the drop-down menu that is used to perform the encryption algorithm.

Click here to refer the documentation to view the types of key encoding.

By default, the activity recommends the most commonly used type, “Unicode UTF-8”.

MISC

DisplayName: Displays the name of the activity. The activity name can be customized, which aids in troubleshooting.

SkipOnError: Specify the “Boolean” value as “True” or “False.”

True: Continue executing the workflow regardless of any errors thrown.
False: Halt the workflow if it encounters any errors.
None: If the option is left blank, the activity will, by default, behave as if “False” were chosen.

Version: It indicates the version of the feature being used.

OUTPUT

Hash: It assists the user to declare a variable to view the output of the activity as the “HASH” value generated for the provided input file. 

This field returns values in “String” datatype. You can either hardcode the values in “String” format or can provide the variable in “String” datatype.

Result: It provides the ability to view the execution status of the activity. It returns values in “Boolean.”

True: Indicates that the activity has been executed successfully without any errors.
False: Indicates that the activity has been unsuccessful due to an unexpected error being thrown.

Represents mandatory fields to execute the workflow.

Types of Algorithms

Below are detailed explanations of the types of algorithms and their status:

1. HMAC using MD5 (Deprecated):
a. HMAC (Keyed-Hash Message Authentication Code) using MD5 is a cryptographic hashing algorithm. It combines a secret key with the MD5 hash function to generate a unique hash value.
b. Status: Deprecated due to vulnerabilities. Not recommended for new implementations because of collision vulnerabilities.
2. HMAC using SHA-1 (Deprecated):
a. HMAC using SHA-1 combines a secret key with the SHA-1 hash function to produce a hash value.
b. Status: Deprecated due to vulnerabilities similar to MD5. It’s not recommended for security-sensitive applications.
3. HMAC using SHA-256: 
a. This algorithm utilizes SHA-256 (Secure Hash Algorithm 256-bit) for hashing alongside a secret key.
b. Security: Offers stronger security compared to MD5 and SHA-1 due to SHA-256’s enhanced collision resistance.
4. HMAC using SHA-384:
a. This variant employs SHA-384, a member of the SHA-2 family, for hashing with a secret key.
b. Security: Provides higher security and collision resistance compared to SHA-256 due to its longer hash size (384 bits).
5. HMAC using SHA-512:
a. This algorithm utilizes SHA-512, another SHA-2 variant, for hashing alongside a secret key.
b. Security: Offers the highest level of security and collision resistance among the listed HMAC algorithms due to its longer hash size (512 bits).
6. SHA-1:
a. SHA-1 (Secure Hash Algorithm 1) produces a 160-bit hash value from input data.
b. Status: Deprecated for security-sensitive applications due to vulnerabilities. Still used in legacy systems but not recommended for new implementations.
7. SHA-256:
a. SHA-256, part of the SHA-2 family, generates a 256-bit hash value, providing stronger security and collision resistance compared to SHA-1.
b. Security: Widely adopted for security-sensitive applications and digital signatures.
8. SHA-384:
a. SHA-384, another SHA-2 variant, produces a 384-bit hash value, offering higher security than SHA-256 due to its longer hash size.
9. SHA-512:
a. SHA-512 is the 512-bit variant of SHA-2, providing the highest level of security and collision resistance among the SHA algorithms listed.
b. Security: Suitable for applications requiring maximum security, such as secure communication protocols and digital certificates.

11.3.7 HashText

This activity assists the user to create a unique digital fingerprint, known as a hash value, for any text you provide. This fingerprint serves as a quick and secure way to compare or verify the original text without revealing its contents.

Key Points

1. Secret Key Requirement: For certain algorithm types listed below, you’ll need to include a “Secret” key along with the text to generate the hash value:
a. HMAC using MD5 (Deprecated)
b. HMAC using SHA-1 (Deprecated)
c. HMAC using SHA-256
d. HMAC using SHA-384
e. HMAC using SHA-512
2. No Minimum Character Requirement: There’s no specific minimum character requirement for the secret key with these algorithms.
3. Accessing the Secret Key Option: If you select any of the above algorithm types, the “Secret key” parameter won’t be visible in the properties section. Instead, you’ll find this option when you double-click on the activity itself.

Properties

INPUT

Algorithm: This parameter indicates to choose the algorithm type from the drop-down menu that is used to generate the hash for the input text based on it.

1. HMAC using MD5 (Deprecated)
2. HMAC using SHA-1 (Deprecated)
3. HMAC using SHA-256
4. HMAC using SHA-384
5. HMAC using SHA-512
6. SHA-1
7. SHA-256
8. SHA-384
9. SHA-512

Refer to the documentation below to view the types of algorithms.

By default, the activity recommends the most commonly used type, ” HMAC using SHA-256”.

DelayAfter: It assists the user to add a delay before initiating subsequent activities. The delay duration here is in milliseconds. By default, it is set to “1000” milliseconds.
When the option is left blank, the delay will not be considered.

DelayBefore: It assists the user in adding a delay before starting the execution of the activities. The delay duration here is in milliseconds. By default, it is set to “1000” milliseconds.
When the option is left blank, the delay will not be considered.

Input Text*:  This parameter indicates the input text value for which the unique hash value needs to be generated.

It accepts values in the “String” datatype. You can either hardcode the values in “String” format or provide a variable in “String” datatype.

Key Encoding: It assists the user to choose the key encoding type from the drop-down menu that is used to perform the encryption algorithm.

Click here to refer the documentation to view the types of key encoding.

By default, the activity recommends the most commonly used type, “Unicode UTF-8”.

MISC

DisplayName: Displays the name of the activity. The activity name can be customized, which aids in troubleshooting.

SkipOnError: Specify the “Boolean” value as “True” or “False.”

True: Continue executing the workflow regardless of any errors thrown.
False: Halt the workflow if it encounters any errors.
None: If the option is left blank, the activity will, by default, behave as if “False” were chosen.

Version: It indicates the version of the feature being used.

OUTPUT

Hash: It assists the user to declare a variable to view the output of the activity as the “HASH” value generated for the provided input text. 

This field returns values in “String” datatype. You can either hardcode the values in “String” format or can provide the variable in “String” datatype.

Result: It provides the ability to view the execution status of the activity. It returns values in “Boolean.”

True: Indicates that the activity has been executed successfully without any errors.
False: Indicates that the activity has been unsuccessful due to an unexpected error being thrown.

Represents mandatory fields to execute the workflow.

11.4 DatabaseAutomation

Introduction

Database automation in Robility refers to the automated handling of database tasks and operations using software robots. These robots are programmed to execute tasks such as querying databases, updating records, extracting data, performing data validations, and generating reports. By automating database-related processes, organizations can streamline data management, improve accuracy, enhance efficiency, and reduce manual errors.

SQL Command

1. SQL (Structured Query Language) commands are instructions used to communicate with a database management system (DBMS) to perform various operations on a database.
2. These commands are used to create, retrieve, update, and delete data from tables, as well as manage the structure and configuration of the database itself.
3. Examples of SQL commands include SELECT (to retrieve data), INSERT (to add new records), UPDATE (to modify existing records), DELETE (to remove records), CREATE (to create new tables or databases), ALTER (to modify table structures), and DROP (to delete tables or databases).
4. SQL commands are essential for interacting with and managing databases effectively.

Authentication modes

Windows authentication mode and SQL Server authentication mode are two different authentication methods used to connect to a SQL Server database. The users can avail this option at “Connect DB” activity while initiating the connection to the database.

Windows Authentication Mode:

1. Also known as Integrated Security or Trusted Connection.
2. Relies on Windows user accounts and Active Directory for authentication.
3. Provides a more secure and convenient way to connect as it leverages existing Windows credentials.
4. Users are authenticated based on their Windows login credentials.
5. Generally preferred in environments where users are already authenticated by Windows domains.

SQL Server Authentication Mode:

1. Also known as SQL Server Authentication or Mixed Mode Authentication.
2. Requires users to provide a username and password specifically created within SQL Server.
3. Authentication is performed directly by SQL Server without relying on Windows credentials.
4. Allows for more flexibility in managing user access and permissions within SQL Server itself.
5. Suitable for scenarios where Windows authentication is not feasible or desired, such as external applications or non-Windows environments.

Benefits

1. Improved Efficiency: Automation reduces manual efforts in database operations, leading to faster data processing and task completion.
2. Accuracy: Robots perform database tasks with precision, minimizing errors and ensuring data integrity.
3. Cost Savings: Reduced manual intervention lowers operational costs associated with database management.
4. Scalability: Automation allows organizations to handle large volumes of data and scale operations as needed without significant resource constraints.
5. Compliance: Automated database processes can enforce data governance policies and ensure regulatory compliance.
6. Faster Decision-Making: Access to real-time and accurate data through automation enables quicker decision-making processes.

Use Cases

1. Data Entry and Updates: Automating data entry tasks into databases and updating records based on predefined criteria.
2. Data Extraction and Reporting: Extracting data from multiple sources, consolidating it, and generating automated reports for analysis.
3. Data Validation and Cleansing: Automating validation checks, data cleansing processes, and error handling in databases.
4. Database Backup and Maintenance: Scheduling automated backups, performing database maintenance tasks, and monitoring database health.
5. Data Migration: Automating data migration processes between different databases or systems.
6. Integration with Business Processes: Integrating database operations seamlessly with other business processes such as order processing, inventory management, and customer relationship management (CRM).

11.4.1 Release Notes

v.1.1.0

In this release, we have included enhancements to the DSN activity.

Enhancement

An “Insert” option has been added to the Query Type dropdown in the DSN activity, allowing users to perform data insertion without manually writing queries, making the process simpler and less error prone.

11.4.2 BulkInsert

This activity assists the user in uploading or inserting a large data table into the specified database server for a specific table.

Properties

INPUT

CommandTimeout: This parameter indicates the timeout value for executing the activity within the connected database. If the execution cannot be established within this specified time, it will throw an exception.

This parameter accepts values in “Integer” datatype. You can either enter the values hardcoded in “INT32” format or pass the values as “Int32” datatype.

Datatable*: This parameter indicates providing the “DataTable” value where the input has been stored to execute the bulk insert option. This parameter accepts values in the “DataTable” data type.

SQLConnection*: This parameter indicates the existing SqlConnection to be provided for execution of the activity. Here, you should mention the output variable declared in the “ConnectDB” activity. This parameter only accepts values in the “SqlConnection” data type.

TableName*: This parameter indicates providing the “TableName” from the connected database to perform a bulk data insertion.

It accepts values in “String” datatype. You can either enter the values hardcoded in “String” format or pass the values as “String” datatype.

MISC

DisplayName: Displays the name of the activity. The activity name can be customized, which aids in troubleshooting.

SkipOnError: Specify the “Boolean” value as “True” or “False.”

True: Continue executing the workflow regardless of any errors thrown.
False: Halt the workflow if it encounters any errors.
None: If the option is left blank, the activity will, by default, behave as if “False” were chosen.

Version: It indicates the version of the feature being used.

OUTPUT

Result: It provides the ability to view the execution status of the activity. It returns values in “Boolean.”

True: Indicates that the activity has been executed successfully without any errors.
False: Indicates that the activity has been unsuccessful due to an unexpected error being thrown.

Represents mandatory fields to execute the workflow.

Here’s an example of how the activity is used in the workflow –

In the following example, utilizing this activity I am going to insert the data into a table in my database from an excel sheet. Here, I have already extracted the datatable value from an excel sheet and stored in a variable. You can refer the steps on how to extract the datatable from the excel sheet here – Click here.

Now I am continuing from the “ConnectDB” activity. 

Please note that in the following example, I have added the credentials in a respective variable which is then used in the example.

Steps to build the bot:

1. Create a solution.
2. Drag and drop the “BulkInsert” activity and place it below the “ConnectDB” activity.
a. Double click on the activity to provide the “TableName”.
b. Here I have already created a table in the provided database. Hence, my table name is “Employees”. Click here to know how to create a table
3. Now, navigating to the “Datatable” in the properties, here I am providing the input datatable as the variable declared as output in the “ReadRange” activity.
4. Next, moving to the “SqlConnection” in the properties, Here I am utilizing the variable “DB_OUTPUT” declared as output in the “ConnectDB” activity.
5. Moving to the “Result” in the output section of the properties to view the state of the activity.
a. There are two ways to declare a variable –
b. Method 1: Double-click on the variable parameter in the Output section and enter a name that helps you easily identify the flow. Here, I’m using the name “Bulk_Status” and using the shortcut key “Ctrl+Q” to create the variable.
c. Method 2: Click on the variable pane, enter your preferred name. (here, I’m using “Bulk_Status”), and choose the data type as “Boolean” since the values are returned as “True or False”.
6. You can use the write log activity to print the “Bulk_Status” variable output.
a. Here the input is “Bulk Insert Status:” + Bulk_Status. ToString”.
b. Then choosing the log level as “Info”.
7. Now, save and execute the workflow.

The bot will execute and insert the data into the table in the database. 

11.4.3 ConnectDB

This activity helps the user to initiate a connection with the provided database server using a standard connection string. It is essential for processes that rely on database interactions, such as data extraction, transformation, loading, and reporting.

It acts as a scope where the output from the “ConnectDB” activity is used in other activities to automate SQL commands with the database, except for the “DSN” activity.

Properties

INPUT

AuthenticationMode: This parameter indicates to choose the authentication mode to connect with the database. Select the option from the drop-down:

 Windows: This mode allows the bot to connect to the database using the Windows credentials of the user.
SQL: In this mode, the bot connects to the SQL Server using a specific SQL Server login (username and password) created within the SQL Server instance.

DatabaseName*: This parameter indicates the name of the database to which the robot needs to establish a connection in order to automate processes.
It accepts values in “String” datatype. You can either enter the values hardcoded in “String” format or pass the values as “String” datatype.

DatabaseServer*: This parameter indicates the name of the server where the database is configured. The robot will establish a connection to this server to automate processes.
It accepts values in “String” datatype. You can either enter the values hardcoded in “String” format or pass the values as “String” datatype.

Password: This parameter indicates the password of the database to which the robot needs to establish a connection in order to automate processes.
It accepts values in “String” datatype. You can either enter the values hardcoded in “String” format or pass the values as “String” datatype.

Timeout: This parameter indicates the timeout value for establishing a connection to the database server. If the connection cannot be established within this specified time, it will throw an exception.

It accepts values in “String” datatype. You can either enter the values hardcoded in “String” format or pass the values as “String” datatype.

Username: This parameter indicates the username of the database to which the robot needs to access and establish a connection in order to automate processes.

It accepts values in “String” datatype. You can either enter the values hardcoded in “String” format or pass the values as “String” datatype.

MISC

DisplayName: Displays the name of the activity. The activity name can be customized, which aids in troubleshooting.

SkipOnError: Specify the “Boolean” value as “True” or “False.”

True: Continue executing the workflow regardless of any errors thrown.
False: Halt the workflow if it encounters any errors.
None: If the option is left blank, the activity will, by default, behave as if “False” were chosen.

Version: It indicates the version of the feature being used.

OUTPUT

Result: It provides the ability to view the execution status of the activity. It returns values in “Boolean.”

True: Indicates that the activity has been executed successfully without any errors.
False: Indicates that the activity has been unsuccessful due to an unexpected error being thrown.

SQLConnection: It helps to return the output as SQL connection which is required to automate with the other activities. It returns the values in “SQLConnection” datatype. (Refer the documentation below).

Represents mandatory fields to execute the workflow.

Here’s an example of how the activity is used in the workflow –

In the following example, I am going to use this activity to connect the Database and return the SQL connection as output to utilize it in the other activities.

Please note that in the following example, I have stored the credentials in a respective variable which is used in the example.

Steps to build the bot:

1. Create a solution.
2. Install the latest feature of “Database Automation” from the “Manage features”.
3. Drag and drop the “ConnectDB” activity into the workflow and set it as start node
4. Navigating to the “Authentication mode” in the properties, here I am choosing the value as “SQL” since I am authenticating my database with SQL credentials.
5. Now, moving on to the database server details, I have hardcoded the values in a variable
a. Here in the properties, (“Database name,” “Database server,” “Username,” and “Password”) i have added the variable respectively.
6. Next in the “Timeout” parameter, I am mentioning the value as “10000” seconds.
7. Moving to the “SqlConnection” in the output section of the properties to declare a variable here to view the output.
a. This step is crucial as it will be used as input in other activities except DSN activity. There are two ways to declare a variable –
b. Method 1: Double-click on the variable parameter in the Output section and enter a name that helps you easily identify the flow. Here, I’m using the name “DB_OUTPUT” and using the shortcut key “Ctrl+Q” to create the variable.
c. Method 2: Click on the variable pane, enter your preferred name. (here, I’m using “DB_OUTPUT”), and choose the data type as “BrowseForTypes”.
d. Select the value as “System.Data.Sqlclient.SqlConnection”.
8. Now, save and execute the workflow. You can view the state of the activity by declaring a variable in the “Result” properties.

11.4.4 DisconnectDB

This activity assists the user in terminating the connection with the specified database.

Properties

INPUT

SqlConnection*: This parameter indicates the existing SqlConnection to be provided for disconnection.

Here, mentions the output variable declared in the “ConnectDB” activity.
It accepts values in the “SqlConnection” data type.

MISC

DisplayName: Displays the name of the activity. The activity name can be customized, which aids in troubleshooting.

SkipOnError: Specify the “Boolean” value as “True” or “False.”

True: Continue executing the workflow regardless of any errors thrown.
False: Halt the workflow if it encounters any errors.
None: If the option is left blank, the activity will, by default, behave as if “False” were chosen.

Version: It indicates the version of the feature being used.

OUTPUT

Result: It provides the ability to view the execution status of the activity. It returns values in “Boolean.”

True: Indicates that the activity has been executed successfully without any errors.
False: Indicates that the activity has been unsuccessful due to an unexpected error being thrown.

Represents mandatory fields to execute the workflow.

Here’s an example of how the activity is used in the workflow –

In the following example, I am going to continue from the “ConnectDB” activity and utilizing the Disconnect DB activity I am terminating the connection with the provided database.

Steps to build the bot:

1. Create a solution.
2. Drag and drop the “DisconnectDB” activity and place it below the “ConnectDB” activity in the workflow.
3. Navigate to the “SqlConnection” in the properties to provide the input values.
a. Here I am utilizing the variable “DB_OUTPUT” declared as output in the “ConnectDB” activity.
4. Now, you can declare a variable in the “Result” property to view the state of the activity.
a. There are two ways to declare a variable –
b. Method 1: Double-click on the variable parameter in the Output section and enter a name that helps you easily identify the flow. Here, I’m using the name “Result” and using the shortcut key “Ctrl+Q” to create the variable.
c. Method 2: Click on the variable pane, enter your preferred name. (here, I’m using “DB_OUTPUT”), and choose the data type as “Boolean”.
5. You can view the output using the “Writelog” activity.
6. Save and execute the workflow.

11.4.5 DSN

The DSN (Data Source Name) activity is used to establish a database connection using a pre-configured ODBC (Open Database Connectivity) Data Source Name.

What’s a DSN and why do we need it?

1. A DSN is a configuration setting that defines a connection to a specific database instance.
2. It includes information such as the database server’s address, database name, authentication credentials, and other connection parameters.
3. It acts as an intermediary that allows applications to communicate with databases without needing to know the intricate connection details.

Limitations

1. The DSN activity typically relies on ODBC (Open Database Connectivity) connections, which may limit compatibility with other database connection types.
2. DSN configurations are often static and may not support dynamic changes during runtime, requiring manual adjustments for any modifications.
3. Proper installation and configuration of ODBC drivers are necessary for the DSN activity to function correctly, adding complexity to setup and maintenance.
4. Each DSN activity usually connects to a single data source at a time, which can be restrictive when dealing with multiple databases or data sources in a single automation process.
5. The activity may offer limited configuration options for advanced database interactions, such as custom queries, stored procedures, or specific authentication methods.
a. The custom queries referred as “CREATE, READ, DELETE” SQL commands are restricted and may not be fully supported.
b. Execution on “Stored Procedures” is restricted from this activity.
c. DSN activity supports only “Windows” and “SQL Server” authentication modes, other modes of authentication are limited.

6. The activity is only compatible with the 64-bit version of the ODBC driver.

Properties

CREDENTIALS

Password: This parameter specifies the password associated with the DSN. You need to provide the password that was configured during the creation of the DSN in ODBC. (Refer to the documentation below for more information)

It accepts values in “String” datatype. You can either enter the values hardcoded in “String” format or pass the values as “String” datatype.

Username: This parameter specifies the Username associated with the DSN. You need to provide the username that was configured during the creation of the DSN in ODBC. (Refer to the documentation below for more information)

It accepts values in “String” datatype. You can either enter the values hardcoded in “String” format or pass the values as “String” datatype.

INPUT

CommandTimeout: This parameter indicates the timeout value for executing the activity within the connected database. If the execution cannot be established within this specified time, it will throw an exception.

It accepts values in “Integer” datatype. You can either enter the values hardcoded in “INT32” format or pass the values as “Int32” datatype.

DSNFilepathName: Indicates the file path location of the DSN where the configuration details are stored. It enables the robot to access and utilize the stored connection information for establishing connections with the specified data source.

This is not a mandatory field; you can choose either the “DsnName” or “DsnFilepathName” property.

It accepts values in “String” datatype. You can either enter the values hardcoded in “String” format or pass the values as “String” datatype.

DsnName: Indicates the “Name” of the DSN created while configuration in ODBC.

This is not a mandatory field; you can choose either the “DsnName” or “DsnFilepathName” property.

It accepts values in “String” datatype. You can either enter the values hardcoded in “String” format or pass the values as “String” datatype.

Query*: This parameter indicates to provide the SQL Command/ query that needs to be executed via DSN. You should mention the “Query” based on the “Command Type” chosen in the “QueryType” parameter.

It accepts values in the “String” datatype. You can either enter the values hardcoded in “String” format or pass the values as a “String” datatype.

QueryType: Indicates to choose the “Command Type” that is required to execute along with the provided “SqlQuery”. Select the option from drop-down:

Select: It is used to retrieve data from one or more tables in a database.
Update: It is used to modify existing records in a database table.
Insert: It is used to add new records (rows) into a database table.

By default, the “Select” query is chosen. Refer the tips below in the documentation.

MISC

DisplayName: Displays the name of the activity. The activity name can be customized, which aids in troubleshooting.

SkipOnError: Specify the “Boolean” value as “True” or “False.”

True: Continue executing the workflow regardless of any errors thrown.
False: Halt the workflow if it encounters any errors.
None: If the option is left blank, the activity will, by default, behave as if “False” were chosen.

Version: It indicates the version of the feature being used.

OUTPUT

Datatable: It helps to view the output of the activity in a table view format as the output executed from the provided SQL query. It returns the value in “Datatable” datatype.  

Result: It provides the ability to view the execution status of the activity. It returns values in “Boolean.”

True: Indicates that the activity has been executed successfully without any errors.
False: Indicates that the activity has been unsuccessful due to an unexpected error being thrown.

Represents mandatory fields to execute the workflow.

How to create a DSN file in the ODBC?

ODBC is a standard interface for accessing and working with data from various database management systems (DBMS) using a common method.

1. Interface Standardization: ODBC ensures consistent interaction with databases across different DBMS.
2. Driver-Based Approach: ODBC uses specific drivers for each DBMS, translating commands for smooth communication.
3. Connection Establishment: Configure a DSN for connecting applications to databases via ODBC drivers.
4. Supported Operations: ODBC supports SQL queries, data manipulation, transactions, and stored procedures.

Creating a DSN

To facilitate secure connection with the database and streamline processes, a “DSN” is created. The 64-bit ODBC is accessible to all users through the Windows administrative system. Creating a DSN in ODBC aids users in managing connections with ease and ensuring a secure bridge between the Designer and database server.

Steps to create the DSN:

1. Open the “ODBC Data Source Administrator” dialog by navigating Start -> Control Panel -> Administrative Tools -> Data Sources (ODBC).
2. Select the “System DSN” tab if you want to create the DSN that needs to be accessible for all the users on the system.
a. If you create “DSN” against the “User DSN” tab, it will be accessible only for the user account that created them. Other users cannot access it.
3. Now, click on “Add” option from the right-hand side.
4. A pop-up will appear on the screen, first you need to choose the data source where you want to set up the driver.
a. To automate via SQL server database, you need to choose the “SQL server” option.
b. Now, click on “Finish” button.
5. The next window will prompt you with the configuration steps to create a new data source in the SQL Server.
a. Provide any name with description for the “DSN” to be created.
b. Provide the “SQL Server” name where the DSN needs to be configured; then click on “Next” button.
6. Choose the authentication to verify and login with the provided SQL Server database.
a. Windows NT – If you are authenticating with “Windows” NT credentials, you can opt this option.
b. SQL Server – If you are authenticating with “SQL server” credentials, you can opt this option.
c. If you choose the “SQL Server” option, you need to provide the Server credentials in the next step; then click on “Next” button.
7. Next steps of configuration will be to setup the default file of DSN Configuration. To know about further information, click here.

Here’s an example of how the activity is used in the workflow –

In this example, I’ve already set up the “DSN” in ODBC. Now, I’ll use a “Select” query to retrieve the list of tables available in the DSN.

Please note that I’ve stored the credentials in a corresponding variable, as shown in the example.

Steps to build the bot:

1. Create a new solution.
2. Drag and drop the “DSN” activity into the workflow and set it as the start node.
3. Navigating to the “Credentials” in the properties to provide the database credentials.
a. Here in the properties, (“Password,” and “Username”) i have added the variable respectively.
b. Since my “DSN” is configured in the SQL Server, I have provided the database credentials.
4. Next, navigating to the “DsnName” in the properties to provide the name of the DSN created.
a. Here it is as “Documentation”.
5. Moving to the “QueryType” property, here I am fetching the tables list available in my DSN hence my query is,
a. “SELECT name FROM sys.tables”.
6. Choosing the “QueryType” as “Select” according to my query.
7. Now, declaring a variable in the “Datatable” property to view the output.
a. Click here to refer how to create variables.
8. You can add the “Table Viewer” activity to view the output of the Datatable.
9. Now, save and execute the workflow.

The bot will fetch the tables list available in the DSN in a table format.

11.4.6 ExecuteNonQuery

This activity assists users in executing SQL commands on the provided database that do not return any data as output. It enables users to carry out essential operations such as inserting new data into the tables (INSERT), deleting existing records (DELETE), updating information (UPDATE), dropping tables (DROP TABLE), creating new tables (CREATE TABLE), and various other data manipulation tasks.

Limitations

1. When using the “CREATE TABLE” command to create a table and if there are spaces in the column names, you should enclose the column names within square brackets []. For instance, in the command below, “Start date” has a space, so it’s enclosed in brackets:
a. “CREATE TABLE Employees (
 Name VARCHAR(100),
 Position VARCHAR(150,
 Project VARCHAR(100),
 Location VARCHAR(150),
 [Start date] DATE,     
Salary DECIMAL(10, 2)
);”
2. The column names in the database table must exactly match the names in the “Datatable” variable when uploading values via the “Bulk Insert” option. Any differences in lowercase or uppercase letters will cause a mismatch error.

Properties

INPUT

CommandTimeout: This parameter indicates the timeout value for executing the activity within the connected database. If the execution cannot be established within this specified time, it will throw an exception.

It accepts values in “Integer” datatype. You can either enter the values hardcoded in “INT32” format or pass the values as “Int32” datatype.

DBConnection*: This parameter indicates the existing SqlConnection to be provided for execution of the activity. Here, you should mention the output variable declared in the “ConnectDB” activity.

This parameter only accepts values in the “SqlConnection” data type.

Parameters: Indicates to provide the collection of parameters that are required to be passed in the SQL query provided.

This parameter accepts the “Dictionary” datatype, which is bound to the SQL query. Refer the below documentation on how to provide the parameters.

SqlQuery*: This parameter indicates to provide the SQL Command/ query that needs to be executed. You should mention the “SQLQuery” based on the “Command Type” chosen in the “Type” parameter.

It accepts values in the “String” datatype. You can either enter the values hardcoded in “String” format or pass the values as a “String” datatype.

Type: Indicates to choose the “Command Type” that is required to execute along with the provided “SqlQuery”. Select the option from drop-down:

Text: Use this option when you want to execute a straightforward SQL command directly without involving stored procedures.
StoredProcedure: Use this option when you want to execute a pre-defined stored procedure that resides in your database. Refer the below documentation.

MISC

DisplayName: Displays the name of the activity. The activity name can be customized, which aids in troubleshooting.

SkipOnError: Specify the “Boolean” value as “True” or “False.”

True: Continue executing the workflow regardless of any errors thrown.
False: Halt the workflow if it encounters any errors.
None: If the option is left blank, the activity will, by default, behave as if “False” were chosen.

Version: It indicates the version of the feature being used.

OUTPUT

Result: It provides the ability to view the execution status of the activity. It returns values in “Boolean.”

True: Indicates that the activity has been executed successfully without any errors.
False: Indicates that the activity has been unsuccessful due to an unexpected error being thrown.

Represents mandatory fields to execute the workflow.

Text & Stored Procedure

The choice between using the “Text” and “Stored Procedure” types in the Execute Non-Query activity depends on the nature of the SQL command you want to execute:

1. Text (SQL Query):
a. Use the “Text” type when you want to execute a straightforward SQL command directly in the activity without involving stored procedures.
b. This is suitable for commands like INSERT, DELETE, UPDATE, and other data manipulation tasks where you provide the SQL query directly in the “SQLQuery” parameter.

2. Stored Procedure:
a. Use the “Stored Procedure” type when you want to execute a pre-defined stored procedure that resides in your database.
b. This is beneficial for complex operations or when you have stored procedures designed to handle specific tasks within your database.
c. Instead of providing the SQL query directly, you specify the name of the stored procedure in the “SQLQuery” parameter.

Here’s an example of how the activity is used in the workflow –

In the following example, I have already created a stored procedure in the provided database. Using this activity, I am going to delete the stored procedure from the database. Here I am continuing from the “ConnectDB” activity. 

Please note that in the following example, I have added the credentials in a respective variable which is then used in the example.

Steps to build the bot:

1. Continuing from the “ConnectDB” steps.
2. Drag and drop the “Execute Non-Query” activity and place it below the “Writelog”.
3. Navigating to the “DB Connection” in the properties and providing the “SQL Connection” variable declared as output in the “Connect DB” activity. Here it is as “DB_OUTPUT”.
4. Now, moving to “SqlQuery” and providing the query to delete the table. Here it is as,
a. “DROP PROCEDURE InsertEmployee;”
b. In my case, the stored procedure created in the database is known as “InsertEmployee”, hence I have mentioned the same.
5. Next, since here I am providing the SQL command directly, I am opting the “Type” as “Text” in the properties.
6. Moving to the “Result” in the output section of the properties to view the state of the activity.
a. There are two ways to declare a variable –
b. Method 1: Double-click on the variable parameter in the Output section and enter a name that helps you easily identify the flow. Here, I’m using the name “Table_Delete” and using the shortcut key “Ctrl+Q” to create the variable.
c. Method 2: Click on the variable pane, enter your preferred name. (here, I’m using “Altered_Table”), and choose the data type as “Boolean” since the values are returned as “True or False”.
7. You can use the write log activity to print the “Table_Delete” variable output.
a. Here the input is “Delete Status:” + Table_Delete. ToString”.
b. Then choosing the log level as “Info”.
8. Now, save and execute the workflow.

The bot will execute the workflow and initiates to connect the Database, once it has been connected, it will proceed to delete the mentioned stored procedure. In the above image, you can view the success state of the “Execute Non-Query” activity.

11.4.7 ExecuteQuery

This activity helps the user to perform SQL queries against a database. It allows users to execute SELECT statements to retrieve data from a database table or perform other SQL operations that return results, such as counting records, calculating values, or filtering data.

Properties

INPUT

CommandTimeout: This parameter indicates the timeout value for executing the activity within the connected database. If the execution cannot be established within this specified time, it will throw an exception.

It accepts values in “Integer” datatype. You can either enter the values hardcoded in “INT32” format or pass the values as “Int32” datatype.

DBConnection*: This parameter indicates the existing SqlConnection to be provided for execution of the activity. Here, you should mention the output variable declared in the “ConnectDB” activity.

This parameter only accepts values in the “SqlConnection” data type.

Parameters: Indicates to provide the collection of parameters that are required to be passed in the SQL query provided.

This parameter accepts the “Dictionary” datatype, which is bound to the SQL query. Refer the below documentation on how to provide the parameters.

SqlQuery*: This parameter indicates to provide the SQL Command/ query that needs to be executed. You should mention the “SQLQuery” based on the “Command Type” chosen in the “Type” parameter.

It accepts values in the “String” datatype. You can either enter the values hardcoded in “String” format or pass the values as a “String” datatype.

Type: Indicates to choose the “Command Type” that is required to execute along with the provided “SqlQuery”. Select the option from drop-down:

Text: Use this option when you want to execute a straightforward SQL command directly without involving stored procedures.
StoredProcedure: Use this option when you want to execute a pre-defined stored procedure that resides in your database. Refer the below documentation.

MISC

DisplayName: Displays the name of the activity. The activity name can be customized, which aids in troubleshooting.

SkipOnError: Specify the “Boolean” value as “True” or “False.”

True: Continue executing the workflow regardless of any errors thrown.
False: Halt the workflow if it encounters any errors.
None: If the option is left blank, the activity will, by default, behave as if “False” were chosen.

Version: It indicates the version of the feature being used.

OUTPUT

Datatable: It helps to view the output of the activity in a table view format as the output executed from the provided SQL query. It returns the value in “Datatable” datatype.

Represents mandatory fields to execute the workflow.

Text & Stored Procedure

The choice between using the “Text” and “Stored Procedure” types in the Execute Non-Query activity depends on the nature of the SQL command you want to execute:

1. Text (SQL Query):
a. Use the “Text” type when you want to execute a straightforward SQL command directly in the activity without involving stored procedures.
b. This is suitable for commands like INSERT, DELETE, UPDATE, and other data manipulation tasks where you provide the SQL query directly in the “SQLQuery” parameter.

2. Stored Procedure:
a. Use the “Stored Procedure” type when you want to execute a pre-defined stored procedure that resides in your database.
b. This is beneficial for complex operations or when you have stored procedures designed to handle specific tasks within your database.
c. Instead of providing the SQL query directly, you specify the name of the stored procedure in the “SQLQuery” parameter.

Execute Non-query & Execute Query

Here’s an example of how the activity is used in the workflow –

In the following example, I am continuing from “BulkInsert” activity example, using a query I am going to alter the table and add a new column in addition to it.

The table in the database already contains Name, Position, Project, Location, Salary. In addition to it, I am adding a column as “Email” to it.

Steps to build the bot:

1. Continuing the steps from Bulk Insert activity.
2. Now, I am adding the “ExecuteQuery” activity and placing it below the “Writelog” activity.
a. Here I am using this activity to alter the table using the SQL Query.
b. Navigating to the “DB Connection” property in the properties section to provide the sql connection variable declared as output in the “ConnectDB” activity.
c. Here it is as “DB_OUTPUT”.
d. Next, moving to the “SqlQuery” property to provide the query that satisfies the condition.
e. Here I am providing the query as
“ALTER TABLE Employees
ADD Email VARCHAR(255)”
f. Now, choosing the “Type” as “Text” since here I am directly providing the query to alter the table and not through the stored procedure.
g. Then, moving to the output section of the properties to declare a variable in the “Datatable” field to view the output.
3. To view the output, I am adding a table viewer activity.
a. Here I am providing the “Input Datatable” as “Altered_Table”.
4. Save and execute the workflow.

The bot will create a new column as “Email” in the provided table “Employees”.

11.5 Java Automation

Java automation in Robility is designed to streamline and simplify interactions with applications built on the Java platform. By leveraging specialized tools and libraries, it allows developers to access and manipulate Java-based UI elements, components, and APIs directly. This capability makes it possible to automate a wide range of tasks, including repetitive operations, data extraction, testing, and workflow processes.

Prerequisites for Java Automation

1. Java Access Bridge Configuration: Before using Java automation activities, it is essential to configure the Java Access Bridge properly. This enables Robility to detect and interact with Java UI elements. Improper configuration can lead to errors or incomplete automation. Click here to learn more.

2. Application Compatibility: Java automation activities are specifically designed to work only with Java-based applications. These activities cannot be used with web applications, standard desktop applications, or other non-Java platforms.

3. Environment Requirements: The target system should have the compatible version of Java installed (JDK or JRE), and any required environment variables should be properly set to allow smooth execution of automation tasks.

11.5.1 Release Notes

v.1.0.7

This release includes enhancements to dependent DLLs.

Enhancement

All dependent DLLs have been upgraded to the latest stable versions, enhancing security, performance, and workflow reliability. This update ensures smoother execution and maintains compatibility with both existing and new workflows.

Released Date: 09/03/2026

11.5.2 Configuration of Java Access Bridge

This guide explains how to configure the Java Access Bridge for automation by following the steps below.

Note: Administrative rights are required to perform these steps.

1. Download the Open JDK msi using below URL greater than 1.8 version for 64 bit. https://www.openlogic.com/openjdk-downloads

2. Install the Open JDK. While installing the JDK, enable the “Set JAVA_HOME” option as “Will be installed on local hard drive” as instructed in below image.

3. Download Java Access Bridge 2.0.2 from the Java Access Bridge Home Page at the following URL:

http://www.oracle.com/technetwork/java/javase/tech/index-jsp-136191.html.

The above step requires Oracle sign in to download the file. Once downloaded, extract the folder.

4. Open the extracted access bridge folder and open the below file – accessibility.properties.

5. In this file, Add “#” before the screen_magnifier_present=true

a. After saving which should be “#screen_magnifier_present=true”.

6. Now, go to the JDK installation path à C:\Program Files\OpenLogic\jdk-8.x.x.x-hotspot\lib.

7. Add a new folder as “ext”.

8. There are a few files that need to be moved from the Access Bridge folder to the JDK installation path. The table below shows where each file should be placed.

Table 2-2 Java Access Bridge Windows Libraries and Related Files for Windows 64-Bit.

Java Access Bridge File Destination Directory
WindowsAccessBridge-32.dll %WINDOWSHOME%\SYSWOW64
C:\Windows\SysWOW64
WindowsAccessBridge-64.dll %WINDOWSHOME%\SYSTEM32
C:\Windows\System32
JavaAccessBridge-64.dll %JAVAHOME64%\bin
C:\Program Files\OpenLogic\jdk-8.x.xxx.xx-hotspot\bin
JAWTAccessBridge-64.dll %JAVAHOME64%\bin
C:\Program Files\OpenLogic\jdk-8.x.xxx.xx-hotspot\bin
accessibility.properties %JAVAHOME32%\lib and %JAVAHOME64%\lib depending on the JDKs and JREs installed on your system
C:\Program Files\OpenLogic\jdk-8.x.xxx.xx-hotspot\lib
access-bridge-64.jar %JAVAHOME64%\lib\ext
C:\Program Files\OpenLogic\jdk-8.x.xxx.xx-hotspot\lib\ext
jaccess.jar %JAVAHOME32%\lib\ext and %JAVAHOME64%\lib\ext depending on the JDKs and JREs installed on your system
C:\Program Files\OpenLogic\jdk-8.x.xxx.xx-hotspot\lib\ext

9. Once the support DLL’s are replaced, install the Java desktop application.

10. After installation, right-click on the desktop shortcut and select ‘Open file location.’
a. In the opened folder, locate the JRE folder and rename it to a user-defined name.

11. Open Command Prompt and navigate to the following path: cd C:\Program Files\OpenLogic\jdk-8.x.xxx.xx-hotspot\bin

12. Enter the command: jabswitch –enable

a. This enables the Java Access Bridge, which allows automation tools to detect elements in Java applications.

13. Restart your system and use Java automation activities to automate the Java desktop application.

11.5.3 CheckAppState

This activity allows the user to check the availability of a Java application by verifying the presence of a specific element within it. It enables automation processes to proceed further based on the availability or disappearance of a particular element on the application.

Properties

INPUT

DelayAfter: It assists the user to add a delay before initiating subsequent activities. The delay duration here is in milliseconds. By default, it is set to “300” milliseconds. When the option is left blank, the delay will not be considered.

DelayBefore: It assists the user in adding a delay before starting the execution of the activities. The delay duration here is in milliseconds. By default, it is set to “200” milliseconds. When the option is left blank, the delay will not be considered.

ExecuteBy: *Gets auto filled once the “Active Application” is selected. This contains the set of attributes for the detected element in “String” datatype. 

WaitFor: Specifies the event that triggers the action to be performed.
Element to appear:
Waits for the specified element to appear in the application until the defined wait time elapses.
Element to vanish:
Waits for the specified element to disappear from the application until the defined wait time elapses.

WaitTime: It helps the user to add a delay for activity execution, either to wait for the element to appear or to disappear in milliseconds.

MISC

DisplayName: Displays the name of the activity. The activity name can be customized which will help in troubleshooting.

Version: It specifies the version of the web automation feature in use.

* Represents mandatory fields to execute the workflow.

11.5.4 Click

The activity allows users to interact with applications by clicking on specified target elements.

Properties

INPUT

DelayAfter: It assists the user to add a delay before initiating subsequent activities in milliseconds. By default, it is set to “300” milliseconds. When the option is left blank, the delay will not be considered.

DelayBefore: It assists the user in adding a delay before starting the execution of the activities in milliseconds. By default, it is set to “200” milliseconds. When the option is left blank, the delay will not be considered.

ExecuteBy: *Automatically populated after selecting the Active Application. It contains a set of attributes associated with the specific detected element.

WaitTime: It enables the user to introduce a delay before initiating subsequent activities in milliseconds.
By default, it is set to 10000 milliseconds. Leaving the option blank will result in no delay being applied.

Action_by / Perform: Specifies how the action on the detected element will be executed.

Native: The action is performed in the background once captured in the spy window (default option).
Human: The action is performed as if a human is interacting with the element after it is detected.

Mouse_buttonSpecifies which mouse button to use for the click action.

1. When Native is selected in Action_by, the default action is used and cannot be changed.
2. When Human is selected, you can choose the button:

a. LeftClick: Performs a left-click.
b. RightClick: Performs a right-click.
c. MiddleButton: Performs a middle-click (scroll button) action.

MISC

Click Type: Determines the type of click action to perform on the element.

When Native is selected in Action_by, the default click action is used and cannot be changed.

When Human is selected, you can choose the click type:

Single Click: Performs a single click on the element.

Double Click: Performs a double click on the element

DisplayName: Displays the name of the activity. The activity name can be customized, which aids in troubleshooting.

SkipOnError: Specify the “Boolean” value as “True” or “False.”
True: Continue executing the workflow regardless of any errors thrown.
False: Halt the workflow if it encounters any errors.
None: If the option is left blank, the activity will, by default, behave as if “False” were chosen.

Version: It indicates the version of the feature being used.

RESULT

Result: It provides the ability to view the execution status of the activity. It returns values in “Boolean.”
True: Indicates that the activity has been executed successfully without any errors.
False: Indicates that the activity has been unsuccessful due to an unexpected error being thrown.

* Represents mandatory fields to execute the workflow.

11.5.5 Expand Collapse

This activity helps the user to either expand or collapse the menu of the selected java application.

Properties

INPUT

Action: *Specifies choosing the action to be performed.

Expand: Expands the ‘Menu’ to view the available options.
Collapse: Collapses the ‘Menu’ to hide the options. By default, it is set to the ‘Expand’ option.

DelayAfter: It assists the user to add a delay before initiating subsequent activities. The delay duration here is in milliseconds. By default, it is set to “300” milliseconds. When the option is left blank, the delay will not be considered.

DelayBefore: It assists the user in adding a delay before starting the execution of the activities. The delay duration here is in milliseconds. By default, it is set to “200” milliseconds. When the option is left blank, the delay will not be considered.

ExecuteBy: *Gets auto filled once the “Active Application” is selected. This contains the set of attributes for the specific spied element in String datatype.

WaitTime: It enables the user to introduce a delay before initiating subsequent activities. The delay is specified in milliseconds. By default, it is set to 10000 milliseconds. Leaving the option blank will result in no delay being applied.

MISC

DisplayName: Displays the name of the activity. The activity name can be customized, which aids in troubleshooting.

SkipOnError: Specify the “Boolean” value as “True” or “False.”
True: Continue executing the workflow regardless of any errors thrown.
False: Halt the workflow if it encounters any errors.
None: If the option is left blank, the activity will, by default, behave as if “False” were chosen.

Version: It indicates the version of the feature being used.

OUTPUT

Result: It provides the ability to view the execution status of the activity. It returns values in “Boolean.”
True: Indicates that the activity has been executed successfully without any errors.
False: Indicates that the activity has been unsuccessful due to an unexpected error being thrown.

* Represents mandatory fields to execute the workflow.

11.5.6 Find Children

This activity allows users to retrieve a collection of child elements from a specified parent element. It is especially helpful when you need to work with several items within a section of an application, such as reading table data, going through a list, or interacting with multiple buttons. This makes it easier to automate tasks that involve multiple elements at once.

Properties

INPUT

DelayAfter: It assists the user to add a delay before initiating subsequent activities. The delay duration here is in milliseconds. By default, it is set to “300” milliseconds. When the option is left blank, the delay will not be considered.

DelayBefore: It assists the user in adding a delay before starting the execution of the activities. The delay duration here is in milliseconds. By default, it is set to “200” milliseconds. When the option is left blank, the delay will not be considered.

ExecuteBy: *Gets auto filled once the “Active Application” is selected. This contains the set of attributes for the specific spied element in “String” datatype. 

Scope: Specifies the scope for retrieving either child or descendants from the specified element.
Children: Retrieves the collection of immediate child elements from the parent element.
Descendants: Retrieves the descendants of the parent UI element, including all nested child elements.

Refer to the below documentation for further details.

WaitTime: It helps the user to add a delay to start the execution of the activity. The format of the delay here is milliseconds. By default, it will be set to 10000. When the option is left blank, no delay is considered.

MISC

DisplayName: Displays the name of the activity. The activity name can be customized which will help in troubleshooting.

SkipOnError: Specify the “Boolean” value as “True” or “False.”
True: Continue executing the workflow regardless of any errors thrown.
False: Halt the workflow if it encounters any errors.
None: If the option is left blank, the activity will, by default, behave as if “False” were chosen.

Version: It specifies the version of the feature in use.

OUTPUT

Children: This parameter provides the output of the activity as a collection of child elements retrieved from the specified parent element.
The output values are of the List<UIChildren> datatype. Refer to the guide below for instructions on declaring the variable.

Result: It provides the ability to view the execution status of the activity. It returns values in “Boolean.”
True: Indicates that the activity has been executed successfully without any errors.
False: Indicates that the activity has been unsuccessful due to an unexpected error being thrown.

*Represents mandatory fields to execute the workflow

Child & Descendant Elements

1. Child Elements: These are the direct elements within a parent element. For example, in a file explorer window (the parent), each file or folder displayed is a child element of that window.

2. Descendants: These are elements nested further inside child elements. For instance, if a child element is a folder, the files or subfolders inside that folder are its descendants.

In short, child elements are directly within the parent, while descendants are one level deeper, contained within the child elements.

How to view the output from the activity?

The “FindChildren” activity provides the output in the “List<UIChildren>” format. This list includes the following four types as output:

1. AutomationName – Provides the “name” of the detected element during the execution of the bot.
2. AutomationID – It indicates the unique identification for the detected element to identify it and making easier to interact with it. It returns the “AutomationID” as output. When there is no AutomationID, it will be returned as null value. 
3. ClassName – It indicates the “Class” of the detected element and returns the output. When there is no  ClassName available, it will be returned as null value. 
4. UIChildren – It provides the count of the UI child and descendant elements associated with the parent element.

If you want to view any of the above types as output, you need to specify this along with the ‘ForEach’ variable. For example, “Item.AutomationName”.

11.5.7 Get Attribute Element

This activity allows users to extract the value of a specific attribute from a detected element in a Java application. It provides a list of available attributes for selection, and the extracted values can be used in later activities for processing or to validate the UI element before taking any action.

Properties

INPUT

DelayAfter: It assists the user to add a delay before initiating subsequent activities. The delay duration here is in milliseconds. By default, it is set to “300” milliseconds. When the option is left blank, the delay will not be considered.

DelayBefore: It assists the user in adding a delay before starting the execution of the activities. The delay duration here is in milliseconds. By default, it is set to “200” milliseconds. When the option is left blank, the delay will not be considered.

ExecuteBy: Gets auto filled once the “Active Application” is selected. This contains the set of attributes for the specific spied element.

WaitTime: It enables the user to introduce a delay before initiating subsequent activities. The delay is specified in milliseconds.
By default, it is set to 10000 milliseconds. Leaving the option blank will result in no delay being applied.

Attribute: This option becomes available after the element is detected in the Java application. It allows you to select a specific attribute from the dropdown to retrieve its value. Click here to learn more about the list of attributes.

Note: Use this option when you want to extract only a particular attribute value.

MISC

DisplayName: Displays the name of the activity. The activity name can be customized, which aids in troubleshooting.

SkipOnError: Specify the “Boolean” value as “True” or “False.”
True: Continue executing the workflow regardless of any errors thrown.
False: Halt the workflow if it encounters any errors.
None: If the option is left blank, the activity will, by default, behave as if “False” were chosen.

Version: It indicates the version of the feature being used.

RESULT

Attributes: *Returns all the attributes and their corresponding values from the specified element in a table format.

AttributesValue: Returns the value of the selected attribute from the “Attribute” dropdown as a String.

Result: It provides the ability to view the execution status of the activity. It returns values in “Boolean.”
True: Indicates that the activity has been executed successfully without any errors.
False: Indicates that the activity has been unsuccessful due to an unexpected error being thrown.

* Represents mandatory fields to execute the workflow.

11.5.8 Get Table Data

This activity allows users to extract table data from Java applications. The retrieved table can then be used for further processing, such as data analysis, reporting, or automation tasks.

Properties

INPUT

DelayAfter: It assists the user to add a delay before initiating subsequent activities. The delay duration here is in milliseconds. By default, it is set to “300” milliseconds. When the option is left blank, the delay will not be considered.

DelayBefore: It assists the user in adding a delay before starting the execution of the activities. The delay duration here is in milliseconds. By default, it is set to “200” milliseconds. When the option is left blank, the delay will not be considered.

ExecuteBy: *Gets auto filled once the “Active Application” is selected. This contains the set of attributes for the specific spied element in “String” datatype.

WaitTime: It enables the user to introduce a delay before initiating subsequent activities. The delay is specified in milliseconds.
By default, it is set to 10000 milliseconds. Leaving the option blank will result in no delay being applied.

MISC

DisplayName: Displays the name of the activity. The activity name can be customized, which aids in troubleshooting.

SkipOnError: Specify the “Boolean” value as “True” or “False.”
True: Continue executing the workflow regardless of any errors thrown.
False: Halt the workflow if it encounters any errors.
None: If the option is left blank, the activity will, by default, behave as if “False” were chosen.

Version: It indicates the version of the feature being used.

RESULT

Datatable: *Returns the output in a tabular format in “Datatable” datatype.

Result: It provides the ability to view the execution status of the activity. It returns values in “Boolean.”
True: Indicates that the activity has been executed successfully without any errors.
False: Indicates that the activity has been unsuccessful due to an unexpected error being thrown.

* Represents mandatory fields to execute the workflow.

11.5.9 Get Text

This activity allows you to extract text from specific elements or controls within a Java application. It can be used to capture information displayed on the screen for validation, processing, or data extraction purposes.

Properties

INPUT

DelayAfter: It assists the user to add a delay before initiating subsequent activities in milliseconds. By default, it is set to “300” milliseconds. When the option is left blank, the delay will not be considered.

DelayBeforeIt assists the user in adding a delay before starting the execution of the activities in milliseconds. By default, it is set to “200” milliseconds. When the option is left blank, the delay will not be considered.

ExecuteBy: * Automatically populated after selecting the Active Application. It contains a set of attributes associated with the specific detected element.

WaitTime: It enables the user to introduce a delay before initiating subsequent activities in milliseconds.
By default, it is set to 10000 milliseconds. Leaving the option blank will result in no delay being applied.

MISC

DisplayName: Displays the name of the activity. The activity name can be customized, which aids in troubleshooting.

SkipOnError: Specify the “Boolean” value as “True” or “False.”
True: Continue executing the workflow regardless of any errors thrown.
False: Halt the workflow if it encounters any errors.
None: If the option is left blank, the activity will, by default, behave as if “False” were chosen.

Version: It indicates the version of the feature being used.

RESULT

Text: *Returns the output as the extracted text from the detected element in “String” datatype.

Represents mandatory fields to execute the workflow.

11.5.10 Launch Java Application

This activity helps you launch a Java application to start the automation process.

Properties

INPUT

DelayAfter: It assists the user to add a delay before initiating subsequent activities. The delay duration here is in milliseconds. By default, it is set to “300” milliseconds. When the option is left blank, the delay will not be considered.

DelayBefore: It assists the user in adding a delay before starting the execution of the activities. The delay duration here is in milliseconds. By default, it is set to “200” milliseconds. When the option is left blank, the delay will not be considered.

ExecuteBy: * Gets auto filled once the “Active Application” is selected. This contains the set of attributes for the specific spied element in “String” datatype.

MISC

DisplayName: Displays the name of the activity. The activity name can be customized, which aids in troubleshooting.

SkipOnError: Specify the “Boolean” value as “True” or “False.”
True: Continue executing the workflow regardless of any errors thrown.
False: Halt the workflow if it encounters any errors.
None: If the option is left blank, the activity will, by default, behave as if “False” were chosen.

Version: It indicates the version of the feature being used.

RESULT

Result: This parameter allows you to view the execution status of the activity and returns a value in “Boolean.”

True: Indicates that the activity has been executed successfully without any errors.
False: Indicates that the activity has been unsuccessful due to an unexpected error being thrown.

* Represents mandatory fields to execute the workflow.

11.5.11 Secure Type Text

This activity allows you to securely enter values into a field within a Java application. During runtime, the input is masked with symbols to protect sensitive information.

Properties

INPUT

ClearAndType: Determines how text is entered into a field that already contains values.

True: Clears the existing data and types the new value.
False (default): Keeps the existing data and appends the new value

DelayAfter: It assists the user to add a delay before initiating subsequent activities in milliseconds. By default, it is set to “300” milliseconds. When the option is left blank, the delay will not be considered.

DelayBefore: It assists the user in adding a delay before starting the execution of the activities in milliseconds. By default, it is set to “200” milliseconds. When the option is left blank, the delay will not be considered.

DelayBetweenChar: It helps the user to add a delay between the characters of the input value in milliseconds. By default, it is set to “150” milliseconds. When the option is left blank, the delay will not be considered.

ExecuteBy: *Automatically populated after selecting the Active Application. It contains a set of attributes associated with the specific detected element.

Input String: *Specifies the input value in SecureString datatype. You can either enter the value directly or use a secure string variable dynamically.

Send type: Specifies how the action is executed in the application during runtime. You can select one of the following options from the dropdown:

Normal: The bot types each character one by one.
Key as User: Simulates typing as if performed by a human.
Paste: The bot pastes the entire text at once using a copy-paste method.
Characters: Types the text character by character with controlled input speed.

WaitTime: It enables the user to introduce a delay before initiating subsequent activities in milliseconds. By default, it is set to 10000 milliseconds. Leaving the option blank will result in no delay being applied.

MISC

DisplayName: Displays the name of the activity. The activity name can be customized, which aids in troubleshooting.

SkipOnError: Specify the “Boolean” value as “True” or “False.”
True: Continue executing the workflow regardless of any errors thrown.
False: Halt the workflow if it encounters any errors.
None: If the option is left blank, the activity will, by default, behave as if “False” were chosen.

Version: It indicates the version of the feature being used.

Output

Result: It provides the ability to view the execution status of the activity. It returns values in “Boolean.”
True: Indicates that the activity has been executed successfully without any errors.
False: Indicates that the activity has been unsuccessful due to an unexpected error being thrown.

* Represents mandatory fields to execute the workflow. 

11.5.12 Select Item

This activity helps the user to retrieve specified values from the dropdown during runtime in a java-based application.

Properties

INPUT

DelayAfter: It assists the user to add a delay before initiating subsequent activities. The delay duration here is in milliseconds. By default, it is set to “300” milliseconds. When the option is left blank, the delay will not be considered.

DelayBefore: It assists the user in adding a delay before starting the execution of the activities. The delay duration here is in milliseconds. By default, it is set to “200” milliseconds. When the option is left blank, the delay will not be considered.

ExecuteBy: *Gets auto filled once the “Active Application” is selected. This contains the set of attributes for the specific spied element in “String” datatype.

Input String: *Specifies the value to select from the dropdown, provided in String format. You can either enter the value directly or dynamically as a string variable.

Select by: Choose the action for selecting a value from the drop-down list.
Text: Retrieves the “Text” value from the drop-down list.
Index: Retrieves the “Numeric” value from the drop-down list. “By default, it is set to ‘Text’.

WaitTime: It enables the user to introduce a delay before initiating subsequent activities in milliseconds. By default, it is set to 10000 milliseconds. Leaving the option blank will result in no delay being applied.

MISC

DisplayName: Displays the name of the activity. The activity name can be customized, which aids in troubleshooting.

SkipOnError: Specify the “Boolean” value as “True” or “False.”
True: Continue executing the workflow regardless of any errors thrown.
False: Halt the workflow if it encounters any errors.
None: If the option is left blank, the activity will, by default, behave as if “False” were chosen.

Version: It indicates the version of the feature being used.

RESULT

Result: It provides the ability to view the execution status of the activity. It returns values in “Boolean.”
True: Indicates that the activity has been executed successfully without any errors.
False: Indicates that the activity has been unsuccessful due to an unexpected error being thrown.

Represents mandatory fields to execute the workflow

11.5.13 Type Text

This activity allows you to enter values into a field within a Java application.

Properties

INPUT

ClearAndType: Determines how text is entered into a field that already contains values.

True: Clears the existing data and types the new value.
False (default): Keeps the existing data and appends the new value

DelayAfter: It assists the user to add a delay before initiating subsequent activities in milliseconds. By default, it is set to “300” milliseconds. When the option is left blank, the delay will not be considered.

DelayBeforeIt assists the user in adding a delay before starting the execution of the activities in milliseconds. By default, it is set to “200” milliseconds. When the option is left blank, the delay will not be considered.

DelayBetweenChar: It helps the user to add a delay between the characters of the input value in milliseconds. By default, it is set to “150” milliseconds. When the option is left blank, the delay will not be considered.

ExecuteBy: *Automatically populated after selecting the Active Application. It contains a set of attributes associated with the specific detected element.

Input String: *Specifies the input value in String datatype. You can either enter the value directly or use a string variable dynamically.

Send type: Specifies how the action is executed in the application during runtime. You can select one of the following options from the dropdown:

Normal: The bot types each character one by one.
Key as User: Simulates typing as if performed by a human.
Paste: The bot pastes the entire text at once using a copy-paste method.
Characters: Types the text character by character with controlled input speed.

WaitTime: It enables the user to introduce a delay before initiating subsequent activities in milliseconds. By default, it is set to 10000 milliseconds. Leaving the option blank will result in no delay being applied.

MISC

DisplayName: Displays the name of the activity. The activity name can be customized, which aids in troubleshooting.

SkipOnError: Specify the “Boolean” value as “True” or “False.”
True: Continue executing the workflow regardless of any errors thrown.
False: Halt the workflow if it encounters any errors.
None: If the option is left blank, the activity will, by default, behave as if “False” were chosen.

Version: It indicates the version of the feature being used.

Output

Result: It provides the ability to view the execution status of the activity. It returns values in “Boolean.”
True: Indicates that the activity has been executed successfully without any errors.
False: Indicates that the activity has been unsuccessful due to an unexpected error being thrown.

* Represents mandatory fields to execute the workflow.

11.6 Json

JSON is frequently employed for transmitting data between servers and clients, as well as for interchanging information among various components within an application.

JSON data is structured as an assemblage of key-value pairs, with each key being a string and each corresponding value capable of being a string, number, boolean, array, object, or null.

A valid JSON file should look like the below example. “{‘Project’: ‘key’: ‘Activation’: ‘Manager’}”

1. The values within JSON are presented as “InputFile,” “JsonObject,” and “Variable,” all of which should commence and conclude with double quotes.
2. It starts and ends with a curly bracket.
3. The values inside the JSONObject should be single quoted.
4. This feature supports only Json format as input files.

Below are some of the use cases where JSON activities can be used during automations.

1. REST and SOAP api when provided with JSON as response.
2. HTTP requests to web servers which gives JSON as output.
3. Web scraping from websites which gives an output in JSON format.
4. In cloud platforms like AWS, Cognitive services, Interact and Azure which provide API’s. with Json responses.

Click here to view the Json sample file that is used in execution of the activity.

11.6.1 Release Notes

v.1.1.1

This release includes enhancements to dependent DLLs.

Enhancement

All dependent DLLs have been upgraded to the latest stable versions, enhancing security, performance, and workflow reliability. This update ensures smoother execution and maintains compatibility with both existing and new workflows.

Released Date: 09/03/2026

11.6.2 DeserializeJsonObject

This activity is used along with Deserialize Json array activity to extract each object from an array of data.

The input variable is the value assigned to “for” in the Foreach activity which is assigned against the variable in the deserialize json array activity. 

In this example the input variable is obj.ToString() where “obj” is the value assigned to “For” in the Foreach activity and it is assigned against the variable “Jarray” in which the Json file is stored in array format. 

Properties

INPUT

InputVariable:* Enter the variable declared in the for each activity which has the deserialized array variable assigned to it.

MISC

Display Name: Displays the name of the activity. You can also customize the activity name to help in troubleshoot.

SkipOnError: It specifies whether to continue executing the workflow even if it throws an error. This supports only Boolean value “True or False.”
True: Continues to execute the workflow irrespective of any error thrown.
False: The workflow aborts if it throws any error.

Version: It specifies the version of the Json feature in use.

OUTPUT

JsonObject:* Declare a variable here to see the output of each detail extracted through this activity in an output box.

Result: Returns the success state of the activity in Boolean value.

* Represents the mandatory fields to execute the workflow

Click here to know in detail on how to use the activity.

11.6.3 DeserializeJsonArray

This activity is used to convert the details of an input file, a JSON object or a variable to an array of data. An array of data is a list of values. (Navigate to the bottom of this page to download the sample file for this activity).

Properties

MISC

Display Name: Displays the name of the activity. You can also customize the activity name to help in troubleshooting.

SkipOnError: It specifies whether to continue executing the workflow even if it throws an error. This supports only Boolean value “True or False.”
True: Continues to execute the workflow irrespective of any error thrown.
False: The workflow aborts if it throws any error.

Version: Specifies the version of the Json feature in use.

OUTPUT

JsonArray:*  It helps to view the output of the JSON file in an array format. 

Result: Returns the success state of the activity in Boolean value.

* Represents mandatory fields to execute the workflow

Use Case

The following usecase helps us to understand how the deserialization of JSON is used in the workflow. Here the input is a JSON file which contans a combination of mixed variables such as name of the person,age and name of the car.

The following are the scenarios covered in the example.

Scenario 1: Utilizing the input file to iterate and convert the values to an array format.
Scenario 2: Utilizing the array variable to iterate and convert the values to Jobject. 

Scenario 1

In the following steps, we are using the deserialize Json array and ForEach activity to iterate and convert each value to an array format from the input file.

Steps to execute the bot

1. Drag and drop the deserialize Json array activity into the Get Json Object activity.
2. Declare a variable here in the JsonArray box of the output segment. Here it is Jarray. 
3.Drag and drop a ForEach activity into the workflow.

4. Navigate to the property section and change the Type Argument as Object from the drop down.
5. Now we need to assign a value for each item in the Foreach activity. Here the value for ForEach is changed from “item to obj” as it is the variable declared above, which is Jarray.

Scenario 2

It’s a continuation from scenario1. The input here will be the variable declared (Obj) in ForEach activity. From this variable (Obj) we are going to iterate and convert the Jobject value and get the key and value for each property. 

6. Now drag and drop a sequence activity into the Foreach activity.
7. Drag and drop a deserialize json object activity into the sequence.
8. Click on the activity and navigate to the property window, specify the input variable as obj.ToString().
9. Declare a variable in the JsonObject box of the output segment in the Deserialize Json Object property window. Here it isJObject.
10. Drag and drop another ForEach activity below this activity as the values stored in the variable is stored as JObject and we need to extract each property from it.

11. Click on the for each activity in the workflow and navigate to the property section. Change the Type Argument asJProperty.
12. Nowwe need to assign a value for each item in the Foreach activity. Here the value for ForEach is changed from “item to prop” and in is the variable declared above, which is JObject.properties.
13. Now drag and drop two write line activities below this, as we have two different properties for three different objects. For example we have a key which is “name” and we have a value for that which is “XXXX1″.

14. So let’s use a “key” and “value” tag for each property that we extract from the above JObject.
15. Here the input string that we use is“Key : ” + prop.name.tostring() “Value : ” + prop.Value.ToString() Use this as the input string in each of the write line activity.
16. Execute the workflow.        

The bot executes the activity, converts the given json file to an array of data and then uses the deserialize json object activity to deserialize the array of data and give an output as individual detail. Please find the attached Sample Json file for reference below in creating a workflow.

11.6.4 GetJsonObject

The “Get JsonObject” function acts as the overarching scope for all other activities within this feature. It enables users to visually represent the input as “InputFile,” “JsonObject,” and “Variable” in a tree view format. This function facilitates the conversion of the input into a dataset, its deserialization into an array format, and the extraction of individual objects from the array of data.

The scope is where we provide the required JSON file, input string, or variable as an input. Please scroll down to the bottom of the page to access the sample file for this activity.

JSON Input

The following inputs can be provided in the GetJson activity.

Upload file – This type can be used when a JSON file is already available in your system or in the shared path. When we want to use the entire file for further execution we can choose the uploadfile type.

InputString – This option can be used when we want to extract specific data from the Json file or we can use a variable from a previous activity (Example: REST/SOAP Json output), in which a Json file is stored. Refer the “important” section to see how we can enter the input string directly.

Properties

INPUTS

JSONInput:* Choose the JSONinput as upload file or input string.
InputString: It accepts a variable or a string value.
UploadFile: It accepts the file path of the Json file.

MISC

Body: Autofill’s when an activity is dropped inside the scope.

Display Name: Displays the name of the activity. You can also customize the activity name to help in troubleshooting.

SkipOnError: It specifies whether to continue executing the workflow even if it throws an error. This supports only Boolean value “True or False.”
True: Continues to execute the workflow irrespective of any error thrown.
False: The workflow aborts if it throws any error.

Version: It specifies the version of the Json feature in use.

OUTPUT

IsValidJson: A Boolean value which specifies if the given value is a JSON or not.

Result: Returns the success state of the activity in Boolean value.

ResultData: It helps you to view the JSON output value in a string format.

* Represents mandatory fields to execute the workflow.

Use Case

The following example illustrates how we can use the GetJsonObject activity and view the details of the JsonObject.

Here the input will be a JSON file. It contains the name of a person, his age and the car that the person owns. The output of the given JSONObject can be seen in a string format. 

Steps to execute the bot

1. Drag and drop a Get Json object to the workflow.
2. Double click on the activity and choose upload Json file from the file type.
3. Click on the three dots and choose the Json file.
4. Declare a variable in the result data box of the output segment. Here it is “RD”.
5. Drag and drop a writelog activity to the workflow.

6. Enter the declared variable as the input string.
7. Enter the log level as “info”.
8. Execute the workflow to see the details in the Json file.

The bot executes the activity, gets the details from the Json file, and displays the details
of the file in the log. 
Please find the attached Sample Json file for reference below in creating a workflow.

11.6.5 JsontoDataset

This activity helps in converting a JSON file, a JSON object or an input variable to a dataset. To extract specific details from the dataset we can use other activities (Datatable activities). 
This activity works within the scope. Navigate to the bottom of this page to download the sample file for this activity.

Properties

INPUT

ExpirySecs: Specify the number of seconds for the table to be displayed. By default, the time is set to 10 seconds. We can change the expiry seconds to our requirement.

MISC

Display Name: Displays the name of the activity. You can also customize the activity name to help in troubleshooting.

SkipOnError: It specifies whether to continue executing the workflow even if it throws an error. This supports only Boolean value “True or False.”
True: Continues to execute the workflow irrespective of any error thrown.
False: The workflow aborts if it throws any error.

Version: Specifies the version of the Json feature in use.

OUTPUT

OutputDataset:* The Json file is stored as a dataset in the variable declared here.

Result: Returns the success state of the activity in boolean values.

* Represents mandatory fields to execute the workflow

Example

The following activity illustrates how we can use input JSON file to convert it to a dataset value.

Here we will be using a JSON file which has the user data with the name of the person, age and the car the person owns, as an input.

Follow the below steps on how to build a workflow using a JSONToDataset activity. 

Steps to execute the bot

1. Drag and drop a Json to Dataset activity within the GetJsonObject scope.
2. Fill in the required details for the Json to Dataset activity in the property box. Specify the expiry seconds for the table display.   
3. When we execute the activity the Json to dataset values is seen in a table as below.
4. Declare a variable in the OutputDataset box of the output segment. Here it is dsset.
5. To view the details of the Dataset in iteration, let’s assign the value as dt = dsset.Tables(0) in the assign activity (To get the details from the first table we have given the value as (0)).
6. Now drag and drop a writeline activity to the workflow, to see the output of a value from the dataset. Here we need the value for cars from the datatable, so we use dt.Rows(0)(“cars”).ToString(). It returns the first car value from the datatable. 
7. Execute the activity in debug mode to see the output of the Json file converted to dataset values.

The bot executes the activity, extracts details from the Json file and displays the specific
detail from the datatable in the log. 
Please find the attached Sample Json file for reference below in creating a workflow.

11.6.6 JsontoTreeview

The Json input’s details can be seen in a tree view using this activity. The input can be a Input file, Json object or a variable. Here the Json object can be seen hierarchically. This makes it easier to view the entire file information. It is represented in a similar way the files and folders are displayed on the left pane of Windows Explorer.

This activity works within the JSON scope activity. (Navigate to the bottom of this page to download the sample file for this activity)

Properties

INPUT

ExpirySecs:* Specify the number of seconds for the table to be displayed. By default, the time is set to 10 seconds. We can change the expiry seconds to our requirement.

InputJsonValue:* Mention the variable declared in GetJsonObject  activity which contains the Json file.

MessageTitle:*  Specify the message title to be given to the table within strings.

MISC

Display Name: Displays the name of the activity. You can also customize the activity name to help in troubleshooting.

SkipOnError: It specifies whether to continue executing the workflow even if it throws an error. This supports only Boolean value “True or False.”
True: Continues to execute the workflow irrespective of any error thrown.
False: The workflow aborts if it throws any error.

Version: Specifies the version of the Json feature in use.

RESULT

Result: Returns the success state of the activity in Boolean values.

 * Represents the mandatory fields to execute the workflow

Example

The following activity illustrates how we can use the JsonTotree view activity to view the details of the Json object in a tree view pattern.

In this example we will be using a Json file that has 100 records of user data as an input file. The Json tree viewer activity helps to see these 100 records in count of 5, 10, 15, 20 or 25. 

Here we will be viewing the MRN, Area, Landmark, Street, Time and Date of a user in a tree view.

View 1:(Record Size) If we choose the record size as “10”, we can view all the details for 10 users. Use the scroll option in the side bar to view all the details. 

View 2:(Page Number) It lets us view the user data page wise and the number of pages is seen based on the record size chosen. Since we choose the record size as “10”, we will have 10 pages of user data with the details of 10 users in each page. 

View 3:(Expand Collapse View) We can choose to expand or collapse the data by choosing the same within the box, which gives an easier view of the entire file. 

Steps to execute the bot

1. Drag and drop Get Json Object activity to the workflow which is the scope. Declare a variable in the result data box to see the output of the Json file. Here it is RD.
2. Click on the activity and fill in the required details. Click here to know in detail about the Get Json Object.
3. Drag and drop a JsonToTree view activity to the scope.
4. Specify the expiry seconds to view the table.
5. Specify the variable declared for the Json file in the InputJsonValue and also give a message title.
6. Execute the activity in Debug mode to see the output.

The bot executes the activity, converts the details in the Json file to a tree view and displays the details in a tree view format in which the output can be seen based on the record size and page number selected from the drop down.

11.7 PortableDatabase

A portable database, also known as an embedded database, is a lightweight database management system (DBMS) designed to be easily deployable and integrated within applications or systems. Unlike traditional client-server databases, portable databases are self-contained and do not require a separate server process to operate. They are often used in scenarios where data storage and management are required within the application itself.

Benefits

1. Simplicity and Ease of Deployment: Portable databases are easy to deploy as they do not require separate server installations or configurations. They can be included directly within the application’s deployment package.

2. Reduced Dependencies: Since portable databases are self-contained, they reduce dependencies on external database servers, making application deployment and maintenance simpler.

3. Improved Performance: In many cases, portable databases offer faster data access and query processing compared to client-server databases, as they operate directly within the application’s runtime environment.

4. Offline Capabilities: Portable databases can function offline, allowing applications to continue storing and accessing data even when disconnected from the network.

5. Data Security: By keeping data within the application’s environment, portable databases can enhance data security and privacy, reducing the risk of unauthorized access or data breaches.

6. Scalability: While portable databases may have limitations in terms of scalability compared to server-based databases, they can still handle moderate-sized datasets effectively, making them suitable for many use cases.

Use Cases

1. Local Data Storage: Use a portable database in workflows to store and manage data locally within the automation application. This can include storing configuration settings, user preferences, or temporary data used during automation tasks.

2. Data Caching: Implement a portable database to cache frequently accessed data or results of expensive computations. This can improve performance by reducing the need to retrieve data from external sources repeatedly.

3. Embedded Reporting: Use a portable database to store data for generating reports or analytics within automation workflows. The database can store aggregated data, historical records, or intermediate results for reporting purposes.

4. Data Integration: Incorporate a portable database into automation solutions for data integration tasks. The database can serve as a local staging area for data transformations, cleansing, and consolidation before transferring data to external systems or databases.

5. Configuration Management: Manage application configurations, settings, and version control using a portable database. This allows for easy management of application parameters and settings across automation processes.

11.7.1 Release Notes

v.1.0.6

In this release, we have bug fixes in the following:

Bug Fixes

1. The DB Backup activity was not functioning correctly and displayed an error even when valid details were provided. This issue has now been fixed.

2. In the HTMLtoDatatable activity, the WriteLog activity displayed false values in both output and log details, although product logs indicated successful data import. This issue has now been fixed.

Released Date: 25/03/2026

11.7.2 CreateTable

This activity is used to create a table in a database.

Properties

INPUT

DatabaseLocation:* Specify the location where the database is stored.

DatabaseName:* Name of the database in which the table has to be created.

Script: Autofills once the script is generated using the design table.

TableName: Autofills once the script is generated using the design table.

MISC

DisplayName: Displays the name of the activity. You can also customize the activity name to help troubleshoot issues faster. This name will be used for logging purposes.

SkipOnError: Specify the “Boolean” value as “True” or “False.”
True: Continue executing the workflow regardless of any errors thrown.
False: Halt the workflow if it encounters any errors.
None: If the option is left blank, the activity will, by default, behave as if “False” were chosen.

Version: It indicates the version of the feature being used.

OUTPUT

Created Script: This is not a mandatory field. However, if you wish to see the script declare a variable here to see the same in the output box.

Result: It provides the ability to view the execution status of the activity. It returns values in “Boolean.”
True: Indicates that the activity has been executed successfully without any errors.
False: Indicates that the activity has been unsuccessful due to an unexpected error being thrown.

Represents mandatory fields to execute the workflow.

11.7.3 CreateDatabase

The activities grouped under this package helps create a database in the local system enabling users to extract large amount of data, swiftly. Thus, it facilitates extraction of data in minimal time during the run time.

This activity is used to create a database.

Properties

INPUT

EnvironmentName: The “Name” mentioned in this parameter refers to the name of the downloaded “Python Script” used for automation.
By default, the name will be auto filled and disable to make any changes.

EnvironmentVersion: It indicates the version of the script that is being used.

PythonPath:* It indicates to provide the “Path” of the Python application. You can either hardcode the values in “String” datatype or can provide the values in the “String” format. This field accepts “String” datatype.

MISC

Body: Gets auto filled once the “Activity” is dropped into the body

DisplayName: Displays the name of the activity. The activity name can be customized, which aids in troubleshooting.

SkipOnError: Specify the “Boolean” value as “True” or “False.”
True: Continue executing the workflow regardless of any errors thrown.
False: Halt the workflow if it encounters any errors.
None: If the option is left blank, the activity will, by default, behave as if “False” were chosen.

Version: It indicates the version of the feature being used.

OUTPUT

Result: It provides the ability to view the execution status of the activity. It returns values in “Boolean.”
True: Indicates that the activity has been executed successfully without any errors.
False: Indicates that the activity has been unsuccessful due to an unexpected error being thrown.

Represents mandatory fields to execute the workflow.

11.7.4 DropTable

This activity is used to drop a table inserted into the database.

Properties

INPUT

DBLocation:* Specify the location where the database is stored.

DBName:* Name of the database in which the table has to be created.

TableName:*  Specify the name of the table to be deleted.

MISC

Display Name: Displays the name of the activity. You can also customize the activity name to help troubleshoot issues faster. This name will be used for logging purposes.

SkipOnError: It specifies whether to continue executing the workflow even if it throws an error. This supports only Boolean value “True or False.”
True: Continues to execute the workflow irrespective of any error thrown.
False: Stops the workflow if it throws any error

Version: It specifies the version of the Portable database feature in use.

OUTPUT

Result: Define a Boolean value to validate the success state of the activity.

*Represents mandatory fields to execute the workflow.

11.7.5 DropDatabase

This activity is used to delete database from the given Database location.

Properties

INPUT

DBLocation:* Specify the location where the database is stored.

DBName:* Name of the database in which the table has to be created.

MISC

Display Name: Displays the name of the activity. You can also customize the activity name to help troubleshoot issues faster. This name will be used for logging purposes.

SkipOnError: It specifies whether to continue executing the workflow even if it throws an error. This supports only Boolean value “True or False.”
True: Continues to execute the workflow irrespective of any error thrown.
False: Stops the workflow if it throws any error

Version: It specifies the version of the Portable database feature in use.

OUTPUT

Result: Define a Boolean value to validate the success state of the activity

*Represents mandatory fields to execute the workflow. 

11.7.6 ExecuteNonQuery

This activity is used to Insert, Delete, or update details to and from an existing table. The import data and the execute non-query activity performs the same functions. The difference is, the import data can be used to input data into a table without adding any condition. The execute non- query activity is used to do the same activity, with a specific condition.

Properties

INPUT

Location:*Specify the location of the database in which the table to be edited is present.

DBName:* Specify the name of the database in which the table is present.

Query:* Specify the query which has to be used to insert, delete or update the table

MISC

Display Name: Displays the name of the activity. You can also customize the activity name to help troubleshoot issues faster. This name will be used for logging purposes.

SkipOnError: It specifies whether to continue executing the workflow even if it throws an error. This supports only Boolean value “True or False.”
True: Continues to execute the workflow irrespective of any error thrown.
False: Stops the workflow if it throws any error

Version: It specifies the version of the Portable database feature in use.

OUTPUT

Result: Define a Boolean value to validate the success state of the activity.

*Represents mandatory fields to execute the workflow.

11.7.7 ExecuteQuery

This activity is used to Insert, Delete, or update details to and from an existing table. The import data and the execute non-query activity performs the same functions. The difference is, the import data can be used to input data into a table without adding any condition. The execute non- query activity is used to do the same activity, with a specific condition.

Properties

INPUT

Location:*Specify the location of the database in which the table to be edited is present.

DBName:* Specify the name of the database in which the table is present.

Query:* Specify the query which has to be used to insert, delete or update the table

MISC

Display Name: Displays the name of the activity. You can also customize the activity name to help troubleshoot issues faster. This name will be used for logging purposes.

SkipOnError: It specifies whether to continue executing the workflow even if it throws an error. This supports only Boolean value “True or False.”
True: Continues to execute the workflow irrespective of any error thrown.
False: Stops the workflow if it throws any error

Version: It specifies the version of the Portable database feature in use.

OUTPUT

Result: Define a Boolean value to validate the success state of the activity.

*Represents mandatory fields to execute the workflow.

11.7.8 ImportData

This activity is used to import data from the browser to the created table.

Properties

INPUT

DBLocation:* Specify the location where the database is stored.

DBName:* Specify the name of the database in which the table is present.

ImportFile: Specify the name of the CSV File.

InputTable:* Specify the Variable from which the data has to be taken and imported to the created table.

Seperator: Specify any separator present in the CSV File.

TableName:* Specify the name of the table into which the data has to be imported.

Type: Choose the type from the drop down if it’s a datatable, CSV, Excel

MISC

Display Name: Displays the name of the activity. You can also customize the activity name to help troubleshoot issues faster. This name will be used for logging purposes.

SkipOnError: It specifies whether to continue executing the workflow even if it throws an error. This supports only Boolean value “True or False.”
True: Continues to execute the workflow irrespective of any error thrown.
False: Stops the workflow if it throws any error

Version: It specifies the version of the Portable database feature in use.

OUTPUT

Result: It provides the ability to view the execution status of the activity. It returns values in “Boolean.”
True: Indicates that the activity has been executed successfully without any errors.
False: Indicates that the activity has been unsuccessful due to an unexpected error being thrown.

* Represents mandatory fields to execute the workflow.

11.8 SAP GUI Configuration

In order to enable and automate Robility Designer to interact with SAP WINGUI , there are few configuration steps that needs to be followed beforehand.  This configuration is performed on both client and server side that allows the user to automate with the SAP application.

In the context of SAP, VB scripting can be used in conjunction with SAP GUI scripting to automate interactions with the SAP GUI (Graphical User Interface). This allows users to automate tasks such as data extraction and data entry in the SAP GUI from Excel.

On the server side

To use VB scripting (VBA) for automating tasks in SAP, you typically need to enable and configure SAP GUI scripting. The following steps will enable the “Record” button for recording the actions of processes that needs to be automated. Here’s a general overview of the steps:

Below are the steps that needs to be followed by the server side.

1. Launch SAP Logon and connect to the server.
2. From the SAP Easy Access screen, enter transaction RZ11.

3. Enter parameter “sapgui/user_scripting” and click on the “Display” option.

4. Check if the following settings are labeled as “True”,
a. Kernel Default
b. Default profile.
c. Instance Profile

If it’s not enabled, click on the “Change Value” on the top of the screen or press “CTRL + F5”. Refer the below image.

5. In another window, enter the “new value” as “TRUE” and click on Save. Refer the below image.

6. Now the scripting has been enabled. Log off and back on again for the changes to take effect.

On the Client Side

1. Launch the Control Panel, choose Appearance and Personalization, and launch SAP GUI configuration.

2. Navigate to Accessibility & Scripting.

3. Choose Scriptingand check the “Enable Scripting”.
4. Clear the checkboxes for the following options:
a. Notify when a script attaches to SAP GUI.
b. Notify when a script opens a connection.
5. Save the changes by clicking OK. The SAP WinGUI scripting is now enabled.

11.8.1 Release Notes

v.1.0.5

This release includes enhancements to dependent DLLs.

Enhancement

All dependent DLLs have been upgraded to the latest stable versions, enhancing security, performance, and workflow reliability. This update ensures smoother execution and maintains compatibility with both existing and new workflows.

Released Date: 09/03/2026

11.8.2 Record VB Script

Enabling the SAP GUI automation engine simplifies the process of recording user actions performed in the SAP GUI. This generates VBScript code as output, which can be used in Robility Designer activities to automate these actions.

Ensure that the SAP GUI scripting configurations are done.

1. Open SAP Logon, and then select the SAP system to which you want to sign in.

2. Select Customize Local Layout (Alt F12), and then select Script Recording and Playback.

3. Select More.
4. Under Save To, provide the path and file name where you want to store the captured user interactions.


5. Select Record Script to start the screen capturing process.
6. Every interaction you do in SAP will be captured as repeatable VBScript commands.
7. Select the Record and Playback dialog, select Stop Recording, and then close the dialog.
8. Close all SAP windows now.

SAP’s scripting engine records each click as VBScript commands and saves it to the output file you provide. Open the file in your code editor of choice to examine its contents.

Once the script is available in the provided path, there is a crucial step to follow before using this activity in “Invoke DLL” in Robility Designer.

1. Open the VB script saved in your local.
2. Find where all the inputs are passed as values that are required to perform actions.
3. The values will be as below,
a. Session.findById(“wnd[0]/usr/ctxt$8A-YEAR”).text=”samplevalue” .
4. Since we are performing this script via the “InvokeDLL” activity, we must pass the values as arguments in the script. Therefore, all the parameters that require input to be passed from the activity need to be modified as below:
a. Session.findById(“wnd[0]/usr/ctxt$8A-YEAR”).text=WScript.Arguments(0)
5. This will enable the arguments for the inputs to be passed from the activity.
6. Ensure that the value of the first argument starts from “0”, so the second argument needs to be passed as WScript.Arguments(1) and so on.

11.8.3 ExtractData

This activity helps the user to retrieve the ReadOnly/text from the provided field in the SAP application. 

Properties

INPUT

DelayAfter: It assists the user to add a delay before initiating subsequent activities. The delay duration here is in milliseconds. By default, it is set to “100” milliseconds. When the option is left blank, the delay will not be considered.

DelayBefore: It assists the user in adding a delay before starting the execution of the activities. The delay duration here is in milliseconds. By default, it is set to “200” milliseconds. When the option is left blank, the delay will not be considered.

ElementId: *This parameter specifies to provide the “ElementID” captured from the scripting against the field where you want to extract the text and accepts values in the “String” datatype. 

MISC

DisplayName: Displays the name of the activity. The activity name can be customized, which aids in troubleshooting.

SkipOnError: Specify the “Boolean” value as “True” or “False.”
True: Continue executing the workflow regardless of any errors thrown.
False:
 Halt the workflow if it encounters any errors.
None:
 If the option is left blank, the activity will, by default, behave as if “False” were chosen.

Version: It indicates the version of the feature being used.

OUTPUT

OutputText: *It helps to view the output of the activity as the extracted text from the provided field in the SAP application and returns value in “String” datatype. 

Result: This parameter allows you to view the execution status of the activity and returns a value in “Boolean”.
True: Indicates that the activity has been executed successfully without any errors.
False: Indicates that the activity has been unsuccessful due to an unexpected error being thrown.

* Represents mandatory fields to execute the workflow.

How to get the element ID from the scripting? 

To retrieve the element ID from the specific field in the SAP application, follow the below steps.

1. Open SAPLogon application and follow the further steps here to record the steps. 
2. Now, the VB script will be saved in your local folder, open it.
3. Find where all the inputs are passed as values that are required to perform actions.
4. For instance, the values will be as below,
a. Session.findById(“wnd[0]/usr/ctxt$8A-YEAR”).text=”samplevalue” 
5. Copy the ID that is inside the “Session.findById”, which as “wnd[0]/usr/ctxt$8A-YEAR”. This is the ID from where you will retrieve the text using the Extract data activity. 
6. Add this ID in the “Element ID” field in the “Extract data” activity and execute the activity

11.8.4 ExtractTable

This activity helps the user to extract the specified table in datatable format in the SAP application. 

Limitation

In SAP GUI 8000 version, extracting data from tables with a large number of rows and columns may take longer. This is due to SAP’s lazy loading mechanism, which loads content only when scrolled, impacting extraction speed.

Properties

INPUT

DelayAfter: It assists the user to add a delay before initiating subsequent activities. The delay duration here is in milliseconds. By default, it is set to “100” milliseconds. When the option is left blank, the delay will not be considered.

DelayBefore: It assists the user in adding a delay before starting the execution of the activities. The delay duration here is in milliseconds. By default, it is set to “200” milliseconds. When the option is left blank, the delay will not be considered.

TableID: *This parameter specifies to provide the “TableID” captured from the scripting against the field where you want to extract the table and it accepts values in the “String” datatype.

MISC

DisplayName: Displays the name of the activity. The activity name can be customized, which aids in troubleshooting.

SkipOnError: Specify the “Boolean” value as “True” or “False.”
True: Continue executing the workflow regardless of any errors thrown.
False:
 Halt the workflow if it encounters any errors.
None:
 If the option is left blank, the activity will, by default, behave as if “False” were chosen.

Version: It indicates the version of the feature being used.

OUTPUT

Datatable: *It helps to view the output of the activity as the extracted table from the provided field in the SAP application and returns value in “Datatable” datatype. 

Result: This parameter allows you to view the execution status of the activity and returns a value in “Boolean”.
True: Indicates that the activity has been executed successfully without any errors.
False: Indicates that the activity has been unsuccessful due to an unexpected error being thrown.

* Represents mandatory fields to execute the workflow.

How to get the Table ID from the scripting? 

To retrieve the element ID from the specific field in the SAP application, follow the below steps.

1. Open SAPLogon application and follow the further steps here to record the steps. 
2. Now, the VB script will be saved in your local folder, open it.
3. Find where all the inputs are passed as values that are required to perform actions.
4. For instance, the values will be as below,
a. Session.findById(“wnd[0]/usr/ctxt$8A-YEAR”).text=”samplevalue” 
5. Copy the ID that is inside the “Session.findById”, which as “wnd[0]/usr/ctxt$8A-YEAR”. This is the ID from where you need to extract the table using the Extract table activity. 
6. Add this ID in the “Table ID” field in the “Extract Table” activity and execute the activity

11.9 XML

Robility has a set of XML activities to read information from an XML document or string. This means that data in an XML document or string is surrounded by text markup that assigns tags to identify data values required by the robot to perform the set of operations.

A well-formed XML document meets the XML specification and can be interpreted by the Robility activity. Documents that don’t meet the below standards are rejected by the Robility XML scope activity. 

1. XML elements must have a closing tag.
2. XML tags are case sensitive.
3. XML elements must be properly nested.
4. XML attribute values must be single quoted.

Below are some of the use cases where XML activities can be used during automation.

1. REST & SOAP API when provided with XML as a response.
2. Application database storage as an XML string.
3. Webpages with table views extracted as an XML string.
4. Application with XML download option.

Click here to view the XML sample file that is used in execution of the activity.

11.9.1 Release Notes

v.2.0.8

This release includes enhancements to dependent DLLs.

Enhancement

All dependent DLLs have been upgraded to the latest stable versions, enhancing security, performance, and workflow reliability. This update ensures smoother execution and maintains compatibility with both existing and new workflows.

Released Date: 09/03/2026

11.9.2 DeserializeXML

The Deserialize XML activity is used to convert structured XML format, which can be passed as a “string” or an “XML Object,” into an XDocument.

The output of the deserialized XML activity empowers the user to execute various actions, including extracting nodes/attributes and creating nodes/attributes within the XML Document.

XML is a markup language employed to define the structure and content of data, while XDocument represents the output yielded by the Deserialize XML activity. 

Properties

INPUT

DelayAfter: It helps the user to add a delay to start the execution of the further activity. The format of the delay here is milliseconds. By default, it will be set to zero. When the option is left blank, no delay is considered.

DelayBefore: It helps the user to add delay before the execution of the current activity. The format of the delay here is milliseconds. By default, it will be set to zero. When the option is blank or zero, no delay is considered in the activity’s execution.

InputString:* Specify the XML nodes that need to be passed as input here. Either you can hardcode the value or you can call the value as a variable (from the output of other activities). The XML format needs to be passed within double quotes. Click here to view the XML format.

MISC

DisplayName: Displays the name of the activity. It can also be customized for troubleshooting purposes

SkipOnError: Specify the Boolean value as “True or False.”
True: Continues to execute the workflow irrespective of any error thrown.
False: Stops the workflow if it throws any error.
None: If the option is specified as blank, by default the activity will perform as “False” action.

Version: It specifies the version of the XML automation feature in use.

OUTPUT

XML Document:* It helps you to view the output value of the XML object as a deserialized  XDocument format. The “output value” accepts in “Xdocument variable” datatype. (Refer to the steps in creating a workflow.)

Represents mandatory fields to execute the workflow

Example

The following illustration demonstrates the process of obtaining the most popularly used book titles and their corresponding IDs using the XML feature.

A private library has been requested to extract and provide a list of the most popularly used book titles along with their respective IDs to its administrative office.

The input is an XML response that has been extracted from the library’s website and is present in a text document. This response contains a comprehensive list of book details, including title, ID, author, year, category, description, and price of each book.

In this scenario, the input will be an XML Object variable specifically designed for utilizing XML features. Using the XML activities, we will extract the “Book title” and “Book ID” from this variable. Subsequently, the extracted values of the “Book title” and “Book ID” will be updated within an Excel spreadsheet under their respective columns, thus enabling the continuation of the subsequent stages of the process. Please scroll down to the bottom of the page to access the sample file for this use case.

Steps to execute the bot 

1. Create a solution named “BookExtraction.”
2. Drag and drop the “ReadText” activity from the text automation feature and set as “StartNode”.
a. Navigate to the properties section and provide the file path of the XML where the input file is stored. (Refer to the attached XML text document.)
b. Create a variable named “XMLInput” to store the read data from the “Text” property.

3. Drag and drop the “Deserialize XML” activity from the XML feature and place it next to the “ReadText” activity.
a. Navigate to the n the “XMLDocument” property. This variable will store the deserialied output of the XML document.

4. Now, add the “GetNodes” activity and place it next to the “DeserializeXML” activity.
a. Navigate to properties and choose the filter type as “XPath” from the drop-down. The purpose of selecting “XPath” is to extract the titles of the “books.”
b. Enter the filter value as “/catalog/book/title” from which the text needs to be extracted.
c. Declare a variable for the “XmlNode.” Let’s name it “XPNode.

5. Next, drag and drop the “ForEach” activity to iterate and write each value that has been extracted from the node using the “XPath expressions.”
a. Enter “XPNode” as the input value here, which is where westored the extracted book titles.
b. The values from “XPNode” have been assigned to the “Item.”
c. Select “System.Xml.Linq.XNode” as the “TypeArgument” since it’s a list of values.

6. Now, drag and drop the “GetText” activity and place it inside the “ForEach” activity.
a. Navigate to the properties and enter the variable “item” in the “XMLNode” property.
b. Declare a variable for the “Output” property to retrieve the text. Let’s name it “Text.

7. Drag and drop the “GetNodes” activity and place it next to the “WriteLine” activity.
a. Navigate to properties and choose the filter type as “Node Name” from the drop-down.
b. Enter the filter value as “book” from which the text needs to be extracted.
c. Declare a variable for the “XmlNode” segment. Let’s call it XNode.

8. Next, drag and drop the “ForEach” activity to iterate and write each value that has been extracted from the “Node” using the “XPath expressions.” The purpose of using the “Node” is to retrieve the “Book ID.”
a. Enter “XNode” as the input value here, where we stored the extracted book titles.
b. The values from “XNode” have been assigned to the “Item.”

c. Select “System.Xml.Linq.XNode” as the “TypeArgument” since it’s a list of values. Click here to know how to choose “TypeArgument”.

9. Drag and drop the “GetAttributes” activity and place it inside the “ForEach” activity. The purpose of using the “GetAttribute” is to extract the value corresponding to the “Book ID.”
a. Navigate to the properties and enter the variable “item” in the “XMLNode” property.
b. Declare a variable for the “Output” property named “Attributes” to obtain the list of values available in the node list

10. Add a “WriteLine” activity to the workflow to inspect the extracted value.
a. Enter the input string as “Attributes(0).Value.ToString” to retrieve the value of the attribute available in the node against the attribute name.

11. Add an “Assign” activity and place it next to the “WriteLine” activity. We are going to assign the values from “Attributes(0).Value.ToString” to the variable “AttrValue.” The purpose of this assignment is to consolidate the values into a single variable.
a. Create a variable named “AttrValue” in the variable panel.
b. Click on the “Variable Types” column and select “String” from the “dropdown”menu.
c. Enter “AttrValue” in the “To” field of the assign activity.

d. Enter “Attributes(0).Value.ToString” in the “Value” field of the assign activity.

12. Then add the “GetText” activity and place it next to the “Writeline” activity.
13. Navigate to the properties and enter the “AttributeName” as “AttrValue”.
14. Enter the variable as “item” in the “XMLNode” property.
15. Place the “GetExcelObject” next to the “WriteLine” activity and select the input file path containing the list of inputs.
a. Drag and drop the “WriteCell” activity into the scope. Specify the cell value as “A” + Counter.ToString, since the Book title is located in the “A” column.
b. Assign the value stored from “GetText” to the “WriteCell” activity and set the “InputString” value as “BookTitle.”
c. Indicate the sheet name as “Sheet1,” where the data is stored.
d. The purpose of using a counter is to increment the values for the “WriteCell” activity. To accomplish this, include an “Assign” activity. Prior to this, declare a variable named “Counter” and select the “DataType” as “Int32.”  The reason for choosing the integer “DataType” is to increment the value, and specify the default value as “2,” as it consider from the header as 1. Refer 13th point how to assign the counter increment value in the “Assign” activity.
e. Drag and drop another “WriteCell” activity into the scope. Specify the cell value as “B” + Counter.ToString, as the Book ID is located in the “B”.
f. Transfer the stored value from “GetText” to the “WriteCell” activity and set the “InputString” value as “Text.” Place an “Assign” activity next to the “GetExcelObject” scope and input the declared variable, in this case, “Counter.” Specify the “To” value as “Counter,” and set the “Value” as “Counter + 1.” This increments the counter for further use.

The bot executes the workflow and extract the “Book titles” and “Book id” and updates them into the excel sheet. 

11.9.3 GetNodes

This activity helps the user to extract the values against the specified node of an XML Object using the “Node” name or “XPath.”

Properties

INPUT

DelayAfter:  It helps the user to add a delay to start the execution of the further activity. The format of the delay here is milliseconds.
By default, it will be set to zero. When the option is left blank, no delay is considered.

DelayBefore: It helps the user to add delay before the execution of the current activity. The format of the delay here is milliseconds.
By default, it will be set to zero. When the option is left blank, no delay is considered.

FilterType: Choose either node name or Xpath from the drop down. 
XPath: Enter the Xpath expression to navigate through the nodes and extract the value.
NodeName: Use the Node name from the XML document to extract the value. 
None: When None is opted, by default the activity will perform with “NodeName” functionality.

FilterValue:* Enter the node name or the XPath expression from which the details have to be retrieved. This accepts only string format. 

XMLDocument:*  Specify the input which is the  Xdocument output from where it returns the extracted node details.

MISC

DisplayName: Displays the name of the activity. It can also be customized for troubleshooting purpose.

SkipOnError: It specifies whether to continue executing the workflow even if it throws an error. This supports only Boolean value “True or False”. By default, it is set to “False.”
True: Continues the workflow to the next step
False: The workflow aborts if it throws any error.
None: If the option is specified as blank, by default the activity will perform as “False” action.

Version: It specifies the version of the XML automation feature in use

OUTPUT

Result: It helps to view the execution state of the activity. It returns the values in Boolean format.
True: It indicates the activity has been executed successfully without any error.
False: It indicates that the activity has been faulted due to some unexceptional error thrown.

XmlNode:* It helps you to view the output value in “node” extracted from the Xdocument as an array format. (Refer to the steps in creating a workflow.)

* Represents mandatory fields to execute the workflow

Click here to view the example of “GetNodes” activity used in the workflow for automation.

11.9.4 GetAttribute

This activity allows the extraction of attribute values from a specified “Node” within the XML Object. Attributes typically contain detailed information about the XML element.

Properties

INPUT

DelayAfter:  It helps the user to add a delay to start the execution of the further activity. The format of the delay here is milliseconds.
By default, it will be set to zero. When the option is left blank, no delay is considered.

DelayBefore: It helps the user to add delay before the execution of the current activity. The format of the delay here is milliseconds.
By default, it will be set to zero. When the option is left blank, no delay is considered.

XML Node:* Specify the input which is the XNode output(declared in GetNode activity) from where it returns the extracted attributes.

MISC

DisplayName: Displays the name of the activity. It can also be customized for troubleshooting purpose.

SkipOnError: It specifies whether to continue executing the workflow even if it throws an error. This supports only Boolean value “True or False”. By default, it is set to “False.”
True: Continues the workflow to the next step
False: The workflow aborts if it throws any error.
None: If the option is specified as blank, by default the activity will perform as “False” action.

Version: It specifies the version of the XML automation feature in use

OUTPUT

Attributes:* It helps to view the output value as an attribute extracted from the node as an array format. (Refer to the steps in creating a workflow.)

Result: It helps to view the execution state of the activity. It returns the values in Boolean format.
True: It indicates the activity has been executed successfully without any error.
False: It indicates that the activity has been faulted due to some unexceptional error thrown.

* Represents mandatory fields to execute the workflow

Click here to view the example of “GetAttributes” activity used in the workflow for automation.

11.9.5 GetText

This activity enables to extract the text from the specified node or attribute in the XML Document.

Properties

INPUT

AttributeName: Specify the attribute name when you need to extract the corresponding text. If left blank, the activity will not retrieve the attribute’s value. This field only accepts values of the string type.

DelayAfter:  It helps the user to add a delay to start the execution of the further activity. The format of the delay here is milliseconds.
By default, it will be set to zero. When the option is left blank, no delay is considered.

DelayBefore: It helps the user to add delay before the execution of the current activity. The format of the delay here is milliseconds.
By default, it will be set to zero. When the option is left blank, no delay is considered.

XML Node:* Specify the input which is the XNode output variable (declared in GetNode activity) from where it returns the extracted text.

MISC

DisplayName: Displays the name of the activity. It can also be customized for troubleshooting purpose.

SkipOnError: It specifies whether to continue executing the workflow even if it throws an error. This supports only Boolean value “True or False”. By default, it is set to “False.”
True: Continues the workflow to the next step
False: The workflow aborts if it throws any error.
None: If the option is specified as blank, by default the activity will perform as “False” action.

Version: It specifies the version of the XML automation feature in use

OUTPUT

Output:* It helps to view the output value as the text extracted from the specific node or attribute in a String format. (Refer to the steps in creating a workflow.)

Result: It helps to view the execution state of the activity. It returns the values in Boolean format.
True: It indicates the activity has been executed successfully without any error.
False: It indicates that the activity has been faulted due to some unexceptional error thrown.

* Represents mandatory fields to execute the workflow

Click here to view the example of “GetText” activity used in the workflow for automation.

12. System Activities

12.1 Overview

Introduction

System activities in Robility encompass a range of tools and functionalities designed to streamline automation processes and enhance the capabilities of automation solutions. These activities cover various aspects of automation, including data handling, file management, communication with external systems, user interactions, time management, notifications, and advanced text processing.

These system activities collectively empower developers to build comprehensive automation solutions that handle diverse tasks efficiently, ranging from data processing and file management to user interactions and advanced text processing, enhancing the productivity and effectiveness of automation implementations in Robility.

Let’s delve deeper into the key functionalities offered by these system activities:

  1. Data Handling: It enables developers to manage data effectively within automation workflows. This includes activities for data extraction, transformation, validation, and integration with datatables or external data sources.
  2. File Management: It allows for seamless file handling operations such as file creation, copying, moving, deletion, and manipulation of file attributes.
  3. Communication with External Systems: Robility provides activities to facilitate communication with external systems.
  4. User Interactions: System activities in Robility support automation of user interactions with applications through simulated keyboard inputs, mouse actions, and UI interactions.
  5. Time Management: It also includes the functionalities for managing time delays and timeouts.
  6. Notifications: It allows for sending notifications, alerts, or messages during automation execution.
  7. Advanced Text Processing: It also supports advanced text processing capabilities through system activities such as regular expressions (Regex).

About the package

1. DataTable package: This package facilitates the manipulation of tabular data within automation workflows. It supports operations such as adding, updating, deleting rows, sorting, filtering, and performing calculations on Datatables.

2. FileSystem (FS) Package: It enables interaction with the file system, including operations like creating, copying, moving, renaming, and deleting files and directories. It also supports file attributes manipulation and file system monitoring.

It is crucial for file management tasks, file manipulation, working with file paths, and handling file-related operations in automation processes.

3. FTP package: This package facilitates file transfer operations between local and remote systems using FTP/SFTP protocols. It supports uploading, downloading, listing directory contents, and managing FTP connections.

It is valuable for automation tasks involving file transfers, data synchronization between servers, batch processing, and integration with FTP/SFTP servers.

4. Delay Package: This package introduces a time delay or pause in the automation workflow, allowing developers to control timing between actions. It helps in managing workflow execution timing and handling synchronization requirements.

5. Keyboard Automation Package: It simulates keyboard inputs, keystrokes, and keyboard shortcuts within automation workflows. It allows developers to interact with applications by sending virtual keyboard commands.

6. Notification Package: This package facilitates to send notifications, alerts, or messages to users or systems during automation execution.

7. Mouse Automation package: It simulates mouse actions and movements, including clicking, dragging, scrolling, and hovering, within automation workflows. It allows developers to interact with applications through virtual mouse inputs.

Mouse automation package is used for UI automation, mouse-based interactions, testing mouse functionalities, automating GUI interactions, and performing actions that require mouse input.

8. Regex (Regular Expression) package: Regex feature provides support for regular expressions, allowing developers to perform advanced text matching, pattern recognition, and text manipulation operations within automation workflows.

Project Compatibility

12.2 DatatableAutomation

DataTable Automation in Robility provides a versatile way to organize, analyze and manipulate tabular data, known as datatables. Integrate DataTable Automation in your workflows to enhance and enrich data-driven automation. This documentation serves a comprehensive guide to understanding and implementing DataTable Automation within your automation workflows.
Before delving into automation, acquire the skills to import data from diverse sources like CSV files, databases, and websites into data tables for subsequent processing. 
The following inputs are intended for the “Datatable” automation and can be utilized: 

1. “HTML Table” can be extracted as response from “Websites”.
2. “Datasets” can be returned as output response from the “Rest” or “Json” activity.
3. Range can be extracted from the excel sheet.
4.In “Database” automation, we can extract the response as “datatable” output.
5. In “WebAutomation” and “Desktop” automation we can extract the “Attributes” and its “elements as “Datatables”.
6. In “PDF” automation, the “Tables” from the pdf can be extracted as response.

UseCase

Below are the use cases where the “Datatable” Automation can be useful in Robility.

• Data Transformation: Use it to structure raw data into a Datatable by removing duplicates, handling missing values, and eliminating unnecessary ones.
• Data Comparison: Utilize “DataTable” automation to validate and compare data extracted from Excel sheets, updating values as needed.
• Data Parsing: Extracted values from Excel sheets can be filtered to retain specific rows and update the sheet.
• Data Validation: To optimize memory usage, clear extracted “DataTables” from Excel sheets before proceeding to the next step in automation.
• Data Troubleshooting: Troubleshoot extracted “Datatable” to ensure the accuracy of values extracted from websites.
• Data Merging and Joining: Automate the merging or exclusion of values in similar extracted “Datatable” from websites using “Datatable” automation.

12.2.1 Release Notes

v.1.4.5

This release includes enhancements to dependent DLLs.

Enhancement

All dependent DLLs have been upgraded to the latest stable versions, enhancing security, performance, and workflow reliability. This update ensures smoother execution and maintains compatibility with both existing and new workflows.

Released Date: 09/03/2026

12.2.2 AddNewColumn

It helps the user to add/ update with a “new column” to the “Existing input datatable” during the runtime.

Properties

INPUT

Datatable:Enter the “Input datatable” variable where the input data is stored. This parameter helps you to add a new column. This field only accepts the “datatable” data type.

Datatype:Select the data type which is required to be added in  the “Column”.
Int: It accepts only the “Integer” datatype. (For e.g., 1,2,3).
String: It accepts only the “String” datatype (For e.g., sample).
DateTime: It accepts only the “DateTime” datatype. (For e.g., 01/01/2001 12:00 AM).
Double: It accepts only the “Double” datatype. It refers to the floating-point and decimal values.  (For e.g., 123.456 or -3.145).

DefaultValue:Indicate the “Default value” that should be automatically filled for the column values. This value will be consistent for all rows in the column.
You can only assign “default values” to the columns; it’s not possible to add multiple values. This field only accepts the “string” data type.

Name:Provide the “Header” for the column to be inserted into the table. This field only accepts the “string” data type.

Position:Indicate the “Position” for the column where it should be inserted. This refers to the “index” position to which the column needs to be added. This field only accepts the “int” data type.

MISC

DisplayName: Displays the name of the activity. It can also customize the activity name to helps in troubleshooting.

SkipOnError: It specifies whether to continue executing the workflow even if it throws an error. This supports only Boolean value “True or False”. By default, it is set to “False.”
True: Continues the workflow to the next step.
False: The workflow aborts if it throws any error.
None: If the option is specified as blank, by default the activity will perform as “False” action.
Version: It specifies the version of the Datatable automation feature in use.

OUTPUT

Result: It helps to view the execution state of the activity. It returns the values in Boolean format.
True: It indicates the activity has been executed successfully without any error.
False: It indicates that the activity has been faulted due to some unexceptional error thrown.

Represents mandatory fields to execute the workflow

12.2.3 AddNewRow

This activity helps to add or update with a “New row” to the “Existing input data table” during the runtime.

Properties

INPUT

AddEmptyRow: To include an “Empty row” in the existing “Input datatable,” select this option. When not selected, the empty row won’t be added.

DataTable: Enter the “Input datatable” variable where the input data is stored. This parameter helps you to add a new column. This field only accepts the “datatable” data type.

InputArray: Provide the necessary “Input values” for the “New Row.” These values should be specified using the “Array of Object” datatype. (For example: {“JOHN,32, Manager”}) You can employ either the “InputArray (hardcoded value)” or the “InputDataRow (variable)” option to introduce a new row.
This field only accepts the “Array of Object” datatype. If left empty, it will operate with the “InputDataRow” field if provided.

InputDataRow: Designate the “Data row” variable where the input values for the row are stored. This field exclusively accepts the “DataRow” datatype for the variable. If left empty, it will operate with the “InputArray” field if provided.

MISC

DisplayName: Displays the name of the activity. It can also customize the activity name to helps in troubleshooting.

SkipOnError: It specifies whether to continue executing the workflow even if it throws an error. This supports only Boolean value “True or False”. By default, it is set to “False.”
True: Continues the workflow to the next step.
False: The workflow aborts if it throws any error.
None: If the option is specified as blank, by default the activity will perform as “False” action.
Version:  It specifies the version of the Datatable automation feature in use.

OUTPUT

Result: It helps to view the execution state of the activity. It returns the values in Boolean format.
True: It indicates the activity has been executed successfully without any error.
False: It indicates that the activity has been faulted due to some unexceptional error thrown.

* Represents mandatory fields to execute the workflow. 

12.2.4 Build Datatable

This activity is used to create a DataTable with configurable rows and columns. It allows users to define the table structure by specifying column names, data types, and optionally adding initial rows of data for use within automation workflows.

Properties

Input

Datatable Wizard *:

Used to define the structure and content of the DataTable by configuring its columns and optional data rows.

Column Name: Specifies the name of the column to be added to the DataTable.

Data Type: Allows you to select the data type for the column from the dropdown list (e.g., String, Int32, Boolean, DateTime).

Allow Null: Specifies whether the column can contain null values.

Auto Increment: Enables automatic incrementation of numeric values for each new row (applicable for numeric columns only).

Default Value: Specifies the default value to be assigned if no data is provided for that column.

Unique: Indicates whether all values in the column must be unique.

Max Length: Defines the maximum number of characters allowed in the column (applicable for String datatype).

MISC

Display Name: Displays the name of the activity. The activity name can be customized, which aids in troubleshooting.

SkipOnError: Specify the “Boolean” value as “True” or “False.”

True: Continue executing the workflow regardless of any errors thrown.
False: Halt the workflow if it encounters any errors.
None: If the option is left blank, the activity will, by default, behave as if “False” were chosen.

Version: It indicates the version of the feature being used.

Output

Datatable: Returns the output as a structured table format with the input provided.

Result: This parameter allows you to view the execution status of the activity and returns a value in “Boolean.”

True: Indicates that the activity has been executed successfully without any errors.
False: Indicates that the activity has been unsuccessful due to an unexpected error being thrown

Represents mandatory fields to execute the workflow.

Note: 

This activity cannot be used at runtime to dynamically pass values for building a DataTable. To create or generate a DataTable during runtime, use the Generate Table From Text activity instead.

12.2.5 ClearTable

This activity assists the user in clearing the “Data” from the designated “Datatable.” It facilitates the resetting of the “Datatable” to its original state, primarily for troubleshooting purposes, especially when the execution is within a loop.

Properties

INPUT

DataTable:* Enter the “Input datatable” variable where the input data is stored. This parameter helps you to clear the data. This field only accepts the “datatable” data type.

MISC

DisplayName: Displays the name of the activity. It can also customize the activity name to helps in troubleshooting.

SkipOnError: It specifies whether to continue executing the workflow even if it throws an error. This supports only Boolean value “True or False”. By default, it is set to “False.”
True: Continues the workflow to the next step.
False: The workflow aborts if it throws any error.
None: If the option is specified as blank, by default the activity will perform as “False” action.
Version: It specifies the version of the Datatable automation feature in use.

OUTPUT

Result: It helps to view the execution state of the activity. It returns the values in Boolean format.
True: It indicates the activity has been executed successfully without any error.
False: It indicates that the activity has been faulted due to some unexceptional error thrown.

* Represents mandatory fields to execute the workflow

12.2.6 Compare Datatable

This activity helps the user to compare between two datatables and provides the updated, modified or findings as result.

Properties

Input

Compare Type: Specifies how the rows in the DataTable are compared during matching or lookup operations.

Full: Compares all columns in the DataTable. A row is considered a match only when every column value is identical between the compared rows.
Primary Key: Compares rows using only the primary key column(s). If the primary key matches, the row is considered a match, even if other column values are different.

Ignore Case: When enabled, it ignores letter casing while searching. Uppercase and lowercase letters are treated the same when matching values.

Ignore Order: Compares rows without considering their position in the DataTable. Even if the rows appear in a different order, they are still treated as matching based on the comparison type.

Key Columns: Specifies the columns used to identify and match values and accepts the list of column names in List of String format.

Source Datatable*: Specifies the source DataTable that contains the values to be matched.

Target Datatable*: Specifies the target DataTable where the matching values will be searched.

MISC

Display Name: Displays the name of the activity. The activity name can be customized, which aids in troubleshooting.

SkipOnError: Specify the “Boolean” value as “True” or “False.”

True: Continue executing the workflow regardless of any errors thrown.
False: Halt the workflow if it encounters any errors.
None: If the option is left blank, the activity will, by default, behave as if “False” were chosen.

Version: It indicates the version of the feature being used.

Output

Added Rows: Returns the rows that exist in the target table but not in the source table in a structured DataTable format.

Modified Rows: Returns the rows that have changed when comparing the target table against the source table in a structured DataTable format.

Removed Rows: Returns the rows that were present in the source table but are missing in the target table in a structured DataTable format

Unchanged Rows: Returns the rows that are identical in both the source and target tables in a structured DataTable format..

Result: This parameter allows you to view the execution status of the activity and returns a value in “Boolean.”

True: Indicates that the activity has been executed successfully without any errors.
False: Indicates that the activity has been unsuccessful due to an unexpected error being thrown.

* Represents mandatory fields to execute the workflow.

12.2.7 DatasetViewer

The activity can be executed only in debug mode. It helps the user to view the “Dataset values” in a table format.

DataSet vs DataTable

“Datatables” are employed to store data comprising “Rows and Columns” and cannot accommodate multiple datatable values. On the other hand, a “Dataset” is utilized to contain multiple “data tables” with distinct relationships.

Properties

INPUT

ExpirySecs: Indicate the duration in seconds for which the dataset table should be displayed.
Provide the time value in seconds. The default setting is “10 seconds.”This field only accepts the “Integer32” datatype.

InputDataset:*  Enter the “Input dataset” variable where the input data is stored. This parameter helps you to view the input from the table. This field only accepts the “dataset” data type.

MessageTitle:* Specify the “Title” for the “Dataset” table. This field accepts only “String” datatype.

MISC

DisplayName: Displays the name of the activity. The activity name can also be customized to help in troubleshooting.

SkipOnError: It specifies whether to continue executing the workflow even if it throws an error. This supports only Boolean value “True or False”. By default, it is set to “False.”
True: Continues the workflow to the next step.
False: The workflow aborts if it throws any error.ZNone: If the option is specified as blank, by default the activity will perform as “False” action.
Version: It specifies the version of the Datatable automation feature in use.

OUTPUT

Result: It helps to view the execution state of the activity. It returns the values in Boolean format.
True: It indicates the activity has been executed successfully without any error.
False: It indicates that the activity has been faulted due to some unexceptional error thrown.

* Represents mandatory fields to execute the workflow.

12.2.8 DatatableToHtmlFile

This activity helps the user to convert the “datatable” to “Html file.” The HTML file can be used for further analysis or visualization.

Properties

INPUT

AuthorName:Enter the desired “File Name” where the converted table should be saved. This field only accepts the “String” datatype.

Datatable:  Enter the “Input datatable” variable where the input data is stored. This parameter helps you to convert the “datatable” to “Htmlfile”. This field only accepts the “datatable” data type.

FilePath: Provide the “File path” for storing the converted “HTML file,” along with the desired file name.

For example: “C:\Users<Username>\Desktop\Notes\Sample”. This field only accepts the “string” datatype.

MISC

DisplayName: Displays the name of the activity. It can also customize the activity name to helps in troubleshooting.

SkipOnError: It specifies whether to continue executing the workflow even if it throws an error. This supports only Boolean value “True or False”. By default, it is set to “False.”
True: Continues the workflow to the next step
False: The workflow aborts if it throws any error.
None: If the option is specified as blank, by default the activity will perform as “False” action.
Version: It specifies the version of the Datatable automation feature in use.

OUTPUT

Result: It helps to view the execution state of the activity. It returns the values in Boolean format.
True: It indicates the activity has been executed successfully without any error.
False: It indicates that the activity has been faulted due to some unexceptional error thrown.

* Represents mandatory fields to execute the workflow.

12.2.9 FilterTable

This activity can be used to filter a “specific value” either by restricting or excluding the “Rows or columns” from the “Input datatable.”

Properties

INPUT

ColumnFilterMode: It gets auto filled once the option is selected in the “Filter Wizard” window. Select the options from the drop-down to filter the “column.”
Keep: It enables to display only the specified “Column and its values”.
Remove: It enables to remove only the specified “Column value” from the table.

InDatatable:* Enter the “Input datatable” variable where the input data is stored. This parameter helps you to filter the “Rows/ Columns” from the table. This field only accepts the “datatable” data type.

RowFilterMode: It gets auto filled once the option is selected in the “Filter Wizard” window. Select the options from the drop-down to filter the row.
Keep: It enables to display only the specified “Row and its values.”
Remove: It enables to remove only the specified “Row value” from the table.

MISC

Display Name: Displays the name of the activity. It can also customize the activity name to helps in troubleshooting.

FilterRowQuery: It gets auto filled once the “Row’s values” are specified in the filter wizard box. It indicates “Query” to the filter the rows from the table. This field accepts only “String” datatype. When left blank, it will throw an exception to provide the “RowQuery” if either the “Rows” or “Columns” are not specified.

SkipOnError: It specifies whether to continue executing the workflow even if it throws an error. This supports only Boolean value “True or False”. By default, it is set to “False.”
True: Continues the workflow to the next step
False: The workflow aborts if it throws any error.
None: If the option is specified as blank, by default the activity will perform as “False” action.

Version: It specifies the version of the Datatable automation feature in use

OUTPUT

OutDatatable:* It helps to view the output of the activity after filtering the rows and columns in a “Datatable” datatype. (Refer the steps below to create a variable)

*Represents Mandatory field to execute the workflow

Filter Wizard

1. Drag and drop the “Filter” activity from the Datatable Automation.
2. Double click on the activity and choose the “Filter wizard” option. 
3. The filter wizard will have two tabs such as “Filter rows” and “Limit columns”.
a. Limit columns:
    i. It enables column filtering, either restricting the view to specified columns or excluding specified columns from the table. This tab has two options,

    ii.  Keep – This option displays only the specified columns.
   iii. Remove– This option eliminates the specified columns. 
   iv. Specify the “Column” name from the “Input Datatable”. Multiple columns can be filtered by choosing the “+” button to add more columns from the table.

   v.  Select either to keep or remove the columns.
   vi. Once done, click on “OK” button.

b. Filter Rows: It enables row filtering, either restricting the view to specified rows or excluding the specified rows from the table.
     i. This tab has two options,
    ii. Keep – This option displays only the specified rows.
c. Remove– This option eliminates the specified rows.
i. Specify the “Column” name from the “Input Datatable”.

Operations available in Filter wizard:

  1. Choose the operation from the drop-down.
  2. < : It validates to check whether the provided “ColumnName” is lesser than the specified “RowValue”.
  3. >: It validates to check whether the provided “ColumnName” is greater than the specified  “RowValue”.
  4. <= : It validates to check whether the provided “ColumnName” is lesser than or equal to the specified “RowValue”.
  5. >= : It validates to check whether the provided “ColumnName” is greater than or equal to the specified “RowValue”.
  6. = : It validates to check whether the provided “ColumnName” is equal to the specified “RowValue”.
  7. != : It validates to check whether the provided “ColumnName” is not equal to the specified “RowValue”.
  8. IsEmpty: It validates to check whether the provided “ColumnName” is empty.
  9. IsNotEMPTY: It validates to check whether the provided “ColumnName” is not empty.
  10. StartsWith: It validates to check whether the provided “ColumnName” starts with the specified value.
  11. EndsWith: It validates to check whether the provided “ColumnName” ends with the specified value.
  12. Contains: It validates to check whether the provided “ColumnName” contains with the specified value.
  13. DoesNotStartwith: It validates to check whether the provided “ColumnName” does not starts with the specified value.
  14. DoesNotEndWith: It validates to check whether the provided “ColumnName” does not ends with the specified value.
  15. DoesNotContain: It validates to check whether the provided “ColumnName” does not contains the specified value.
    i.  Multiple columns can be filtered by choosing the “+” button to add more columns from the table.
    ii. Select either to keep or remove the columns.
    iii.Once done, click on “OK” button.

12.2.10 Find or Replace

This activity allows users to search for a specified value in the input datatable and replace it with another value.

Properties

INPUT

Input Datatable: Specifies to provide the input datatable to search within the provided range in the sheet.

Match Case: Ensures that the search matches the case (uppercase or lowercase) of the provided value exactly.

Operation: Specifies the operation to be performed in the Datatable.
Available options:

a. Find:Finds and returns the first matching value.
b. Find All:Finds and returns all matching values.
c. Replace: Finds and replaces the first matching value.
d. Replace All: Finds and replaces all matching values.

Find Value*: Specifies the input value to be searched within the datatable. Accepts values in String datatype.

Replace Value*: Specifies the value to replace the found text with. This parameter is applicable only when Replace or Replace All is selected. Accepts values in String datatype.

Column Names*: Specifies to provide the column name where the operation is to be performed in comma separated values. Accepts values in String datatype.

e.g.( Name, Age, City)

MISC

Display Name: Displays the name of the activity. The activity name can be customized, which aids in troubleshooting.

SkipOnError: Specify the “Boolean” value as “True” or “False.”

True: Continue executing the workflow regardless of any errors thrown.
False: Halt the workflow if it encounters any errors.
None: If the option is left blank, the activity will, by default, behave as if “False” were chosen.

Version: It indicates the version of the feature being used.

Output

Count: Returns the number of matched values found in the input DataTable in type of Int32.

Found Location: Returns the row index or column index where the first matched value is found in String format.

Found Locations: Returns all row or column indexes where the matched values are found in List of String datatype.

Updated Datatable: Returns the output with the updated values in a structured table format.

Result: This parameter allows you to view the execution status of the activity and returns a value in “Boolean.”

True: Indicates that the activity has been executed successfully without any errors.
False: Indicates that the activity has been unsuccessful due to an unexpected error being thrown.

* Represents mandatory fields to execute the workflow.


12.2.11 Generate Datatable from Text

This activity creates a DataTable in a structured format from the provided raw text. It helps organize the data and allows users to customize it as needed.

Properties

Fixed formatting option

Column Sizes: Specifies the width of the column if required. E.g., “12,13,14”. This option will be enabled only when the “Fixed width column” is used.

Formatting Options

Column Separator: Specifies how columns in the input data are separated. Options available in the dropdown:

Space – Separates columns with a space.
Tab – Separates columns with a tab.
New Line – Places each column on a new line.
Comma (,) – Separates columns with a comma.
Colon (:) – Separates columns with a colon.
Semicolon (;) – Separates columns with a semicolon.
Equals (=) – Separates columns with an equals sign.

Csv Parsing: Enable this option when the input data are separated by comma values. Set True to enable the option and False to skip it. You can also configure them from the Generate Table Wizard by checking the corresponding boxes.

New Line Separator: Specifies how rows in the input data are separated. Options available:

Space – Separates rows with a space.
Tab – Separates rows with a tab.
New Line – Places each row on a new line.

Input

Input: Specifies the input data in the sample input area. Accepts values in String format.

You can provide text values either as a hardcoded string or as a variable.

Note: File paths are not allowed as input.

Misc

Display Name: The display name of the activity. This can be customized to make workflows easier to understand and troubleshoot.

SkipOnError: Accepts a Boolean value (True or False).

True: Continues executing the workflow even if an error occurs.

False: Stops the workflow when an error occurs.

None: If left blank, the default behavior is the same as False.

Output

DataTable: Returns the output as a DataTable, converting the provided input into a structured table.

Table Options

(For the properties below, set True to enable the option and False to skip it. You can also configure them from the Generate Table Wizard by checking the corresponding boxes.)

Auto Detect Types: Automatically detects the data types of column values.

Ignore First Column: Ignores the values in the first column of the input data.

Include Column Headers: Uses the first row of the input as column headers.

Limitations

The column separator and new line separator accept values in String format in the property window, such as:

1. “comma” or “,”
2. “
“[newline]”

When using symbols, only single characters (; , =) are allowed. Therefore, values like \n or \t are not supported.

Example

Let’s look at an example of how to generate a DataTable from text. Assume we have a text file containing unstructured data about the number of tickets. Using the “Generate datatable from text” activity, we are going to create a structured table.

Follow the steps below:

1. Drag and drop the Read Text activity into the workflow.

a. In the File path property, provide the path of the input text file.
b. In the Output section, declare a variable to store the extracted text.

2. Add the Generate DataTable from Text activity into the workflow.

a. In the Input property, assign the variable created in the Read Text activity.
b. Set the CSV Parsing property to True, and in the Column separator property, specify Comma.
c. In the Output section, declare a variable to store the resulting DataTable.

3. Finally, add a Table Viewer activity to the workflow and provide the DataTable variable created above as input.

The bot extracts the content from the text file and passes it to the Generate DataTable activity to create a DataTable from scratch. Click here to view the sample file.

Using Generate Table Wizard for formatting

The Generate Table Wizard feature allows users to easily create and preview a DataTable from a given sample input. It provides options to define the table’s structure, format, and alignment, ensuring the generated DataTable is accurate and ready for use in the workflow.

To access the wizard, double-click on the activity and select the “Options” button, now you can enter your input data and customize the formatting.

Key Steps:

1. Enter your sample data or paste existing content into the input area.
2. Use the available formatting tools to adjust column alignment, headers, and delimiters for structured output.
3. Click the Preview button to visualize how your DataTable will appear before generating it.
4. Once completed with the formatting, save the changes to generate a clean and properly structured DataTable.

Additional Notes:

1. Refer to the Properties panel for detailed descriptions of the options available in the Wizard.
2. If the format is set to CSV, only the Column Separator option will be available.
3. If the format is set to Custom, both Column Separator and New Line Separator options will be available.
4. If the format is set to Fixed Width Columns, the Column Widths option will be available.

Troubleshooting steps

Using Custom Data in Generate DataTable from Text

1. If your input text does not follow a standard format like CSV, you can define your own custom separators.
2. Use the Column Separator property to specify how values in each row are divided (e.g., ;, or tab).
3. Use the New Line Separator property to specify how each row of data is separated (e.g., \n for line breaks).
4. You can set these values directly in the Properties panel or through the Generate DataTable Wizard.

Example:
If your text looks like this:

ID Name Department 

1 John Finance 

2 Emma HR 

a. Set Column Separator = space
b. Set New Line Separator = \n

This will generate a structured DataTable with the correct columns and rows.

Handling Improperly Formatted Text (via Variable)

When you pass text from a variable into the Generate DataTable from Text activity, the output depends on how the text is formatted. If the format is not proper (e.g., inconsistent separators, extra spaces, or line breaks), the DataTable may not generate correctly.

How to Correct It:

1. Ensure the text in the variable uses a consistent structure (e.g., all values separated by commas, pipes, or tabs).
2. Use activities to Replace, Trim to remove unwanted spaces, extra lines, or incorrect characters.
3. If your text doesn’t use commas, configure the Column Separator and New Line Separator properties with the correct delimiters.

Note: You don’t need to customize every time manually. Once you define separators or clean the text, the activity will generate the table consistently.

1. “Column” already belongs to the datatable – occurs when,

a. Your input text or raw CSV data contains the same column name more than once.
b. The Generate DataTable from Text activity automatically tries to create DataTable columns, but DataTables don’t allow duplicate names.

How to correct it:

a. Always make sure the input data has unique column names.
b. If the source data contains duplicate columns, rename or manually check them before converting into a DataTable.

12.2.12 JoinDatatable

This activity can be used to join two tables with similar data columns from the input tables.

Properties

INPUT

DataTable1: *Specify the “datatable” variable where the input data is stored. This parameter helps you to provide the first “datatable” to join the values. This field accepts only “Datatable” datatype.

DataTable2: *Specify the “datatable” variable where the input data is stored. This parameter helps you to provide the second “datatable” to join the values. This field accepts only “Datatable” datatype.

JoinType:* Choose options from the dropdown to select the join type.
Full: Joins all rows from two tables regardless of whether the specified condition is met. Null values are added if data is not available in the datatable.
Left: Joins values meeting the condition from the second datatable. Null values are added to “Datatable1” if no values match the rows from “Datatable2”.
Inner: Joins all values from both tables and removes rows that don’t meet the condition. (For more details, refer to the document below.)

MISC

DisplayName: Displays the name of the activity. The activity name can also be customized to help in troubleshooting.

SkipOnError: It specifies whether to continue executing the workflow even if it throws an error. This supports only Boolean value “True or False”. By default, it is set to “False.”
True: Continues the workflow to the next step.
False: The workflow aborts if it throws any error.
None: If the option is specified as blank, by default the activity will perform as “False” action.
Version: It specifies the version of the Datatable automation feature in use.

OUTPUT

DataTable:* It helps to view the output of the activity after joining the rows in a “Datatable” datatype. (Refer the steps below to create a variable).

Result: It helps to view the execution state of the activity. It returns the values in Boolean format.

* Represents mandatory fields to execute the workflow.

Utilization of Join Table Wizard:
1. Double click on the activity and provide the input datatable for “Datatable1”.
2. Specify the input datatable for “Datatable2”.
3. Click on the three lines adjacent to the “DataTable1” and choose the “Edit wizard” option
4. The wizard contains three sections-
a. To provide “Input” datatables and choose the “Join Type.”
b. To provide the “Output” datatable to view the joined table.
c. To specify the “Condition” that needs to be met while joining the tables.
5. In the condition section, you need to start “=” operation as default.
a. The following are the conditions that are available,
<: It validates to check whether the provided “ColumnName” is lesser than the specified “ColumnName” in the DataTable2.
>: It validates to check whether the provided “ColumnName” is greater than the specified “ColumnName” in the DataTable2.
<=: It validates to check whether the provided “ColumnName” is lesser than or equal to the specified “ColumnName” in the DataTable2.
>=: It validates to check whether the provided “ColumnName” is greater than or equal to the specified “ColumnName” in the DataTable2.
=: It validates to check whether the provided “ColumnName” is equal to the specified “ColumnName” in the DataTable2.
6. Specify the “Output datatable” variable and click on “Save”.

12.2.13 Lookup Datatable

This activity allows the user to search for a specific value within a provided DataTable and retrieve the corresponding value from a specified target column in the same row.

Properties

Input

DataTable: *Specifies the input DataTable from which the lookup operation will be performed.

Lookup Value: *Specifies the value to be searched within the specified lookup column. Accepts values in String datatype

Lookup Column

The properties below let you specify the column to search the value from. Provide any one of the following.

Column: Specifies the DataColumn object where the column name is stored. Accepts values in DataColumn datatype.

Column Name: *Specifies the name of the column in which the lookup needs to be performed. Accepts values in String datatype.

Column Number: Specifies the index position of the column within the input DataTable. Accepts values in Int32 datatype. The index position starts from

Target Column

The properties below specify the target column from which the value should be retrieved for the matched lookup value. Provide any one of the following.

Column: Specifies the DataColumn object where the target column name is stored. Accepts values in DataColumn datatype.

Target Column Name: *Specifies the name of the column from which the value should be retrieved. Accepts values in String datatype.

Column Number: Specifies the index position of the target column within the input DataTable. Accepts values in Int32 datatype. The index position starts from 0.

MISC

Display Name: Displays the name of the activity. The activity name can be customized, which aids in troubleshooting.

SkipOnError: Specify the “Boolean” value as “True” or “False.”

True: Continue executing the workflow regardless of any errors thrown.
False: Halt the workflow if it encounters any errors.
None: If the option is left blank, the activity will, by default, behave as if “False” were chosen.

Version: It indicates the version of the feature being used.

Output

Cell value: Returns the value retrieved from the corresponding target column for the specified lookup value. The output is returned in String datatype.

Row Index: Returns the row index of the identified cell value from the target column. The output is returned in Int32 datatype.

Result: This parameter allows you to view the execution status of the activity and returns a value in “Boolean.”

True: Indicates that the activity has been executed successfully without any errors.
False: Indicates that the activity has been unsuccessful due to an unexpected error being thrown

* Represents mandatory fields to execute the workflow.

12.2.14 MergeTable

The Merge Datatable activity allows users to merge two datatable variables into a single output datatable. This activity supports schema-based control over how the merge handles differences in table structure and duplicate data.

Purpose
The purpose of the Merge Datatable activity is to:
       1. Combine data from two datatables into one.
       2. Handle schema differences between datatables.
       3. Control how duplicate and mismatched data is processed

Properties

INPUT

MissingSchemaAction*: Specifies the action to perform when there are schema differences while merging the datatables.
Select one of the following options from the drop-down list:
 a. Add: Merges all data from both datatables, even if the number of columns differs. Any missing columns are added automatically.
 b. Error: Merges the datatables only if their schemas match. If any schema mismatch is detected, the activity throws an error.
 c. Ignore: Ignores non-common columns and merges only the data that exists in both datatables.
 d. AddWithKey: Merges the datatables based on a validated primary key to avoid duplicate rows.

Table1*: Represents the Source Datatable. Provide the input datatable variable that contains the data to be merged into Table2.
Table2*: Represents the Destination Datatable. Provide the input datatable variable into which Table1 will be merged.
Note: Table1 and Table2 fields accept only the Datatable data type.

MISC

DisplayName: Displays the name of the activity. It can also customize the activity name to helps in troubleshooting.
SkipOnError: Determines whether the workflow should continue execution if the activity encounters an error. This property accepts Boolean values.
True – Continues execution to the next activity
False – Stops the workflow if an error occurs
None – Defaults to False behavior
Version: It specifies the version of the Datatable automation feature being used.

OUTPUT

Table: Returns the merged result as a Datatable.
Result: Indicates the execution status of the activity. It returns the values in Boolean format.
True – The activity executed successfully
False – The activity failed due to an error

* Represents mandatory fields required to execute the workflow.

How It Works

1. Table1 is treated as the source datatable. 
2. Table2 is treated as the destination datatable.
3. The merge operation is performed based on the selected MissingSchemaAction.
4. The final merged data is returned as a single output datatable.

12.2.15 OutputTable

This activity helps the user to convert the “Datatable” into “String” datatype.

Properties

INPUT

Table:* Enter the “Input datatable” variable where the input data is stored. This parameter helps you to convert the “datatable” to “String”. This field only accepts the “datatable” data type.

MISC

DisplayName: Displays the name of the activity. The activity name can also be customized to help in troubleshooting.

SkipOnError: It specifies whether to continue executing the workflow even if it throws an error. This supports only Boolean value “True or False”. By default, it is set to “False.”
True: Continues the workflow to the next step.
False: The workflow aborts if it throws any error.
None: If the option is specified as blank, by default the activity will perform as “False” action.
Version: It specifies the version of the Datatable automation feature in use.

OUTPUT

Result: It helps to view the execution state of the activity. It returns the values in Boolean format.

Text:* It helps to view the output of the activity as the converted table in the “String” format. (Refer the steps below to create a variable).

* Represents mandatory fields to execute the workflow.

12.2.16 RemoveColumn

This activity helps to remove a specified “Column” from the “Input datatable.”

Properties

INPUT

ColumnName:* Enter the “Column name” to remove from the “Input datatable.” Provide the column name within double quotes or input the variable in “string” datatype where the column name is stored. This field only accepts data in “String” datatype. If left blank, it will work with the “DataColumn” field if provided.

Datacolumn:* Enter the “Data column” where the input is stored to remove from the table. You can employ either the “ColumnName (hardcoded value)” or the “DataColumn (variable)” option to remove a column. This field accepts only “Datacolumn” datatype.
If left blank, it will work with the “DataColumn” field if provided.

DataColumnIndex:*  Specify the “Index” position of the data column within the “Datatable” that you want to remove. The index position starts from 0. This field accepts only “Integer” datatype. 

Datatable:* Enter the “Input datatable” variable where the input data is stored. This parameter helps you to remove the “Column” from the “datatable”. This field only accepts the “datatable” data type.

MISC

DisplayName: Displays the name of the activity. The activity name can also be customized to help in troubleshooting.

SkipOnError: It specifies whether to continue executing the workflow even if it throws an error. This supports only Boolean value “True or False”. By default, it is set to “False.”
True: Continues the workflow to the next step
False: The workflow aborts if it throws any error.
None: If the option is specified as blank, by default the activity will perform as “False” action.
Version: It specifies the version of the Datatable automation feature in use.

OUTPUT

Result: It helps to view the execution state of the activity. It returns the values in Boolean format.
True: It indicates the activity has been executed successfully without any error.
False: It indicates that the activity has been faulted due to some unexceptional error thrown.

* Represents mandatory fields to execute the workflow.

12.2.17 RemoveDuplicateRow

This activity helps to remove the “duplicate row” from the input “datatable.”

Properties

INPUT

Table:*  Enter the “Input datatable” variable where the input data is stored. This parameter helps you to remove the “Duplicate rows” from the “datatable”. This field only accepts the “datatable” data type.

MISC

DisplayName: Displays the name of the activity. It can also customize the activity name to helps in troubleshooting.

SkipOnError: It specifies whether to continue executing the workflow even if it throws an error. This supports only Boolean value “True or False”. By default, it is set to “False.”
True: Continues the workflow to the next step.
False: The workflow aborts if it throws any error.
None: If the option is specified as blank, by default the activity will perform as “False” action.
Version: It specifies the version of the Datatable automation feature in use.

OUTPUT

Result: It helps to view the execution state of the activity. It returns the values in Boolean format.
True: It indicates the activity has been executed successfully without any error.
False: It indicates that the activity has been faulted due to some unexceptional error thrown.

Represents mandatory fields to execute the workflow.

12.2.18 RemoveRow

This activity helps the user to remove a specified “Row” from the “input datatable.”

Properties

INPUT

Datarow:* Enter the “Data Row” variable where the input is stored to remove from the table. You can employ either the “Datarow (variable)” or the “DataRowIndex (hardcoded value)” option to remove a column. This field accepts only “DataRow” datatype. If left blank, it will work with the “DataRowIndex” field if provided.

DataRowIndex:Specify the “Index” position of the data row within the “Datatable” that you want to remove. The index position starts from 0. This field accepts only “Integer” datatype.  If left blank, it will work with the “DataRow” field if provided.

Datatable:*  Enter the “Input datatable” variable where the input data is stored. This parameter helps you to remove the “Row” from the “datatable”. This field only accepts the “datatable” data type. 

MISC

DisplayName: Displays the name of the activity. It can also customize the activity name to helps in troubleshooting.

SkipOnError: It specifies whether to continue executing the workflow even if it throws an error. This supports only Boolean value “True or False”. By default, it is set to “False.”
True: Continues the workflow to the next step.
False: The workflow aborts if it throws any error.
None: If the option is specified as blank, by default the activity will perform as “False” action.
Version: It specifies the version of the Datatable automation feature in use.

OUTPUT

Result: It helps to view the execution state of the activity. It returns the values in Boolean format.
True: It indicates the activity has been executed successfully without any error.
False: It indicates that the activity has been faulted due to some unexceptional error thrown.

* Represents mandatory fields to execute the workflow.


12.2.19 Sort

This activity helps the user to sort the column’s value in the table either in ascending or descending order.

Properties

INPUT

Column Name: *Enter the “Column name” to sort from the “Input datatable. “Provide the column name within double quotes or input the variable in “string” datatype where the column name is stored.
This field only accepts data in “String” datatype.

SortAs:* This option determines the sorting order for the “Columns.” Choose the order from the dropdown:
Ascending: Sorts in ascending order from smallest to largest or A to Z based on values.
Descending: Sorts in descending order from largest to smallest or Z to A based on values.

Table:*  Enter the “Input datatable” variable where the input data is stored this parameter helps you to sort the “Column” from the “datatable”.
This field only accepts the “datatable” data type.

MISC

DisplayName: Displays the name of the activity. The activity name can also be customized to help in troubleshooting.

SkipOnError: It specifies whether to continue executing the workflow even if it throws an error. This supports only Boolean value “True or False”. By default, it is set to “False.”
True: Continues the workflow to the next step.
False: The workflow aborts if it throws any error.
None: If the option is specified as blank, by default the activity will perform as “False” action.
Version: It specifies the version of the Datatable automation feature in use.

OUTPUT

Result: It helps to view the execution state of the activity. It returns the values in Boolean format.
True: It indicates the activity has been executed successfully without any error.
False: It indicates that the activity has been faulted due to some unexceptional error thrown.

SortDt:*  It helps to view the output of the activity as the “Sorted” columns in a “Datatable” datatype. (Refer the steps below to create a variable).

* Represents mandatory fields to execute the workflow.

12.2.20 TableViewer

This activity assists in displaying the records of the “datatable” in a tabular format. It is useful for debugging purposes, enabling users to review the values within the “datatable” before the workflow progresses. This helps in identifying errors or incorrect data within the datatable.

Properties

INPUT

ExpirySecs: Indicate the duration in seconds for which the dataset table should be displayed. Provide the time value in seconds. The default setting is “5 seconds.” This field only accepts the “Integer32” datatype.

InputTable:* Enter the “Input datatable” variable where the input data is stored. This parameter helps you to view the “datatable”.
This field only accepts the “datatable” data type.

MessageTitle:* Specify the “Title” for the “Dataset” table. This field accepts only “String” datatype. 

MISC

DisplayName: Displays the name of the activity. The activity name can also be customized to help in troubleshooting.

SkipOnError: It specifies whether to continue executing the workflow even if it throws an error. This supports only Boolean value “True or False”. By default, it is set to “False.”
True: Continues the workflow to the next step
False: The workflow aborts if it throws any error.
None: If the option is specified as blank, by default the activity will perform as “False” action.
Version: It specifies the version of the Datatable automation feature in use.

OUTPUT

Result: It helps to view the execution state of the activity. It returns the values in Boolean format.
True: It indicates the activity has been executed successfully without any error.
False: It indicates that the activity has been faulted due to some unexceptional error thrown.

* Represents mandatory fields to execute the workflow.

12.2.21 Update row item

This activity allows the user to update the value of a specific row in the specified DataTable.

Properties

Input

DataTable*: Specifies the input DataTable in which the row value must be updated. It accepts values in  DataTable variable.

Row*: Specifies the DataRow to be updated and accepts values in DataRow variable where the new value will be applied.

Value*: Specifies the new value to be assigned. It accepts a String data type, and you can provide the value directly in string format.

Misc

Display Name: The display name of the activity. This can be customized to make workflows easier to understand and troubleshoot.

SkipOnError: Specify the “Boolean” value as “True” or “False.”

True: Continue executing the workflow regardless of any errors thrown.
False: Halt the workflow if it encounters any errors.
None: If the option is left blank, the activity will, by default, behave as if “False” were chosen.

Version: It indicates the version of the feature being used.

Output

Datatable: Returns the output with the updated row in a structured table format with the input provided.

Result: This parameter allows you to view the execution status of the activity and returns a value in “Boolean.”

True: Indicates that the activity has been executed successfully without any errors.
False: Indicates that the activity has been unsuccessful due to an unexpected error being thrown

* Represents mandatory fields to execute the workflow.

How to Get DataRow?

The Update Row Item activity requires an input of type DataRow. To retrieve a DataRow variable, follow the steps below:

  1. Create or obtain a DataTable variable. Use activities that generate or extract a DataTable.
  2. Add a For Each Row activity to iterate through the DataTable. This loop provides each row as a DataRow variable.
  3. Use the DataRow variable within the loop as the input for the Update Row Item activity.


12.3 Delay

Introduction

The delay feature allows for adding wait time while executing the bot. It waits for a specified amount of time before proceeding to the next activity. 

This functionality is particularly useful for scenarios where synchronization or pacing between automated actions is necessary, ensuring a smooth and controlled workflow.

Benefits

Synchronization: Delay can be used to synchronize actions in a process, ensuring that one action completes before the next one starts. This is particularly useful when dealing with applications or systems that require a specific response time between interactions.

 Error Handling: Introducing delays can help manage exceptions and errors that may occur during automation. For example, a delay can give time for a system to respond before proceeding with error handling routines.

 Human Emulation: By incorporating delays, RPA bots can mimic human behavior more accurately. Humans don’t always perform actions instantly; they often pause between tasks, and delays can simulate this natural behavior.

System Performance: Delays can be used to manage system performance issues, such as preventing overload or reducing the load on target systems by spacing out interactions.

12.3.1 Delay Automation

This activity enables the user to utilize it when there is a need to introduce a delay between activities. It can be set at any point within the workflow.

Properties

DisplayName: Displays the name of the activity. The activity name can be customized, which aids in troubleshooting.

Version: It indicates the version of the feature being used.

12.4 FS Automation

Introduction

File System (FS) automation involves automating interactions with files and folders on a computer’s file system. This also involves managing and manipulation of files and directories inside a computer’s file system.

Supported File Systems

FS automation supports the following file systems:

1. Local Files: Files stored within local folders on the system.
2. Shared Network Paths: Files located on shared network paths, if appropriate access permissions have been granted.

Use Cases

1. Data Ingestion and Extraction: Bots can automatically ingest data from various file formats, such as spreadsheets or text files, and extract relevant information for further processing.
2. File Transfer and Synchronization: Automate the transfer of files between different systems or directories, ensuring data synchronization and maintaining consistency.
3. Data Backup and Archiving: Implement automated processes to regularly back up important files and archive data based on predefined criteria.
4. File Monitoring and Alerts: Implement automated monitoring of specific folders or files, triggering alerts or actions when certain conditions are met, such as the arrival of a new file.
5. Document Management: Automate document-related tasks, such as renaming files, organizing them into folders.

12.4.1 Release Notes

v.2.1.6

This release includes enhancements to dependent DLLs.

Enhancement

All dependent DLLs have been upgraded to the latest stable versions, enhancing security, performance, and workflow reliability. This update ensures smoother execution and maintains compatibility with both existing and new workflows.

Released Date: 09/03/2026

12.4.2 Beep

This activity helps the user to generate a beep sound or notification on the local system.

Properties

INPUT

Duration: *Specify the duration for the beep sound to be played. It accepts the values in “Milliseconds”. By default, the values will be set to 1000ms.

Volume: *Specify the number here to set the volume of the sound and it accepts the values in “Milliseconds”. By default, the values will be set to 1000ms. 

MISC

DisplayName: Displays the name of the activity. The activity name can be customized, which aids in troubleshooting.

SkipOnError: Specify the “Boolean” value as “True” or “False.”
True: Continue executing the workflow regardless of any errors thrown.
False: Halt the workflow if it encounters any errors.
None: If the option is left blank, the activity will, by default, behave as if “False” were chosen.

Version: It indicates the version of the feature being used.

OUTPUT

Result: This parameter allows you to view the execution status of the activity and returns a value in “Boolean.”
True: Indicates that the activity has been executed successfully without any errors.
False: Indicates that the activity has been unsuccessful due to an unexpected error being thrown

* Represents mandatory fields to execute the workflow.

12.4.3 CopyFile

This activity helps the user to copy file from the respective location to another location specified with it. We can also copy read-only files from one location to another. We can also copy a file from a shared folder, granted we have access to it.

Properties

INPUT

From:* Specify the file path of the file to be copied. You can also select the file manually by selecting the three dots adjacent to the path. This accepts only “String” datatype.

OverWrite: Check this box if you want to overwrite a file, if it is already available in the path that you have chosen.
By default, it is unchecked. This means if the zipped file which we are trying to save to location is already available there, it wouldn’t get saved in that location.

To:Specify the file path to where the selected file needs to be pasted. You can also select the file manually by selecting the three dots adjacent to the activity. This accepts only “String” datatype.

MISC

DisplayName: Displays the name of the activity. The activity name can be customized, which aids in troubleshooting.

SkipOnError: Specify the “Boolean” value as “True” or “False.”
True: Continue executing the workflow regardless of any errors thrown.
False: Halt the workflow if it encounters any errors.
None: If the option is left blank, the activity will, by default, behave as if “False” were chosen.

Version: It indicates the version of the feature being used.

OUTPUT

Result: It provides the ability to view the execution status of the activity. It returns values in “Boolean.”
True: Indicates that the activity has been executed successfully without any errors.
False: Indicates that the activity has been unsuccessful due to an unexpected error being thrown.

Represents mandatory fields to execute the workflow.

12.4.4 Copy Folder

This activity is used to copy a folder from one location to another specified location even if the folder is in read-only format. We can also copy a file from a shared folder, granted we have access to it.

Properties

INPUT

From:Indicates to specify the path in which the folder to be copied is located. You have the option to either hardcode the values in the “String” variable or pass the values as “String” datatype. This accepts only the “String” datatype.

IncludeSubfolder: Check this box if the sub folders within the folders must be copied. If this box is left unchecked, only the files in the folder are copied to the given location and the folders inside this folder are not copied. By default, it is unchecked.

OverWrite: Check this box if you want to overwrite a file, if it is already available in the path that you have chosen.
By default, it is unchecked. This means if the zipped file which we are trying to save to location is already available there, it wouldn’t get saved in that location.

To:Specify the file path to where the selected file needs to be pasted. You can also select the file manually by selecting the three dots adjacent to the activity. This accepts only “String” datatype.

MISC

DisplayName: Displays the name of the activity. The activity name can be customized, which aids in troubleshooting.

SkipOnError: Specify the “Boolean” value as “True” or “False.”
True: Continue executing the workflow regardless of any errors thrown.
False: Halt the workflow if it encounters any errors.
None: If the option is left blank, the activity will, by default, behave as if “False” were chosen.

Version: It indicates the version of the feature being used.

OUTPUT

Result: It provides the ability to view the execution status of the activity. It returns values in “Boolean.”
True: Indicates that the activity has been executed successfully without any errors.
False: Indicates that the activity has been unsuccessful due to an unexpected error being thrown.

Represents mandatory fields to execute the workflow

12.4.5 CreateDirectory

This activity helps the user to create a new folder (Directory) in the specified path of the system.

Properties

INPUT

Name: *Provide a name for the folder to be created within double quotes. You have the option to either hardcode the values in the “String” variable or pass the values as “String” datatype. This accepts only the “String” datatype.

Path: *Specify the path where the folder needs to be created in double quotes or select it manually. You have the option to either hardcode the values in the “String” variable or pass the values as “String” datatype. This accepts only the “String” datatype.

MISC

DisplayName: Displays the name of the activity. The activity name can be customized, which aids in troubleshooting.

SkipOnError: Specify the “Boolean” value as “True” or “False.”
True: Continue executing the workflow regardless of any errors thrown.
False: Halt the workflow if it encounters any errors.
None: If the option is left blank, the activity will, by default, behave as if “False” were chosen.

Version: It indicates the version of the feature being used.

OUTPUT

Result: It provides the ability to view the execution status of the activity. It returns values in “Boolean.”
True: Indicates that the activity has been executed successfully without any errors.
False: Indicates that the activity has been unsuccessful due to an unexpected error being thrown.

Represents mandatory fields to execute the workflow.

12.4.6 CreateFile

This activity helps the user to create a new file in the specified location. We can also create a file in a shared folder, granted we have access to it.

Properties

INPUT

Extn:* “Specify the desired file type by selecting the appropriate extension for creation. From the dropdown, choose one of the following:
Txt: This option generates a Notepad document. It is the default selection.
Xlsx: This option enables the creation of an Excel spreadsheet document.
Docx: This option generates a Microsoft Word document compatible with versions from 2007 onwards.
Doc: This option enables the creation of a Word document for versions before 2007.”

FileName:Specify the name of the file to be created. It accepts the “String” datatype. You have the option to either hardcode the values in the “String” variable or pass the values as “String” datatype. This accepts only the “String” datatype.

FilePath:* Indicates to provide the path where the folder needs to be created. You have the option to either hardcode the values in the “String” variable or pass the values as “String” datatype. This accepts only the “String” datatype.

OverWright: When this parameter is checked, it allows you to overwrite the file. If the parameter is unchecked, the file will not be overwritten. By default, this parameter is unchecked.

MISC

DisplayName: Displays the name of the activity. The activity name can be customized, which aids in troubleshooting.

SkipOnError: Specify the “Boolean” value as “True” or “False.”
True: Continue executing the workflow regardless of any errors thrown.
False: Halt the workflow if it encounters any errors.
None: If the option is left blank, the activity will, by default, behave as if “False” were chosen.

Version: It indicates the version of the feature being used.

OUTPUT

Result: It provides the ability to view the execution status of the activity. It returns values in “Boolean.”
True: Indicates that the activity has been executed successfully without any errors.
False: Indicates that the activity has been unsuccessful due to an unexpected error being thrown.

Represents mandatory fields to execute the workflow.

12.4.7 DeleteDirectory

This activity helps the user to delete a folder (Directory) in the specified path. We can also delete a directory from a shared folder, granted we have access to it.

Properties

INPUT

DirectoryPath:* Specify the path from where the directory/folder needs to be deleted. You have the option to either hardcode the values in the “String” variable or pass the values as “String” datatype. This accepts only the “String” datatype.

OverWrite: Check this box if you want to overwrite a file, if it is already available in the path that you have chosen.
By default, it is unchecked. This means if the zipped file which we are trying to save to location is already available there, it wouldn’t get saved in that location.

To:Specify the file path to where the selected file needs to be pasted. You can also select the file manually by selecting the three dots adjacent to the activity. This accepts only “String” datatype.

MISC

DisplayName: Displays the name of the activity. The activity name can be customized, which aids in troubleshooting.

SkipOnError: Specify the “Boolean” value as “True” or “False.”
True: Continue executing the workflow regardless of any errors thrown.
False: Halt the workflow if it encounters any errors.
None: If the option is left blank, the activity will, by default, behave as if “False” were chosen.

Version: It indicates the version of the feature being used.

OUTPUT

Result: It provides the ability to view the execution status of the activity. It returns values in “Boolean.”
True: Indicates that the activity has been executed successfully without any errors.
False: Indicates that the activity has been unsuccessful due to an unexpected error being thrown.

Represents mandatory fields to execute the workflow

12.4.8 DeleteFile

This activity helps the user to delete a file from the specified location. We can also delete a file from a shared folder, granted we have access to it.

Properties

INPUT

FilePath:* Specify the path of the file which has to be deleted. You have the option to either hardcode the values in the “String” variable or pass the values as “String” datatype. This accepts only the “String” datatype.

MISC

DisplayName: Displays the name of the activity. The activity name can be customized, which aids in troubleshooting.

SkipOnError: Specify the “Boolean” value as “True” or “False.”
True: Continue executing the workflow regardless of any errors thrown.
False: Halt the workflow if it encounters any errors.
None: If the option is left blank, the activity will, by default, behave as if “False” were chosen.

Version: It indicates the version of the feature being used.

OUTPUT

Result: It provides the ability to view the execution status of the activity. It returns values in “Boolean.”
True: Indicates that the activity has been executed successfully without any errors.
False: Indicates that the activity has been unsuccessful due to an unexpected error being thrown.

Represents mandatory fields to execute the workflow

12.4.9 ForEach

This activity helps the user to perform bulk file operations in loop to read, extract, move and perform other operations with it. 

Properties

INPUT

Extension: This parameter indicates to provide the type of extension that needs to be extracted particularly. It accepts “String” datatype. You can either hardcode the values in “String” datatype or provide the value in String format. 

RootDirectory: *Indicates the provide the folder path for execution of file operations. It offers multiple ways to choose the folder:

1. Browse Option: When selecting the “Browse” option, it will automatically list the folders available for the specified account. The user must manually select the spreadsheet each time when using this option.
2. Variable option: You also have the option to provide the values in variable format. You can either hardcode the value in String datatype or provide the values in String format.

MISC

DisplayName: Displays the name of the activity. The activity name can be customized, which aids in troubleshooting.

SkipOnError: Specify the “Boolean” value as “True” or “False.”
True: Continue executing the workflow regardless of any errors thrown.
False: Halt the workflow if it encounters any errors.
None: If the option is left blank, the activity will, by default, behave as if “False” were chosen.

Version: It indicates the version of the feature being used.

OUTPUT

Output: It helps to view the output of the activity as the result of File path. It returns the values in “String” datatype. 

Result: It provides the ability to view the execution status of the activity. It returns values in “Boolean.”
True: Indicates that the activity has been executed successfully without any errors.
False: Indicates that the activity has been unsuccessful due to an unexpected error being thrown.

Represents mandatory fields to execute the workflow.

Property Configuration

Root Directory: Indicates the provide the folder path for execution of file operations.

Type/Extension (Optional): Users can limit the scope for the file system operation by including the file extensions here. The input should be string with only comma for separating multiple file extensions. Example jpg,png.

Include Subfolders (Optional): When enabled users can increase the scope of file operations by including all the sub folders under the selected root directory.

Skip and continue for access denied (Optional): This will log all the access denied errors and continue to the next file.

Advanced Options (Optional):

File Name: Use this option to configure an advanced filter to specify any conditions for the files to be read.
     a. And / OR condition: The “AND” function returns results that meet all specified conditions, while the “OR” function returns results that meet any of the specified conditions.

Size: Allows users to limit scope for file selection by its Size. Four conditions available equal to, Greater than, lesser than and range.

Created date: Allows users to limit the scope for file selection by file created date.  Four conditions available equal to, Greater than, lesser than and range.

Modified date: Allows users to limit the scope for file selection by file modified date.  Four conditions available equal to, Greater than, lesser than and range.

Limit number of files to: Integer input here is to limit the output file count to match this number.

12.4.10 GetFileInformation

This activity helps the user to retrieve detailed information about a specific file. It’s possible to obtain file information from a shared path as well, assuming access permissions are granted.

Properties

INPUT

FilePath: *This parameter specifies to provide the “Path” of the input file to extract the information. It accepts values in “String” datatype. 

MISC

DisplayName: Displays the name of the activity. The activity name can be customized, which aids in troubleshooting.

SkipOnError: Specify the “Boolean” value as “True” or “False.”
True: Continue executing the workflow regardless of any errors thrown.
False: Halt the workflow if it encounters any errors.
None: If the option is left blank, the activity will, by default, behave as if “False” were chosen.

Version: It indicates the version of the feature being used.

OUTPUT

Accessibility: This parameter returns the accessibility status of the specified file in a Boolean datatype.
True: Indicates the file is accessible during automation.
False: Indicates the file is not accessible due to insufficient permissions

AccessTime: This parameter enables you to retrieve the last accessed time of the file and returns the values in “DateTime” data type displayed as 12-hour time format.

CreatedDateAndTime: This parameter helps you retrieve the “Date and Time” when the folder was created and returns the values in “DateTime” data type format. 

HiddenIt helps to identify whether the file is hidden or not and returns the values in “Boolean” data type. 
True: Indicates the file is hidden. 
False: Indicates the file is not hidden. 

IsValidPath: This parameter returns whether the specified path is valid or not in “Boolean” datatype. 
True: Indicates the folder path is valid. 
False: Indicates the folder path is not valid.

ModifiedTime: This parameter enables you to retrieve the “Date and Time” when the file was last modified, and it returns the values in “DateTime” data type format. 

ReadOnly: This parameter helps you determine whether the file is in read-only mode or not and returns the values in “Boolean” data type.
True: Indicates the file is in read-only mode. 
False: Indicates the file is not read-only mode. 

SizeOnDisk: It returns the size of the file in “Int64” data type. 

TypeOfFile: This parameter helps you identify the type of the provided file and returns the values in “String” data type.

UserPermission: It returns the list of users along with their permissions for this specific file in “DataTable” data type. 

* Represents mandatory fields to execute the workflow.

12.4.11 GetFolderInformation

This activity helps the user to retrieve detailed information about the specified folder. 

Properties

INPUT

FolderPath: *This field specifies the path of the folder from which the information needs to be retrieved. It accepts values in “String” datatype. 

MISC

DisplayName: Displays the name of the activity. The activity name can be customized, which aids in troubleshooting.

SkipOnError: Specify the “Boolean” value as “True” or “False.”
True: Continue executing the workflow regardless of any errors thrown.
False: Halt the workflow if it encounters any errors.
None: If the option is left blank, the activity will, by default, behave as if “False” were chosen.

Version: It indicates the version of the feature being used.

OUTPUT

Accessibility: This parameter returns the accessibility status of the specified folder in a Boolean datatype.
True: Indicates the folder is accessible during automation.
False: Indicates the folder is not accessible due to insufficient permissions.

CreationDateTime: This parameter helps you retrieve the “Date and Time” when the folder was created in “DateTime” data type format. The output will be in a 12-hour format.

Files: It returns the list of files from the folder in “List of string” data type. 

Folder: It returns the list of sub folders available in the folder in “List of string” data type.

IsValidPath: This parameter returns whether the specified path is valid or not in “Boolean” datatype. 
True: Indicates the folder path is valid. 
False: Indicates the folder path is not valid. 

SharingEnabled: It returns whether sharing is enabled or disabled for the specific folder in “Boolean” data type.
True: Indicates the folder is enabled for sharing.
False: Indicates the folder is not enabled for sharing. 

SizeOnDisk: It returns the size of the folder in “Int64” data type. 

UserPermission: It returns the list of users along with their permissions for this specific folder in “DataTable” data type. 

* Represents mandatory fields to execute the workflow.

12.4.12 GetSpecialDirectory

This activity helps the user to access directory information for applications or files within a machine. It helps retrieve the path of a targeted folder for further action.

Properties

INPUT

SystemFolder:* This parameter displays the list of directories available in the system folder. You can choose the drop-down to get the special directory. By default, “Desktop” will be selected.

OverWrite: Check this box if you want to overwrite a file, if it is already available in the path that you have chosen. By default, it is unchecked. This means if the zipped file which we are trying to save to location is already available there, it wouldn’t get saved in that location.

To:Specify the file path to where the selected file needs to be pasted. You can also select the file manually by selecting the three dots adjacent to the activity. This accepts only “String” datatype.

MISC

DisplayName: Displays the name of the activity. The activity name can be customized, which aids in troubleshooting.

SkipOnError: Specify the “Boolean” value as “True” or “False.”
True: Continue executing the workflow regardless of any errors thrown.
False: Halt the workflow if it encounters any errors.
None: If the option is left blank, the activity will, by default, behave as if “False” were chosen.

Version: It indicates the version of the feature being used.

OUTPUT

Path:A variable declared here is used to store information about the special directory. It is stored in the “String” data type.

Represents mandatory fields to execute the workflow

12.4.13 Exist

The “Exist” activity is employed to determine whether a specific file or directory exists in the designated path. We can also assess the existence status of a file or directory within a shared folder, granted we have access to it.

Properties

INPUT

Mode:* Select from the dropdown the option for which you want to check the existence status.
File: Choose this to check the existence status of a file.
Directory: Choose this to check the existence status of a directory. This is the default selection.

Path:* This field represents the path where the specified file or directory is located. You have the option to either hardcode the values in the “String” variable or pass the values as “String” datatype. This accepts only the “String” datatype.

MISC

DisplayName: Displays the name of the activity. The activity name can be customized, which aids in troubleshooting.

SkipOnError: Specify the “Boolean” value as “True” or “False.”
True: Continue executing the workflow regardless of any errors thrown.
False: Halt the workflow if it encounters any errors.
None: If the option is left blank, the activity will, by default, behave as if “False” were chosen.

Version: It indicates the version of the feature being used.

OUTPUT

Result: It provides the ability to view the execution status of the activity. It returns values in “Boolean.”
True: Indicates that the activity has been executed successfully without any errors.
False: Indicates that the activity has been unsuccessful due to an unexpected error being thrown.

Represents mandatory fields to execute the workflow

12.4.14 MoveFile

This activity facilitates the user in moving files from one location to another destination by specifying the path. It can also be employed to transfer files from a shared folder, provided that we have access to it.

Properties

INPUT

DestinationPath:* This parameter indicates to specify the “Path” to where the input files need. You can either hardcode the values in “String” datatype or can enter the values in “String” format. This parameter accepts the vales in “String” datatype.

OverWrite: Check this box if you want to overwrite a file, if it is already available in the path that you have chosen.
By default, it is unchecked. This means if the zipped file which we are trying to save to location is already available there, it wouldn’t get saved in that location.

FilePathList:* This parameter indicates to specify the “Path” of the input files that needs to be moved. You can either hardcode the values in “Array of String” datatype or can enter the values in “Array of String” format. This parameter accepts the vales in “Array of String” datatype.(Refer the tips below)

MISC

DisplayName: Displays the name of the activity. The activity name can be customized, which aids in troubleshooting.

SkipOnError: Specify the “Boolean” value as “True” or “False.”
True: Continue executing the workflow regardless of any errors thrown.
False: Halt the workflow if it encounters any errors.
None: If the option is left blank, the activity will, by default, behave as if “False” were chosen.

Version: It indicates the version of the feature being used.

OUTPUT

Result: It provides the ability to view the execution status of the activity. It returns values in “Boolean.”
True: Indicates that the activity has been executed successfully without any errors.
False: Indicates that the activity has been unsuccessful due to an unexpected error being thrown.

Represents mandatory fields to execute the workflow

12.4.15 RenameFile

This activity assists in renaming files within a designated folder. It’s also feasible to rename files within a shared folder, provided there is permission to access them

Properties

INPUT

FilePath:* Provide the name of the file along with the path that needs to be renamed. It accepts only “String” datatype.

NewFileName:* Indicate the new file name along with its path. Alternatively, we can opt for a different path to store the renamed file. It aceepts only “String” datatype.

MISC

DisplayName: Displays the name of the activity. The activity name can be customized, which aids in troubleshooting.

SkipOnError: Specify the “Boolean” value as “True” or “False.”
True: Continue executing the workflow regardless of any errors thrown.
False: Halt the workflow if it encounters any errors.
None: If the option is left blank, the activity will, by default, behave as if “False” were chosen.

Version: It indicates the version of the feature being used.

OUTPUT

Result: It provides the ability to view the execution status of the activity. It returns values in “Boolean.”
True: Indicates that the activity has been executed successfully without any errors.
False: Indicates that the activity has been unsuccessful due to an unexpected error being thrown.

Represents mandatory fields to execute the workflow

12.4.16 RunningProcess

This activity assists the user in retrieving information about the currently running applications and processes, either for the current user or the entire system.

Properties

INPUT

UserOrSystem:* This parameter indicates to choose the specific option from the drop-down,
User: It retrieves the process list running against the user logged in credentials.
System: It retrieves the process list running against the system credentials.

MISC

DisplayName: Displays the name of the activity. The activity name can be customized, which aids in troubleshooting.

SkipOnError: Specify the “Boolean” value as “True” or “False.”
True: Continue executing the workflow regardless of any errors thrown.
False: Halt the workflow if it encounters any errors.
None: If the option is left blank, the activity will, by default, behave as if “False” were chosen.

Version: It indicates the version of the feature being used.

OUTPUT

ProcessList: It helps to view the output of the activity as the processes running against the system or user specified in “Datatable” format. This field returns the output in “Datatable” datatype.

Result: It provides the ability to view the execution status of the activity. It returns values in “Boolean.”
True: Indicates that the activity has been executed successfully without any errors.
False: Indicates that the activity has been unsuccessful due to an unexpected error being thrown.

Represents mandatory fields to execute the workflow

12.4.17 FileSystemTrigger

This activity helps the user monitor changes in a specified file or folder, such as the creation, deletion, or modification of files or folders. When such changes occur, the activity triggers the execution of a specific set of actions or a workflow.

Pre-requisites

1. This activity must be set as the initial activity in the workflow and cannot be used at the end or in the middle of the automation process.
2. Only one trigger activity is allowed per workflow and its sub-workflows. Multiple triggers are not supported.

Properties

INPUT

Extension: Indicates the file extension that needs to be filtered and monitored during workflow execution.
This parameter accepts values in the String datatype. You can either hardcode the values in “String” format or provide them in a “String” variable.

If left blank, all extension types will be considered.

IsIncludeSubfolders: When this option is checked, it enables monitoring of changes in the subfolders within the specified folder.
If left unchecked, subfolders will not be considered.

RootDirectory:* This parameter specifies the folder or directory path where the activity should monitor changes.
It accepts input values in the String datatype. You can either hardcode the values in a “String” variable or provide them in “String” format.

MISC

DisplayName: Displays the name of the activity. The activity name can be customized, which aids in troubleshooting.

SkipOnError: Specify the “Boolean” value as “True” or “False.”
True: Continue executing the workflow regardless of any errors thrown.
False: Halt the workflow if it encounters any errors.
None: If the option is left blank, the activity will, by default, behave as if “False” were chosen.

Version: It indicates the version of the feature being used.

OUTPUT

Result: It provides the ability to view the execution status of the activity. It returns values in “Boolean.”
True: Indicates that the activity has been executed successfully without any errors.
False: Indicates that the activity has been unsuccessful due to an unexpected error being thrown.

Represents mandatory fields to execute the workflow

Conditions

The advanced filter option allows you to validate against any of the specified conditions and trigger the workflow based on the selected action. By default, the trigger is set to activate when a file is created. You can select multiple filters to validate and trigger the action.

File System Events: Indicates to choose on which event the bot needs to filter and monitor the type of change. The action will be triggered immediately when the chosen action is met,

  • All: If a file or folder is created, renamed, modified, or deleted in the specified root directory.
  • Created: If a file or folder is created in the specified root directory.
  • Renamed: If a file or folder is renamed in the specified root directory.
  • Modified: If a file or folder is modified in the specified root directory.
  • Deleted: If a file or folder is deleted in the specified root directory.

Notify Filters: Based on the filter type chosen, it will validate with the file system events above to trigger the action workflow.

  • File name: Changes to file\folder name in the specified root directory.
  • Directory name: Changes to Directory name in the specified root directory.
  • Attributes: Changes to file\folder attribute in the specified root directory.
  • Size: changes to file size in the specified root directory.
  • Last write: Changes to last write date\time in the specified root directory.
  • Last access: Changes to last access date\time in the specified root directory.
  • Creation time: Changes to creation date\time in the specified root directory.
  • Security: Changes to File\folder security in the specified root directory.

12.4.18 Unzip

This activity is used to unzip any previously zipped file or folder. It is used to extract files from a compressed file or folder during run time. We can unzip a file or directory within a shared folder, granted we have access to it.

Properties

INPUT

OverWrite: Check this box if you want to overwrite a file if it is already available in the path that you have chosen. By default, it is checked. When left blank, it will not be considered. 

Password: This indicates the password of the file (if any) to be unzipped. You can either hardcode the values in “String” datatype or can enter the values “String” format.  This parameter accepts only “String” datatype.

SavePath: This indicates the path where the extracted files need to be saved. It accepts only “String” datatype.

ZipFilePath:*  Choose the file path of the zipped folder from which the files must be extracted. It accepts only “String” datatype.

MISC

DisplayName: Displays the name of the activity. The activity name can be customized, which aids in troubleshooting.

SkipOnError: Specify the “Boolean” value as “True” or “False.”
True: Continue executing the workflow regardless of any errors thrown.
False: Halt the workflow if it encounters any errors.
None: If the option is left blank, the activity will, by default, behave as if “False” were chosen.

Version: It indicates the version of the feature being used.

OUTPUT

Result: It provides the ability to view the execution status of the activity. It returns values in “Boolean.”
True: Indicates that the activity has been executed successfully without any errors.
False: Indicates that the activity has been unsuccessful due to an unexpected error being thrown.

Represents mandatory fields to execute the workflow

12.4.19 Zip

This activity is used to compress a folder during the execution of a robot. We can zip a file or directory within a shared folder, granted we have access to it.

Properties

INPUT

FileList:* Specify the declared variable name in this box. Refer to the tip below to see how it can be done. It accepts “List of string” datatype.
FileName: Specify the name of the file or folder that you want to zip. It accepts only “String” datatype.
FolderPath: Specify the directory path in which the file to be zipped is located. It accepts only “String” datatype

OverWrite: Check this box if you want to overwrite a file, if it is already available in the path that you have chosen.
By default, it is unchecked. This means if the zipped file which we are trying to save to location is already available there, it wouldn’t get saved in that location.

Password: If there is any password for the zipped file or folder, enter the same here.It accepts only “String” datatype.
SavePath: Specify the path in which the zipped file or folder must be saved. It accepts only “String” datatype.

MISC

DisplayName: Displays the name of the activity. The activity name can be customized, which aids in troubleshooting.

Mode: Choose from the drop down.
File –  Choose this to zip a file.
Folder – Choose this to zip a folder. This is the default selection.

SkipOnError: Specify the “Boolean” value as “True” or “False.”
True: Continue executing the workflow regardless of any errors thrown.
False: Halt the workflow if it encounters any errors.
None: If the option is left blank, the activity will, by default, behave as if “False” were chosen.

Version: It indicates the version of the feature being used.

OUTPUT

Result: It provides the ability to view the execution status of the activity. It returns values in “Boolean.”
True: Indicates that the activity has been executed successfully without any errors.
False: Indicates that the activity has been unsuccessful due to an unexpected error being thrown.

Represents mandatory fields to execute the workflow

12.5 FTP Automation

FTP (File Transfer Protocol) in Robility is a feature that enables automation for facilitating the automated exchange of files between systems, enabling scheduled transfers, batch processing, and remote file management by allowing seamless incorporation of file transfers into automated workflows. This integration enhances data handling efficiency, error management, and scheduling capabilities, ensuring reliable and timely file transfers in various automation scenarios.

Pre-requisites

The user must configure the FTP and SFTP server details (such as hostname, port, username, and password) within the workflow. This configuration is set in the properties panel of the FTP activities.

Benefits

1. Efficient Data Transfer: Automates the exchange of large volumes of data between systems without manual intervention.
2. Scheduled Operations: Enables regular, timed file transfers to ensure data consistency and timely updates.
3. Error Handling and Logging: Provides robust mechanisms for tracking and resolving transfer issues, maintaining data integrity.
4. Remote Access: Allows remote retrieval and updating of files, facilitating distributed data management.
5. Batch Processing: Supports simultaneous transfer of multiple files, streamlining large-scale data operations.

Use Cases

1. Daily Report Upload: Automatically upload daily sales reports from a local server to a cloud server, ensuring timely updates for management review.
2. Data Synchronization: Sync files between different office locations by scheduling regular FTP transfers, maintaining data consistency across the organization.
3. Backup Automation: Automate the backup of critical files to an FTP server at specified intervals to safeguard against data loss.
4. Log File Management: Download log files from remote servers for centralized processing and analysis, helping in monitoring and diagnostics.

12.5.1 Release Notes

v.1.1.6

This release includes enhancements to the NLog package.

Enhancement

The NLog package has been upgraded to version 6.0.7, delivering improved logging reliability, performance, and compatibility. The update supports both existing and new workflows.

Limitation

To use both FTP and SFTP in the same workflow, ensure you are using FTP version 1.1.6 and SFTP version 1.1.1. Otherwise, due to package reference conflicts, only one of them can be used at a time.

Released Date: 09/02/2026

12.5.2 DirectoryExists

This activity is used to check if a directory exists in the specified path.

Properties

INPUT

DirectoryName: Provide a name for the directory to be created. You have the option to either hardcode the values in the “String” variable or pass the values as “String” datatype.This accepts only the “String” datatype.

MISC

DisplayName: Displays the name of the activity. The activity name can be customized, which aids in troubleshooting.

SkipOnError: Specify the “Boolean” value as “True” or “False.”
True: Continue executing the workflow regardless of any errors thrown.
False: Halt the workflow if it encounters any errors.
None: If the option is left blank, the activity will, by default, behave as if “False” were chosen.

Version: It indicates the version of the feature being used.

OUTPUT

DirectoryExists: This indicates the exist status of the directory. It accepts only “Boolean” datatype.

Result: It provides the ability to view the execution status of the activity. It returns values in “Boolean.”
True: Indicates that the activity has been executed successfully without any errors.
False: Indicates that the activity has been unsuccessful due to an unexpected error being thrown.

Represents mandatory fields to execute the workflow

12.5.3 CreateDirectory

This activity is used to create a new directory in the specified path. This works within the FTP scope.

Properties

INPUT

DirectoryName: Provide a name for the directory to be created. You have the option to either hardcode the values in the “String” variable or pass the values as “String” datatype.This accepts only the “String” datatype.

MISC

DisplayName: Displays the name of the activity. The activity name can be customized, which aids in troubleshooting.

SkipOnError: Specify the “Boolean” value as “True” or “False.”
True: Continue executing the workflow regardless of any errors thrown.
False: Halt the workflow if it encounters any errors.
None: If the option is left blank, the activity will, by default, behave as if “False” were chosen.

Version: It indicates the version of the feature being used.

OUTPUT

Result: It provides the ability to view the execution status of the activity. It returns values in “Boolean.”
True: Indicates that the activity has been executed successfully without any errors.
False: Indicates that the activity has been unsuccessful due to an unexpected error being thrown.

Represents mandatory fields to execute the workflow

12.5.4 Download

This activity is used to download a specific file from the specified directory of a server to a local folder.

Properties

INPUT

FilePath: Indicate the path in which the downloaded file has to be saved. You have the option to either hardcode the values in the “String” variable or pass the values as “String” datatype. This accepts only the “String” datatype.

FTPFileName:* Indicate the name of the file with the path which has to be uploaded. You have the option to either hardcode the values in the “String” variable or pass the values as “String” datatype. This accepts only the “String” datatype.

SaveFileName:* Provide a name for the downloaded file to be saved. You have the option to either hardcode the values in the “String” variable or pass the values as “String” datatype. This accepts only the “String” datatype.

MISC

DisplayName: Displays the name of the activity. The activity name can be customized, which aids in troubleshooting.

SkipOnError: Specify the “Boolean” value as “True” or “False.”
True: Continue executing the workflow regardless of any errors thrown.
False: Halt the workflow if it encounters any errors.
None: If the option is left blank, the activity will, by default, behave as if “False” were chosen.

Version: It indicates the version of the feature being used.

RESULT

Result: It provides the ability to view the execution status of the activity. It returns values in “Boolean.”
True: Indicates that the activity has been executed successfully without any errors.
False: Indicates that the activity has been unsuccessful due to an unexpected error being thrown.

Represents mandatory fields to execute the workflow

12.5.5 FileExists

This activity helps to find out if a file exists in a directory or not.

Properties

INPUT

FileExists: Indicate the path of the file for which you want to check the existence status. Specify the file name along with the directory name here. The directory name should be within the server. You have the option to either hardcode the values in the “String” variable or pass the values as “String” datatype. This accepts only the “String” datatype.

MISC

DisplayName: Displays the name of the activity. The activity name can be customized, which aids in troubleshooting.

SkipOnError: Specify the “Boolean” value as “True” or “False.”
True: Continue executing the workflow regardless of any errors thrown.
False: Halt the workflow if it encounters any errors.
None: If the option is left blank, the activity will, by default, behave as if “False” were chosen.

Version: It indicates the version of the feature being used.

OUTPUT

FileExists: Declare a variable here, which will show the exist status of the file. The result is seen only in “Boolean” datatype.

Result: It provides the ability to view the execution status of the activity. It returns values in “Boolean.”
True: Indicates that the activity has been executed successfully without any errors.
False: Indicates that the activity has been unsuccessful due to an unexpected error being thrown.

Represents mandatory fields to execute the workflow

12.5.6 RemoveDirectory

This activity is used to remove a directory from the given server.

Properties

INPUT

DirectoryPath: Specify the name of the directory which has to be removed from the server within double quotes. You have the option to either hardcode the values in the “String” variable or pass the values as “String” datatype.This accepts only the “String” datatype.

MISC

DisplayName: Displays the name of the activity. The activity name can be customized, which aids in troubleshooting.

SkipOnError: Specify the “Boolean” value as “True” or “False.”
True: Continue executing the workflow regardless of any errors thrown.
False: Halt the workflow if it encounters any errors.
None: If the option is left blank, the activity will, by default, behave as if “False” were chosen.

Version: It indicates the version of the feature being used.

OUTPUT

Result: It provides the ability to view the execution status of the activity. It returns values in “Boolean.”
True: Indicates that the activity has been executed successfully without any errors.
False: Indicates that the activity has been unsuccessful due to an unexpected error being thrown.

Represents mandatory fields to execute the workflow

12.5.7 RemoveFile

This activity is used to remove a specific file from a specific directory in the server.

Properties

INPUT

FilePath:* Mention the name of the file along with the directory name to be removed. You have the option to either hardcode the values in the “String” variable or pass the values as “String” datatype.This accepts only the “String” datatype

MISC

DisplayName: Displays the name of the activity. The activity name can be customized, which aids in troubleshooting.

SkipOnError: Specify the “Boolean” value as “True” or “False.”
True: Continue executing the workflow regardless of any errors thrown.
False: Halt the workflow if it encounters any errors.
None: If the option is left blank, the activity will, by default, behave as if “False” were chosen.

Version: It indicates the version of the feature being used.

OUTPUT

Result: It provides the ability to view the execution status of the activity. It returns values in “Boolean.”
True: Indicates that the activity has been executed successfully without any errors.
False: Indicates that the activity has been unsuccessful due to an unexpected error being thrown.

Represents mandatory fields to execute the workflow

12.5.8 Upload

This activity is used to upload a file from the system to the server in a specified directory.

Properties

INPUT

FilePath:Indicate the name of the directory in the FTP server where the file has to be uploaded. You have the option to either hardcode the values in the “String” variable or pass the values as “String” datatype. This accepts only the “String” datatype.

FTDDirectoryName:* Indicate the name of the file with the path which has to be uploaded. You have the option to either hardcode the values in the “String” variable or pass the values as “String” datatype. This accepts only the “String” datatype.

MISC

DisplayName: Displays the name of the activity. The activity name can be customized, which aids in troubleshooting.

SkipOnError: Specify the “Boolean” value as “True” or “False.”
True: Continue executing the workflow regardless of any errors thrown.
False: Halt the workflow if it encounters any errors.
None: If the option is left blank, the activity will, by default, behave as if “False” were chosen.

Version: It indicates the version of the feature being used.

RESULT

Result: It provides the ability to view the execution status of the activity. It returns values in “Boolean.”
True: Indicates that the activity has been executed successfully without any errors.
False: Indicates that the activity has been unsuccessful due to an unexpected error being thrown.

Represents mandatory fields to execute the workflow

12.5.9 FTP

This activity helps the user connect to the specified FTP server using username and password credentials. It serves as a scope activity to upload and download files, create and remove directories, and check if a directory or file exists within the SFTP server.

Once entered, these values apply to all associated activities, eliminating the need for separate authentication steps with each FTP activity. This approach enhances efficiency and ensures consistency by avoiding repetitive access procedures for each service.

Properties

INPUT

Password: * This parameter is used to enter the ‘Password’ for the provided server, allowing access and authentication to the specified FTP server.

This parameter accepts values in “String” datatype. You can either hardcode the values in “String” format or provide the value in String” datatype

Port: This parameter indicates to provide the network port number that is used to establish a connection between the system and FTP server.  

This parameter accepts values in “String” datatype. You can either hardcode the values in “String” format or provide the value in String” datatype.

When left blank, this parameter will not be considered during execution. It is not required when connecting FTP server. 

ServerName:* This parameter indicates to provide the “ServerName” of the FTP to execute the set of actions within it.  

This parameter accepts values in “String” datatype. You can either hardcode the values in “String” format or provide the value in String” datatype.

Type: This parameter helps you choose the ‘Server’ type from the provided server name. Select the option from the drop-down menu:

FTP: Enables you to perform a set of activities on an FTP server.

UserID:* This parameter is used to enter the User ID for the provided server, allowing access and authentication to the specified FTP server.

This parameter accepts values in “String” datatype. You can either hardcode the values in “String” format or provide the value in String” datatype.

MISC

DisplayName: Displays the name of the activity. The activity name can be customized, which aids in troubleshooting.

Version: It indicates the version of the feature being used.

OUTPUT

Result: It provides the ability to view the execution status of the activity. It returns values in “Boolean.”
True: Indicates that the activity has been executed successfully without any errors.
False: Indicates that the activity has been unsuccessful due to an unexpected error being thrown.

Represents mandatory fields to execute the workflow

12.6 Keyboard Automation

Introduction 

Keyboard automation in Robility involves using robots to replicate keyboard inputs and interactions with the desktop and web applications. This includes tasks such as typing, enabling shortcut keys, and navigating through different applications. This form of automation is integral to streamlining repetitive and rule-based processes in various industries.

Benefits

  1. Increased Efficiency: Keyboard automation allows bots to perform tasks at a faster pace than manual data entry, leading to improved operational efficiency.
  2. Error Reduction: Automation minimizes the risk of human errors associated with repetitive tasks, enhancing accuracy and data quality.
  3. Enhanced Scalability: Keyboard automation facilitates the scaling of processes without the need for additional human resources, allowing organizations to handle increased workloads efficiently.

Use Cases

  1. Data Entry and Validation: The bots can automate data entry tasks by inputting information into various systems and validating data for accuracy.
  2. Form Filling:Automating the completion of forms in applications, such as customer registration forms or order processing forms, reduces manual effort.
  3. Legacy System Integration: Bots can interact with legacy systems that lack modern APIs, using keyboard automation to navigate through the user interfaces of these systems.
  4. Account Reconciliation: Bots can automate the reconciliation of financial transactions by entering data into accounting systems and cross-verifying records.
  5. Customer Service Processes: It can be applied to automate repetitive tasks in customer service, such as updating customer records or processing routine requests.
  6. Data Migration: Keyboard automation is valuable for migrating data between systems, ensuring smooth transfer without the need for manual data input.

12.6.1 Release Notes

v.1.1.6 (Hotfix)

This release includes the following bug fix

Bug Fixes

 1. Shortcut Key Activity
Resolved an issue where the Active Windows popup opened on the primary display instead of the display where the designer was open. The popup now opens on the same display as the designer.

2. Send Text Data Activity
Resolved an issue where the Send Text Data activity did not function correctly when the target application and designer were on different displays. The activity now works as expected in multi-monitor setups.

Released Date: 08/06/2026

12.6.2 ShortcutKey

This activity helps the user to simulate keyboard shortcuts or keyboard combinations within an application. It allows to mimic user keypresses for tasks such as navigation, command execution, or data manipulation.

Properties

HOTKEY

Alt: Check this box to combine “Alt” with the input key specified to perform the action. By default, the box will be unchecked. When left blank, it will not be considered.

Ctrl: Check this box to combine “Ctrl” with the input key specified to perform the action. By default, the box will be unchecked. When left blank, it will not be considered.

Shift: Check this box to combine “Shift” with the input key specified to perform the action. By default, the box will be unchecked. When left blank, it will not be considered.

Win: Check this box to combine “Win” with the input key specified to perform the action. By default, the box will be unchecked. When left blank, it will not be considered.

INPUT

Actionkeys: Indicates to choose the dropdown value based on what pattern the text must be applied in the application.
None: It will not consider providing the action to the keys specified.
Hold: It enables a pause time after executing the hotkey action to proceed.
Release: It releases the bot to execute the next action in the workflow.

DelayBeforeActivity: It assists the user to add a delay before initiating subsequent activities. The delay duration here is in milliseconds. By default, it is set to “0” milliseconds. When the option is left blank, the delay will not be considered.

DelayBetweenKeys: It assists the user to add a delay between the keys in milliseconds. The delay duration here is in milliseconds. By default, it is set to “0” milliseconds. When the option is left blank, the delay will not be considered.

InputString: Specify the text to be passed or set in the specified window. You have the option to either hardcode the values in the “String” variable or pass the values as “String” datatype.This parameter accepts values in “String” datatype.

SendType: Indicates to choose the dropdown value based on what pattern the text must be entered in the application.
SimulateKey: Enables to performs the keys with a hold in between the action.
Normal: Enables to perform the actions naturally.

StandardKeysThis parameter provides a list of Standard keyboard actions that can be employed on the application and combined with the Hotkeys. Choose the list from the drop-down.

Use Window Title: Allows you to perform the action only on the selected application that appears on the windows title property. 

WindowTitle: *Specifies to choose the applications from the list of active applications to where the text needs to be inputted. You have the option to either hardcode the values in the “String” variable or pass the values as “String” datatype. 

MISC

DisplayName: Displays the name of the activity. The activity name can be customized, which aids in troubleshooting.

SkipOnError: Specify the “Boolean” value as “True” or “False.”
True: Continue executing the workflow regardless of any errors thrown.
False: Halt the workflow if it encounters any errors.
None: If the option is left blank, the activity will, by default, behave as if “False” were chosen.

Version: It indicates the version of the feature being used.

WaitTime: It enables the user to introduce a delay before initiating subsequent activities. The delay is specified in milliseconds. By default, it is set to zero milliseconds. Leaving the option blank will result in no delay being applied.

OUTPUT

Result: It provides the ability to view the execution status of the activity. It returns values in “Boolean.”
True: Indicates that the activity has been executed successfully without any errors.
False: Indicates that the activity has been unsuccessful due to an unexpected error being thrown.

*Represents mandatory fields to execute the workflow.

12.6.3 SendTextData

This activity enables users to send text data to a targeted application field, simulating user input.

Properties

INPUT

ClearBeforeType: When this box is checked the bot clears the existing data in the application and types the given text. By default, this option will be un-checked. When left blank, the option will not be considered.

ClickBeforeType: When this box is checked the bot places the cursor on the visible application before initiating the execution of the activity. By default, this option will be un-checked. When left blank, the option will not be considered.

DelayBeforeActivity: It assists the user to add a delay before initiating subsequent activities. The delay duration here is in milliseconds. By default, it is set to “300” milliseconds. When the option is left blank, the delay will not be considered.

DelayBetweenChar: It assists the user to add a delay between the characters in milliseconds. The delay duration here is in milliseconds. By default, it is set to “300” milliseconds. When the option is left blank, the delay will not be considered.

EnsureValue: It indicates the user to ensure whether the value has been entered in the specified window. By default, It will be left unchecked. When the option is left blank, the delay will not be considered.

InputString: *Specify the text to be passed or set in the specified window. You have the option to either hardcode the values in the “String” variable or pass the values as “String” datatype. This parameter accepts values in “String” datatype.

SendType: Indicates to choose the dropdown value based on what pattern the text must be entered in the application.
Key_as_user: Enters the text as the human does.
Normal: Enters the text naturally as how bot functions.
Paste: Enters the text as in copy paste pattern.
Characters: Enters the text as character by character. 

Use Window Title: Allows you to perform the action only on the selected application that appears on the windows title property. 

WindowTitle:* Specifies to choose the applications from the list of active applications to where the text needs to be inputted. You have the option to either hardcode the values in the “String” variable or pass the values as “String” datatype. 

MISC

DisplayName: Displays the name of the activity. The activity name can be customized, which aids in troubleshooting.

SkipOnError: Specify the “Boolean” value as “True” or “False.”
True: Continue executing the workflow regardless of any errors thrown.
False: Halt the workflow if it encounters any errors.
None: If the option is left blank, the activity will, by default, behave as if “False” were chosen.

Version: It indicates the version of the feature being used.

WaitTime: It enables the user to introduce a delay before initiating subsequent activities. The delay is specified in milliseconds. By default, it is set to zero milliseconds. Leaving the option blank will result in no delay being applied.

OUTPUT

Result: It provides the ability to view the execution status of the activity. It returns values in “Boolean.”
True: Indicates that the activity has been executed successfully without any errors.
False: Indicates that the activity has been unsuccessful due to an unexpected error being thrown. 

*Represents mandatory fields to execute the workflow.

12.7 MouseAutomation

Introduction

Mouse automation in Robility involves using robots to simulate mouse actions, such as clicking, dragging, and scrolling. This allows bots to interact with graphical user interfaces (GUIs) and perform tasks that mimic human actions. 

Use Case

1. Graphical User Interface (GUI) Interaction: Bots can use mouse automation to interact with various elements in a GUI, such as buttons, dropdown menus, checkboxes, and radio buttons.
2. Web Scraping: Mouse automation is valuable for web scraping tasks where bots need to navigate web pages, click on links, and extract information from different parts of a webpage.
3. Document Processing: Bots can use mouse automation to interact with documents, such as clicking on specific areas, highlighting text, or copying/pasting information.
4. File Management: Automation of mouse actions enables bots to manage files by simulating tasks like dragging and dropping files, creating folders, or selecting multiple files.
5. Workflow Automation in Desktop Applications: Mouse automation plays a crucial role in automating end-to-end workflows within desktop applications, allowing bots to perform tasks that involve clicking on various elements in the application interface.

12.7.1 Release Notes

v.1.1.7

This release includes enhancements to dependent DLLs.

Enhancement

All dependent DLLs have been upgraded to the latest stable versions, enhancing security, performance, and workflow reliability. This update ensures smoother execution and maintains compatibility with both existing and new workflows.

Released Date: 09/03/2026

12.7.2 Click

This activity helps the user to replicate any action of the mouse which is routinely performed by a human such as a single click/right click/double click or click.

Properties

INPUT

Action: Choose the action that needs to be performed during the execution. 
Click: Performs the “Single-click” action on the selected windows application.
DoubleClick: Performs “DoubleClick” action where it requires on the selected application.
RightClick: Performs “Right Click” action on the selected windows application.
Hold: Perform to hold the element or value on the selected windows application.
Release: Perform to hold the element or value on the selected windows application.

DelayBeforeActivity: It assists the user to add a delay before initiating subsequent activities. The delay duration here is in milliseconds. By default, it is set to “300” milliseconds. When the option is left blank, the delay will not be considered.

UseWindowTitle: Indicates to check this box when the action needs to be performed only on the selected active application. By default, this option will be un-checked. When left blank, the option will not be considered. 

WindowTitle: * This parameter specifies to choose the applications from the list of active applications to where the text needs to be inputted. It accepts values in “String” datatype. You have the option to either hardcode the values in the “String” variable or pass the values as “String” datatype. 

MISC

DisplayName: Displays the name of the activity. The activity name can be customized, which aids in troubleshooting.
SkipOnError: Specify the “Boolean” value as “True” or “False.”
True: Continue executing the workflow regardless of any errors thrown. 
False: Halt the workflow if it encounters any errors. 
None: If the option is left blank, the activity will, by default, behave as if “False” were chosen.
Version: It indicates the version of the feature being used.

OUTPUT

Result: It provides the ability to view the execution status of the activity. It returns values in “Boolean.”
True: Indicates that the activity has been executed successfully without any errors. 
False: Indicates that the activity has been unsuccessful due to an unexpected error being thrown. 
Represents mandatory fields to execute the workflow.

12.7.3 Move

This activity aids the user in moving the cursor to extract specific data from the Citrix application or the Console window.

Properties

INPUT

DelayAfterActivity: It assists the user to add a delay before initiating subsequent activities. The delay duration here is in milliseconds. By default, it is set to “Zero” milliseconds. When the option is left blank, the delay will not be considered.

DelayBeforeActivity: It assists the user in adding a delay before starting the execution of the activities. The delay duration here is in milliseconds. By default, it is set to “zero” milliseconds. When the option is left blank, the delay will not be considered.

DirectionHorizontal: Represents the horizontal position (X-Axis) to where the mouse needs to be moved on the selected application.
Left: Indicates to move the cursor on the “X- axis” on the left side. 
Right: Indicates to move the cursor on the “X- axis” on the right side. By default, the option will be Right.

DirectionVertical: Represents the vertical position (Y-Axis) to where the mouse needs to be moved on the selected application. 
Up: Indicates to move the cursor on the “Y- axis” to the top side.
Right: Indicates to move the cursor on the “Y- axis” to the bottom. By default, the option will be Up.

MoveOnHorizontalRepresents the horizontal position (X-Axis) to where the mouse needs to be moved on the selected application.  This parameter accepts value in “Integer” datatype. You have the option to either hardcode the values in the “Integer” variable or pass the values as “Integer” datatype. By default, the option will be blank.

MoveOnVerticalRepresents the vertical position (Y-Axis) to where the mouse needs to be moved on the selected application. This parameter accepts value in “Integer” datatype. You have the option to either hardcode the values in the “Integer” variable or pass the values as “Integer” datatype. By default, the option will be blank.

WindowTitle: This parameter specifies to choose the applications from the list of active applications to where the cursor point needs to be moved. It accepts values in “String” datatype. You have the option to either hardcode the values in the “String” variable or pass the values as “String” datatype.

MISC

DisplayName: Displays the name of the activity. The activity name can be customized, which aids in troubleshooting.
SkipOnError: Specify the “Boolean” value as “True” or “False.”
True: Continue executing the workflow regardless of any errors thrown. 
False: Halt the workflow if it encounters any errors. 
None: If the option is left blank, the activity will, by default, behave as if “False” were chosen.
Version: It indicates the version of the feature being used.

OUTPUT

Result: It provides the ability to view the execution status of the activity. It returns values in “Boolean.”
True: Indicates that the activity has been executed successfully without any errors. 
False: Indicates that the activity has been unsuccessful due to an unexpected error being thrown. 
Represents mandatory fields to execute the workflow.

12.7.4 MoveTo

This activity assists the user in moving the cursor to the specified area within the selected application. It doesn’t execute any click action on the snipped area; it solely moves the cursor.

Properties

INPUT

DelayAfterActivity: It assists the user to add a delay before initiating subsequent activities. The delay duration here is in milliseconds. By default, it is set to “Zero” milliseconds. When the option is left blank, the delay will not be considered.

DelayBeforeActivity: It assists the user in adding a delay before starting the execution of the activities. The delay duration here is in milliseconds. By default, it is set to “zero” milliseconds. When the option is left blank, the delay will not be considered.

PointXRepresents the horizontal position (X-Axis) to where the mouse needs to be moved on the selected application.  
By default, this option will be blank. Gets auto filled once the area has been snipped.This parameter accepts value in “Integer” datatype.

PointYRepresents the vertical position (Y-Axis) to where the mouse needs to be moved on the selected application.
By default, this option will be blank. Gets auto filled once the area has been snipped.This parameter accepts value in “Integer” datatype.

WindowTitleThis parameter specifies to choose the applications from the list of active applications to where the cursor needs to be executed. It accepts values in “String” datatype. You have the option to either hardcode the values in the “String” variable or pass the values as “String” datatype.

MISC

DisplayName: Displays the name of the activity. The activity name can be customized, which aids in troubleshooting.
SkipOnError: Specify the “Boolean” value as “True” or “False.”
True: Continue executing the workflow regardless of any errors thrown. 
False: Halt the workflow if it encounters any errors. 
None: If the option is left blank, the activity will, by default, behave as if “False” were chosen.
Version: It indicates the version of the feature being used.

OUTPUT

Result: It provides the ability to view the execution status of the activity. It returns values in “Boolean.”
True: Indicates that the activity has been executed successfully without any errors. 
False: Indicates that the activity has been unsuccessful due to an unexpected error being thrown. 
Represents mandatory fields to execute the workflow.

12.8 Notification

Introduction

The notification automation package consists of activities that record the robot’s actions, display required messages during execution, and enable input during runtime. Additionally, this feature can be utilized to alert the user with messages or prompt input.

Benefits

1. Enhanced Logging: The package allows for detailed recording of the robot’s
activities, providing a comprehensive log of executed tasks.
2. Real-time Visibility: Messages generated by the automation package are displayed visibly during execution, offering real-time insights into the robot’s progress.
3. User Interaction: The package facilitates input during runtime, enabling interaction with the robot and potentially adjusting its behavior based on user prompts.
4. Alerting Mechanism: It serves as an alert system, notifying users with messages about specific events or conditions, enhancing situational awareness.

Use Cases

1. Error Handling: The package can be employed to alert users when errors occur during execution, allowing for quick identification and resolution of issues.
2. Progress Tracking: Messages displayed during execution provide a means to track the progress of the automation, aiding in monitoring and troubleshooting.
3. User Guidance: When user input is required for certain decisions during runtime, the package can prompt users for input, making the automation more flexible and adaptable.
4. Notification of Completion: After the successful completion of specific tasks or processes, the package can be used to notify users, ensuring timely awareness of completed operations.
5. Custom Messaging: It allows for the customization of messages, enabling the communication of specific information or instructions to users as needed. 

12.8.1 Release Notes

v.1.2.4

This release includes enhancements to dependent DLLs.

Enhancement

All dependent DLLs have been upgraded to the latest stable versions, enhancing security, performance, and workflow reliability. This update ensures smoother execution and maintains compatibility with both existing and new workflows.

Released Date: 09/03/2026

12.8.2 InputBox

This activity is utilized whenever there is human intervention required to provide inputs for processing during execution.

Properties

INPUT

InputJson: *This parameter specifies the fields and values for an input box that collects information from the user during execution. Values can be hardcoded or provided dynamically as a “String” datatype but must adhere to the below “Json” format.

“[
{‘Label Name’: ‘Sample’,’Label Value’: ‘SampleValue’, ‘Value Max Length’: 20, ‘Required’: true}]”

MessageTitle:*This parameter specifies the Title of the input box, allowing you to display a custom title for the input prompt. It accepts only the “String” datatype, which can either be hardcoded or provided dynamically as a “String” value. 

MISC

DisplayName: Displays the name of the activity. The activity name can also be customized to help in troubleshooting.

SkipOnError : Specify the Boolean value as “True or False.”
True: Continues to execute the workflow irrespective of any error thrown.
False: Stops the workflow if it throws any error.
None: If the option is specified as blank, by default the activity will perform the “False” action.
Version: It specifies the version of the FS automation feature in use.

OUTPUT

Output: It helps to view output of the activity in “Datatable” format with the user provided values in the input box. 

Result: It helps to view the execution state of the activity. It returns the values in Boolean format.
True: It indicates that the activity has been executed successfully without any error.
False: It indicates that the activity has been unsuccessful due to some unexceptional error thrown.

* Represents mandatory fields to execute the workflow. 

12.8.3 WriteLog

This activity allows the user to print or log the robot’s activities based on the chosen log level during runtime.

This feature proves invaluable for debugging and troubleshooting, as higher log levels provide more granular insights into the execution flow, while lower levels offer a more concise overview.

Properties

INPUT

InputString: This parameter indicates to provide the “Input” value or variable to print the output during execution. You have the option to either hardcode the values in the “String” variable or pass the values as “String” datatype. This accepts only the “String” datatype.

Loglevel:* The Log Level drop-down has multiple options to choose from and they are as follows. 
·        Info
·        Trace
·        Fatal
·        Error
·        Debug
·        Warning
·        Off
Depending on the selected option, the message is displayed only at that log level. Refer below in the documentation to get further information.

MISC

DisplayName: Displays the name of the activity. The activity name can also be customized to help in troubleshooting.

SkipOnError: Specify the Boolean value as “True or False.”
True: Continues to execute the workflow irrespective of any error thrown.
False: Stops the workflow if it throws any error.
None: If the option is specified as blank, by default the activity will perform the “False” action.
VersionIt specifies the version of the FS automation feature in use.

OUTPUT

Result: It helps to view the execution state of the activity. It returns the values in Boolean format.
True: It indicates that the activity has been executed successfully without any error.
False: It indicates that the activity has been unsuccessful due to some unexceptional error thrown.

 * Represents mandatory fields to execute the workflow.

Types of Log Levels

Log levels refer to the severity or granularity of messages recorded in logs during the execution of a program, system, or automation process. They help categorize and prioritize the information based on its significance. Commonly, log levels are defined as follows:

1. Info:This log level provides information regarding the initiation and conclusion of the workflow execution. If the user selects the info log level, any errors, warnings, and fatal errors encountered will be captured.
2. Trace:The Trace level enables the user to capture every individual action or step executed by the robot, including step-by-step information. Choosing the trace level traces Info, Debug, and the subsequent levels.
3. Debug: For detailed initiation and completion information of activities, excluding system details, choose the Debug level. Information, Warning, and the following levels will be captured (if present) when selecting the Debug level. All log levels, except for trace, will be displayed.
4. Warn: Set the “Warn” level in instances where an exception does not impede processing but requires attention. Similar to other log levels mentioned earlier, Warning will also capture the following levels, such as Error.
5. Error: In certain runs, certain parts of the workflow may execute, while others may not be due to errors. Users can set Error to investigate where, why, and how the mistake occurred.

12.8.4 MessageBox

The Message Box activity is used to display a message to the user. It can show information such as the output generated by specific actions, like extracted data or results from bot operations.

Properties

INPUT

ExpirySecs: Indicate the duration in seconds for which the input should be displayed. Provide the time value in seconds. The default setting is “10 seconds.” This field only accepts the “Integer32” datatype.

InputString:* This parameter indicates to provide the “Input” value or variable to print the output during execution. You have the option to either hardcode the values in the “String” variable or pass the values as “String” datatype. This accepts only the “String” datatype.

MessageTitle:* This parameter specifies the Title of the input box, allowing you to display a custom title for the input prompt. It accepts only the “String” datatype, which can either be hardcoded or provided dynamically as a “String” value.

Text Alignment: This parameter indicates to provide the text alignment format. Select the options from the drop-down, 
1. Left 
2. Right
3. Center
4. Justify 

MISC

DisplayName: Displays the name of the activity. The activity name can also be customized to help in troubleshooting.

SkipOnError: Specify the Boolean value as “True or False.”
True: Continues to execute the workflow irrespective of any error thrown.
False: Stops the workflow if it throws any error.
None: If the option is specified as blank, by default the activity will perform the “False” action.
Vanish: It specifies the version of the FS automation feature in use.

OUTPUT

Result: It helps to view the execution state of the activity. It returns the values in Boolean format.
True: It indicates that the activity has been executed successfully without any error.
False: It indicates that the activity has been unsuccessful due to some unexceptional error thrown.

* Represents mandatory fields to execute the workflow.

12.9 Regex

Introduction

Regular expressions, commonly known as regex, are powerful tools used in programming and automation to search for and manipulate text based on specific patterns. They consist of sequences of characters that define a search pattern, allowing users to find, extract, and manipulate data within strings of text. In Robility, regular expressions play a crucial role in data extraction and processing tasks.

Benefits

1. Flexible Pattern Matching: Regular expressions provide a flexible and customizable way to match patterns in text, allowing for precise data extraction based on specific criteria.

2. Efficient Data Extraction: With regex, users can extract targeted information from text quickly and accurately, improving the efficiency of data processing tasks.

3. Text Manipulation: Regex enables text manipulation tasks such as replacing, formatting, and validating text based on defined patterns, enhancing data quality and consistency.

4. Scalable Data Processing: Using regular expressions in Robility enables scalable data processing capabilities, accommodating large volumes of text data efficiently.

5. Customizable Rules: Users can define custom rules and patterns using regular expressions, tailoring data extraction and processing tasks to specific business needs and requirements.

Use Cases

1. Data Extraction from Emails: Use regular expressions in Robility to extract specific data elements such as order numbers, customer names, or dates from incoming emails. This can automate the process of extracting important information from emails and feeding it into relevant systems or processes.

2. Form Data Validation: Incorporate regular expressions in workflows to validate form data entered by users. For example, validate email addresses, phone numbers, or postal codes to ensure they meet specific formatting requirements before submitting the form.

3. Text Parsing and Analysis: Use regular expressions to parse and analyze text data from documents, reports, or web pages. Extract key information like product names, prices, or stock levels for inventory management or market analysis.

4. Log File Analysis: Automate the analysis of log files using regular expressions in Robility. Extract error codes, timestamps, or specific events from log files to identify issues, track system performance, and generate reports.

5. File Naming Convention Enforcement: Automate the enforcement of file naming conventions using regular expressions. Ensure that files are named correctly based on predefined patterns or criteria to maintain consistency and organization.

12.9.1 Release Notes

v.1.1.7

This release includes enhancements to dependent DLLs.

Enhancement

All dependent DLLs have been upgraded to the latest stable versions, enhancing security, performance, and workflow reliability. This update ensures smoother execution and maintains compatibility with both existing and new workflows.

Released Date: 09/03/2026

12.9.2 IsMatch

This activity helps you validate details using the format of a data/detail.

Properties

INPUT

InputString:* Enter the input string to which the Regex pattern has to be applied.

Pattern:* Enter the Regex pattern to be used.

RegexOption:* Choose from the drop-down menu.

MISC

Display Name: Displays the name of the activity. You can also customize the activity name to help troubleshoot issues faster. This name will be used for logging purposes.

SkipOnError: It specifies whether to continue executing the workflow even if it throws an error. This supports only Boolean value “True or False”

True: Continues to execute the workflow irrespective of any error thrown.

False: Stops the workflow if it throws any error

Version: It specifies the version of the Regex Automation feature in use.

OUTPUT

Result: It provides the ability to view the execution status of the activity. It returns values in “Boolean.”
True: Indicates that the activity has been executed successfully without any errors.
False: Indicates that the activity has been unsuccessful due to an unexpected error being thrown.

* Represents mandatory fields to execute the workflow.

12.9.3 Matches

This activity helps you to locate and handle required data from a large string of characters.

Properties

INPUT

InputString:* Enter the input string to which the Regex pattern has to be applied.

Pattern: *Enter the Regex pattern to be used.

RegexOption:* Choose from the drop-down menu.

MISC

Display Name: Displays the name of the activity. You can also customize the activity name to help troubleshoot issues faster. This name will be used for logging purposes.

SkipOnError: It specifies whether to continue executing the workflow even if it throws an error. This supports only Boolean value “True or False”
True: Continues to execute the workflow irrespective of any error thrown.
False: Stops the workflow if it throws any error

Version: It specifies the version of the Regex Automation feature in use.

OUTPUT

MatchResults: It provides the ability to view the execution status of the activity. It returns values in “Boolean.”
True: Indicates that the activity has been executed successfully without any errors.
False: Indicates that the activity has been unsuccessful due to an unexpected error being thrown.

* Represents mandatory fields to execute the workflow.

12.9.4 Replace

This activity is used to replace a character within a specified string by applying the regex pattern given.

Properties

INPUT

InputString:* Enter the input string to which the Regex pattern has to be applied.

Pattern:* Enter the Regex pattern to be used.

RegexOption:* Choose from the drop-down menu.

Replacement:* Enter the replacement text to be used in the input string

MISC

Display Name: Displays the name of the activity. You can also customize the activity name to help troubleshoot issues faster. This name will be used for logging purposes

SkipOnError: It specifies whether to continue executing the workflow even if it throws an error. This supports only Boolean value “True or False”
True: Continues to execute the workflow irrespective of any error thrown.
False: Stops the workflow if it throws any error

Version: It specifies the version of the Regex Automation feature in use.

OUTPUT

Text: Declare a variable here to view the result of the replaced string. This is not a mandatory field however declare a variable to get the result.

* Represents mandatory fields to execute the workflow.

12.10 SFTP

Introduction

Robility integrates with SFTP (Secure File Transfer Protocol), a secure version of the File Transfer Protocol (FTP) that uses the Secure Shell (SSH) protocol to provide encryption and secure file transfer over a network. SFTP ensures that the authentication of both the client and server, as well as the data being transferred, are protected from eavesdropping, tampering, and interception.

Key features

1. Security: SFTP uses SSH to encrypt both the commands and the data being transferred, providing a secure channel for file transfer.
2. Authentication: SFTP supports various authentication methods, including password-based and key-based authentication, ensuring secure access control.
3. Data Integrity: The use of SSH ensures that the data remains intact during transfer, preventing data corruption or tampering.
4. Encryption: All data transmitted over SFTP is encrypted, making it difficult for unauthorized parties to intercept or decipher the information.
5. Firewall Friendly: SFTP operates over a single port (typically port 22), making it easier to manage and configure in network environments with firewalls.

Benefits

1. Enhanced Security: SFTP uses SSH to encrypt both commands and data, ensuring secure file transfers and protecting sensitive information from unauthorized access and cyber threats.
2. Data Integrity: Ensures that the data remains intact during transfer, preventing corruption or tampering. This is crucial for maintaining the accuracy and reliability of the data being transferred.
3. Compliance: Helps meet regulatory requirements for data protection and privacy by providing a secure method for transferring sensitive information.
4. Automated Transfers: Facilitates automated and scheduled file transfers, which can enhance productivity and efficiency in workflows.
5. Scalability: Easily scalable to accommodate increasing volumes of data transfer, making it suitable for both small and large enterprises.

12.10.1 Release Notes

v.1.1.1

In this release, we have addressed bug fixes.

Bug Fix

Previously, users encountered an issue while executing the SFTP activity, receiving an “Unexpected error occurred” message due to a DLL mismatch within the package. This issue has now been resolved. 

Limitation

To use both FTP and SFTP in the same workflow, ensure you are using FTP version 1.1.6 and SFTP version 1.1.1. Otherwise, due to package reference conflicts, only one of them can be used at a time.

Released Date: 18/03/2026

12.10.2 SFTPScope

This activity helps the user to connect to an SFTP server using a username and password. It allows users to upload, download, create, delete, and check files or directories. Once authenticated, the credentials apply to all related actions, avoiding repeated logins.

Properties

INPUT

HostName: *Specifty the address of the “SFTP Server” to connect with and execute actions from within. It typically refers to the “Domain” or “IP Address” of the server and it accepts input values in “String” datatype. 

Password: *Specify the “Password” for the provided server, allowing access and authentication to the specified SFTP server.  It accepts values in “String” datatype.

PortNumber: *Specify the network port number that is used to establish a connection between the system and SFTP server. It accepts values in “Integer” datatype. 

Username: *Specify the Username for the provided server, allowing access and authentication to the specified SFTP server. It accepts values in “String” datatype. 

MISC

BodyGets auto filled once the “Activity” is dropped into the body.

DisplayName: Displays the name of the activity. The activity name can be customized, which aids in troubleshooting.

SkipOnError: Specify the “Boolean” value as “True” or “False.”

True: Continue executing the workflow regardless of any errors thrown.
False: Halt the workflow if it encounters any errors.
None: If the option is left blank, the activity will, by default, behave as if “False” were chosen.

Version: It indicates the version of the feature being used.

OUTPUT

Result: This parameter allows you to view the execution status of the activity and returns a value in “Boolean”.
True: Indicates that the activity has been executed successfully without any errors.
False: Indicates that the activity has been unsuccessful due to an unexpected error being thrown
.

* Represents mandatory fields to execute the workflow.

Execution of activities

The user needs to provide the server credentials to authenticate the SFTP server. Once authenticated, proceed to drag and drop the necessary activities inside the scope.

To learn how to execute these activities, follow these steps:

  1. Utilize “SFTP Scope”: Drag and drop the “SFTP Scope” activity into the workflow. 
  2. Enter Server Credentials: Provide the required server credentials, including the servername, username, and password, to establish a secure connection to the SFTP server.
  3. Configure Additional Settings: Adjust other relevant settings such as port number, if needed.
  4. Drag and Drop Activities: Add the desired activities within the SFTP scope to perform file operations such as uploading, downloading, or deleting files.
  5. Execute the Activities: Once the activities are configured, execute the workflow to perform the defined operations on the SFTP server.

For detailed instructions and examples on executing these activities, click here.

12.10.3 CreateDirectory

This activity allows the user to create a new directory at the specified path on the SFTP server. It must be used within a scope activity.

Properties

INPUT

DirectoryName:*Specify the name of the directory that needs to be created. It accepts input values in “String” datatype. 

SourcePath: *Specify the root directory path where the new directory will be created, and it accepts input values in “String” datatype. 

MISC

DisplayName: Displays the name of the activity. The activity name can be customized, which aids in troubleshooting.

SkipOnError: Specify the “Boolean” value as “True” or “False.”

True: Continue executing the workflow regardless of any errors thrown.
False: Halt the workflow if it encounters any errors.
None: If the option is left blank, the activity will, by default, behave as if “False” were chosen.

Version: It indicates the version of the feature being used.

OUTPUT

Result: This parameter allows you to view the execution status of the activity and returns a value in “Boolean”.
True: Indicates that the activity has been executed successfully without any errors.
False: Indicates that the activity has been unsuccessful due to an unexpected error being thrown
.

* Represents mandatory fields to execute the workflow.

12.10.4 DirectoryExists

This activity allows the user to check and validate whether the specified directory exists on the connected SFTP server. It must be used within a scope activity.

Properties

INPUT

DirectoryPath: *This parameter indicates to specify the directory path to validate whether it exists in the connected SFTP server. 

It accepts input values in “String” datatype. You can either hardcode the values in “String” format or provide the value in String” datatype.

MISC

DisplayName: Displays the name of the activity. The activity name can be customized, which aids in troubleshooting.

SkipOnError: Specify the “Boolean” value as “True” or “False.”

True: Continue executing the workflow regardless of any errors thrown.
False: Halt the workflow if it encounters any errors.
None: If the option is left blank, the activity will, by default, behave as if “False” were chosen.

Version: It indicates the version of the feature being used.

OUTPUT

Result: It provides the ability to view the execution status of the activity. It returns values in “Boolean.”
True: Indicates that the activity has been executed successfully without any errors.
False: Indicates that the activity has been unsuccessful due to an unexpected error being thrown.

Represents mandatory fields to execute the workflow


Here’s an example of how the activity is used in the workflow:

In the following example, we check if the specified directory exists on the SFTP server. I have used our SFTP server for this demonstration, but you can automate it with your own SFTP server.

1. Create a solution as “Backup”.
2. Install the “SFTP” feature from the “Manage Features” option.
3. Drag and drop the “SFTP Scope” activity into the workflow and set it as the start node.
a. This activity will authenticate the provided credentials and establish a connection to the SFTP server.
b. Enter the SFTP credentials, including the “Host Name,” “User Name,” and “Password,” in their respective fields.
4. Add the “DirectoryExists” into the body of the “Sftp Scope” activity.
a. Provide the “DirectoryPath” in the property.
b. In this case, I am providing the directory path from my SFTP server to validate it, which is “/SampleTest/”.
5. Now, navigate to the “Result” in the output section of the property to declare a variable to view the output.
6. Add the “Writelog” activity to print the output.
a. Enter the “InputString” as “DE.ToString” and provide the log level as “Info”.
7. Save and execute the workflow.

The bot will execute the workflow and provide the result of the output either as “True” or “False”.

12.10.5 DownloadFile

This activity helps the user to download the file from the specified directory in the connected SFTP server. It must be used within a scope activity

Properties

INPUT

DestinationPath: *This parameter specifies the directory path where the downloaded file should be placed on the local system.

It accepts input values in “String” datatype. You can either hardcode the values in “String” format or provide the value in String” datatype.

SourcePath: * This parameter specifies the location of the file on the SFTP server that needs to be fetched for downloading. 

It accepts input values in “String” datatype. You can either hardcode the values in “String” format or provide the value in String” datatype.

MISC

DisplayName: Displays the name of the activity. The activity name can be customized, which aids in troubleshooting.

SkipOnError: Specify the “Boolean” value as “True” or “False.”

True: Continue executing the workflow regardless of any errors thrown.
False: Halt the workflow if it encounters any errors.
None: If the option is left blank, the activity will, by default, behave as if “False” were chosen.

Version: It indicates the version of the feature being used.

OUTPUT

Result: It provides the ability to view the execution status of the activity. It returns values in “Boolean.”
True: Indicates that the activity has been executed successfully without any errors.
False: Indicates that the activity has been unsuccessful due to an unexpected error being thrown.

Represents mandatory fields to execute the workflow

Here’s an example of how the activity is used in the workflow:

In the following example, we check if the specified directory exists on the SFTP server. I have used our SFTP server for this demonstration, but you can automate it with your own SFTP server.

1. Create a solution as “Backup”.
2. Install the “SFTP” feature from the “Manage Features” option.
3. Drag and drop the “SFTP Scope” activity into the workflow and set it as the start node.
a. This activity will authenticate the provided credentials and establish a connection to the SFTP server.
b. Enter the SFTP credentials, including the “Host Name,” “User Name,” and “Password,” in their respective fields.
4. Add the “DownloadFile” into the body of the “Sftp Scope” activity.
a. Provide the “SourcePath” in the property as the path from the SFTP server. Here it is as “/SampleTest/output.txt”.
b. Next in the “DestinationPath” property, provide a path to where the file needs to be stored in the local system
c. Here it is as “C:\Users\user\Desktop\SFTP”.
5. Now, save and execute the workflow.

The bot will download the file and store in the specified location in the local file system.

12.10.6 EnumerateObject

This activity helps the user to retrieve the list of files and sub folders from the specified directory in the connected SFTP server. It must be used within a scope activity

Properties

INPUT

RemoteDirectoryPath: *This parameter specifies to provide the directory path from where the details need to be retrieved. It accepts input values in “String” datatype. You can either hardcode the values in “String” format or provide the value in String” datatype.

MISC

DisplayName: Displays the name of the activity. The activity name can be customized, which aids in troubleshooting.

SkipOnError: Specify the “Boolean” value as “True” or “False.”

True: Continue executing the workflow regardless of any errors thrown.
False: Halt the workflow if it encounters any errors.
None: If the option is left blank, the activity will, by default, behave as if “False” were chosen.

Version: It indicates the version of the feature being used.

OPTION

SubFolder: This parameter can be utilized when there are sub folders available in the specified directory. Check with option to retrieve the list of files from the sub folders also. 
When left empty, it will not be considered. 

OUTPUT

Files: It helps you to view the output of the activity as the list of files’ details retrieved from the specified folder. It returns values in “FileObject” datatype. It contains the following details,
1. Name
2. Size
3. LastModified
4. Permissions
5. IsDirectory 

Result: This parameter allows you to view the execution status of the activity and returns a value in “Boolean”.
True: Indicates that the activity has been executed successfully without any errors.
False: Indicates that the activity has been unsuccessful due to an unexpected error being thrown
.

* Represents mandatory fields to execute the workflow.

Here’s an example of how the activity is used in the workflow:

In the following example, we check if the specified directory exists on the SFTP server. I have used our SFTP server for this demonstration, but you can automate it with your own SFTP server.

1. Create a solution as “Backup”.
2. Install the “SFTP” feature from the “Manage Features” option.
3. Drag and drop the “SFTP Scope” activity into the workflow and set it as the start node.
a. This activity will authenticate the provided credentials and establish a connection to the SFTP server.
b. Enter the SFTP credentials, including the “Host Name,” “User Name,” and “Password,” in their respective fields.
4. Add the “EnumerateObject” into the body of the “Sftp Scope” activity.
a. Now, provide the “RemoteDirectoryPath” in the property as the path from the SFTP server from where the list of files needs to be retrieved.
b. Here it is as “/SampleTest/”.
5. Now, navigate to the “Files” in the output section of the property to declare and view the output.
a. Click on the property as “Files” and provide the variable name as “List_files” and press “CTRL+Q” to create the variable.
b. Now, navigate to the variable section in the designer and click on the “Create variable” option.
    i.  Provide the variable name as “Sample”.
   ii. Click on the “variable type” and choose the “Browse for types” option.
  iii. Now, in the search area, provide the name as “Robility.SFTP.FileObject” and click on “Ok” button.
6. Add the “ForEach” activity into the body of the SFTP scope activity.
a. Here we are choosing this activity to iterate and retrieve each file in the specified directory.
b. Choose the “Type Argument” as “FileObject”.
c. Provide the value as “List_Files”.
7. Now, add a “Writelog” activity into the ForEach scope activity.
a. Here we are choosing this activity to iterate and print the name of each file in the specified directory.
b. Provide the input value as “Item.Name.ToString”.
     i. To retrieve the name of each file, we have provided the value as “Name” near Item variable
     ii. To retrieve other properties details, you can add the property name along with the “Item” variable” as follows,

Item.LastModified.ToString – Retrieves the last modified date of the item.
Item.Size.ToString – Displays the file size from the list.
Item.Permissions – Provides the permissions assigned to each file in the specified source folder.
Item.IsDirectory.ToString – Determines whether the listed item is a directory.
8. Save and execute the workflow. 

The bot will retrieve all the files from the specified directory in the connected SFTP server and prints the name of each file in it.

Files & Folder Permissions Explanation

When retrieving the permissions for a list of files/folders, the following outputs represent the permissions:

1. rw-r–r– (Readable by everyone)
Owner (rw-) → Read & Write
Group (r–) → Read-only
Others (r–) → Read-only

2. rw-rw—- (Owner and Group only has access)
Owner (rw-) → Read & Write
Group (rw-) → Read & Write
Others (—) → No permissions

3. rw——-(Owner only has full control)
Owner(rw-) → Read & Write
Group (—) →No permissions
Others (—) → No permissions

4. rwx——(Owner only has full control)
Owner (rwx) → Read, Write & Execute
Group (—) → No permissions
Others (—) → No permissions

12.10.7 FileExists

This activity allows the user to check and validate whether the specified file exists on the connected SFTP server. It must be used within a scope activity. 

Properties

INPUT

FilePath: *This parameter specifies the file path to validate whether it exists in the specified directory path.  

It accepts input values in “String” datatype. You can either hardcode the values in “String” format or provide the value in String” datatype.

MISC

DisplayName: Displays the name of the activity. The activity name can be customized, which aids in troubleshooting.

SkipOnError: Specify the “Boolean” value as “True” or “False.”

True: Continue executing the workflow regardless of any errors thrown.
False: Halt the workflow if it encounters any errors.
None: If the option is left blank, the activity will, by default, behave as if “False” were chosen.

Version: It indicates the version of the feature being used.

OUTPUT

Result: It provides the ability to view the execution status of the activity. It returns values in “Boolean.”
True: Indicates that the activity has been executed successfully without any errors.
False: Indicates that the activity has been unsuccessful due to an unexpected error being thrown.

Represents mandatory fields to execute the workflow.

Here’s an example of how the activity is used in the workflow:

In the following example, we check if the specified file exists on the SFTP server. I have used our SFTP server for this demonstration, but you can automate it with your own SFTP server.

1. Create a solution as “Backup”.
2. Install the “SFTP” feature from the “Manage Features” option.
3. Drag and drop the “SFTP Scope” activity into the workflow and set it as the start node.
a. This activity will authenticate the provided credentials and establish a connection to the SFTP server.
b. Enter the SFTP credentials, including the “Host Name,” “User Name,” and “Password,” in their respective fields.
4. Add the “FileExists” into the body of the “Sftp Scope” activity.
a. Provide the “DirectoryPath” in the property.
b. In this case, I am providing the directory path from my SFTP server to validate it, which is “/SampleTest/”.
5. Now, navigate to the “Result” in the output section of the property to declare a variable to view the output.
6. Add the “Writelog” activity to print the output.
a. Enter the “InputString” as “FE.ToString” and provide the log level as “Info”.
7. Save and execute the workflow.

The bot will execute the workflow and provide the result of the output either as “True” or “False”.

12.10.8 MoveItem

The “Move Item” will help the users to move either file or directory from one directory to another directory on the connected SFTP server.

Properties

INPUT

Move Item Type: This parameter indicates the user to choose the below type for the execution of the activity. 

File: Allows you to move the files from the specified directory.
Directory:  Allows you to move the directory from the specified directory.

Destination Remote Path: *This parameter indicates to provide the destination path of the directory to where the specified file/ directory is required to be moved.

It accepts input values in “String” datatype. You can either hardcode the values in “String” format or provide the value in String” datatype.

Source Remote Path: *This parameter indicates to provide the source path of the directory from where the specified file/ directory is required to be moved.

It accepts input values in “String” datatype. You can either hardcode the values in “String” format or provide the value in String” datatype.

MISC

DisplayName: Displays the name of the activity. The activity name can be customized, which aids in troubleshooting.

SkipOnError: Specify the “Boolean” value as “True” or “False.”

True: Continue executing the workflow regardless of any errors thrown.
False: Halt the workflow if it encounters any errors.
None: If the option is left blank, the activity will, by default, behave as if “False” were chosen.

Version: It indicates the version of the feature being used.

OPTIONS

Overwrite: Utilize this option to enable if the specified file/directory in the destination path needs to be over written.

When left empty, it will not be considered during execution.

OUTPUT

Result: It provides the ability to view the execution status of the activity. It returns values in “Boolean.”
True: Indicates that the activity has been executed successfully without any errors.
False: Indicates that the activity has been unsuccessful due to an unexpected error being thrown.

Represents mandatory fields to execute the workflow.

12.10.9 RemoveDirectory

This activity helps the user to remove/delete the directory from the specified path in the connected SFTP server. It must be used within a scope activity.

Properties

INPUT

DirectoryPath: *This parameter indicates to specify the directory path to remove the directory from the connected SFTP server. 

It accepts input values in “String” datatype. You can either hardcode the values in “String” format or provide the value in String” datatype.

MISC

DisplayName: Displays the name of the activity. The activity name can be customized, which aids in troubleshooting.

SkipOnError: Specify the “Boolean” value as “True” or “False.”

True: Continue executing the workflow regardless of any errors thrown.
False: Halt the workflow if it encounters any errors.
None: If the option is left blank, the activity will, by default, behave as if “False” were chosen.

Version: It indicates the version of the feature being used.

OUTPUT

Result: It provides the ability to view the execution status of the activity. It returns values in “Boolean.”
True: Indicates that the activity has been executed successfully without any errors.
False: Indicates that the activity has been unsuccessful due to an unexpected error being thrown.

Represents mandatory fields to execute the workflow.

12.10.10 RemoveFile

This activity helps the user to remove/delete the file from the specified directory in the connected SFTP server. It must be used within a scope activity.

Properties

INPUT

DirectoryPath: *This parameter specifies the file path to remove from the connected SFTP server. 

It accepts input values in “String” datatype. You can either hardcode the values in “String” format or provide the value in String” datatype.

MISC

DisplayName: Displays the name of the activity. The activity name can be customized, which aids in troubleshooting.

SkipOnError: Specify the “Boolean” value as “True” or “False.”

True: Continue executing the workflow regardless of any errors thrown.
False: Halt the workflow if it encounters any errors.
None: If the option is left blank, the activity will, by default, behave as if “False” were chosen.

Version: It indicates the version of the feature being used.

OUTPUT

Result: It provides the ability to view the execution status of the activity. It returns values in “Boolean.”
True: Indicates that the activity has been executed successfully without any errors.
False: Indicates that the activity has been unsuccessful due to an unexpected error being thrown.

Represents mandatory fields to execute the workflow.

12.10.11 UploadFile

This activity enables the user to transfer a file from the local system to the specified SFTP server. It must be used within a scope activity.

Properties

INPUT

DestinationPath: *This parameter indicates to the provide the directory path where the file needs to be placed in the connected SFTP server.

It accepts input values in “String” datatype. You can either hardcode the values in “String” format or provide the value in String” datatype.

SourcePath: *This parameter specifies the location of the file on the local system that needs to be fetched for uploading to the connected SFTP server.

It accepts input values in “String” datatype. You can either hardcode the values in “String” format or provide the value in String” datatype.

MISC

DisplayName: Displays the name of the activity. The activity name can be customized, which aids in troubleshooting.

SkipOnError: Specify the “Boolean” value as “True” or “False.”

True: Continue executing the workflow regardless of any errors thrown.
False: Halt the workflow if it encounters any errors.
None: If the option is left blank, the activity will, by default, behave as if “False” were chosen.

Version: It indicates the version of the feature being used.

OUTPUT

Result: It provides the ability to view the execution status of the activity. It returns values in “Boolean.”
True: Indicates that the activity has been executed successfully without any errors.
False: Indicates that the activity has been unsuccessful due to an unexpected error being thrown.

Represents mandatory fields to execute the workflow.

12.11 Formatting

About

The Formatting feature in Robility simplifies the process of text transformation and manipulation within automation workflows. It provides a visual, no-code approach to performing text transformations that would otherwise require complex expressions or custom scripting.

This feature is designed to make text modification intuitive and feasible for users whether technical or non-technical by replacing syntax-based logic with configurable, drag-and-drop activities.

Key Benefits

1. Ease of Use: Allows users to perform text operations without writing expressions.

2. Improved Readability: Makes automation workflows clearer and easier to maintain.

3.Time Efficiency: Reduces development time by eliminating manual coding.

4. Consistency: Ensures uniform formatting rules across different processes.

5. Error Reduction: Minimizes syntax errors and enhances reliability of data handling.


12.11.1 Release Notes

v.1.3.8

This release includes enhancements to dependent DLLs.

Enhancement

All dependent DLLs have been upgraded to the latest stable versions, enhancing security, performance, and workflow reliability. This update ensures smoother execution and maintains compatibility with both existing and new workflows.

Released Date: 09/03/2026

12.11.2 Combined Text

This activity can be used only within the “Modify Text” scope. It allows users to append new text to the existing input value.

Properties

Input

New Text to Add: Specifies the new text value to be appended to the existing input. Accepts values of the String data type.

Add New Text To: Specifies the position where the new text should be appended.

Left: Appends the new text to the beginning of the input value.

Right: Appends the new text to the end of the input value.

MISC

Display Name: Displays the name of the activity. The activity name can be customized, which aids in troubleshooting.

SkipOnError: Specify the “Boolean” value as “True” or “False.”

True: Continue executing the workflow regardless of any errors thrown.
False: Halt the workflow if it encounters any errors.
None: If the option is left blank, the activity will, by default, behave as if “False” were chosen.

Version: It indicates the version of the feature being used.

Limitation

The drag-and-drop functionality is not supported within the scope. The activity is automatically inserted into the scope once the corresponding action is selected. 

12.11.3 Find And Replace Text

This activity can be used only within the “Modify Text” scope. It allows users to search for a specified text and replace it with another value.

Properties

Input

Search For: Specifies the text value to be searched within the input. Accepts values of the String data type.

Replace With: Specifies the new value that will replace the searched text. Accepts values of the String data type.

MISC

Display Name: Displays the name of the activity. The activity name can be customized, which aids in troubleshooting.

SkipOnError: Specify the “Boolean” value as “True” or “False.”

True: Continue executing the workflow regardless of any errors thrown.
False: Halt the workflow if it encounters any errors.
None: If the option is left blank, the activity will, by default, behave as if “False” were chosen.

Version: It indicates the version of the feature being used.

Option

Match Case: Enables case-sensitive matching to ensure that the find-and-replace operation distinguishes between uppercase and lowercase characters.

Limitation

The drag-and-drop functionality is not supported within the scope. The activity is automatically inserted into the scope once the corresponding action is selected.

12.11.4 Modify Text

This activity allows users to modify input text by performing actions such as combining, finding/replacing, trimming, or converting text to upper or lower case. It functions as a scope to execute the modification and returns the modified output.

Properties

Input

Text to Modify: *Specifies the input text to be modified based on the selected action. Accepts values of the String data type.

Add a Modification from the Below: Allows users to choose and add the modification action to be performed. Selecting the action will automatically include the child activity into the scope.

Modification Options

Find and Replace: Finds the specified input text and replaces it with another value.

Combine Text: Appends the provided input text to the existing text.

Trim: Removes whitespace and tab characters from the input text.

Text to Upper/Lower: Converts all characters in the input text to either upper or lower case.

MISC

Display Name: Displays the name of the activity. The activity name can be customized, which aids in troubleshooting.

SkipOnError: Specify the “Boolean” value as “True” or “False.”

True: Continue executing the workflow regardless of any errors thrown.
False: Halt the workflow if it encounters any errors.
None: If the option is left blank, the activity will, by default, behave as if “False” were chosen.

Version: It indicates the version of the feature being used.

Output

Modified Text: *Returns the modified text as the output in STRING datatype.

Result: This parameter allows you to view the execution status of the activity and returns a value in “Boolean.”

True: Indicates that the activity has been executed successfully without any errors.
False: Indicates that the activity has been unsuccessful due to an unexpected error being thrown

*Represents mandatory fields to execute the workflow.

12.11.5 Split Text

This activity allows users to split the provided input text based on specific delimiters such as newline, space, tab, comma, colon, semicolon, or by extracting values that occur between two specified strings.

Properties

Input

Source Text: *Specifies the input text to be split based on the selected delimiter. Accepts values of the String data type.

Separator: *Specifies the delimiter to be used for splitting the text. The following options are available:

Newline: Splits the text wherever a new line occurs.

Space: Splits the text at each space character.

Tab: Splits the text at each tab character.

Comma: Splits the text at each comma.

Colon: Splits the text at each colon.

Semicolon: Splits the text at each semicolon.

Value Between Strings: Extracts and returns values that occur between two specified strings.

MISC

Display Name: Displays the name of the activity. The activity name can be customized, which aids in troubleshooting.

SkipOnError: Specify the “Boolean” value as “True” or “False.”

True: Continue executing the workflow regardless of any errors thrown.
False: Halt the workflow if it encounters any errors.
None: If the option is left blank, the activity will, by default, behave as if “False” were chosen.

Version: It indicates the version of the feature being used.

Output

All Extracted Text: Returns all the extracted as output in list of string datatype.

First Extracted Text: Returns only the first result of the split action performed in string datatype.

Result: This parameter allows you to view the execution status of the activity and returns a value in “Boolean.”

True: Indicates that the activity has been executed successfully without any errors.
False: Indicates that the activity has been unsuccessful due to an unexpected error being thrown

* Represents mandatory fields to execute the workflow.

12.11.6 Text to Upper Lower Case

This activity can be used only within the “Modify Text” scope. It allows users to convert all characters in the provided input text to either upper or lower case.

Properties

Input

Change Text To: Specifies the action to convert the text to either Upper Case or Lower Case.

MISC

Display Name: Displays the name of the activity. The activity name can be customized, which aids in troubleshooting.

SkipOnError: Specify the “Boolean” value as “True” or “False.”

True: Continue executing the workflow regardless of any errors thrown.
False: Halt the workflow if it encounters any errors.
None: If the option is left blank, the activity will, by default, behave as if “False” were chosen.

Version: It indicates the version of the feature being used.

Limitation

The drag-and-drop functionality is not supported within the scope. The activity is automatically inserted into the scope once the corresponding action is selected.

12.11.7 Trim Text

This activity can be used only within the “Modify Text” scope. It allows users to remove extra spaces and tab characters from the input text.

Properties

Input

Select Left/Right or Both: Specifies the position from which whitespace or tab characters should be removed.

Left: Removes whitespace and tab characters from the beginning of the input text.

Right: Removes whitespace and tab characters from the end of the input text.

Both: Removes whitespace and tab characters from both the beginning and end of the input text.

MISC

Display Name: Displays the name of the activity. The activity name can be customized, which aids in troubleshooting.

SkipOnError: Specify the “Boolean” value as “True” or “False.”

True: Continue executing the workflow regardless of any errors thrown.
False: Halt the workflow if it encounters any errors.
None: If the option is left blank, the activity will, by default, behave as if “False” were chosen.

Version: It indicates the version of the feature being used. 

Limitation

The drag-and-drop functionality is not supported within the scope. The activity is automatically inserted into the scope once the corresponding action is selected.

12.12 CoreActivities

12.12.1 Release Notes

v.2.3.8

This release includes stability and performance improvements across connector activities.

Bug Fix

Resolved an issue that could cause intermittent execution failures and increased processing time during connector operations. Authentication handling has been optimized to improve connection reliability, reduce unnecessary authentication requests, and enhance overall workflow performance.

Released Date: 02/06/2026

12.12.2 InvokeVBScript

The Invoke VBScript activity enables the execution of a standalone VBScript (.vbs) file within an automated workflow. It supports passing input arguments to the script at runtime and capturing the resulting output, making it well-suited for performing Windows-specific tasks through the Windows Script Host environment.

Properties

INPUT

VBScriptFilePath*: Specifies the full file path of the VBScript to be executed. Accepts a String value. The path may be hardcoded directly or supplied dynamically through a variable. The file must have a .vbs extension.

MISC

DisplayName: Defines the label displayed for the activity on the workflow canvas. This field may be customized to improve readability and simplify troubleshooting.

SkipOnError: Specifies a Boolean value (True or False):
True: Continues executing the workflow even if an error occurs.
False: Stops the workflow if an error is encountered.
None: If left blank, the default behavior is False.

Timeout: Defines the maximum duration, in milliseconds, the activity will wait before timing out. The default value is 30,000 ms (30 seconds).

Version: Displays the version of the activity being used. This field is auto populated and read-only.

OPTION

WaitForOutput: Determines whether the workflow should pause until the script completes and returns its output. Set to True to wait for completion before proceeding, or False to continue execution without waiting. Defaults to True.

OUTPUT

Result: Returns a Boolean value indicating the execution status. True confirms the activity completed successfully; False indicates a failure occurred.

ResultText: Returns the output produced by the VBScript as a String. If the activity fails, this field may be empty or may contain relevant error details.

*Represents the mandatory fields

Input Arguments Panel

To configure input arguments, click the Input Arguments button on the activity canvas. Each argument defined in this panel is passed into the script at runtime and referenced within the VBScript by its positional index.

Argument Table
Column Description
Direction Indicates the flow of data. Fixed as In and cannot be modified.
Type Indicates the data type of the argument. Fixed as String and cannot be modified.
Value The string value to be passed into the script at the corresponding index position.
+ Adds a new argument entry row.
× Removes the selected argument row.

How It Works

The activity accepts the file path of a VBScript and processes any input arguments provided. Upon execution, it returns the script’s output as a string value along with a status flag, which can be used to control downstream workflow behavior.

1. Drag and drop the Invoke VBScript activity into the workflow canvas and designate it as the start node.

2. Double-click the activity to open its properties panel.

3. In the VBScriptFilePath field, enter the full path to your .vbs file — for example, C:\Scripts\CheckNumber.vbs

4. Click Input Arguments to open the configuration panel. Enter the string values to be passed into the script. Each value is accessible within the script.

5. Connect a Write Log activity downstream to review the values returned in Result and ResultText.

Example – Number Evaluation Script

VBScript file path: C:\Scripts\CheckNumber.vbs

VBScript code:

num = CInt(WScript.Arguments(0))
If num > 5 Then
    result = “Number is greater than 5”
Else
    result = “Number is 5 or less”
End If
WScript.Echo result

The script reads the first input argument, evaluates it against the condition, and returns the appropriate result.

Input arguments passed: “10”, “3”, “2”, “8”

Output Reference:

Input Value ResultText Result
10 Number is greater than 5 True
8 Number is greater than 5 True
3 Number is 5 or less False
2 Number is 5 or less False

Write Log syntax – string output:

“Output is: ” + result

Write Log syntax – boolean expression:

“Result: ” + (num > 5).ToString

12.12.3 KillProcess

The Kill Process activity is used to terminate a specified Windows process. It forcefully closes running instances of an application based on the provided process name or process object. This activity is commonly used to ensure that unwanted or previously running instances of an application interfere with the automation workflow.

Properties

INPUT

Process: Represents a Process object that identifies the specific process instance to be terminated. It is typically used when the process has been retrieved dynamically and needs to be referenced directly (for example, from a Start Process activity).

ProcessName: Specifies the name of the process to be terminated. It accepts a string variable representing the process name as seen in Task Manager (for example, “Notepad”).

Note: Either Process or ProcessName is mandatory.

MISC

DisplayName: Displays the name of the activity. The name can be customized for better readability and troubleshooting.

SkipOnError: Specify the “Boolean” value as “True” or “False.”

True: Continue executing the workflow regardless of any errors thrown.
False: Halt the workflow if it encounters any errors.
None: If the option is left blank, the activity will, by default, behave as if “False” were chosen.

Version: Displays the version of the activity being used. This field is auto-populated and read-only.

OUTPUT

ResultIt provides the ability to view the execution status of the activity. It returns values in “Boolean.”

True: Indicates that the activity has been executed successfully without any errors.
False: 
Indicates that the activity has been unsuccessful due to an unexpected error being thrown.

Note:

  1. In shared environments such as Citrix or VDI, forcefully terminating browser processes (e.g., Chrome or Edge) is not considered best practice. This can result in unclean shutdowns, causing browser sessions and extensions to reload or reinitialize. As a result, subsequent retries in the automation flow may experience additional latency and inconsistent behavior.
  2. In shared environments such as Citrix, using the Kill Process activity with a process name may terminate all instances of the application across user sessions if not properly scoped. It is recommended to ensure session-level isolation or use alternative methods to safely close applications.

13. Control Plane

13.1 Home

The Builder Assistant is a conversational interface for creating and configuring platform components such as Agents, Policies, and Compliance Groups. It guides users through the required configuration steps, validates selections, and generates the required artifacts.

The Builder Assistant is available from the Home page.

Capabilities

  • Creating Agents
  • Creating Policies
  • Creating Compliance Groups
  • Framework selection
  • Tool selection
  • Compliance group assignment
  • Policy recommendations
  • Configuration review before creation
  • Downloadable agent packages
  • Thread-based workflow management

Starting a New Thread

To begin:

  1. Navigate to Home.
  2. Click New Thread.
  3. Select the component to create.

Available Options

  • Agent
  • Policy
  • Compliance
  • Other
Note: Only one component can be created within a thread. Complete the current workflow before starting another.
Get Started: Begin creating your agent by following the steps in Creating an Agent .

13.1.1 Create Agent

The Agent Creation workflow allows users to create and configure agents through the Builder Assistant. The assistant guides users through defining the agent purpose, configuring required settings, reviewing the configuration, and generating the agent package.

Agent Creation Workflow

The workflow consists of the following steps:

  1. Define the Agent Purpose
  2. Configure the Agent
  3. Review Configuration
  4. Create Agent
  5. Generated Output
Step 1 – Define the Agent Purpose

Provide a short description of the business objective for the agent.

Example: Automate customer interactions to improve response time and customer satisfaction.

The description should focus on the business outcome rather than implementation details.

Step 2 – Configure the Agent

Configure the required settings for the agent.

Framework

Select the framework used to build the agent.

Supported frameworks include:

  • Google ADK
  • LangChain
  • CrewAI
  • Strands

Tools (Optional)

Select one or more platform tools to extend the agent's capabilities.

  • Multiple tools can be selected.
  • Available tools may vary based on the selected framework.

Compliance Groups (Optional)

Select one or more compliance groups applicable to the agent.

Examples include:

  • HIPAA
  • SOC 2

Policy Recommendations (Optional)

When a compliance group is selected, the Builder Assistant displays recommended policies associated with the selected compliance framework.

Review the recommendations before proceeding.

Step 3 – Review Configuration

Before creating the agent, review the generated configuration summary.

The summary includes:

  • Framework
  • Selected tools
  • Compliance groups
  • Applied policies

Modify the configuration if required, then select Create.

Step 4 – Create Agent

After reviewing the configuration, create the agent using the Builder Assistant.

The system processes the selected configuration and generates the required agent artifacts.

Step 5 – Generated Output

After the agent is created, the Builder Assistant generates a downloadable ZIP package containing:

  • Generated agent source code
  • Configuration files

The generated files can be integrated into the application and deployed.

The following animation demonstrates the steps involved in this process.

Create Agent workflow demonstration

Best Practices

  • Define the business objective before creating an agent.
  • Select only the tools required for the solution.
  • Apply the appropriate compliance groups.
  • Review recommended policies before creating the agent.
  • Validate the configuration before generating the agent package.

13.2 Agent Management

13.2.1 Agent Group

Agent Groups is a centralized management layer for creating, organizing, and managing AI agents within a project. It allows you to configure agent settings, assign tools and skills, apply compliance requirements, define execution limits, and monitor agent activity.

Agent Groups help maintain consistent agent behavior and governance by allowing associated agents to inherit shared configurations such as tools, skills, compliance policies, and execution constraints.

Key Capabilities

  • Compliance Monitoring: Tracks how agents handle sensitive data and ensures configured organizational policies are enforced during execution.
  • Trace Investigations: Detailed execution traces to review agent activity, analyze behavior, and investigate operational or security-related events.

13.2.2 Agent Group Dashboard

The Agent Group Dashboard provides an overview of agent group activity, compliance, policy events, and model usage within a project.

The dashboard consists of:

  • Agent Group Overview
  • Agent Controls

Agent Group Overview

The Agent Group Overview displays operational and compliance metrics across all agent groups.

The overview includes:

  • Trace Activity & Compliance – Trace volume and compliance outcomes.
  • Per-Agent Breakdown – Activity metrics for individual agent groups.
  • Top Triggered Policies – Policies triggered most frequently during execution.
  • Recent High-Risk Events – Recent events flagged as high risk.
  • Model Usage – Model usage across agent groups.
  • Tool Invocations – Tool usage during agent execution.

Trace Activity & Compliance

Trace Activity

The Trace Activity chart displays the number of traces processed over the last seven days, grouped by compliance outcome.

Compliance outcomes include:

Status Description
Passed Trace completed successfully without any compliance violations.
Redacted Sensitive content was detected and masked during processing.
Blocked Trace was blocked due to one or more compliance violations.
Trace Activity by Compliance Outcome

Compliance Split

The Compliance Split widget displays the distribution of trace outcomes across all processed traces as a donut chart.

Trace outcomes are categorized into:

Status Description
Passed Traces completed without compliance violations.
Redacted Traces where sensitive content was masked or modified.
Blocked Traces prevented from completing due to compliance violations.
Compliance Split

Per-Agent Breakdown

The Per-Agent Breakdown widget displays compliance and performance metrics for each agent group.

Health Score represents the percentage of requests handled successfully from a compliance perspective.

Formula:

Health Score = (Passed Traces + Sanitized Traces) ÷ Total Traces

The following metrics are displayed for each agent group:

Metric Description
Traces Total number of requests processed.
Passed Requests completed without compliance violations.
Sanitized Requests where sensitive data was successfully masked or redacted.
Blocked Requests prevented from completing due to policy violations.
Compliance Health Percentage of compliant requests.
Avg Runtime Average processing time per request.
Policies Number of active policies applied to the agent group.
Per-Agent Breakdown

Configure Agent Group

The Configure Agent Group screen allows users to define the operational settings, resources, and constraints for an agent group. Through a guided workflow, users can configure agent behavior, assign tools and skills, apply compliance requirements, and set execution limits.

Step 1: Agent Information

Provide the basic information required for the agent group.

Field Description
Description Describe what the agent group is responsible for, what tasks it is intended to perform, and how it is expected to behave.

Step 2: Adapter

Select the adapter that the agent group will use during execution.

Field Description
Adapter Choose an adapter from the available list. The selected adapter determines how the agent group interacts with underlying services and execution environments.

Supported Adapters: LangChain, Google ADK, Crew AI, and Strands.

Step 3: Tools Configuration

Manage the tools available to the agent group.

  • Selected Tools — Choose the built-in and custom tools that agents in the group can use during execution.
    Refer to Tools for more information.
  • Blocked Tools — Restrict access to tools that are unnecessary, sensitive, or irrelevant to the agent's intended purpose.
  • Custom Tools — If a required tool is not available, click Add Custom Tool to create a new project-scoped tool and make it available for selection.
    Refer to Custom Tools for more information.

Step 4: Agent Group Limits

Set execution boundaries and resource usage limits to help manage agent performance and system consumption.

Setting Description
Max Agent Calls Specify the maximum number of agent invocations allowed during execution.
Timeout (sec) Specify the maximum execution time, in seconds, before the request is terminated.
Input Tokens Specify the maximum number of input tokens that can be processed in a single request.
Output Tokens Specify the maximum number of output tokens that can be generated during execution.

Step 5: Compliance

Assign compliance to ensure agent interactions and outputs follow defined governance and regulatory requirements.

  • Select one or more compliance configurations from the available list.
  • Applied compliance rules are enforced during agent execution.
  • The policies associated with the selected compliance are listed. If you do not want to include a policy, you can disable it.

Step 6: Skills

Select the skills that should be available to the agent group during execution.

  • Selected Skills — Choose from built-in or project-specific custom skills available within the platform.
    Refer to Skills for more information.
  • Custom Skills — Click Add Custom Skill to create and register a new project-scoped skill. Newly created skills become immediately available for selection.
    Refer to Custom Skills for more information.

Step 7: Export Agent Slug

Export the agent group's unique identifier for use in integrations, deployments, or external references.

  • Generate the agent slug after completing the configuration.
  • Use the exported slug to reference the agent group in external systems and workflows.

Save Configuration

After completing all steps, review your settings and save the agent group. Once saved, the configured agent group becomes available for use within the selected project.

Trace Investigation

The Trace Investigation page provides a detailed audit trail for each request processed by an agent.

Each trace includes:

  • Input Context – The user request submitted for processing.
  • Processing Details – Information about the agent, model, and tool execution.
  • Response Output – The final response generated by the agent.

Trace outcome indicators:

  • Green – Passed
  • Amber – Redacted
  • Red – Blocked
Trace Investigation

Individual Trace Investigation Details

The Individual Trace Investigation Details page provides a detailed view of a single trace.

1. Execution Timeline

Displays all execution steps in chronological order.

2. Transaction Details Panel

Displays the request input, intermediate processing, model and tool interactions, and the final response.

3. Compliance Policies Panel

Displays the policies applied during execution. Expand a policy to view its evaluation results and the actions taken.

Individual Trace Investigation Details

Top Triggered Policies

The Top Triggered Policies widget displays the compliance policies that are triggered most frequently across all agent groups.

Severity levels are indicated by color:

  • Orange – High priority
  • Red – Critical
Top Triggered Policies
Note: This widget is read-only.

Recent High-Risk Events

The Recent High-Risk Events widget displays the latest policy enforcement events across all agent groups.

Each event includes:

  • Policy – The policy that was triggered.
  • Risk Category – The type of compliance risk identified.
  • Agent Group – The agent group associated with the event.
  • Time of Occurrence – The date and time when the event occurred.

Severity levels are indicated by color:

  • Red – Critical
  • Orange – High priority
Recent High-Risk Events
Note: This widget is read-only.

Model Usage

The Model Usage widget displays the number of LLM calls made by each model across all agent groups.

Each model includes:

  • Model Name – The name of the LLM model.
  • LLM Calls – The total number of calls made to the model.
  • Usage Bar – A visual representation of the total number of LLM calls.
Model Usage
Note: This widget is read-only.

Tool Invocations

The Tool Invocations widget displays the number of times each tool was invoked across all agent groups.

Each tool includes:

  • Tool Name – The name of the tool.
  • Invocation Count – The total number of times the tool was invoked.
  • Usage Bar – A visual representation of the total number of invocations.
Tool Invocations
Note: This widget is read-only.

Agent Controls

The Agent Controls page allows administrators to manage the execution of agent groups in real time. It provides controls for managing all agent groups, individual agent groups, and bulk operations.

Overall Controls

The Overall Controls section provides actions that apply to all agent groups.

  • Start All – Starts processing new traces across all agent groups.
  • Emergency Stop All – Immediately stops processing across all agent groups, including requests that are currently in progress.

Per-Agent Controls

The Per-Agent Controls section provides actions for managing individual agent groups.

  • Start – Starts processing new traces.
  • Pause – Temporarily pauses new trace processing while keeping the agent group available.
  • Stop – Immediately stops the agent group, including any requests that are currently in progress.
  • Drain – Stops accepting new traces while allowing in-progress requests to complete.
  • Adjust Rate Limits – Sets the maximum number of traces the agent group can process per minute.

Danger Zone

The Danger Zone section provides bulk actions that affect all agent groups.

  • Pause All Agents – Temporarily pauses processing across all agent groups.
  • Drain All Running Agents – Stops accepting new traces while allowing in-progress requests to complete.
  • Stop All Agents – Immediately stops processing across all agent groups, including any requests that are currently in progress.
Agent Controls
Note: Use Drain to stop an agent after all current executions are completed. Use Stop to terminate the agent immediately, including any requests that are still in progress.

13.3 Observability

13.3.1 Traces

A Trace represents the complete lifecycle of a single request or interaction within the application. It captures every stage of execution, from the initial input to the final output, providing a unified record of how the request was processed.

A trace includes:

  • Input received from the user or application.
  • Intermediate observations, such as model calls, tool executions, API requests, and workflow activities.
  • Outputs generated during execution.
  • Execution metadata, including timestamps, latency, token usage, cost, identifiers, tags, and environment information.

Each trace contains one or more observations (also referred to as spans or events) that represent the individual operations performed during execution.

Trace List View

The Trace List View provides a centralized view of all captured traces, enabling users to monitor, analyze, and troubleshoot application executions.

Each trace is displayed as a row in the table with the following information:

Column Description
Timestamp Date and time when the trace was created.
Input Request, prompt, or data submitted to the application.
Output Response generated by the application or model.
Observation Level Number and hierarchy of observations associated with the trace.
Latency Total execution time of the trace.
Tokens Total number of input and output tokens consumed.
Total Cost Processing cost incurred for the trace.
Environment Environment in which the trace was executed (for example, Development, Staging, or Production).
Tags User-defined labels associated with the trace.
Metadata Additional contextual information captured during execution.
Score Evaluation scores assigned to the trace.
Actions Actions available for the selected trace.

Filter Panel

Use Hide Filters to collapse the filter panel and maximize the space available for viewing trace data.

The panel offers a wide range of filter options to help you precisely narrow down and locate the specific traces relevant to your analysis.

Refresh Options

Configure automatic refresh using one of the following intervals:

  • Off
  • Every 30 Seconds
  • Every 1 Minute
  • Every 5 Minutes
  • Every 15 Minutes

Trace Detail View

Selecting a trace from the list opens the Trace Detail View, which provides comprehensive information about the selected trace, including execution details, observations, evaluations, and related metadata.

Trace Information

The header section displays key information about the trace.

Field Description
Trace ID A unique identifier for the trace that can be used for reference and troubleshooting.
Latency The total time taken to process the trace from input to output.
Usage Breakdown A detailed breakdown of token consumption and associated costs.
Session ID Identifies the session associated with the trace. Selecting the Session ID opens the corresponding session details page.
User ID Identifies the user associated with the trace. Selecting the User ID opens the corresponding user details page.

Trace Views

The Trace View includes the following tabs for viewing trace information.

  • Preview – Displays the trace input, output, and observations in a structured format for quick review.
  • Log View – Displays the complete execution sequence, including all observations and workflow activities in chronological order.
  • Scores – Displays evaluation scores and assessment metrics applied to the trace and its observations.

Actions

The Trace Detail View provides the following actions.

  • Add Item to Dataset – Saves the trace input and output as a reusable dataset item for testing, evaluation, and benchmarking.
  • Annotate – Applies predefined scores, labels, or evaluation metrics to a trace or observation.
  • Playground – Opens the trace in the Playground for testing and experimentation.
    • Fresh Playground – Creates a new Playground using the selected trace without affecting existing configurations.
    • Add to Existing – Adds the selected trace to an existing Playground for continued experimentation.
  • Add Comment – Adds comments to a trace for collaboration, feedback, or additional context.

13.3.2 Sessions

A Session groups multiple traces that belong to the same interaction, such as a multi-turn conversation or a long-running workflow. Each trace is associated with a Session ID, and traces that share the same Session ID are automatically grouped into a single session.

Session Creation and Grouping

Sessions are created by assigning a Session ID when a trace is generated. The Session ID can be generated automatically by the system or supplied by the application.

Once assigned, all traces and observations with the same Session ID are grouped into the same session.

For complete grouping, assign the Session ID at the beginning of the trace so that all subsequent observations inherit it.

Session ID Constraints

  • Must be a string containing standard ASCII characters.
  • Must be fewer than 200 characters.
  • Identifiers longer than 200 characters are ignored rather than truncated.
Session Grouping

Example

In a chatbot conversation, each user message is recorded as a separate trace, while the entire conversation is represented as a single session.

13.3.3 Users

A User represents an individual or entity interacting with the application. Each trace can be associated with a User ID, allowing all traces and sessions generated by the same user to be grouped and analyzed together.

The User ID can represent:

  • A registered user
  • A system or service
  • An anonymous user or session identifier

Example

A user with the User ID user_123 may generate multiple traces across different sessions. Because each trace is associated with the same User ID, all related activity can be viewed and analyzed together.

Users

User Views

  • User List – Displays all users tracked within the system, providing an overview of key metrics such as token usage, number of traces, and feedback. This enables quick analysis and comparison across users.
  • Individual User View – Provides a detailed view of a specific user, allowing all associated traces, sessions, and feedback to be grouped and analyzed together for deeper insights into user activity over time.

13.4 Governance

13.4.1 Compliance Hub

The Compliance Hub is a centralized workspace for defining, monitoring, and enforcing compliance across agents, policies, and operational workflows. It provides visibility into compliance coverage, governance status, policy enforcement, and regulatory adherence.

Purpose

The Compliance Hub Dashboard provides the following capabilities:

  • Provides a high-level overview of compliance health.
  • Offers quick access to policy management and rule configuration.
  • Displays key compliance indicators for monitoring governance activities.

Key Metrics

The dashboard displays summary metrics that provide an overview of the current compliance environment.

Metric Description
Enabled Policies Displays the total number of active policies currently enforced.
Active Compliance Displays the number of compliance frameworks or standards currently monitored.
Dynamic Rules Displays the total number of rules that dynamically evaluate and enforce compliance conditions.
Protected Directions Displays the number of protected configurations or enforcement areas.

Dashboard Layout

The Compliance Hub dashboard is organized into the following sections.

  • Overview Dashboard
  • Policy Section
  • Compliance
  • Templates

Overview Dashboard

Note: Dashboard widgets are read-only and are intended for monitoring and analysis.
Action Distribution

The Action Distribution widget displays a bar chart showing policies grouped by their configured enforcement actions.

Policies are categorized as follows:

Action Description
Allow Permits the requested action or behavior.
Mask Redacts or obscures sensitive information before it is returned or displayed.
Block Prevents the action or response when policy conditions are violated.
Policy Categories

The Policy Categories widget displays a donut chart showing the distribution of configured policies across governance and compliance categories.

Key Highlights

  • Displays the proportion of policies within each category.
  • Each segment represents both the number of policies and their relative distribution.
Compliance Coverage

The Compliance Coverage widget displays a bar chart showing the number of policies mapped to each compliance standard.

Key Highlights

  • Displays the number of policies associated with each compliance standard.
  • Helps identify well-covered and under-covered compliance standards.
Recent Governance Snapshot

The Recent Governance Snapshot provides a summary of the latest governance updates and current system status.

Information Description
Latest Policy Update Displays the most recent policy modification or enhancement.
Most Constrained Area Displays the area where the strictest enforcement rules are currently applied.
Template Readiness Indicates whether predefined policy and compliance templates are available.

Policy Section

The Policy Section displays all configured policies and their enforcement details. Each policy is presented as an individual card, allowing users to review policy information, monitor enforcement status, and perform basic policy management.

Key Highlights

  • Displays all configured policies as individual cards.
  • Supports searching by policy key, category, or description.
  • Displays the policy category, action type, detection method, region, and enforcement direction.
  • Allows policies to be enabled or disabled using toggle controls.
Note: This section is intended for monitoring and basic management of existing policies.

Filters

Use the available filters to quickly locate policies based on their status, action type, or category.

Filter Available Options
Status All, Enabled, Draft
Action Type All, Alert, Redact, Block
Category All, Data Security & Privacy, AI Governance
Note: Filters affect only the current view and do not modify policy configurations.

Compliance

The Compliance section displays all configured compliance frameworks available within the project. Each compliance framework is presented as an individual card, allowing users to review its status, associated policies, and recent updates.

Key Highlights

  • Displays compliance frameworks as individual cards.
  • Shows the number of associated policies.
  • Displays the current status (Enabled or Disabled).
  • Displays the last updated date.
  • Supports searching by compliance name or description.
Available Actions

Clone

Creates a duplicate of an existing compliance framework, including all associated policies. The cloned compliance can be modified independently without affecting the original configuration.

Export

Downloads the selected compliance framework as a JSON file for backup purposes or import into another environment.

Import Compliance

The Import Compliance feature allows you to upload an existing compliance framework using a supported JSON file.

Steps to Import Compliance

  1. Open Import Compliance.
  2. Upload a valid JSON file.
  3. Review the selected file.
  4. Click Analyze File to validate the configuration.
  5. Confirm the import after successful validation.
Important:
  • The JSON file must be generated using the Compliance Export feature.
  • Only one .json file can be uploaded at a time.
  • compliance.name is automatically derived from the imported JSON.
  • Policies must contain valid regular expression (Regex) patterns and enforcement directions.
Note: The uploaded file is validated before the import process is completed.
Filters

Use the available filters to quickly locate compliance frameworks.

Filter Available Options
Status All, Enabled, Disabled
Type All, Template, Custom
Note: Filters affect only the current view and do not modify compliance configurations.

Templates

The Templates section provides reusable policy and compliance templates that help accelerate governance setup. Templates can be used as a starting point when creating new policies or compliance frameworks, reducing manual configuration effort and promoting consistency across projects.

Policy Templates

The Policy Templates library provides predefined policy templates that can be used to quickly create commonly used governance and security policies.

Key Highlights

  • Browse available policy templates.
  • View the template name, category, and description.
  • Use templates as a starting point for creating new policies.
  • Reduce manual policy configuration and maintain consistency.
Note: Creating a policy from a template does not modify the original template.
Compliance Templates

The Compliance Templates library provides predefined compliance frameworks with policy mappings that can be reused across projects.

Key Highlights

  • Browse available compliance templates.
  • View the compliance framework and its associated policies.
  • Create new compliance configurations using predefined templates.
  • Promote consistent governance practices across multiple projects.
Note: Compliance templates include predefined policy mappings that can be customized after creation.

13.4.2 Budget & Consumption

13.5 Prompt Management

13.5.1 Prompts

13.5.2 Playground

The Playground is a testing environment for creating, executing, and refining prompts before integrating them into applications or workflows. It allows you to configure model settings, provide input values, execute prompts, and review responses in real time.

Prerequisites

Before using the Playground, ensure that:

  • A supported Large Language Model (LLM) is connected.
  • Required API credentials and integrations are configured.
Note: Without an active model connection, prompts cannot be executed.

Playground Features

The Playground provides features to help you create, test, and manage prompts efficiently.

Split Window

The Split Window displays the prompt editor, input values, and model response side by side, allowing you to test and compare prompt behavior efficiently.

Playground Split Window
Save as Prompt

The Save as Prompt option saves the current prompt configuration for future reuse.

Saved prompts can be reused, modified, and executed whenever required.

Save as Prompt
Run All

The Run All option executes the configured prompt using the selected model settings, input values, and prompt configuration.

Run All
Reset Playground

The Reset Playground option clears the configured prompts, input values, settings, and generated responses, restoring the Playground to its default state.

Playground Interface

The following animation demonstrates the overall Playground interface and its key features during prompt creation and execution.

Playground Interface

Model Settings

The Model Settings section allows you to configure parameters that control model behavior during prompt execution. These settings help adjust response consistency, creativity, length, and reasoning capability based on your requirements.

Temperature

Temperature controls the randomness of the generated response.

Range Behavior Recommended Use
0.0 – 0.3 More deterministic Suitable for code generation, technical documentation, and factual responses.
0.4 – 0.7 Balanced Suitable for general-purpose tasks.
0.8 – 1.0 More creative Suitable for brainstorming, storytelling, and ideation.

Lower values produce more consistent responses, while higher values generate more diverse outputs.

Max Tokens

Max Tokens defines the maximum number of tokens that the model can generate in a response.

Range Response Length Recommended Use
100 – 300 Short Suitable for summaries and quick answers.
300 – 1000 Medium Suitable for explanations and overviews.
1000+ Long Suitable for detailed analysis and reports.
Top P

Top P controls the diversity of token selection during response generation.

Range Behavior Recommended Use
0.1 – 0.5 More focused Suitable for precise and factual responses.
0.6 – 0.9 Balanced Suitable for general-purpose tasks.
1.0 Maximum diversity Suitable for creative content generation.
Note: Adjust either Temperature or Top P, but not both simultaneously.
Max Reasoning Tokens

Max Reasoning Tokens controls the reasoning budget used before generating a response for supported models.

Range Behavior Recommended Use
0 Minimal reasoning Suitable for simple queries requiring faster responses.
50 – 200 Moderate reasoning Suitable for multi-step tasks.
200+ Extensive reasoning Suitable for complex analysis, debugging, and logical reasoning.
Additional Options

Additional Options allows you to provide advanced, model-specific parameters as a JSON object.

Usage

  1. Enable Additional Options.
  2. Enter a valid JSON object.
  3. Execute the prompt.

Example

{
  "frequency_penalty": 0.5,
  "presence_penalty": 0.2,
  "stop": ["\n\n"]
}

Use this option only when model-specific parameters are required.

API Key

The API Key option overrides the default API key configured for the project.

If left blank, the project default API key is used during prompt execution.

Model Settings Interface

The following animation demonstrates the Model Settings available in the Playground, including model parameters and advanced configuration options.

Model Settings

Prompt Configuration

The Prompt Configuration section allows you to define and manage the components that control prompt behavior, including tools, structured outputs, variables, messages, and placeholders.

Tools

Tools allow the model to invoke predefined functions during prompt execution.

Each tool is defined using a JSON schema that specifies its inputs and enables the model to interact with external functions during execution.

Tool Definition Includes

  • Tool name
  • Description of the tool purpose
  • Input parameters
  • JSON schema definition

Configured tools can be tested within the Playground before being reused across the project.

Structured Output

Structured Output ensures that the model response follows a predefined JSON schema, making responses consistent and easier for downstream applications to process.

Schema Defines

  • Required fields
  • Data types
  • Validation constraints
Note: Structured Output and Tools cannot be used in the same request.
Prompt Variables

Prompt Variables allow dynamic values to be supplied during execution, enabling the same prompt to be reused with different inputs.

Variables are defined using double curly braces.

Examples

{{user_input}}

{{question}}

{{context}}
Note: Variables must use double curly braces.

Variable Format

{{variable_name}}
Messages

Messages define the role of each interaction within a prompt and determine how instructions, user inputs, and generated responses are handled.

Message Type Description
System Defines the model behavior, rules, and instructions.
User Represents the input provided by the end user.
Assistant Represents responses generated by the model.
Developer Provides additional implementation-specific instructions.
Tool Represents input or output exchanged with tools.
Variables and Placeholders

Variables allow dynamic input values to be injected into prompts during execution.

Message placeholders allow chat messages and conversation history to be inserted into prompts dynamically.

Each message placeholder contains one or more messages in JSON format.

[
  {
    "role": "user",
    "content": "..."
  }
]

Message Placeholders Can Inject

  • Previous conversation history
  • System instructions
  • User messages
  • Assistant responses
  • External conversation data

Usage

  1. Create a message placeholder.
  2. Assign a descriptive name.
  3. Provide one or more messages in JSON format.
  4. Execute the prompt.
Note: Multiple message placeholders can be defined within the same prompt to inject different sets of contextual messages.

13.6 Resources

13.6.1 Annotation Queue

Annotation Queues organize and manage manual evaluation workflows for traces and observations. They allow users to assign reviewers, apply predefined score configurations, and track annotation progress.

Create an Annotation Queue

Use New Annotation Queue to create a queue for reviewing and annotating traces or observations.

Fields

Field Description
Name Name of the annotation queue.
Example: Chatbot Evaluation Queue
Description (Optional) Additional information about the queue.
Example: Used to review chatbot responses for quality and accuracy.
Score Configurations One or more predefined score configurations used during annotation.
Assigned Users Users responsible for reviewing and annotating items in the queue.

Workflow

  1. Create an annotation queue.
  2. Select one or more score configurations.
  3. Assign reviewers to the queue.
  4. Add traces or observations for evaluation.
  5. Review, score, and annotate each item.

13.7 Project Settings

13.7.1 Tools

13.7.2 Skills

13.7.3 Score Configs

A Score Configuration defines the structure and validation rules for evaluation scores used when annotating traces or observations.

Create a Score Configuration

Use Add New Score Config to define a custom evaluation metric.

Fields

1. Name – Specifies the name of the evaluation metric.

Examples:

  • Accuracy
  • Quality
  • Relevance

2. Data Type – Defines the type of value accepted by the score configuration. Supported types include:

a. Numeric

Accepts numeric values within a defined range.

Shows additional fields:

  • Minimum – Lower bound of the score
  • Maximum – Upper bound of the score

Examples:

  • 0 to 1
  • 1 to 5

b. Categorical

Allows users to select from predefined categories.

Displays:

  • Value – Numeric value or identifier
  • Label – User-friendly display name shown during annotation

Use Add Category to define multiple options.

Example:

Value Label
0 Poor
1 Average
2 Good

c. Boolean

Represents a binary evaluation (true/false).

Standard convention:

  • 1 → True
  • 0 → False

d. Text

Accepts free-form text input and no additional fields are displayed.

Used for:

  • Comments
  • Explanations
  • Qualitative feedback

3. Description – Provides additional context about the score measures and how it should be interpreted.

Availability

After a score configuration is created, it becomes available in the Annotate panel, where it can be applied to traces and observations.

13.8 Organization Settings

14. Activities

14.1 Get Started

Robility Activities are the core building blocks of Robility Designer, designed to simplify and streamline automation processes. These activities enable users to define and execute tasks efficiently by integrating various functionalities into a cohesive workflow.

Each activity is purpose-built to handle specific tasks, such as data extraction, integration with external systems, file management, or decision-making processes. Robility’s intuitive interface and activity library make it accessible for both technical and non-technical users, enabling them to design workflows with minimal effort.

With features like error handling, logging, and debugging tools integrated into the activity framework, users can ensure their processes are reliable and optimized for performance. By leveraging Robility Activities, businesses can achieve greater efficiency, reduce manual errors, and accelerate their digital transformation journey.

Discover the activities tailored to meet your automation needs. 

14.2 UI Automation

14.3 Integration Activities

14.4 IT Automation

14.5 Application Activities

14.6 System Activities

14.7 Developer Activities

14.8 Other Activities

14.9 MarketPlace

14.10 Release Notes

v2.3.4

This release includes the following enhancement:

Enhancement

Expression Editor
A new “Auto Fix” option has been introduced in the Expression Editor popup. When selected, it automatically detects and corrects expression syntax issues. It also helps users resolve argument type mismatches such as Boolean, String, and others without requiring manual intervention.

Released Date: 20/04/2026

15. Platform Updates

15.1 Upcoming Platform Update

Upcoming Features

1. Security Scan – Phase II
Enhancing governance and visibility, Phase II introduces integrated certification status indicators for all solutions—certified and non-certified to the Robility Manager. It helps to view detailed execution logs in the Manager, helping track compliance adherence and notify when sensitive information is being printed, even after being flagged. This ensures proactive risk management and reinforces secure automation practices.

2. Workflow Analyzer II
Advanced validation for automation quality with new set of rules to ensure consistency, reliability, and standardization across all automation projects.

3. RAG Integration with GenAI: Combine retrieval-augmented knowledge with Gen AI activities to deliver context-rich, accurate, and intelligent automation outcomes.

4. Java UI Automation: Seamlessly perform user interface automations in Java-based applications, expanding coverage across enterprise systems.

5. Image Classification (GenAI): Leverage AI-driven image recognition to categorize and interpret visuals, enabling faster decisions and automation of image-based tasks.

15.1.1 Upcoming features update in July

Upcoming Features

Security Scan – Phase II
Enhancing governance and visibility, Phase II introduces integrated certification status indicators for all solutions—certified and non-certified to the Robility Manager. It helps to view detailed execution logs in the Manager, helping track compliance adherence and notify when sensitive information is being printed, even after being flagged. This ensures proactive risk management and reinforces secure automation practices.

New Activities for Secure Authentication
Simplify secure integration with upcoming activities:

1. Get PIN & Key
2. JWT (JSON Web Token) Retrieval
3. Token Management

Workflow Analyzer II
Advanced validation for automation quality:

1. Validate mandatory package usage
2. Detect invalid parameter modifiers
3. Perform comprehensive project structure checks
4. Ensure consistency, reliability, and standardization across all automation projects.

15.2 Latest Updates

Robility Platform Updates – Jul’26 Platform Updates

Robility Flow

Outlook Components
Automate email operations within workflows to improve communication and streamline email handling.
Read more.

Project-Level Model Provider Configuration
Configure model providers separately for each project, improving flexibility and control over AI settings.
Read more.

Save File Component – DataFrame Support
Convert DataFrame data into table format when saving PDF and DOCX files, improving document formatting and readability.
Read more.

Get Credentials – Enhanced Output
Retrieve username and password values through component outputs for easier credential handling.
Read more.

Robility Manager

Admin Console
Monitor and manage Unattended Runner machines from a centralized console, improving operational visibility and simplifying remote administration.
Read more.

Microsoft SharePoint
Seamlessly manage SharePoint sites, files, folders, and documents within Robility automation workflows using Microsoft Graph API.
Read More

Robot – Move to Idle
Restore locked robots to an Idle state with a single action, reducing downtime and making robots available for task execution more quickly.
Read more.

Automated API Key Management
Automatically renew Flow API keys for scheduled workflows, ensuring uninterrupted execution and eliminating manual key renewal.
Read more.

Transaction Report Download
Download transaction reports directly from email notifications in Excel format, enabling faster reporting, analysis, and sharing of execution results.
Read more.

Robility Activities

Microsoft Outlook 365 Calendar
Automate calendar management and scheduling activities to improve productivity and streamline Outlook calendar workflows.
Read more.

Robility Runner

Runner Troubleshoot (UI Automation)
Runner can now automatically capture screenshots when Desktop, Image, and Web automation activities fail. This provides visual context for troubleshooting, reduces debugging effort, and accelerates issue resolution.
Read more.

15.2.1 Aug'26 Release

The August 2026 release introduces robust enhancements across AI-driven automation, enterprise integration, workflow analytics, and document processing. These features are designed to minimize maintenance overhead, simplify multi-system connectivity, and enhance operational visibility across your organization.

AUTOMATE APPLICATION WITH AI

Computer Interaction
Robility’s upgraded Computer Interaction capability bridges the gap between technical execution and business value by replacing fragile, UI-dependent selectors with intuitive natural language instructions. For development teams, implementation is simplified with flexible targeting options, including element spying, active window selection, and direct executable paths, alongside built-in AI that automatically closes unexpected popups and self-heals when application UIs change. For sales and client-facing teams, this translates directly to lower maintenance costs, faster deployment cycles, and higher workflow reliability.

Faster Automation Development | Reduced Maintenance Effort | Improved Automation Reliability

STREAMLINED AUTHENTICATION & SYSTEM ACCESS 

SharePoint Document Management
Interact directly with SharePoint document libraries. Automated refresh token management ensures continuous, long-running operation.

Simplified SharePoint Automation | Reduced Administrative Effort | Greater Process Continuity

App Integration Token
Standardize third-party authentication with built-in token retrieval, validation, enterprise-grade encryption, and automatic retry mechanisms.

Secure Application Access | Reduced Development Complexity | Faster Integration Delivery

REAL-TIME OPERATIONAL VISIBILITY

Flow Insights
Monitor live execution progress and diagnose workflow behavior instantly using an intuitive visual interface.

Improved Workflow Visibility | Faster Issue Resolution | Enhanced Operational Control

Flow Analytics
Access detailed metrics regarding run completion rates, latency, failure modes, and AI utilization to eliminate bottlenecks and measure performance ROI.

Data-Driven Optimization | Improved Workflow Efficiency | Better Workflow Performance

Token Optimizer
Optimize AI-driven workflows by reducing unnecessary content while preserving key information and meaning. Token Optimizer applies configurable compression settings based on token thresholds and target content retention, delivering optimized content along with clear compression statistics.

Reduced Token Consumption | Optimized AI Processing | Greater Workflow Efficiency

Workflow Pass-Through
Workflow Pass-Through provides greater control over workflow data by forwarding only the required information to the next step. It reduces unnecessary data transfer, simplifies workflow connections, and keeps automation clean and organized.

Simplified Workflow Design | Better Data Control | Cleaner Workflow Execution

HIGH-ACCURACY DATA EXTRACTION

Robility OCR Extractor
Instantly transform unstructured documents, scanned files, and image assets into reliable, structured data ready for downstream enterprise processes.

Higher Data Accuracy | Increased Operational Efficiency | Scalable Document Processing

15.2.2 Jul'26 Release

The July 2026 release delivers new capabilities across automation operations, workflow development, new integration, reporting, and AI governance, it enables to manage enterprise automation with greater visibility, control, and efficiency.

AUTOMATION GOVERNANCE

Centralized Runner Diagnostics

Robility Manager provides centralized management of machines hosting unattended runners, giving operations teams complete visibility and control from a single console. With remote diagnostics, real-time health monitoring, log management, and administrative capabilities, organizations can accelerate issue resolution, minimize operational downtime, and eliminate the need for direct machine access—ensuring resilient, uninterrupted automation at scale.

Dynamic Troubleshooting

Accelerate issue resolution for UI Automation activities with advanced Runner Troubleshooting. When enabled, Robility Runner automatically captures the application screen whenever an exception occurs and attaches it to the exception details, providing immediate visibility into the point of failure for faster root cause analysis and improved automation reliability.

WORKFLOW DEVELOPMENT

See Every Execution

Robility Designer introduces Execution Trial, providing complete visibility into workflow execution before production. Trace every activity, identify bottlenecks, and evaluate workflow health to optimize automations, reduce production risks, and deliver more reliable workflows.

Immediate Window in Debug Watcher

The new Immediate Window in Debug Watcher enables developers to evaluate workflow inputs and expressions in real time during debugging without adding temporary logging activities, reducing troubleshooting effort and accelerating development.

ENTERPRISE INTEGRATION

Expand Microsoft 365 Automation

Robility expands Microsoft 365 automation with Calendar and Outlook capabilities across Robility Activities and Flow. Automatic refresh token management eliminates manual token renewal, ensuring reliable Microsoft 365 automation with reduced administrative effort.

REPORTING

Secure. Simple. Accessible.

Authorized users can securely access reports directly from notification emails through Robility Manager authentication, eliminating manual report distribution while maintaining secure access.

FLOW ENHANCEMENTS

Centralize AI Configuration

Robility Flow introduces project-level Model Provider Configuration, allowing AI providers to be managed at the project level. Dedicated project configurations and project-level permissions provide greater governance while supporting project-specific AI requirements.

Release Date: 25.07.2026

15.2.3 May'26 Release

Robility Platform Updates – May 2026 Release

New Features & Enhancements

Robility Manager

Microsoft 365 Integration
Robility’s Microsoft 365 integration brings Outlook directly into your automation layer. Trigger workflows from incoming emails, extract data, and process attachments using built-in activities without manual intervention or external connectors.

Read More.

Machine Template

Machine Templates provide a standardized way to configure and manage automation environments across multiple machines. Eliminate repetitive setup, reduce configuration inconsistencies, and scale automation seamlessly across your infrastructure.

Read More

Centralise. Manage. Deploy.

Managing AI models without central control introduces security risks and operational inconsistency. Robility’s LLM Configuration provides a tenant-level control plane where authorized administrators can manage and distribute AI models and embeddings securely. Credentials remain fully protected, ensuring flows consume AI capabilities without exposure.  

Read More

Run on Time. Every Time.

Robility’s time-based scheduling ensures every flow executes exactly when required, fully unattended and without any dependency on operator availability. Every run is automatically logged and traceable, giving organisations complete confidence that time-critical operations are always delivered on time and on record. 

Read More

DataTable Timestamp

Enhanced Datatable capabilities at Robility flow enable efficient handling of large datasets directly within automation flows. This reduces dependency on external storage while improving performance for data-intensive processes.

Read More

Server Stability

Enhancements to the execution engine ensure large and complex workflows run reliably without interruptions. These improvements address the root causes of delays, enabling consistent performance even under high workloads.

Read More

15.2.4 Mar'26 Release

Robility Platform Updates – March 2026 Release

New Features & Enhancements

Centralized AI Management, Simplified Control

LLM Configuration now supports multiple providers within a unified framework. API keys, endpoints, and model settings are managed centrally with secure storage and built-in governance, enabling consistent and compliant AI usage across environments.

Real-Time Automation with Queue-Based Triggers

Robility Flows now support queue-based triggers, allowing workflows to execute automatically when new transactions arrive. This removes reliance on manual or scheduled triggers and enables real-time processing of high-volume data.

Reliable Process Control

The Kill Process activity enables forceful termination of unresponsive applications, helping prevent stalled executions and ensuring automation continues smoothly in long-running scenarios.

Structured Data, Consistent Handling

Build Collection introduces the ability to initialize typed collections such as strings or integers. Data types are inferred from the first element, ensuring consistency and predictable workflow behavior.

Smarter Email Organization

Set Email Category allows emails to be tagged with one or more categories, improving classification, filtering, and grouping within mailboxes for better organization and retrieval.

Stronger, More Stable Automation Environment

Modern Desktop Automation has been upgraded with the latest stable package versions, improving performance, enhancing security, and ensuring compatibility across workflows for a more reliable automation experience.

15.2.5 Feb'26 Release

Robility Platform Updates – February 2026 Release

New Features & Enhancements

Twilio Record Access, Simplified Retrieval

Instantly retrieve detailed Twilio records — Calls, Messages, and Media, using a unique SID. Boost workflow visibility and enable faster, more reliable processing across all communication use cases.

Centralized Runner Setup with Machine Templates

Machine Templates make Robility Runner setup effortless with a unified framework for registration, configuration, and deployment. Enjoy consistent provisioning, simplified onboarding, and dependable execution across all environments.

Optimized Logging, Improved Reliability

Robility now runs on NLog 6.0.7 across Designer, Activities, and Runner for enhanced performance and stability. Reduced memory usage, structured logs, and sharper diagnostics ensure faster troubleshooting and reliable workflow execution.

15.2.6 Jan'26 Release

Robility Platform Updates – January 2026 Release

New Features & Enhancements

From Dedicated Servers to Dynamic Pooling

Robility Machine Templates shift infrastructure from fixed, one-to-one machine assignments to dynamic resource pooling. Multiple automations execute across available machines, removing host dependencies and enabling elastic scaling.

Secured Credentials. Built for Compliance.

The Vault in Robility Manager now enforces project-level, role-based access. Only authorized administrators can access or modify keys, tokens, and credentials—reducing exposure risk and supporting compliance requirements without disrupting approved workflows.

Centralized AI Stack

Robility Manager now provides centralized LLM configuration management across all flow projects. Store API keys, endpoints, and model settings in one encrypted vault, accessible only to tenant administrators.

Complete Traceability

Robility Manager transforms operational data into actionable insight with end-to-end traceability across the data lifecycle.

Authentication & Security

Robility Manager’s TOTP-based MFA protects logins using time-based, locally generated codes to verify identity before access is granted.

Your Data, Your Control

Robility Manager now introduces archival and purge policies for project-level data—retaining Interact workflow data to meet regulatory needs and removing outdated data to reduce cost and risk.

Enhanced Workflows. Better Results.

Robility Activities expand with new capabilities: Merge Table enhancements for seamless consolidation, Refresh Pivot Table for automated Excel analysis, and Export to PDF for professional Word document delivery.

Debug Faster. Rapid Resolution.

Robility Designer now traces exceptions directly to the exact failing activity during design-time execution. In complex flowcharts or long automation chains, errors automatically highlight and navigate to the failing step in seconds.

15.2.7 Nov'25 Release

Robility Platform Updates – November 2025 Release

New Features & Enhancements

Robility Flow – New Components

Robility Flow adds new components including File Download, Webex, Interact Get & Update, File Read & Save, Multi-Condition Router, and new Data Table actions to add columns, insert rows, update rows, and retrieve rows. These additions expand workflow capabilities and make data handling easier.

Enhanced File System Structure

The file system is now refined to operate based on Tenant, Project, or Local settings, offering clearer organization and better control. This enhancement improves how files are managed across environments.

Data Table Management (Preview)

Data Table management now supports project-based operations, including Create, List, Delete, and Rename. This provides better organization and simplifies how table structures are maintained within projects.

Clear Unused Sequence, Imports & Dependencies

Robility Designer now identifies and removes unused sequences, imports and dependencies, helping teams reduce clutter and streamline workflows. This improves maintainability and keeps automations clean and efficient.

Workflow Analyzer

The enhanced Workflow Analyzer applies advanced rules to simplify complex workflows and reduce development effort. It gives better visibility and control, helping teams build more consistent automation designs.

Auto Interact Activities via Co-Pilot

The Interact Workflow Assistant automatically generates complete Interact workflows, removing the need to manually create activities, define JSON structures, or map fields. This streamlines setup and speeds up building form-based automations.

Formatting Feature – New Activities

The Formatting feature now includes new activities such as ModifyDate, FindStartEndWeekMonthYear, AddSubtractDatePeriod, FindNextPreviousDayOfWeek, FormatValue, and ChangeType. These additions help handle date, value, and type formatting more efficiently within workflows.

Core Activities – New Additions

Core activities now include MultiAssign and StartProcess, enabling clearer variable handling and easier process initiation. These additions strengthen workflow structure and simplify essential automation steps.

Excel – New Activities

Excel automation introduces DuplicateSheet and FindAndReplaceExcel to simplify sheet management and content updates. These activities reduce manual steps and make spreadsheet operations more efficient.

List – New Activity

A new SortList activity is added under List operations, allowing quick sorting of list items within workflows. This improves data organization and enhances list-based processing.

Queue-Based Trigger Implementation

Robility Scheduler now automatically triggers transactions from selected queues to available machines while respecting blackout dates. This improves processing efficiency, minimizes delays, and ensures controlled execution during non-working periods.

Blackout Dates for Time-Based Triggers

Users can now define blackout dates for all schedulers to prevent jobs from running on non-working days. Blackout dates can also be uploaded through an Excel file using the provided template for consistent formatting.

AI-Powered Interact Pre-Configuration – Beta
The Interact layer is enhanced with AI to automatically generate and apply project configurations without manual steps. This beta phase introduces a guided setup to help you quickly build automation projects using AI or pre-built templates.

Secured Login with PIN

Robility Manager now supports PIN-based authentication, sending a PIN to the user’s registered email during login. This adds an extra layer of security and ensures safer platform access.

Resource Changes – Vault

Resources are now stored in the vault based on the tenant’s configured storage type, ensuring secure and compliant data handling. This provides consistent protection aligned with each tenant’s configuration.

Workflow Analyzer Integration

Workflow Analyzer data is now displayed directly in the Project → Workflow tab for each published version. This allows users to review workflow details without manually opening or inspecting the JSON file.

Workflow Scan Logs in Robility Manager

Robility Manager now displays Workflow Scan Logs for each workflow version, enabling users to review scan results even after publication. This improves traceability and supports ongoing workflow compliance.

Analytics Tile Search

Analytics tile search is added across Invite Users, Project, Resource, Templates, and Deploy Robots pages. This helps users quickly locate analytics tiles and navigate large lists more efficiently.

15.2.8 Oct'25 Release

Robility Platform Updates – October 2025 Release

New Features & Enhancements

1. Robility Flow
Robility Flow now includes new components, project import and export options, and the flexibility to create projects within a tenant or in local. Along with a refined log structure and improved UI, the platform ensures smoother, more efficient automation.

2. Prevent Duplicate transactions
Automatically detect and manage duplicate transactions with the new Reference Field, keeping your data accurate and reliable without manual effort. Read More.

3. Prioritize the transactions
Assign urgency levels to transactions with the Priority feature, ensuring critical cases are handled first and improving operational efficiency. 

4. Simplified Renewal Process
Renew tenants and RPA developer licenses individually or in bulk with ease, reducing administrative delays and keeping your team productive. Read More.

5. Build, Debug, optimize
The enhanced Debug feature shows real-time input and output for each activity, making it easy to trace data flow, identify issues, and optimize performance. Read More.

6. Cut Complexity, Boost Efficiency
The new Repeat Number of Times and Custom Assign activities automate repetitive tasks and give precise control over data—simplifying workflows and preventing errors. Read More

7. Automation with Java
Integrate Java-based processes directly into workflows to automate complex tasks efficiently and gain greater flexibility. 

8. Simplify List Handling
New List Activities let you easily initialize, read, append, and update lists without complicated syntax, reducing workflow complexity and speeding up automation. Read More

9. Faster, Smarter Resource Management
The Modern Grid Control gives a clear overview and greater control on Resources and Templates pages, making management faster and simpler. Read More

10. Enhanced Workflow Usability
Zoom in and out of your workflow design pane for better visibility and control, even on the most complex workflows. Read More

15.2.9 Aug'25 Release

Robility Platform Updates – Aug 2025 Release

New Features & Enhancements

1. UI Enhancements
Experience a cleaner, more intuitive interface across Robility Designer and Robility Manager, featuring simplified navigation, improved layout for simplified user management and provides better visibility into overall data.

2. Designer & Runner – Enhanced Security
We have strengthened the validation during connection and communication between Designer/Runner and Robility Manager, ensuring secure and reliable automation.

3. Collection – Filter Collection Activity
Simplify your workflow by reducing multiple automation steps into a single activity that filters and returns only the specified data. Read More. 

4. Manager Activities
A new set of activities to configure and retrieve your credentials (token, PIN & key, and JWT token) directly from Robility Manager. This centralizes credential management and enhances security without requiring workflow changes. Read More.

5. Close Browser
Easily terminate browser applications with multiple tabs using the Close Browser activity, eliminating the need to force-close the browser. Read More.

15.2.10 Jul'25 Release

Robility Platform Updates – July 2025 Release

New Features & Enhancements

1. Advanced Scheduler with Cron Expressions
Define complex and highly flexible automation schedules using advanced Cron Expressions. This feature ensures precise and reliable task execution, fully aligned with operational requirements. Read More

2. Secure Asset Management
Eliminate hardcoded values in workflows by storing API keys, credentials, and environment-specific configurations in a secure, centralized vault. Access is tightly controlled so only authorized bots and users can retrieve these assets, ensuring both security and compliance across deployments. Read more. 

3. FIFO/LIFO Queue Processing
Choose between First-In-First-Out (FIFO) or Last-In-First-Out (LIFO) models for queue task execution. This flexibility allows workflows to prioritize tasks based on business needs.

4. Third-Party Storage & Vault Integration
Seamlessly integrate with AWS S3 and Google Cloud Storage and vault for secure and scalable data management. Maintain compliance with your infrastructure and security policies while extending capabilities.

5. Enhanced Reporting & Analytics
Gain actionable insights into automation performance with new dashboard widgets and detailed reports. Track bot performance, task completion rates, and ROI to enable data-driven decisions and continuous optimization.

6. UI Enhancements
Experience a cleaner, more intuitive interface across Robility Designer and Robility Manager, featuring simplified navigation, improved layout, and faster development workflows for greater productivity.

7. GenAI – Content Generation
Leverage GenAI to create dynamic, context-aware content for automation. From crafting intelligent responses to generating summaries and structured data, this feature introduces human-like interaction within workflows. Read More.

8. Salesforce – Search Records Activity
Quickly retrieve Salesforce records based on custom search criteria for faster decision-making and seamless CRM integration. Read More.

9. Manager – Get Asset Activity
Access runtime assets configured in Robility Manager directly from workflows. Securely retrieve credentials, tokens, and configurations to reduce manual effort and streamline execution. Read More

15.3 Preview Release Features

Welcome to the preview release of our new features. This document provides key information, best practices, and usage guidelines for preview features so you can make informed decisions while exploring early-stage innovations.

Overview of Preview Release Features

What are Preview Features?
Preview features are early versions of upcoming functionalities, labeled with the “Preview” tag, and shared for your evaluation and feedback. They are not production ready.

Purpose of Preview Release
Preview releases allow us to gather valuable user insights, test usability, and identify improvements before finalizing features in a stable release.

Important Usage Guidelines

1. Non-Production Ready – Preview features may be incomplete or experimental and may lack full quality assurance testing. Please use with caution and do not deploy in production environments.

2. Feature Evolution and Potential Changes – The product team continually evolves preview features based on user feedback, market needs, and competitive analysis. Features and functionalities may be modified, enhanced, or even disabled during the preview period to better align with product strategy and priorities.

3. Feedback Collection, Not Bug Reporting – Any issues or unexpected behavior with preview features should be submitted as feedback. These are not treated as formal bug reports. Feedback is used to guide the final product but does not guarantee immediate fixes or updates.

4. General Release Cycle for Updates – Preview feature updates and any issue resolutions are incorporated in line with our standard major release cycle, rather than through urgent or ad-hoc patches.

5. No Dedicated Support – There is no dedicated technical support or troubleshooting assistance for preview features. For help, use available resources like community forums, documentation, or FAQs for self-service solutions.

Best Practices for Using Preview Releases

1. Test in Non-Production Environments: Use preview features in sandbox or test environments to avoid disrupting production systems.

2. Regularly Backup Data: Backup important data before enabling preview features to safeguard against potential data loss.

3. Stay Current with Documentation: Preview features may change rapidly. Review release notes and documentation frequently for the latest details.

4. Participate in Feedback Channels: Submit clear, actionable feedback through official channels. Your input directly influences the final design and implementation.

5. Prepare for Changes or Feature Disabling: Be aware that features may change substantially—or be disabled—based on feedback or strategic direction. Plan your workflows so you can adapt quickly when features evolve or are retired.

6. Plan for Transition to General Availability: Workflows may need adjustment once preview features reach general availability due to changes in APIs or functionality. 

Summary Table

Aspect Preview Release Features
Production Ready? No — Use cautiously, not for production use
Support Availability No dedicated troubleshooting support
Issue Handling Feedback collected; addressed in major releases
Potential for Change Features may evolve, change, or be disabled during preview
Recommended Environment Test or sandbox environments only
Feedback Importance Critical for refinement and product development

Thank you for exploring preview features and providing crucial feedback. Your participation drives us toward delivering reliable, high-impact solutions. For more information and updates, refer to official documentation and our support community.

15.3.1 Preview Features

1. Robility Flow
Introducing agentic automation—intelligent workflows that think, decide, and act based on desired outcomes. Orchestrate multi-step tasks, collaborate in real time, and adapt dynamically to changing conditions.

2. Workflow Analyzer
Automatically validate workflows against best practices and organizational standards. Detect design issues early to maintain high-quality automation from the start. Read More. 

3. Security Scan
Perform real-time security scans of workflow logs to identify risks such as hardcoded credentials, hidden secrets, and sensitive data references, ensuring proactive compliance and security. Read More. 

4. Co-Pilot in Robility Designer
Your in-app AI assistant for smarter development. Co-Pilot answers product queries, suggests custom logic, and provides a playground for experimenting with GenAI activities. Read More. 

5. GenAI

Bring intelligence into your automations with GenAI-powered activities. From dynamic content generation and text summarization to PII filtering and entity extraction, Robility Flow enables context-aware decision-making within workflows—enhancing both efficiency and human-like interaction. Read More. 

16. Robility Flow

16.1 About Robility Flow

Robility Flow is an enterprise-grade platform for designing, orchestrating, deploying, and managing Agentic AI workflows and solutions at scale. It enables organizations to embed intelligent, context-aware decision-making directly into business processes by combining AI agents, structured workflow orchestration, and deep integrations with core business systems and data sources.

Robility Flow unifies the capabilities organizations need to operationalize agentic AI workflows:

1. Agentic workflow orchestration: Coordinate multi-step, multi-agent processes that reason, plan and act across tasks turning agent outputs into reliable business decisions and actions.

2. MCP & tool connectivity: Support for the Model Context Protocol (MCP) and standard connector patterns lets models access live data, services, and tools securely and consistently, reducing one-off integrations and enabling model-agnostic workflows.

3. Enterprise integrations: Plug into ERPs, CRMs, ITSM, databases, APIs, automation systems and other enterprise platforms so AI-driven workflows are embedded in day-to-day operations rather than isolated experiments.

4. Model and storage flexibility: Bring-your-own-LLM and pluggable storage/vector options prevent vendor lock-in and allow teams to choose providers that meet performance, cost and compliance needs.

5. Visual design + production execution: A visual orchestration layer enables subject-matter experts and developers to design, test, deploy and monitor workflows, bridging prototyping speed and enterprise-grade reliability.

Why this matter?

Robility Flow is built to move organizations beyond point solutions and experimentation: it delivers a governed, extensible platform where agentic AI is a first-class part of operational workflows — measurable, auditable, and integrated with the systems that run the business.

Agentic AI Workflow Orchestration

Robility Flow enables organizations to design and operationalize AI-driven workflows and intelligent enterprise solutions across critical business functions. It supports production-grade use cases where AI must interact with enterprise systems, automation layers, and structured data in a governed execution environment.

Real-World Enterprise Use Cases

a. SDLC & Engineering: AI-driven requirement analysis, automated code review, test case generation, and intelligent release validation integrated with development pipelines.
b. ITSM & Service Operations: Intelligent ticket triaging, incident summarization, SLA monitoring, and automated resolution workflows connected to service management platforms.
c. KYC & Compliance: Automated document verification, identity validation, risk scoring, and regulatory case summarization embedded into compliance workflows.
d. Telecom Operations: Churn prediction, complaint classification, billing dispute resolution, and proactive customer retention workflows powered by AI agents.
e. Banking & Financial Services: Fraud signal analysis, transaction review assistance, loan document validation, and policy compliance orchestration.
f. Enterprise Back Office: Invoice validation, procurement approvals, HR query automation, and finance document intelligence integrated with ERP systems.

Build Flows in Minutes

At the core of Robility Flow is the concept of flows, modular representations of application logic built using configurable component nodes.

Using the drag-and-drop visual editor, you can create complete workflows by connecting components, each representing a specific step in the process. For instance, you can build a chatbot for an e-commerce site that integrates an LLM with a product database, allowing customers to ask product-related questions and receive intelligent responses.

Real-Time Flow Testing

Robility Playground allows you to test flows interactively without building the full application stack. You can validate flow logic and receive real-time feedback during development. You can also execute individual components independently to isolate and test dependencies. 

Execute and Operationalize Flows

Robility Flow enables organizations to execute Agentic AI workflows within a structured and governed enterprise environment. Designed for operational use, flows can be deployed as managed workflow units that interact seamlessly with enterprise systems, automation platforms, and data sources.

Once designed and validated, workflows can be executed as part of business processes — supporting real-time decision-making, system-triggered actions, and human-in-the-loop scenarios.

Robility Flow ensures:

a. Controlled execution of AI-driven workflows
b. Secure interaction with enterprise applications and APIs
c. Structured handling of inputs, outputs, and contextual data
d. Monitoring and refinement of workflow behavior

For more information, see the following: Trigger flows with the Robility flow API

Flexible Configuration and Integration

Robility flow includes a wide range of components designed to integrate with various AI services and tools.

a. General components: input, output, data stores
b. Specialized components: agents, language models, embedding providers

Each component supports parameter customization, either fixed or dynamic. You can also apply runtime tweaks to override default settings.

Legacy Components

Legacy components are outdated system elements kept for backward compatibility. They no longer meet current platform standards and will be phased out (decluttered) in upcoming updates to boost performance, usability, and maintainability.
They’ll work in existing workflows for now but won’t get enhancements or support. Avoid using them in new workflows, they risk becoming unavailable, causing compatibility issues or upgrade disruptions. Switch to the latest supported components for better reliability and features.

Built-In Agent and MCP Support

Robility flow enables advanced agentic workflows and supports the following features:

1. Create and manage AI agents within workflows
2. Use flows and components as tools within agents
3. Operate Robility flow as an MCP server
4. Connect to external MCPs as a client

Extending Custom Components

Beyond the built-in components, Robility flow allows for full extensibility.
You can:

1. Use community-built custom components
2. Develop your own components for internal or shared use.
3. Package and reuse proprietary connectors
4. Standardize internal tooling as reusable workflow modules. 


16.1.1 Quick Start

Begin using Robility Flow by loading a template, running a flow, and serving it via the /run API endpoint.

Prerequisites

Before you start, ensure you have the following:

a. An OpenAI API key

b. Create a Robility flow API key

The Robility API key is a project specific token that you can use within Robility Flow. 

To create Robility flow API key, do the following:

1. Publish your flow to the Robility Manager. 
2. Navigate to the project in the Robility Manager. 
3. Go to the “Workflows” page. 
4. It will list the flows published against the Manager and choose your respective flow. 
5. Click on “Generate API Key” and choose the published version of the flow. 
6. Once the key is generated, click on “History” button and you can view the API key generated against each version of the flow published. 
7. Copy the API key and store it securely.

To use your Robility flow API key in a request, set a ROBILITYFLOW_API_KEY environment variable, and then include an x-api-key header or query parameter with your request. For example:

# Set variable
export ROBILITYFLOW_API_KEY="sk..."

# Send request
curl --request POST \
  --url "http://ROBILITYFLOW_SERVER_ADDRESS/api/v1/run/FLOW_ID" \
  --header "Content-Type: application/json" \
  --header "x-api-key: $ROBILITYFLOW_API_KEY" \
  --data '{
    "output_type": "chat",
    "input_type": "chat",
    "input_value": "Hello"
  }'

Run the Simple Agent Template Flow

To quickly test a flow:

1. In Robility Flow, click New Flow.
2. Select the Simple Agent template from the list.

You can now configure, run, and serve the flow using the /run API endpoint.

The Simple Agent flow includes an Agent component connected to Chat I/O components, a Calculator tool, and a URL tool. When you run the flow, it processes user input from the Chat Input, invokes the appropriate tool (Calculator or URL), and returns the result via Chat Output.

1. User Input is submitted through the Chat Input
2. The Agent analyzes the query and decides which tool(s) to invoke:
a. For math-related questions, it uses the Calculator tool.
b. For current events or external content, it calls the URL tool to fetch data.

3. The response is displayed through the Chat Output
4. Agents can also use other tools, such as Model Context Protocol (MCP) servers, depending on flow configuration and context.
5. In the Agent component settings, locate the OpenAI API Key
6. Enter your key directly or click the Globe icon to create a global variable.

Note: This example uses OpenAI. You can change the provider and model by updating the Model Provider and Model Name fields and supplying the relevant credentials.

Run and Test the Flow

1. Click Playground to open the test environment.
2. To test the Calculator: Ask a math question (e.g., “I want to add 4 and 4”). The Agent will call the Calculator tool using the evaluate_expression action.
3. To test the URL tool: Ask a current events question (e.g., “What’s the latest news?”). The Agent will call the fetch_content action and summarize the fetched content.
4. Click Close once you’re done testing.

What’s Next

Now that you’ve successfully run your first flow, you can:

a. Customize the Simple Agent flow by adding new tools or components.
b. Build a flow from scratch or explore other templates.
c. Integrate Robility flows with external apps via the Robility Flow API.

Running Flows from External Applications

Robility Flow functions both as an IDE and a runtime server. You can call through the Robility flow API using Python, JavaScript, or HTTP (cURL).

To test locally, send requests to your local server. For production, deploy a persistent instance of Robility Flow.

Access API Snippets

1. In the Playground, click Share, then API Access.
2. You’ll find code snippets for:

a. Python
b. JavaScript
c. cURL

These snippets are pre-filled with:

a. Your server URL
b. Flow ID
c. A sample payload
d. Your Robility Flow API key (if defined as an environment variable)

Sample Python Snippet


import requests

url = "http://ROBILITY_SERVER_ADDRESS/api/v1/run/FLOW_ID"  # The complete API endpoint URL for this flow

payload = {
    "output_type": "chat",
    "input_type": "chat",
    "input_value": "hello world!"
}

headers = {
    "Content-Type": "application/json",
    "x-api-key": "$ROBILITY_API_KEY"
}

try:
    response = requests.request("POST", url, json=payload, headers=headers)
    response.raise_for_status()  # Raise exception for bad status codes

    print(response.text)  # Print response

except requests.exceptions.RequestException as e:
    print(f"Error making API request: {e}")
except ValueError as e:
    print(f"Error parsing response: {e}")

Run the script to test your flow. If using cURL, you can execute the command directly in your terminal.
Sample API Response
A successful response includes:
a. session_id
b. Inputs and outputs
c. Components used
d. Durations
e. and more
In production, extract only relevant parts of the response for your application, such as displaying the final output or storing logs.

Extract data from the response

The following example builds on the API pane’s example code to create a question-and-answer chat in your terminal that stores the agent’s previous answer.

1. Incorporate your Simple Agentflow’s /run snippet into the following script. This script runs a question-and-answer chat in your terminal and stores the agent’s previous answer so you can compare them.
Example: Python Script
python

import requests

url = "http://ROBILITY_SERVER_ADDRESS/api/v1/run/FLOW_ID" # The complete API endpoint URL for this flow

payload = {
  "output_type": "chat",
  "input_type": "chat",
  "input_value": "hello world!"
}

headers = {
  "Content-Type": "application/json",
  "x-api-key": "$ROBILITY_API_KEY"
}

try:
  response = requests.request("POST", url, json=payload, headers=headers)
  response.raise_for_status() # Raise exception for bad status codes

  print(response.text) # Print response

except requests.exceptions.RequestException as e:
  print(f"Error making API request: {e}")
except ValueError as e:
  print(f"Error parsing response: {e}")

To view the agent’s previous answer, type compare. To close the terminal chat, type exit.

Use Tweaks to Override Flow Parameters

You can include tweaks with your requests to temporarily modify flow parameters. Tweaks are added to the API request and temporarily change component parameters within your flow. Tweaks override the flow’s components’ settings for a single run only. They don’t modify the underlying flow configuration or persist between runs.

Tweaks are added to the /run endpoint’s payload. To assist with formatting, you can define tweaks in Robility flow’s Input Schema pane before copying the code snippet.

1. To open the Input Schema pane, from the API access pane, click Input Schema.
2. In the Input Schema pane, select the parameter you want to modify in your next request. Enabling parameters in the Input Schema pane doesn’t permanently change the listed parameters. It only adds them to the sample code snippets.
3. For example, to change the LLM provider from OpenAI to Groq, and include your Groq API key with the request, select the values Model Providers, Model, and Groq API Key. Robility flow updates the tweaks object in the code snippets based on your input parameters and includes default values to guide you. Use the updated code snippets in your script to run your flow with your overrides.

Example Payload with Tweaks

{
  "output_type": "chat",
  "input_type": "chat",
  "input_value": "hello world!",
  "tweaks": {
    "Agent-ZOknz": {
      "agent_llm": "Groq",
      "api_key": "GROQ_API_KEY",
      "model_name": "llama-3.1-8b-instant"
    }
  }
}

Note: Tweaks apply only to the current execution—they do not alter the original flow configuration.

16.1.2 Tutorials

Tutorials in Robility Flow offer hands-on, step-by-step guides for building AI-powered applications and integrating Robility Flow’s capabilities into real-world solutions. Each tutorial targets a specific use case, such as building a vector RAG chatbot, creating a file-ingesting chatbot, connecting applications to agents, or linking applications to MCP servers — and walks through the essential steps needed to configure a working implementation.

By following these guided examples, you’ll see how components, agents, files, retrieval systems, and external applications come together within a complete solution. Tutorials bridge the gap between individual concepts and practical application, helping you move confidently from learning Robility Flow’s building blocks to deploying functional AI-driven solutions.

16.2 Flows

In Robility flow, flows represent the complete pipeline of how data moves and gets processed across connected components. A flow is essentially the visual workflow you design on the canvas by dragging, dropping, and linking components together. Each flow starts with an input (like a user query, file, or external request), passes through a sequence of core components (data processing, logic, model calls, or tool usage), and ends with an output that returns the final result.

Flows can be simple, such as connecting a prompt input directly to a language model, or highly complex, involving loops, conditional branches, external API calls, and agents for dynamic decision-making. They can be run interactively for testing, served through APIs, or embedded into applications—making them flexible for both experimentation and production use.

In short, flows are the orchestrated pathways that bring components, agents, and tools together into a working system that delivers intelligent, end-to-end automation. 

How Flows Work

1. Starting Point (Inputs) – Every flow begins with one or more input components. These can be direct user prompts, uploaded files, database queries, or external API calls. The input acts as the entry point of data into the workflow.

2. Processing Stage (Core Components) – Once the data enters the flow, it moves through a chain of core components. These may include:

a. Data Processing (splitting, cleaning, embedding text, structuring data).

b. Logic Control (routers, conditionals, or loops to handle branching scenarios).

c. Language Model Calls (passing prompts and context to an LLM for reasoning or generation).

3. Dynamic Decisions (Agents) – For more complex workflows, flows can integrate agents. Agents dynamically decide which tools or components to invoke, creating a layer of autonomy within the flow.

4. External Integrations (Tools & APIs) – Flows can call external services or APIs through tool components. For example, a flow could retrieve real-time data from a knowledge base, perform calculations, or connect to third-party systems like Google Sheets or databases.

5. Output Generation – Finally, the flow delivers results via output components. This could be a direct response in natural language, a structured dataset, a visualization, or even an automated action like sending an email or updating a record in a system.

16.2.1 Use the visual editor

Robility flow’s visual editor lets you design, test, and share flows—visual representations of application logic built from modular components. Each component reflects a specific step in your workflow.

With its drag-and-drop interface, Robility flow enables you to create sophisticated AI-powered workflows without writing complex code. You can seamlessly integrate various resources such as prompts, large language models (LLMs), data sources, agents, MCP servers, and other tools or connectors.

Workspace

The Workspace is your main canvas for creating flows. Here, you’ll add components, configure their behavior, and connect them to build out your workflow logic.

Workspace Interactions and Gestures

1. Pan View: Click and drag any empty space in the Workspace to move horizontally or vertically.
2. Rearrange Components: Drag and drop components to reposition them visually.
3. Modify Component Connections: To adjust the logical relationships between components, modify their edges or ports. (Refer to the Components Overview for more details.)
4. Lock Layout: Click Lock to fix the current position of components on the canvas.
5. Zoom Options:

a. Use your mouse wheel or trackpad to scroll up/down.
b.
Click Zoom In or Zoom Out.
c. Click Fit to Zoom to automatically scale the canvas to fit your entire flow.

6. Add Notes: Use Add Note to insert text boxes for comments or documentation purposes.

When your flow includes an Agent component, the Playground allows you to observe the agent’s tool calls and outputs in real time. This helps you understand how the agent makes decisions and uses its tools.

To explore how an agentic flow operates, create a flow using the Simple Agent template and open it in the Playground. For more information, see Test flows in the Playground.

Sharing and Integration Options

The Share menu offers multiple ways to integrate and distribute your flow outside the Robility environment:

1. API Access: Use auto-generated Python, JavaScript, or curl snippets to integrate your flow with external applications.
2. Export: Download your flow as a JSON file for local storage or version control.
3. MCP Server: Make your flow available as a tool for clients compatible with the MCP protocol.
4. Embed into Site: Seamlessly embed your flow into HTML, React, or Angular-based web applications.
5. Shareable Playground: Provide others with access to your Playground interface for demonstration or collaboration purposes.

Note: The Shareable Playground option is intended for previewing and testing, not for deploying flows in production environments.

16.2.2 Build Flows

A flow represents the logical sequence of an application workflow. It receives input, processes it, and produces output through a set of configurable components. Each component corresponds to a specific task in your application, such as connecting to a data source or invoking an AI model.

Robility flows are fully serializable meaning they can be saved and reloaded from the file system where Robility Flow is installed.

Quick Start Tip

To quickly get started with flow creation and execution, refer to the Robility Flow Quickstart guide.

Creating a Flow

You can create flows in Robility Flow using the following methods via the user interface:

1. Blank Flow: From the Projects page, select a project and click New Flow to start from scratch.
2. Flow from Template: Choose a project and select New Flow to create a flow using pre-defined templates.

What are templates?

Templates are pre-built flows that you can use as a starting point for your own flow. They range from basic flows with a few components to complex flows with many components and sub-flows.

For example, the Basic Prompting template demonstrates a small flow that passes both chat input and pre-defined instructions (as a prompt) to an LLM. In contrast, the Vector Store RAG template consists of two sub-flows that demonstrate how to create a Retrieval Augmented Generation (RAG) chatbot. One sub-flow populates the vector store with contextually relevant data and embeddings, and the other sub-flow queries the vector store for similar data to answer user questions.

You can also contribute templates to the Langflow codebase.

3. Import a Flow from local: You can load an existing local flow file directly during the new flow creation process.

You can also create a flow with the Robility flow API, but the Robility flow team recommends using the visual editor until you are familiar with flow creation. 

Creating a Flow in Robility Manager

All flows are mapped to a specific project within Robility Manager, enabling seamless automation and access to project-level resources such as Vault, API keys, Data Tables, and File Manager.

You can either create a new workflow or use an existing workflow that has already been published in Robility Manager. 

Adding Components to a Flow

Flows are built using components, which are modular nodes representing individual tasks. You can add and configure components in the Robility Flow visual editor.

Steps:

1. Drag and Drop: Use the Components panel to drag components into your flow workspace.
2. Configure: Set up each component by defining its configuration properties. These may include inputs, outputs, parameters, and credentials.
3. Connect Components: Use edges (ports) to connect components. These ports define the type of data transferred between nodes, for example, text strings or structured objects.

For more information on component types, configuration, and support port types, refer to the Components Overview section.

Run a flow

Once your flow is designed, you can:

1. Test in the Playground: Validate the prototype by executing it in a safe, interactive environment.
2. Trigger via API: Use the Robility Flow API to programmatically invoke flows.
3. Explore Advanced Options: Configure custom dependencies or containerize your flow for deployment.

For production readiness or external access, refer to the Robility Flow Deployment Overview for guidance on setting up an MCP (Managed Control Plane) server.

Flow graphs

When a flow runs, Robility Flow builds a Directed Acyclic Graph (DAG) from the components and their connections. The system then:

1. Calls each component’s def_build function to validate and initialize it.
2. Sorts nodes based on dependency order.
3. Executes each node sequentially, passing the output to downstream components.

This architecture ensures efficient and predictable execution.

Manage flows in projects

The Projects page serves as your main hub for managing flows.

Organize Flows

Projects act as containers to group related flows. The default project is Starter Project, but you can create new ones as needed.

Project Operations

1. View Flows: Select a project from the Projects list.
2. Create Flows: Use the methods outlined in Creating a Flow.
3. Edit Flow Details: Click More on a flow and select Edit Details.
4. Delete Flow: Select Delete from the More menu.
5. Serve as MCP Tools: See Using Robility Flow as an MCP Server.

To create a new project, click Create New Project.

Version History

The Version History feature enables users to save and restore different versions of flow. This functionality supports change tracking and allows reverting to previously saved states when required.

Saving a Flow Version

Steps

1. Open the flow to be saved.
2. In the Flow Editor sidebar, select Version History.
3. Under Current (Working Version), click Save.
4. In the confirmation prompt, select Publish to save the current flow as a new version.

Outcome
 1.
A new version (for example, v1) is added to the Version History list.
 2.
Each version is recorded with a timestamp.
 3.
The version is marked as Published, indicating that it has been successfully saved.

Restoring a Saved Version

Steps

1. Open Version History from the Flow Editor sidebar.
2. Select the version to be restored from the version list.
3. If necessary, select Publish current draft to Manager to preserve the current draft before proceeding.
4. Click Restore.

Outcome

1. The selected version becomes the active draft on the canvas.
2. The restored version remains available within the Version History list.
3. The version retains its Published status.

Additional Information

1. Saving a version creates a restore point without interrupting the current workflow.
2. Restoring a version replaces the current draft in its entirety.
3. It is recommended to publish the current draft before restoring another version to prevent unintended data loss.

Edit Flow Details

You can update a flow’s description and manage its lock state from the Projects page.

Edit Flow Information

1. Navigate to the Projects page.
2. Locate the flow you want to update.
3. Click More, then select Edit Details.
4. Update the Description as needed.
5. (Optional) Enable the Lock option to restrict further edits to the flow.
6. Click Save to apply your changes.

Lock and Unlock a Flow

1. When a flow is locked, it cannot be modified.
2. To unlock a flow, open it in the editor. A Flow Locked dialog appears on the canvas. Click the dialog to unlock the flow.

The Lock Status indicates whether a flow is currently locked or unlocked. This status is for reference only while editing and cannot be changed directly from the Edit Details panel.

Flow storage and logs

By default, Robility Flow stores flows and logs locally:

Edit Flow Details

You can update a flow’s description and manage its lock state from the Projects page.

Edit Flow Information

1. Navigate to the Projects page.
2. Locate the flow you want to update.
3. Click More, then select Edit Details.
4. Update the Description as needed.
5. (Optional) Enable the Lock option to restrict further edits to the flow.
6. Click Save to apply your changes.

Lock and Unlock a Flow

1. When a flow is locked, it cannot be modified.
2. To unlock a flow, open it in the editor. A Flow Locked dialog appears on the canvas. Click the dialog to unlock the flow.

The Lock Status indicates whether a flow is currently locked or unlocked. This status is for reference only while editing and cannot be changed directly from the Edit Details panel.

Flow storage and logs

By default, Robility Flow stores flows and logs locally:E

Platform Path
macOS /Users/<username>/.Robility flow/cache
Windows C:\Users\<username>\AppData\Roaming\com.Robility flow\cache
OSS (uv install) <venv_path>/lib/python3.12/site-packages/Robility flow/cache
OSS (git clone) <repo_path>/src/backend/base/Robility flow/cache

You can customize these locations:

  • Flow Storage: Set ROBILITY_FLOW_CONFIG_DIR
  • Log File Storage: Set ROBILITY_FLOW_LOG_FILE

16.2.3 Run Flows

In Robility flow, running flows refers to the process of executing a designed workflow so that it can produce results based on real inputs. Once a flow has been built by connecting components, tools, and agents, it can be run either within the Robility flow interface for testing or deployed externally for integration into applications.

16.2.4 Test Flows

The Playground in Robility flow is an interactive space where you can test how your LLM-based flow behaves in real-time. It’s especially useful for experimenting with prompts, reviewing memory, checking output, and verifying how agentic flows use tools to respond to various inputs.

Whether you’re building a chatbot, digital assistant, or any tool that involves an LLM, the Playground helps you quickly prototype, debug, and improve your flow’s logic.

How to Run a Flow in the Playground

1. Open your flow.
2. Click Playground in the toolbar.
3. If your flow uses a Chat Input component, type your prompt or use voice mode to begin a chat session and trigger the flow.

Important Notes

1. If you don’t see a message input field, check that your flow includes a Chat Input connected (directly or indirectly) to a Language Model or Agent.
2. The Playground supports flows designed around LLMs with the following components:

a. Chat Input
b. Language Model / Agent
c. Chat Output

3. If your flow triggered differently (e.g., via webhook, file upload, or standard text input), you can use the Robility flow API to trigger the flow. You can then view the LLM processing in the Playground if the flow uses one.

Reviewing Agent Logic

When your flow includes an Agent component, the Playground displays the tools used by the agent along with the output from each tool. This allows you to track how the agent operates and better understand the reasoning behind its responses.

For instance, if the agent uses a connected fetch content tool to perform a web search, the Playground will show that tool’s execution and its results, helping you visualize the agent’s decision-making process in real-time.

View Chat History

The Playground lets you review message logs from your flow’s chat sessions, showing details like timestamps, message content, and sender information.

To access the logs:

1. Go to the Playground sidebar.
2. Find the chat session you want to review.
3. Click Options and select Message Logs.

Modify memories in the Playground

To help debug and test your flows, you can edit or delete individual messages in message logs. For example, you might want to delete messages that you sent while testing a component that is no longer part of your flow.

You can also delete entire chat sessions from the sidebar: click  Options, and then select Delete.

Modifying memories influences the behavior of the chatbot responses if you continue the chat session or if you preserve memories over multiple chat sessions.

Editing message logs edits Robility flow’s internal messages table, which is the default chat memory storage. For more information about managing sessions and chat memory in Robility flow, see Use custom session IDs and Memory management options.

View and Explore Message Logs

The Playground allows you to inspect the full chat history of any session, including timestamps, message content, and who sent each message.

To view message logs:

1. In the Playground sidebar, find the chat session.
2. Click OptionsMessage Logs.
3. Click any cell to view the full contents of that message.

Edit or Delete Messages and Sessions

You can directly modify messages in the Playground to help test and debug your flows.

1. Edit or delete individual messages in the message log to adjust memory or remove irrelevant test data.
2. Delete entire chat sessions from the sidebar:
a. Click OptionsDelete.

Changing the message log edits Robility flow’s internal memory table, which may affect how the chatbot responds if you continue the session or reuse its memory across multiple sessions.

To learn more, see Memory Management Options and Using Custom Session IDs.

Custom Session IDs

By default, Robility flow uses the flow ID as the session ID, meaning all chats in a flow are grouped under one long conversation.

You can set a custom session_id to:

1. Separate sessions in multi-user or multi-instance scenarios.
2. Preserve chat context across multiple flow runs.
3. Debug more effectively by identifying individual sessions.
4. Avoid memory overlap between distinct interactions.

Ways to Set a Custom Session ID

1. In the Visual Editor:

a. Click the component (input/output) where you want to set the session ID.
b. Open the Controls menu in the header.
c. Enable Session ID and close the menu.
d. Enter your custom session ID.

2. Via the Robility flow API:
Pass session_id as a parameter when triggering flows.

Pro Tip: Use variables instead of hardcoded session IDs in production.
Examples:

a. Use a user ID to tie sessions to specific users.
b. Use a UUID to generate a unique session per interaction.

Share a Flow’s Playground

The Shareable Playground is for testing only. It’s not meant for embedding flows into production apps. For that, use the Robility flow API.

You can generate a public URL for a specific flow’s Playground, allowing others to test the flow without installing Robility flow or using an API key.

To Share a Playground:

1. Open the flow you want to share.
2. Click Share → Enable Shareable Playground.
3. Click Shareable Playground again to open it.
4. Copy the URL (e.g., https://your-server/playground/<FLOW_ID>).
5. Share the link with others so they can try your flow directly.

Users accessing the shared Playground can interact with the chat interface and see results—perfect for quick collaboration or demos. 

Publishing to Manager

This option is available only for flows created within a Robility Manager–connected project. It allows you to publish the flow to Robility Manager, making it accessible for other users in the same project to view and use. 

To publish the flow:

1. Open the flow you want to publish.
2. Click Share → Publish to Manager.
3. Provide the required details and click “Publish To Manager”.

16.2.5 Import and export flows

Robility Flow allows you to export flows for backup, reuse, or sharing, and import flows to quickly load and run pre-built automations.

Exporting a Flow

You can export individual flows in the following ways:

1. Export from projects: From the Projects page, locate the flow, click More, then select Export.
2. Export by sharing: While editing a flow, click Share > Export.
3. Export with the Robility flow API: Programmatically via the API endpoint: GET /flows/download.

Exported flows are downloaded to your local machine as JSON files named FLOW_NAME.json. If you export an entire project, the JSON files are packaged in a zip archive. For more information, see Robility flow JSON file contents.

Save with My API Keys

When exporting from the Projects page or Share menu, you can select Save with my API keys to export the flow and any defined API key variables. Non-API key variables are included in the export regardless of the Save with my API keys setting.

When you or another user imports the flow to another Robility flow instance, that instance must have Robility flow global variables with the same names and valid values in order to run the flow successfully. If any variables are missing or invalid, those variables must be created or edited after importing the flow.

Import a flow

You can import Robility flow JSON files from your local machine in the following ways:

1. Import to projects: On the Projects page, click Upload a flow, and then select the Robility flow JSON file to import.
2. Import anywhere: Drag and drop Robility flow JSON files from your file explorer into your Robility flow window to import a flow from any Robility flow page.
3. Import with the Robility flow API: To import one Robility flow JSON file, use the /flows/upload/ endpoint. To import a zip archive of Robility flow JSON files, use the /projects/upload endpoint.

Run an imported flow

Once imported, your flow is ready to use. If the flow contains any global variables, make sure your Robility flow instance has global variables with the same names and valid values. For more information, see Save with my API keys.

Robility flow JSON file contents

An exported flow is downloaded to your local machine as a JSON file named FLOW_NAME.json.

Robility flow JSON files contain nodes and edges that describe components and connections, and additional metadata that describe the flow.

Nodes

Nodes represent the components that make up the flow. For example, this object represents a Chat Input component:

{
  "data": {
    "description": "Get chat inputs from the Playground.",
    "display_name": "Chat Input",
    "id": "ChatInput-jFwUm",
    "node": {
      "base_classes": [
        "Message"
      ],
      "description": "Get chat inputs from the Playground.",
      "display_name": "Chat Input",
      "icon": "MessagesSquare",
      "template": {
        "input_value": {
          "display_name": "Text",
          "info": "Message to be passed as input.",
          "value": "Hello"
        },
        "sender": {
          "value": "User",
          "options": [
            "Machine",
            "User"
          ]
        },
        "sender_name": {
          "value": "User"
        },
        "should_store_message": {
          "value": true
        }
      }
    },
    "type": "ChatInput"
  },
  "position": {
    "x": 689.5720422421635,
    "y": 765.155834131403
  }
}

Each node has a unique identifier in the format of NODE_NAME-UUID, such as ChatInput-jFwUm.

Entrypoint nodes, such as the ChatInput node, are the first node executed when running a flow.

Edges

Edges represent the connections between nodes.

The connection between the ChatInput node and the OpenAIModel node is represented as an edge:

{
  "className": "",

  "data": {
    "sourceHandle": {
      "dataType": "ChatInput",
      "id": "ChatInput-jFwUm",
      "name": "message",
      "output_types": [
        "Message"
      ]
    },

    "targetHandle": {
      "fieldName": "input_value",
      "id": "OpenAIModel-OcXkl",
      "inputTypes": [
        "Message"
      ],
      "type": "str"
    }
  },

  "id": "reactflow__edge-ChatInput-jFwUm{œdataTypeœ:œChatInputœ,œidœ:œChatInput-jFwUmœ,œnameœ:œmessageœ,œoutput_typesœ:[œMessageœ]}-OpenAIModel-OcXkl{œfieldNameœ:œinput_valueœ,œidœ:œOpenAIModel-OcXklœ,œinputTypesœ:[œMessageœ],œtypeœ:œstrœ}",

  "source": "ChatInput-jFwUm",

  "sourceHandle": "{œdataTypeœ: œChatInputœ, œidœ: œChatInput-jFwUmœ, œnameœ: œmessageœ, œoutput_typesœ: [œMessageœ]}",

  "target": "OpenAIModel-OcXkl",

  "targetHandle": "{œfieldNameœ: œinput_valueœ, œidœ: œOpenAIModel-OcXklœ, œinputTypesœ: [œMessageœ], œtypeœ: œstrœ}"
}

This edge shows that the ChatInput component outputs a Message type to the target node, which is the OpenAIModel node. The OpenAIModel component accepts the Message type at the input_value field.

Additional metadata and project information

Additional information about the flow is stored in the root data object.

Metadata and project information including the name, description, and last_tested_version of the flow:

{
  "name": "Basic Prompting",
  "description": "Perform basic prompting with an OpenAI model.",
  "tags": [
    "chatbots"
  ],
  "id": "1511c230-d446-43a7-bfc3-539e69ce05b8",
  "last_tested_version": "1.0.19.post2",
  "gradient": "2",
  "icon": "Braces"
}

Visual information about the flow defining the initial position of the flow in the workspace:

{
  "viewport": {
    "x": -37.61270157375441,
    "y": -155.91266341888854,
    "zoom": 0.7575251406952855
  }
}

Notes are comments that help you understand the flow within the workspace. They may contain links, code snippets, and other information. Notes are written in Markdown and stored as node objects.

{
  "id": "undefined-kVLkG",
  "node": {
    "description": "## 📖 README\nPerform basic prompting with an OpenAI model.\n\n#### Quick Start\n- Add your **OpenAI API key** to the **OpenAI Model**\n- Open the **Playground** to chat with your bot.\n..."
  }
}

16.2.6 Playground

The Playground is a built-in interactive testing environment that lets you execute, inspect, and iterate on your workflow directly from the canvas, before deploying it to production. It provides real-time feedback on agent behavior, model responses, and data flow across components, making it the primary surface for development-time validation and debugging.

Think of the Playground as a safe sandbox: you can send inputs, observe outputs, manipulate session memory, and refine logic without any risk to live deployments.

Prerequisites

Before opening the Playground, ensure your workflow meets the following requirements:

1. Chat Input /Chat Output component Must be present and connected in the flow.
2. All components connected No orphaned nodes; the execution path must be complete.

Note: Both the Chat Input and Chat Output components must be present for the Playground to function fully.

a.If only the Chat Output is added, the Playground will not display an option to enter and send a message, only the Run option will be available.
b. If only the Chat Input is added, the query sent to the agent will be visible, but the response will not be displayed.

Accessing the Playground

To open the Playground:

1. Build or load your workflow on the canvas.
2. Click the Playground button in the top-right corner of the canvas.
3. The Playground panel will open alongside your canvas.

Key Capabilities

1. Live workflow execution – Enter text or data and run it through your workflow immediately.
2. Dynamic output preview – View model or agent responses as they are generated.
3. Conversation tracking – Inspect system instructions, user messages, and responses to analyze workflow logic.
4. Session memory control – Modify or clear messages and session history to simulate varied context scenarios.

 a. Tool invocation visibility – When your workflow includes an Agent component, the Playground displays each tool the agent called, the inputs passed, and the output returned, giving you full transparency into agent decision-making.
b. Prompt iteration – Modify system prompts, model parameters, and component settings on the fly and immediately re-run to observe the impact.
c. Intermediate output inspection – Trace data as it moves through each component to isolate where unexpected behavior originates.
d. Session history logs – Access structured logs per session, including timestamps, sender identity, and full message content, for detailed post-run analysis.
e. Memory manipulation – Delete or modify past messages to test how the agent responds to altered context, useful for evaluating memory sensitivity and fallback behavior.

Testing a Workflow

To test a workflow in the Playground, follow the steps below:

1. Open your workflow: Create a new flow or load an existing one in the canvas. Make sure all components are properly connected before proceeding.
2. Launch the Playground: Click the Playground button in the top-right corner of the canvas to switch to the interactive testing environment.
3. Provide an input: Type your text or query into the Chat Input component. This will serve as the starting point for workflow execution.
4. Execute the workflow: Submit the input to trigger processing. The workflow will run through all linked components in sequence.
 5. Review the results: Once execution is complete, the output and any intermediate responses will appear within the Playground interface for you to review and evaluate.

Exploring Results

Once the workflow runs, the Playground provides several controls to help you inspect and evaluate its behavior:

a. history: Review all messages exchanged during the session to trace the reasoning path and understand how the workflow arrived at its outputc..
b. Detailed logs: Access a full record of each message, including timestamps, sender details, and content, for complete traceability.
c. Adjust memory: Edit or delete individual messages or the entire session history to observe how changes in context affect the workflow’s output.
d. Start new sessions: Create a separate session to test alternative scenarios or inputs without affecting or overwriting existing session data.
e. Remove sessions: Permanently delete a session to clear its memory and start fresh with a clean state.

Viewing Chat History

To view message logs for a Playground session:

1. In the Playground sidebar, locate the chat session you want to examine.
2. Click Options next to the session.
3. Select Message Logs to review timestamps, content, and sender details.

To rename a session, click the (…) icon next to the session name and select Rename to update the name of that session.

Best Practices

1. Include chat components: Add Chat Input and Chat Output to your workflow for interactive validation.
2. Test incrementally: Run portions of the workflow in isolation to identify and resolve issues faster.
3. Iterate on prompts: Refine system instructions, prompts, and model settings based on observed output behavior.

Important Notes

a. The Playground is intended for development, experimentation, and debugging, not for production deployment.
b. If the workflow contains an Agent component, the Playground displays the tools invoked by the agent and the output from each tool, providing visibility into how and why the agent arrived at its final response.

16.2.7 Freeze

The Freeze feature allows you to preserve the output of a component and reuse it in subsequent executions. When a component is frozen, it and its upstream dependencies are skipped during execution, and the previously generated output is reused.

This is useful when the component output is stable and does not need to change across runs, helping improve performance and reduce unnecessary computation.

How It Works

When a component is frozen:

1. The last successful output is stored
2. The component does not execute again in future runs
3. Downstream components continue execution using the stored output
4. All upstream components are also frozen automatically.

Purpose

Use Freeze to:

1. Avoid repeated execution of stable components
2. Reduce cost from repeated API calls or model usage
3. Improve execution speed by skipping unchanged steps
4. Maintain consistent inputs for testing and debugging

How to Freeze a Component

To freeze a component:

1. Select any component in the workspace for the workflow
2. Click the (…) option available on the component header
3. Select Freeze option to freeze all upstream components.

Once enabled, the component reuses its last output of the last component instead of executing it again.

Behavior

1. Frozen Component

a. Output is treated as immutable
b. Component execution is skipped for the freeze component
c. Stored output of the last component is passed to downstream nodes

2. Upstream Components

a. Automatically frozen along with the selected component
b. Do not execute during subsequent runs
c. Entire upstream chain remains unchanged

3. Downstream Components

a. Continue to execute normally
b. Use frozen output as input

4. Empty Component Handling

If a component is frozen without any previous output:

a. The component executes once
b. The output is stored
c. Subsequent runs use the stored output

5. Unfreezing Behavior

A component is automatically unfrozen when, any configuration or parameter is modified. 

1. On the next execution, the component runs again
2. A new output is generated and stored

Loop Component Limitation

Freeze does not apply to loop components:

a. Loop components execute multiple times during a run
b. They must always execute to function correctly 
c. Their outputs cannot be reused using Freeze

When to Use Freeze

Benefits of Using Freeze Limitations of Freeze
Skips re-running stable components Not suitable for dynamic or frequently changing data
Reduces execution time Cannot be used with real-time API responses
Saves cost on model/API calls Not suitable for components reading live data
Helps in debugging with consistent inputs Does not work with loop or iterative components
Enables faster iteration during development Cannot be used when fresh output is required

16.2.8 Robility Flow Assistant 

Robility Flow Assistant is an AI-powered assistant available directly within the canvas that simplifies workflow creation through natural language interactions.

The assistant understands the structure and context of the currently active flow, enabling it to:

a. Recommend appropriate components.
b. Generate workflow elements.
c. Answer platform-related questions.
d. Guide users during workflow design.

Each request sent to Robility Flow Assistant is processed through a dedicated server-side workflow that runs independently of the flow currently open in the canvas. This separate execution model ensures reliable processing, consistent responses, and uses its own language model to provide assistance.

Limitation: Robility Flow Assistant supports a maximum input length of 780 characters per request.

Create a Custom Component with Robility Flow Assistant

This example demonstrates how to use Robility Flow Assistant to generate a custom component that transforms a paragraph into a simple bullet-point summary.

Step 1: Enter a Prompt

Provide a prompt describing the custom component you want to generate.

Example Prompt:

Create a custom component named Paragraph Summarizer that accepts a paragraph as input and returns a message-style output. The component should split the paragraph into individual sentences and convert each sentence into a bullet point. Ensure proper whitespace and formatting cleanup, gracefully handle empty or invalid inputs, use typed methods, and include appropriate error handling for robustness.

Step 2: Generate the Component

Robility Flow Assistant generates the component code based on your prompt.

Note: Since the code is AI-generated, the output may vary and may not exactly match the example shown in this documentation.

import re
import logging
from typing import List

from lfx.custom import Component
from lfx.io import MessageTextInput, MessageTextOutput


class ParagraphSummarizer(Component):
    """
    Converts a paragraph into a simple bullet-point summary.
    """

    display_name = "Paragraph Summarizer"
    description = "Splits a paragraph into sentences and returns a bullet-point summary."

    inputs = [
        MessageTextInput(
            name="text_input",
            display_name="Text Input",
            info="Enter a paragraph to summarize.",
        ),
    ]

    outputs = [
        MessageTextOutput(
            name="output_text",
            display_name="Summary Output",
            method="summarize_text",
        )
    ]

    def summarize_text(self) -> str:
        try:
            text = self.text_input

            if not isinstance(text, str) or not text.strip():
                return "Please provide a valid paragraph."

            sentences = self._split_sentences(text)
            bullets = self._format_bullets(sentences)

            return "\n".join(bullets)

        except Exception as e:
            logging.error(f"Error in ParagraphSummarizer: {str(e)}")
            return "Error while generating summary."

    def _split_sentences(self, text: str) -> List[str]:
       olor:#b294bb;">return [
            s.strip()
            for s in re.split(r"(?<=[.!?]) +", text)
            if s.strip()
        ]

    def _format_bullets(self, sentences: List[str]) -> List[str]:
        return [f"• {sentence}"for sentence in sentences]

Step 3: Save the Component

a. Copy the generated code into the Custom Component Code editor.
b. Click Check & Save.
c. After successful validation, the component becomes available in the canvas and can be reused like any other custom component.

16.3 Supported Libraries & Packages

Dependency Groups Overview

The following dependency groups will provide the technical foundation for building, orchestrating, and operating AI-driven flows and agents across the platform. Each group will address a specific layer of functionality, from core orchestration to observability and infra integration.

Core Flow & Agent Frameworks

This group will form the backbone of the platform’s orchestration layer.

  1. Langgraph-base and Langchain will provide the visual and programmatic building blocks for creating flows, chains, and agents that combine LLMs, tools, and data sources.
  2. dspy-ai, pydantic-ai, and smolagents will enable more structured, programmatic agent design, helping you define tool-using agents with typed inputs/outputs, deterministic behavior, and optimization capabilities.
  3. litellm will act as a unified LLM interface and proxy, allowing the platform to route calls across multiple model providers while centralizing configuration, logging, and throttling.
  4. mcp (Model Context Protocol) will standardize how agents will talk to external tools and services, making the platform more extensible and interoperable.

Collectively, this group will orchestrate how flows and agents will execute end-to-end across the platform.

LangChain Integrations

This group will unlock the wider AI ecosystem through plug-and-play integrations.

  1. Model provider integrations (langchain-google-genai, langchain-cohere, langchain-anthropic, langchain-openai, langchain-groq, langchain-mistralai, langchain-aws, langchain-nvidia-ai-endpoints, langchain-sambanova, etc.) will let flows switch between different LLMs and embedding models without changing the core logic.
  2. Vector and storage integrations (langchain-pinecone, langchain-chroma, langchain-milvus, langchain-astradb, langchain-elasticsearch, langchain-
  3. mongodb, langchain-chroma, langchain-graph-retriever) will allow retrieval-augmented generation (RAG) patterns across multiple databases.
  4. Tooling and service integrations (langchain-unstructured, langchain-google-vertexai, langchain-google-calendar-tools, langchain-google-community, langchain-ollama, langchain-community) will give the platform access to document loaders, calendar operations, local models, and community-maintained connectors.

This group will ensure that LangChain-based flows will connect seamlessly to the models, storages, and services required by enterprise use cases.

AI / LLM Provider SDKs & Tools

These dependencies will provide direct access to commercial AI providers and LLM utilities outside LangChain, giving more flexibility in how the platform will use models.

  1. Provider SDKs such as openai, huggingface-hub[inference], qianfan, ibm-watsonx-ai, langchain-ibm, assemblyai, twelvelabs, and jigsawstack will let the platform call text, vision, speech, and multimodal models directly.
  2. mem0ai will add long-term memory capabilities for agents, improving continuity across sessions.
  3. cleanlab-tlm will help evaluate and improve output quality, especially around noisy or low-quality labels.
  4. gassist will introduce platform-specific helper capabilities on Windows where required.

This group will allow the platform to mix high-level orchestration (via LangChain) with low-level, provider-specific capabilities when needed.

Vector DB & Retrieval

This group will power semantic search, embeddings storage, and graph-based retrieval across structured and unstructured content.

  1. Hosted or managed vector stores such as qdrant-client, weaviate-client, zep-python, upstash-vector, astra-assistants[tools], and metal_sdk will let the platform scale RAG workloads with external services.
  2. Local / embedded vector solutions like chromadb, faiss-cpu, and pgvector will support on-prem or lightweight deployments.
  3. Search-layer integrations like opensearch-py and elasticsearch will combine full-text and vector search patterns.
  4. graph-retriever will allow graph-based retrieval, enabling more advanced knowledge graph and relationship-based querying.

Together, this group will enable flexible retrieval strategies ranging from simple document search to complex knowledge graph–driven reasoning.

Databases, Storage & ORM

This group will handle application state, logs, configuration, and analytical data.

  1. sqlalchemy (with aiosqlite and Postgres drivers) will provide the primary ORM and SQL abstraction for relational data.
  2. aiosqlite, pymongo, supabase, oracledb, and pyodbc will allow the platform to connect to SQLite, MongoDB, Supabase (Postgres), Oracle, and ODBC-compatible databases.
  3. redis will be used for caching, queues, and ephemeral state management.
  4. azure-storage-blob will support blob storage for large artifacts such as files, logs, and attachments.
  5. Serialization and analytics tools like fastavro, pyarrow, and fastparquet will handle efficient storage and processing of large datasets and event streams.

This group will ensure the platform will persist and manage data in a reliable, scalable, and provider-agnostic way.

Cloud & External Platform SDKs

These SDKs will connect flows and agents to cloud infrastructure and external SaaS platforms.

  1. boto3 will enable interactions with AWS services (S3, Lambda, Bedrock, etc.).
  2. kubernetes will allow the platform to query and manage K8s resources, for example to orchestrate workloads or monitor deployments.
  3. google-api-python-client will open up access to Google services like Drive, Sheets, and Gmail.
  4. msal will provide secure authentication against Microsoft identity platforms (Azure AD).
  5. atlassian-python-api will connect to Jira, Confluence, and other Atlassian tools for ticketing and documentation workflows.

This group will let agents move beyond pure “chat” and interact with real operational environments.

Web Search, Scraping & Data Sources

This group will allow the platform to pull information from the public web and external data sources for RAG and enrichment.

  1. Search wrappers such as google-search-results, duckduckgo_search, metaphor-python, yfinance, and wolframalpha will provide search, semantic search, financial data, and computational knowledge.
  2. Web automation and scraping tools like scrapegraph-py, apify-client, spider-client, beautifulsoup4, and fake-useragent will allow robust crawling and HTML extraction while mimicking realistic user agents.
  3. Content APIs like wikipedia and datasets (Hugging Face Datasets) will provide ready-to-use corpora and reference data.

This group will ensure that agents will ground their reasoning in real-world, up-to-date information where appropriate.

NLP, Parsing & Data Processing

These libraries will handle text processing, parsing, structural transformations, and numeric computation.

  1. nltk and lark will support classic NLP tasks and grammar-based parsing (e.g., for DSLs or configuration languages).
  2. jq and json_repair will help query, transform, and repair JSON structures produced by LLMs or external APIs.
  3. Markdown will convert Markdown documents into HTML, which the platform will then reduce to text as needed.
  4. Numeric and scientific computation will be handled by numexpr and scipy.
  5. networkx will model and analyze graph structures, useful for knowledge graphs and flow graphs.
  6. docling_core and docling will manage document parsing for complex formats like PDFs and office documents.

This group will give the platform the tools required to normalize, clean, parse, and analyze data before it is passed to models or stored.

Document, OCR & Vision

This group will focus on extracting text and information from documents and images.

  1. easyocr and opencv-python will enable OCR and basic computer vision operations for scanned documents, screenshots, and image-based inputs.
  2. pdfkit will convert HTML content back into PDF, allowing the platform to generate human-readable reports or exports.

These capabilities will allow the platform to handle both digital and scanned content end-to-end.

Agent Tooling & Automation Bridges

These dependencies will make it possible for agents to call rich sets of external tools without custom glue code for each integration.

  1. composio and composio-langchain will provide a tool hub that exposes many SaaS and productivity tools (e.g., calendars, task systems, communication apps) as callable actions from within a LangChain agent.

This group will turn agents into real “doers” by enabling workflows that perform actions across the user’s SaaS landscape.

Observability, Tracing & Experimentation

This group will provide full visibility into LLM behavior, performance, and reliability.

  1. langfuse, langwatch, langsmith, opik, and traceloop-sdk will capture traces, metrics, and evaluations of flows and agent runs.
  2. arize-phoenix-otel and openinference-instrumentation-langchain will integrate with OpenTelemetry-style pipelines for standardized tracing.
  3. newrelic will act as an APM layer to monitor application performance and error rates.
  4. pytest-codspeed will support performance benchmarking at the test level, while needle-python will provide code instrumentation and telemetry.

This group will ensure that the platform will remain observable, debuggable, and continuously improvable as workloads grow.

System, Security & Utility Libraries

These cross-cutting libraries will handle configuration, security, logging, and other foundational concerns.

  1. pydantic-settings will standardize configuration via environment variables and typed settings objects.
  2. filelock and aiofile will support safe, concurrent file access, including async workloads.
  3. MarkupSafe and certifi will handle HTML escaping and TLS certificate validation.
  4. cryptography will provide secure primitives for encryption, key handling, and secure communication.
  5. uv will improve Python environment and dependency management, particularly in containerized deployments.
  6. GitPython will allow programmatic interactions with Git repositories (e.g., pulling flows or scripts from version control).
  7. sseclient-py, types-cachetools, and structlog will support streaming, caching, and structured logging.

This group will underpin the non-functional aspects of the platform—security, reliability, and maintainability.

Feature Flags & Config

This group will control runtime behavior via feature flags.

  1. unleashclient will let the platform expose and evaluate feature flags, enabling gradual rollouts, experiments, and tenant-specific configurations without redeploying core services.

Feature-flagging will be critical for safely evolving the platform and testing new capabilities.

Platform-Specific (Windows / Conditional)

This group will cover OS-specific needs.

  1. pywin32 will expose Windows APIs (COM, registry, etc.), enabling automations or integrations that are only possible or necessary on Windows environments.

This group will be used selectively, ensuring the platform will support Windows-specific scenarios without affecting cross-platform deployments.

16.3.1 Whitelisting URLs

This document contains a list of external URLs that must be whitelisted to ensure proper functionality of RobilityFlow.

All listed URLs are required to be added to the organization’s approved whitelist to allow secure access from RobilityFlow. These URLs are trusted endpoints used for documentation references, integrations, or related platform operations.

Any URL not included in this list will be restricted and may result in limited functionality or access issues within RobilityFlow.

Category Component / Service Default Port Regex Pattern
AI/ML & Model Providers AI/ML API N/A *.aimlapi.com
AnthropicN/A*.anthropic.com
Azure OpenAIN/A*.openai.azure.com
Baidu (ERNIE)N/Aapi.baidu.com
CohereN/A*.cohere.ai
DeepSeekN/A*.deepseek.com
Google GeminiN/A*.googleapis.com
GroqN/A*.groq.com
Hugging FaceN/A*.huggingface.co
Hugging Face InferenceN/A*.huggingface.cloud
IBM watsonx.aiN/A*.cloud.ibm.com
LM Studio1234CUSTOM_URL
Mistral AIN/A*.mistral.ai
NVIDIA NIMN/A*.nvidia.com
Ollama11434CUSTOM_URL
OpenAIN/A*.openai.com
OpenRouterN/A*.openrouter.ai
PerplexityN/A*.perplexity.ai
Vertex AIN/A*.googleapis.com
Cloud & Infrastructure Amazon Bedrock N/A *.bedrock.amazonaws.com
Cloudflare Workers AIN/A*.cloudflare.com
Vector Stores & Databases Cassandra 9042 CUSTOM_URL
Chroma8000CUSTOM_URL
ClickHouse8123CUSTOM_URL
Couchbase8091CUSTOM_URL
DataStax Astra DBN/A*.astra.datastax.com
Elasticsearch9200CUSTOM_URL
FAISSN/AN/A
Milvus19530CUSTOM_URL
MongoDB AtlasN/A*.mongodb.net
PineconeN/A*.pinecone.io
Qdrant6333CUSTOM_URL
Qdrant Cloud443*.qdrant.io
Redis6379CUSTOM_URL
Supabase VectorN/A*.supabase.co
Weaviate8080CUSTOM_URL
Weaviate CloudN/A*.weaviate.network
Search & Data Tools Apify N/A *.apify.com
arXivN/A*.arxiv.org
Bing SearchN/A*.microsoft.com
Exa (Metaphor)N/A*.exa.ai
GleanN/A*.glean.com
SearchAPIN/A*.searchapi.io
SerperN/A*.serper.dev
TavilyN/A*.tavily.com
WikipediaN/A*.wikipedia.org
Document Processing AssemblyAI N/A *.assemblyai.com
CleanlabN/A*.cleanlab.ai
NotionN/A*.notion.com
MCP & Package Managers npm Registry N/A *.npmjs.org
npm Registry MirrorN/A*.npmmirror.com
PyPI RegistryN/A*.pypi.org
PyPI Simple APIN/A*.pypi.python.org
PyPI CDNN/A*.pythonhosted.org
GitHub API443*.github.com
GitHub Packages Registry443*.pkg.github.com
GitHub Raw CDN443*.githubusercontent.com
jsDelivr CDN443*.jsdelivr.net
unpkg CDN443*.unpkg.com
esm.sh CDN443*.esm.sh
MCP Registries & Discovery Official MCP Registry N/A *.modelcontextprotocol.io
Smithery RegistryN/A*.smithery.ai
MCP.so RegistryN/A*.mcp.so
mcpservers.orgN/A*.mcpservers.org
MCP Schema CDNN/A*.modelcontextprotocol.io
Required Infrastructure uv Package Manager N/A *.astral.sh
Docker HubN/A*.docker.com
Docker APIN/A*.docker.io
Popular MCP Servers GitHub MCP Server N/A *.github.com

16.4 Agent

The Agents section in Robility Flow provides the core capabilities required to design, deploy, and manage autonomous AI agents within your workflows. It brings together the tools, cognitive architectures, and integration services that support agent creation, tool orchestration, context management, performance monitoring, and execution control.

Within Agents, you can configure agent models and prompt instructions, supply agents with custom tools and APIs, manage conversational memory and state across sessions, and monitor agent decision-making processes through detailed execution logs.

These capabilities help you create intelligent, adaptive applications by centralizing agent configuration, enabling seamless interaction with external components and services, maintaining context during complex multi-turn interactions, and providing clear visibility into how agents evaluate and execute tasks. Whether you are building single-purpose task bots, multi-agent systems, or interactive chat assistants, the Agents section provides the essential foundation needed throughout the agent lifecycle.

In essence, the Agents section empowers you to construct, run, and refine reliable AI agents, ensuring that your agentic workflows are context-aware, highly capable, and ready for production.

16.4.1 Configure tools for agents

You can extend an agent’s functionality by configuring tools linked to it.

Edit a tool’s Component Actions

When you set a component to Tool Mode or Tool Output, its actions (functions) become available for agents to use. These actions are listed in the component’s Actions list.

You can customize each action’s label, description, and availability to guide the agent in using the tool effectively and to prevent it from executing irrelevant or undesired actions.

For example, when Tool Mode is enabled, the URL component offers two available actions:

Tool Name Description Enabled
fetch_content Fetch content from web pages recursively true
fetch_content_as_message Fetch web content formatted as messages true

Each Robility Flow Agent interprets a tool’s purpose based on its name and description metadata. These fields are essential for guiding the agent’s behavior. The enabled field (a boolean) determines whether a tool is available for the agent to use.

If an agent appears to misuse a tool, consider updating the tool’s description metadata to clarify its intended use. While you can freely edit tool names and descriptions, default tool identifiers cannot be modified. To use a different identifier, create a custom component.

Using an Agent as a Tool

The Agent component itself supports Tool Mode, enabling the creation of multi-agent workflows.

For example, you can add an agent that uses a different OpenAI model (such as gpt-4.1) to handle tasks requiring a larger context window, like scraping or deep search. Here’s how:

1. Create the Simple Agent Starter Flow.
2. Add a second Agent component to the flow.
3. Provide your OpenAI API key in the new Agent component.
4. In the Model Name field, choose gpt-4.1.
5. Enable Tool Mode to configure this agent as a tool.
6. Connect the Toolset port of the new agent to the original agent’s Tools

Now, the first agent can leverage the second agent—with its own language model and capabilities—as a tool for handling complex or extended-context tasks.

7. You can update the agent’s actions to guide how it should be used. Click Edit Tools to change the tool’s name, description, or its enabled status.
For example, the default name is Agent. You can rename it to Agent-gpt-41 and update the description to: Uses the gpt-4.1 model for complex problem solving.

This helps the connected agent understand that the tool is specifically for tasks requiring a larger context window and should be used accordingly.

Use Custom Components as Tools

Agents can also interact with custom components as tools.

To add a custom component to an agent flow:

1. Click New Custom Component in the flow editor.
2. Add your custom Python code in the component’s Code pane.
a. For example, to build a text analyzer tool, paste the corresponding code snippet into this section.
3. Click Tool Mode to configure the custom component to function as a tool.

4. Link the custom component’s Tool Output to the agent’s Tools Input to establish the connection.
5. Open the Playground and give the agent an instruction such as:
Use the text analyzer on this text: “Agents really are thinking machines!”
The agent will now recognize and execute the custom tool as part of its response.

Response:

AI
gpt-4o
Finished
0.6s

Here is the analysis of the text "Agents really are thinking machines!":

Original Text: Agents really are thinking machines!
Word Count: 5
Character Count: 36
Sentence Count: 1
Reversed Text: !senihcam gnikniht era yllaer stnegA
Uppercase Text: AGENTS REALLY ARE THINKING MACHINES!

The agent successfully invokes the analyze_text action and returns the result in the Playground.

Using Any Component as a Tool

If a component does not include a Tool Mode button, you can still configure it as a tool by setting tool_mode=True on one of its inputs. Then, connect the component’s Toolset Output to the agent’s Tools Input.

Supported Input Types for Tool Mode in Robility Flow:
Robility Flow supports Tool Mode for the following input types:

a. DataInput
b. DataFrameInput
c. PromptInput
d. MessageTextInput
e. MultilineInput
f. DropdownInput

For example, in the earlier scenario, tool_mode=True is added to the MessageTextInput input, enabling the custom component to function as a tool. 

inputs = [
    MessageTextInput(
        name="input_text",
        display_name="Input Text",
        info="Enter text to analyze",
        value="Hello, World!",
        tool_mode=True,
    ),
]

Use Flows as Tools

Agents can leverage saved flows from your workspace as tools by using the Run flow component.

1. Drag the Run flow component into your workspace.
2. Choose the flow you want the agent to access as a tool.
3. Enable Tool Mode on the component. This allows the flow to appear as an available action.
4. Connect the tool output of the Run flow component to the agent’s tools input.
5. Instruct the agent by asking, “What tools are you using to answer my questions?” — the connected flow will be listed among the tools.
6. Ask the agent to use the specific tool to answer your question. The flow will execute and return a response based on its internal configuration.

Example: A Basic Prompting flow connected as a tool may return different results depending on the selected LLM and prompt setup.

16.4.2 Use Robility flow agents

Robility Flow Agents help you create intelligent workflows by combining the power of Large Language Models (LLMs) with custom tools and external systems. Agents allow your automation to not just respond—but to reason, act, and adapt.

With Robility Flow Agents, you can:

1. Integrate with multiple LLM providers (like OpenAI)
2. Use tools to perform external actions
3. Add custom instructions to guide your agent’s behavior
4. Focus more on logic, and less on configuration

How Do Robility Agents Work?

Think of an agent as a smart assistant that can:

a. Understand input (using an LLM)
b. Decide what action to take
c. Either respond with text or perform real tasks (e.g., update files, call APIs)

Agents are more powerful than plain LLMs because they can use tools—custom functions that provide access to your data, knowledge base, or other systems.

Example: Instead of just replying to “What’s the status of Project X?”, an agent can check your internal tracker and respond with the latest updates.

Agents = LLM + Tools

At the heart of every agent is:

a. A reasoning engine (the LLM)
b. A set of tools (functions that the agent can use)

Each Tool:

a. Has a clear description
b. Is packaged as a standardized Tool object
c. Is registered during agent setup
d. Helps the agent decide when and how to use it autonomously

Creating an Agent Flow in Robility Flow

To build an agent-powered flow:

Step 1: Start a New Flow – Click New Flow > Blank Flow

Step 2: Add an Agent Component – Drag the Agent component into your workspace

Step 3: Set Up Your LLM

a. Enter a valid OpenAI API key
b. Want to use a different model? Update the Model Provider, Model Name, and API Key fields
 See Agent Component Parameters for more details

Step 4: Connect Chat Components

a. Add Chat Input and Chat Output components
b.
Connect them to the Agent

At this stage, you’ve built a simple LLM-based chatbot.

Make It Agentic: Add Tools

To turn your chatbot into a real agent:

a. Add Tool components to your flow
b. Register them with your Agent
c. Each tool gives your agent real-world capabilities like calling APIs, accessing data, or triggering actions

Try It Out

You can:

a. Use the Simple Agent template for a ready-made example
b. Try the Robility Flow Quickstart for step-by-step guidance

Step5: Add Components
Add the News Search, URL, and Calculator components to your flow.

6. Enable Tool Mode
Turn on Tool Mode for each of the components:

a. Click on each component (e.g., News Search) to reveal its header menu.
b. Enable Tool Mode from the menu.
c. Repeat this for the URL and Calculator

7. Connect to the Agent

a. Once Tool Mode is enabled, each component will display a Toolset
b. Connect the Toolset port of each component to the Tools port on your Agent

Enabling Tool Mode allows a component to be used as a tool by the Agent. This changes how the component receives input, letting the Agent trigger specific actions during the conversation.

For details, refer to Configure tools for agents.

8. Open the Playground, and then ask the agent, what tools are you using to answer my questions?

The agent should respond with a list of the connected tools. It may also include built-in tools.

I use a combination of my built-in knowledge (up to June 2024) and a set of external tools to answer your questions. Here are the main types of tools I can use:

Web Search & Content Fetching: I can fetch and summarize content from web pages, including crawling links recursively.

News Search: I can search for recent news articles using Google News via RSS feeds.

Calculator: I can perform arithmetic calculations and evaluate mathematical expressions.

Date & Time: I can provide the current date and time in various time zones.

These tools help me provide up-to-date information, perform calculations, and retrieve specific data from the internet when needed. If you have a specific question, let me know, and I’ll use the most appropriate tool(s) to help!

9. To test a specific tool, ask the agent a question that uses one of the tools, such as Summarize today’s tech news.

To help you debug and test your flows, the Playground displays the agent’s tool calls, the provided input, and the raw output the agent received before generating the summary. With the given example, the agent should call the News Search component’s search_news action.

You’ve successfully created a basic agentic flow that uses some generic tools.

To continue building on this tutorial, try connecting other tool components or use Robility flow as an MCP client to support more complex and specialized tasks.

For a multi-agent example, see Use an agent as a tool.

Agent Component Parameters

The Agent component in Robility Flow can be configured to use your preferred model provider, custom instructions, and tools. It also supports memory and various advanced settings to customize agent behavior.

Model Provider and Model Selection

Use the Model Provider and Model Name settings to choose which LLM the agent will use. Robility Flow supports several built-in models from popular providers.

a. To use other providers, set the Model Provider to Custom and connect a compatible Language Model component.
b. For embedding generation, use a separate Embedding Model

API Key Configuration

If you’re using a built-in provider (e.g., OpenAI), enter a valid API key for that provider in the API Key field.

  • This key must have permission and credits to access the selected model.
  • It’s recommended to store API keys securely using environment variables or global variables.
  • For custom providers, API authentication should be handled in the connected Language Model component.

Agent Instructions and Inputs

Use the Agent Instructions field to define system-level prompts or behavior guidelines for the agent.

  • These instructions are always included with each conversation.
  • The Input field can receive user input directly or from components like Chat Input.

Tools

Agents become more powerful when integrated with tools.

  • You can convert any Robility Flow component into a tool by enabling Tool Mode on it.
  • After enabling Tool Mode, connect the component’s output to the Tools port on the Agent component.
  • Tools may include utilities like calculators, search components, or even other agents.

To connect tools hosted on external MCP servers, use the MCP Tools component.

Agent Memory

Agents have built-in chat memory enabled by default. This allows them to recall past interactions within a session.

  • Chat memory is tied to a session ID. By default, this is the flow ID.
  • For more controls such as isolating conversations between different users—use custom session IDs.
  • The number of past messages retrieved is controlled by the Number of Chat History Messages

To enable more advanced memory filtering and external storage, use the Message History component.

Additional Parameters

The Agent component offers several advanced settings. Some parameters are hidden by default and can be enabled through the component’s controls.

Examples include:

  • Current Date Tool: Adds a built-in tool that allows the agent to fetch the current date.
  • Handle Parse Errors: Allows the agent to recover from input errors like typos.
  • Verbose Logging: Enables detailed logging to help with debugging and tracking agent decisions.

Settings may vary depending on the chosen model or provider.

Agent component Output

The Agent component generates a Response, which contains the raw reply from the agent.

  • This response is typically passed to a Chat Output component for display.
  • It can also be routed to other components for additional processing or automation.

16.5 Model Context Protocol (MCP)

The Model Context Protocol (MCP) is an open standard created to make it easier for AI models and applications to access external data, tools, and services in a secure and structured way. Instead of every AI platform building custom integrations, MCP provides a unified protocol that defines how models can connect to external sources—like databases, APIs, file systems, or enterprise apps—through a common interface.

How It Works

1. MCP works as a bridge between an AI model (e.g., GPT) and external systems.
2. It uses servers to expose tools, resources, and data in a standardized format.
3. AI applications can then request context or perform actions via these servers without needing custom connectors each time.

Example:

a. A Robility flow app using MCP could connect to a CRM system to fetch customer data or update records.
b. Instead of building a new integration, it just calls the CRM via MCP.

Key Benefits

1. Interoperability – Works across different LLMs, apps, and services.
2. Extensibility – Developers can easily add new servers for custom data sources.
3. Security – Access to external systems is controlled and sandboxed.
4. Reusability – The same MCP server can be used by multiple AI apps without rewriting integrations.

16.5.1 Use Robility Flow as an MCP Client

Robility Flow supports integration with the Model Context Protocol (MCP) as both a client and a server. This guide focuses on using Robility Flow as an MCP client to connect to external tools using the MCP Tools component.

For details about acting as an MCP server, see Use Robility Flow as an MCP Server.

MCP Tools Component Overview

The MCP Tools component connects your flow to an MCP server and exposes that server’s tools to Robility Flow agents.

You can connect to:

1. External MCP servers (non-Robility Flow)
2. Robility Flow MCP servers (from other projects or flows)

Connect to an External (Non-Robility Flow) MCP Server

1. Add the MCP Tools component to your flow.

2. Configure or select an MCP server in the MCP Server field:
a. JSON: Paste the MCP server configuration in JSON format and click Add Server.
b. STDIO: Enter the server name, command, arguments, and any required environment variables.
For example, to start a Fetch server, use uvx mcp-server-fetch.
c. SSE: Provide the server name, SSE URL, and any required headers or environment variables.

Note: uvx is bundled with uv in Robility Flow. If you need to use npx-based servers, ensure an LTS version of Node.js is installed.

For reference, see: Connect an Astra DB MCP server to Robility Flow.

3. Set any required environment variables in the Env fields using the format: VARIABLE=value

4. Important: Robility Flow only reads environment variables from the .env file. It does not use global variables defined in the UI.
To make a variable available globally, add it to the .env file before starting the application.

5. (Optional) Select a specific tool from the connected MCP server.
If left blank, all available tools will be exposed.

6. Some tools may require additional configuration. Refer to the documentation for your MCP server for details.

7. Enable Tool Mode on the MCP Tools component to allow it to be used by agents.

8. Connect the MCP Tools component to your Agent:
a. Link the Toolset port of the MCP Tools component to the Tools port of the Agent component.
b. Ensure Chat Input and Chat Output components are connected to the Agent if they are not already part of your flow.

Test the Flow and Use Connected Tools

1. Open the Playground and enter a prompt that triggers the connected tool via the MCP Tools component.
For example, if you’ve connected the mcp-server-fetch tool, you might prompt the agent with a question like “Summarize recent tech news.”
The agent should call the fetch function on the MCP server and return the relevant response.

2. To allow the agent to access additional tools, repeat the steps to add more MCP Tools components, each configured with a different server or tool.

Connect a Robility Flow MCP Server

1. Each Robility flow project runs its own MCP server that exposes the project’s flows as MCP tools. For more on managing flows exposed by your MCP server, refer to the guide on using Robility flow as an MCP server.

2. To connect and use flows as tools, follow these steps to configure the MCP Tools component in Server-Sent Events (SSE) mode:

3. Add an MCP Tools component to your flow, select Add MCP Server, and choose SSE mode.

4. In the MCP SSE URLfield, update the default address to match your Robility flow server’s SSE endpoint.
The typical default URL is: http://localhost:7860/api/v1/mcp/sse. When using SSE mode, all flows on the targeted server become available as tools.

5. In the component’s settings, enable Tool modeto make the component usable with an agent.

6. Connect the Toolset port of the MCP Tools component to the Tools port of the Agent component. Also ensure that Chat Input and Chat Output components are connected to the Agent if they aren’t already.

7. Test your flow to ensure the agent uses your flows to respond to queries. Open the Playground and enter a prompt that invokes a flow connected through the MCP Tools component.

8. To enable the agent to use additional flows, repeat these steps by adding more MCP Tools components and selecting different servers or tools.

MCP Tools Parameters

Parameter Description
MCP Server Select the MCP server that this component will connect to and use. The dropdown lists all servers you have already configured in your MCP Servers settings.
Use Cached Server (Toggle button) Enables caching of the MCP server and its tools to improve performance. When disabled, Robility Flow always fetches the latest tools and server updates on each run.
Verify SSL Certificate (Toggle button) Enables SSL certificate verification for HTTPS connections. Disable this only in development or testing environments where self-signed certificates are used.
Actions Lists the tools available for the connected MCP server. You can modify tool names and descriptions to help agents better understand when and how to use each tool.

MCP Flow Requirements

1. MCP Server Panel Overview

On the right panel, you can view all added MCP servers and manage existing server configurations. This section serves as the central place to monitor and control your MCP connections.

2. Accessing Server Management

Click on Manage Server to open the MCP Servers management page.

3. MCP Servers Page

On the MCP Servers page, you can connect to a server in two ways:
Click “+ Add MCP Server” to manually configure a custom server Or select one of the 10 preloaded MCP servers and click “Add Server” next to the one you want to connect.

Available Preloaded MCP Servers

The following MCP servers are available out of the box:

  1. Playwright
  2. File System
  3. Oracle Database
  4. MySQL
  5. SQL Server
  6. PostgreSQL
  7. Puppeteer
  8. Quick Chart
  9. Azure DevOps
 10. Atlassian Jira & Confluence

Some servers can be used immediately without credentials, while others require authentication details to establish a secure connection before use.

+ Add MCP Server

The Add MCP Server dialog lets you connect to an MCP server using one of three configuration methods:

1. JSON Configuration

Use this option to paste or enter a complete JSON configuration object.

When to use:

a. You already have a predefined configuration from a tool or service
b. You want to quickly import settings without manually filling fields

2. STDIO (Local Server)

Use this option to connect to a locally running MCP server that communicates via standard input/output (stdio).

Required fields:

a. Name – A label to identify the server in Robility Flow
b. Command – The executable used to start the server (e.g., npx, node, python)
c. Arguments – Command-line parameters required to run the server
d. Environment Variables – Key-value pairs used for configuration (commonly API keys, tokens, or secrets)

When to use: Running MCP servers locally from the command line

3. Streamable HTTP / SSE (Remote Server)

Use this option to connect to a remotely hosted MCP server over HTTP using Streamable HTTP or Server-Sent Events (SSE).

Required fields:

a. Name – A label to identify the server in Robility Flow
b. Streamable HTTP/SSE URL – The full endpoint URL of the hosted MCP server
c. Headers – Optional headers such as Authorization or Content-Type
d. Environment Variables – Key-value pairs used for authentication or runtime configuration (e.g., API keys, tokens)

When to use: Cloud-hosted or externally deployed MCP servers

After completing the configuration:
Click Add Server to save and connect the MCP server or Cancel to discard changes.

16.5.2 Use Robility flow as an MCP server

Robility flow integrates with the Model Context Protocol (MCP) as both an MCP server and an MCP client.

This page describes how to use Robility flow as an MCP server that exposes your flows as tools that MCP clients can use when generating responses.

Robility flow MCP servers support both the streamable HTTP transport and Server-Sent Events (SSE) as a fallback. The default project MCP server configuration uses streamable HTTP transport at the URL path /streamable.

For information about using Robility flow as an MCP client, see Use Robility flow as an MCP client.

Prerequisites

1. A Robility flow project with at least one flow.
2.The Chat Output component is required to use a flow as an MCP tool.
3. Any LTS version of Node.js installed on your computer if you want to use MCP Inspector to test and debug flows.
4. ngrok installed and an ngrok authtoken if you want to deploy a public Robility flow server.

Select and configure flows to expose as MCP tools

MCP flow requirements

A flow must contain a Chat Output component to be used as a tool by MCP clients.

Each Robility flow project has an MCP server that exposes the project’s flows as tools that MCP clients can use to generate responses.

By default, all flows in a project are exposed as tools on the project’s MCP server.

The following steps explain how to limit the exposed flows and, optionally, rename flows for agentic use:

1. From the Robility flow dashboard, select the project that contains the flows you want to serve as tools, and then click the MCP Server tab. Alternatively, you can quickly access the MCP Server tab from within any flow by selecting Share > MCP Server.

The Auto install and JSON tabs display options for connecting MCP clients to the project’s MCP server.

The Flows/Tools section lists the flows that are currently being served as tools.

Serve flows as MCP tools

When you create a Robility Flow project, Robility Flow automatically adds the project to your MCP server configuration and makes the project’s flows available as MCP tools.

Selectively enable and disable MCP servers for Robility flow projects

A flow can only be used as a tool by MCP clients if it includes a Chat Output component.

Each Robility flow project automatically provides an MCP server that exposes the project’s flows as tools, which MCP clients can call to generate responses.

By default, every flow in a project is exposed as a tool through that project’s MCP server.

The following steps explain how to use:

1. Click the MCP Server tab on the Projects page

The Flows/Tools section lists the flows that are currently being served as tools on this MCP server.

2. To toggle exposed flows, click Edit Tools, and then select the flows that you want exposed as tools. To prevent a flow from being used as a tool, clear the checkbox in the first column.

3. Close the MCP Server Tools dialog to save your changes.

Edit flow tool names and descriptions

Tool names and descriptions help MCP clients determine which actions your flows provide and when to use those actions. It is recommended to provide clear, descriptive names and descriptions for all tools that you serve to MCP clients.

To edit the names and descriptions of flow tools on a Robility flow MCP server, do the following:

1. Click the MCP Server tab on the Projects page, or, when editing a flow, click Share, and then select MCP Server.
2. Click Edit Tools.
3. Click the Description or Tool that you want to edit:
a. Tool name: Enter a name that clearly explains what the flow does when used as a tool by an agent.
b. Tool description: Enter a description that completely and accurately explains the specific actions the flow performs.
4. Close the MCP Server Tools dialog to save your changes.

Importance of tool names and descriptions

MCP clients use tool names and descriptions to determine which actions to use when generating responses.

Because MCP clients treat your Robility flow project as a single MCP server with all enabled flows listed as tools, unclear names and descriptions can cause the agent to select tools incorrectly or inconsistently.

For example, a flow’s default tool name might be a flow ID such as: adbbf8c7-0a34-493b-90ea-5e8b42f78b66. This provides no meaningful information about the flow’s purpose.

To give better context, ensure your flows are clearly named and described when configuring your Robility flow project’s MCP server.

Think of these names and descriptions like function names and code comments. Use clear, specific language to describe the problems your flows solve.

Connect clients to your Robility flow MCP server

Robility flow provides automatic installation and code snippets to help you deploy your Robility flow MCP servers to your local MCP clients.

The JSON option allows you to connect a Robility Flow MCP server to any local or remote MCP client. You can modify this process for any MCP-compatible client.

1. Install any MCP-compatible client.

These steps use Cursor as an example, but the process is generally the same for all clients, with slight differences in client-specific details like file names.

2. In your client, add a new MCP server using the client’s UI or configuration file.

For example, in Cursor, go to Cursor Settings, select MCP, and then click Add New Global MCP Server to open Cursor’s global mcp.json configuration file.

a. In Robility Flow, on the workflow canvas menu page, click the MCP Server tab.
b. Click the JSON tab, copy the code snippet for your operating system, and then paste it into your client’s MCP configuration file. For example:

{
  "mcpServers": {
    "PROJECT_NAME": {
      "command": "uvx",
      "args": [
        "mcp-proxy",
        "--transport",
        "streamablehttp",
        "http://ROBILITY_SERVER_ADDRESS/api/v1/mcp/project/PROJECT_ID/streamable"
      ]
    }
  }
}

The MCP Server tab automatically populates the ROBILITYFLOW_SERVER_ADDRESS and PROJECT_ID values.

To include other environment variables with your MCP server command, add an env object with key-value pairs of environment variables. For example:

{
  "mcpServers": {
    "PROJECT_NAME": {
      "command": "uvx",
      "args": [
        "mcp-proxy",
        "--transport",
        "streamablehttp",
        "http://ROBILITYFLOW_SERVER_ADDRESS/api/v1/mcp/project/PROJECT_ID/streamable"
      ],
      "env": {
        "KEY": "VALUE"
      }
    }
  }
}

Don’t add API keys in the env object, as these variables are specifically for the mcp-proxy process. Instead, add API keys under args. For example, see MCP server authentication.

1. Save and close your client’s MCP configuration file.

2. Confirm that your Robility Flow MCP server is on the client’s list of MCP servers. If necessary, restart your client to apply the modified configuration file.

Auto Install

Info
The auto install option is available only for specific MCP clients. Auto install requires the client to be installed locally so Robility Flow can write to the client’s configuration file. If your client isn’t supported, it is installed remotely, or you need to pass on additional environment variables, use the JSON option.

1. Install CursorClaude, or Windsurf on the same computer where your Robility Flow server is running.
2. In Robility Flow, on the Projects page, click the MCP Server tab.
3. On the Auto install tab, find your MCP client provider, and then click  Add.

Your Robility Flow project’s MCP server is automatically added to the configuration file for your local Cursor, Claude, or Windsurf client. For example, with Cursor, the server configuration is added to the mcp.json configuration file.

Robility Flow attempts to add this configuration even if the selected client isn’t installed. To verify the installation, check the available MCP servers in your client.

MCP server authentication and environment variables

You must provide a Robility flow API key in your MCP client configuration if your Robility flow server has authentication enabled.
When this is the case, the code template in your project’s MCP Server tab automatically includes the –header and x-api-key arguments:

{
  "mcpServers": {
    "PROJECT_NAME": {
      "command": "uvx",
      "args": [
        "mcp-proxy",
        "--headers",
        "x-api-key",
        "YOUR_API_KEY",
        "http://ROBILITYFLOW_SERVER_ADDRESS/api/v1/mcp/project/PROJECT_ID/sse"
      ]
    }
  }
}

Click Generate API key to automatically insert a new Robility flow API key into the code template. Alternatively, you can replace YOUR_API_KEY with an existing Robility flow API key.

To include other environment variables with your MCP server command, use the env object with key-value pairs of environment variables:

{
  "mcpServers": {
    "PROJECT_NAME": {
      "command": "uvx",
      "args": [
        "mcp-proSxy",
        "http://ROBILITYFLOW_SERVER_ADDRESS/api/v1/mcp/project/PROJECT_ID/sse"
      ],
      "env": {
        "KEY": "VALUE"
      }
    }
  }
}

Deploy your MCP server externally

To deploy your MCP server externally with ngrok, see Deploy a public Robility flowserver.

Use MCP Inspector to test and debug flows

MCP Inspector is a common tool for testing and debugging MCP servers. You can use MCP Inspector to monitor your flows and get insights into how they are being consumed by the MCP server:

1. Install MCP Inspector: npx @modelcontextprotocol/inspector. For more information about configuring MCP Inspector, including specifying a proxy port, see the MCP Inspector GitHub project.
2. Open a web browser and navigate to the MCP Inspector UI. The default address is http://localhost:6274.
3. In the MCP Inspector UI, enter the connection details for your Robility flow project’s MCP server:

a. Transport Type: Select SSE.
b. URL: Enter Robility flowMCP server’s sse endpoint.
For example: http://localhost:7860/api/v1/mcp/project/d359cbd4-6fa2-4002-9d53-fa05c645319c/sse
If you’ve configured authentication for your MCP server, fill out the following additional fields:

a. Transport Type: Select STDIO.
b. Command: uvx 
c. Arguments: Enter the following list of arguments, separated by spaces. Replace the values for YOUR_API_KEY, ROBILITYFLOW_SERVER_ADDRESS, and PROJECT_ID with the values from your Robility flow MCP server. For example: mcp-proxy – headers x-api-key YOUR_API_KEY http://ROBILITYFLOW_SERVER_ADDRESS/api/v1/mcp/project/PROJECT_ID/sse

4. Click Connect. If the connection was successful, you should see your project’s flows in the Tools tab. From this tab, you can monitor how your flows are registered as tools by MCP, as well as test the tools with custom input values.
5. To quit MCP Inspector, press Control+C in the same terminal window where you start it.

Troubleshooting MCP server

If Claude for Desktop isn’t using your server’s tools correctly, you may need to explicitly define the path to your local uvx or npx executable file in the claude_desktop_config.json configuration file.

1. To find your UVX path, run which uvx. To find your NPX path, run which npx.
2. Copy the path and then replace PATH_TO_UVX or PATH_TO_NPX in your claude_desktop_config.json file.
a. uvx
b. npx

{
  "mcpServers": {
    "PROJECT_NAME": {
      "command": "PATH_TO_UVX",
      "args": [
        "mcp-proxy",
        "http://ROBILITYFLOW_SERVER_ADDRESS/api/v1/mcp/project/PROJECT_ID/sse"
      ]
    }
  }
}

16.6 Develop

The Develop section in Robility Flow provides the core capabilities required to build, configure, and manage workflow applications. It brings together the tools and services that support application development, data management, integration, monitoring, and runtime configuration.

Within Develop, you can securely manage API keys and authentication, configure global and environment variables, work with storage and memory, monitor workflow execution through observability, and understand the Robility Flow data types used across components and workflows.

These capabilities help you create scalable and maintainable applications by centralizing configuration, enabling secure connections to external systems, managing application state and data, and providing visibility into workflow performance and execution. Whether you’re setting up development environments, handling files and session data, integrating third-party services, or troubleshooting workflow behavior, the Develop section provides the tools needed throughout the application lifecycle.

In essence, Develop serves as the foundation for building, operating, and maintaining reliable Robility Flow applications, ensuring that workflows are secure, observable, and ready for production.

16.6.1 Authentication and Authorization overview

RobilityFlow uses authentication to verify who a user is before granting access, and authorization to control what an authenticated user is allowed to do.

Authentication and authorization are configured independently. Most deployments only require authentication. Authorization is an optional plugin that adds role-based access control (RBAC) to your server.

To configure authentication and authorization for your RobilityFlow server, pick your authentication path below and follow the corresponding documentation.

1. To secure a server RobilityFlow with user accounts and API keys using RobilityFlow’s built-in authentication, see API keys and authentication. Built-in authentication is always available and is the default setting. Users log in with a username and password, and RobilityFlow issues a short-lived JWT session token and validates RobilityFlow API keys against its own database.

2. To connect RobilityFlow to your company’s SSO, OIDC, or identity provider, see External authentication. External authentication lets an upstream identity provider, OIDC proxy, or corporate SSO gateway handle login. RobilityFlow accepts the token the proxy forwards, validates it against the identity provider’s JWKS endpoint, and provisions a local user automatically.

3. To configure RBAC on your RobilityFlow server, see Authorization. After a user is authenticated by any of the authentication paths, the authorization layer decides what the user can do. RBAC enforcement requires a registered authorization plugin.

When multiple credentials are present, RobilityFlow tries each credential in the order of built-in JWT, external token, and then RobilityFlow API key.

16.6.2 API keys and authentication

Authentication credentials help prevent unauthorized access to your Robility flow server, flows, and services connected through components.

There are three types of credentials that you use in Robility flow:

1. Robilityflow API keys: For authentication with the Robility flow API and authorizing server-side Robility flow actions like running flows and uploading files.
2. Component API keys: For authentication between Robility flow and a service connected through a component, such as a model provider or third-party API.
3. Authentication environment variables: These environment variables configure how Robility flow handles user authentication and authorization.

Robility flow API keys

Robility Flow API keys allow you to interact with the platform programmatically, offering the same permissions as your user account. This means:

1. Your API key can access only your own flows, components, and data.
2. It cannot access other users’ resources.
3. The key represents the user who created it, if created by a superuser, it inherits superuser privileges.
4. Anyone with a superuser API key can perform privileged actions such as user and flow management via the Robility Flow API.

In single-user environments, you are always a superuser, and your Robility flow API keys always have superuser privileges.

In multi-user environments, users who aren’t superusers cannot use their API keys to access other users’ resources. You must start your Robility flow server with authentication enabled to allow user management and creation of non-superuser accounts.

Authentication and Access

Most API endpoints in Robility Flow require an API key, even if AUTO_LOGIN is enabled.

Create a Robility Flow API Key

To create Robility flow API key, do the following:

1. Publish your flow to the Robility Manager. 
2. Navigate to the project in the Robility Manager. 
3. Go to the “Workflows” page. 
4. It will list the flows published against the Manager and choose your respective flow. 
5. Click on “Generate API Key” and choose the published version of the flow. 
6. Once the key is generated, click on “History” button and you can view the API key generated against each version of the flow published. 
7. Copy the API key and store it securely.

How the Scheduler Uses API Keys

The Robility Flow Scheduler uses your API key to authenticate requests to the platform. When the scheduler triggers a bot or workflow execution, it includes this API key in the HTTP header of the request, ensuring secure and authorized access to run the bots.

You can generate and manage your Robility Flow API keys through the Workflow page in the Robility Manager. To schedule tasks, use the ‘Schedule Robots’. To verify whether a bot has executed successfully, check the ‘Automation Ops’ page under the ‘Flow‘ tab.

16.6.3 Flow Insights

Flow Insights provides a centralized view of component connectivity and workflow execution across the flow graph. It helps you identify missing connections, monitor component execution in real time, track workflow progress with Run Focus, and troubleshoot issues more efficiently through visual execution insights.

Note: You can hide the Flow Insight panel by selecting the first option in the bottom pane.

This feature is currently available as a beta version.

Flow Insights Panel

The Flow Insights panel displays components in sequence based on their position in the flow graph. Use the following filters to focus on specific areas:

a. Missing Connections: Displays components with missing required node connections.
b. Errors: Shows components that failed during execution.
c. Troubleshooting: Highlights execution insights to help identify and resolve issues.

Component Execution Status

Components are color-coded to indicate their execution status:

🟢 Green: Execution completed successfully.
🔴 Red: Execution failed or encountered an error.
🟡 Yellow: Component is unconnected or missing a required connection.

Key Features

Refresh: Refreshes the Flow Insights panel with the latest flow state. Successful execution highlights are cleared, while errors and missing connection indicators remain until the issues are resolved.

Run Focus: Run Focus controls execution tracking on the canvas.

When enabled, the canvas automatically follows workflow execution by panning and zooming to the component currently being processed. When disabled, the canvas remains in its current view for manual navigation.

Limitations

1. Disconnected Input Nodes: If the starting component contains an input node, it must be connected to an active source such as a Chat Input. Otherwise, Run Focus is unavailable.
2. Parallel Execution Paths: Run Focus is not supported for flows that execute multiple components simultaneously, as execution tracking requires a single sequential path.

Benefits

1. Faster Diagnostics: Identify missing connections and execution failures from a centralized view.
2. Real-Time Monitoring: Track workflow progress using visual status indicators.
3. Enhanced Execution Visibility: Follow the execution path automatically with Run Focus.
4. Simplified Troubleshooting: Quickly locate and resolve workflow issues directly within the flow graph.

16.6.4 Flow Analytics

The Flow Analytics Dashboard provides real-time visibility into workflow reliability, execution speed, resource utilization, and component efficiency. Use it to isolate performance bottlenecks, monitor failure patterns, and track model token consumption.

Quick Actions

1. Filter by Timeframe: Use the date selector in the upper-right corner to analyze activity for Today, Yesterday, or the Past 3, 5, or 7 Days.
2. Refresh Data: Click the Refresh icon next to the timeframe selector to manually update the dashboard with the latest execution metrics.

Core Value & Use Cases

1. Monitor Reliability: Track execution volumes and success vs. failure rates. Instantly spot failure spikes and jump directly into execution logs.
2. Identify Bottlenecks: Analyze latency across specific workflow components—such as Agent, vLLM, and Search Files—to pinpoint steps causing execution delays.
3. Optimize Costs: Track token consumption trends over time to forecast model utilization, manage operational budgets, and prevent overages.

Key Performance Indicators

Metric Definition
Total Runs Total workflow executions completed within the selected timeframe.
Success Percentage Percentage of workflow runs completed successfully without errors.
Failure Percentage Percentage of workflow runs that failed due to runtime or tool execution errors.
Avg. Execution Time Average time required for a workflow to complete from start to finish.
Total Tokens Cumulative number of LLM tokens consumed across all executions within the selected timeframe.

Charts & Visualizations

Chart Name Description & Focus Visual Indicators
Workflow Status Distribution
(Success vs. Failure Metrics)
Tracks daily execution volumes, failure spikes, and activity levels over time.

Note: Clicking any green or red bar opens the traces for those specific runs.
🟢 Passed: Successful runs
🔴 Failed: Failed runs
🔵 No Runs: Days with zero activity
Token Consumption Trends
(Daily Resource Utilization)
Maps total token usage across execution dates to highlight consumption spikes and support cost forecasting. 🟢 Green Line: Total daily token volume
Component Performance Breakdown
(Latency Distribution - Top 10)
Ranks workflow components by latency (for example, Agent, vLLM, and Search Files) based on aggregated trace timing. 🔵 Horizontal Bar: Execution latency (seconds)

Troubleshooting Common Scenarios

Scenario 1: High Failure Percentage 
Locate Issue:
Check the Workflow Status Distribution stacked bar chart and hover over red segments to pinpoint affected dates.
1. Investigate Logs: Click the red bar or open execution logs corresponding to those dates to analyze failure details and stack traces.
2. Common Root Causes:
a. Tool or integration execution errors.
b. Invalid or malformed input payloads.
c. Third-party service interruptions or workflow configuration mistakes.

Scenario 2: High Average Execution Time
Locate Issue: Review the Component Performance Breakdown chart to identify which component accounts for the highest latency.
1. Investigate Nodes: Trace the individual workflow nodes attached to the high-latency step (e.g., model inference or file indexing).
2. Common Root Causes:
a. Slow model inference response times (e.g., vLLM).
b. Heavy document search or unoptimized file retrieval operations.
c. Delays from external tool calls or network requests.

16.6.5 Global variables

Global variables allow you to store and reuse input values and credentials across your projects. These variables can be used in any input field marked with the Globe icon.

Robility Flow stores all global variables in its internal database and secures them using encryption with a secret key.

Create a global variable

To create a new global variable, follow these steps.

1. Click Global Variables in the right-side panel of the robilityflow canvas.
2. Click Add New.
3. In the Create Variable dialog, enter a name for your variable in the Variable Name field.
4. Optional: Select a Type for your global variable. The available types are Generic (default) and Credential.

RobilityFlow encrypts both Generic and Credential type global variables. However, Generic variables aren’t masked in the visual editor, whereas Credential variables are masked. Session ID fields don’t accept Credential (masked) variables.

5. Enter the Value for your global variable.
Optional: Use the Apply To Fields menu to select one or more fields that you want RobilityFlowto automatically apply your global variable to. For example, if you select OpenAI API Key,RobilityFlow automatically applies the variable to any OpenAI API Key field.

6. Click Save Variable.

You can now select your global variable from any text input field that displays the  Globe icon.

Edit a global variable

1. Click Global Variables in the right-side panel of the robilityflow canvas.
2. Click on the global variable you want to edit.
3. In the Update Variable dialog, you can edit the following fields: Variable NameValue, and Apply To Fields.
4. Click Update Variable.

Delete a global variable

Deleting a global variable permanently deletes the value from the database. Flows that reference the deleted global variable will fail.

1. Click Global Variables in the right-side panel of the robilityflow canvas.
2. Click the checkbox next to the global variable that you want to delete.
3. Click  Delete.

The global variable is deleted from the database.

Add custom global variables from the environment

RobilityFlow can source custom global variables from your runtime environment. For information about how RobilityFlow detects and applies environment variables, see RobilityFlow environment variables.

RobilityFlow automatically generates global variables based on constants.py if it detects any matching environment variables. For example, if you set OPENAI_API_KEY in your runtime environment, RobilityFlowautomatically generates a global variable using that value.

You can declare additional variables in ROBILITYFLOW_VARIABLES_TO_GET_FROM_ENVIRONMENT. For example, ROBILITYFLOW_VARIABLES_TO_GET_FROM_ENVIRONMENT=WATSONX_PROJECT_ID,WATSONX_API_KEY creates global variables named WATSONX_PROJECT_ID and WATSONX_API_KEY in RobilityFlow’s database. Then, you can use these variables wherever they are needed in your component settings.

Local

If you installed RobilityFlow locally, set ROBILITYFLOW_VARIABLES_TO_GET_FROM_ENVIRONMENT in your RobilityFlow .env file:

1. Create or edit your RobilityFlow.env file.
2.  Add the ROBILITYFLOW_VARIABLES_TO_GET_FROM_ENVIRONMENT environment variable as follows:

You can specify the variables either as a comma-separated string with no spaces, or as a JSON list:

# Option 1: Comma-separated string (no spaces)
ROBILITYFLOW_VARIABLES_TO_GET_FROM_ENVIRONMENT=VARIABLE1,VARIABLE2

# Option 2: JSON list format
ROBILITYFLOW_VARIABLES_TO_GET_FROM_ENVIRONMENT=["VARIABLE1", "VARIABLE2"]
 

Replace VARIABLE1,VARIABLE2 with your additional variables that you want ROBILITYFLOW to source from the environment, such as CUSTOM_API_KEY,INTERNAL_SERVICE_URL or ["CUSTOM_API_KEY", "INTERNAL_SERVICE_URL"].

Save and close the file.

1. Start Robilityflow with the .env file:

uv run Robilityflow run --env-file .env
Alternatively, you can set environment variables directly in the command line:
VARIABLE1="VALUE1" VARIABLE2="VALUE2" uv run Robilityflow run --env-file .env
The command-line variables override matching variables in the .env file. Expose your environment variables to Robilityflow in a manner that best suits your own environment.

1. Confirm that Robilityflow successfully sourced the global variables from the environment: Click Global Variables, and then make sure that your environment variables appear in the Global Variables list.

Docker

If you’re using Docker, there are two ways that you can set ROBILITYFLOW_VARIABLES_TO_GET_FROM_ENVIRONMENT:

On the command line:

docker run -it --rm \
-p 7860:7860 \
-e ROBILITYFLOW_VARIABLES_TO_GET_FROM_ENVIRONMENT="VARIABLE1,VARIABLE2" \
-e VARIABLE1="VALUE1" \
-e VARIABLE2="VALUE2" \
Robilityflow ai/Robilityflow:latest
In your .env file:
docker run -it --rm \
-p 7860:7860 \
--env-file .env \
-e VARIABLE1="VALUE1" \
-e VARIABLE2="VALUE2" \
Robilityflowai/Robilityflow:latest
The list in ROBILITYFLOW_VARIABLES_TO_GET_FROM_ENVIRONMENT includes only the variable names. You must ensure that these environment variables are defined in your Docker environment, such as with -e or otherwise.

After starting Robilityflow, go to your Robilityflow Settings to confirm that the variables were created.

Only the Name and Value are taken from the environment. You can edit the variables in your Robilityflow Settings if you want to configure additional options, such as the Apply To Fields option.

Global variables sourced from the environment are assigned the Credential type, which masks the values in the visual editor. However, Robilityflow automatically encrypts all global variables stored in the database.

Default Environment Variables Automatically Detected

Robility Flow automatically imports the following environment variables as Credential type global variables:

a. ANTHROPIC_API_KEY
b. ASTRA_DB_API_ENDPOINT
c. ASTRA_DB_APPLICATION_TOKEN
d. AWS_ACCESS_KEY_ID
e. AWS_SECRET_ACCESS_KEY
f. AZURE_OPENAI_API_DEPLOYMENT_NAME
g. AZURE_OPENAI_API_EMBEDDINGS_DEPLOYMENT_NAME
h. AZURE_OPENAI_API_INSTANCE_NAME
i. AZURE_OPENAI_API_KEY
j. AZURE_OPENAI_API_VERSION
k. COHERE_API_KEY
l. COMPOSIO_API_KEY
m. GOOGLE_API_KEY
n. GROQ_API_KEY
o. HUGGINGFACEHUB_API_TOKEN
p. NOVITA_API_KEY
q. OPENAI_API_KEY
r. PINECONE_API_KEY
s. SAMBANOVA_API_KEY
t. SEARCHAPI_API_KEY
u. SERPAPI_API_KEY
v. TAVILY_API_KEY
w. UPSTASH_VECTOR_REST_TOKEN
x. UPSTASH_VECTOR_REST_URL
y. VECTARA_API_KEY
z. VECTARA_CORPUS_ID and VECTARA_CUSTOMER_ID

For additional environment configuration options, refer to the Environment Variables documentation.

16.6.6 Project-Level Model Provider

Model Provider configuration is managed at the project level in Robility Flow. A new Model Providers option is available under Global Variables in the Canvas Flow sidebar, allowing each project to configure and manage its own AI providers and language models.

Each project has its own model provider configurations, credentials, and models. These settings are available only within the project and can be used by its AI components and the Flow Assistant.

Supported providers include OpenAI, Anthropic, Google Generative AI, IBM WatsonX, and Ollama. Each provider stores its API key and model details in one place, enabling all model-driven components to access the same connection and credentials seamlessly.

Key Benefits

a. Configure AI providers independently for each project.
b. Keep provider configurations isolated between projects.
c. Make only project-specific providers available to AI components and the Flow Assistant.
d. Use different AI providers, models, and credentials for different projects.

How AI Components Use Model Providers

After a model provider is configured, it becomes available to AI components and the Flow Assistant in the current project.

When configuring an AI component, select the required model provider and language model. During execution, the component uses the selected provider configuration to connect to the AI service.

Important:

  • Model Provider configurations are not migrated automatically at the project level. Reconfigure them from the Model Providers menu on the Canvas Flow page.
  • Language Model selections are not retained. Update the Language Model manually for the required components.
  • Model Provider validation happens during execution. Errors are displayed if the Model Provider is not configured correctly for the project.
  • Playground does not validate project-level Model Provider configurations. Configuration issues are identified only during component execution.

Configure a Model Provider

1. Open the Canvas Flow page.
2. Click the Brain icon in the right panel.
3. Select an AI model provider.
4. Enter the required details, such as: API Key, Project ID or Endpoint URL
5. Click Save.

The configured provider is then available to AI components and the Flow Assistant in the current project.

Secure Sensitive Values

Store sensitive values, such as API keys and access tokens, in the Vault instead of entering them directly in the configuration.

Reference the Vault entries when configuring the model provider. During execution, Robility Flow securely retrieves the stored values, preventing sensitive information from being exposed to other users.

Best Practices

1. Store all API keys, secrets, and credentials in the Vault.
2. Reference Vault entries in model provider configurations.
3. Do not hardcode sensitive values in workflows or project configurations.

16.6.7 Environment Variables

Robility flow uses environment variables to configure certain settings. You can also import environment variables for use in your deployment, such as environment variables used by certain components in your flows.

You can set Robility flow environment variables in your terminal, in .env, and with the Robility flow CLI.

Precedence

If an environment variable is set in multiple places, the following hierarchy applies:

1. Robility flow CLI options override .env and terminal variables.
2. .env overrides terminal variables.
3. Terminal variables are used only if the variable isn’t set in .env or Robility flow CLI options.

For example, if you set ROBILITY FLOW_PORT in .env and your terminal, then Robility flow uses the value from .env. Similarly, if you run a Robility flow CLI command with –port, Robility flow uses that port number instead of the ROBILITY FLOW_PORT in .env.

Configure environment variables

Robility flow recognizes supported environment variables from the following sources:

a. Environment variables that you’ve set in your terminal.
b. Environment variables that you’ve imported from a .env file when starting Robility flow or using the –env-file option in the Robility flow CLI.

You can choose to use one or both sources. However, environment variables imported from a .env file take precedence over those set in your terminal.

Set environment variables in your terminal

Run the following commands to set environment variables for your current terminal session:

a. Linux or macOS
b. Windows
c. Docker

export VARIABLE_NAME=’VALUE’

When you start Robility flow, it looks for environment variables that you’ve set in your terminal. If it detects a supported environment variable, then it automatically adopts the specified value, subject to precedence rules.

Import environment variables from a .env file

1. If Robility flow is running, quit Robility flow.
2. Create a .env file and then open it in your preferred editor.
3. Define Robility flow environment variables in the .env file. For example:


DO_NOT_TRACK=True

ROBILITY_FLOW_AUTO_LOGIN=False

ROBILITY_FLOW_AUTO_SAVING=True

ROBILITY_FLOW_AUTO_SAVING_INTERVAL=1000

ROBILITY_FLOW_BACKEND_ONLY=False

ROBILITY_FLOW_BUNDLE_URLS=["https://github.com/user/repo/commit/hash"]

ROBILITY_FLOW_CACHE_TYPE=async

ROBILITY_FLOW_COMPONENTS_PATH=/path/to/components/

ROBILITY_FLOW_CONFIG_DIR=/path/to/config/

ROBILITY_FLOW_DATABASE_URL=postgresql://<username>:<password>@<host>:5432/<database_name>

ROBILITY_FLOW_DEV=False

ROBILITY_FLOW_FALLBACK_TO_ENV_VAR=False

ROBILITY_FLOW_HEALTH_CHECK_MAX_RETRIES=5

ROBILITY_FLOW_HOST=localhost

ROBILITY_FLOW_MAX_FILE_SIZE_UPLOAD=10000

ROBILITY_FLOW_MAX_ITEMS_LENGTH=100

ROBILITY_FLOW_MAX_TEXT_LENGTH=1000

ROBILITY_FLOW_LOG_LEVEL=error

ROBILITY_FLOW_OPEN_BROWSER=False

ROBILITY_FLOW_PORT=7860

ROBILITY_FLOW_REMOVE_API_KEYS=False

ROBILITY_FLOW_SAVE_DB_IN_CONFIG_DIR=True

ROBILITY_FLOW_SECRET_KEY=somesecretkey

ROBILITY_FLOW_STORE=True

ROBILITY_FLOW_STORE_ENVIRONMENT_VARIABLES=True

ROBILITY_FLOW_SUPERUSER=adminuser

ROBILITY_FLOW_SUPERUSER_PASSWORD=adminpass

ROBILITY_FLOW_WORKER_TIMEOUT=60000

ROBILITY_FLOW_WORKERS=3

For additional examples, see the .env.example file in the Robility flow repository.

4. Save and close .env.
5. Start Robility flow with your .env file:

a. Local
b. Docker

python -m robility flow run –env-file .env

If your .env file isn’t in the same directory, provide the path to your .env file.

On startup, Robility flow imports the environment variables from your .env file, as well as any others that you set in your terminal, and then adopts their specified values.

Supported environment variables

The following table lists the environment variables supported by Robility flow.

Variable Format Default Description
DO_NOT_TRACKBooleanFalseWhether to report Robility flow telemetry data. If true, Robility flow telemetry is disabled.
ROBILITY FLOW_AUTO_LOGINBooleanTrueSee ROBILITY FLOW_AUTO_LOGIN.
ROBILITY FLOW_AUTO_SAVINGBooleanTrueEnable flow auto-saving.
ROBILITY FLOW_AUTO_SAVING_INTERVALInteger1000Set the interval for flow auto-saving in milliseconds.
ROBILITY FLOW_BACKEND_ONLYBooleanFalseRun only the Robility flow backend service (no frontend).
ROBILITY FLOW_BUNDLE_URLSList[String][]A list of URLs from which to load component bundles and flows. Supports GitHub URLs. If ROBILITY FLOW_AUTO_LOGIN is enabled, flows from these bundles are loaded into the database.
ROBILITY FLOW_CACHE_TYPEStringasyncSet the cache type for Robility flow. Possible values: async, redis, memory, disk. If redis, you must also set ROBILITY FLOW_REDIS_HOST, ROBILITY FLOW_REDIS_PORT, ROBILITY FLOW_REDIS_DB, and ROBILITY FLOW_REDIS_CACHE_EXPIRE.
ROBILITY FLOW_COMPONENTS_PATHStringNot setPath to the directory containing custom components.
ROBILITY FLOW_CONFIG_DIRStringVariesSet the Robility flow configuration directory where files, logs, and the Robility flow database are stored. Default path depends on your installation. See Flow storage and logs.
ROBILITY FLOW_DATABASE_URLStringNot setDatabase URL for Robility flow. Defaults to SQLite if not provided.
ROBILITY FLOW_DATABASE_CONNECTION_RETRYBooleanFalseWhether to retry lost database connections.
ROBILITY FLOW_DB_POOL_SIZEInteger20DEPRECATED. Use ROBILITY FLOW_DB_CONNECTION_SETTINGS instead.
ROBILITY FLOW_DB_MAX_OVERFLOWInteger30DEPRECATED. Use ROBILITY FLOW_DB_CONNECTION_SETTINGS instead.
ROBILITY FLOW_DB_CONNECT_TIMEOUTInteger30Timeout in seconds for DB connections.
ROBILITY FLOW_DB_CONNECTION_SETTINGSJSONNot setCentralized DB connection parameters. Example: {"pool_size": 20, "max_overflow": 30}
ROBILITY FLOW_DISABLE_TRACK_APIKEY_USAGEBooleanFalseDisable API key usage tracking to reduce DB contention under high concurrency.
ROBILITY FLOW_ENABLE_SUPERUSER_CLIBooleanTrueAllow creation of superusers with CLI. Recommended to disable in production.
ROBILITY FLOW_FALLBACK_TO_ENV_VARBooleanTrueIf enabled, global variables can fallback to environmen variables.
ROBILITY FLOW_FRONTEND_PATHString./frontendPath to the frontend build directory (dev only).
ROBILITY FLOW_HEALTH_CHECK_MAX_RETRIESInteger5Maximum number of retries for the health check.
ROBILITY FLOW_HOSTStringlocalhostThe host on which the server will run.
ROBILITY FLOW_LOG_LEVELStringINFOLogging level. Options: DEBUG, INFO, WARNING, ERROR, CRITICAL.
ROBILITY FLOW_LOG_FILEStringNot setPath to the log file. Defaults to stdout if not set.
ROBILITY FLOW_LOG_RETRIEVER_BUFFER_SIZEInteger10000Buffer size for log retrieval. Used only if log retrieval is enabled.
ROBILITY FLOW_MAX_FILE_SIZE_UPLOADInteger100Maximum upload file size in MB.
ROBILITY FLOW_MAX_ITEMS_LENGTHInteger100Maximum number of items in the visual editor.
ROBILITY FLOW_MAX_TEXT_LENGTHInteger1000Maximum number of characters in the visual editor.
ROBILITY FLOW_MCP_SERVER_ENABLEDBooleanTrueIf false, MCP server is not enabled.
ROBILITY FLOW_MCP_SERVER_ENABLE_PROGRESS_NOTIFICATIONSBooleanFalseIf true, progress notifications are sent in MCP server.
ROBILITY FLOW_NEW_USER_IS_ACTIVEBooleanFalseSee ROBILITY FLOW_NEW_USER_IS_ACTIVE.
ROBILITY FLOW_OPEN_BROWSERBooleanFalseOpen the system web browser on startup.
ROBILITY FLOW_PORTInteger7860Port on which the server runs. Auto-selects if port is in use.
ROBILITY FLOW_PROMETHEUS_ENABLEDBooleanFalseExpose Prometheus metrics.
ROBILITY FLOW_PROMETHEUS_PORTInteger9090Port for Prometheus metrics.
ROBILITY FLOW_REDIS_CACHE_EXPIREInteger3600See ROBILITY FLOW_CACHE_TYPE.
ROBILITY FLOW_REDIS_DBInteger0See ROBILITY FLOW_CACHE_TYPE.
ROBILITY FLOW_REDIS_HOSTStringlocalhostSee ROBILITY FLOW_CACHE_TYPE.
ROBILITY FLOW_REDIS_PORTString6379See ROBILITY FLOW_CACHE_TYPE.
ROBILITY FLOW_REDIS_PASSWORDStringNot setPassword for Redis authentication.
ROBILITY FLOW_REMOVE_API_KEYSBooleanFalseRemove API keys from saved projects.
ROBILITY FLOW_SAVE_DB_IN_CONFIG_DIRBooleanFalseIf false, DB is saved in root dir. If true, saved in CONFIG_DIR.
ROBILITY FLOW_SECRET_KEYStringAutomatedSee ROBILITY FLOW_SECRET_KEY.
ROBILITY FLOW_STOREBooleanTrueEnable Robility flow Store features.
ROBILITY FLOW_STORE_ENVIRONMENT_VARIABLESBooleanTrueWhether to store environment variables as global variables in the database.
ROBILITY FLOW_CREATE_STARTER_PROJECTSBooleanTrueCreate templates during initialization.
ROBILITY FLOW_UPDATE_STARTER_PROJECTSBooleanTrueUpdate templates with latest versions after upgrade.
ROBILITY FLOW_SUPERUSERStringrobility flowSee ROBILITY FLOW_SUPERUSER and ROBILITY FLOW_SUPERUSER_PASSWORD.
ROBILITY FLOW_SUPERUSER_PASSWORDStringrobility flowSee ROBILITY FLOW_SUPERUSER and ROBILITY FLOW_SUPERUSER_PASSWORD.
ROBILITY FLOW_VARIABLES_TO_GET_FROM_ENVIRONMENTStringNot setComma-separated list of environment variables to get from the environment and store as global variables.
ROBILITY FLOW_LOAD_FLOWS_PATHStringNot setPath to directory containing flow JSON files loaded on startup.
ROBILITY FLOW_WORKER_TIMEOUTInteger300Worker timeout in seconds.
ROBILITY FLOW_WORKERSInteger1Number of worker processes.
ROBILITY FLOW_SSL_CERT_FILEStringNot setPath to SSL certificate file.
ROBILITY FLOW_SSL_KEY_FILEStringNot setPath to SSL key file.
ROBILITY FLOW_SKIP_AUTH_AUTO_LOGINBooleanTrueSee ROBILITY FLOW_AUTO_LOGIN.

Configure .env, override.conf, and tasks.json files

The following examples show how to configure Robility flow using environment variables in different scenarios.

.env file

The .env file is a text file that contains key-value pairs of environment variables.

Create or edit a .env file in the root directory of your application or Robility flow environment, and then add your configuration variables to the file:

Environment Variables

The following environment variables can be configured to customize the behavior of Robility Flow.

DO_NOT_TRACK=True

ROBILITY_FLOW_AUTO_LOGIN=False

ROBILITY_FLOW_AUTO_SAVING=True

ROBILITY_FLOW_AUTO_SAVING_INTERVAL=1000

ROBILITY_FLOW_BACKEND_ONLY=False

ROBILITY_FLOW_BUNDLE_URLS=["https://github.com/user/repo/commit/hash"]

ROBILITY_FLOW_CACHE_TYPE=async

ROBILITY_FLOW_COMPONENTS_PATH=/path/to/components/

ROBILITY_FLOW_CONFIG_DIR=/path/to/config/

ROBILITY_FLOW_DATABASE_URL=postgresql://<username>:<password>@<host>:5432/<database_name>

ROBILITY_FLOW_DEV=False

ROBILITY_FLOW_FALLBACK_TO_ENV_VAR=False

ROBILITY_FLOW_HEALTH_CHECK_MAX_RETRIES=5

ROBILITY_FLOW_HOST=localhost

ROBILITY_FLOW_MAX_FILE_SIZE_UPLOAD=10000

ROBILITY_FLOW_MAX_ITEMS_LENGTH=100

ROBILITY_FLOW_MAX_TEXT_LENGTH=1000

ROBILITY_FLOW_LOG_LEVEL=error

ROBILITY_FLOW_OPEN_BROWSER=False

ROBILITY_FLOW_PORT=7860

ROBILITY_FLOW_REMOVE_API_KEYS=False

ROBILITY_FLOW_SAVE_DB_IN_CONFIG_DIR=True

ROBILITY_FLOW_SECRET_KEY=somesecretkey

ROBILITY_FLOW_STORE=True

ROBILITY_FLOW_STORE_ENVIRONMENT_VARIABLES=True

ROBILITY_FLOW_SUPERUSER=adminuser

ROBILITY_FLOW_SUPERUSER_PASSWORD=adminpass

ROBILITY_FLOW_WORKER_TIMEOUT=60000

ROBILITY_FLOW_WORKERS=3

Systemd Service

A systemd service configuration file configures Linux system services.

To add environment variables, create or edit a service configuration file and add an override.conf file. This file allows you to override the default environment variables for the service.

[Service]

Environment="DO_NOT_TRACK=true"
Environment="ROBILITY_FLOW_AUTO_LOGIN=false"
Environment="ROBILITY_FLOW_AUTO_SAVING=true"
Environment="ROBILITY_FLOW_AUTO_SAVING_INTERVAL=1000"
Environment="ROBILITY_FLOW_BACKEND_ONLY=false"
Environment="ROBILITY_FLOW_BUNDLE_URLS=[\"https://github.com/user/repo/commit/hash\"]"
Environment="ROBILITY_FLOW_CACHE_TYPE=async"
Environment="ROBILITY_FLOW_COMPONENTS_PATH=/path/to/components/"
Environment="ROBILITY_FLOW_CONFIG_DIR=/path/to/config/"
Environment="ROBILITY_FLOW_DATABASE_URL=postgresql://<username>:<password>@<host>:5432/<database_name>"
Environment="ROBILITY_FLOW_DEV=false"
Environment="ROBILITY_FLOW_FALLBACK_TO_ENV_VAR=false"
Environment="ROBILITY_FLOW_HEALTH_CHECK_MAX_RETRIES=5"
Environment="ROBILITY_FLOW_HOST=localhost"
Environment="ROBILITY_FLOW_MAX_FILE_SIZE_UPLOAD=10000"
Environment="ROBILITY_FLOW_MAX_ITEMS_LENGTH=100"
Environment="ROBILITY_FLOW_MAX_TEXT_LENGTH=1000"
Environment="ROBILITY_FLOW_LOG_ENV=container_json"
Environment="ROBILITY_FLOW_LOG_FILE=logs/Robility flow.log"
Environment="ROBILITY_FLOW_LOG_LEVEL=error"
Environment="ROBILITY_FLOW_OPEN_BROWSER=false"
Environment="ROBILITY_FLOW_PORT=7860"
Environment="ROBILITY_FLOW_REMOVE_API_KEYS=false"
Environment="ROBILITY_FLOW_SAVE_DB_IN_CONFIG_DIR=true"
Environment="ROBILITY_FLOW_SECRET_KEY=somesecretkey"
Environment="ROBILITY_FLOW_STORE=true"
Environment="ROBILITY_FLOW_STORE_ENVIRONMENT_VARIABLES=true"
Environment="ROBILITY_FLOW_SUPERUSER=adminuser"
Environment="ROBILITY_FLOW_SUPERUSER_PASSWORD=adminpass"
Environment="ROBILITY_FLOW_WORKER_TIMEOUT=60000"
Environment="ROBILITY_FLOW_WORKERS=3"

For more information on systemd, see the Red Hat documentation.

VSCode tasks.json

The tasks.json file located in .vscode/tasks.json is a configuration file for development environments using Visual Studio Code.

Create or edit the .vscode/tasks.json file in your project root:

{
  "version": "2.0.0",
  "options": {
    "env": {
      "DO_NOT_TRACK": "true",
      "ROBILITY_FLOW_AUTO_LOGIN": "false",
      "ROBILITY_FLOW_AUTO_SAVING": "true",
      "ROBILITY_FLOW_AUTO_SAVING_INTERVAL": "1000",
      "ROBILITY_FLOW_BACKEND_ONLY": "false",
      "ROBILITY_FLOW_BUNDLE_URLS": "[\"https://github.com/user/repo/commit/hash\"]",
      "ROBILITY_FLOW_CACHE_TYPE": "async",
      "ROBILITY_FLOW_COMPONENTS_PATH": "D:/path/to/components/",
      "ROBILITY_FLOW_CONFIG_DIR": "D:/path/to/config/",
      "ROBILITY_FLOW_DATABASE_URL": "postgresql://<username>:<password>@<host>:5432/<database_name>",
      "ROBILITY_FLOW_DEV": "false",
      "ROBILITY_FLOW_FALLBACK_TO_ENV_VAR": "false",
      "ROBILITY_FLOW_HEALTH_CHECK_MAX_RETRIES": "5",
      "ROBILITY_FLOW_HOST": "localhost",
      "ROBILITY_FLOW_MAX_FILE_SIZE_UPLOAD": "10000",
      "ROBILITY_FLOW_MAX_ITEMS_LENGTH": "100",
      "ROBILITY_FLOW_MAX_TEXT_LENGTH": "1000",
      "ROBILITY_FLOW_LOG_ENV": "container_csv",
      "ROBILITY_FLOW_LOG_FILE": "Robility flow.log",
      "ROBILITY_FLOW_LOG_LEVEL": "error",
      "ROBILITY_FLOW_OPEN_BROWSER": "false",
      "ROBILITY_FLOW_PORT": "7860",
      "ROBILITY_FLOW_REMOVE_API_KEYS": "true",
      "ROBILITY_FLOW_SAVE_DB_IN_CONFIG_DIR": "false",
      "ROBILITY_FLOW_SECRET_KEY": "somesecretkey",
      "ROBILITY_FLOW_STORE": "true",
      "ROBILITY_FLOW_STORE_ENVIRONMENT_VARIABLES": "true",
      "ROBILITY_FLOW_SUPERUSER": "adminuser",
      "ROBILITY_FLOW_SUPERUSER_PASSWORD": "adminpass",
      "ROBILITY_FLOW_WORKER_TIMEOUT": "60000",
      "ROBILITY_FLOW_WORKERS": "3"
    }
  },
  "tasks": [
    {
      "label": "Robility Flow backend",
      "type": "shell",
      "command": ". ./RobilityFlowNightly/Scripts/activate && Robility Flow run",
      "isBackground": true,
      "problemMatcher": []
    }
  ]
}

To run Robility Flow using the above tasks.json file, open the Visual Studio Code Command Palette and select Tasks > Run Task > Robility Flow backend.

Set environment variables for Robilityflow Desktop

Environment variables set in your terminal aren’t automatically available to GUI-based applications like Robilityflow Desktop when you launch them from the Windows or macOS GUI.

For Windows, this means any GUI-based app launched from the Start menu, desktop shortcuts, or Windows Explorer.

For macOS, this means any GUI-based app launched from Finder, Spotlight, Launchpad, or the Dock.

To set environment variables for Robilityflow Desktop, you need to use specific commands or files, depending on your OS.

1. macOS
2. Window System Properties
3. Powershell

macOS

Robilityflow  Desktop for macOS cannot automatically use variables set in your terminal, such as those in.zshrc or .bash_profile, when launched from the macOS GUI.

To make environment variables available to GUI apps on macOS, you need to use launchctl with a plist file:

1. Create the LaunchAgents directory if it doesn’t exist:

mkdir -p ~/Library/LaunchAgents
2. In the LaunchAgents directory, create a .plist file called dev.Robilityflow.env.

3. Add the following content to dev.Robilityflow.env.plist, and then add, change, or remove Robilityflow environment variables as needed for your configuration.

This example sets multiple environmental variables for all GUI apps launched from the macOS GUI.

<?xml version="1.0" encoding="UTF-8"?>
<!DOCTYPE plist PUBLIC "-//Apple//DTD PLIST 1.0//EN" "http://www.apple.com/DTDs/PropertyList-1.0.dtd">
<plist version="1.0">
<dict>
<key>Label</key>
<string>dev.Robilityflow.env</string>
<key>ProgramArguments</key>
<array>
<string>/bin/sh</string>
<string>-c</string>
<string>
launchctl setenv ROBILITYFLOW_CONFIG_DIR /Users/your_user/custom/config ;
launchctl setenv ROBILITYFLOW_PORT 7860 ;
launchctl setenv ROBILITYFLOW_HOST localhost ;
launchctl setenv ARIZE_API_KEY ak-...
</string>
</array>
<key>RunAtLoad</key>
<true/>
</dict>
</plist>

4. Load the file with launchctl:

launchctl bootstrap gui/$(id -u) ~/Library/LaunchAgents/dev.Robilityflow.env.plist

Window System Properties

Robilityflow Desktop for Windows cannot automatically use variables set in your terminal, such as those defined with set in cmd or $env:VAR=... in PowerShell, when launched from the Windows GUI.

To make environment variables available to the Robilityflow Desktop app, you must set them at the user or system level using the System Properties interface or the Terminal.

To set environment variables using the System Properties interface, do the following:

1. Press Win + R, enter SystemPropertiesAdvanced, and then press Enter.
2. Click Environment Variables.
3. Under User variables, click New.

Note: To apply the setting to all users, select System variables.

4. Enter the name of the Robilityflow variable you want to set, such as ROBILITYFLOW_CONFIG_DIR, and the desired value, such as C:\Users\your_user\.Robilityflow_config.
5. Click OK to save the variable.
6. Repeat until you have set all necessary Robilityflow environment variables.
7. Launch or restart Robilityflow Desktop to apply the environment variables.

Powershell

To define environment variables for Windows using PowerShell, do the following:

Enter the name of the Robilityflow variable you want to set, such as ROBILITYFLOW_CONFIG_DIR, and the desired value, such as C:\Users\your_user\.robilityflow_config.

To set an environment variable for the current user:

[System.Environment]::SetEnvironmentVariable("ROBILITYFLOW_CONFIG_DIR", "C:\Users\your_user\.robilityflow_config", "User")

To set an environment variable for all users (you must have Administrator priveleges):

[System.Environment]::SetEnvironmentVariable("ROBILITYFLOW_CONFIG_DIR", "C:\Robilityflow\Config", "Machine")
Repeat until you have set all necessary Robilityflow environment variables.

Launch or restart Robilityflow Desktop to apply the environment variables.

16.6.8 Storage and Memory

The Storage and Memory section in Robility Flow provides the capabilities required to manage files, maintain application context, and persist data across workflow executions. These features enable workflows to store, retrieve, and manage information efficiently, ensuring continuity and consistency throughout the lifecycle of an application. With file management, workflows can upload, store, access, and process files required during execution.

Memory management helps applications retain context and state across interactions, allowing workflows to deliver more personalized and context-aware experiences. By leveraging Session IDs, applications can associate data and memory with specific users or workflow instances, ensuring seamless continuity across multiple requests and conversations. For scenarios that require long-term data persistence or enterprise-managed storage, Robility

Flow supports integration with an external PostgreSQL database. This allows applications to store workflow data outside the platform’s default storage layer, providing greater flexibility, scalability, and control over data management.

Whether you need to manage application files, maintain conversational context, track user sessions, or persist business-critical data, Storage and Memory provides the foundational services that enable reliable, stateful, and scalable workflow applications in Robility Flow.

16.6.9 Observability

Observability in Robility flow equips developers with powerful tools to monitor, trace, and debug flows with precision. It delivers clear visibility into the execution of components, agents, and models, helping teams quickly identify errors, optimize performance, and strengthen reliability. With features such as structured logging, tracing, and detailed execution insights, developers can track how data moves across components, evaluate model outputs, and measure latency or potential failure points. By providing a transparent view of flow behavior, observability streamlines troubleshooting, reduces development overhead, and ensures applications remain scalable, resilient, and high-performing throughout their lifecycle.

16.6.10 Robility flow data types

Robility flow components are designed to accept and produce specific types of inputs and outputs. Input and output data types define the structure and flow of information between components. Understanding these structures helps you build applications that provide valid input and correctly anticipate the output format.

Component ports represent the data types that each component can send and receive. Some data types are self-evident from the fields they are attached to; for example, a System Message field accepts message data. Port colors also indicate the port’s data type. For example, Data ports, represented by, either accept or emit structured data objects.

When building flows, connect output ports to input ports of the same type (color) to transfer that type of data between two components.

Data

Data ports  accept or produce the Data type, which is a structured data object, like a JSON payload that you might send to an API. This data type is used to pass key-value pairs between components, such as user profiles, settings, or other structured information.

Data objects include a primary text field, indicated by a text_key, and additional metadata.

Schema and attributes

The schema is defined in data.py.

The following attributes are available:

a. data: A Data object stores key-value pairs within the .data attribute. This is the Data object’s core dictionary. Each key is a field name, and the values can be any supported data type.
b. text_key: The key in data that is considered the primary text value.
c. default_value: Fallback if text_key is missing. The default text_key is “text”.

Data objects can be serialized to JSON, created from JSON, or created from other dictionary data. However, the resulting Data object is a structured object with validation and methods, not a plain dictionary.

data_obj = Data(
    text_key="text",
    data={
        "text": "Hello world",
        "name": "Charlie",
        "age": 28
    },
    default_value=""
)

For example, when serialized into JSON, the previous Python example becomes the following JSON object:

{
  "text_key": "text",
  "data": {
    "text": "Hello world",
    "name": "Charlie",
    "age": 28
  },
  "default_value": ""
}

DataFrame

DataFrame ports accept or produce pandas DataFrames, which are similar to tabular CSV data. Use the DataFrame type to work with data containing multiple rows or records.

Schema and attributes

The schema is defined in dataframe.py.

The following attributes are available:

  1. Full pandas compatibility: All pandas DataFrame methods and functionality are supported.
  2. Robility Flow integration: Accepts lists of Data objects, dictionaries, or existing DataFrames.
  3. Convenience methods:
    1. to_data_list()
    2. add_row()
    3. add_rows()
    4. to_lc_documents()
    5. to_data()
    6. to_message()
  4. Text key support: Maintains text_key and default_value attributes for Data object compatibility.

DataFrame structure

A DataFrame has a tabular data structure with rows and columns. Keys are columns, and each object in the array is a row.

[
  {
    "name": "Charlie Lastname",
    "age": 28,
    "email": "charlie.lastname@example.com"
  },
  {
    "name": "Alexandra Example",
    "age": 34,
    "email": "alexandra@example.com"
  }
]

When represented as tabular data, the preceding DataFrame object is structured as follows:

Name Age Email
Charlie Lastname 28 charlie.lastname@example.com
Alexandra Example 34 alexandra@example.com

Embeddings

Embeddings ports  emit or ingest vector embeddings to support functions like similarity search.

The Embeddings data type is used specifically by components that either produce or consume vector embeddings, such as the Embedding Model components and Vector Store components.

For example, Embedding Model components output Embeddings data that you can connect to an Embedding input port on a Vector Store component.

LanguageModel

The LanguageModel type is a specific data type that can be produced by Language Model components and accepted by components that use an LLM.

When you change a Language Model component’s output type from Model Response to Language Model, the component’s output port changes from a Message port to a Language Model port .

Then, you connect the outgoing Language Model port to a Language Model input port on a compatible component, such as a Smart Function component.

For more information about using these components in flows and toggling LanguageModel output, see Language Model components.

Memory

Memory ports are used to integrate a Message History component with external chat memory storage. For more information, see the Message History component.

Message

Message ports  accept or produce Message data, which extends the Data type with additional fields and methods for text input typically used in chat flows.

This data type is used by many components.

Points to note:

Components that accept or produce Message data may not include all attributes in the incoming or outgoing Message data. If the data is compatible with the Message schema, it can be valid.

When building flows, focus on the fields shown on each component in the workspace, rather than the data types passed between components. The details of a particular data type are often only relevant when you are debugging a flow or component that isn’t producing the expected output.

For example, a Chat Input component only requires the content of the Input Text (input_value) field. The component then constructs a complete Message object before passing the data to other components in the flow.

Schema, structure, and attributes

The Message schema is defined in message.py. Some Message attributes have their own schema definitions, such as content_block.py.

{
  "text": "Name: Charlie Lastname, Age: 28, Email: charlie.lastname@example.com",
  "sender": "User",
  "sender_name": "Charlie Lastname",
  "session_id": "some-session-id",
  "timestamp": "2024-06-01T12:00:00Z",
  "files": [],
  "content_blocks": [],
  "category": "message"
}

The attributes included in a specific Message object depend on the context, including the component type, flow activity, and whether the message is a query or response. Some common attributes include the following:

a. text: The main message content.
b. sender: Identifies the originator of a chat message as either User or Language Model.
c. sender_name: The display name for the sender. Defaults to User or Language Model.
d. session_id: The chat session identifier.
e. flow_id: The ID of the flow that the message is associated with. flow_id and session_id are the same if the flow doesn’t use custom session IDs.
f. timestamp: The UTC timestamp that the message was sent.
g. files: A list of file paths or images included with the message
h. content_blocks: Container for rich content input, such as text, media, or code. Also contains error message information if the LLM can’t process the input.
i. category: “message”, “error”, “warning”, or “info”.

Not all attributes are required, and some components accept message-compatible input, such as raw text input. The strictness depends on the component.

Message data in Input and Output components

In flows with Chat Input and Output components, Message data provides a consistent structure for chat interactions, and it is ideal for chatbots, conversational analysis, and other use cases based on a dialogue with an LLM or agent. In these flows, the Playground chat interface prints only the Message attributes that are relevant to the conversation, such as text, files, and error messages from content_blocks. To see all Message attributes, inspect the message logs in the Playground.

In flows with Text Input and Output components, Message data is used to pass simple text strings without the chat-related metadata. These components handle Message data as independent text strings, not as part of an ongoing conversation. For this reason, a flow with only Text Input and Output components isn’t compatible with the Playground. For more information, see Input and Output components.

When using the Robility flow  API, the response includes the Message object along with other response data from the flow run. Robility flow  API responses can be extremely verbose, so your applications must include code to extract relevant data from the response to return to the user. For example, see the Robility flow QuickStart.

Additionally, input sent to the input port of input/output components does not need to be a complete Message object because the component constructs the Message object that is then passed to other components in the flow or returned as flow output. In fact, some components shouldn’t receive a complete Message object because some attributes, like timestamp should be added by the component for accuracy.

Tool

Tool ports connect tools to an Agent component.

Tools can be other components where you enabled Tool Mode, they can be the dedicated MCP Tools component, or they can be other components that only support Tool Mode. Multiple tools can be connected to the same Agent component at the same port.

For more information, see Configure tools for agents and Use Robility flow as an MCP client.

Unknown or multiple types

If a port can accept or produce multiple data types, it is represented by the gray port icon.

Hover over the port to see the accepted or produced data types.

View data types in flows

In Robility flow , you can use  Inspect output to view the output of individual components. This can help you learn about the different data types and debug problems with invalid or malformed inputs and output.

The following example shows how to inspect the output of a Type Convert component, which can convert data from one type to another:

1. Create a flow and then connect a Chat Input component to a Type Convert component. 
2. In the Chat Input component, enter some text for the type converter to process. 
3. On the Type Convert component, click Run component, and then click Inspect output.

The default output is Message data, which is the same as the input coming from the Chat Input component. To see the Message data converted to Data or DataFrame, change the Output Type on the Type Convert component, and then rerun the component.

a. Message
b. Data
c. DataFrame

16.6.11 Use voice mode

You can use Robility flow’s voice mode to interact with your flows verbally through a microphone and speakers.

Prerequisites

Voice mode requires the following:

1. A flow with Chat InputLanguage Model, and Chat Output components.

If your flow has an Agent component, make sure the tools in your flow have accurate names and descriptions to help the agent choose which tools to use.

Additionally, be aware that voice mode overrides typed instructions in the Agent component’s Agent Instructions field.

2. An OpenAI account and an OpenAI API key because Robility flow uses the OpenAI API to process voice input and generate responses. 
3. Optional: An ElevenLabs API key to enable more voice options for the LLM’s response. 
4. A microphone and speakers.

A high-quality microphone and minimal background noise are recommended for optimal voice comprehension.

Test voice mode in the Playground

In the Playground, click the Microphone to enable voice mode and verbally interact with your flows through a microphone and speakers.

The following steps use the Simple Agent template to demonstrate how to enable voice mode:

1. Create a flow based on the Simple Agent template.
2. Add your OpenAI API key credentials to the Agent component. 
3. Click Playground.
4. Click the Microphone icon to open the Voice mode dialog. 
5. Enter your OpenAI API key, and then click Save. Robility flow saves the key as a global variable
6. If you are prompted to grant microphone access, you must allow microphone access to use voice mode. If microphone access is blocked, you won’t be able to provide verbal input.
7. For Audio Input, select the input device to use with voice mode.
8. Optional: Add an ElevenLabs API key to enable more voices for the LLM’s response. Robility flow saves this key as a global variable.
9. For Preferred Language, select the language you want to use for your conversations with LLM. This option changes both the expected input language and the response language.
10. Speak into your microphone to start the chat.

If configured correctly, the waveform registers your input, and then the agent’s logic and response are described verbally and in the Playground.

Develop applications with websockets endpoints

Robility flow exposes two OpenAI Realtime API-compatible websocket endpoints for your flows. You can build applications against these endpoints the same way you would build against OpenAI Realtime API websockets.

The Robility flow API’s websockets endpoints require an OpenAI API key for authentication, and they support an optional ElevenLabs integration with an ElevenLabs API key.

Additionally, both endpoints require that you provide the flow ID in the endpoint path.

Voice-to-voice audio streaming

The /ws/flow_as_tool/$FLOW_ID endpoint establishes a connection to OpenAI Realtime voice, and then invokes the specified flow as a tool according to the OpenAI Realtime model.

This approach is ideal for low latency applications, but it is less deterministic because the OpenAI voice-to-voice model determines when to call your flow.

Speech-to-text audio transcription

The /ws/flow_tts/$FLOW_ID endpoint converts audio to text using OpenAI Realtime voice transcription, and then directly invokes the specified flow for each transcript.

This approach is more deterministic but has higher latency.

This is the mode used in the Robility flow Playground.

Session IDs for websockets endpoints

Both endpoints accept an optional /$SESSION_ID path parameter to provide a unique ID for the conversation. If omitted, Robility flow uses the flow ID as the session ID.

However, be aware that voice mode only maintains context within the current conversation instance. When you close the Playground or end a chat, verbal chat history is discarded and not available for future chat sessions.

16.7 API Reference

The API Reference section provides the resources, endpoints, and client libraries required to interact with Robility Flow programmatically. It enables developers to integrate workflows into external applications, automate platform operations, and manage Robility Flow resources through code.

By leveraging these APIs and client libraries, organizations can extend Robility Flow beyond the visual development environment and integrate workflow capabilities directly into custom applications, enterprise systems, and automation platforms. This enables scalable integrations, automated deployment scenarios, and seamless interaction between Robility Flow and external services.

Whether you’re building application integrations, automating workflow management, embedding flow execution into business applications, or monitoring workflows at scale, the API Reference provides the technical foundation needed to develop, manage, and operate Robility Flow programmatically.

16.7.1 Get started with Robility flow API

The Robility Flow API allows you to interact with Robility programmatically. You can use it to:

1. Create and manage flows, including file handling.
2. Develop applications that integrate with your flows.
3. Build and deploy custom components.
4. Use Robility Flow as part of a larger system.
5. Contribute to the Robility Flow open platform.

Quickstart Example

For a hands-on introduction, see the Robility Flow Quickstart. It demonstrates how to:

1. Retrieve auto-generated API code snippets.
2. Run a flow from a script.
3. Parse data from the Robility Flow API response.

Form Robility API Requests

While options vary by endpoint, all Robility Flow API requests follow a consistent structure—using a base URL, HTTP method, parameters, and authentication.

As an example of a Robilityflow API request, the following curl command calls the /v1/run endpoint, and it passes a runtime override (tweaks) to the flow’s Chat Output component:

Example: Run a Flow with curl

curl –request POST \

  –url “$ROBILITY_FLOW_SERVER_URL/api/v1/run/$FLOW_ID?stream=false” \

  –header “Content-Type: application/json” \

  –header “x-api-key: $ROBILITY_FLOW_API_KEY” \

  –data ‘{

    “input_value”: “hello world!”,

    “output_type”: “chat”,

    “input_type”: “chat”,

    “tweaks”: {

      “ChatOutput-6zcZt”: {

        “should_store_message”: true

      }

    }

  }’

Base URL

By default, local Robility Flow deployments are hosted at:

a. http://localhost:7860/api

For remote deployments, the URL will depend on your configuration. Examples:

a. https://UUID.ngrok.app/api
b. http://IP_OR_DNS/api
c. http://IP_OR_DNS:ROBILITY_FLOW_PORT/api

The port number can be configured using the ROBILITY_FLOW_PORT environment variable.

Authentication

As of Robility Flow version, most endpoints require an API key—even when AUTO_LOGIN=True. The only exceptions are MCP-related endpoints:

1. /v1/mcp
2. /v1/mcp-projects
3. /v2/mcp

To authenticate, include your Robility Flow API key via: x-api-key header or ?x-api-key=… query parameter

For more information, see API keys and authentication.

As with any API, follow industry best practices for storing and referencing sensitive credentials. For example, you can set environment variables for your API keys and then reference those environment variables in your API requests.

Supported HTTP Methods and Parameters

Each endpoint uses different combinations of:

a. HTTP Methods (GET, POST, etc.)
b. Path and query parameters
c. JSON-formatted request bodies

Example: Create and Run a Flow

1. Create a flow:
POST /v1/flows with a flow definition in the body.

2. Run a flow:
POST /v1/run/$FLOW_ID with optional runtime parameters.

API Versions

Robility Flow supports both /v1 and /v2 endpoints. Some endpoints are exclusive to one version. If a request doesn’t behave as expected, verify that the path uses the correct version.

Setting Environment Variables

Store commonly used values in environment variables for security and convenience. Here’s an example:

# Set variables

export ROBILITY_FLOW_API_KEY=”sk-…”

export ROBILITY_FLOW_SERVER_URL=”http://localhost:7860″

export FLOW_ID=”359cd752-07ea-46f2-9d3b-a4407ef618da”

export PROJECT_ID=”1415de42-8f01-4f36-bf34-539f23e47466″

# Use them in a curl command

curl –request POST \

  –url “$ROBILITY_FLOW_SERVER_URL/api/v1/run/$FLOW_ID?stream=false” \

  –header “Content-Type: application/json” \

  –header “x-api-key: $ROBILITY_FLOW_API_KEY” \

  –data ‘{

    “input_value”: “hello world!”,

    “output_type”: “chat”,

    “input_type”: “chat”,

    “tweaks”: {

      “ChatOutput-6zcZt”: {

        “should_store_message”: true

      }

    }

  }’

Environment variables help manage:

  • Server URLs
  • API keys
  • Flow and project IDs

Flow IDs can be retrieved from:

  • The API Access pane
  • The flow’s URL
  • The GET /flows endpoint

Try These Useful API Requests

Get Robility Flow Version

curl -X GET \

  “$ROBILITY_FLOW_SERVER_URL/api/v1/version” \

  -H “accept: application/json” \

  -H “x-api-key: $ROBILITY_FLOW_API_KEY”

Result:

{

    “version”: “1.1”,
    “main_version”: “1.1.1”,
    “package”: “Robilityflow”

}

Get Deployment Configuration

curl -X GET \

  “$ROBILITY_FLOW_SERVER_URL/api/v1/config” \

  -H “accept: application/json” \

  -H “x-api-key: $ROBILITY_FLOW_API_KEY”

 Result:

{

  “feature_flags”: {

    “mvp_components”: false

  },

  “frontend_timeout”: 0,

  “auto_saving”: true,

  “auto_saving_interval”: 1000,

  “health_check_max_retries”: 5,

  “max_file_size_upload”: 100

}

Get All Components

curl -X GET \

  “$ROBILITY_FLOW_SERVER_URL/api/v1/all” \

  -H “accept: application/json” \

  -H “x-api-key: $ROBILITY_FLOW_API_KEY”

Available endpoints

Because you can run Robility flow as either an IDE (frontend and backend) or a runtime (headless, backend-only), it serves endpoints that support frontend and backend operations. Many endpoints are for orchestration between the frontend and backend, reading and writing to the Robility flow database, or enabling frontend functionality, like the Playground. Unless you are contributing to the Robility flow codebase, you won’t directly call most of the Robility flow endpoints.

For application development, the most commonly used endpoints are the /run and /webhook flow trigger endpoints. For some use cases, you might use some other endpoints, such as the /files endpoints to use files in flows.

To help you explore the available endpoints, the following lists are sorted by primary use case, although some endpoints might support multiple use cases.

1. Application development
2. Custom components
3. MCP servers and clients
4. Codebase development
5. Deprecated

Application development

The following endpoints are useful for developing applications with Robility flow and administering Robility flow deployments with one or more users. You will most often use the flow trigger endpoints. Other endpoints are helpful for specific use cases, such as administration and flow management in runtime deployments that don’t have a visual editor.

1. Flow trigger endpoints:

a. POST /v1/run/{flow_id_or_name}: Run a flow.
b. POST /v1/run/advanced/{flow_id}: Advanced run with explicit inputs, outputs, tweaks, and optional session_id.
c. POST /v1/webhook/{flow_id_or_name}: Trigger a flow via webhook payload.

2. Deployment details:

a. GET /v1/version: Return Robility flow version. See Get version.
b. GET /v1/config: Return deployment configuration. See Get configuration.

3. Projects endpoints:

a. POST /v1/projects/: Create a project.
b. GET /v1/projects/: List projects.
c. GET /v1/projects/{project_id}: Read a project (with paginated flows support).
d. PATCH /v1/projects/{project_id}: Update project info and membership.
e. DELETE /v1/projects/{project_id}: Delete a project.
f. GET /v1/projects/download/{project_id}: Export all flows in a project as ZIP.
g. POST /v1/projects/upload/: Import a project ZIP (creates project and flows).
h. GET /v1/starter-projects/: Return a list of templates.

4. Files endpoints:

Files (v1)

a. POST /v1/files/upload/{flow_id}: Upload a file to a specific flow.
b. GET /v1/files/download/{flow_id}/{file_name}: Download a file from a flow.
c. GET /v1/files/images/{flow_id}/{file_name}: Stream an image from a flow.
d. GET /v1/files/profile_pictures/{folder_name}/{file_name}: Get a profile picture asset.
e. GET /v1/files/profile_pictures/list: List available profile picture assets.
f. GET /v1/files/list/{flow_id}: List files for a flow.
g. DELETE /v1/files/delete/{flow_id}/{file_name}: Delete a file from a flow.

Files (v2)

a. POST /v2/files (alias /v2/files/): Upload a file owned by the current user.
b. GET /v2/files (alias /v2/files/): List files owned by the current user.
c. DELETE /v2/files/batch/: Delete multiple files by IDs.
d. POST /v2/files/batch/: Download multiple files as a ZIP by IDs.
e. GET /v2/files/{file_id}: Download a file by ID (or return raw content internally).
f. PUT /v2/files/{file_id}: Edit a file name by ID.
g. DELETE /v2/files/{file_id}: Delete a file by ID.
h. DELETE /v2/files (alias /v2/files/): Delete all files for the current user.

5. API keys and authentication:

a. GET /v1/api_key/: List API keys for the current user.
b. POST /v1/api_key/: Create a new API key.
c. DELETE /v1/api_key/{api_key_id}: Delete an API key.
d. POST /v1/api_key/store: Save an encrypted Store API key (cookie set).

6. Flow management endpoints:

a. POST /v1/flows/: Create a flow.
b. GET /v1/flows/: List flows (supports pagination and filters).
c. GET /v1/flows/{flow_id}: Read a flow by ID.
d. GET /v1/flows/public_flow/{flow_id}: Read a public flow by ID.
e. PATCH /v1/flows/{flow_id}: Update a flow.
f. DELETE /v1/flows/{flow_id}: Delete a flow.
g. POST /v1/flows/batch/: Create multiple flows.
h. POST /v1/flows/upload/: Import flows from a JSON file.
i. DELETE /v1/flows/: Delete multiple flows by IDs.
j. POST /v1/flows/download/: Export flows to a ZIP file.
k. GET /v1/flows/basic_examples/: List basic example flows.

7. Users endpoints:

a. POST /v1/users/: Add a user (superuser required when auth enabled).
b. GET /v1/users/whoami: Return the current authenticated user.
c. GET /v1/users/: List all users (superuser required).
d. PATCH /v1/users/{user_id}: Update a user (with role checks).
e.PATCH /v1/users/{user_id}/reset-password: Reset own password.
f. DELETE /v1/users/{user_id}: Delete a user (cannot delete yourself).

Custom components

You might use these endpoints when developing custom Robility flow components for your own use or to share with the Robility flow community:

1. Develop custom components:

a. GET /v1/all: Return all available Robility flow component types. See Get all components.
b. POST /v1/custom_component: Build a custom component from code and return its node.
c. POST /v1/custom_component/update: Update an existing custom component’s build config and outputs.
d. POST /v1/validate/code: Validate a Python code snippet for a custom component.

2. Robility flow Store:

a. GET /v1/store/check/: Return whether the Store feature is enabled.
b. GET /v1/store/check/api_key: Check if a Store API key exists and is valid.
c. POST /v1/store/components/: Share a component to the Store.
d. PATCH /v1/store/components/{component_id}: Update a shared component.
e. GET /v1/store/components/: List available Store components (filters supported).
f. GET /v1/store/components/{component_id}: Download a component from the Store.
g. GET /v1/store/tags: List Store tags.
h. GET /v1/store/users/likes: List components liked by the current user.
i. POST /v1/store/users/likes/{component_id}: Like a component.

MCP Serves and clients

The following endpoints are for managing Robility flow  MCP servers, both Robility flow -hosted MCP servers and external MCP server connections:

1. MCP (global):

a. HEAD /v1/mcp/sse: Health check for MCP SSE.
b. GET /v1/mcp/sse: Open SSE stream for MCP server events.
c. POST /v1/mcp/: Post messages to the MCP server.

2. MCP (project-specific):

a. GET /v1/mcp/project/{project_id}: List MCP-enabled tools and project auth settings.
b. HEAD /v1/mcp/project/{project_id}/sse: Health check for project SSE.
c. GET /v1/mcp/project/{project_id}/sse: Open project-scoped MCP SSE.
d. POST /v1/mcp/project/{project_id}: Post messages to project MCP server.
e. POST /v1/mcp/project/{project_id}/ (trailing slash): Same as above.
f. PATCH /v1/mcp/project/{project_id}: Update MCP settings for flows and project auth settings.
g. POST /v1/mcp/project/{project_id}/install: Install MCP client config for Cursor/Windsurf/Claude (local only).
h. GET /v1/mcp/project/{project_id}/installed: Check which clients have MCP config installed.

Code base development

The following endpoints are most often used when contributing to the Robility flow  codebase, and you need to understand or call endpoints that support front-end-to-backend orchestration or other internal functionality.

1. Base (metadata):

a. GET /v1/all: Return all available Robility flow component types. See Get all components.
b. GET /v1/version: Return Robility flow version. See Get version.
c. GET /v1/config: Return deployment configuration. See Get configuration.
d. GET /v1/starter-projects/: Return a list of templates.

2. Build endpoints (internal editor support):

a. POST /v1/build/{flow_id}/flow: Start a flow build and return a job ID.
b. GET /v1/build/{job_id}/events: Stream or fetch build events.
c. POST /v1/build/{job_id}/cancel: Cancel a build job.
d. POST /v1/build_public_tmp/{flow_id}/flow: Build a public flow without auth.
e. POST /v1/validate/prompt: Validate a prompt payload.

3. API keys and authentication:

a. POST /v1/login: Login and set tokens as cookies.
b. GET /v1/auto_login: Auto-login (if enabled) and set tokens.
c. POST /v1/refresh: Refresh tokens using refresh cookie.
d. POST /v1/logout: Logout and clear cookies.

4. Monitor endpoints:

a. GET /v1/monitor/builds: Get vertex builds for a flow.
b. DELETE /v1/monitor/builds: Delete vertex builds for a flow.
c. GET /v1/monitor/messages/sessions: List message session IDs (auth required).
d. GET /v1/monitor/messages: List messages with optional filters.
e. DELETE /v1/monitor/messages: Delete messages by IDs (auth required).
f. PUT /v1/monitor/messages/{message_id}: Update a message.
g. PATCH /v1/monitor/messages/session/{old_session_id}: Change a session ID for all messages in that session.
h. DELETE /v1/monitor/messages/session/{session_id}: Delete messages by session.
i. GET /v1/monitor/transactions: List transactions for a flow (paginated).

5. Variables:

a. POST /v1/variables/: Create a variable, such as an API key, for the user.
b. GET /v1/variables/: List variables for the user.
c. PATCH /v1/variables/{variable_id}: Update a variable.
d. DELETE /v1/variables/{variable_id}: Delete a variable.

6. Use voice mode:

a. WS /v1/voice/ws/flow_as_tool/{flow_id}: Bi-directional voice session exposing the flow as a tool.
b. WS /v1/voice/ws/flow_as_tool/{flow_id}/{session_id}: Same as above with explicit session ID.
c. WS /v1/voice/ws/flow_tts/{flow_id}: Voice-to-text session that runs a flow and returns TTS.
d. WS /v1/voice/ws/flow_tts/{flow_id}/{session_id}: Same as above with explicit session ID.
e. GET /v1/voice/elevenlabs/voice_ids: List available ElevenLabs voice IDs for the user.

Deprecated

The following endpoints are deprecated:

a. POST /v1/predict/{flow_id}: Use /v1/run/{flow_id} instead.
b. POST /v1/process/{flow_id}: Use /v1/run/{flow_id} instead.
c. GET /v1/task/{task_id}: Deprecated functionality.
d. POST /v1/upload/{flow_id}: Use /files instead.
e. POST /v1/build/{flow_id}/vertices: Replaced by /monitor/builds.
f. POST /v1/build/{flow_id}/vertices/{vertex_id}: Replaced by /monitor/builds.
g. GET /v1/build/{flow_id}/{vertex_id}/stream: Replaced by /monitor/builds.

16.7.2 Use the TypeScript client

The Robility flow TypeScript client allows your TypeScript applications to programmatically interact with the Robility flow API.

Install the Robility flow TypeScript package

To install the Robility flow typescript client package, use one of the following commands:

a. npm
b. yarn
c. pnpm

npm install @datastax/Robility flow -client

Initialize the Robility flow TypeScript client

1. Import the client into your code.

import { Robility flow Client } from “@datastax/Robility flow -client”;

2. Initialize a Robility flow Client object to interact with your server:

const baseUrl = “BASE_URL”;

const apiKey = “API_KEY”;

const client = new Robility flow Client({ baseUrl, apiKey });

Replace BASE_URL and API_KEY with values from your deployment. The default Robility flow  base URL is http://localhost:7860. To create an API key, see API keys and authentication.

Robility flow TypeScript client quickstart

1. With your Robility flow  client initialized, test the connection by calling your Robility flow  server.

The following example runs a flow (runFlow) by sending the flow ID and a chat input string:

import { Robility flow Client } from “@datastax/Robility flow -client”;

const baseUrl = “http://localhost:7860”;

const client = new Robility flow Client({ baseUrl });

async function runFlow() {

    const flowId = “aa5a238b-02c0-4f03-bc5c-cc3a83335cdf”;

    const flow = client.flow(flowId);

    const input = “Is anyone there?”;

    const response = await flow.run(input);

    console.log(response);

}

runFlow().catch(console.error);

Replace the following:

a. baseUrl: The URL of your Robility flow server
b. flowId: The ID of the flow you want to run
c. input: The chat input message you want to send to trigger the flow.

2. Review the result to confirm that the client connected to your Robility flow server.

The following example shows the response from a well-formed runFlow request that reached the Robility flow  server and successfully started the flow:

FlowResponse {

  sessionId: ‘aa5a238b-02c0-4f03-bc5c-cc3a83335cdf’,

  outputs: [ { inputs: [Object], outputs: [Array] } ]

}

In this case, the response includes a sessionID that is a unique identifier for the client-server session and an outputs array that contains information about the flow run.

3. If you want to get full response objects from the server, change console.log to stringify the returned JSON object:

console.log(JSON.stringify(response, null, 2));

The exact structure of the returned inputs and outputs objects depends on the components and configuration of your flow.

4. If you want the response to include only the chat message from the Chat Output component, change console.log to use the chatOutputText convenience function:

console.log(response.chatOutputText());

Use advanced TypeScript client features

The TypeScript client can do more than just connect to your server and run a flow.

This example builds on the quickstart with additional features for interacting with Robility flow .

1. Pass tweaks to your code as an object with the request.

Tweaks change values within components for all calls to your flow.

This example tweaks the OpenAI component to enforce using the gpt-4o-mini model:

const tweaks = { model_name: “gpt-4o-mini” };

2. Pass a session ID with the request to separate the conversation from other flow runs, and to be able to continue this conversation by calling the same session ID in the future:

const session_id = “aa5a238b-02c0-4f03-bc5c-cc3a83335cdf”;

3. Instead of calling run on the Flow object, call stream with the same arguments:

const response = await client.flow(flowId).stream(input);

for await (const event of response) {

  console.log(event);

}

The response is a ReadableStream of objects. For more information on streaming Robility flow responses, see the /run endpoint.

4. Run the modified TypeScript application to run the flow with tweaks and session_id and then stream the response back.

Replace baseUrl and flowId with values from your deployment.

import { Robility flow Client } from “@datastax/Robility flow -client”;

const baseUrl = “http://localhost:7860”;

const client = new Robility flow Client({ baseUrl });

async function runFlow() {

    const flowId = “aa5a238b-02c0-4f03-bc5c-cc3a83335cdf”;

    const input = “Is anyone there?”;

    const tweaks = { model_name: “gpt-4o-mini” };

    const session_id = “test-session”;

    const response = await client.flow(flowId).stream(input, {

        session_id,

        tweaks,

      });

    for await (const event of response) {

        console.log(event);

    }

}

runFlow().catch(console.error);

Replace baseUrl and flowId with your server URL and flow ID, as you did in the previous run.

Retrieve Robility flow logs with the TypeScript client

To retrieve Robility flow logs, you must enable log retrieval on your Robility flow server by including the following values in your server’s .env file:

1. ROBILITY FLOW _ENABLE_LOG_RETRIEVAL=True
2. ROBILITY FLOW _LOG_RETRIEVER_BUFFER_SIZE=10000
3. ROBILITY FLOW _LOG_LEVEL=DEBUG

The following example script starts streaming logs in the background, and then runs a flow so you can monitor the flow run:

import { Robility flow Client } from “@datastax/Robility flow -client”;

const baseUrl = “http://localhost:7863”;

const flowId = “86f0bf45-0544-4e88-b0b1-8e622da7a7f0”;

async function runFlow(client: Robility flow Client) {

    const input = “Is anyone there?”;

    const response = await client.flow(flowId).run(input);

    console.log(‘Flow response:’, response);

}

async function main() {

    const client = new Robility flow Client({ baseUrl: baseUrl });

    // Start streaming logs

    console.log(‘Starting log stream…’);

    for await (const log of await client.logs.stream()) {

        console.log(‘Log:’, log);

    }

    // Run the flow

    await runFlow(client);

}

main().catch(console.error);

Replace baseUrl and flowId with your server URL and flow ID, as you did in the previous run.

Logs begin streaming indefinitely, and the flow runs once.

The following example result is truncated for readability, but you can follow the messages to see how the flow instantiates its components, configures its model, and processes the outputs.

The FlowResponse object, at the end of the stream, is returned to the client with the flow result in the outputs array.

For more information, see Logs endpoints.

16.7.3 Flow Management Endpoints

Use the /flows endpoint to create, read, update, and delete flows.

If you want to use the Robilityflow API to run a flow, see Flow trigger endpoints.

Create flow

Creates a new flow. 

curl -X POST \
  "$ROBILITYFLOW_URL/api/v1/flows/" \
  -H "accept: application/json" \
  -H "Content-Type: application/json" \
  -H "x-api-key: $ROBILITYFLOW_API_KEY" \
  -d '{
  "name": "string2",
  "description": "string",
  "icon": "string",
  "icon_bg_color": "#FF0000",
  "gradient": "string",
  "data": {},
  "is_component": false,
  "updated_at": "2024-12-30T15:48:01.519Z",
  "webhook": false,
  "endpoint_name": "string",
  "tags": ["string"]
}'
Result
{
  "name": "string2",
  "description": "string",
  "icon": "string",
  "icon_bg_color": "#FF0000",
  "gradient": "string",
  "data": {},
  "is_component": false,
  "updated_at": "2025-02-04T21:07:36+00:00",
  "webhook": false,
  "endpoint_name": "string",
  "tags": ["string"],
  "locked": false,
  "id": "e8d81c37-714b-49ae-ba82-e61141f020ee",
  "user_id": "f58396d4-a387-4bb8-b749-f40825c3d9f3",
  "project_id": "1415de42-8f01-4f36-bf34-539f23e47466"
}

Create flows

Creates multiple new flows, returning an array of flow objects.

curl -X POST \
  "$ROBILITYFLOW_URL/api/v1/flows/batch/" \
  -H "accept: application/json" \
  -H "Content-Type: application/json" \
  -H "x-api-key: $ROBILITYFLOW_API_KEY" \
  -d '{
  "flows": [
    {
      "name": "string",
      "description": "string",
      "icon": "string",
      "icon_bg_color": "string",
      "gradient": "string",
      "data": {},
      "is_component": false,
      "updated_at": "2024-12-30T18:36:02.737Z",
      "webhook": false,
      "endpoint_name": "string",
      "tags": ["string"],
      "locked": false,
      "user_id": "3fa85f64-5717-4562-b3fc-2c963f66afa6",
      "project_id": "3fa85f64-5717-4562-b3fc-2c963f66afa6"
    },
    {
      "name": "string",
      "description": "string",
      "icon": "string",
      "icon_bg_color": "string",
      "gradient": "string",
      "data": {},
      "is_component": false,
      "updated_at": "2024-12-30T18:36:02.737Z",
      "webhook": false,
      "endpoint_name": "string",
      "tags": ["string"],
      "locked": false,
      "user_id": "3fa85f64-5717-4562-b3fc-2c963f66afa6",
      "project_id": "3fa85f64-5717-4562-b3fc-2c963f66afa6"
    }
  ]
}'

Read flow

Retrieves a specific flow by its ID.

curl -X GET \
  "$ROBILITYFLOW_URL/api/v1/flows/$FLOW_ID" \
  -H "accept: application/json" \
  -H "x-api-key: $ROBILITYFLOW_API_KEY"
Result
{
  "name": "Basic Prompting",
  "description": "Perform basic prompting with an OpenAI model.",
  "icon": "Braces",
  "icon_bg_color": null,
  "gradient": "2",
  "data": {
    "nodes": [
      ...
    ]
  }
}

Read flows

Returns a JSON object containing a list of flows.

Retrieve all flows with pagination:

curl -X GET \
  "$ROBILITYFLOW_URL/api/v1/flows/?remove_example_flows=false&components_only=false&get_all=true&header_flows=false&page=1&size=50" \
  -H "accept: application/json" \
  -H "x-api-key: $ROBILITYFLOW_API_KEY"

To retrieve flows from a specific project, use the project_id query parameter:

curl -X GET \
  "$ROBILITYFLOW_URL/api/v1/flows/?remove_example_flows=true&components_only=false&get_all=false&project_id=$PROJECT_ID&header_flows=false&page=1&size=1" \
  -H "accept: application/json" \
  -H "x-api-key: $ROBILITYFLOW_API_KEY"

Read sample flows

Retrieves a list of sample flows:

curl -X GET \
  "$ROBILITYFLOW_URL/api/v1/flows/basic_examples/" \
  -H "accept: application/json" \
  -H "x-api-key: $ROBILITYFLOW_API_KEY"

Update flow

Updates an existing flow by its ID.

This example changes the value for endpoint_name from a random UUID to my_new_endpoint_name.

curl -X PATCH \
  "$ROBILITYFLOW_URL/api/v1/flows/$FLOW_ID" \
  -H "accept: application/json" \
  -H "Content-Type: application/json" \
  -H "x-api-key: $ROBILITYFLOW_API_KEY" \
  -d '{
  "name": "string",
  "description": "string",
  "data": {},
  "project_id": "3fa85f64-5717-4562-b3fc-2c963f66afa6",
  "endpoint_name": "my_new_endpoint_name",
  "locked": true
}'
Result
{
  "name": "string",
  "description": "string",
  "icon": "Braces",
  "icon_bg_color": null,
  "gradient": "2",
  "data": {},
  "is_component": false,
  "updated_at": "2024-12-30T18:30:22+00:00",
  "webhook": false,
  "endpoint_name": "my_new_endpoint_name",
  "tags": null,
  "locked": true,
  "id": "01ce083d-748b-4b8d-97b6-33adbb6a528a",
  "user_id": "f58396d4-a387-4bb8-b749-f40825c3d9f3",
  "project_id": "3fa85f64-5717-4562-b3fc-2c963f66afa6"
}

Delete flow

Deletes a specific flow by its ID.

curl -X DELETE \
  "$ROBILITYFLOW_URL/api/v1/flows/$FLOW_ID" \
  -H "accept: application/json" \
  -H "x-api-key: $ROBILITYFLOW_API_KEY"
Result
{
  "message": "Flow deleted successfully"
}

Export flows

Exports specified flows to a ZIP file.

This endpoint downloads a ZIP file containing Robilityflow JSON files for each flow ID listed in the request body.

curl -X POST \
  "$ROBILITYFLOW_URL/api/v1/flows/download/" \
  -H "accept: application/json" \
  -H "Content-Type: application/json" \
  -H "x-api-key: $ROBILITYFLOW_API_KEY" \
  -d '[
  "e1e40c77-0541-41a9-88ab-ddb3419398b5",
  "92f9a4c5-cfc8-4656-ae63-1f0881163c28"
]' \
  --output robilityflow-flows.zip
Result
% Total    % Received % Xferd  Average Speed   Time    Time     Time  Current
                                 Dload  Upload   Total   Spent    Left  Speed
100 76437    0 76353  100    84  4516k   5088 --:--:-- --:--:-- --:--:-- 4665k

Import flows

Imports flow by uploading a Robilityflow-compatible JSON file.

To specify a target project for the flow, include the query parameter folder_id. The target folder_id must already exist before uploading a flow. Call the /api/v1/projects/ endpoint for a list of available folders and projects.

This example uploads a local file named agent-with-astra-db-tool.json to a folder specified by a FOLDER_ID variable:

curl -X POST \
  "$ROBILITYFLOW_URL/api/v1/flows/upload/?folder_id=$FOLDER_ID" \
  -H "accept: application/json" \
  -H "Content-Type: multipart/form-data" \
  -H "x-api-key: $ROBILITYFLOW_API_KEY" \
  -F "file=@agent-with-astra-db-tool.json;type=application/json"
Result
[
  {
    "name": "agent-with-astra-db-tool",
    "description": "",
    "icon": null,
    "icon_bg_color": null,
    "gradient": null,
    "data": {}
  ...
  }
]

16.7.4 Flow Trigger Endpoints

Use the /run and /webhook endpoints to run flows.

To create, read, update, and delete flows, see Flow management endpoints.

Run flow

Points to note

Robility flow automatically generates Python, JavaScript, and curl code snippets for the /v1/run/$FLOW_ID endpoint for all flows. For more information, see Generate API code snippets.

Execute a specified flow by ID or name. Flow IDs can be found on the code snippets on the API access pane or in a flow’s URL.

The following example runs the Basic Prompting template flow with flow parameters passed in the request body. This flow requires a chat input string (input_value) and uses default values for all other parameters.

curl -X POST \

  “$ROBILITY FLOW_SERVER_URL/api/v1/run/$FLOW_ID” \

  -H “Content-Type: application/json” \

  -H “x-api-key: $ROBILITY FLOW_API_KEY” \

  -d ‘{

    “input_value”: “Tell me about something interesting!”,

    “session_id”: “chat-123”,

    “input_type”: “chat”,

    “output_type”: “chat”,

    “output_component”: “”,

    “tweaks”: null

  }’

The response from /v1/run/$FLOW_ID includes metadata, inputs, and outputs for the run.

If you are parsing the response in an application, you most likely need to extract the relevant content from the response, rather than pass the entire response back to the user. For an example of a script that extracts data from a Robility flow API response, see the Quickstart.

Stream LLM token responses

With /v1/run/$FLOW_ID, the flow is executed as a batch with optional LLM token response streaming.

To stream LLM token responses, append the ?stream=true query parameter to the request:

curl -X POST \

  “$ROBILITY FLOW_SERVER_URL/api/v1/run/$FLOW_ID?stream=true” \

  -H “accept: application/json” \

  -H “Content-Type: application/json” \

  -H “x-api-key: $ROBILITY FLOW_API_KEY” \

  -d ‘{

    “message”: “Tell me something interesting!”,

    “session_id”: “chat-123”

  }’

LLM chat responses are streamed back as token events, culminating in a final end event that closes the connection.

Result

Run endpoint headers

Header Info Example
Content-Type Required. Specifies the JSON format. "application/json"
accept Optional. Specifies the response format. "application/json"
x-api-key Optional. Required only if authentication is enabled. "sk-..."

Run endpoint parameters

Parameter Type Info
flow_id UUID/string Required. Part of URL: /run/$FLOW_ID
stream Boolean Optional. Query parameter: /run/$FLOW_ID?stream=true
input_value string Optional. JSON body field. Main input text/prompt. Default: null
input_type string Optional. JSON body field. Input type ("chat" or "text"). Default: "chat"
output_type string Optional. JSON body field. Output type ("chat", "any", "debug"). Default: "chat"
output_component string Optional. JSON body field. Target component for output. Default: ""
tweaks object Optional. JSON body field. Component adjustments. Default: null
session_id string Optional. JSON body field. Conversation context ID. See Session ID. Default: null

Request example with all headers and parameters

curl -X POST \

  “$ROBILITY FLOW_SERVER_URL/api/v1/run/$FLOW_ID?stream=true” \

  -H “Content-Type: application/json” \

  -H “accept: application/json” \

  -H “x-api-key: $ROBILITY FLOW_API_KEY” \

  -d ‘{

    “input_value”: “Tell me a story”,

    “input_type”: “chat”,

    “output_type”: “chat”,

    “output_component”: “chat_output”,

    “session_id”: “chat-123”,

    “tweaks”: {

      “component_id”: {

        “parameter_name”: “value”

      }

    }

  }’

Webhook run flow

Use the /webhook endpoint to start a flow by sending an HTTP POST request.

Points to note

After you add a Webhook component to a flow, open the API access pane, and then click the Webhook curl tab to get an automatically generated POST /webhook request for your flow. For more information, see Trigger flows with webhooks.

curl -X POST \

  “$ROBILITY FLOW_SERVER_URL/api/v1/webhook/$FLOW_ID” \

  -H “Content-Type: application/json” \

  -H “x-api-key: $ROBILITY FLOW_API_KEY” \

  -d ‘{“data”: “example-data”}’

Deprecated flow trigger endpoints

The following endpoints are deprecated and replaced by the /run endpoint:

  • /process
  • /predict

16.7.5 Projects Endpoints

Use the /projects endpoint to create, read, update, and delete Robilityflow projects.

Read projects

Get a list of Robilityflow projects, including project IDs, names, and descriptions.

curl -X GET \
  "$ROBILITYFLOW_URL/api/v1/projects/" \
  -H "accept: application/json" \
  -H "x-api-key: $ROBILITYFLOW_API_KEY"
Result
[
  {
    "name": "Starter Project",
    "description": "Manage your own projects. Download and upload projects.",
    "id": "1415de42-8f01-4f36-bf34-539f23e47466",
    "parent_id": null
  }
]

Create project

Create a new project.

curl -X POST \
  "$ROBILITYFLOW_URL/api/v1/projects/" \
  -H "Content-Type: application/json" \
  -H "x-api-key: $ROBILITYFLOW_API_KEY" \
  -d '{
  "name": "new_project_name",
  "description": "string",
  "components_list": [],
  "flows_list": []
}'
Result
{
  "name": "new_project_name",
  "description": "string",
  "id": "b408ddb9-6266-4431-9be8-e04a62758331",
  "parent_id": null
}

To add flows and components at project creation, retrieve the components_list and flows_list values from the /all and /flows/read endpoints and add them to the request body.

Adding a flow to a project moves the flow from its previous location. The flow isn’t copied.

curl -X POST \
  "$ROBILITYFLOW_URL/api/v1/projects/" \
  -H "accept: application/json" \
  -H "Content-Type: application/json" \
  -H "x-api-key: $ROBILITYFLOW_API_KEY" \
  -d '{
  "name": "new_project_name",
  "description": "string",
  "components_list": [
    "3fa85f64-5717-4562-b3fc-2c963f66afa6"
  ],
  "flows_list": [
    "3fa85f64-5717-4562-b3fc-2c963f66afa6"
  ]
}'

Read project

Retrieve details of a specific project.

To find the UUID of your project, call the read projects endpoint.

curl -X GET \
  "$ROBILITYFLOW_URL/api/v1/projects/$PROJECT_ID" \
  -H "accept: application/json" \
  -H "x-api-key: $ROBILITYFLOW_API_KEY"
Result
[
  {
    "name": "Starter Project",
    "description": "Manage your own projects. Download and upload projects.",
    "id": "3fa85f64-5717-4562-b3fc-2c963f66afa6",
    "parent_id": null
  }
]

Update project

Update the information of a specific project with a PATCH request.

Each PATCH request updates the project with the values you send. Only the fields you include in your request are updated. If you send the same values multiple times, the update is still processed, even if the values are unchanged.

curl -X PATCH \
  "$ROBILITYFLOW_URL/api/v1/projects/b408ddb9-6266-4431-9be8-e04a62758331" \
  -H "accept: application/json" \
  -H "x-api-key: $ROBILITYFLOW_API_KEY" \
  -d '{
  "name": "string",
  "description": "string",
  "parent_id": "3fa85f64-5717-4562-b3fc-2c963f66afa6",
  "components": [
    "3fa85f64-5717-4562-b3fc-2c963f66afa6"
  ],
  "flows": [
    "3fa85f64-5717-4562-b3fc-2c963f66afa6"
  ]
}'
Result
{
  "name": "string",
  "description": "string",
  "id": "b408ddb9-6266-4431-9be8-e04a62758331",
  "parent_id": null
}

Delete project

Delete a specific project.

curl -X DELETE \
  "$ROBILITYFLOW_URL/api/v1/projects/$PROJECT_ID" \
  -H "accept: */*" \
  -H "x-api-key: $ROBILITYFLOW_API_KEY"
Result
204 No Content

Export a project

Download all flows from a project as a zip file.

The –output flag is optional.

curl -X GET \
  "$ROBILITYFLOW_URL/api/v1/projects/download/$PROJECT_ID" \
  -H "accept: application/json" \
  -H "x-api-key: $ROBILITYFLOW_API_KEY" \
  --output robilityflow-project.zip

Import a project

Import a project and its flows by uploading a Robilityflow project zip file:

curl -X POST \
  "$ROBILITYFLOW_URL/api/v1/projects/upload/" \
  -H "accept: application/json" \
  -H "Content-Type: multipart/form-data" \
  -H "x-api-key: $ROBILITYFLOW_API_KEY" \
  -F "file=@20241230_135006_robilityflow_flows.zip;type=application/zip"

16.7.6 Monitor Endpoints

The /monitor endpoints are for internal Robility flow functionality, primarily related to running flows in the Playground, storing chat history, and generating flow logs.

This information is primarily for those who are building custom components or contributing to the Robility flow codebase in a way that requires calling or understanding these endpoints.

For typical application development with Robility flow, there are more appropriate options for monitoring, debugging, and memory management. For more information, see the following:

1. Logs: Robility flow log storage locations, customization options, and where to view logs in the visual editor
2. Test flows in the Playground: Run flows and inspect message history
3. Memory management options: Robility flow storage locations and options, including the database, cache, and chat history

Vertex builds

The Vertex build endpoints (/monitor/builds) are exclusively for Playground functionality.

When you run a flow in the Playground, Robility flow calls the /build/$FLOW_ID/flow endpoint. This call retrieves the flow data, builds a graph, and executes the graph. As each component (or node) is executed, the build_vertex function calls build_and_run, which may call the individual components’ def_build method, if it exists. If a component doesn’t have a def_build function, the build still returns to a component.

The build function allows components to execute logic at runtime. For example, the Recursive Character Text Splitter component is a child of the LCTextSplitterComponent class. When text needs to be processed, the parent class’s build method is called, which creates a RecursiveCharacterTextSplitter object and uses it to split the text according to the defined parameters. The split text is then passed on to the next component. This all occurs when the component is built.

Get Vertex builds

Retrieve Vertex builds for a specific flow.

curl -X GET \

  “$ROBILITY FLOW_URL/api/v1/monitor/builds?flow_id=$FLOW_ID” \

  -H “accept: application/json” \

  -H “x-api-key: $ROBILITY FLOW_API_KEY”

Delete Vertex builds

Delete Vertex builds for a specific flow.

curl -X DELETE \

  “$ROBILITY FLOW_URL/api/v1/monitor/builds?flow_id=$FLOW_ID” \

  -H “accept: */*” \

  -H “x-api-key: $ROBILITY FLOW_API_KEY”

Messages endpoints

The /monitor/messages endpoints store, retrieve, edit, and delete records in the message table in Robility flow.db Typically, these are called implicitly when running flows that produce message history, or when inspecting and modifying Playground memories.

Get messages

Retrieve a list of messages:

curl -X GET \

  “$ROBILITY FLOW_URL/api/v1/monitor/messages” \

  -H “accept: application/json” \

  -H “x-api-key: $ROBILITY FLOW_API_KEY”

To filter messages, use the flow_id, session_id, sender, and sender_name query parameters.

To sort the results, use the order_by query parameter.

This example retrieves messages sent by Machine and AI in a given chat session (session_id) and orders the messages by timestamp.

curl -X GET \

  “$ROBILITY FLOW_URL/api/v1/monitor/messages?flow_id=$FLOW_ID&session_id=01ce083d-748b-4b8d-97b6-33adbb6a528a&sender=Machine&sender_name=AI&order_by=timestamp” \

  -H “accept: application/json” \

  -H “x-api-key: $ROBILITY FLOW_API_KEY”

Delete messages

Delete specific messages by their IDs.

This example deletes the message retrieved in the previous GET /messages example.

curl -v -X DELETE \

  “$ROBILITY FLOW_URL/api/v1/monitor/messages” \

  -H “accept: */*” \

  -H “Content-Type: application/json” \

  -H “x-api-key: $ROBILITY FLOW_API_KEY” \

  -d ‘[“MESSAGE_ID_1”, “MESSAGE_ID_2”]’

Update message

Update a specific message by its ID.

This example updates the text value of message 3ab66cc6-c048-48f8-ab07-570f5af7b160.

curl -X PUT \

  “$ROBILITY FLOW_URL/api/v1/monitor/messages/3ab66cc6-c048-48f8-ab07-570f5af7b160” \

  -H “accept: application/json” \

  -H “Content-Type: application/json” \

  -H “x-api-key: $ROBILITY FLOW_API_KEY” \

  -d ‘{

  “text”: “testing 1234”

}’

Update session ID

Update the session ID for messages.

This example updates the session_ID value 01ce083d-748b-4b8d-97b6-33adbb6a528a to different_session_id.

curl -X PATCH \

  “$ROBILITY FLOW_URL/api/v1/monitor/messages/session/01ce083d-748b-4b8d-97b6-33adbb6a528a?new_session_id=different_session_id” \

  -H “accept: application/json” \

  -H “x-api-key: $ROBILITY FLOW_API_KEY”

Delete messages by session

Delete all messages for a specific session.

curl -X DELETE \

  “$ROBILITY FLOW_URL/api/v1/monitor/messages/session/different_session_id_2” \

  -H “accept: */*” \

  -H “x-api-key: $ROBILITY FLOW_API_KEY”

Get transactions

Retrieve all transactions, which are interactions between components, for a specific flow. This information is also available in flow logs.

curl -X GET \

  “$ROBILITY FLOW_URL/api/v1/monitor/transactions?flow_id=$FLOW_ID&page=1&size=50” \

  -H “accept: application/json” \

  -H “x-api-key: $ROBILITY FLOW_API_KEY”

16.8 Use Case Videos

Use Case Videos show Robility Flow in action, applied to real business scenarios. Each video demonstrates how flows, agents, models, tools, and integrations come together to solve specific business challenges and automate complex processes.

Covering areas like Software Development Lifecycle (SDLC) and IT Service Management (ITSM), these videos give you a practical look at how workflows are designed and how AI capabilities can be woven into existing processes to support intelligent automation.

Use these videos to explore real implementations, understand what’s possible, and find inspiration for applying Robility Flow to your own automation and AI initiatives.

16.8.1 SDLC

Discover how Robility reimagines the Software Development Life Cycle with agentic automation, bringing intelligence to every stage of build, test, and deployment. See how AI-driven workflows streamline development, accelerate decisions, and elevate automation delivery with precision and efficiency.

16.8.2 ITSM, Transformed by AI

Ever Wonder How ITSM Looks When AI Takes Over the Heavy Lifting?

Discover how Robility redefines ITSM by infusing agentic intelligence into incident triage, service request fulfillment, and problem resolution. Watch how automated decisioning and adaptive workflows help teams respond proactively, reduce effort, and drive seamless service experiences across the enterprise.

16.9 Components Reference

In Robility Flow, components are the fundamental building blocks for designing workflows. Each component includes inputs, outputs, and parameters that define how data is processed and transferred. Components can represent a wide range of functions—such as logic (routing, looping), language models (LLM calls), tools (APIs, calculators, custom scripts), or data operations.


They are visual, configurable, and easily connectable on the canvas, enabling users to design complete end-to-end pipelines. Additionally, developers can extend the platform by building custom components, making Robility Flow highly flexible for both standard workflows and complex integrations.

16.9.1 Components Overview

Components are the fundamental building blocks of a flow in Robility Flow. Much like classes in a traditional software application, each component is tailored to perform a specific task or enable a particular integration. They handle input, execute logic, and produce output—allowing you to construct sophisticated workflows with modular, reusable elements.

Tips for Efficient Workflow Navigation

Robility Flow offers keyboard shortcuts to improve your efficiency when working within the Workspace.

To view available shortcuts:

1. Click your profile icon in the header.
2. Select Settings.
3. Navigate to the Shortcuts

Adding Components to a Flow

To build your flow, you’ll start by adding components from the Components menu to the Workspace.

Steps:

1. Open the Components menu on the left panel.
2. Drag a component from the menu into the Workspace.

Component Categories:

The Components menu is organized by type and may contain hidden items based on status:

1. Beta Components:
Core Robility components organized by functionality—such as Inputs, Data, or Models. These are under active development and may not be suitable for production use.

2. Legacy Components:
Deprecated components that are no longer supported. Hidden by default. To view, go to Component Settings and enable legacy components.

3. Bundle Components:
Integration-specific components grouped by external provider or service.

Component Inspection Panel

A Component Inspection Panel is a dedicated UI panel that provides complete visibility into the properties and configuration of a selected component. When you select a component in the workspace, the inspection panel automatically appears on the right side of the screen, displaying all of the component’s parameters, including hidden or advanced ones. The inspection panel displays all parameters of the selected component.

How It Works

1. Select a Component – Click on any component in the workspace.
2. Panel Appears – The inspection panel instantly appears on the right side of the screen.
3. View Parameters – All parameters of the selected component are listed in the panel.
4. Edit or Inspect – You can read, modify, or configure the component’s settings directly from the panel.

Key

1. The inspection panel is located on the right side of the screen.
2. It is context-sensitive; it only appears when a component is selected.

Configuring a Component

Once a component is added to your flow, it must be configured to function correctly and connected to other components in the workflow.

Key Configuration Elements:

a. Inputs & Outputs: Define what data the component accepts and produces.
b. Parameters: Core settings that influence the component’s behavior.
c. Controls: Optional runtime flags, toggles, or switches depending on the component type.

By default, only the required and commonly used options are visible. To view advanced settings (such as meta-parameters or conditional configurations):

1. Click the component in your Workspace.
2. Use the header menu (accessible at the top of the component block) to explore and edit full configuration options.

Each component includes a header menu that provides quick access to commonly used actions. Some key options include:

a. Code: Open and edit the component’s underlying Python code to modify advanced settings or custom logic.
b. Controls: Access all configurable parameters, including optional settings hidden by default.
c. Tool Mode: Enable this mode when integrating the component with an Agent component for specialized use cases.

For additional actions—such as duplicating or deleting a component, click Show More in the header menu.

Renaming a Component

To rename a component or update its description:

1. Click the component in the Workspace.
2. Select Edit from the header menu.
3. Update the name and/or description.

Tip: Component descriptions support Markdown syntax for better formatting.

Running a Single Component

You can execute an individual component independently to test its behavior.

a. Click Run Component on the selected node.
b. A Last Run value will confirm successful execution.

How It Works:

1. The component’s build_vertex function is invoked, using inputs provided through the UI (inputs_dict).
2. This returns a VertexBuildResult, which is passed to the build_and_run method.
3. Only the selected component runs—upstream dependencies are not executed.

This is different from running an entire flow, where execution proceeds through all dependencies in sequence.

Viewing Output and Logs

To inspect the results of a single component:

1. Select the component in the Workspace.
2. Click Inspect to view:
a. Output data
b. Execution logs
c. Runtime status

Freezing a Component

Important: Freezing a component will also freeze all its upstream components.

Use the Freeze option when the output from a component and its dependencies are stable and doesn’t need to be re-executed in future runs.

a. This prevents re-running the component and its inputs.
b. Instead, Robility Flow reuses the preserved output from the last successful run.

To Freeze:

1. Select the component in the Workspace.
2. Open the Show More menu in the header.
3. Click Freeze.

Component ports

Each component displays circular icons along its edges—these are ports used to pass data between components- .

a. Input Ports: Accept incoming data.
b. Output Ports: Send data to downstream components.

Data types are inferred based on the field or are color-coded. For example, a blue port on the System Message field represents message data.

When designing flows in Robility Flow, you connect output ports of one component to the input ports of another to enable data transfer. For a successful connection, the data types must match, which is visually indicated by port colors.

To understand the underlying structure of each data type, refer to the Robility Flow Data Types documentation.

Tips for Connecting Ports

a. Hover over a port to view detailed information about its expected input or output.
b. Click a port to automatically filter the Components menu and display only those with compatible connection types.
c. If two components use incompatible data types, insert a processing component such as Type Convert to transform the data as needed.

Dynamic Ports

Some components support dynamic ports that appear or disappear based on context. For instance:

a. The Prompt component dynamically creates new input ports when variables are detected within curly braces {} in the Template.
b. As soon as a new variable is referenced (e.g., {username}), a matching port is added to accept input for that placeholder.

This dynamic behavior allows for flexible, context-aware component configuration without requiring manual port setup.

Output Type Selection

Certain components in Robility Flow provide dropdown menus that allow you to choose the type of output to send to the next component in the flow.

Example: Language Model Component

This component offers multiple output options:

1. Model Response: Sends a standard message output, typically connected to another component expecting a Message input.

2. Language Model: Provides a raw LLM output that can be routed to components like Structured Output, enabling advanced reasoning or further processing.

How Output Selection Works in Code

The behavior of output options is controlled by the group_outputs parameter within the component’s code:

1. group_outputs=False (default):
All outputs are combined into a single dropdown menu, allowing only one output to be selected at a time.

2. group_outputs=True:
Outputs are displayed individually, enabling multiple outputs to be exposed and connected simultaneously. 

Port colors

The color of a component’s port visually represents the type of data it sends or receives. For instance, a Message port indicates that it either accepts or emits data of type Message.

Below is a reference table mapping data types to their corresponding port colors:

Data type Port color
Data Red
DataFrame Pink
Embeddings Emerald
LanguageModel Fuchsia
Memory Orange
Message Indigo
Tool Cyan
Unknown or multiple types Gray

Component versions

Versioning Overview

Robility Flow maintains an internal database to track component versions and states. When you add a component to a flow, a detached copy of that component is created based on the database version at that time.

This detached copy:

a. Is isolated from future updates in the Robility Flow database.
b. Retains its version and configuration as it was initially added.
c. Does not automatically update, even if newer versions become available after a platform upgrade.

Example:
If a component is at version 1.0 when added to a flow, it remains at 1.0 until explicitly updated—even if a newer version (e.g., 1.2) is later introduced.

Updating Components

Robility Flow notifies you when a component in your flow is out of sync with its latest available version:

1. Update ready: Safe to update. No breaking changes are expected. 
2. Update available: The update may include breaking changes, such as modifications to input/output structure. These updates may require reconfiguration or reconnection of component ports.

Breaking changes may disconnect components or affect flow execution. Review changes before applying.

How to Update Components

You can update components using two methods:

1. Single Component Update
a. Click Update on a specific component when no breaking changes are present.

2. Review and Bulk Update
a. Click Review to see all components with available updates.
b. Optionally enable Create backup flow before updating to generate a snapshot with the suffix (backup) in the same project folder.
c. Select specific components to update or update all in one go by clicking Update Components.

Components will be updated to the latest version compatible with your current Robility Flow installation.

Grouping Components

Grouping allows you to combine multiple components into a single, reusable unit. This is ideal for organizing complex flows and encapsulating logic—for example, bundling a RAG Agent with its Vector Database.

To Group Components:

1. Hold Ctrl (Windows) or Cmd (Mac) and click each component you want to group.
2. Click Group to merge them into a single component.

Grouped components:

a. Share a unified configuration, name, and codebase.
b. Can be reused, managed, and edited as one logical block.

To Ungroup Components:

1. Click the grouped component in the Workspace.
2. Open the header menu.
3. Select Show MoreUngroup.

To Reuse Grouped Components Across Flows:

1. Select the grouped component in the Workspace.
2. Open the header menu.
3. Click Show MoreSave to add it to your Components menu for reuse in other flows.

16.9.2 API Automation

API Automation is a component within Robility Flow designed to enable seamless integration and interaction with external systems and services. It achieves this by directly performing REST API calls from within an automated workflow.

This functionality supports a wide range of HTTP methods and request configurations, allowing users to exchange data, perform system updates, manage authentication, and automate complex API-driven processes with high flexibility and reliability. It’s essential for tasks like data retrieval, cross-application integration, and updating system records within automated workflows. 

Click here to learn more about the REST API Call component in detail. 

16.9.3 App Integration

The App Integration component in the Robility Flow platform enables secure and automated connections between workflows and third-party enterprise applications. It uses pre-built connectors and standardized authentication to allow workflows to interact with integrated applications without requiring custom authentication logic.

By centralizing application connections, App Integration eliminates the need to hardcode authentication details or implement complex integration logic within individual workflows. The component retrieves the authentication token for a configured application connection and makes it available to the workflow when required.

Prerequisites

Before using the App Integration component:

1. The required application must be connected and configured in App Integration through Robility Manager.
2. A valid application connection must be available for the component to retrieve the authentication token.
3. If the application is not connected, the component cannot retrieve the authentication token, and the workflow cannot authenticate with the external application.

Available Component

App Integration Token: Retrieves the authentication token for a configured application connection, enabling workflows to securely authenticate with external applications and perform authorized operations.

16.9.4 Agents

In Robility flow, agents act as intelligent decision-makers that use language models to choose and execute actions. Instead of following a fixed sequence, agents dynamically decide which tools, components, or data to use based on the user’s input and the context provided. They are designed for complex workflows where adaptive reasoning is needed, such as answering queries, retrieving knowledge, or invoking external APIs. By combining reasoning with available tools, agents bring flexibility, autonomy, and conversational intelligence to Robility flow pipelines. 

How Agents Work

1. User Input Interpretation – The agent processes natural language queries and interprets user intent using an LLM.

2. Decision-Making – Based on the context and available tools or components, the agent decides which action(s) to take.

3. Tool/Component Invocation – The agent can call tools (like search, APIs, calculators, or custom scripts) or trigger other Robility flow components to retrieve or process data.

4. Reasoning Loop – After receiving results, the agent evaluates whether the response fully addresses the query. If not, it iterates by selecting another tool or action until it builds a complete answer.

5. Response Delivery – Finally, the agent compiles and returns a cohesive, context-aware response to the user.

Why Agents Are Useful

1. Adaptive Behavior – Instead of rigid, step-by-step flows, agents dynamically adjust their actions to suit each query.

2. Tool Orchestration – Agents can coordinate multiple tools and components, selecting and combining outputs as needed.

3. Complex Problem Solving – Well-suited for tasks like multi-step reasoning, research, or knowledge retrieval where flexibility is essential.

4. Scalable Intelligence – Agents can grow with your project, handling anything from simple Q&A to sophisticated automation pipelines.

Agents vs. Components

1. Components are modular, predefined units (data processing, logic, LLM calls, etc.) that form the structure of a workflow.

2. Agents sit on top of components and tools, providing autonomy and reasoning so the system can adapt to user inputs without manually defining every step.

In essence, agents bring conversational intelligence and autonomy into Robility flow pipelines, enabling workflows that are not only structured but also self-directed, context-aware, and adaptive to real-world scenarios.

16.9.5 Credential Vault

The Robility Credential Vault is a component within the Robility Flow platform, designed to provide secure and seamless access to sensitive data required during automation. It directly connects with the Robility Vault page to retrieve confidential information such as credentials, API keys, tokens, assets, and other secure data elements.

By integrating this component into automation workflows, users can safely manage and access critical information without hardcoding or exposing secrets.

Credential Vault ensures that all data retrieval is handled through encrypted communication channels, maintaining compliance with organizational security standards.

Prerequisite

To use the components under this feature, you must first select and create a project in Robility Flow that is linked to the corresponding vault configuration in Robility Manager. Once connected, the component automatically fetches the available credentials for that specific project.

Refer the documentation to learn more about the components in details. 

1. Get Credentials
2. Get Asset
3. Get Vault Token details
4. Get JWT token details
5. Get Pin & Key details
6. Unlock Credentials
7. Vault Global Variable Creation

16.9.6 Data Sources

Data Components

Data components allow you to bring external data into your Robility flows. Whether you need to parse local files, query a live database, or fetch data from dynamic web services, these components act as the entry points for your data pipeline.

Capabilities & Supported Sources

Category Typical Use Cases Key Components
Web & Search Fetching web pages, RSS feeds, live news, or search engine results Web Search, News Search, RSS Reader, URL
API & Messaging Listening for external triggers or calling REST APIs API Request, Webhook
Databases Executing SQL queries and fetching structured records SQL Database

How Data Components Work

Each Data component executes tailored commands for retrieval, processing, and type checking:

1. Wrapper vs. Built-in: Some components act as lightweight wrappers around user-provided commands, while others include built-in scripts to handle fetching and variable-driven processing automatically.
2. Data Formatting: Output formats vary by component. Some output raw data, while others automatically convert, restructure, or validate the payload before passing it along.


Integration Patterns in Flows

You can implement Data components in your flows in two primary ways:
Isolated Execution Steps: Run the component as a deterministic, standalone step in a linear pipeline (e.g., fetch data → transform → store). Agent Tools: Connect the component directly to an Agent component. The agent will autonomously decide when to invoke the tool based on the user’s intent and prompt context.


Tutorials & Examples

Explore these practical step-by-step guides to see Data components in action:
1. Create a Document-Aware Chatbot: Use the File component to load local files into context alongside user prompts.
2. Build a Vector RAG Chatbot: Ingest documents, chunk text, and store embeddings for contextual vector search during chat sessions.
3. Configure Tools for Autonomous Agents: Attach Data components to agents to let them perform dynamic lookups and API calls on the fly.
4. Trigger Flows with Webhooks: Utilize the Webhook component to automatically execute flows in response to external platform events.

16.9.7 DataTable

The Robility Datatable is a structured, in-memory data component designed to store, organize, and manipulate tabular data within automation workflows. It enables users to work with rows and columns efficiently, making it ideal for handling structured datasets such as records, lists, reports, and transactional data during automation execution.

By integrating seamlessly with Robility Flow, the Datatable allows automation processes to perform operations such as reading, writing, filtering, sorting, comparing, and transforming data dynamically across workflow steps. This ensures smooth data exchange between activities, systems, and decision points within a flow.  

Each Datatable is maintained securely within the context of its workflow, ensuring data consistency, controlled access, and reliable processing throughout execution. It supports both system-generated and user-defined data structures, enabling flexible handling of inputs from files, APIs, databases, and external applications.

With built-in data handling capabilities and structured schema management, the Robility Datatable improves accuracy, traceability, and efficiency in automation design. It plays a key role in enabling scalable and data-driven automations by ensuring that information remains organized, accessible, and reusable across the automation lifecycle. 

Steps to add a Datatable to the Flow

1. Create a new flow within the tenant.
2. In the blank flow canvas, click the Menu option located near the Playground.
3. From the context menu, select Datatables.
4. Click Create Datatable.
5. Enter a name and description for the datatable.
6. An empty datatable is now created and available for use in the flow.

Import a CSV as a Datatable into the Flow

1. Click the Menu option and select Datatables.
2. Click the dropdown button and choose Import Datatable.
3. Provide a name and description for the datatable.
4. Select the CSV file from your local system and click Create.

16.9.8 File System

The Robility File System is a secure and centralized component designed to handle file operations within automation projects. It enables users to upload, manage, and retrieve files directly within the Robility ecosystem, ensuring that critical documents and assets are easily accessible to workflows during execution.

By integrating tightly with the Robility flow, it allows automation processes to interact with files safely and efficiently whether for reading inputs, storing outputs, or exchanging data across systems. Each file is securely stored and linked to its respective project, ensuring controlled access and traceability.

With built-in security measures and permission controls, the Robility File System minimizes the risk of data exposure, safeguarding sensitive information throughout the automation lifecycle. It supports seamless collaboration between bots and human operators by maintaining file integrity, version consistency, and audit visibility. 

Refer the below documentation for the components to learn more in detail:

1. Read File
2. Delete File
3. Save File
4. Search Files

16.9.9 Flow Control

16.9.10 Flow Operation

In Robility Flow, Functions are control and logic components that determine how a workflow executes. They evaluate input values, apply predefined rules, and control the flow of execution based on logical conditions.

Functions are used to:

1. Apply business logic within workflows
2. Evaluate input or variable values
3. Control decision-making and execution paths
4. Enable dynamic behavior without duplicating workflow steps

By using functions, workflows become more flexible, intelligent, and adaptive to different runtime scenarios.

Use Cases

1. Validate data before proceeding to the next activity
2. Handle multiple decision scenarios using conditional logic
3. Control workflow paths for success, failure, or exception handling
4. Dynamically adapt workflow behavior based on runtime data

16.9.11 Google Infra

The Google Infra component is built-in component designed to automate the creation and deletion of virtual machines (VMs) within the Google Cloud Infrastructure. It enables seamless provisioning and deprovisioning of cloud resources directly from the Robility Flow platform, helping users manage their compute environments efficiently through automation.

Prerequisites

1. The user must configure valid Google Cloud credentials (Service Account Key).

2. Proper IAM permissions are required for creating and deleting compute instances in Google Cloud.

Refer the documentation below to learn more about the components:

1. Create VM
2. Delete VM

16.9.12 Input & Output

Robility Flow’s Input and Output components define where data enters and exits your workflow pipeline. While both handle data transmission, their functionality differs based on whether you are building a conversational application or processing raw text.
 

Chat Input & Chat Output

The Chat Input and Chat Output components are designed to handle conversational interactions in Robility Flow. They are required if you want to chat directly with your flow in the Playground.

These components facilitate multi-turn dialogues by handling both the message text and rich conversation metadata—such as sender details, session IDs, and timestamps—making them ideal for context-aware chatbots and interactive AI assistants.

Text Input & Text Output

The Text Input and Text Output components handle straightforward string input and output operations that do not require conversational context. Unlike chat components, they pare data down to basic, unformatted text strings without tracking sender details or message history, making them best suited for simple text transformations and linear processing pipelines.

16.9.13 Interact Manager

The Interact Manager is a component in the Robility Flow platform, designed to automate case creation within the Robility Interact. This component enables workflows to create cases in a specified queue as soon as the required data is available.

About Robility Interact

Robility Interact acts as a bridge between automated processes and human tasks, allowing seamless collaboration between bots and human operators. Through Interact, users can manage cases efficiently, upload and retrieve files, apply business rules, and ensure secure handling of sensitive information within workflows. Click here to learn more.

Prerequisites

Before using the Interact Manager component:

1. Ensure a project is created in Robility Flow that is linked to the corresponding Interact configuration in Robility Manager.
2. The component will automatically fetch the available fields for the project once connected.

16.9.14 LLM Operations

The LLM Operations section in Robility Flow provides components for integrating Large Language Models (LLMs) into workflows. These operations enable workflows to send data to LLMs, process responses, and incorporate AI-powered reasoning and language understanding into automation.

LLM operations can be combined with prompts, models, data sources, and workflow components to support tasks such as content generation, text transformation, information extraction, classification, summarization, and response generation.

Unlike standalone model interactions, LLM operations are designed to work as part of an end-to-end workflow, alongside business rules, external integrations, data processing, and custom logic. This enables developers to build intelligent workflows that analyze information, automate decisions, enrich data, and generate context-aware responses.

16.9.15 LLM Models

The LLM Models feature powers the intelligence behind workflows by enabling seamless integration with large language models. It allows workflows to understand input, generate responses, and perform complex reasoning tasks in real time.

This feature acts as the decision-making engine of your automation, transforming prompts into meaningful outputs while managing how models are configured, executed, and optimized. It supports both hosted and self-managed models, providing flexibility in how AI capabilities are deployed and scaled across workflows.

By using LLM Models, workflows can dynamically process context-rich input and generate outputs that drive downstream actions across agents, automations, and applications.

LLM Usage Modes

All LLM components support two primary usage modes:

1. Language Model Mode: In this mode, the model acts as an intelligence layer for AI agents. It provides reasoning, context, and decision support, enabling agents to interpret inputs, make decisions, and execute actions within workflows.

2. Model Response Mode: In this mode, the component directly processes the provided input and returns an AI-generated response. It is optimized for tasks such as text generation, summarization, and analysis, without requiring agent integration.

Core Capabilities

1. AI-Powered Execution: Enables workflows to perform intelligent tasks such as generation, reasoning, and conversation.

2. Flexible Model Integration: Connects to both cloud-based and self-hosted language models through standardized APIs.

3. Adaptive Response Generation: Generates context-aware outputs by combining system instructions, user input, and workflow data.

4. Controlled Model Behavior: Provides control over response behavior, execution timing, retries, and performance.

5. Seamless Workflow Integration: Embeds AI capabilities into agents, RAG pipelines, and automation processes.

16.9.16 Memory

The Memory section in Robility Flow provides core state-retention capabilities designed to persist, manage, and retrieve interaction context across workflow runs. These components enable flows to retain conversational history, track session states, and maintain long-term context, allowing for intelligent, multi-turn interactions without losing background information between component executions.

Included Memory Components

Chat Memory

Stores and retrieves active conversation logs for specific session IDs, allowing components to access prior messages and maintain coherent dialogue context during execution.

History

Tracks and maintains a structured chronological log of past workflow interactions, system messages, and user exchanges to support auditing, context retrieval, and long-term memory management.

16.9.17 Notification Services

A Notification Service allows an application or automated workflow to inform users instantly. Instead of checking logs or dashboards manually, users receive real-time alerts through communication platforms such as chat tools, email, or messaging services.

a. Delivers notifications instantly when events or conditions are met
b. Keeps teams informed through commonly used communication channels
c. Supports automated and event-driven communication
d. Ensures important information reaches the right audience on time
e. Reduces the need for manual system or workflow monitoring

By integrating notification services, workflows become more proactive, responsive, and user-friendly, ensuring important updates reach at the right time.


16.9.18 OCR

OCR (Optical Character Recognition) extracts text from images, scanned documents, PDFs, screenshots, and other image-based files, converting visual content into machine-readable text. It enables organizations to digitize documents, automate data extraction, and integrate extracted text into downstream workflows and AI-powered processes.

Key Features

  • Extract text from images and documents: Converts text from scanned PDFs, photos, screenshots, and other image-based formats into editable, searchable text.
  • Support multiple file and document types: Processes a broad range of image and document formats, from single-page scans to multi-page files.
  • Preserve content structure: Retains layout, formatting, tables, and text organization during extraction, so output stays usable rather than a flat text dump.
  • Process at scale: Automates extraction across large volumes of files and documents, supporting batch and workflow-driven processing.
  • Feed structured data downstream: Makes extracted text available in structured, machine-readable form for automation, analytics, and AI-driven applications.

OCR helps organizations move off manual transcription, reduce errors in document-heavy processes, and unlock the value of information trapped in image-based and scanned files, making it searchable, accessible, and ready for reuse.

16.9.19 Oracle

The Oracle components allow you to natively connect to enterprise-grade Oracle Relational Database Management Systems (RDBMS) directly within your Robility Flow workflows. Use these components to execute complex SQL queries, run stored procedures, manage transactional records, extract structural metadata, and ingest structured data at scale.

Oracle Database support in Robility Flow simplifies database operations by allowing workflows to interact directly with structured enterprise tables without requiring external scripts or custom integration code.

Key Capabilities

a. Native Connectivity: Direct communication with on-premises or cloud-hosted Oracle Database instances.
b. Full Query Support: Execute standard SQL operations including SELECT, INSERT, UPDATE, and DELETE.
c. Procedural Execution: Call PL/SQL functions and stored procedures with input and output bindings.
d. Transactional Reliability: Ensure data consistency across automated workflow steps with robust error handling.

Prerequisites

a. Connection Details: Oracle host, port, service name or SID, username, and password.
b. Network Access: Connectivity to the Oracle database must be available (commonly via port 1521).

Oracle Components

1. Oracle Query Runner: Execute SQL statements directly against your Oracle database to read and manipulate live data within a workflow.

a. Supports: SELECT, INSERT, UPDATE, DELETE, and compatible DDL operations.
b. Returns results as: Data, JSON, DataFrame, or Message.
c. Use Case: Fetching rows, inserting entries, updating values, or deleting data.

2. Oracle Schema to DataTable: Extracts structural metadata from your Oracle database without touching the underlying row data.

a. Retrieves: Table names, column definitions, data types, and constraints.
b. Returns results as: DataTable or DataFrame.
c. Use Case: Inspecting the shape of your database before building pipelines, transforming data, or debugging workflows.

16.9.20 Outlook

The Outlook in Robility Flow enable automation workflows to interact with Microsoft Outlook using service accounts configured and managed in Robility Manager. By leveraging centrally managed service account credentials, these components can securely perform email operations without requiring individual user authentication.

The Outlook integration supports common email automation scenarios, allowing workflows to send emails, retrieve inbox messages, process attachments, and manage communication efficiently through a dedicated service account.

The following Outlook components are available:

1. Read Email: Retrieves emails from a specified mailbox or folder, enabling workflows to process incoming messages, extract email content, and handle attachments.
2. Send Email: Sends emails through the configured Outlook service account, supporting recipients, CC/BCC, attachments, and formatted message content.

16.9.21 Processing

Robility flow’s Processing components process and transform data within a flow. They have many uses, including:

1. Feed instructions and context to your LLMs and agents with the Prompt Template component.

2. Extract content from larger chunks of data with a Parser component.

3. Filter data with natural language with the Smart Function component.

4. Save data to your local machine with the Save File component.

5. Transform data into a different data type with the Type Convert component to pass it between incompatible components.

Prompt Template

See Prompt Template.

16.9.22 RAG

Robility RAG (Research-Augmented Generation) enhances automation workflows by enabling intelligent knowledge retrieval and synthesis directly within Robility Flow. It allows components and agents to generate accurate, context-aware responses by referencing a curated knowledge base stored and managed in Robility Manager.

The knowledge base in Robility Manager serves as the primary source of factual and contextual information. It can contain structured data, documents, FAQs, and other reference materials that support automation processes.

Refer the documentation below to learn about the components in detail:

1. Robility Agentic RAG
2. Robility Knowledge Ingestion
3. Robility Knowledge Retrieval

16.9.23 Policy

The Policy feature controls how AI systems interact with tools, data, and external services within a workflow. It ensures that every action performed by the AI is evaluated against defined business rules, security requirements, and compliance standards.

Unlike traditional validation that focuses only on generated content, Policy operates at the action level. It monitors tool usage, evaluates execution requests in real time, and prevents unauthorized or unsafe operations before they reach connected systems.

By enforcing these rules during execution, the Policy feature helps protect infrastructure, maintain data integrity, enforce access controls, and ensure workflows operate securely and predictably.

Core Capabilities

1. Real-Time Action Enforcement: Evaluates tool calls and execution requests continuously, blocking violations before they are performed.

2. Fine-Grained Control: Define specific rules for operations, such as restricting database writes, limiting API usage, or controlling data access.

3. Execution-Level Risk Prevention: Stops unsafe or unauthorized actions (beyond just unsafe text) from impacting external systems or infrastructure.

4. Policy-Driven Automation: Ensures all AI-driven workflows follow consistent business rules without manual intervention.

5. Operational Safety & Compliance: Enforces security, privacy, and regulatory requirements across all tool interactions.

Refer to the documentation below to learn more in detail:

1. Policies (Beta)

16.9.24 Test Operation

The Azure DevOps Test Plan suite in Robility Flow offers a comprehensive set of components designed to manage and automate all aspects of test planning and execution within Azure DevOps. These components provide seamless integration with Azure DevOps, enabling users to:

1. Automate Test Plan Creation: Create new Test Plans with structured configurations, including area paths, iteration paths, and descriptive metadata, directly from Robility Flow without manual intervention.
2. Manage Test Suites and Cases: Organize Test Cases into hierarchical Test Suites, ensuring clear structure, easy tracking, and better maintainability of test artifacts.
3. Track Test Execution: Update Test Case states and execution results automatically, allowing QA teams to monitor progress, detect failures, and maintain accurate reporting in real time.
4. Streamline Quality Assurance Workflows: Reduce manual effort by automating repetitive test management tasks, ensuring consistent execution, and improving collaboration between development and QA teams.
5. Ensure Accurate Test Reporting: Retrieve detailed information about Test Plans, Suites, and Cases in structured JSON formats, supporting downstream processing, analytics, and reporting.

By using these components, organizations can achieve end-to-end automation of software testing processes, maintain consistency across test environments, and integrate quality assurance seamlessly into their DevOps pipelines. This approach ensures that testing is not only faster and more reliable but also fully traceable and aligned with development workflows. 

Refer the below documentation for the components in detail:

1. Test Plan Fetcher
2. Test Plan Cases Creator
3. Test State Updater
4. Test Execution Status Updater
5. Test Plan Creator
6. Test Suite Creator
7. Test Case Creator
8. Test Case Fetcher

16.9.25 Token Optimizer

Token Optimizer reduces token usage by removing unnecessary words, formatting, and repetition while preserving information relevant to AI processing. It can be used to optimize documentation, prompts, knowledge-base articles, and other large text inputs.

Key Features

1. Reduce text size: Makes large inputs more efficient to process.
2. Optimize only when needed: Runs optimization when the input exceeds the configured token threshold.
3. Control compression levels: Adjusts the amount of content retained using a configurable retention percentage.
4. Preserve essential information: Removes redundant or low-value content while retaining information required for downstream AI tasks.
5. Measure token savings: Displays the original and optimized token counts, total tokens saved, and percentage reduction.

Compression Levels

The Target Content to Keep setting defines the approximate percentage of the original information retained after optimization. Lower values provide greater compression, while higher values retain more content.

Content to Keep* Compression Level Best For
75–90% Light Documentation and prompts where context and detail are important.
40–60% Balanced General documentation, prompts, and knowledge-base articles.
10–30% Aggressive Scenarios where minimizing token usage is the highest priority.

*Percentages indicate the approximate amount of original information retained after optimization, not the exact number of tokens retained.

Expected Outcomes

Using Token Optimizer can help:

1. Lower AI processing costs by reducing the number of tokens sent to AI models.
2. Improve response times by reducing input size and processing overhead.
3. Improve prompt efficiency by focusing AI models on relevant information.
4. Optimize large documentation sets for knowledge retrieval and AI-powered workflows.
5. Improve scalability when processing large volumes of text.

Tip: Start with Balanced compression for general use. Use Light when preserving more context is important and Aggressive when maximum token reduction is the priority.

16.9.26 Tools

16.9.27 Utilities

The Utilities section in Robility Flow provides essential helper tools and functional utilities designed to perform everyday computational, time-based, identification, and logic operations within your workflows. These components simplify flow design by handling standard procedural logic, runtime context, unique key generation, and custom code execution directly within the workspace without requiring external service integrations.

16.9.28 Vector Stores

Robility flow’s Vector Store components are used to read and write vector data, including embedding storage, vector search, Graph RAG traversals, and specialized provider-specific search, such as OpenSearch, Elasticsearch, and Vectara.

These components are critical for vector search applications, such as Retrieval Augmented Generation (RAG) chatbots that need to retrieve relevant context from large datasets.

Most of these components connect to a specific vector database provider, but some components support multiple providers or platforms. For example, the Cassandra vector store component can connect to self-managed Apache Cassandra-based clusters as well as Astra DB, which is a managed Cassandra DBaaS.

Other types of storage, like traditional structured databases and chat memory, are handled through other components like the SQL Database component or the Message History component.

Use Vector Store components in a flow

Points to note

For a tutorial using Vector Store components in a flow, see Create a vector RAG chatbot.

The following steps introduce the use of Vector Store components in a flow, including configuration details, how the components work when you run a flow, why you might need multiple Vector Store components in one flow, and useful supporting components, such as Embedding Model and Parser components.

1. Create a flow with the Vector Store RAG template.

This template has two subflows. The Load Data subflow loads embeddings and content into a vector database, and the Retriever subflow runs a vector search to retrieve relevant context based on a user’s query.

2. Configure the database connection for both Astra DB components, or replace them with another pair of Vector Store components of your choice. Make sure the components connect to the same vector store, and that the component in the Retriever subflow is able to run a similarity search.

The parameters you set in each Vector Store component depend on the component’s role in your flow. In this example, the Load Data subflow writes to the vector store, whereas the Retriever subflow reads from the vector store. Therefore, search-related parameters are only relevant to the Vector Search component in the Retriever subflow.

For information about specific configuration parameters, see the section of this page for your chosen Vector Store component and Hidden parameters.

3. To configure the embedding model, do one of the following:

a. Use an OpenAI model: In both OpenAI Embeddings components, enter your OpenAI API key. You can use the default model or select a different OpenAI embedding model.

b. Use another provider: Replace the OpenAI Embeddings components with another pair of Embedding Model component of your choice, and then configure the parameters and credentials accordingly.

c. Use Astra DB vectorize: If you are using an Astra DB vector store that has a vectorize integration, you can remove both OpenAI Embeddings components. If you do this, the vectorize integration automatically generates embedding from the Ingest Data (in the Load Data subflow) and Search Query (in the Retriever subflow).

Tips

If your vector store already contains embeddings, make sure your Embedding Model components use the same model as your previous embeddings. Mixing embedding models in the same vector store can produce inaccurate search results.

4. Recommended: In the Split Text component, optimize the chunking settings for your embedding model. For example, if your embedding model has a token limit of 512, then the Chunk Size parameter must not exceed that limit.

Additionally, because the Retriever subflow passes the chat input directly to the Vector Store component for vector search, make sure that your chat input string doesn’t exceed your embedding model’s limits. For this example, you can enter a query that is within the limits; however, in a production environment, you might need to implement additional checks or preprocessing steps to ensure compliance. For example, use additional components to prepare the chat input before running the vector search, or enforce chat input limits in your application code.

5. In the Language Model component, enter your OpenAI API key, or select a different provider and model to use for the chat portion of the flow. 
6. Run the Load Data subflow to populate your vector store. In the File component, select one or more files, and then click Run component on the Vector Store component in the Load Data subflow.

The Load Data subflow loads files from your local machine, chunks them, generates embeddings for the chunks, and then stores the chunks and their embeddings in the vector database.

The Load Data subflow is separate from the Retriever subflow because you probably won’t run it every time you use the chat. You can run the Load Data subflow as needed to preload or update the data in your vector store. Then, your chat interactions only use the components that are necessary for chat.

If your vector store already contains data that you want to use for vector search, then you don’t need to run the Load Data subflow.

7. Open the Playground and start chatting to run the Retriever subflow.

The Retriever subflow generates an embedding from chat input, runs a vector search to retrieve similar content from your vector store, parses the search results into supplemental context for the LLM, and then uses the LLM to generate a natural language response to your query. The LLM uses the vector search results along with its internal training data and tools, such as basic web search and datetime information, to produce the response.

To avoid passing the entire block of raw search results to the LLM, the Parser component extracts text strings from the search results Data object and then passes them to the Prompt Template component in Message format. From there, the strings and other template content are compiled into natural language instructions for the LLM.

You can use other components for this transformation, such as the Data Operations component, depending on how you want to use the search results.

To view the raw search results, click Inspect output on the Vector Store component after running the Retriever subflow.

Hidden parameters

You can inspect a Vector Store component’s parameter to learn more about the inputs it accepts, the features it supports, and how to configure it.

Many input parameters for Vector Store components are hidden by default in the visual editor. You can toggle parameters through the Controls in each component’s header menu.

Some parameters are conditional, and they are only available after you set other parameters or select specific options for other parameters. Conditional parameters may not be visible on the Controls pane until you set the required dependencies. However, all parameters are always listed in a component’s code.

For information about a specific component’s parameters, see the provider’s documentation and the component details.

Search results output

If you use a Vector Store component to query your vector store, it produces search results that you can pass to downstream components in your flow as a list of Data objects or a tabular DataFrame. If both types are supported, you can set the format near the component’s output port in the visual editor.

The exception to this pattern is the Vectara RAG component, which outputs only an answer string in Message format.

Vector store instances

Vector Store components to drive the underlying vector search functions. In the component code, this is often instantiated as vector_store, but some components use a different name, such as the provider’s name.

For the Cassandra Graph and Astra DB Graph components, vector_store is an instance of graph vector store.

These instances are provider-specific and configured according to the component’s parameters. For example, the Redis component creates an instance of RedisVectorStore based on the component’s parameters, such as the connection string, index name, and schema.

Some LangChain classes don’t expose all possible options as component parameters. Depending on the provider, these options might use default values or allow modification through environment variables, if they are supported in Robility flow. For information about specific options, see the LangChain API reference and provider documentation.

Vector Store Connection ports

The Astra DB and OpenSearch components have an additional Vector Store Connection output. This output can only connect to a VectorStore input port, and it was intended for use with dedicated Graph RAG components.

The only non-legacy component that supports this input is the Graph RAG component, which was meant as a Graph RAG extension to the Astra DB component. Instead, you can use the Astra DB Graph component that includes both the vector store connection and Graph RAG functionality. OpenSearch instances support Graph traversal through built-in RAG functionality and plugins.

16.9.29 Web Scraper

The Robility Scraper component is designed to extract structured data from websites directly within your automation workflows. It processes raw web content and transforms it into organized, actionable datasets, ensuring seamless integration with Robility Flow.

Core Capabilities

1. Static & Dynamic Extraction: Efficiently scrape static pages or discover and traverse dynamic URLs.
2. Data Transformation: Convert unstructured web content into clean data ready for downstream processing.
3. Workflow Integration: Feed extracted data directly into research, monitoring, or data pipeline automations.

Refer to the documentation below to learn more in detail:

  1. Scrapy Web Scraper
  2. Dynamic URL Scraper

16.9.30 Create Custom Python Reference

Custom components extend Robility flow’s functionality through Python classes that inherit from Component. This enables integration of new features, data manipulation, external services, and specialized tools.

In Robility flow’s  node-based environment, each node is a “component” that performs discrete functions. Custom components are Python classes which define:

1. Inputs — Data or parameters your component requires. 
2. Outputs — Data your component provides to downstream nodes. 
3. Logic — How you process inputs to produce outputs.

The benefits of creating custom components include unlimited extensibility, reusability, automatic field generation in the visual editor based on inputs, and type-safe connections between nodes.

Create custom components for performing specialized tasks, calling APIs, or adding advanced logic.

Custom components in Robility flow are built upon:

1. The Python class that inherits from Component.
2. Class-level attributes that identify and describe the component.
3. Input and output lists that determine data flow.
4. Internal variables for logging and advanced logic.

Class-level attributes

Define these attributes to control a custom component’s appearance and behavior: 

class MyCsvReader(Component):

    display_name = “CSV Reader”
    description = “Reads CSV files”
    icon = “file-text”
    name = “CSVReader”
    documentation = “http://docs.example.com/csv_reader”. 

1. display_name: A user-friendly label shown in the Components menu and on the component itself when you add it to a flow. 
2. description: A brief summary shown in tooltips and printed below the component name when added to a flow.
3. icon: A decorative icon from Robility flow’s icon library, printed next to the name.

Robility flow uses Lucide for icons. To assign an icon to your component, set the icon attribute to the name of a Lucide icon as a string, such as icon = “file-text”. Robility flow renders icons from the Lucide library automatically.

a. name: A unique internal identifier.

b. documentation: An optional link to external documentation, such as API or product documentation.

Structure of a custom component

A Robility flow custom component is more than a class with inputs and outputs. It includes an internal structure with optional lifecycle steps, output generation, front-end interaction, and logic organization.

A basic component:

a. Inherits from robilityflow.custom.Component.
b. Declares metadata like display_name, description, icon, and more.
c. Defines inputs and outputs lists.
d. Implement methods matching output specifications.

A minimal custom component skeleton contains the following: 

from robilityflow.custom import Component
from robilityflow.template import Output

class MyComponent(Component):

    display_name = “My Component”
    description = “A short summary.”
    icon = “sparkles”
    name = “MyComponent”

    inputs = []

    outputs = []

    def some_output_method(self):

        return …

Internal Lifecycle and Execution Flow

Robility flow’s engine manages:

a. Instantiation: A component is created and internal structures are initialized.
b. Assigning Inputs: Values from the visual editor or connections are assigned to component fields.
c. Validation and Setup: Optional hooks like _pre_run_setup. 
d. Outputs Generation: run() or build_results() triggers output methods.

Optional Hooks:

1. initialize_data or _pre_run_setup can run setup logic before the component’s main execution.
2. __call__, run(), or _run() can be overridden to customize how the component is called or to define custom execution logic.

Input and outputs

Custom component inputs are defined with properties like:

1. name, display_name
2. Optional: info, value, advanced, is_list, tool_mode, real_time_refresh

For example:

a. StrInput: simple text input.
b. DropdownInput: selectable options.
c. HandleInput: specialized connections.

Custom component Output properties define:

a. name, display_name, method
b. Optional: info

For more information, see Custom component inputs and outputs.

Associated Methods

Each output is linked to a method:

a. The output method name must match the method name.
b. The method typically returns objects like Message, Data, or DataFrame.
c. The method can use inputs with self.<input_name>.

For example:

Output(

    display_name=”File Contents”,

    name=”file_contents”,

    method=”read_file”

)

#…

def read_file(self) -> Data:

    path = self.filename

    with open(path, “r”) as f:

        content = f.read()

    self.status = f”Read {len(content)} chars from {path}”

    return Data(data={“content”: content})

Components with multiple outputs

A component can define multiple outputs. Each output can have a different corresponding method. For example:

outputs = [

    Output(display_name=”Processed Data”, name=”processed_data”, method=”process_data”),

    Output(display_name=”Debug Info”, name=”debug_info”, method=”provide_debug_info”),

]

Output Grouping Behavior with group_outputs

By default, components in Robility flow that produce multiple outputs only allow one output selection in the visual editor. The component will have only one output port where the user can select the preferred output type.

This behavior is controlled by the group_outputs parameter:

group_outputs=False (default): When a component has more than one output and group_outputs is false or not set, the outputs are grouped in the visual editor, and the user must select one.

Use this option when the component is expected to return only one type of output when used in a flow.

group_outputs=True: All outputs are available simultaneously in the visual editor. The component has one output port for each output, and the user can connect zero or more outputs to other components.

Use this option when the component is expected to return multiple values that are used in parallel by downstream components or processes.

a. False or not set
b. True

In this example, the visual editor provides a single output port, and the user can select one of the outputs. Since group_outputs=False is the default behavior, it doesn’t need to be explicitly set in the component, as shown in this example:

outputs = [

    Output(

        name=”structured_output”,

        display_name=”Structured Output”,

        method=”build_structured_output”,

    ),

    Output(

        name=”dataframe_output”,

        display_name=”DataFrame Output”,

        method=”build_structured_dataframe”,

    ),

]

Common internal patterns

_pre_run_setup()

To initialize a custom component with counters set:

def _pre_run_setup(self):

    if not hasattr(self, “_initialized”):

        self._initialized = True

        self.iteration = 0

Override run or _run

You can override async def _run(self): … to define custom execution logic, although the default behavior from the base class usually covers most cases.

Store data in self.ctx

Use self.ctx as a shared storage for data or counters across the component’s execution flow:

def some_method(self):

    count = self.ctx.get(“my_count”, 0)

    self.ctx[“my_count”] = count + 1

Directory structure requirements

By default, Robility flow looks for custom components in the component’s directory.

If you’re creating custom components in a different location using the ROBILITYFLOW_COMPONENTS_PATH environment variable, components must be organized in a specific directory structure to be properly loaded and displayed in the visual editor:

/your/custom/components/path/    # Base directory set by ROBILITYFLOW_COMPONENTS_PATH

    └── category_name/          # Required category subfolder that determines menu name

        └── custom_component.py # Component file

Components must be placed inside category folders, not directly in the base directory.

The category folder name determines where the component appears in the Robility flow Components menu. For example, to add a component to the Helpers category, place it in the helpers subfolder:

/app/custom_components/          # ROBILITYFLOW_COMPONENTS_PATH

    └── helpers/                 # Displayed within the “Helpers” category

        └── custom_component.py  # Your component

You can have multiple category folders to organize components into different categories:

/app/custom_components/

    ├── helpers/

    │   └── helper_component.py

    └── tools/

        └── tool_component.py

This folder structure is required for Robility flow to properly discover and load your custom components. Components placed directly in the base directory aren’t loaded.

/app/custom_components/          # ROBILITYFLOW_COMPONENTS_PATH

    └── custom_component.py      # Won’t be loaded – missing category folder!

Custom component inputs and outputs

Inputs and outputs define how data flows through the component, how it appears in the visual editor, and how connections to other components are validated.

Inputs

Inputs are defined in a class-level inputs list. When Robility flow loads the component, it uses this list to render component fields and ports in the visual editor. Users or other components provide values or connections to fill these inputs.

An input is usually an instance of a class from robilityflow.io (such as StrInput, DataInput, or MessageTextInput). The most common constructor parameters are:

a. name: The internal variable name, accessed with self.<name>. 
b. display_name: The label shown to users in the visual editor.
c. info (optional): A tooltip or short description.
d. value (optional): The default value.
e. advanced (optional): If true, moves the field into the “Advanced” section.
f. required (optional): If true, forces the user to provide a value.
g. is_list (optional): If true, allows multiple values.
h. input_types (optional): Restricts allowed connection types (e.g., [“Data”], [“LanguageModel”]).

Here are the most used input classes and their typical usage.

Text Inputs: For simple text entries.

a. StrInput creates a single-line text field. 
b. MultilineInput creates a multi-line text area.

Numeric and Boolean Inputs: Ensures users can only enter valid numeric or Boolean data.

BoolInputIntInput, and FloatInput provide fields for Boolean, integer, and float values, ensuring type consistency.

Dropdowns: For selecting from predefined options, useful for modes or levels – DropdownInput

Secrets: A specialized input for sensitive data, ensuring input is hidden in the visual editor- SecretStrInput for API keys and passwords.

Specialized Data Inputs: Ensures type-checking and color-coded connections in the visual editor.

a. DataInput expects a Data object (typically with .data and optional .text). 
b. MessageInput expects a Message object, used in chat or agent flows. 
c. MessageTextInput simplifies access to the .text field of a Message.

Handle-Based Inputs: Used to connect outputs of specific types, ensuring correct pipeline connections – HandleInput

File Uploads: Allows users to upload files directly through the visual editor or receive file paths from other components – FileInput

Lists: Set is_list=True to accept multiple values, ideal for batch or grouped operations.

This example defines three inputs: a text field (StrInput), a Boolean toggle (BoolInput), and a dropdown selection (DropdownInput).

from robilityflow.io import StrInput, BoolInput, DropdownInput

inputs = [

    StrInput(name=”title”, display_name=”Title”),

    BoolInput(name=”enabled”, display_name=”Enabled”, value=True),

    DropdownInput(name=”mode”, display_name=”Mode”, options=[“Fast”, “Safe”, “Experimental”], value=”Safe”)

]

Outputs

Outputs are defined in a class-level outputs list. When Robility flow renders a component, each output becomes a connector point in the visual editor. When you connect something to an output, Robility flow automatically calls the corresponding method and passes the returned object to the next component.

An output is usually an instance of Output from robilityflow.io, with common parameters:

  • name: The internal variable name.
  • display_name: The label shown in the visual editor.
  • method: The name of the method called to produce the output.
  • info (optional): Help text shown on hover.

The method must exist in the class, and it is recommended to annotate its return type for better type checking. You can also set a self.status message inside the method to show progress or logs.

Common Return Types:

  • Message: Structured chat messages.
  • Data: Flexible object with .data and optional .text.
  • DataFrame: Pandas-based tables (robilityflow.schema.DataFrame).
  • Primitive types: str, int, bool (not recommended if you need type/color consistency).

In this example, the DataToDataFrame component defines its output using the outputs list. The df_out output is linked to the build_df method, so when connected to another component (node), Robility flowcalls this method and passes its returned DataFrame to the next node. This demonstrates how each output maps to a method that generates the actual output data.

from robilityflow.custom import Component

from robilityflow.io import DataInput, Output

from robilityflow.schema import Data, DataFrame

class DataToDataFrame(Component):

    display_name = “Data to DataFrame”

    description = “Convert multiple Data objects into a DataFrame”

    icon = “table”

    name = “DataToDataFrame”

    inputs = [

        DataInput(

            name=”items”,

            display_name=”Data Items”,

            info=”List of Data objects to convert”,

            is_list=True

        )

    ]

    outputs = [

        Output(

            name=”df_out”,

            display_name=”DataFrame Output”,

            method=”build_df”

        )

    ]

    def build_df(self) -> DataFrame:

        rows = []

        for item in self.items:

            row_dict = item.data.copy() if item.data else {}

            row_dict[“text”] = item.get_text() or “”

            rows.append(row_dict)

        df = DataFrame(rows)

        self.status = f”Built DataFrame with {len(rows)} rows.”

        return df

Tool Mode

Components that support Tool Mode can be used as standalone components (when not in Tool Mode) or as tools for other components with a Tools input, such as Agent components.

You can allow a custom component to support Tool Mode by setting tool_mode=True:

inputs = [

    MessageTextInput(

        name=”message”,

        display_name=”Mensage”,

        info=”Enter the message that will be processed directly by the tool”,

        tool_mode=True,

    ),

]

Robility flow currently supports the following input types for Tool Mode:

a. DataInput
b. DataFrameInput
c. PromptInput
d. MessageTextInput
e. MultilineInput
f. DropdownInput

Typed annotations

In Robility flow, typed annotations allow Robility flow to visually guide users and maintain flow consistency.

Typed annotations provide:

a. Color-coding: Outputs like -> Data or -> Message get distinct colors. 
b. Validation: Robility flow blocks incompatible connections automatically.
c. Readability: Developers can quickly understand data flow.
d. Development tools: Better code suggestions and error checking in your code editor.

Common Return Types

Message: For chat-style outputs. Connects to any of several Message-compatible inputs.

def produce_message(self) -> Message:

    return Message(text=”Hello! from typed method!”, sender=”System”)

Data: For structured data like dicts or partial texts. Connects only to DataInput (ports that accept Data).

def get_processed_data(self) -> Data:

    processed = {“key1”: “value1”, “key2”: 123}

    return Data(data=processed)

DataFrame: For tabular data. Connects only to DataFrameInput (ports that accept DataFrame).

def build_df(self) -> DataFrame:

    pdf = pd.DataFrame({“A”: [1, 2], “B”: [3, 4]})

    return DataFrame(pdf)

Primitive Types (str, int, bool): Returning primitives is allowed but wrapping in Data or Message is recommended for better consistency in the visual editor.

def compute_sum(self) -> int:

    return sum(self.numbers)

Tips for typed annotations

When using typed annotations, consider the following best practices:

1. Always Annotate Outputs: Specify return types like -> Data, -> Message, or -> DataFrame to enable proper visual editor color-coding and validation. 
2. Wrap Raw Data: Use Data, Message, or DataFrame wrappers instead of returning plain structures. 
3. Use Primitives Carefully: Direct str or int returns are fine for simple flows, but wrapping improves flexibility. 
4. Annotate Helpers Too: Even if internal, typing improves maintainability and clarity.
5. Handle Edge Cases: Prefer returning structured Data with error fields when needed. 
6. Stay Consistent: Use the same types across your components to make flows predictable and easier to build.

Enable dynamic fields

In Robility flow, dynamic fields allow inputs to change or appear based on user interactions. You can make an input dynamic by setting dynamic=True. Optionally, setting real_time_refresh=True triggers the update_build_config method to adjust the input’s visibility or properties in real time, creating a contextual visual editor experience that only exposes relevant fields based on the user’s choices.

In this example, the operator field triggers updates with real_time_refresh=True. The regex_pattern field is initially hidden and controlled with dynamic=True.

from robilityflow.io import DropdownInput, StrInput

class RegexRouter(Component):

    display_name = “Regex Router”

    description = “Demonstrates dynamic fields for regex input.”

    inputs = [

        DropdownInput(

            name=”operator”,

            display_name=”Operator”,

            options=[“equals”, “contains”, “regex”],

            value=”equals”,

            real_time_refresh=True,

        ),

        StrInput(

            name=”regex_pattern”,

            display_name=”Regex Pattern”,

            info=”Used if operator=’regex'”,

            dynamic=True,

            show=False,

        ),

    ]

Implement update_build_config

When a field with real_time_refresh=True is modified, Robility flow calls the update_build_config method, passing the updated field name, value, and the component’s configuration to dynamically adjust the visibility or properties of other fields based on user input.

This example will show or hide the regex_pattern field when the user selects a different operator.

def update_build_config(self, build_config: dict, field_value: str, field_name: str | None = None) -> dict:

    if field_name == “operator”:

        if field_value == “regex”:

            build_config[“regex_pattern”][“show”] = True

        else:

            build_config[“regex_pattern”][“show”] = False

    return build_config

Additional Dynamic Field Controls

You can also modify other properties within update_build_config, such as:

1. required: Set build_config[“some_field”][“required”] = True/False
2. advanced: Set build_config[“some_field”][“advanced”] = True
3. options: Modify dynamic dropdown options.

Tips for Managing Dynamic Fields

When working with dynamic fields, consider the following best practices to ensure a smooth user experience:

a. Minimize field changes: Hide only fields that are truly irrelevant to avoid confusing users.
b. Test behavior: Ensure that adding or removing fields doesn’t accidentally erase user input.
c. Preserve data: Use build_config[“some_field”][“show”] = False to hide fields without losing their values. 
d. Clarify logic: Add info notes to explain why fields appear or disappear based on conditions. 
e. Keep it manageable: If the dynamic logic becomes too complex, consider breaking it into smaller components, unless it serves a clear purpose in a single node.

Error handling and logging

In Robilityflow, robust error handling ensures that your components behave predictably, even when unexpected situations occur, such as invalid inputs, external API failures, or internal logic errors.

Error handling techniques

1. Raise Exceptions: If a critical error occurs, you can raise standard Python exceptions such as ValueError, or specialized exceptions like ToolException. Robility flow will automatically catch these and display appropriate error messages in the visual editor, helping users quickly identify what went wrong.

def compute_result(self) -> str:

    if not self.user_input:

        raise ValueError(“No input provided.”)

    # …

2. Return Structured Error Data: Instead of stopping flowing abruptly, you can return a Data object containing an “error” field. This approach allows the flow to continue operating and enables downstream components to detect and handle the error gracefully.

def run_model(self) -> Data:

    try:

        # …

    except Exception as e:

        return Data(data={“error”: str(e)})

Improve debugging and flow management

1. Use self.status: Each component has a status field where you can store short messages about the execution result—such as success summaries, partial progress, or error notifications. These appear directly in the visual editor, making troubleshooting easier for users.

def parse_data(self) -> Data:

# …

self.status = f”Parsed {len(rows)} rows successfully.”

return Data(data={“rows”: rows})

2. Stop specific outputs with self.stop(…): You can halt individual output paths when certain conditions fail, without affecting the entire component. This is especially useful when working with components that have multiple output branches.

def some_output(self) -> Data:

if <some condition>:

    self.stop(“some_output”)  # Tells Robility flowno data flows

    return Data(data={“error”: “Condition not met”})

3. Log events: You can log key execution details inside components. Logs are displayed in the “Logs” or “Events” section of the component’s detail view and can be accessed later through the flow’s debug panel or exported files, providing a clear trace of the component’s behavior for easier debugging.

def process_file(self, file_path: str):

self.log(f”Processing file {file_path}”)

# …

Tips for error handling and logging

To build more reliable components, consider the following best practices:

a. Validate inputs early: Catch missing or invalid inputs at the start to prevent broken logic.
b. Summarize with self.status: Use short success or error summaries to help users understand results quickly.
c. Keep logs concise: Focus on meaningful messages to avoid cluttering the visual editor.
d. Return structured errors: When appropriate, return Data(data={“error”: …}) instead of raising exceptions to allow downstream handling.
e. Stop outputs selectively: Only halt specific outputs with self.stop(…) if necessary, to preserve correct flow behavior elsewhere.

16.10.1 v.26.8.29.1

This release delivers new features, new components, enhancements, and bug fixes across Robility Flow and its component ecosystem to improve system usability and overall platform performance.

Limitation

1. Invoke Flow: Component nodes may break when multiple chat outputs are configured within the flow.

New Feature

Flow introduces new tools to deliver deeper visibility into workflow execution and overall automation performance:

1. Flow Analytics Dashboard: Track workflow execution and performance in real time. Users can view key execution metrics, analyze operational trends, pinpoint component-level bottlenecks, and jump directly to Traces for fast troubleshooting.

2. Flow Insights: Stay in control of your workflows with a real-time visualization tool that provides a comprehensive view of flow execution. Monitor component interactions, track execution progress, and quickly assess status through visual highlights within a single, searchable, and filterable interface for faster diagnostics and improved workflow health.

Limitations
a. Flow Insights Zoom: Zooming is unavailable for the starting component of any flow; navigation and zoom focus begin from the second component onward.
b. Parallel Execution Zoom Behavior: When a workflow runs with parallel execution, Run Focus zooms to whichever component completes first rather than following sequential order.
   Workaround: Toggle off the Run Focus option while running parallel flow executions.

New Component

Flow introduces new components to improve secure application access, workflow routing, and execution control across automation flows.

1. Robility OCR Extractor: Extract text and structured information from images and PDF files seamlessly. This component uses OpenAI-compatible vision endpoints to process visual data accurately.

2. App Integration Token: Manage and provide authentication tokens automatically across external services. It eliminates manual credential handling by fetching tokens securely when required during execution. This ensures seamless, enterprise-grade security for all connected applications.

3. Workflow Pass-Through: Forward incoming data from the primary input directly to the next step without modification. It provides precise execution control to streamline conditional routing across complex flows. This component is ideal for simplifying data management, flow testing, and debugging.

4. Token Optimizer: Compress input content dynamically while preserving core context and meaning. It triggers based on custom token thresholds and target retention percentages, delivering optimized text alongside real-time compression metrics.

Enhancements

1. Configuration Support: Added deployment name input fields for Azure OpenAI and Embedding Models in Robility Manager. Robility Flow now automatically fetches these configured deployment names, enabling Robility LLM, KB Ingestion, and KB Retrieval components to dynamically utilize them during execution.

2. File Format Support: Enabled .tiff and .tif image formats across Save File, Read, and Search Users can now input and process .tiff and .tif file paths directly within Robility Flow to expand document processing capabilities.

3. Control Plane Prompt Loader: Upgraded the prompt loader component to support fetching prompts using production, latest, or version-specific flags, giving users greater precision and control over prompt retrieval.

4. Empty Flow Publishing: Enhanced Robility Flow to restrict the publishing of empty or incomplete workflows.

Flow Bug Fix

1. Flow Scheduler Status Management
Fixed an issue where flows could remain stuck in Run Initiated status indefinitely.

a. Execution Timeout: Flows that don’t begin execution within 3 minutes are now automatically marked as Failed, with the status synced to Robility Manager.
b. Downtime Recovery: Flows interrupted by application or server downtime are now detected on restart, marked as Failed, and synced to Robility Manager.

2.Model Provider

a. Toggle: Fixed an issue where the toggle within the Model Provider component was disabled. The toggle now works properly, allowing users to enable and manage provider configurations.

b. Project-Level Access: Model Provider integrations are no longer restricted to individual accounts. Access is now tied to the project, allowing all authorized team members in the same workspace to use the configured providers.

Component Bug Fix

1. Multi-Project Dropdown Retrieval
Fixed an issue where having multiple projects within a single tenant caused dropdowns to fail to display values in DataTable, Interact (Get & Add), Credentials, and Invoke Flow. Dropdown values are now retrieved consistently and accurately regardless of how many projects exist under the tenant.

2. REST API Component
Fixed an issue where invalid data formats caused request errors. The Request Body field now includes an automatic formatting tool that cleans up and checks your data structure before sending, reducing configuration errors.

3. Invoke Flow
Fixed an issue where Tool Mode was not working. Also added a refresh option to the version field’s list for easier access to updated versions.

Existing Limitations

1. A user cannot edit or schedule a flow that has already been scheduled by another user within the same project.

2. The Model Provider integration is currently accessible only to the user who configured it. Other users within the same project or agent cannot access or use the configured integration.
Workaround: Use the LLM component by passing the required LLM connection as an input. This enables other users to utilize the LLM functionality without requiring direct access to the configured Model Provider integration.

3.The Pulse Component does not support variable mapping for the Security Key and Public Key input fields when dynamically loading prompts.
Workaround: The component works as expected when the values are provided directly instead of using variable mapping.

4. Version History will track only workflows published after the upgrade. Previously published versions remained available in Robility Manager but will not appear in Version History or be eligible for scheduling. To enable these features, export and rename the workflow (for example, FlowName.1.0.0 → FlowName), then republish it.

5. The Loop component has been enhanced to resolve stale and duplicate Datatable updates. Updating the component will remove all nodes within the Loop component and associated Datatable values. Back up the workflow before upgrading.

6. When processing large files with the Read File component, increase the Timeout and Retry Count settings to ensure successful OCR extraction.

7. The invoke flow in tool mode does not work with the configured slug name.
Workaround: After connecting the tool node, manually update the slug name before using it.

Known Issues

1. The embedding functionality in the Robility LLM component is currently not working.(Tentative fix: Sept 2026) 
2. Deleting a project also removes all associated flows, and they cannot be recovered.(Tentative fix: Sept 2026) 
3. If the description field is removed from the flow JSON before import, the workflow is still uploaded with an empty description. (Tentative fix: Sept 2026)
4. Flow names are user-specific, allowing multiple users to create flows with the same name, which may result in duplicate solution names and versions. (Tentative fix: Sept 2026)
5. Newly generated API keys currently apply to all workflow versions; this will be updated to restrict keys to specific versions in a future release.(Tentative fix: Sept 2026)
6. The Web Scraper component does not support extracting data from JavaScript-based web pages. (Tentative fix: Sept 2026)

Release Date: 29.08.2026

16.10.2 v.26.7.25.1

This release delivers new features, enhancements, and bug fixes to improve usability and the overall Robility Flow experience.

Limitations

1. A user cannot edit or schedule a flow that has already been scheduled by another user within the same project.

2. The Model Provider integration is currently accessible only to the user who configured it. Other users within the same project or agent cannot access or use the configured integration.
Workaround: Use the LLM component by passing the required LLM connection as an input. This enables other users to utilize the LLM functionality without requiring direct access to the configured Model Provider integration.

3.The Pulse Component does not support variable mapping for the Security Key and Public Key input fields when dynamically loading prompts.
Workaround: The component works as expected when the values are provided directly instead of using variable mapping.

New Feature

1. Project-Level Model Provider Configuration

Added support for configuring Model Providers at the project level in Robility Flow. Model provider configurations are now project-specific and must be configured separately for each project.

Important:

  • Model Provider configurations are not migrated automatically at the project level. Reconfigure them from the Model Providers menu on the Canvas Flow page.
  • Language Model selections are not retained. Update the Language Model manually for the required components.
  • Model Provider validation happens during execution. Errors are displayed if the Model Provider is not configured correctly for the project.
  • Playground does not validate project-level Model Provider configurations. Configuration issues are identified only during component execution.

New Components

1. Outlook Read and Send Email Added new components for reading and sending emails through Outlook.

a. Outlook Read Email – Retrieves emails from an Outlook mailbox, including sender, subject, body, and attachments. Supports email filtering to automate the processing of incoming messages.

b. Outlook Send Email – Sends emails through an Outlook account with configurable recipients, subject, body, and attachments. Enables automated notifications, confirmations, and report distribution within workflows.

Enhancements

1. Get Credentials
Enhanced the Get Credentials component to include both username and password fields in the output. For example, the component now returns output variables such as CREDENTIAL_<Name>_Value and CREDENTIAL_<Name>_UserName.

2. Save File Component
Enhanced the Save File component to support DataFrame-to-table conversion when saving files in PDF or DOCX formats.

Bug Fixes

1. Add Transaction Fixed an issue where Table Group insertion was not working correctly.

2. Get Credentials Fixed a validation issue for Vault project configuration during export. Previously, global variables were included even when the project configuration was not set. The system now displays a validation message during export if the required project configuration is missing.

3. Invoke Flow

a. Fixed a cross-project issue where exported components or workflows were not displayed after refreshing the project list.

b. Fixed an issue where the current flow was incorrectly displayed in the Invoke Flow dropdown menu. The dropdown now displays only eligible flows.

4. Insert Row
Resolved an issue where the Insert Query parameter executed successfully only during the first iteration of a loop and failed in subsequent iterations. The query execution logic has been enhanced to ensure the Insert Query parameter executes correctly across all loop iterations.

5. Robility Flow Scheduler

Resolved an issue where long-running flows executed through the Flow Scheduler failed with the error “No input data received from upstream components.” Enhanced scheduler execution with Scheduled Jobs Management to improve reliability and monitoring of flow executions.

Existing Limitation

1. Version History will track only workflows published after the upgrade. Previously published versions will remain available in Robility Manager but will not appear in Version History or be eligible for scheduling. To enable these features, export and rename the workflow (for example, FlowName.1.0.0 → FlowName), then republish it.
2. The Loop component has been enhanced to resolve stale and duplicate Datatable updates. Updating the component will remove all nodes within the Loop component and associated Datatable values. Back up the workflow before upgrading.
3. When processing large files with the Read File component, increase the Timeout and Retry Count settings to ensure successful OCR extraction.

Known Issues

1. The Invoke Flow component does not currently support tool mode. (Tentative fix: Aug 2026)
2. Deleting a project also removes all associated flows, and they cannot be recovered. (Tentative fix: Aug 2026)
3. If the description field is removed from the flow JSON before import, the workflow is still uploaded with an empty description. (Tentative fix: Aug 2026)
4. Flow names are user-specific, allowing multiple users to create flows with the same name, which may result in duplicate solution names and versions. (Tentative fix: Aug 2026)
5. Newly generated API keys currently apply to all workflow versions; this will be updated to restrict keys to specific versions in a future release. (Tentative fix: Aug 2026)
6. The Web Scraper component does not support extracting data from JavaScript-based web pages. (Tentative fix: Aug 2026)

Released Date: 25.07.2026

16.10.3 v26.7.8.11

This release delivers new features, enhancements, and bug fixes to improve usability and the overall Robility Flow experience.

Limitations

1. Upgrading the Credential Vault and related variable components will remove existing global variables as part of the migration to project-level variables. Back up all variables and workflows before upgrading. Global variables must be recreated after the upgrade.

2. Version History will track only workflows published after the upgrade. Previously published versions will remain available in Robility Manager but will not appear in Version History or be eligible for scheduling. To enable these features, export and rename (for example, FlowName.1.0.0 → FlowName), and republish the workflow.

3. The Loop component has been enhanced to resolve stale and duplicate Datatable updates. Updating the component will remove all nodes within the Loop component and associated Datatable values. Back up the workflow before upgrading.

4. When processing large files with the Read File component, increase the Timeout and Retry Count settings to ensure successful OCR extraction.

What’s New

1. Auto Session Timeout for Inactive Users
Added configurable session timeout support for Design Time environments. When a user remains inactive beyond the configured duration, they are prompted to extend the session or log out. If no action is taken, the user is automatically logged out. This feature does not apply to Runtime environments.

2. Embed into Site
Added support for embedding Robility Flow Chat into external websites using a lightweight script and web component, enabling seamless chatbot-based interaction with automated workflows.

Enhancements

1. Variable Management
Redesigned variable management by moving it from Settings to the Flow Canvas Graph Menu. Variables are now scoped at the project level instead of the user level, improving organization, maintainability, and governance through environment-specific access.

2. Shareable Playground
Users can now share a playground without requiring authentication. Flows must contain both Input and Output components. A shareable link with a temporary API key can be generated from the menu and remains valid for 20 minutes.

3. Project Level Variables
Manage variables at the project level to keep project-specific configurations isolated while improving governance, collaboration, and security across automation teams

Bug Fixes

1. Read File Component
Resolved an issue where OCR did not correctly extract content when using the Read File component. 

2. Datatable Components
Resolved an issue where Datatable components updated stale data during loop execution.

Known Issues

1. The Invoke Flow component does not currently support tool mode. (Tentative fix: Aug 2026) 
2. The Robility Flow Scheduler may throw a timeout exception for workflows with execution times exceeding 2 minutes. (Tentative fix: August 2026.)

3. Deleting a project also removes all associated flows, and they cannot be recovered. (Tentative fix: Aug 2026)
4. If the description field is removed from the flow JSON before import, the workflow is still uploaded with an empty description. (Tentative fix: Aug 2026)
5. Flow names are user-specific, allowing multiple users to create flows with the same name, which may result in duplicate solution names and versions. (Tentative fix: Aug 2026)
6. Newly generated API keys currently apply to all workflow versions. This will be updated to restrict keys to specific versions in future releases. (Tentative fix: Aug 2026)
7. The Web Scraper component does not support extracting data from JavaScript-based web pages. (Tentative fix: Aug 2026)

Released Date: 08/07/2026

16.10.4 v.26.6.9.3

This release introduces new components, integrations, features, and platform enhancements to improve usability, workflow management, AI orchestration, and overall experience in Robility Flow.

Limitations

1. Existing workflow nodes will continue to function. However, updating a component may cause its associated nodes to break.
2. On the Robility Flow project page, the version published to Manager is no longer directly visible. For example, previously it was displayed as sample_1_0_0.
3. Existing published workflows are not compatible with Invoke Flow and Scheduler in Manager. To resolve this, republish the workflow using the Version History feature, or export and import it as a new flow before publishing from Version History.
4. Existing Agent components must be updated to the latest supported version for compatibility with this release. Older versions are not supported in existing workflows.
5. Local Flow Creation Removed: You can no longer create local flows. All new flows, including local flows will be now created directly within a designated project and tenant folder. [Refer here.]
6. Strict Naming Conventions: Flow names are currently case-sensitive, where it allows you to create separate flows with names that differ only by capitalization (e.g., testFlow and testflow are treated as two distinct flows).

What’s New

New Components

Flow introduces new components to improve governance, workflow safety, and execution control across automation flows.

1. Policies (Beta): Establish centralized governance for your workflows with natural language–driven policy enforcement. By defining business rules in plain language, this component automatically converts them into executable guard logic, ensuring secure, compliant, and consistent behavior across your automation flows.
2. Guardrails: Add robust safety controls to your workflows with configurable runtime protections. This component enforces constraints and behavioral boundaries in real time to guide model outputs, reduce unpredictability, and ensure stable, secure execution.

New Integrations

Flow now supports the following integrations designed to enhance AI orchestration capabilities:

1. LiteLLM Proxy: Enables unified access and routing across multiple LLM providers through a single proxy layer, simplifying model management and increasing flexibility in multi-model workflows.
2. vLLM: Delivers high-performance, scalable LLM inference optimized for throughput and latency, enabling faster and more efficient execution of AI-driven workflows.

New Features

Flow introduces features to enhance workflow management, debugging, usability, and overall platform experience.

1. Version History: Acts as a built-in change management system, capturing flows published to Manager. Users can track changes, compare versions, and roll back to previous states when needed.
2. Traces: Provides step-by-step visibility into workflow execution, including inputs, outputs, and latency, helping users debug, monitor, and optimize workflows effectively.
3. Model Provider: Supports centralized model configuration, enabling models to be configured once and reused across components and workflows to reduce duplication and improve consistency.

Enhancements

1. Prompt Template with Mustache Support – It now support {{variable}} placeholders, allowing dynamic values to be inserted into prompts without manual string building or complex logic.
2. Gemini 3 Preview Models – Introduces tool calling for Gemini preview models, enabling advanced AI capabilities across Pro, Flash, and Image variants.
3. Data Operations and DataFrame Operations Renaming
Component names have been updated for better clarity and consistency, with no changes to functionality:
a. Data Operations is now JSON Operations under Processing
b. DataFrame Operations is now Table Operations under Processing
4. Component Control Panel – Redesigned as a unified panel displaying fields and parameters for the selected component. Users can choose which fields appear on the component using + and – icons, while others remain available in the panel for configuration.

Action Required

All agent’s slug names will be reset to the default slug after the agent is updated. Please ensure you take a backup of the flow before proceeding with the update and then rename the slug back to its original name afterward.

Important Note on Agent Retries & Token Usage

By default, the Agent component has retry count enabled. If an agent encounters an error or takes too long to execute, it will automatically retry the process. To prevent unexpected or excessive LLM token consumption, we highly recommend lowering the maximum retry count to (15 maximum) in your agent configurations. 

Known Issues

1. The Invoke Flow component does not currently support tool mode. (Tentative fix: June 2026) 
2. The Get Row component loses the configured table selection each time the workflow is launched or republished. (Tentative fix: June 2026)
3. The Loop component currently supports only linear execution. Connecting multiple downstream components from the loop output is not supported and may cause the flow to break. (Tentative fix: June 2026)
4. Deleting a project also removes all associated flows, and they cannot be recovered. (Tentative fix: June 2026)
5. If the descriptionfield is removed from the flow JSON before import, the workflow is still uploaded with an empty description. (Tentative fix: June 2026)
6. Flow names are user-specific, allowing multiple users to create flows with the same name, which may result in duplicate solution names and versions. (Tentative fix: June 2026)
7. Newly generated API keys currently apply to all workflow versions. This will be updated to restrict keys to specific versions in future releases. (Tentative fix: June 2026)
8. The Web Scrapercomponent does not support extracting data from JavaScript-based web pages. (Tentative fix: June 2026)
9. The Shareable Playground feature is not functioning as expected. (Tentative fix: June 2026)

Released Date: 09/06/2026

16.10.5 v.26.4.15.0 (Hotfix)

This release includes the following bug fixes:

Bug Fixes

1. DataTable Timestamp
Fixed a time‑lag issue in DataTable’s Insert Row component when used inside a loop, the “Updated At” column recorded a timestamp ahead of the actual system time. Now the timestamp correctly reflects the exact system time at the moment of record insertion.

2. Server Busy Alert and Data‑Loss

Fixed an intermittent “Server busy” alert that appeared randomly during active sessions and caused unsaved changes to be lost, requiring rework. The platform now remains stable during development, and all user‑entered changes are properly saved without data loss.

Action Required

All agent’s slug names will be reset to the default slug after the agent is updated. Please ensure you take a backup of the flow before proceeding with the update and then rename the slug back to its original name afterward.

Limitations

1. Local Flow Creation Removed:You can no longer create local flows. All new flows including local flows will be now created directly within a designated project and tenant folder. [Refer here.]

2. Strict Naming Conventions:Flow names are currently case-sensitive, where it allows you to create separate flows with names that differ only by capitalization (e.g., testFlow and testflow are treated as two distinct flows).

Known Issues

1. The Loop component currently supports only linear execution. Connecting multiple downstream components from the loop output is not supported and may cause the flow to break. (Tentative fix: May 2026)
2. The Invoke Flow component currently fails when text input is passed from another component, throwing a “No variable found” exception. Passing external input into an invoked workflow is not fully supported in this version and may cause the flow to break. (Tentative fix: May 2026)
3.Deleting a project also removes all associated flows, and they cannot be recovered. (Tentative fix: May 2026)
3. If the description field is removed from the flow JSON before import, the workflow is still uploaded with an empty description. (Tentative fix: May 2026)
4. Flow names are user-specific, allowing multiple users to create flows with the same name, which may result in duplicate solution names and versions. (Tentative fix: May 2026)
5. Newly generated API keys currently apply to all workflow versions. This will be updated to restrict keys to specific versions in future releases. (Tentative fix: May 2026)
6. The Web Scraper component does not support extracting data from JavaScript-based web pages. (Tentative fix: May 2026)
7. The Shareable Playground feature is not functioning as expected. (Tentative fix: May 2026)

Released Date: 02.05.2026

16.10.6 v.26.4.15.0

This release delivers new components, integrations, and a range of enhancements and bug fixes to improve usability and the overall Robility Flow experience.

Action Required

We have put in significant effort to ensure a smooth transition; most of the existing flows will continue to work without interruption. Should any component behave unexpectedly, developers are encouraged to review and resolve the issue at their end.

A selective group of components has been enhanced and require mandatory upgrades or reconfiguration to ensure proper functionality. Please update the following components if they are used in your existing flows:

a. Add Transaction
b. Invoke Flow & Webhook
c. RAG Components (Chroma DB)
d. MCP Servers
e. Playwright MCP
f. Robility LLM

All agent’s slug names will be reset to the default slug after the agent is updated. Please ensure you take a backup of the flow before proceeding with the update and then rename the slug back to its original name afterward. 

Deprecated Components

Several components have been removed and are no longer available in the latest version. While they will continue to work in existing flows, if any issues arise, please update your flows using the recommended alternatives listed below.

Removed Components - Alternatives
Removed Component Recommended Alternative
Save File (from Processing) Save file (from File System features)
Type Convert (from Processing) Type Converter (from Flow Operations)
Multi Condition Router (from Flow Ooperations) Smart Router (from LLM Operations)

Limitations

1. Local Flow Creation Removed: You can no longer create local flows. All new flows including local flows will be now created directly within a designated project and tenant folder. [Refer here.]
2. Strict Naming Conventions: Flow names are currently case-sensitive, where it allows you to create separate flows with names that differ only by capitalization (e.g., testFlow and testflow are treated as two distinct flows).

What’s New

New Components

a. Smart Router: Upgrade your standard routing with LLM-driven intent recognition. By passing incoming payloads to an LLM for semantic evaluation, this component automatically determines the underlying context and dynamically directs your execution flow down the most optimal path. Click here to learn more.  
b. Mock Data: Safely test and prototype your workflows without relying on live data. This component generates realistic sample messages, tables, and data sets, helping you reduce risk and accelerate your development cycle. Click here to refer.  
c. Dynamic Create Data: Seamlessly transform unstructured data into structured outputs at runtime. This allows you to define custom fields and dynamically populate them using the data passed from previous components. Click here to learn more.
d.
Robility Knowledge Base (Ingestion & Retrieval): Build a centralized intelligence hub for your workflows. This tool processes your documents into vectorized AI embeddings and uses semantic search to help your AI agents dynamically retrieve the precise context they need to perform tasks accurately.

New Integrations

Flow now supports the below integrations designed to enhance your AI orchestration:

a. Agent Lifecycle Toolkit (ALTK): Significantly improves the reliability and management of your AI agents. Click here to learn more.
b. CometAPI: Unlocks seamless access to over 500 different AI models through a single, unified integration.
c. Configurable Generalist Agent(CUGA): Empowers you to design and execute complex, highly adaptive workflow scenarios. Click here to learn more.

Enhancements

1. Interact — Queue Listing Updates
a. Add Transaction – The queue listing now displays only the processing queues list from the integrated Interact project.
b. Get Transaction – The queue listing has been expanded to display all queues from Interact.

2. Component Renaming and grouping

a. The Webhook component is now part of the Input & Output group.
b. The Data component has been renamed Data Source.
c. The Logic component is now Flow Control.
d. The Help group has been renamed Utilities, now including the Python Interpreter.
e. Components including Batch Run, Structured Output, Smart Function, LLM Router, and Smart Transform have been consolidated into the LLM Operations group, making them easier to find and manage

3. Read File Component: Hovering over the “Select Files” or “FilePath” field now displays supported formats as a placeholder, making file selection easier and more intuitive.

4. Robility Model: The Robility LLM is now Robility Model and includes embeddings for smarter search, vector tasks, and enhanced AI integration.

5. Data Table — Insert, Update, Delete & Update Component: The component now supports input field nodes to receive inputs directly from other components, improving data flow and making workflows more flexible.

6. Playground — Clear All Sessions: The Playground now includes a Clear All Sessions button next to the New Chat option, allowing users to clear all sessions at once.

7. Flow DateTime Localization: Tables now display dates and times in the local browser time instead of UTC, making data easier to read and consistent across time zones.

8. The “Import” button has been moved from the “Projects” sidebar and is now accessed directly when selecting “New Flow.” Click here to learn more.

Bug Fixes

1. Get Interact Component: Fixed an issue where an incorrect error message was displayed when no queue was available. The component now shows an accurate error message for clearer feedback.
2. Rest API Bug Fixes:

a. Fixed an issue where global variables were not displayed correctly.
b. Resolved the unique identifier name field so that when tool mode is enabled, action field names are updated dynamically using the unique identifier.
c. Addressed missing fields in URL and cURL outputs, ensuring all relevant data is properly displayed.

Known Issues

1. The Loop component currently supports only linear execution. Connecting multiple downstream components from the loop output is not supported and may cause the flow to break. (Tentative fix: Apr 2026)
2. Robility Flow may occasionally encounter a “Server Busy” issue. In such cases, wait for 5–10 minutes, then refresh the browser and try again. If the issue persists, please contact the Support team. (Tentative fix: Apr 2026)
3. Deleting a project also removes all associated flows, and they cannot be recovered. (Tentative fix: May 2026)
4. If the description field is removed from the flow JSON before import, the workflow is still uploaded with an empty description. (Tentative fix: May 2026)
5. Flow names are user-specific, allowing multiple users to create flows with the same name, which may result in duplicate solution names and versions. (Tentative fix: May 2026)
6. Newly generated API keys currently apply to all workflow versions. This will be updated to restrict keys to specific versions in future releases. (Tentative fix: May 2026)
7. The Web Scraper component does not support extracting data from JavaScript-based web pages. (Tentative fix: May 2026)
8. The Shareable Playground feature is not functioning as expected. (Tentative fix: May 2026)

Release Date: 13/04/2026

16.10.7 v.26.3.18.2

This release includes the following enhancements and bug fixes. 

Enhancements

1. Backward Compatibility: Robility Flow now supports backward compatibility. When prompted for a component update, users can choose to update or skip it. Both existing and new workflows will continue to function without any deprecation issues.
2. Local Flows: A notification is now displayed stating: “Local flows will be deprecated soon. Please migrate your local flows to Manager Flows.”  This serves as a proactive reminder to ensure continued support in future releases.
3. Message History: A Message History option has been introduced in the flow menu, allowing users to view messages stored using the message history component.
Note: This feature is currently under development and is not functional yet.

Bug Fixes

1. Datatable Automation – Insert Row:
a. Resolved an issue where executing the Insert Row component in tool mode resulted in a 500 Internal Server Error. This was caused by invalid JSON values, which are now properly handled.

b. Fixed an issue where passing input values to the Insert Row component caused an exception: “JSON object of type Message is not JSON serializable.” The component now handles inputs correctly without errors.

Limitations

1. When a user has multiple project folders in the Robility flow, creating a new flow using “Load from Local” in Robility Manager does not display flows from other folders, even if they belong to the same project and tenant.
2. The flow name must be unique and cannot be duplicated, even across different tenants. Currently, it allows us to create flows with names that differ in case sensitive (e.g.,testFlow and testflow)

Known Issue

1. Deleting a project will also delete all flows associated with that project.
2. If the description field is manually removed from the flow JSON before import, the workflow still uploads successfully with an empty description.
3. Since flow names are user-specific, different users can create flows with the same name. This can lead to duplicate solution names and versions being published simultaneously.
4. The Upsert Row component where passing input values to the component causes an exception: “JSON object of type Message is not JSON serializable.” This will be fixed in the upcoming version.
5. The Web Scraper component does not support extracting content from JavaScript-based web pages.

Release Date: 18/03/2026

16.10.8 v.26.2.25.3

In this release, we have provided bug fixes. 

Bug Fixes

1. Shareable Playground: When selecting the Shareable Playground, it would overwrite the entire flows JSON data instead of updating only the specific parameters. This issue has now been fixed.

2. Component Execution: Some components failed due to an I/O operation error when creating a new workflow after login. This issue has been fixed. 

Limitations

1. When a user has multiple project folders in the Robility flow, creating a new flow using “Load from Local” in Robility Manager does not display flows from other folders, even if they belong to the same project and tenant.
2. The flow name must be unique and cannot be duplicated, even across different tenants. Currently, it allows us to create flows with names that differ in case sensitive (e.g.,testFlow and testflow)

Known Issue

1. Deleting a project will also delete all flows associated with that project.
2. If the description field is manually removed from the flow JSON before import, the workflow still uploads successfully with an empty description.
3. Since flow names are user-specific, different users can create flows with the same name. This can lead to duplicate solution names and versions being published simultaneously.
4. The Insert and Upsert Row component where passing input values to the component causes an exception: “JSON object of type Message is not JSON serializable.” This will be fixed in the upcoming version.
5. The Web Scraper component does not support extracting content from JavaScript-based web pages.

16.10.9 v.26.2.12.1

In this release, we have introduced the new features, enhancements and bug fixes in the following areas:

What’s New

1. MCP Servers

The MCP Server feature in Settings has been enhanced with 10 preloaded servers.

Available MCP servers:

1. Playwright
2. File System
3. Oracle Database
4. MySQL
5. SQL Server
6. PostgreSQL
7. Puppeteer
8. Quick Chart
9. Azure DevOps
10. Atlassian Jira & Confluence

Credential Requirements for Servers
a. No credentials required: Playwright, File System, Puppeteer, Quick Chart
b. Credentials required: Oracle Database, MySQL, SQL Server, PostgreSQL, Azure DevOps, Jira & Confluence

Edit and Delete Functionality

Once a server is added, you can edit its credentials or delete the server if needed.
To do this, click the three dots (…) next to the added server and select Edit or Delete.

 Enhancements

1. Interact Manager – Component and Slug Name Updates

a. The Interact Manager component has been enhanced with updated component names: Add Transaction, Get Transaction, and Update Transaction.
b. The field access data in Add Transaction has been renamed to Queue Name for improved clarity.
c. In Tool Mode, selecting a queue name will automatically update the action field’s slug name to match the selected queue for both the Add Transaction and Get Transaction components.

2. Common Layer Integration
The Web Scraper, Invoke Flow, and Oracle components have been enhanced with Common Layer Integration.
In the Control section of these components, five common layer intergration options are now available:

 a. Retry Count – Retries the action based on the count provided.
 b. Delay Between Retries (Seconds) – Waits for the specified number of seconds between retries.
 c. Delay Before Execution (Seconds) – Delays the action before execution based on the specified seconds.
 d. Delay After Execution (Seconds) – Delays the action after execution based on the specified seconds.
 e. Continue on Error – Defines how the workflow behaves when an error occurs. Three options are available:
 f. Stop Workflow – The workflow stops immediately when an error occurs and displays a popup showing the error.
 g. Continue – The workflow continues when an error occurs. The error is recorded in the output.
 h. Continue (using error output) – The workflow continues when an error occurs. The output specifies the exact error in this component, allowing subsequent actions to handle it directly.

3. Data Table Export 

All data can now be exported at once by selecting the “All” option in the Rows per Page dropdown. The export functionality now supports Excel formats. Data can be exported in either CSV or Excel format.

4. Activity Segregation and Component Renaming

Robility Flow has been enhanced to standardize component names and group operations for improved usability.
The following Robility Core components have been renamed:

1. Flow Operation and related components are now Invoke Flow, Multi Router, and Type Converter
2. Robility Oracle is now Oracle
3. Robility Scraper is now Web Scraper
4. Test Operation now displays both new and existing testing components
5. Custom LLM is now Robility LLM

5. Refresh option in Multi select field

The Multi Selector field now includes a “Refresh” option in the dropdown. This enhancement is available in the following components: Update Row, Insert Row, Upsert Row, and Get Row(s) Joins Table.

Bug Fixes

1. DataTable
Previously, special characters were allowed in DataTable names.
Now, DataTable names can only contain letters, numbers, spaces, hyphens, and underscores.

2. Search Option
Previously, newly added components in Robility Flow did not appear when searched by component name.
This issue has been resolved, and all components now appear correctly in the search results when searched by component name.

16.10.10 v.26.1.31.1

In this release, we have introduced the following new features and enhancements in the following areas:

What’s New

  1. Ollama Integration
    The Robility Ollama component has been introduced in Robility Flow to support local AI model integration, enabling both Chat and Embeddings modes within automation workflows.
  2. Web Scraper Components
    New scraper capabilities have been added to Robility Flow to support web data extraction directly in workflows:
    a. Scrapy Web Scraper – Fetches and captures content from specified web pages.
    b. Dynamic URL Scraper – Detects and collects URLs from websites with dynamic or frequently changing content.
  3. Data Table — Tool Mode Support
    Data Table components now support Tool Mode, enhancing flexibility in tool-based automation workflows:
    a. Insert, Update, and Get components are available in Tool Mode.
    b. A new Get Row(s) Join Table component works exclusively in Tool Mode.
  4. Custom Component
    New Custom Components have been introduced to Robility Flow to support LLM configuration directly in workflows:
    a. Custom LLM – Allows workflows to securely connect to external LLMs using pre-configured settings managed in Robility Manager.

Enhancements

  1. Vault as Global Variable
    Vaults created in Robility Manager can now be automatically fetched and used as global variables in Robility Flow workflows. Supported vault types include PIN & Key, Token, JWT Token, and Assets.
  2. Interact Case Creation — Tool Mode
    The Interact Case Creation component now supports Tool Mode for seamless use in tool-oriented automation workflows.

Released Date: 31/01/2026

17. Use Case Videos

17.1 Demos and Videos

18. Third Party Licenses

18.1 Third Party Licenses

This document outlines the third-party and open-source software components (“Third-Party Software”) used by the Robility Platform, including (but not limited to) Robility Manager, Robility Designer, Robility Runner, Robility Flow, and related tools and services.

1. Each Third-Party Software component remains the property of its respective owner.

2. Each component is licensed to you under its own license terms, as referenced in the table below.

3. Where required by those licenses, Robility (Sutherland) will provide the corresponding source code or license texts through the links indicated below or upon request.

4. Use of the Robility Platform constitutes acceptance of the terms applicable to these Third-Party Software components, in addition to Robility’s own license agreement.

Note: This list may be updated periodically as the Robility Platform adds, removes, or modifies components. 

Click on each product to download the list of third-party software and licenses.

1. Robility Designer and Runner 

2. Robility Activities

3. Robility Manager

Robility Chatbot
Robility Assistant
Online