
Use Robility Flow as an MCP Client
Robility Flow supports integration with the Model Context Protocol (MCP) as both a client and a server. This guide focuses on using Robility Flow as an MCP client to connect to external tools using the MCP Tools component.
For details about acting as an MCP server, see Use Robility Flow as an MCP Server.
MCP Tools Component Overview
The MCP Tools component connects your flow to an MCP server and exposes that server’s tools to Robility Flow agents.
You can connect to:
1. External MCP servers (non-Robility Flow)
2. Robility Flow MCP servers (from other projects or flows)
Connect to an External (Non-Robility Flow) MCP Server
1. Add the MCP Tools component to your flow.
2. Configure or select an MCP server in the MCP Server field:
a. JSON: Paste the MCP server configuration in JSON format and click Add Server.
b. STDIO: Enter the server name, command, arguments, and any required environment variables.
For example, to start a Fetch server, use uvx mcp-server-fetch.
c. SSE: Provide the server name, SSE URL, and any required headers or environment variables.
Note: uvx is bundled with uv in Robility Flow. If you need to use npx-based servers, ensure an LTS version of Node.js is installed.
For reference, see: Connect an Astra DB MCP server to Robility Flow.
3. Set any required environment variables in the Env fields using the format: VARIABLE=value
4. Important: Robility Flow only reads environment variables from the .env file. It does not use global variables defined in the UI.
To make a variable available globally, add it to the .env file before starting the application.
5. (Optional) Select a specific tool from the connected MCP server.
If left blank, all available tools will be exposed.
6. Some tools may require additional configuration. Refer to the documentation for your MCP server for details.
7. Enable Tool Mode on the MCP Tools component to allow it to be used by agents.
8. Connect the MCP Tools component to your Agent:
a. Link the Toolset port of the MCP Tools component to the Tools port of the Agent component.
b. Ensure Chat Input and Chat Output components are connected to the Agent if they are not already part of your flow.
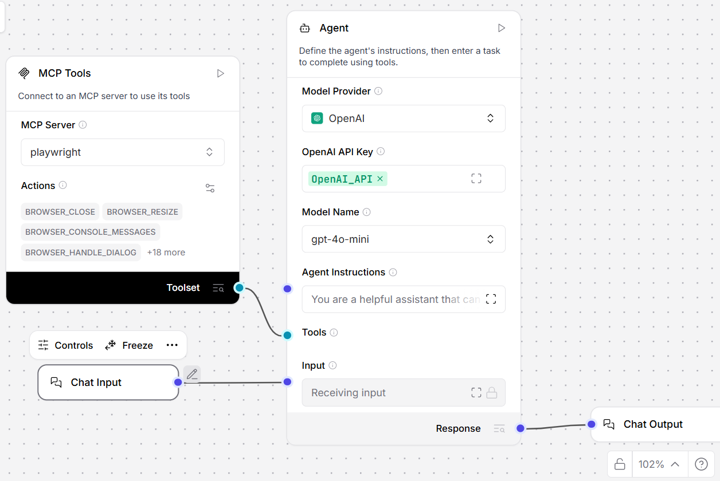
Test the Flow and Use Connected Tools
1. Open the Playground and enter a prompt that triggers the connected tool via the MCP Tools component.
For example, if you’ve connected the mcp-server-fetch tool, you might prompt the agent with a question like “Summarize recent tech news.”
The agent should call the fetch function on the MCP server and return the relevant response.
2. To allow the agent to access additional tools, repeat the steps to add more MCP Tools components, each configured with a different server or tool.
Connect a Robility Flow MCP Server
1. Each Robility flow project runs its own MCP server that exposes the project’s flows as MCP tools. For more on managing flows exposed by your MCP server, refer to the guide on using Robility flow as an MCP server.
2. To connect and use flows as tools, follow these steps to configure the MCP Tools component in Server-Sent Events (SSE) mode:
3. Add an MCP Tools component to your flow, select Add MCP Server, and choose SSE mode.
4. In the MCP SSE URLfield, update the default address to match your Robility flow server’s SSE endpoint.
The typical default URL is: http://localhost:7860/api/v1/mcp/sse. When using SSE mode, all flows on the targeted server become available as tools.
5. In the component’s settings, enable Tool modeto make the component usable with an agent.
6. Connect the Toolset port of the MCP Tools component to the Tools port of the Agent component. Also ensure that Chat Input and Chat Output components are connected to the Agent if they aren’t already.
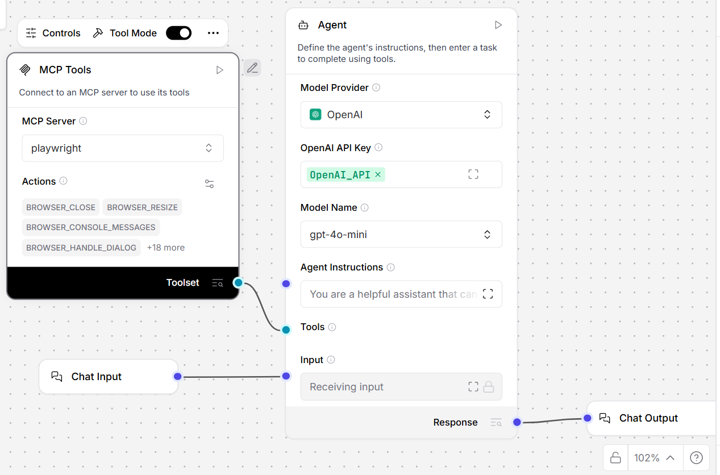
7. Test your flow to ensure the agent uses your flows to respond to queries. Open the Playground and enter a prompt that invokes a flow connected through the MCP Tools component.
8. To enable the agent to use additional flows, repeat these steps by adding more MCP Tools components and selecting different servers or tools.
MCP Tools Parameters
| Parameter | Description |
|---|---|
| MCP Server | Select the MCP server that this component will connect to and use. The dropdown lists all servers you have already configured in your MCP Servers settings. |
| Use Cached Server | (Toggle button) Enables caching of the MCP server and its tools to improve performance. When disabled, Robility Flow always fetches the latest tools and server updates on each run. |
| Verify SSL Certificate | (Toggle button) Enables SSL certificate verification for HTTPS connections. Disable this only in development or testing environments where self-signed certificates are used. |
| Actions | Lists the tools available for the connected MCP server. You can modify tool names and descriptions to help agents better understand when and how to use each tool. |
MCP Flow Requirements
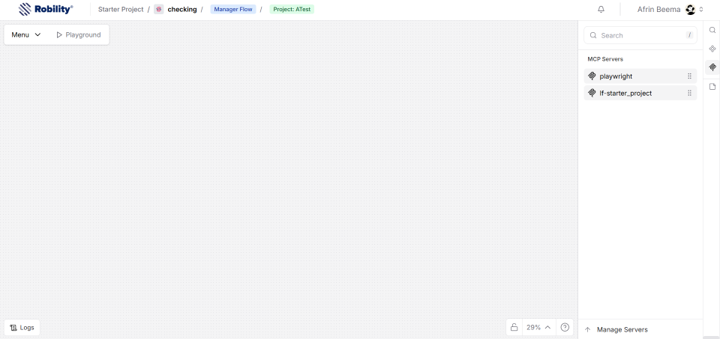
1. MCP Server Panel Overview
On the right panel, you can view all added MCP servers and manage existing server configurations. This section serves as the central place to monitor and control your MCP connections.
2. Accessing Server Management
Click on Manage Server to open the MCP Servers management page.
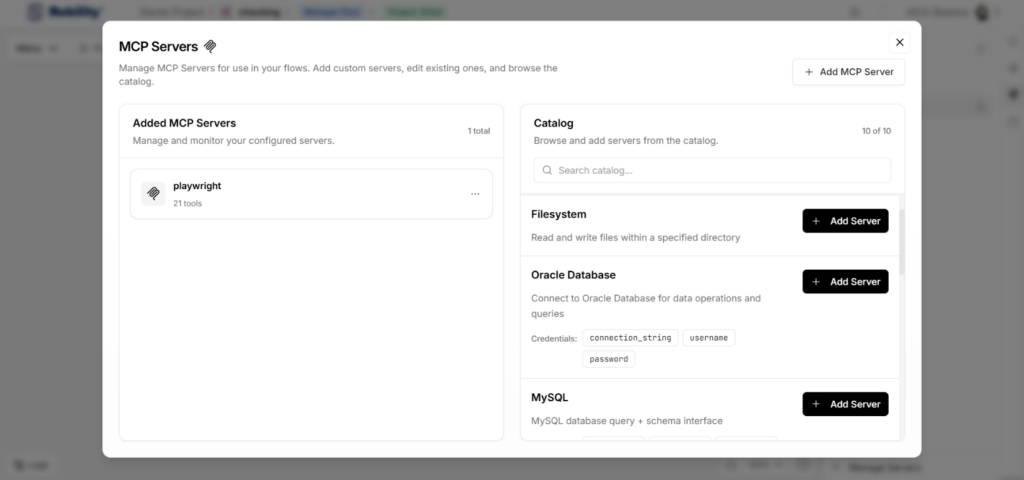
3. MCP Servers Page
On the MCP Servers page, you can connect to a server in two ways:
Click “+ Add MCP Server” to manually configure a custom server Or select one of the 10 preloaded MCP servers and click “Add Server” next to the one you want to connect.
Available Preloaded MCP Servers
The following MCP servers are available out of the box:
1. Playwright
2. File System
3. Oracle Database
4. MySQL
5. SQL Server
6. PostgreSQL
7. Puppeteer
8. Quick Chart
9. Azure DevOps
10. Atlassian Jira & Confluence
Some servers can be used immediately without credentials, while others require authentication details to establish a secure connection before use.
+ Add MCP Server
The Add MCP Server dialog lets you connect to an MCP server using one of three configuration methods:
1. JSON Configuration
Use this option to paste or enter a complete JSON configuration object.
When to use:
a. You already have a predefined configuration from a tool or service
b. You want to quickly import settings without manually filling fields
2. STDIO (Local Server)
Use this option to connect to a locally running MCP server that communicates via standard input/output (stdio).
Required fields:
a. Name – A label to identify the server in Robility Flow
b. Command – The executable used to start the server (e.g., npx, node, python)
c. Arguments – Command-line parameters required to run the server
d. Environment Variables – Key-value pairs used for configuration (commonly API keys, tokens, or secrets)
When to use: Running MCP servers locally from the command line
3. Streamable HTTP / SSE (Remote Server)
Use this option to connect to a remotely hosted MCP server over HTTP using Streamable HTTP or Server-Sent Events (SSE).
Required fields:
a. Name – A label to identify the server in Robility Flow
b. Streamable HTTP/SSE URL – The full endpoint URL of the hosted MCP server
c. Headers – Optional headers such as Authorization or Content-Type
d. Environment Variables – Key-value pairs used for authentication or runtime configuration (e.g., API keys, tokens)
When to use: Cloud-hosted or externally deployed MCP servers
After completing the configuration:
Click Add Server to save and connect the MCP server or Cancel to discard changes.
